
Are you a developer seeking to build dynamic and user-friendly desktop applications? Look no further, as in this blog post, we will guide you on how to create a Windows Form application in C++ using Visual Studio 2019.
Windows Forms, although an older technology, is still widely used in the development community due to its simplicity and functionality. Whether you are a seasoned professional or a beginner in the realm of programming, this step-by-step tutorial will walk you through the process of building your own Windows Form application using Visual Studio 2019.
So, let’s dive into the world of C++ development and explore the creation of visually appealing and interactive desktop applications!
The Relevance of Windows Forms in 2023 and Beyond
If you’re ready to embark on an exciting journey of creating a Windows Form application with C++ in Visual Studio 2019, you’ve come to the right place! In this guide, we’ll navigate through the twists and turns of this process, all while having a good dose of fun. So hold on tight and let’s dive right in!
Setting the Stage: Creating a New Project
First things first, let’s open up Visual Studio 2019, the superstar of our adventure. Once you have it up and running, select “Create a new project”. Now, bear with me, because this is where the magic begins. From the templates available, make sure to choose “Windows Desktop Wizard”—our trusty sidekick for unleashing the power of Windows Forms.
Designing Your Windows Form
With our trusty sidekick by our side, it’s time to get creative and design our Windows Form. Think of it as your canvas, waiting to be adorned with buttons, textboxes, and all sorts of visual goodies. Visual Studio 2019’s drag-and-drop functionality makes this process a breeze. Want a button? Simply drag it onto your Form. Want a textbox? You got it! Let your imagination run wild, as long as it fits within the realm of Windows Form design, of course.
Writing Your C++ Code
Ah, now comes the true cornerstone of our Windows Form application—the C++ code. Cue epic music. On your Form, locate the button that’ll send your users into a frenzy with its awesomeness. Double click on it, and Voilà! You’re now in the code-behind, where your C++ prowess comes to life.
Here’s where things get really interesting. Let’s say you want the button to display a friendly message when clicked. Simply write some C++ code telling it to do just that. It might look something like this:
cpp
void btnClick_Click(Object^ sender, EventArgs^ e)
{
MessageBox::Show(“Hello, world! Welcome to the future of Windows Form applications!”);
}
You’re engaging your users and leaving them in awe—kudos to you!
From Compilation to Execution
Patience, young padawans! We’ve come a long way, but our journey is not over yet. Now, before the grand finale, we need to compile our code and make sure there are no bugs trying to spoil the party. Hit that build button, fix any issues that arise, and once everything is smooth sailing, it’s time to execute!
Press that exhilarating F5 key or click on “Start Debugging” to witness the marvelous creation you’ve brought to life. Your Windows Form application appears on the screen, ready to conquer the hearts of your users.
Celebrate and Expand
Congratulations, you coding maestro! You’ve successfully created a Windows Form application using C++ in Visual Studio 2019. But wait, the adventure doesn’t end here. Now is the time to let your imagination soar, to experiment with different features and functionalities. Embrace the power of Windows Forms and keep honing your skills.
Remember, the possibilities are endless, and your Windows Form application is the gateway to a world of wonder. So go forth, explore, and let your creativity shine!
Keep Calm and Code on!
This concludes our guide on creating a Windows Form application in C++ using Visual Studio 2019. Happy coding!
FAQ: How do I create a Windows Form application in C++ Visual Studio 2019?
Is MVC still relevant in 2023
MVC (Model-View-Controller) continues to remain relevant in the development world in 2023. It is a popular architectural pattern that helps separate the concerns of an application, making it easier to maintain and test. While there are newer patterns and frameworks available, MVC still provides a solid foundation for building web applications. So, go ahead and embrace MVC without any worries!
How do I open a form in C#
To open a form in C#, you can follow these steps:
- In Visual Studio, open your project.
- In the Solution Explorer, navigate to the folder where you want to add the form.
- Right-click the folder and select “Add” -> “New Item”.
- In the “Add New Item” dialog box, select “Windows Form”.
- Give your form a name, such as “MyForm”.
- Click “Add” to create the form.
- The form will open in the Visual Studio designer, and you can start adding controls and code to it.
How do I create a new ASPX page in Visual Studio
Creating a new ASPX page in Visual Studio is a breeze. Just follow these simple steps:
- In Visual Studio, open your project.
- In the Solution Explorer, right-click the folder where you want to add the ASPX page.
- Select “Add” -> “Web Form”.
- Give your ASPX page a meaningful name, like “MyPage.aspx”.
- Click “Add” to create the ASPX page.
- The new page will be added to your project, and you can start designing and coding it to your heart’s content.
Is MVC better than web forms
While both MVC and web forms have their own strengths and uses, it’s important to choose the right option based on the specific needs of your project. MVC provides a more modern and flexible approach to web development, separating concerns and promoting testability. On the other hand, web forms offer a rapid development experience and are suitable for smaller projects or when you prefer a more event-driven programming model. So, instead of thinking one is universally better than the other, consider which approach best suits your project requirements.
How do I create a desktop application in Visual Studio C++
Creating a desktop application in Visual Studio C++ is an exciting adventure! Follow these steps to get started:
- Open Visual Studio 2019 and create a new project.
- Choose the “Windows Desktop Wizard” template.
- Select “Windows Desktop Application” and give your project a catchy name.
- Click “Next” and configure additional project settings if desired.
- Hit “Finish” to create your new desktop application project.
- Visual Studio will generate a sample window for you, and you can start customizing and adding functionality to create your dream desktop application.
Are Windows forms still used in 2023
Absolutely! Windows forms continue to be widely used in 2023 for building desktop applications. They provide a familiar and easy-to-use framework for creating user interfaces in a Windows environment. While newer technologies like WPF and UWP have emerged, Windows forms still serve as an excellent choice, especially when targeting specific Windows platforms or leveraging existing codebases. So, fear not, Windows forms are here to stay!
Does C# have a future
Certainly! C# has a bright future ahead. As one of the most popular programming languages, it is constantly evolving and adapting to meet the needs of modern software development. With its wide range of applications, including web, mobile, cloud, and game development, C# offers numerous opportunities for developers. So, if you’re wondering about the future of C#, rest assured that it’s a language worth investing your time and skills in.
Is .NET dying in 2023
Not at all! In fact, .NET is far from dying in 2023. It continues to thrive and evolve with new updates and features. Microsoft actively supports and enhances the .NET framework, ensuring its relevance in modern software development. With the introduction of .NET Core and .NET 5, the framework has become cross-platform, opening up new possibilities. So, rest assured, .NET is well and truly alive!
How do I select a startup item in Visual Studio 2019
Setting a startup item in Visual Studio 2019 is a piece of cake. Just follow these simple steps:
- Open your project in Visual Studio.
- In the Solution Explorer, right-click the desired project or file.
- From the context menu, select “Set as Startup Project” or “Set as Start Page”.
- Voila! The selected item is now set as the startup item, and when you run your application, it will start from this point.
How do I make an ASPX file
Creating an ASPX file is easier than pie! Just do the following:
- Open your project in Visual Studio.
- In the Solution Explorer, right-click the folder where you want to add the ASPX file.
- Select “Add” -> “New Item”.
- From the templates, choose “Web Form”.
- Give your ASPX file a catchy name, like “MyPage.aspx”.
- Click “Add” to create the ASPX file.
- You’re all set! Start designing and adding code to your ASPX file to create a web page that wows your users.
How do I create a Windows Form application in C++ Visual Studio 2019
Creating a Windows Form application in C++ within Visual Studio 2019 is a delightful process. Follow these steps:
- Open Visual Studio 2019 and create a new project.
- Choose “Windows Forms App (.NET Framework)” as the project template.
- Enter a unique name for your project and click “Create”.
- Visual Studio will generate a new Windows Form application for you.
- Start designing your user interface by dragging and dropping controls onto the form.
- Write the desired code to make your application come to life.
- Hit the “Start” button or use the F5 key to run your Windows Form application and have fun!
And there you have it! A comprehensive FAQ-style subsection to answer all your burning questions about creating a Windows Form application in C++ Visual Studio 2019. Now go forth and conquer the world of Windows app development with your newfound knowledge!
This article is intended for beginners and will demonstrate how to create a Windows Forms / WinForms project using Visual Studio 2019 Community Edition, which is a free version of Visual Studio. The WinForms application created by Visual Studio will contain only a main form with no controls. Then in the future article, we will make this application a bit more interesting and useful.
Before we start creating a Visual Studio project, we need to make sure that the Visual Studio we have installed in our system is able to create WinForms projects.
What about creating a WinForms Project using Visual Studio Code?
I’m a big fan of Visual Studio Code and I did wonder if it’s possible to create WinForms project with it. Visual Studio 2019 added the Windows Forms support to the .NET Core 3.0 Framework, so maybe it will be possible in the future, but at the moment, the answer is No as there is no VS Code extension available and there is no support for the WinForms designer.
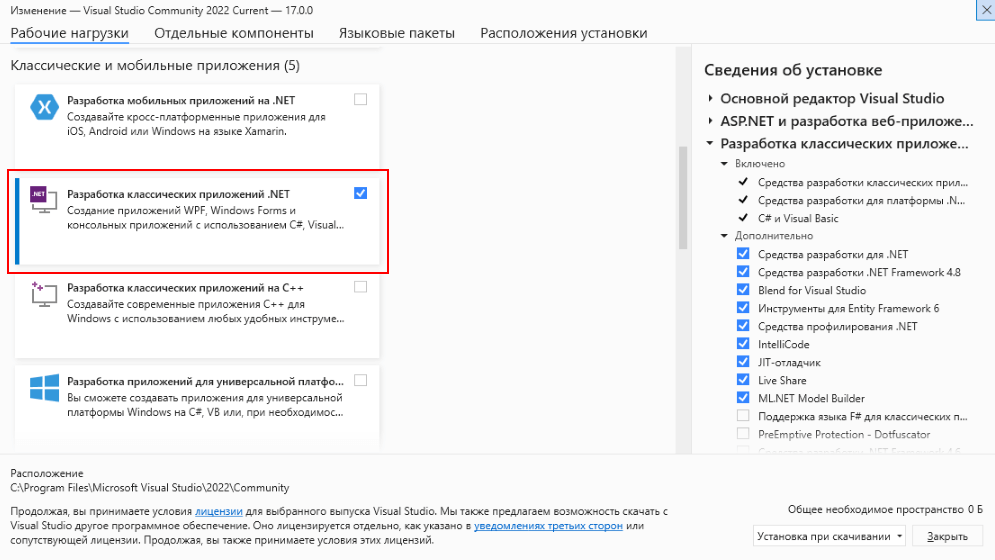
Making sure the .NET desktop development workload is installed for Visual Studio
It is assumed you have installed the Visual Studio Community 2019 in your system and that you have selected the «.NET desktop development» workload during the installation.
If you need to install Visual Studio Community Edition, make sure that during the installation, you select the .NET desktop development workload as we are going to create a WinForms project using the standard .NET Framework.
Note: Starting by Visual Studio 2019, the WinForms support was added to the .NET Core 3.0, so if you have ASP.NET and Web development workload installed, you can make the Windows Forms projects using .NET Core framework. Be aware that there are some breaking changes from the classic WinForms .NET Framework.
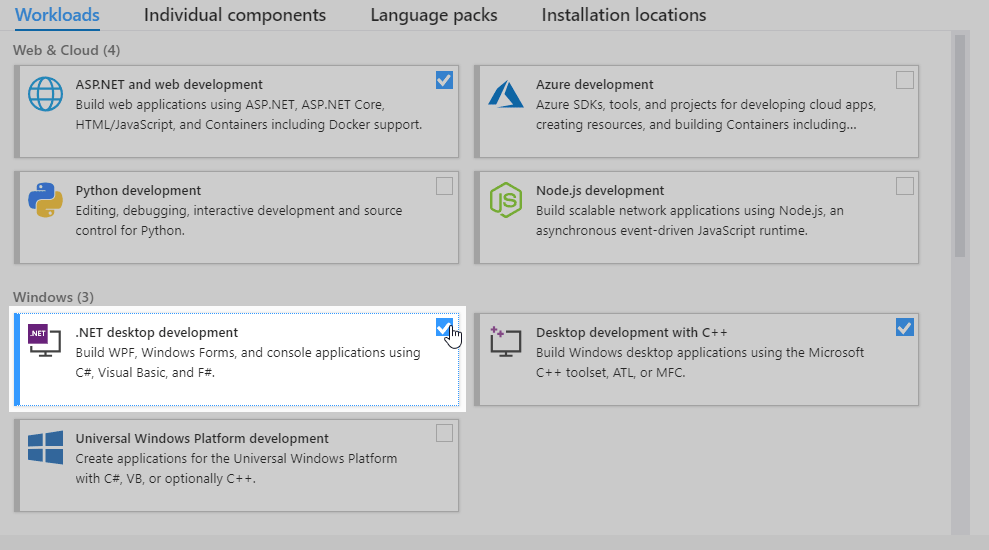
Click image to enlarge
Modifying the existing Visual Studio installation
If you already have Visual Studio installed, but you are unsure if a desktop application workload is installed or not, go to the next step to create a new project in VS. If you will see WinForms templates available, you are good to go.
If WinForms templates are missing, no problem, you should be able to easily add them by modifying the Visual Studio installation using these steps:
- Go to Settings > Apps (in Windows 7, go to Control Panel > Programs & Features).
- From the list of apps, find the Visual Studio Community app.
- Click the Modify button.
- After clicking on Modify, the installation window should appear as shown on the image shown earlier. You need to add a checkbox for the «.NET desktop development» workload. Note that this workload might take up to 5GB of HDD space, depending on what is missing.
Now, let’s create a WinForms project in VS.
Creating a WinForms Project in the Visual Studio
The steps to create a new WinForms project are as follows:
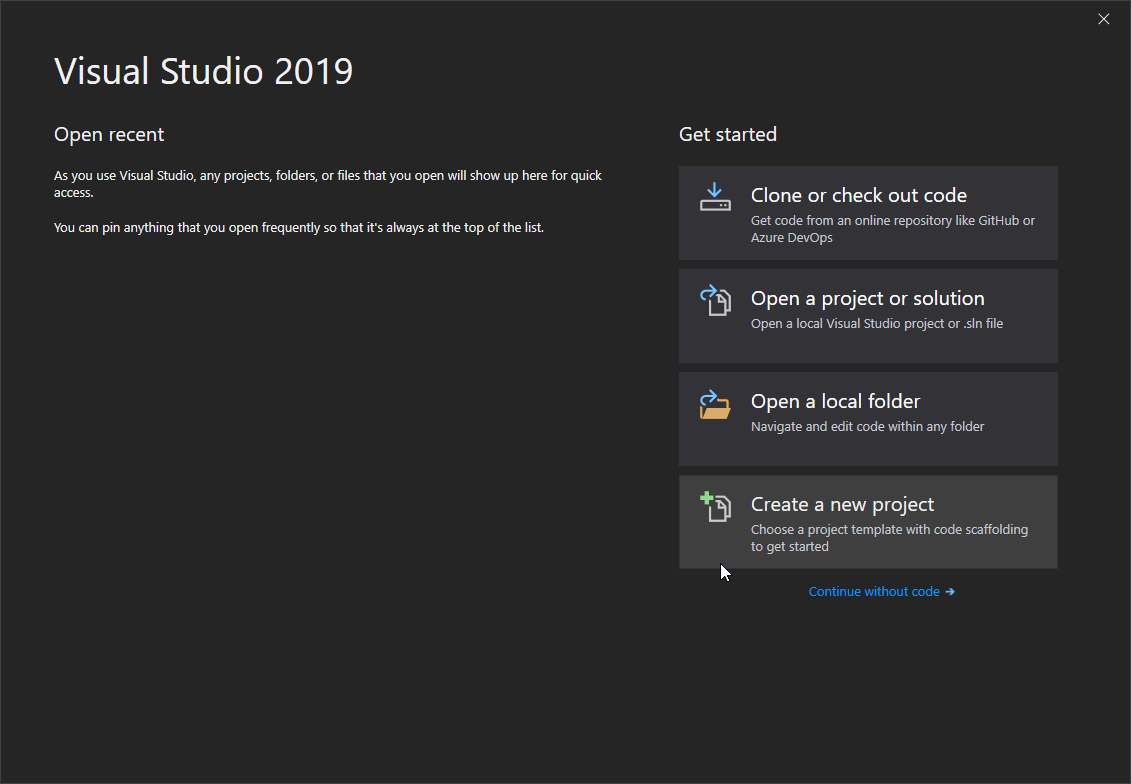
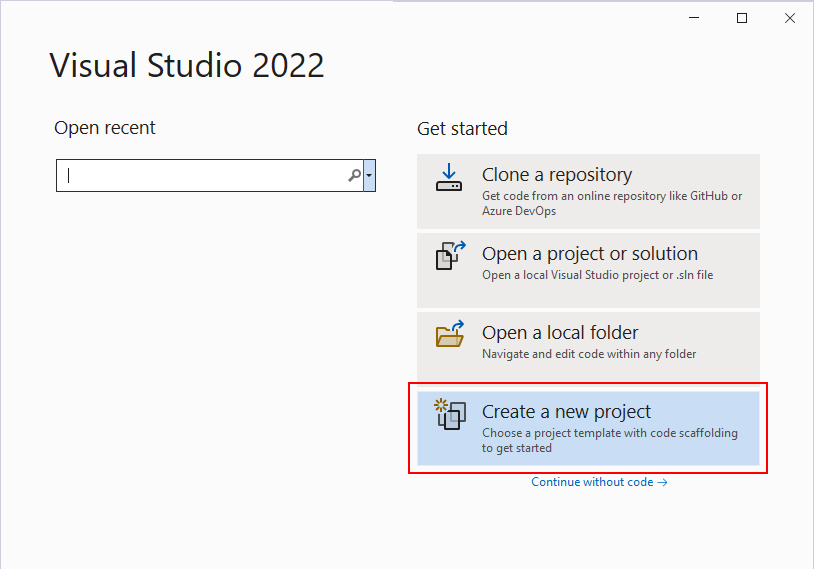
- Start the Visual Studio. After a while, the following window should show up:

Click image to enlarge
On the left side, you will have a list of the recently used project’s and on the right side, you will have several buttons to get started. Click on the «Create new project«.
- This brings us to the window shown below, where we choose the template we want to use for our new project. On the left side we will have a list of the recently used templates and on the right side, we will have a list of all available templates.
We want to create a WinForms project, so inside the search field, type «winforms«. Now, only the WinForms related templates should be listed:
Click image to enlarge
Select the «Windows Forms App (.NET Framework)» template. You might see two of them, one for C# and one for Visual Basic. We will use C#, so select that one and click «Next«.
Note: If you want to check out all the templates in your Visual Studio that are available for the the desktop projects, select «Desktop» under the «Project type» drop-down menu.
What if WinForms template is missing in Visual Studio?
if you are unable to find the WinForms template, it usually means that during the Visual Studio installation, the .NET desktop development workload was not selected. Not to worry though, we can easily add additional packages by modifying the existing installation. Just follow the steps in the first section of this article.
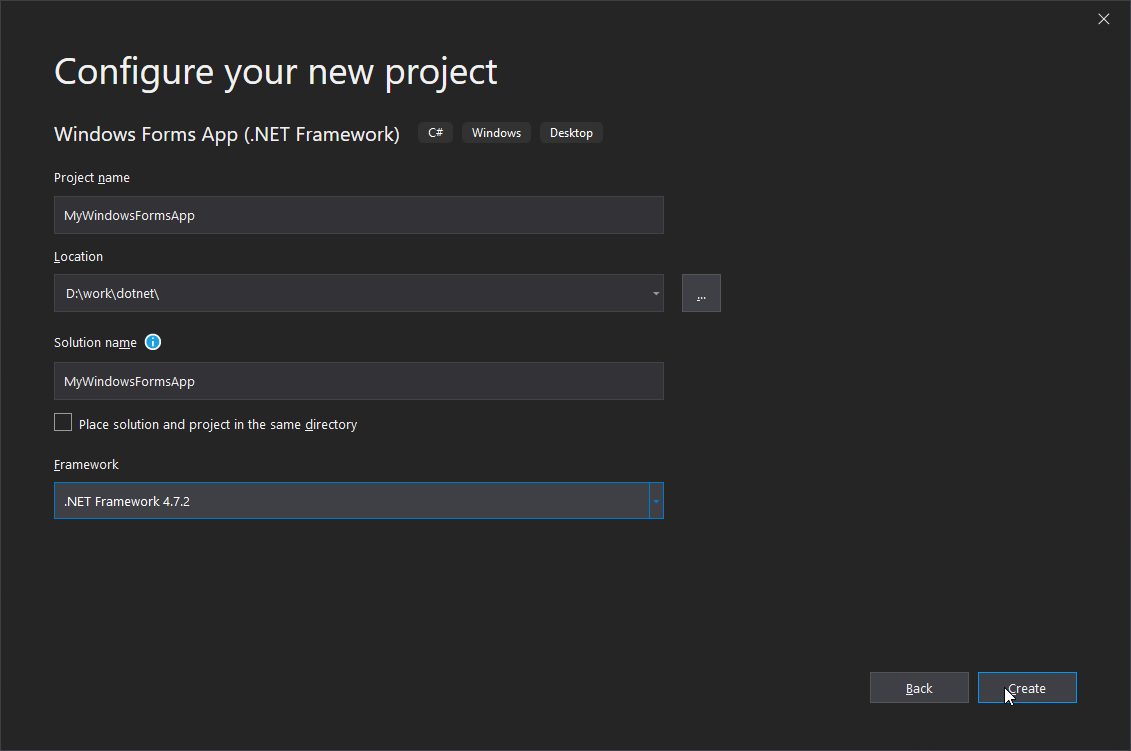
- Now that we selected the WinForms template, the «Configure your new project» window will appear:

Click image to enlarge
Here, we can choose our Project name and Location of the project. I’ll name it «MyWindowsFormsApp«. Notice that your solution name will also be set to the same name. We can change the solution name to something different, but solutions are used to group different projects together and, in our case, we only have one, so we can leave it as it is.
Leave the .NET Framework as it is and click on «Create» button.

After some processing, the Visual Studio should create a new Windows Forms project and it should look something like this:
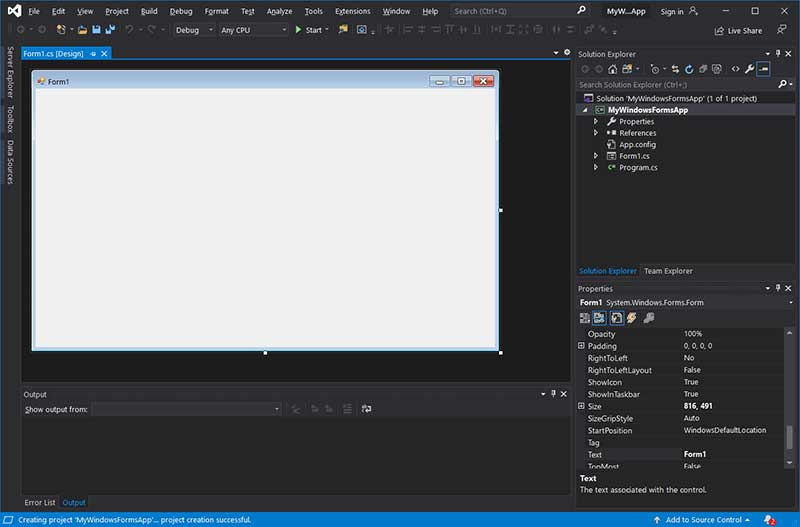
Click image to enlarge
Now, let’s quickly explore the opened project in VS.
Exploring the created WinForms project in Visual Studio
As you can see from the image above, we have an open tab named Form1.cs [Design] containing the main form of the project. The [Design] in the name tells us the Form1.cs is opened in «Designer mode», so we can drag & drop other controls to the Form and setting properties to those controls or the form itself.
The WinForms project created by Visual Studio auto-generates enough code for us to start the desktop application. We build and run the project in different ways:
- By clicking on the green «Start» button located in the Visual Studio Toolbar section.
- By pressing F5.
- From the menu by going to Debug > Start Debugging.
The running project will consist of our main form as shown below.
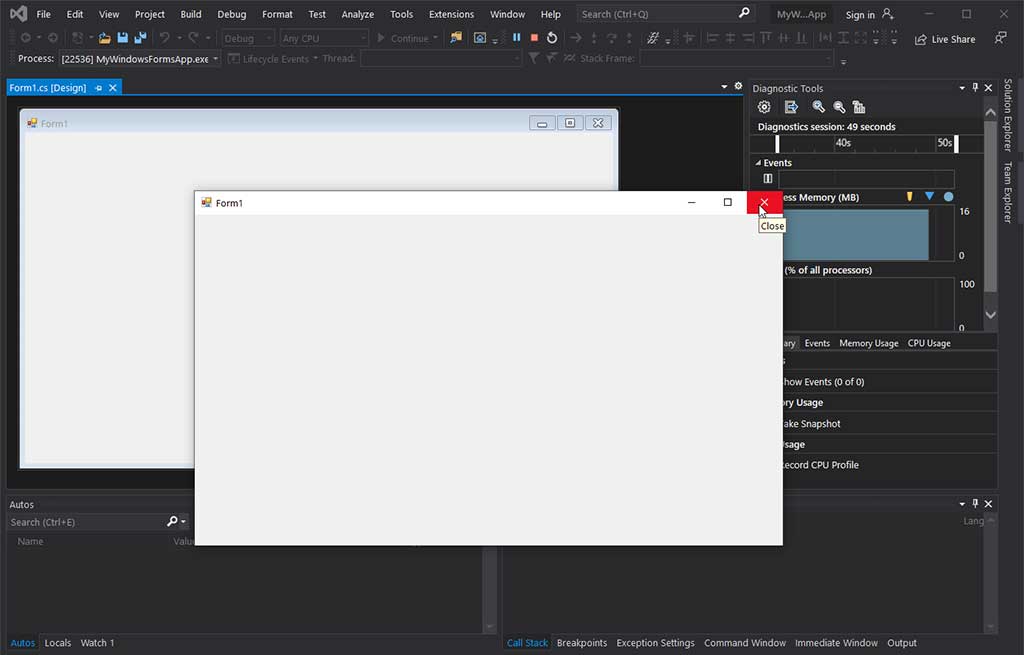
Click image to enlarge
By clicking on the red X close button on the top right corner of the Form1 windows, the application will close.
In the future article we will learn how to add additional WinForms controls into the main form and make the desktop application a bit more functional by adding a button to it that will display a pop-up window when clicked.
Conclusion
In this article we learned how to create WinForms project using Visual Studio and what to do when the WinForms templates are missing in Visual Studio. After the WinForms template was chosen, we configured a project by giving it a name and the location of the project. Finally, with the Windows Forms project in VS successfully created, we learned how to build and run it in three different ways.
Я хотел бы научится разрабатывать классические оконные приложения с графическим интерфейсом пользователя на С++.
У меня есть Visual Studio 2019. Какие пакеты нужно дополнительно скачать для оконных приложений? И есть ли там возможность как в Pascal создать форму с кнопками, надписями и т.п. или нужно будет все в программе прописывать?
-
Вопрос задан
-
17533 просмотра
Самым простым решением для разработки GUI-приложений в среде MSVS2019 будет использование Qt. Собственно, для этого тебе потребуется Qt. Но разработку вести ты cможешь в VS.
Вторым решением будет чуть более сложное: использование C++/CX вместе с UWP / Windows Forms.
Третьим решением, еще более сложным, будет использование уже чистого C++ при поддержке MFC или WTL.
И самым сложным решением будет прямое использование WinAPI.
Помимо всего этого еще можно воспользоваться библиотекой wxWidgets и на ее базе разработать GUI для своего приложения.
Существует несколько методов разработки оконных приложений с использованием языка программирования C++. Если вы хотите использовать конструктор, то QT Creator для вас. Существуют библиотеки для C++, и все они с открытым исходным кодом, https://www.reddit.com/r/cpp/comments/babfl5/a_pre… перейдя по этой ссылке, вы можете увидеть их все.
Пригласить эксперта
Сейчас формошлепство, когда-то подпертое Дельфами, во многом потеряло смысл, так как задачи постоянно смещаются с десктопов на сервера. Соответственно, разрабатывается серверное приложение, веб-морда к нему и Электрон, например, для отдельного клиента. Без копания в серьезных языках, которые для таких задач просто не нужны.
Выбирайте нормальные инструменты. Для UI используйте
C# там и контролы и многое другое.
Хочется экзотики используйте MFC но смысла особого не вижу.
Кроме того есть WPF и UWP
И наконец прочтите инструкцию по выбору
https://docs.microsoft.com/ru-ru/windows/apps/desk…
Войдите, чтобы написать ответ
-
Показать ещё
Загружается…
Минуточку внимания
hey everyone!
Darren here and today we’re going to be learning c sharp. We are going to kick this off by creating a hello world application!
This is going to be a simple little application where we have a label that says some text and we’re going to click on a button to change what that text says.
We may change some styles of the label and a couple of other things but this will be great to get you started learning software development!
Hopefully, this will help you get started. This is not going to be the most complicated application ever but let’s get right into it!
Okay, so first we are going to choose windows forms application c-sharp for windows.

We are going to click next and then we are going to call this project “hello world”.

It is going to save in our repos folder, which is where visual studio 2019 saves all of it’s new projects by default. We are also going to use the latest version of the.net framework we have installed. After that we click create and then it’s going to open a new project with our new form.
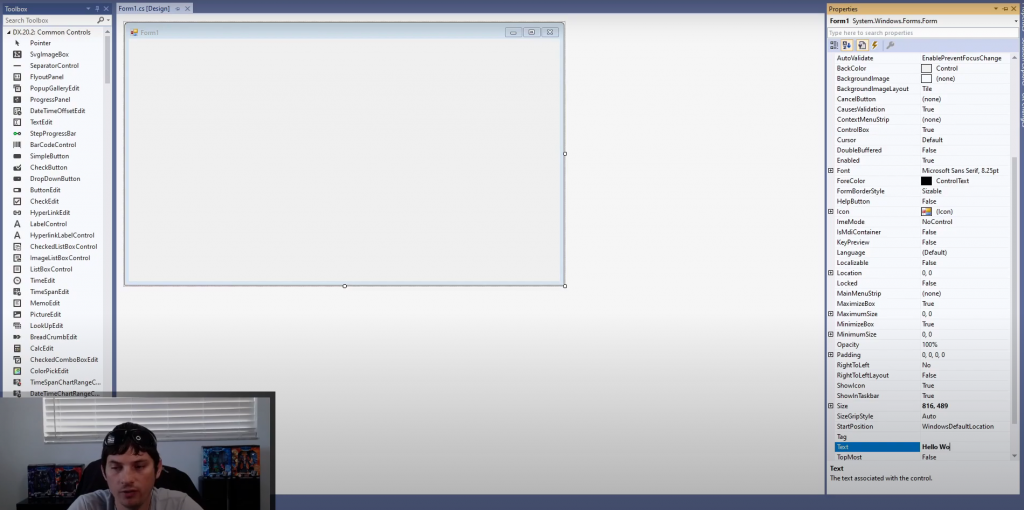
Just for fun i’m just going to change the text property on our form so i have this whole form selected and i choose the text property and just change the text to “hello world” and it’ll change the text up here.
Next, I’m going to go ahead and run this. When it’s running you can see that the text up top now says is “hello world” in the title. Visual Studio generates a regular form that looks just like every other application, you can drag it around, minimize and maximize it.
That all works but it’s simply a blank form for now.
Next, we are going to add some text to that form. The control to add text in C# would be the label control. So we are going to drag over a label here.
Next, I’m going to bring up the properties window for that label and you can change the text of it right here. I’m gonna change the text to “test”. I’m also going to rename the label to a test name. The name property is what you would reference this label by in code.
Alright, so now that our label has some new custom text and it has a new name. We are going to make our label bigger so we can see it better.
we will start by making it 48 point to make it super big! Something else cool you can do is: go up here to format and center the label in the form horizontally. After this our label is ready to go.
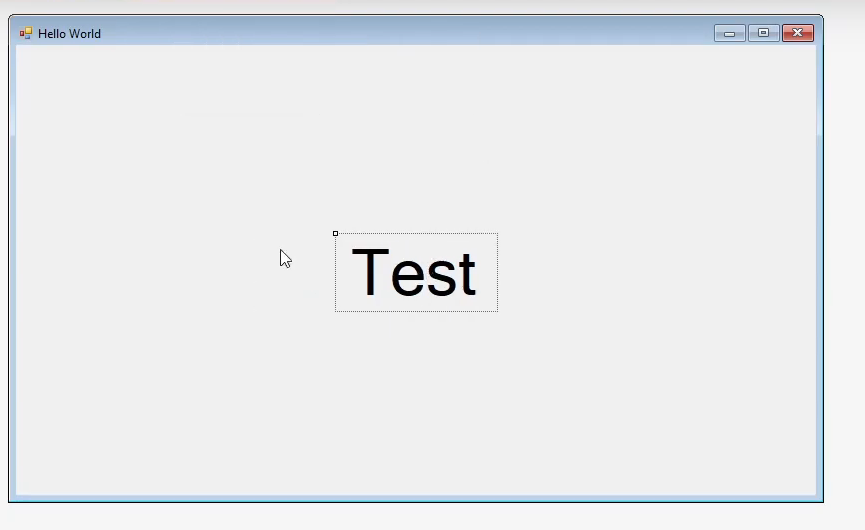
Next, we are going to start our project and now we have this label in the middle of our form that simply says “Test”.
Alright, so now we want to add a button because we’re going to actually make some stuff happen. So we head over to our toolbox on the left and drag this button over to our form.
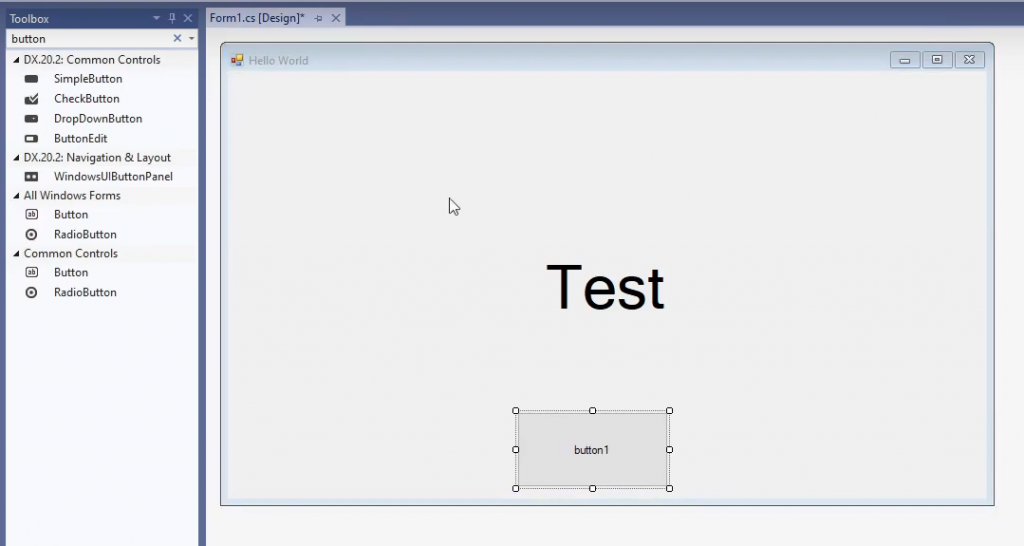
Let’s head over to Format and center this button horizontally. I’m also going to change the text of the button just to say “click me!” using the text property.
Next, let’s name it “BtnClickMe”, so now we have a button called button click me and we have our test label ready to go.
With any of these controls that are on a form, they’re going to have events that you can access from the properties window. So if you come over here to events, there is a click event for this button and this will allow you to execute custom code when this button is clicked on.
If you select over here on the right side of the click event in the properties window and double click, visual studio will actually generate the click event handler for you.
Once you have the method generated in code, click inside of it and we are going to write one line of code that will change the text of our label.
lblTest.Text = "Hello World!";First, we call it our lblTest and lblTest has a Text property. The actual text of this label is stored inside of this Text property. We set this text property equal to the text “Hello World!”.
“Hello World!” has to be in quotes because that is how you tell C# it is a string. The last thing is the semi-colon on the end, which is customary in any C-Syntax based language.
The resulting function looks like this:

This will get executed when the button is clicked because this is the click event handler of that button.
So, next, we head back to the designer where we can hit start and run the program.
So, now we’ve got our little label that says “Test” and then when we click our button, the label changes to “Hello World!”. It’s really that easy to get events firing and change simple things on the form.
For fun, we are going to go ahead and change the font color of the label when the button gets clicked, so you kind of get a better idea of what’s going on.
So, to do that, our label actually has a forcolor property that controls the foreground color. We are going to set that to Color.Red to set the foreground color of the label to Red.
LblTest.ForeColor = Color.Red;Color.Red is just the enumerator for the color red. This literally just means red. so, we run the application again and click our button. now it says “Hello World!” and our text is now red.
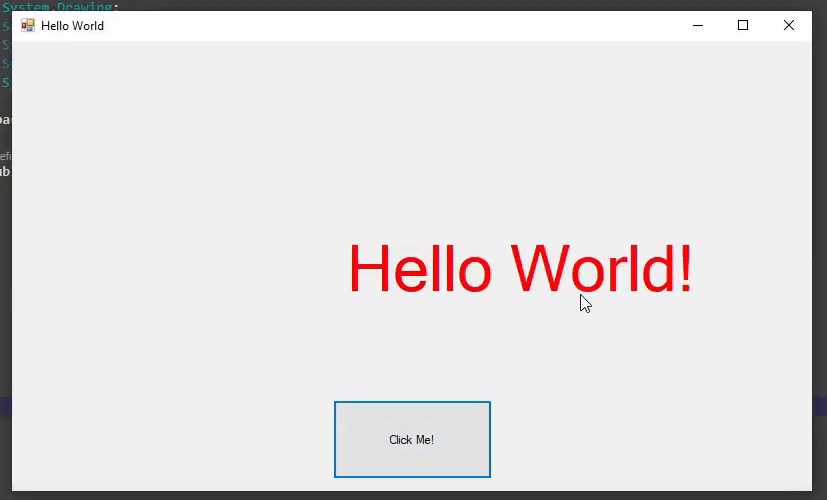
alright, so to keep this short and simple, we are going to end off there. I hope you were able to set the color to red on your test form and get the text to say Hello world.
After you get this going, you can definitely play around with other options and for example, set the label’s back color to black.
There are lots and lots of properties you can change and all kinds of other details about the label control you can edit on the fly.
I also want to point out that there are tons and tons of other controls out there. The possibilities are nearly endless. I really recommend just creating a new project and playing around with all of these different controls. Just start learning everything you can!
Alright, that about wraps it up for this one. I really hope that you learned something from this. I know this isn’t the most complicated project every but we will definitely get into more complicated projects going forward.
Well, thanks again and I’ll see you in the next one!
Последнее обновление: 25.11.2023
Для создания графических приложений на C# можно использовать .NET CLI, но также можно
использовать бесплатную и полнофункциональную среду разработки — Visual Studio Community 2022, которая в ряде случаев облегчает проектирование
приложения. Так, загрузим установщик Visual Studio по адресу:
https://www.visualstudio.com/en-us/downloads.

Чтобы добавить в Visual Studio поддержку проектов для Windows Forms и C# и .NET, в программе установки среди рабочих нагрузок нужно
выбрать только пункт Разработка классических приложений .NET. Можно выбрать и больше опций или вообще все опции, однако стоит
учитывать свободный размер на жестком диске — чем больше опций будет выбрано, соответственно тем больше места на диске будет занято.
После установки среды и всех ее компонентов, запустим Visual Studio и создадим проект графического приложения.
На стартовом экране выберем Create a new project (Создать новый проект)
На следующем окне в качестве типа проекта выберем Windows Forms App:

Стоит отметить, что среди шаблонов можно увидеть еще тип Windows Forms App (.NET Framework) — его НЕ надо выбирать, необходим именно тип
Windows Forms App.
Далее на следующем этапе нам будет предложено указать имя проекта и каталог, где будет располагаться проект.
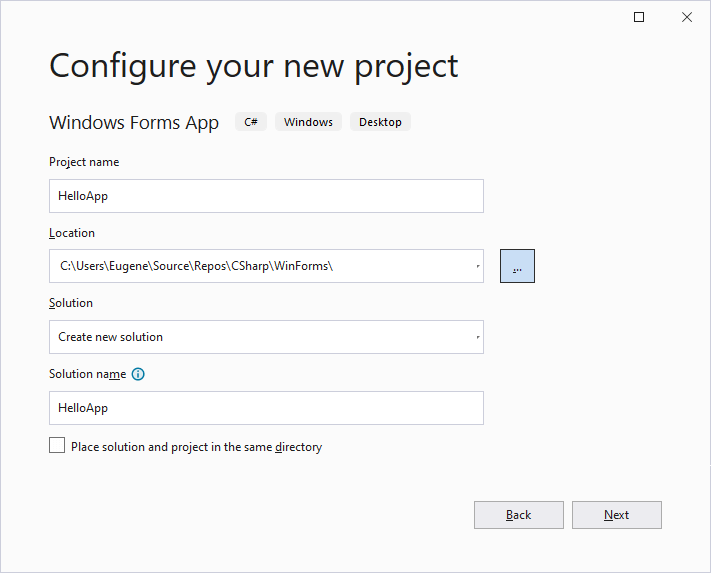
В поле Project Name дадим проекту какое-либо название. В моем случае это HelloApp.
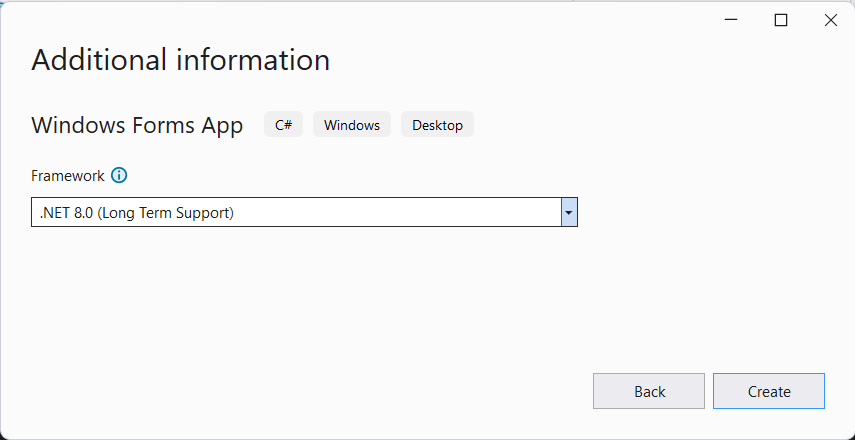
На следующем окне Visual Studio предложит нам выбрать версию .NET, которая будет использоваться для проекта. Выберем последнюю на данный момент версию — .NET и нажмен на кнопку Create (Создать) для создания проекта.
После этого Visual Studio откроет наш проект с созданными по умолчанию файлами:
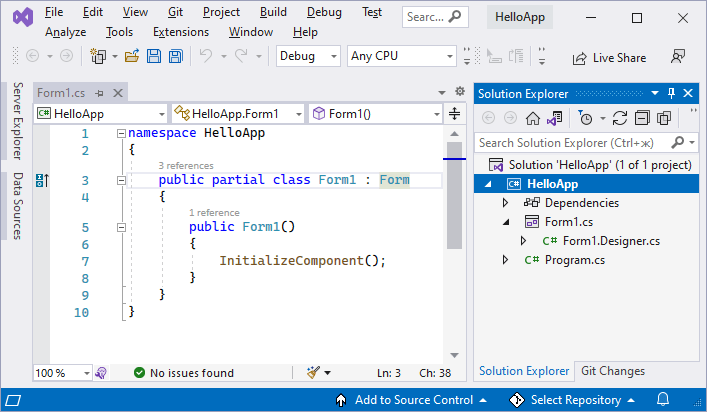
Справа находится окно Solution Explorer, в котором можно увидеть структуру нашего проекта. Практически этот тот же проект, который создается с
помощью .NET CLI:
-
Dependencies — это узел содержит сборки dll, которые добавлены в проект по умолчанию.
Эти сборки как раз содержат классы библиотеки .NET, которые будет использовать C# -
Form1.Designer.cs: он содержит определение компонентов формы, добавленных
на форму в графическом дизайнере -
Далее идет файл единственной в проекте формы — Form1.cs, который по умолчанию открыт в центральном окне.
-
Program.cs определяет точку входа в приложение
Запуск приложения
Чтобы запустить приложение в режиме отладки, нажмем на клавишу F5 или на зеленую стрелочку на панели Visual Studio.
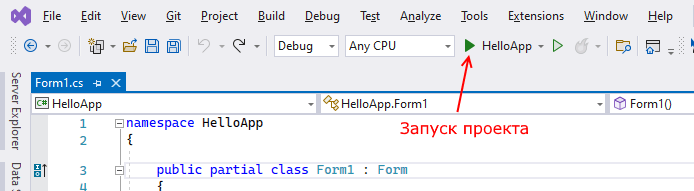
После этого запустится пустая форма Form1 по умолчанию.
После запуска приложения студия компилирует его в файл с расширением exe. Найти данный файл можно, зайдя в папку проекта и далее в каталог
\bin\Debug\net8.0-windows
Рассмотрев вкратце создание проекта графического приложения, мы можем перейти к обзору основных компонентов и начнем мы с форм.