
Table Of Contents
- Installation on Windows
- Installation components
- Installing Python
- Source installation Dependencies
- Making Python available anywhere
- Double-click method
- Send-to method
- Installation components
To install Kivy on Windows via pip, please follow the main installation guide.
Installation components
Following, are additional information linked to from some of the steps in the
main installation guide, specific to Windows.
Installing Python
To install Python on Windows, download it from the main
Python website and follow the
installation steps. You can read about the individual installation options in the
Python guide.
If you installed the
Python launcher,
you will be more easily able to install multiple Python versions side by side
and select, which to run, at each invocation.
Source installation Dependencies
To install Kivy from source, please follow the installation guide until you reach the
Kivy install step and then install the compiler below before continuing.
To install kivy from source, you need a compiler. On Windows, the Visual Studio Build Tools are
required, and they are available for free. You can either:
-
Download and install the complete Visual Studio IDE, which contains the build tools.
This is the easiest approach and the IDE can be downloaded from here. -
The IDE is very big, so you can also download just the smaller build tools, which are used from the command line.
The current download (2019) can be found on this page
under “Tools for Visual Studio 2019”. More info about this topic can be found
in the Kivy wiki.
Now that the compiler is installed, continue to install Kivy.
Making Python available anywhere
There are two methods for launching Python when double clicking on your *.py files.
Double-click method
If you only have one Python installed, and if you installed it using the default options, then *.py files are already
associated with your Python. You can run them by double clicking them in the file manager, or by just executing their name in a console window (without having to prepend python).
Alternatively, if they are not assigned, you can do it the following way:
-
Right click on the Python file (.py file extension) in the file manager.
-
From the context menu that appears, select Open With
-
Browse your hard disk drive and find the
python.exefile that you want
to use (e.g. in the the virtual environment). Select it. -
Select “Always open the file with…” if you don’t want to repeat this
procedure every time you double click a .py file. -
You are done. Open the file.
Send-to method
You can launch a .py file with Python using the Send to menu:
-
Browse to the
python.exeyou want to use. Right click on it and
copy it. -
Open Windows Explorer (the file explorer in Windows 8), and to go the address
‘shell:sendto’. You should get the special Windows directory SendTo. -
Paste the previously copied
python.exefile as a shortcut. -
Rename it to python <python-version>. E.g.
python39.
You can now execute your application by right clicking on the .py file ->
“Send To” -> “python <python-version>”.
Table Of Contents
- Installing Kivy
- Using pip
- Setup terminal and pip
- Create virtual environment
- Install Kivy
- Pre-compiled wheels
- From source
- Pre-release, pre-compiled wheels
- Development install
- Checking the demo
- Installation using Conda
- Installing Kivy’s dependencies
- Python glossary
- Installing Python
- How to use the command line
- What is pip and what are wheels
- What are nightly wheels
- Using pip
Installation for Kivy version 2.3.1. Read the changelog here.
For other Kivy versions, select the documentation from the dropdown on the top left.
Kivy 2.3.1 officially supports Python versions 3.8 — 3.13.
|
|
Platform |
Installation |
Packaging |
|---|---|---|---|
|
Windows |
pip |
PyInstaller |
|
|
macOS |
pip, Kivy.app |
Kivy.app, PyInstaller |
|
|
Linux |
pip, PPA |
— |
|
|
*BSD (FreeBSD,..) |
pip |
— |
|
|
RPi |
pip |
— |
|
|
Android |
python-for-android |
python-for-android |
|
|
iOS |
kivy-ios |
kivy-ios |
|
|
Anaconda |
conda |
— |
Using pip
The easiest way to install Kivy is with pip, which installs Kivy using either a
pre-compiled wheel, if available, otherwise from source (see below).
Kivy provides pre-compiled wheels for the supported Python
versions on Windows, macOS, Linux, and RPi.
If no wheels are available pip will build the package from sources (i.e. on *BSD).
Alternatively, installing from source is required for newer Python versions not listed
above or if the wheels do not work or fail to run properly.
On RPi, when using a 32 bit OS, wheels are provided for Python 3.9 (Raspberry Pi OS Bullseye)
and Python 3.11 (Raspberry Pi OS Bookworm) via the PiWheels project.
For other Python versions, on 32 bit OSes, you will need to install from source.
Setup terminal and pip
Before Kivy can be installed, Python and pip needs to be pre-installed.
Then, start a new terminal that has
Python available. In the terminal, update pip and other installation
dependencies so you have the latest version as follows (for linux users you may have to
substitute python3 instead of python and also add a --user flag in the
subsequent commands outside the virtual environment):
python -m pip install --upgrade pip setuptools virtualenv
Create virtual environment
Create a new virtual environment
for your Kivy project. A virtual environment will prevent possible installation conflicts
with other Python versions and packages. It’s optional but strongly recommended:
-
Create the virtual environment named
kivy_venvin your current directory: -
Activate the virtual environment. You will have to do this step from the current directory
every time you start a new terminal. This sets up the environment so the newkivy_venv
Python is used.For Windows default CMD, in the command line do:
kivy_venv\Scripts\activate
If you are in a bash terminal on Windows, instead do:
source kivy_venv/Scripts/activate
If you are in linux or macOS, instead do:
source kivy_venv/bin/activate
Your terminal should now preface the path with something like (kivy_venv), indicating that
the kivy_venv environment is active. If it doesn’t say that, the virtual environment
is not active and the following won’t work.
Install Kivy
Finally, install Kivy using one of the following options:
Pre-compiled wheels
The simplest is to install the current stable version of kivy and optionally kivy_examples
from the kivy-team provided PyPi wheels. Simply do:
python -m pip install "kivy[base]" kivy_examples
This also installs the minimum dependencies of Kivy. To additionally install Kivy with
audio/video support, install either kivy[base,media] or kivy[full].
See Kivy’s dependencies for the list of selectors.
Note
When using Raspberry Pi OS Lite or similar Linux-based headless systems, it may be necessary to install additional
dependencies to ensure Kivy functions properly.
For instance, on Raspberry Pi OS Lite, you will be required to install the following dependencies:
apt-get install libgl1-mesa-glx libgles2-mesa libegl1-mesa libmtdev1
From source
If a wheel is not available or is not working, Kivy can be installed from source
with some additional steps. Installing from source means that Kivy will be installed
from source code and compiled directly on your system.
First install the additional system dependencies listed for each platform:
Windows, macOS,
Linux, *BSD,
RPi
Note
In past, for macOS, Linux and BSD Kivy required the installation of the SDL dependencies from package
managers (e.g. apt or brew). However, this is no longer officially supported as the version
of SDL provided by the package managers is often outdated and may not work with Kivy as we
try to keep up with the latest SDL versions in order to support the latest features and bugfixes.
You can still install the SDL dependencies from package managers if you wish, but we no longer
offer support for this.
Instead, we recommend installing the SDL dependencies from source. This is the same process
our CI uses to build the wheels. The SDL dependencies are built from source and installed into a
specific directory.
With all the build tools installed, you can now install the SDL dependencies from source for SDL support
(this is not needed on Windows as we provide pre-built SDL dependencies for Windows)
In order to do so, we provide a script that will download and build the SDL dependencies
from source. This script is located in the tools directory of the Kivy repository.
Create a directory to store the self-built dependencies and change into it:
mkdir kivy-deps-build && cd kivy-deps-build
Then download the build tool script, according to your platform:
On macOS:
curl -O https://raw.githubusercontent.com/kivy/kivy/master/tools/build_macos_dependencies.sh -o build_kivy_deps.sh
On Linux:
curl https://raw.githubusercontent.com/kivy/kivy/master/tools/build_linux_dependencies.sh -o build_kivy_deps.sh
Make the script executable:
chmod +x build_kivy_deps.sh
Finally, run the script:
The script will download and build the SDL dependencies from source. It will also install
the dependencies into a directory named kivy-dependencies. This directory will be used
by Kivy to build and install Kivy from source with SDL support.
Kivy will need to know where the SDL dependencies are installed. To do so, you must set
the KIVY_DEPS_ROOT environment variable to the path of the kivy-dependencies directory.
For example, if you are in the kivy-deps-build directory, you can set the environment
variable with:
export KIVY_DEPS_ROOT=$(pwd)/kivy-dependencies
With the dependencies installed, and KIVY_DEPS_ROOT set you can now install Kivy into the virtual environment.
To install the stable version of Kivy, from the terminal do:
python -m pip install "kivy[base]" kivy_examples --no-binary kivy
To install the latest cutting-edge Kivy from master, instead do:
python -m pip install "kivy[base] @ https://github.com/kivy/kivy/archive/master.zip"
If you want to install Kivy from a different branch, from your forked repository, or
from a specific commit (e.g. to test a fix from a user’s PR) replace the corresponding
components of the url.
For example to install from the stable branch, the url becomes
https://github.com/kivy/kivy/archive/stable.zip. Or to try a specific commit hash, use e.g.
https://github.com/kivy/kivy/archive/3d3e45dda146fef3f4758aea548da199e10eb382.zip
Pre-release, pre-compiled wheels
To install a pre-compiled wheel of the last pre-release version of Kivy, instead of the
current stable version, add the --pre flag to pip:
python -m pip install --pre "kivy[base]" kivy_examples
This will only install a development version of Kivy if one was released to
PyPi. Instead, one can also install the
latest cutting-edge Nightly wheels from the Kivy server with:
python -m pip install kivy --pre --no-deps --index-url  https://kivy.org/downloads/simple/
python -m pip install "kivy[base]" --pre --extra-index-url https://kivy.org/downloads/simple/
It is done in two steps, because otherwise pip may ignore the wheels on the server and install
an older pre-release version from PyPi.
Development install
Note
We suggest to select master or relevant branch/version of doc from top left,
ensuring correct version/branch of kivy git repository you are working with.
If you want to edit Kivy before installing it, or if you want to try fixing some Kivy issue
and submit a pull request with the fix, you will need to first download the Kivy source code.
The following steps assumes git is pre-installed and available in the terminal.
The typical process is to clone Kivy locally with:
git clone https://github.com/kivy/kivy.git
This creates a kivy named folder in your current path. Next, follow the same steps of the
Installing from source above, but instead of installing Kivy via a
distribution package or zip file, install it as an
editable install.
In order to do so, first change into the Kivy folder you just cloned::
and then install Kivy as an editable install:
cd kivy
python -m pip install -e ".[dev,full]"
Now, you can use git to change branches, edit the code and submit a PR.
Remember to compile Kivy each time you change cython files as follows:
python setup.py build_ext --inplace
Or if using bash or on Linux, simply do:
to recompile.
To run the test suite, simply run:
or in bash or Linux:
On *BSD Unix remember to use gmake (GNU) in place of make (BSD).
Checking the demo
Kivy should now be installed. You should be able to import kivy in Python or,
if you installed the Kivy examples, run the demo.
on Windows:
python kivy_venv\share\kivy-examples\demo\showcase\main.py
in bash, Linux and macOS:
python kivy_venv/share/kivy-examples/demo/showcase/main.py
on *BSD Unix:
python3 kivy_venv/share/kivy-examples/demo/showcase/main.py
The exact path to the Kivy examples directory is also stored in kivy.kivy_examples_dir.
The 3d monkey demo under kivy-examples/3Drendering/main.py is also fun to see.
Installation using Conda
If you use Anaconda, you can
install Kivy with its package manager Conda using:
conda install kivy -c conda-forge
Do not use pip to install kivy if you’re using Anaconda, unless you’re installing from source.
Installing Kivy’s dependencies
Kivy supports one or more backends for its core providers. E.g. it supports glew, angle,
and sdl2 for the graphics backend on Windows. For each category (window, graphics, video,
audio, etc.), at least one backend must be installed to be able to use the category.
To facilitate easy installation, we provide extras_require
groups
that will install selected backends to ensure a working Kivy installation. So one can install
Kivy more simply with e.g.«pip install “kivy[base,media,tuio]”«. The full list of selectors and
the packages they install is listed in
setup.py. The exact packages in each selector
may change in the future, but the overall goal of each selector will remain as described below.
We offer the following selectors:
- base: The minimum typical dependencies required for Kivy to run,
not including video/audio.
- media: Only the video/audio dependencies required for Kivy to
be able to play media.
- full: All the typical dependencies required for Kivy to run, including video/audio and
most optional dependencies.
- dev: All the additional dependencies required to run Kivy in development mode
(i.e. it doesn’t include the base/media/full dependencies). E.g. any headers required for
compilation, and all dependencies required to run the tests and creating the docs.tuio: The dependencies required to make TUIO work (primarily oscpy).
The following selectors install backends packaged as wheels by kivy under the Kivy_deps namespace.
They are typically released and versioned to match specific Kivy versions, so we provide selectors
to facilitate installation (i.e. instead of having to do pip install kivy kivy_deps.sdl2==x.y.z,
you can now do pip install "kivy[sdl2]" to automatically install the correct sdl2 for the Kivy
version).
- gstreamer: The gstreamer video/audio backend, if it’s available
(currently only on Windows)
- angle: A alternate OpenGL backend, if it’s available
(currently only on Windows)
- sdl2: The window/image/audio backend, if it’s available (currently only on Windows,
on macOS, Linux and *BSD Unix is already included in the main Kivy wheel).
glew: A alternate OpenGL backend, if it’s available (currently only on Windows)
Following are the kivy_deps dependency wheels:
-
gstreamer (optional)
kivy_deps.gstreameris an optional dependency which is only needed for audio/video support.
We only provide it on Windows, for other platforms it must be installed independently.
Alternatively, use ffpyplayer instead. -
glew and/or
anglekivy_deps.glewandkivy_deps.angleare for OpenGL.
You can install both, that is no problem. It is only available on Windows. On other
platforms it is not required externally.One can select which of these to use for OpenGL using the
KIVY_GL_BACKENDenvironment variable: By setting it toglew
(the default),angle_sdl2, orsdl2. Here,angle_sdl2is a substitute for
glewbut requireskivy_deps.sdl2to be installed as well. -
sdl2
kivy_deps.sdl2is for window/images/audio and optionally OpenGL. It is only available on Windows
and is included in the main Kivy wheel for other platforms.
Python glossary
Here we explain how to install Python packages, how to use the command line and what wheels are.
Installing Python
Kivy is written in
Python
and as such, to use Kivy, you need an existing
installation of Python.
Multiple versions of Python can be installed side by side, but Kivy needs to
be installed as package under each Python version that you want to use Kivy in.
To install Python, see the instructions for each platform:
Windows, macOS,
Linux, RPi,
*BSD.
Once Python is installed, open the console and make sure
Python is available by typing python --version.
How to use the command line
To execute any of the pip or wheel commands given here, you need a command line (here also called console, terminal, shell or bash, where the last two refer to Linux / *BSD Unix style command lines) and Python must be on the PATH.
The default command line on Windows is the
command prompt, short cmd. The
quickest way to open it is to press Win+R on your keyboard.
In the window that opens, type cmd and then press enter.
Alternative Linux style command lines on Windows that we recommend are
Git for Windows or Mysys.
Note, the default Windows command line can still be used, even if a bash terminal is installed.
To temporarily add your Python installation to the PATH, simply open your command line and then use the cd command to change the current directory to where python is installed, e.g. cd C:\Python37.
If you have installed Python using the default options, then the path to Python will already be permanently on your PATH variable. There is an option in the installer which lets you do that, and it is enabled by default.
If however Python is not on your PATH, follow the these instructions to add it:
-
Instructions for the windows command line
-
Instructions for bash command lines
What is pip and what are wheels
In Python, packages such as Kivy can be installed with the python package
manager, named pip (“python install package”).
When installing from source, some packages, such as Kivy, require additional steps, like compilation.
Contrary, wheels (files with a .whl extension) are pre-built
distributions of a package that has already been compiled.
These wheels do not require additional steps when installing them.
When a wheel is available on pypi.org (“Python Package Index”) it can be installed with pip. For example when you execute python -m pip install kivy in a command line, this will automatically find the appropriate wheel on PyPI.
When downloading and installing a wheel directly, use the command
python -m pip install <wheel_file_name>, for example:
python -m pip install C:\Kivy-1.9.1.dev-cp27-none-win_amd64.whl
What are nightly wheels
Every day we create a snapshot wheel of the current development version of Kivy (‘nightly wheel’).
You can find the development version in the master branch of the
Kivy Github repository.
As opposed to the last stable release (which we discussed in the previous section), nightly
wheels contain all the latest changes to Kivy, including experimental fixes.
For installation instructions, see Pre-release, pre-compiled wheels.
Warning
Using the latest development version can be risky and you might encounter
issues during development. If you encounter any bugs, please report them.
Time 🕐
Estimated time of completion: 30min to 1h (depending on your experience and your operating system)
Requirements
Before installing Kivy, you need to install some tools and libraries:
- Git
- Pyenv
- Poetry
We strongly recommend you to follow this guide to install the required tools and libraries. If you ever need help, go to any support channel in the Official Kivy Discord.
Installation Guide
Please, choose your operating system and follow the instructions below:
macOSLinux — UbuntuWindowsLinux — FedoraLinux — Arch
This is the macOS installation guide. If you are using another operating system, please, select it from the menu above.
How to open the terminal on macOS
You can open the terminal on macOS by pressing ⌘ + Space and typing terminal in the search bar.
Tip 💡
If you are using macOS, we recommend you to use Homebrew to install the required tools and libraries. Enter the website and follow the instructions to install Homebrew. This will make your life easier.
Step 1: Check if you have Homebrew installed
What is Homebrew?
Homebrew is a free and open-source software package management system that simplifies the installation of software on Apple’s operating system, macOS, as well as Linux.
from Wikipedia
How to check if you have Homebrew installed
- Press ⌘ + Spacebar, type terminal and press enter
- Type
brew --versionand press enter.
$ brew --version

Homebrew 3.6.20
Select the result that matches your case:
Homebrew 3.6.20zsh: command not found: brew
-
If you see «zsh: command not found: brew», click on the menu above.
-
If you see «Homebrew {version}», you have Homebrew installed. You can skip this step.
If you see zsh: command not found: brew, the command brew was not found. There are two possible reasons:
-
You don’t have Homebrew installed.
-
You have Homebrew installed, but you need to add it to your
PATH.
Check if one of these folders exist: /opt/homebrew/ or /usr/local/homebrew/. If one of these folders exist, you need to add Homebrew to your PATH. Open the terminal and type:
export PATH=/opt/homebrew/bin:$PATH
Close the terminal and open it again. Type brew --version and press enter. If you see Homebrew {version}, you have Homebrew installed. You can skip this step.
If you are still seeing zsh: command not found: brew, you don’t have Homebrew installed, you can install it by following the instructions on the Homebrew website.
Step 2: Check if you have Xcode Command Line Tools installed
What are Xcode Command Line Tools?
«Xcode Command Line Tools are tools for software developers that run on the command line, in the Terminal application. Since before Apple’s beginnings, this assortment of Unix-based tools have been the foundation of almost all software development.
Out of the box, a Mac doesn’t contain all of the software and tools needed for programming. Instead, Apple provides a complete development environment for programmers named Xcode, which is available separately for download and installation»
from Mac Install Guide
How to check if you have Xcode Command Line Tools installed
- Press ⌘ + Spacebar, type terminal and press enter
- Type
xcode-select --installand press enter.
$ xcode-select --install

---> 100%
If this message appears:
xcode-select: error: command line tools are already installed, use "Software Update" to install updates
You can skip this step. Otherwise, type git --version and press enter.
If your result is similar to the previous video, congratulations! You have successfully installed Xcode Command Line Tools.
Step 3: Install Pyenv
What is Pyenv?
Pyenv is a simple Python version management tool. It lets you easily switch between multiple versions of Python. It’s simple, unobtrusive, and follows the UNIX tradition of single-purpose tools that do one thing well.
from pyenv
How do I install Pyenv?
Preferably, you should install Pyenv using Homebrew. But you can also install it from source.
Using HomebrewFrom source
- Press ⌘ + Spacebar, type terminal and press enter
- Type
brew install openssl readline sqlite3 xz zliband press enter.
$ brew install openssl readline sqlite3 xz zlib
- Type
brew updateand press enter.
Type brew install pyenv and press enter.
Close the terminal and open it again. Type pyenv --version and press enter. If you see pyenv {version}, you have successfully installed Pyenv.
- Press ⌘ + Spacebar, type terminal and press enter
- Type
git clone https://github.com/pyenv/pyenv.git ~/.pyenvand press enter.
$ git clone https://github.com/pyenv/pyenv.git ~/.pyenv
- Type
cd .pyenvand press enter
- Type
make -s -j2and press enter
- Type
cd srcand press enter
- Type the following multiline code and press enter
CPPFLAGS="-I/opt/local/include" \
LDFLAGS="-L/opt/local/lib" \
./configure --with-pydebug
- Type
cd ..and press enter
- Type the following multiline code and press enter
echo 'export PYENV_ROOT="$HOME/.pyenv"' >> ~/.zshrc
echo 'export PATH="$PYENV_ROOT/bin:$PATH"' >> ~/.zshrc
echo 'eval "$(pyenv init --path)"' >> ~/.zshrc
- Close the terminal and open it again. Type
pyenv --versionand press enter. If you see an output like this, you have successfully installed Pyenv.
Step 4: Install Python
How do I install Python?
- Type
pyenv install 3.10.9and press enter. This will install Python 3.10.9.
- Type
pyenv versionsand press enter. This will show you all the Python versions you have installed with Pyenv.
$ pyenv versions

* system
3.10.9 (set by /Users/kivyschool/.python-version)
- Type
PATH=$(pyenv root)/shims:$PATHand press enter. This will add the path to the shims folder to the PATH variable. This will allow you to use the Python version you installed.
$ PATH=$(pyenv root)/shims:$PATH
- Type
python --versionand press enter. If you seePython 3.10.9, you have successfully installed Python.
- Also, if you type
which pythonand press enter, you should see something like/Users/kivyschool/.pyenv/shims/python. This means that you are using the Python version you installed with Pyenv.
Step 5: Install Poetry
How do I install Poetry?
-
Press ⌘ + Spacebar, type terminal and press enter
-
Type
curl -sSL https://install.python-poetry.org | python3 -and press enter. This will install Poetry.
$ curl -sSL https://install.python-poetry.org | python3 -

---> 100%
- Close the terminal and open it again. Type
poetry --versionand press enter. If you see something likePoetry (version 1.3.2), you have successfully installed Poetry.
Poetry configuration
- Type
poetry config virtualenvs.in-project trueand press enter. This will set the virtual environment to be created in the project folder.
$ poetry config virtualenvs.in-project true
- Type
poetry config virtualenvs.create trueand press enter. This will set the virtual environment to be created automatically when you runpoetry install.
$ poetry config virtualenvs.create true
Step 6: Start a new project with Poetry
How to start a new project with Poetry?
-
Press ⌘ + Spacebar, type terminal and press enter
-
Type
mkdir kivy_schooland press enter. This will create a new folder calledkivy_school.
- Type
cd kivy_schooland press enter. This will change the current directory tokivy_school.
- Type
poetry initand press enter. This will start the Poetry wizard.
Just press enter to accept the default values. You can change them later. Once the wizard is finished, you will see a pyproject.toml file in the kivy_school directory. This is the Poetry configuration file, which contains the project dependencies. This means that any library you install using Poetry will be added to this file. This is super useful because you can share this file with other developers and they will be able to install the same dependencies as you have.
Check the Python version used by Poetry
You need to check this only once. Do it now.
- Make sure that Poetry is using the Python version you installed with pyenv. Type
poetry env infoand press enter. You should see something like this:
Virtualenv
Python:         3.10.9
Implementation: CPython
Path:           /Users/kivyschool/kivy_school/.venv
Executable:     /Users/kivyschool/kivy_school/.venv/bin/python
Valid:          True

System
Platform:   darwin
OS:         posix
Python:     3.10.9
Path:       /Users/kivyschool/.pyenv/versions/3.10.9
Executable: /Users/kivyschool/.pyenv/versions/3.10.9/bin/python3.10
Pay attention to the Path and Executable fields used by System. They should point to the Python version you installed with Pyenv. To make sure that poetry is using the correct Python version, you can type poetry env use $(pyenv which python) and press enter.
$ poetry env use $(pyenv which python)
Poetry update Jan 5 2025 changed poetry shell to poetry env activate
What this means:
-
If you want to follow this tutorial with the latest python poetry, try
poetry env activate. This tells you the command to run to enter the shell (since this is different for different environments). -
For Mac/Linux and Bash/Zsh/Csh:
- Activate the virtual environment by typing
poetry shelland pressing enter.
- Type
poetry add kivyand press enter. This will install Kivy.
That’s it! You have successfully installed Kivy using Pyenv and Poetry.
Step 7: Run a Kivy «Hello world» example
Create a file called main.py and paste the following code in it.
| main.py | |
|---|---|
1 2 3 4 5 6 7 |
|
- On your terminal, type
python main.pyand press enter. This will run the Kivy «Hello world» example.
Prepare your heart for the magic!
Congratulations! You have successfully installed Kivy using Pyenv and Poetry.
This is the Ubuntu installation guide. If you are using another operating system, please, select it from the menu above.
Step 1: Check if you have Git installed
What is Git?
Git is a distributed version control system that enables multiple developers to collaborate on a project efficiently by tracking changes, managing different versions, and facilitating code integration. It allows developers to create branches for independent development, commit snapshots of their code, and merge changes seamlessly. It stores the entire project history locally on each developer’s machine, ensuring data redundancy and offline access. Popular platforms like GitHub, GitLab, and Bitbucket host remote Git repositories, enhancing collaboration with additional tools and services.
How to check if you have Git installed?
-
Open the terminal by pressing Ctrl + Alt + T
-
Type
git --versionand press enter. If you see the Git version, you have Git installed. -
If you don’t have Git installed, you can install it by typing
sudo apt-get install gitand pressing enter.
Step 2: Install build dependencies
What are build dependencies?
Build dependencies are the libraries, tools, and other resources required to compile and build a software project. These dependencies ensure that the project can be successfully compiled and run in a development or production environment.
How to install build dependencies?
- Update the package list by typing
sudo apt updateand pressing enter.
- Install the build dependencies
$ sudo apt install build-essential libssl-dev zlib1g-dev libbz2-dev libreadline-dev libsqlite3-dev curl libncursesw5-dev xz-utils tk-dev libxml2-dev libxmlsec1-dev libffi-dev liblzma-dev
Step 3: Install Pyenv
What is Pyenv?
Pyenv is a simple python version management tool. It lets you easily switch between multiple versions of Python. It’s simple, unobtrusive, and follows the UNIX tradition of single-purpose tools that do one thing well.
from pyenv
How do I install Pyenv?
-
Open the terminal by pressing Ctrl + Alt + T
-
Type
git clone https://github.com/pyenv/pyenv.git ~/.pyenv
$ git clone https://github.com/pyenv/pyenv.git ~/.pyenv
- Compile Pyenv
$ cd ~/.pyenv && src/configure && make -C src
- Run the following commands on your terminal to add Pyenv to your path
$ echo 'export PYENV_ROOT="$HOME/.pyenv"' >> ~/.bashrc
$ echo 'command -v pyenv >/dev/null || export PATH="$PYENV_ROOT/bin:$PATH"' >> ~/.bashrc
$ echo 'eval "$(pyenv init -)"' >> ~/.bashrc
- Close the terminal and open it again. Type
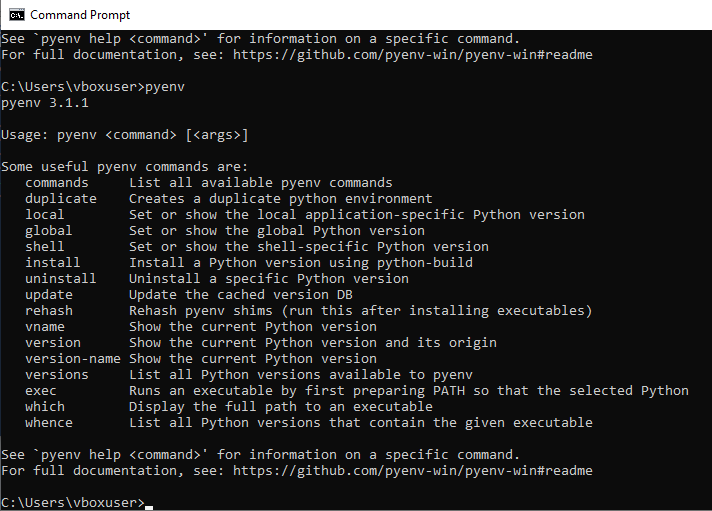
pyenv --versionand press enter. If you see something likepyenv 2.3.14, you have successfully installed Pyenv.
Step 4: Install Python using Pyenv
How to install Python?
-
Open the terminal by pressing Ctrl + Alt + T
-
Type
pyenv install 3.10.9and press enter. This will install Python 3.10.9.
- Type
pyenv versionsand press enter. This will show you all the Python versions you have installed with Pyenv.
$ pyenv versions

* system
3.10.9 (set by /home/kivyschool/.pyenv/version)
- Type
pyenv global 3.10.9and press enter. This will set the global Python version to 3.10.9.
- Type
python --versionand press enter. If you seePython 3.10.9, you have successfully set the global Python version to 3.10.9.
Step 5: Install Poetry
What is Poetry?
Poetry is a tool for dependency management and packaging in Python. It allows you to declare the libraries your project depends on and it will manage (install/update) them for you. Poetry offers a lockfile to ensure repeatable installs, and can build your project for distribution.
from Python Poetry
How to install Poetry?
-
Open the terminal by pressing Ctrl + Alt + T
-
Type
curl -sSL https://install.python-poetry.org | python3 -and press enter. This will install Poetry.
$ curl -sSL https://install.python-poetry.org | python3 -
- Add Poetry to your path by typing
echo 'export PATH="$HOME/.local/bin:$PATH"' >> ~/.bashrcand pressing enter.
$ echo 'export PATH="$HOME/.local/bin:$PATH"' >> ~/.bashrc
- Close the terminal and open it again. Type
poetry --versionand press enter. If you see something likePoetry version 1.4.0, you have successfully installed Poetry.
Poetry configuration
Here we are going to configure Poetry to always create the virtual environment in the project folder for future projects. This will make sure that you don’t have to configure it again. Also, we are going to configure Poetry to create the virtual environment automatically when you run poetry install.
- Type
poetry config virtualenvs.in-project trueand press enter. This will set the virtual environment to be created in the project folder.
$ poetry config virtualenvs.in-project true
- Type
poetry config virtualenvs.create trueand press enter. This will set the virtual environment to be created automatically when you runpoetry install.
$ poetry config virtualenvs.create true
Step 6: Start a Kivy project using Poetry
How to create a Kivy project?
Here we are going to create a folder called kivy_school, initialize a Poetry project, and install Kivy. Then we are going to run a Kivy «Hello world» example.
-
Open the terminal by pressing Ctrl + Alt + T
-
Type
mkdir kivy_schooland press enter. This will create a new directory calledkivy_school.
- Type
cd kivy_schooland press enter. This will change the current directory tokivy_school.
- Type
poetry initand press enter. This will start the Poetry wizard.
Always press enter to accept the default values, except on «Compatible Python versions» part. It will ask you things like:
- Package name, Version, Description, Author, License (accept default values by just pressing enter)
Compatible Python versions: type 3.10.9 and press enter- Would you like to define your main dependencies interactively? Just press enter twice.
- Would you like to define your development dependencies interactively? Just press enter twice.
- Do you confirm generation? (yes/no) [yes]
Do not worry if you make anything wrong during the wizard, you can change them later.
Once the wizard is finished, you will see a pyproject.toml file in the kivy_school directory. This is the Poetry configuration file, which contains the project dependencies. This means that any python library you install using Poetry will be added to this file. This is super useful because you can share this file with other developers and they will be able to install the same dependencies as you have.
Check the Python version used by Poetry
You need to check this only once. Do it now.
- Make sure that poetry is using the python version you installed with pyenv. Type
poetry env infoand press enter. You should see something like this:
Virtualenv
Python:         3.10.9
Implementation: CPython
Path:           NA
Executable:     NA

System
Platform:   linux
OS:         posix
Python:     3.10.9
Path:       /home/kivyschool/.pyenv/versions/3.10.9
Executable: /home/kivyschool/.pyenv/versions/3.10.9/bin/python3.10
Pay attention to the Path and Executable fields used by Virtualenv. They should point to the Python version you installed with Pyenv. To make sure that poetry is using the correct Python version, you can type poetry env use $(pyenv which python) and press enter.
$ poetry env use $(pyenv which python)
Poetry update Jan 5 2025 changed poetry shell to poetry env activate
What this means:
-
If you want to follow this tutorial with the latest python poetry, try
poetry env activate. This tells you the command to run to enter the shell (since this is different for different environments). -
For Mac/Linux and Bash/Zsh/Csh:
- Activate the virtual environment by typing
poetry shelland pressing enter.
— Type poetry add kivy and press enter. This will install Kivy.
That’s it! You have successfully installed Kivy using Pyenv and Poetry.
Step 7: Run a Kivy «Hello world» example
Create a file called main.py and paste the following code in it.
| main.py | |
|---|---|
1 2 3 4 5 6 7 |
|
- On your terminal, type
python main.pyand press enter. This will run the Kivy «Hello world» example.
Prepare your heart for the magic!
Congratulations! You have successfully installed Kivy using Pyenv and Poetry.
This is the Windows installation guide. If you are using another operating system, please, select it from the menu above.
What is the plan?
The plan is to install Git, Pyenv and Poetry on Windows. Then we are going to create a Kivy project and run a Kivy «Hello world» example.
Step 1: Install Git
What is Git?
Git is a version control system. You use git so you can manage several projects at once. As you can imagine, different projects require different tools and dependencies. Git is one way to control your projects so that you don’t have to struggle remembering what package goes where a few weeks after you actually installed your package. It is also used with online repositories like Github and Gitlab.
How do I install Git?
- Git download link
- Download Git for Windows and follow the installer. The default settings should be fine. You can change the initial branch name to anything you like (or easier/faster to type) like
mainordevinstead of the long default ofmaster. We recommend usingmainas the default branch name.
Why should I change the default branch name?
If you stick to the default, you will have to type master very often. A common command will be git checkout master or git merge origin master, which will be shortened to: git checkout main if using main.
Step 2: Install Pyenv
What is Pyenv?
Pyenv is a version management tool for Python. This is important because you do not want to install several versions of Python in your default system’s PATH. Instead, you want to use Pyenv and the command poetry env use to manage different versions of Python for your projects.
How do I install Pyenv?
- Original documentation for installing pyenv
Using PowershellUsing git
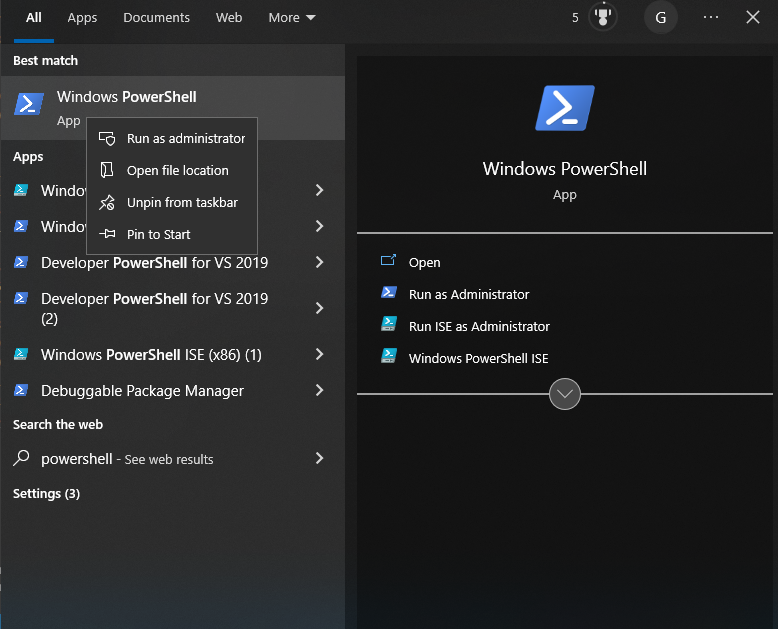
How to open a Powershell terminal as admin?
- You can hit the ⊞ Windows key and type Powershell
- Then either right click on the Powershell icon and click on «run as administrator» or the «run as administrator» button on the right side of the start screen
Run Powershell as administrator and execute the following before installing pyenv-win:
£C:\Users\KivySchool Set-ExecutionPolicy -ExecutionPolicy RemoteSigned -Scope LocalMachine
Type Y for «yes».
In Powershell, install pyenv-win by executing the following:
£C:\Users\KivySchool Invoke-WebRequest -UseBasicParsing -Uri "https://raw.githubusercontent.com/pyenv-win/pyenv-win/master/pyenv-win/install-pyenv-win.ps1" -OutFile "./install-pyenv-win.ps1"; &"./install-pyenv-win.ps1"
If the install fails, try doing the install command again before Googling your error.
-
Reference for git installation of pyenv:
- git clone instructions
- Using powershell to add pyenv to path
-
Open Command Prompt
How to open Command Prompt?
- ⊞ Windows key
- Type «cmd» without quotes
- Press Enter
- In Command Prompt, type:
£C:\Users\KivySchool git clone https://github.com/pyenv-win/pyenv-win.git "%USERPROFILE%\.pyenv"
What does it mean to add to PATH?
Adding a program to PATH means that your system by default can activate it from the terminal. If you don’t have pyenv in your PATH you will get:
'pyenv' is not recognized as an internal or external command, operable program or batch file.
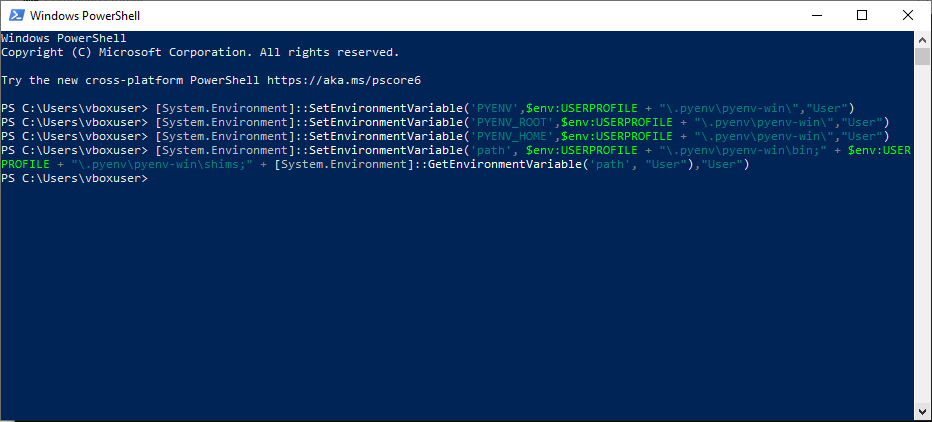
- Now add pyenv to PATH:
- Open a new Powershell instance
-
Copy paste the commands, one at a time:
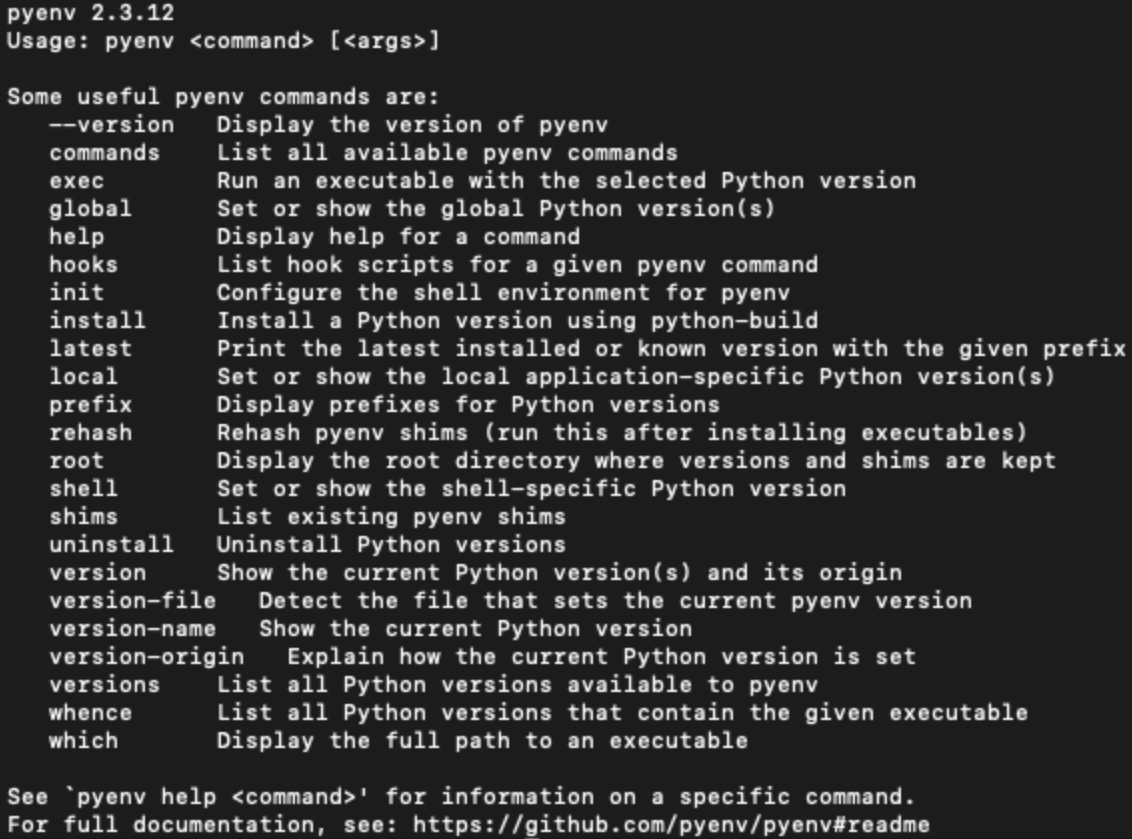
£C:\Users\KivySchool [System.Environment]::SetEnvironmentVariable('PYENV',$env:USERPROFILE + "\.pyenv\pyenv-win\","User")£C:\Users\KivySchool [System.Environment]::SetEnvironmentVariable('PYENV_ROOT',$env:USERPROFILE + "\.pyenv\pyenv-win\","User")£C:\Users\KivySchool [System.Environment]::SetEnvironmentVariable('PYENV_HOME',$env:USERPROFILE + "\.pyenv\pyenv-win\","User")£C:\Users\KivySchool [System.Environment]::SetEnvironmentVariable('path', $env:USERPROFILE + "\.pyenv\pyenv-win\bin;" + $env:USERPROFILE + "\.pyenv\pyenv-win\shims;" + [System.Environment]::GetEnvironmentVariable('path', "User"),"User")
Check if pyenv is installed
- Open a new command prompt terminal and type:
pyenv - The response should be your pyenv version and options for commands
If there’s no errors, proceed to the next step.
Step 3: Install Python using Pyenv
How do I install Python?
- Open a new command prompt terminal and type
pyenv install 3.10.9and press enter. This will install Python 3.10.9.
You can install any Python you want. 3.10.9 is just an example!
£C:\Users\KivySchool\ pyenv install 3.10.9
- Type
pyenv versionsand press enter. This will show you all the Python versions you have installed with Pyenv.
£C:\Users\KivySchool\ pyenv versions

* system
3.10.9 (set by C:\Users\kivyschool\.pyenv\pyenv-win\version)
- Type
pyenv global 3.10.9and press enter. This will set the global Python version to 3.10.9.
£C:\Users\KivySchool\ pyenv global 3.10.9
- Type
python --versionand press enter. If you seePython 3.10.9, you have successfully set the global Python version to 3.10.9.
£C:\Users\KivySchool\ python --version
Python 3.10.9
Step 4: Install Poetry
What is Poetry?
Poetry is a tool for dependency management and packaging in Python. It allows you to declare the libraries your project depends on and it will manage (install/update) them for you. Poetry offers a lockfile to ensure repeatable installs, and can build your project for distribution. This is necessary for packaging to Android as buildozer installation and dependency install will be handled for you by Poetry.
Python Poetry Homepage Link
How do I install Poetry?
Installing Poetry on your Windows machine using Powershell and Pyenv
- Official Poetry installation link.
- Open a new Powershell terminal and check that Python is available:
£C:\Users\KivySchool\ python
- You can type
exit()to leave the Python interpreter in Powershell.
Python is not installed!
- If Python is not installed, you can use Pyenv to install and set a Python version with these commands. The Pyenv installation instructions are above.
£C:\Users\KivySchool\ pyenv install 3.10.9
£C:\Users\KivySchool\ pyenv global 3.10.9
- If you don’t have Python 3.10.9 available for your machine, you can use
£C:\Users\KivySchool\ pyenv install -l -o
to find a Python version available for your machine and use
£C:\Users\KivySchool\ pyenv global (your installed version)
Example
- If you installed Python 3.10.7 with
pyenv install 3.10.7, you would type this to set your global Python version to 3.10.7:
-
If you needed to install Python, open a new Powershell terminal so that it has Python available. If your Powershell terminal already had Python installed, you can use it for the next section.
-
Then, type in Powershell:
£C:\Users\KivySchool\ (Invoke-WebRequest -Uri https://install.python-poetry.org -UseBasicParsing).Content | python -
- Now add Poetry to your system’s PATH:
What does it mean to add to PATH? Command Prompt cannot find Poetry after installation!
Adding a program to path means that your system can activate it by default from the terminal. If you don’t have poetry in your PATH you will get:
'poetry' is not recognized as an internal or external command, operable program or batch file.
To manually add a file to your PATH:
- To check if you have added Poetry to PATH, make a new command prompt (press ⊞ Windows key > cmd)
- Type in cmd:
£C:\Users\KivySchool\ poetry --version
Check if Poetry is installed
- Hit ⊞ Windows key and type:
cmd - Type
poetry -v,poetry -version, or simplypoetry. - If you see no errors, Poetry is installed.
Poetry configuration
Why set the virtual environment in the project?
At some point, you will end up reading a lot source code. It’s easier to have the environment in an accessible place per project so you can have quick access to your dependencies. Having your virtual environment in the same folder as your project makes it easier to find the right dependency to read. Just remember to exclude the environment folder in your .gitignore file so git doesn’t upload your entire environment online.
Here we are going to configure Poetry to always create the virtual environment in the project folder for future projects. This will make sure that you don’t have to configure it again. Also, we are going to configure Poetry to create the virtual environment automatically when you run poetry install.
- Type
poetry config virtualenvs.in-project trueand press enter. This will set the virtual environment to be created in the project folder.
£C:\Users\KivySchool\ poetry config virtualenvs.in-project true
- Type
poetry config virtualenvs.create trueand press enter. This will set the virtual environment to be created automatically when you runpoetry install.
£C:\Users\KivySchool\ poetry config virtualenvs.create true
- There will be no success message, but you will know it works when Poetry makes a
.venvfolder in your first project. There, you can see the Python version, and all the libraries associated with that project in the «Lib» folder.
Step 5a: Install Visual Studio Code (Optional)
What is VS Code?
VS Code is a text editor that is easy to use and also gives easy access to Command Prompt and Powershell with
We use VS Code for this tutorial because it is easy to use and has a lot of extensions that make it easy to use for beginners. You can use any text editor you want, but we recommend VS Code.
- Download and install VS Code from: https://code.visualstudio.com/
- The defaults are good enough to use, so follow through the installer.
Step 5b: Install Kivy using Poetry
Now it’s time to make your own «Hello world!» app!
Quick Hello world! Kivy app from scratch
You will create a simple Kivy «Hello world!» app. We will be using VS Code to demonstrate.
- Make a new folder with the name «HelloWorld»
How do I make a new folder in Windows?
File ExplorerVS CodeCommand Prompt
- Open File Explorer ( ⊞ Windows key > type «file explorer»)
- You can right click on an empty space in the folder of your choice and click «New > Folder»
- In VS Code, use the default shortcut to bring up a new terminal
£C:\Users\KivySchool\ CTRL + J
- Check if the terminal is in the folder you want to create your subfolder
- If you need to change directory, the command is
cd <folder location> - In your VS Code terminal, type
£C:\Users\KivySchool\ mkdir "KivyProjects"
- You can also press ⊞ Windows key, type
cmdand entercd "Your folder location"to a folder of your choice - In your terminal, type
£C:\Users\KivySchool\ mkdir "KivyProjects"
-
Open VS Code (⊞ Windows key > type
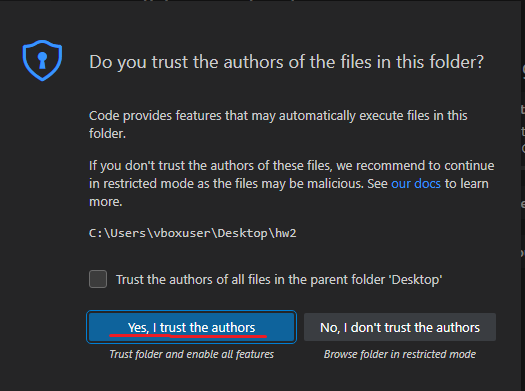
VS Code> press Enter), and open the HelloWorld folder (File > Open Folder > HelloWorld). You can use the shortcutCTRL + Kfollowed byCTRL + Oto see theOpen Folderdialogue option in VS Code. -
If VS Code asks you to «trust the authors», click Yes.

-
Select VS Code and open the terminal with
CTRL +J. -
Type in VS Code terminal:
£C:\Users\KivySchool\HelloWorld poetry init
What does Poetry ask me?
- These are the options Poetry will ask you to define, the only one that matters now is the Python version. If you are asked for author, put whatever you want. Keep pressing Enter until
Compatible Python versionsappears. For that line, type3.10.9.
Package name:
Version:
Description:
Author:
License:
Compatible Python versions:
These options matter if you want to upload a package to PyPI, or to share with other users. Remember to choose Python 3.10.9 for this tutorial! You may choose any Python version you want once you are comfortable with this setup.
- Just keep pressing enter to accept the default values. If you are asked for author, put whatever you want. You can change them later.
- For
Compatible Python Versions, type3.10.9. Remember to choose Python 3.10.9 for this tutorial! You may choose any Python version you want once you are comfortable with this setup. - Once the wizard is finished, you will see a
pyproject.tomlfile in theHelloWorlddirectory. This is the Poetry configuration file, which contains the project dependencies. This means that any library you install using Poetry will be added to this file. This is super useful because you can share this file with other developers and they will be able to install the same dependencies as you have.
You can use any Python version with Kivy. This next section teaches you how to use any Python version with Poetry.
However, this tutorial is guaranteed to work with Python 3.10.9.
Now we are going to force Poetry to use Python 3.10.9 from Pyenv. First, find the path to Python 3.10.9:
If you haven’t installed Python 3.10.9 with Pyenv
- To install:
£C:\Users\KivySchool\HelloWorld pyenv install 3.10.9
- If that version is not available to you, you can use
pyenv install -l -oand pick a recent Python version.
- To find the location of Python 3.10.9, type in your VS Code terminal:
£C:\Users\KivySchool\HelloWorld pyenv shell 3.10.9
£C:\Users\KivySchool\HelloWorld pyenv which python
- Copy the file location for the next step.
- Next, type:
£C:\Users\KivySchool\HelloWorld poetry env use "location of python 3.10.9 from the previous step"
Example
- For example:
£C:\Users\KivySchool\HelloWorld poetry env use "C:\Users\KivySchool\.pyenv\pyenv-win\versions\3.10.9\python.exe"
Too many arguments!
If your filepath has spaces, you must use quotes to surround your filepath so that you do not get an error, else you will see:
£C:\Users\KivySchool\HelloWorld Too many arguments to "env use" command, expected arguments "python"
In the example above, the filepath is already surrounded by quotes.
- Once the terminal is done, VS Code may ask in the bottom right (if the option has not been set already):
- Click yes. This allows VS Code to run your Python files with the right version of Python and running a Python file with the
F5key. You can always run any Python file from within apoetry shell(orpoetry env activate) instance of the terminal usingpython filelocation.py
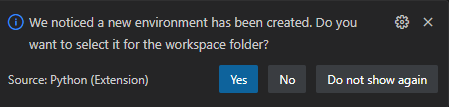
The specified Python version is not supported by the project.
This means that your pyproject.toml file has a different version requirement than 3.10.9. To fix this, open pyproject.toml and change the line python = under [tool.poetry.dependencies] to python = "3.10.9". Then run poetry env use again. Remember to save the pyproject.toml file!
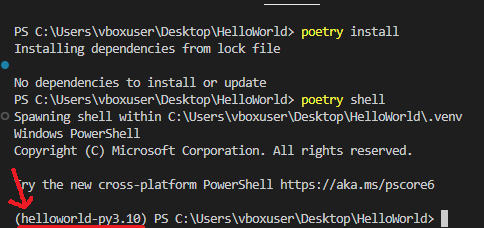
- Then you will see:
£C:\Users\KivySchool\HelloWorld Creating virtualenv helloworld in C:\Users\KivySchool\Desktop\HelloWorld\.venv
Using virtualenv: C:\Users\KivySchool\Desktop\HelloWorld\.venv
- Now, we use Poetry to add Kivy to our Python 3.10.9 virtual environment in the «HelloWorld» folder:
£C:\Users\KivySchool\HelloWorld poetry add kivy
-
This installs Kivy to your virtual environment.
-
Afterwards, type this to update and install everything to the virtual environment. You might get
No dependencies to install or update. That is ok.
£C:\Users\KivySchool\HelloWorld poetry install
Dependency did not install!
Sometimes your dependencies don’t install completely. If that is the case, poetry install again. In the worst case, Google is your friend.
Poetry update Jan 5 2025 changed poetry shell to poetry env activate
What this means:
-
If you want to follow this tutorial with the latest python poetry, try
poetry env activate. This tells you the command to run to enter the shell (since this is different for different environments). -
For Windows and Powershell:
- Now that the virtual environment is set up, we can enter it using
£C:\Users\KivySchool\HelloWorld poetry shell
What is a virtual environment?
A virtual environment is used to separate your work on a project from your base operating system. This is so that different Python versions don’t conflict, and make it harder for version conflicts to happen. The worst case scenario is that you install everything in your base Windows system. This is a problem because one project might need a dependency like OpenCV and Python 3.7 to work, but in another project a dependency wants Python 3.10. You will get a lot of headaches trying to sort out versions. Instead, separate them in virtual environments away from your operating system to save yourself the trouble.
With Poetry, you type poetry shell (or poetry env activate) in your project’s folder so that you interact with Python and the dependencies listed for that project only, NOT the version of Python that is installed in your base OS.
Poetry update Jan 5 2025 changed poetry shell to poetry env activate
What this means:
-
If you want to follow this tutorial with the latest python poetry, try
poetry env activate. This tells you the command to run to enter the shell (since this is different for different environments). -
For Mac/Linux and Bash/Zsh/Csh:
$ eval $(poetry env activate)
(test-project-for-test) $  # Virtualenv entered
- For Windows and Powershell:
- Now that you typed poetry shell, you will see your project on the left side of the terminal:
- That means that you’re inside your virtual environment, and can access all the dependencies for the project
HelloWorld
How to make a new file in VS Code
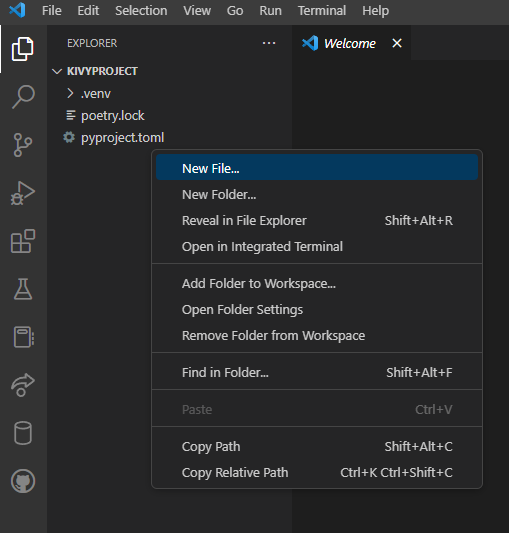
-
Now make a
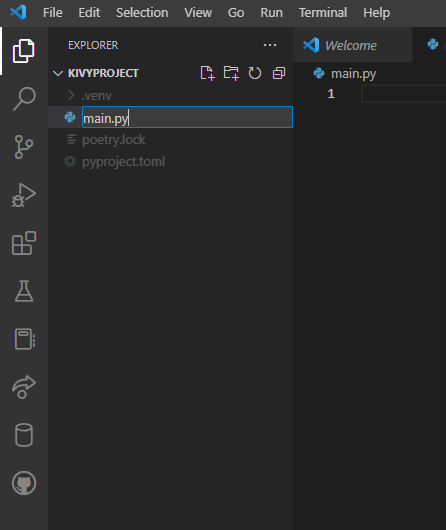
main.pyfile with these lines. In the left hand side of VS Code, you can right click under the project directoryHelloWorldand there will be an option to make a new file. -
main.py:
from kivy.app import runTouchApp
from kivy.lang import Builder
kvString = '''
Button:
    text: "Hello world!"
'''
runTouchApp(Builder.load_string(kvString))
- Remember to save your file before running!
VS Code Setup
- For VS Code, you need to install the Python extensions to debug with
F5. You should click «Install» for this then you can run selected Python files by pressingF5in VS Code.
- If you skipped the above dialogue option, you can press
F5while yourmain.pyfile is selected. You will be greeted with this dialogue:
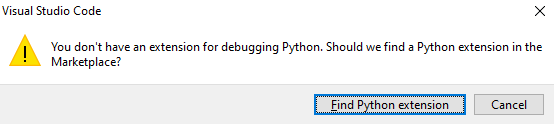
-
Press «Find Python extension»
-
Download this extension, and at the time of writing it has 79M downloads:

- Wait for the install to finish then you can debug Python files with the
F5shortcut while your file is selected in VS Code.
- To run the app, you can type in your poetry shell terminal
£C:\Users\KivySchool\HelloWorld python main.py
-
Or, you can click on
main.pyin VS Code and pressF5. -
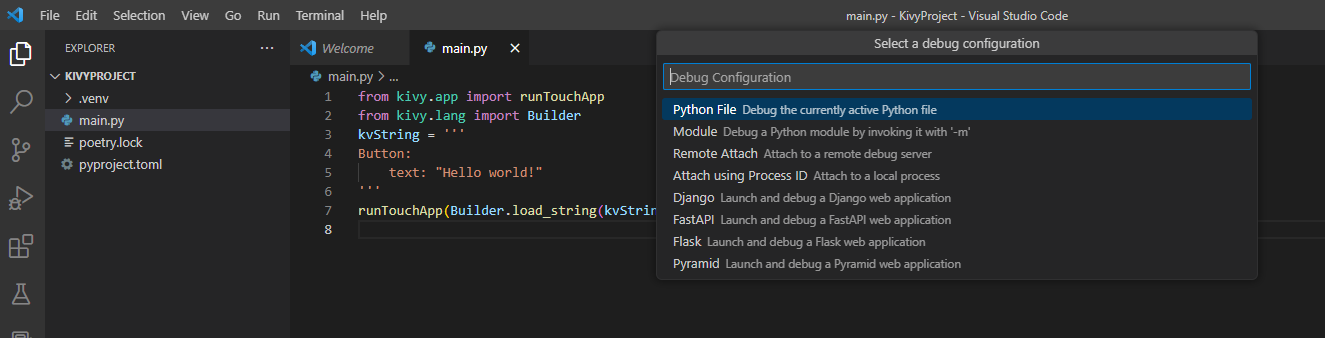
If VS Code shows this, click to «Debug the currently active Python file»
- Hello world!
-
If you’re using Git to upload to Github, now is the time to add
.venvandpoetry.lockto the.gitignorefile. You’ll thank yourself later. -
Add these lines to
.gitignoreif you are using git:
Linux installation guide
Linux installation guide
Are you ready to learn more about Kivy? Let’s go!
Kivy
====
Kivy is an open-source Python framework
for developing GUI apps that work cross-platform, including desktop, mobile and
embedded platforms.
The aim is to allow for quick and easy interaction design and rapid prototyping
whilst making your code reusable and deployable: Innovative user interfaces made
easy.
Kivy is written in Python and Cython and is built on
OpenGL ES 2.0. It supports various input
devices and has an extensive (and extensible) widget library. With the
same codebase, you can target Windows, macOS, Linux (including Raspberry Pi OS),
Android, and iOS. All Kivy widgets are built with multitouch support.
Kivy is MIT licensed, actively developed by a great community and is
supported by many projects managed by the
Kivy Organization.
Installation, Documentation and Examples
Extensive installation instructions as well as tutorials and general
documentation, including an API reference, can be found at https://www.kivy.org/docs.
A PDF version is also available.
Kivy ships with many examples which can be found in the examples folder.
Support
Are you having trouble using the Kivy framework, or any of its related projects?
Is there an error you don’t understand? Are you trying to figure out how to use
it? We have volunteers who can help!
The best channels to contact us for support are listed in the latest
Contact Us document.
Contributing
We love pull requests and discussing novel ideas. Check out our
latest contribution guide and
feel free to improve Kivy.
It gives details of the best places online to discuss the development with the
core developers and other enthusiasts.
Sibling projects
The Kivy team manager a number of additional projects that support the Kivy
eco-system.
-
Buildozer: a development tool for turning Python applications into binary packages ready for installation on
any of a number of platforms, including mobile devices.
-
Plyer: a platform-independent Python API for accessing hardware features of various platforms (Android, iOS,
macOS, Linux and Windows).
-
PyJNIus: a Python library for accessing Java classes using the Java Native Interface (JNI).
-
Pyobjus: Python module for accessing Objective-C classes as Python classes using
Objective-C runtime reflection.
-
Python for Android: a development tool that packages Python apps into binaries that can run on Android devices.
-
Kivy iOS: a toolchain to compile the necessary libraries for iOS to run Kivy applications, and manage the
creation of Xcode projects.
-
Audiostream: library for direct access
to the microphone and speaker.
-
KivEnt: entity-based game engine for Kivy.
-
Oscpy: a Python implementation of Open Sound Control (OSC) network protocol.
-
Garden: widgets and libraries created and
maintained by users.
Licenses
-
Kivy is released under the terms of the MIT License. Please refer to the
LICENSE file.
-
The provided fonts Roboto and Roboto Mono are licensed and
distributed under the terms of the
Apache License, Version 2.0.
The DejaVuSans (used for the virtual keyboard) license can be viewed
here.
-
The current UI design has been adapted from Moblintouch theme’s SVGs
and is licensed under the terms of the
LGPLv2.1.
Code of Conduct
In the interest of fostering an open and welcoming community, we as
contributors and maintainers need to ensure participation in our project and
our sister projects is a harassment-free and positive experience for everyone.
It is vital that all interaction is conducted in a manner conveying respect,
open-mindedness and gratitude.
Please consult the latest Code of Conduct.
Contributors
This project exists thanks to
all the people who contribute.
[Become a contributor].

Backers
Thank you to all of our backers!
🙏 [Become a backer]

Sponsors
Special thanks to
all of our sponsors, past and present.
Support this project by
[becoming a sponsor].
Here are our top current sponsors. Please click through to see their websites,
and support them as they support us.
В наши дни каждый разработчик может столкнуться с необходимостью работы над мобильным или веб-приложением на Python. В Python нет встроенных инструментов для мобильных устройств, тем не менее существуют пакеты, которые можно использовать для создания мобильных приложений. Это Kivy, PyQt и даже библиотека Toga от Beeware.
Содержание
- Принципы работы фреймворка Kivy Python
- Установка Kivy
- Работа с виджетами в Kivy
- Запуск программы «Hello, Kivy!»
- Отображение виджета Image в Kivy Python
- Разметка (Layout) в UI Kivy
- Добавление событий в Kivy
- Использование языка дизайна KV
- Создание приложения Kivy Python
- Создаем apk приложения для Android на Python
- Создание приложений для iPhone (iOS) на Python
- Создание exe приложений для Windows на Python используя Kivy
- Создание приложений для macOS на Python используя Kivy
Библиотеки являются основными элементами мобильного мира Python. Однако, говоря о Kivy, нельзя игнорировать преимущества данного фреймворка при работе с мобильными приложениями. Внешний вид приложения автоматически подстраивается под все платформы, разработчику при этом не нужно компилировать код после каждой поправки. Кроме того, здесь для создания приложений можно использовать чистый синтаксис Python.
В руководстве будут разобраны следующие темы:
- Работа с виджетами Kivy;
- Планировка UI и лейауты;
- Добавление событий;
- Использование языка KV;
- Создание приложения-калькулятора;
- Упаковка приложения для iOS, Android, Windows и macOS.
Разбор данного руководства предполагает, что читатель знаком с объектно-ориентированным программированием. Для введения в курс дела можете просмотреть статью об Объектно-ориентированном программировании (ООП) в Python 3.
Приступим!
Принципы работы фреймворка Kivy Python
Kivy был создан в 2011 году. Данный кросс-платформенный фреймворк Python работает на Windows, Mac, Linux и Raspberry Pi. В дополнение к стандартному вводу через клавиатуру и мышь он поддерживает мультитач. Kivy даже поддерживает ускорение GPU своей графики, что во многом является следствием использования OpenGL ES2. У проекта есть лицензия MIT, поэтому библиотеку можно использовать бесплатно и вкупе с коммерческим программным обеспечением.
Во время разработки приложения через Kivy создается интуитивно понятный интерфейс (Natural user Interface), или NUI. Его главная идея в том, чтобы пользователь мог легко и быстро приспособиться к программному обеспечению без чтения инструкций.
Kivy не задействует нативные элементы управления, или виджеты. Все его виджеты настраиваются. Это значит, что приложения Kivy будут выглядеть одинаково на всех платформах. Тем не менее, это также предполагает, что внешний вид вашего приложения будет отличаться от нативных приложений пользователя. Это может стать как преимуществом, так и недостатком, все зависит от аудитории.
Установка Kivy
У Kivy есть множество зависимостей, поэтому лучше устанавливать его в виртуальную среду Python. Можно использовать встроенную библиотеку Python venv или же пакет virtualenv.
Виртуальная среда Python создается следующим образом:
|
$ python3 —m venv my_kivy_project |
По ходу данного действия исполняемый файл Python 3 будет скопирован в папку под названием my_kivy_project, куда также будут добавлено несколько других папок.
Есть вопросы по Python?
На нашем форуме вы можете задать любой вопрос и получить ответ от всего нашего сообщества!
Telegram Чат & Канал
Вступите в наш дружный чат по Python и начните общение с единомышленниками! Станьте частью большого сообщества!
Паблик VK
Одно из самых больших сообществ по Python в социальной сети ВК. Видео уроки и книги для вас!
Для использования виртуальной среды ее нужно активировать. На Mac или Linux это можно сделать, выполнив следующую команду, будучи внутри папки my_kivy_project:
Команда для Windows точно такая же, но активировать скрипт нужно в другом месте — через папку Scripts, а не bin.
После активации виртуальной среды Python можно запустить pip для установки Kivy. На Linux и Mac нужно выполнить следующую команду:
|
$ python —m pip install kivy |
Инсталляция на Windows несколько сложнее. В официальной документации фреймворка изучите пункт, касающийся установки Kivy на Windows. Пользователи Mac также могут скачать файл dmg и установить Kivy данным образом.
В случае возникновения проблем во время установки Kivy на вашу платформу изучите дополнительные инструкции, с которыми можно ознакомиться через страницу загрузки.
Работа с виджетами в Kivy
Виджеты — это отображаемые на экране элементы управления, которыми пользователь может оперировать. Любой инструментарий графического интерфейса пользователя поставляется с набором виджетов. Типичными представителями виджетов, что вы не раз использовали, являются кнопки, выпадающие списки и вкладки. Внутри фреймворка Kivy встроено много виджетов.
Запуск программы «Hello, Kivy!»
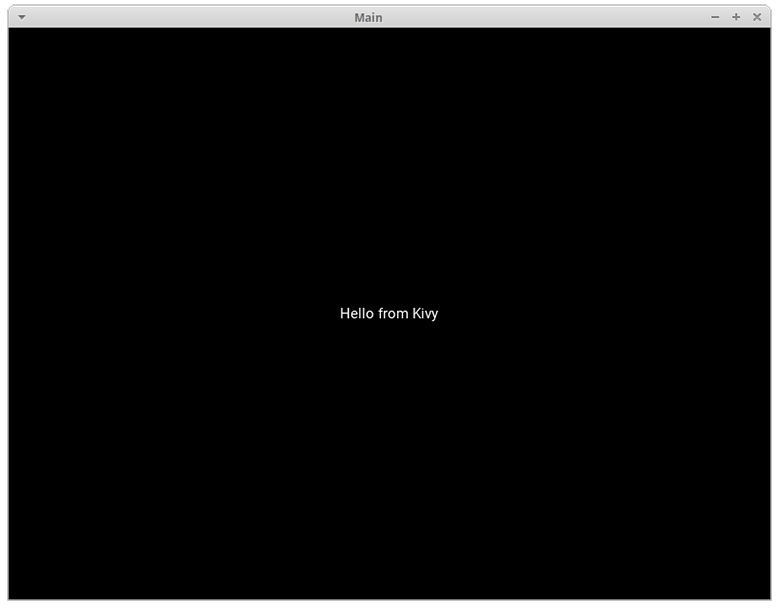
Принцип работы Kivy можно уловить, взглянув на следующее приложение «Hello, World!»:
|
from kivy.app import App from kivy.uix.label import Label class MainApp(App): def build(self): label = Label(text=‘Hello from Kivy’, size_hint=(.5, .5), pos_hint={‘center_x’: .5, ‘center_y’: .5}) return label if __name__ == ‘__main__’: app = MainApp() app.run() |
Каждому приложению Kivy требуется создать подкласс App и переопределить метод build(). Сюда вы помещаете код UI или вызываете другие функции, которые определяют код UI. В данном случае создается виджет Label и передается text, size_hint и pos_hint. Последние два аргумента не обязательны.
size_hint говорит Kivy о размерах что нужно использовать при создании виджета. Используются два числа:
- Первое число
xуказывает на размер ширины элемента управления. - Второе число
yуказывает на размер высоты элемента управления.
Значение обоих чисел должно быть в промежутке между 0 и 1. Значение по обоих показателей по умолчанию равно 1. Также можно задействовать pos_hint, что используется для позиционирования виджета. В коде, размещенном выше, указывается, что виджет должен быть размещен в центре осей x и y.
Для запуска приложения нужно инициализировать класс MainApp и вызвать метод run(). После этих действий на экране появится следующее:
Kivy также выводит в stdout довольно много текста:
|
1 2 3 4 5 6 7 8 9 10 11 12 13 14 15 16 17 18 19 20 21 22 23 |
[INFO ] [Logger ] Record log in /home/mdriscoll/.kivy/logs/kivy_19—06—07_2.txt [INFO ] [Kivy ] v1.11.0 [INFO ] [Kivy ] Installed at «/home/mdriscoll/code/test/lib/python3.6/site-packages/kivy/__init__.py» [INFO ] [Python ] v3.6.7 (default, Oct 22 2018, 11:32:17) [GCC 8.2.0] [INFO ] [Python ] Interpreter at «/home/mdriscoll/code/test/bin/python» [INFO ] [Factory ] 184 symbols loaded [INFO ] [Image ] Providers: img_tex, img_dds, img_sdl2, img_gif (img_pil, img_ffpyplayer ignored) [INFO ] [Text ] Provider: sdl2([‘text_pango’] ignored) [INFO ] [Window ] Provider: sdl2([‘window_egl_rpi’] ignored) [INFO ] [GL ] Using the «OpenGL» graphics system [INFO ] [GL ] Backend used <sdl2> [INFO ] [GL ] OpenGL version <b‘4.6.0 NVIDIA 390.116’> [INFO ] [GL ] OpenGL vendor <b‘NVIDIA Corporation’> [INFO ] [GL ] OpenGL renderer <b‘NVS 310/PCIe/SSE2’> [INFO ] [GL ] OpenGL parsed version: 4, 6 [INFO ] [GL ] Shading version <b‘4.60 NVIDIA’> [INFO ] [GL ] Texture max size <16384> [INFO ] [GL ] Texture max units <32> [INFO ] [Window ] auto add sdl2 input provider [INFO ] [Window ] virtual keyboard not allowed, single mode, not docked [INFO ] [Base ] Start application main loop [INFO ] [GL ] NPOT texture support is available |
Это может быть полезно для отладки приложения.
Далее добавим виджет Image и посмотрим, чем он отличается от Label.
Отображение виджета Image в Kivy Python
В Kivy есть несколько видов виджетов, связанных с изображениями. Для загрузки картинок с жесткого диска можно задействовать Image, а при использовании адреса URL подойдет AsyncImage. К следующем примере берется стандартный класс Image:
|
from kivy.app import App from kivy.uix.image import Image class MainApp(App): def build(self): img = Image(source=‘/path/to/real_python.png’, size_hint=(1, .5), pos_hint={‘center_x’:.5, ‘center_y’:.5}) return img if __name__ == ‘__main__’: app = MainApp() app.run() |
В данном коде импортируется Image из подпакета kivy.uix.image. Класс Image принимает много разных параметров, однако единственным для нас нужным является source, что указывает Kivy, какое изображение должно быть загружено. Здесь передается полный путь к выбранному изображению. Оставшаяся часть кода такая же, как и в прошлом примере.
После запуска кода должно выводиться нечто подобное:
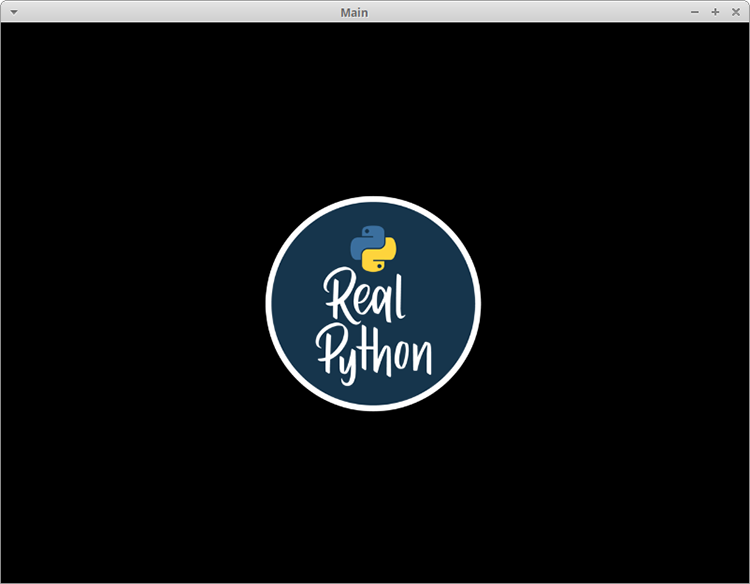
Текст из предыдущего примера был заменен картинкой.
Теперь рассмотрим, как добавить и оптимально расположить несколько виджетов в приложении.
Разметка (Layout) в UI Kivy
У каждого фреймворка есть свой собственный метод для размещения виджетов. К примеру, в wxPython используются классификаторы, а в Tkinter будет задействован лейаут, или менеджер геометрии. В Kivy за это отвечают Лейауты (Layouts). Доступно несколько различных типов Лейаутов. Чаще всего используются следующие виды:
- BoxLayout;
- FloatLayout;
- GridLayout.
Найти полный список доступных Лейаутов можно в документации Kivy. Рабочий исходный код можно найти в kivy.uix.
Рассмотрим BoxLayout на примере следующего кода:
|
1 2 3 4 5 6 7 8 9 10 11 12 13 14 15 16 17 18 19 20 21 22 23 24 25 26 27 28 |
import kivy import random from kivy.app import App from kivy.uix.button import Button from kivy.uix.boxlayout import BoxLayout red = [1,0,0,1] green = [0,1,0,1] blue = [0,0,1,1] purple = [1,0,1,1] class HBoxLayoutExample(App): def build(self): layout = BoxLayout(padding=10) colors = [red, green, blue, purple] for i in range(5): btn = Button(text=«Button #%s» % (i+1), background_color=random.choice(colors) ) layout.add_widget(btn) return layout if __name__ == «__main__»: app = HBoxLayoutExample() app.run() |
Здесь из kivy.uix.boxlayout импортируется модуль BoxLayout и затем устанавливается. После этого создается список цветов, которые представляют собой цвета RGB (Red-Blue-Green).
В конечном итоге формируется цикл для range из 5, результатом чего является кнопка btn для каждой итерации. Сделаем вещи немного интереснее и поставим в качестве фона кнопки background_color случайный цвет. Теперь можно добавить кнопку в лейаут при помощи layout.add_widget(btn).
После запуска кода выведется нечто подобное:
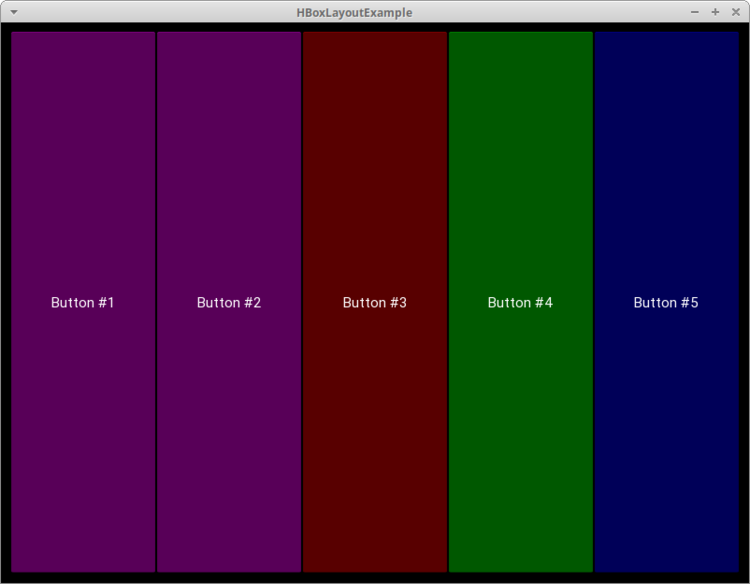
Здесь представлены 5 кнопок, окрашенных случайным образом, по одной для каждой итерации цикла for.
Во время создания лейаута следует учитывать следующие аргументы:
- padding: Отступ
paddingмежду лейаутом и его дочерними элементами уточняется в пикселях. Для этого можно выбрать один из трех способов:- Список из четырех аргументов:
[padding_left, padding_top, padding_right, padding_bottom] - Список из двух аргументов:
[padding_horizontal, padding_vertical] - Один аргумент:
padding=10
- Список из четырех аргументов:
- spacing: При помощи данного аргумента добавляется расстояние между дочерними виджетами.
- orientation: Позволяет изменить значение
orientationдляBoxLayoutпо умолчанию — с горизонтального на вертикальное.
Добавление событий в Kivy
Как и многие другие инструментарии GUI, по большей части Kivy полагается на события. Фреймворк отзывается на нажатие клавиш, кнопки мышки или прикосновение к сенсорному экрану. В Kivy задействован концепт Часов (Clock), что дает возможность создать своего рода график для вызова определенных функций в будущем.
В Kivy также используется концепт Свойств (Properties), что работает с EventDispatcher. Свойства помогают осуществить проверку достоверности. Они также запускают события, когда виджет меняет размер или позицию.
Добавим событие для кнопки из предыдущего кода:
|
1 2 3 4 5 6 7 8 9 10 11 12 13 14 15 16 17 18 |
from kivy.app import App from kivy.uix.button import Button class MainApp(App): def build(self): button = Button(text=‘Hello from Kivy’, size_hint=(.5, .5), pos_hint={‘center_x’: .5, ‘center_y’: .5}) button.bind(on_press=self.on_press_button) return button def on_press_button(self, instance): print(‘Вы нажали на кнопку!’) if __name__ == ‘__main__’: app = MainApp() app.run() |
В данном коде вызывается button.bind(), а событие on_press ссылается на MainApp.on_press_button().
Этот метод неявно принимает экземпляр виджета, который является самим объектом кнопки. Сообщение будет выводиться на stdout всякий раз при нажатии пользователем на кнопку.
Использование языка дизайна KV
Kivy предоставляет язык дизайна KV, что можно использовать в приложениях Kivy. Язык KV позволяет отделить дизайн интерфейса от логики приложения. Он придерживается принципа разделения ответственности и является частью архитектурного паттерна Модель-Представление-Контроллер (Model-View-Controller). Предыдущий пример можно обновить, используя язык KV:
|
from kivy.app import App from kivy.uix.button import Button class ButtonApp(App): def build(self): return Button() def on_press_button(self): print(‘Вы нажали на кнопку!’) if __name__ == ‘__main__’: app = ButtonApp() app.run() |
С первого взгляда данный код может показаться несколько странным, так как кнопка Button создается без указания атрибутов или привязывания к ним событий. Здесь Kivy автоматически ищет файл с таким же названием, что и у класса, только строчными буквами и без части App в названии класса.
В данном случае названием класса является ButtonApp, поэтому Kivy будет искать файл button.kv. Если такой файл существует, и он также форматирован должным образом, тогда Kivy использует его при загрузке UI. Попробуйте создать такой файл и добавить следующий код:
|
<Button>: text: ‘Press me’ size_hint: (.5, .5) pos_hint: {‘center_x’: .5, ‘center_y’: .5} on_press: app.on_press_button() |
Действия каждой строки:
- Строка 1 соответствует вызову
Buttonв коде Python. Kivy должен осмотреть инициализированный объект для определения кнопки; - Строка 2 устанавливает
textкнопки; - Строка 3 устанавливает ширину и высоту при помощи
size_hint; - Строка 4 устанавливает позицию кнопки через
pos_hint; - Строка 5 устанавливает обработчик событий
on_press. Для указания Kivy места обработчика событий используетсяapp.on_press_button(). Здесь Kivy будет искать метод.on_press_button()в классеApplication.
Вы можете установить все ваши виджеты и лейауты внутри одного или нескольких файлов языка KV. Язык KV также поддерживает импорт модулей Python в KV, создавая динамичные классы, и это далеко не предел. Ознакомиться с полным перечнем его возможностей можно в гиде Kivy по языку KV.
Теперь мы можем приступить к созданию настоящего рабочего приложения.
Создание приложения Kivy Python
Создание чего-то полезное несомненно является отличным способом выучить новый навык. Учитывая данное утверждение, давайте используем Kivy при создании калькулятора, который будет поддерживать следующие операции:
- Сложение;
- Вычитание;
- Умножение;
- Деление.
В данном приложении будет использован набор кнопок в своего рода лейауте. В верхней части также будет специальный блок для вывода операций и их результатов. В итоге калькулятор будет выглядеть следующим образом:
Теперь, когда у нас есть в наличии целевой UI, может составить код:
|
1 2 3 4 5 6 7 8 9 10 11 12 13 14 15 16 17 18 19 20 21 22 23 24 25 26 27 28 29 30 31 32 33 34 35 36 37 38 39 |
from kivy.app import App from kivy.uix.boxlayout import BoxLayout from kivy.uix.button import Button from kivy.uix.textinput import TextInput class MainApp(App): def build(self): self.operators = [«/», «*», «+», «-«] self.last_was_operator = None self.last_button = None main_layout = BoxLayout(orientation=«vertical») self.solution = TextInput( multiline=False, readonly=True, halign=«right», font_size=55 ) main_layout.add_widget(self.solution) buttons = [ [«7», «8», «9», «/»], [«4», «5», «6», «*»], [«1», «2», «3», «-«], [«.», «0», «C», «+»], ] for row in buttons: h_layout = BoxLayout() for label in row: button = Button( text=label, pos_hint={«center_x»: 0.5, «center_y»: 0.5}, ) button.bind(on_press=self.on_button_press) h_layout.add_widget(button) main_layout.add_widget(h_layout) equals_button = Button( text=«=», pos_hint={«center_x»: 0.5, «center_y»: 0.5} ) equals_button.bind(on_press=self.on_solution) main_layout.add_widget(equals_button) return main_layout |
Калькулятор работает следующим образом:
- В строках с 8 по 10 создается список
operatorsи несколько полезных значений,last_was_operatorиlast_button, которые будут использованы чуть позже. - В строках с 11 по 15 создается лейаут верхнего уровня
main_layout, к нему также добавляется виджет только для чтенияTextInput. - В строках с 16 по 21 создается вложенный список из списков, где есть большая часть кнопок для калькулятора.
- В строке 22 начинается цикл for для кнопок. Для каждого вложенного списка делается следующее:
- В строке 23 создается
BoxLayoutс горизонтальной ориентацией. - В строке 24 начинается еще один цикл
forдля элементов вложенного списка. - В строках с 25 по 39 создаются кнопки для ряда и связываются обработчиком событий, после чего кнопки добавляются к горизонтальному
BoxLayoutиз строки 23. - В строке 31 этот лейаут добавляется к
main_layout.
- В строке 23 создается
- В строках с 33 по 37 создается кнопка равно (=) и привязывается к обработчику событий, после чего она добавляется к
main_layout.
Далее создается обработчик событий .on_button_press(). Код будет выглядеть следующим образом:
|
1 2 3 4 5 6 7 8 9 10 11 12 13 14 15 16 17 18 19 20 |
def on_button_press(self, instance): current = self.solution.text button_text = instance.text if button_text == «C»: # Очистка виджета с решением self.solution.text = «» else: if current and ( self.last_was_operator and button_text in self.operators): # Не добавляйте два оператора подряд, рядом друг с другом return elif current == «» and button_text in self.operators: # Первый символ не может быть оператором return else: new_text = current + button_text self.solution.text = new_text self.last_button = button_text self.last_was_operator = self.last_button in self.operators |
Почти все виджеты приложения вызывают .on_button_press(). Это работает следующим образом:
- Строка 41 принимает аргумент
instance, в результате чего можно узнать, какой виджет вызвал функцию. - Строки между 42 и 43 извлекают и хранят значения
solutionиtextкнопки. - Строки c 45 по 47 проверяют, на какую кнопку нажали. Если пользователь нажимает с, тогда очищается
solution. В противном случае используется утверждениеelse. - Строка 49 проверяет, было ли у решения предыдущее значение.
- Строки с 50 по 52 проверяют, была ли последняя нажатая кнопка оператором. Если да, тогда
solutionобновляться не будет. Это необходимо для предотвращения создания двух операций в одном ряду. К примеру,1 * /будет недействительным утверждением. - Строки с 53 по 55 проверяют, является ли первый символ оператором. Если да, тогда solution обновляться не будет, так как первое значение не может быть значением оператора.
- Строки с 56 по 58 переходят к условию
else. Если никакое из предыдущих значений не найдено, тогда обновляетсяsolution. - Строка 59 устанавливает
last_buttonк метке последней нажатой кнопки. - Строка 60 устанавливает
last_was_operatorк значениюTrueилиFalseв зависимости от того, был символ оператором или нет.
Последней частью кода будет .on_solution():
|
def on_solution(self, instance): text = self.solution.text if text: solution = str(eval(self.solution.text)) self.solution.text = solution |
Здесь берется текущий текст из solution и используется встроенный в Python eval() для исполнения. Если пользователь создал формулу вроде 1+2, тогда eval() запустит код и вернет результат. В конце результат устанавливается как новое значение виджета solution.
На заметку: порой
eval()бывает опасным, так как он может запустить произвольный код. Многие разработчики избегают его использование именно по этой причине. Тем не менее, ввиду задействования только целых чисел, операторов и точки в качестве вводных данных дляeval(), в данном контексте его можно использовать безопасно.
При запуске данного кода на рабочем столе компьютера приложение будет выглядеть следующим образом:
Полный текст кода примера калькулятора представлен ниже:
|
1 2 3 4 5 6 7 8 9 10 11 12 13 14 15 16 17 18 19 20 21 22 23 24 25 26 27 28 29 30 31 32 33 34 35 36 37 38 39 40 41 42 43 44 45 46 47 48 49 50 51 52 53 54 55 56 57 58 59 60 61 62 63 64 65 66 67 68 69 70 71 |
from kivy.app import App from kivy.uix.boxlayout import BoxLayout from kivy.uix.button import Button from kivy.uix.textinput import TextInput class MainApp(App): def build(self): self.operators = [«/», «*», «+», «-«] self.last_was_operator = None self.last_button = None main_layout = BoxLayout(orientation=«vertical») self.solution = TextInput( multiline=False, readonly=True, halign=«right», font_size=55 ) main_layout.add_widget(self.solution) buttons = [ [«7», «8», «9», «/»], [«4», «5», «6», «*»], [«1», «2», «3», «-«], [«.», «0», «C», «+»], ] for row in buttons: h_layout = BoxLayout() for label in row: button = Button( text=label, pos_hint={«center_x»: 0.5, «center_y»: 0.5}, ) button.bind(on_press=self.on_button_press) h_layout.add_widget(button) main_layout.add_widget(h_layout) equals_button = Button( text=«=», pos_hint={«center_x»: 0.5, «center_y»: 0.5} ) equals_button.bind(on_press=self.on_solution) main_layout.add_widget(equals_button) return main_layout def on_button_press(self, instance): current = self.solution.text button_text = instance.text if button_text == «C»: # Очистка виджета с решением self.solution.text = «» else: if current and ( self.last_was_operator and button_text in self.operators): # Не добавляйте два оператора подряд, рядом друг с другом return elif current == «» and button_text in self.operators: # Первый символ не может быть оператором return else: new_text = current + button_text self.solution.text = new_text self.last_button = button_text self.last_was_operator = self.last_button in self.operators def on_solution(self, instance): text = self.solution.text if text: solution = str(eval(self.solution.text)) self.solution.text = solution if __name__ == «__main__»: app = MainApp() app.run() |
Пришло время разместить приложение в Google Play или в AppStore!
По завершении составления кода вы можете поделиться своим приложением с другими. Хорошим способом сделать это может стать превращение вашего кода в приложения для смартфона на Android. Для этого вначале нужно установить пакет buildozer через pip:
Затем создается новая папка, после чего нужно перейти в нее через терминал. Затем выполняется следующая команда:
После этого создается файл buildozer.spec, который будет использован для конфигурации сборки. К примеру, первые две строчки файла спецификации можно редактировать следующим образом:
|
[app] # (str) Название вашего приложения title = KvCalc # (str) Название упаковки package.name = kvcalc # (str) Домен упаковки (нужен для упаковки android/ios) package.domain = org.kvcalc |
Не бойтесь посмотреть оставшуюся часть файла для выяснения того, что еще можно поменять.
На данный момент приложение почти готово к сборке, однако для начала нужно установить зависимости для buildozer. После их установки скопируйте ваше приложение калькулятора в новую папку и переименуйте его в main.py. Этого требует buildozer. Если файл будет назван неверно, тогда процесс сборки завершится неудачей.
Теперь можно запустить следующую команду:
|
$ buildozer —v android debug |
Этап сборки займет время! На моем компьютере на это ушло около 15-20 минут. Здесь все зависит от вашего железа, так что времени может потребоваться еще больше. Расслабьтесь, налейте чашечку кофе или прогуляйтесь. Buildozer скачает те элементы Android SDK, которые нужны для процесса сборки. Если все идет по плану, тогда в папке bin появится файл под названием, напоминающим что-то вроде kvcalc-0.1-debug.apk.
Далее требуется связать телефон Android с компьютером и перенести туда файл apk. Затем откройте менеджер файлов телефона и кликните на файл apk. Android должен спросить, хотите ли вы установить приложение. Есть вероятность появления предупреждения, ведь приложение было скачано не из Google Play. Тем не менее, вы по-прежнему сможете установить его.
Вот как выглядит калькулятор, запущенный на Samsung S9:
У buildozer также есть несколько других команд, которые вы можете использовать. Изучите документацию, чтобы подробнее узнать об этом.
При необходимости добиться более детального управления упаковку можно осуществить через python-for-android. Здесь это обсуждаться не будет, но если интересно, ознакомьтесь, как еще можно быстро начать проект.
Создание приложений для iPhone (iOS) на Python
Инструкция для сборки приложения для iOS будет немного сложнее, нежели для Android. Для получения последней информации всегда проверяйте обновления официальной документации Kivy.
Вам нужен будет компьютер с операционной системой OS X: MacBook или iMac. На Linux или Windows вы не сможете создать приложения для Apple.
Перед упаковкой приложения для iOS на Mac необходимо выполнить следующие команды:
|
$ brew install autoconf automake libtool pkg—config $ brew link libtool $ sudo easy_install pip $ sudo pip install Cython==0.29.10 |
После успешной установки нужно скомпилировать при использования следующих команд:
|
$ git clone git://github.com/kivy/kivy—ios $ cd kivy—ios $ ./toolchain.py build python3 kivy |
Если вы получаете ошибку, где говорится, что iphonesimulator не найден, тогда поищите способ решение проблемы на StackOverflow, после чего попробуйте запустить команды вновь.
Если вы получаете ошибки SSL, тогда скорее всего у вас не установлен OpenSSL от Python. Следующая команда должна это исправить:
|
$ cd /Applications/Python\ 3.7/ $ ./Install\ Certificates.command |
Теперь вернитесь назад и запустите команду toolchain опять.
После успешного выполнения всех указанных выше команд можете создать проект Xcode при помощи использования скрипта toolchain. Перед созданием проекта Xcode переименуйте ваше главное приложение в main.py, это важно. Выполните следующую команду.
|
./toolchain.py create <title> <app_directory> |
Здесь должна быть папка под названием title, внутри которой будет проект Xcode. Теперь можно открыть проект Xcode и работать над ним отсюда. Обратите внимание, что если вы хотите разместить свое приложение на AppStore, вам понадобится создать аккаунт разработчика на developer.apple.com и заплатить годовой взнос.
Создание exe приложений для Windows на Python используя Kivy
Упаковать приложение Kivy для Windows можно при помощи PyInstaller. Если ранее вы никогда не работали с ним, тогда изучите тему использования PyInstaller для упаковки кода Python в исполняемый файл.
Для установки PyInstaller можно использовать pip:
|
$ pip install pyinstaller |
Следующая команда упакует ваше приложение:
Команда создаст исполняемый файл Windows, а вместе с ним еще несколько других файлов. Аргумент -w говорит PyInstaller, что приложение открывается в оконном режиме и не является приложение для командной строки. Если вы хотите, чтобы PyInstaller создал только один исполняемый файл, тогда можете передать в дополнение к -w аргумент --onefile.
Создание приложений для macOS на Python используя Kivy
Как и в случае с Windows, для создания исполняемого файла Mac можно также использовать PyInstaller. Единственным условием является запуск следующей команды на Mac:
|
$ pyinstaller main.py —w —onefile |
Результатом станет один исполняемый файл в папке dist. Название исполняемого файла будет таким же, как и название файла Python, что был передан PyInstaller.
Если вы хотите уменьшить размер исполняемого файла или использовать в приложении GStreamer, тогда для получения дополнительной информации изучите тему упаковки для macOS.
Заключение
Kivy является действительно интересным фреймворком GUI, что можно использовать для создания пользовательских интерфейсов и мобильных приложений для Android и iOS. Внешне приложения Kivy будут отличаться от нативных приложений выбранной платформы. В том случае, если вы хотите выделяться на фоне конкурентов, это может быть выгодным преимуществом.
В данном руководстве были рассмотрены основы Kivy, среди которых стоит выделить добавление виджетов, привязку событий, планировку виджетов и лейауты, а также использование языка KV. В результате мы получили рабочее приложение Kivy и рассмотрели способы его переноса на другие платформы, в том числе мобильные.
В Kivy есть множество виджетов и концептов, которые не были рассмотрены в статьи. Для дальнейшего изучения темы можете изучить официальный сайт Kivy, где размещены разнообразные руководства, примеры приложений и многое другое.
Рекомендации
Для дальнейшего изучения Kivy ознакомьтесь со следующими ресурсами:
- Гид программирования на Kivy
- Документация по упаковке приложений Kivy
- Сборка приложений GUI через Python
Чтобы посмотреть, как создать приложение с графическим интерфейсом при использовании другого GUI фреймфорка Python, можете ознакомиться со статьями о wxPython.
Являюсь администратором нескольких порталов по обучению языков программирования Python, Golang и Kotlin. В составе небольшой команды единомышленников, мы занимаемся популяризацией языков программирования на русскоязычную аудиторию. Большая часть статей была адаптирована нами на русский язык и распространяется бесплатно.
E-mail: vasile.buldumac@ati.utm.md
Образование
Universitatea Tehnică a Moldovei (utm.md)
- 2014 — 2018 Технический Университет Молдовы, ИТ-Инженер. Тема дипломной работы «Автоматизация покупки и продажи криптовалюты используя технический анализ»
- 2018 — 2020 Технический Университет Молдовы, Магистр, Магистерская диссертация «Идентификация человека в киберпространстве по фотографии лица»