
If you are using Windows 10, you can use WSL (also sometimes called «bash on windows»), to package your app for android.
https://docs.microsoft.com/en-us/windows/wsl/install-win10
Once your ubuntu on windows is setup, you can follow buildozer’s instructions
https://buildozer.readthedocs.io/en/latest/installation.html#installation
also follow the steps for «targeting android» for ubuntu.
Making ADB work.
Almost everything will work just like on a normal ubuntu installation (though possibly a bit slower), but adb which is used by buildozer to install the app on your android device and display the logs, can’t work directly inside WSL, but it’s possible to make it work.
First you need to check the version of adb that buildozer installed.
After a successful build of your apk, type the two following commands in bash.
adb=$(find ~/.buildozer -name adb -type f,l)
$adb --version
This will show the version of adb that was installed, for me it’s 1.0.39, but it’s probably different for you.
Download the windows version of this version of adb.
https://developer.android.com/studio/releases/platform-tools#downloads
allows you to download the latest version of the tools, try this one first.
- extract adb from it
- open a cmd window
- drag and drop your extracted adb.exe onto it and type
--versionafter it then validate. - If the version is more recent than the one you got through buildozer, you can download an older version by editing the version in this link
https://dl.google.com/android/repository/platform-tools_r27.0.0-windows.zip
repeat the steps to check for adb version, once you got the same version as with buildozer, create yourself a shortcut to start it easily, you don’t even need to see it, just to be able to easily start it.
using that ADB for server.
Make sure an adb server is not running in ubuntu
adb=$(find ~/.buildozer -name adb -type f,l)
$adb --kill-server
Then run the window’s adb (using cmd or just double-clicking your shortcut)
check that you can access your device by running
$adb devices in ubuntu.
Of course, your device must be in developer mode (https://developer.android.com/studio/debug/dev-options) and have usb debugging enabled (https://developer.android.com/studio/debug/dev-options) for this to work.
When you run the command, you might get a confirmation dialog on your device asking for confirmation of access to your device, this is for security purpose, and is fine to accept here as you are the one asking for connection.
After that you should be all set to do android development with buildozer on windows 10, don’t forgot to run adb on windows before trying to use it in ubuntu every time you reboot your computer.
Время на прочтение8 мин
Количество просмотров71K

Фух! Только что выбрался из под траков этого чудовища. А кое-кому повезло меньше. Как и было обещано в предыдущей статье, сегодня мы расскажем, как собираются apk пакеты для программ, написанных с использованием фреймворка Kivy при помощи утилиты Buildozer.
Что для этого понадобится? Помимо уже известных инструментов — кофе-сигареты, полкило нервов — нам потребуются ключи от новенького Бульдозера, который стоит в ангаре на github и сопутствующие зависимости, без которых он, к сожалению, не заведется, а если заведется, то никого задавить не удастся и apk пакет для Android не собрать.
Кстати, пользователи Microsoft, на своих Windows машинах за Бульдозером с нами не едут, потому что для сборки apk пакета требуется Linux система, либо ее образ на виртуалке. Ну, что ж. А мы отправляемся на github, отбуксируем Бульдозер и распакуем архив в какую-нибудь директорию. Блин. Да это просто монстр!
Спокойно. Не заводим. За рычаги не хватаемся. Во-первых, нам нужно скачать пакет pip — инструмент для установки и управления пакетами Python.
sudo apt-get install python-pipЗаходим в ангар, в смысле в папку с Бульдозером…
… и выполняем команду —
sudo python setup.py installОб успешной установке мы будем извещены сообщением Successfully installed buildozer. Бульдозер работает как на Python 2.7 так и на Python >= 3.3. Я использую Python 2.7. Просто потому, что я пока не пытался собирать apk пакеты для программ, написанных с использованием Python 3, хотя по заявлениям разработчиков Kivy, третий Python полностью поддерживается. Ну, и теперь, собственно, давайте скачаем python-for-android. У меня работает именно эта ветка, поэтому других я не предлагаю. Распакуйте python-for-android.zip и пока забудем о нем.
Зависимости
Их довольно много и от правильной их установки будет зависеть, сможете ли вы собрать заветную apk-шечку или придется выпить валидолу и начать все сначала. Считается, что все вышеперечисленные пакеты у вас отсутствуют и предполагается, что фреймворк Kivy установлен и успешно вами используется.
sudo pip install --upgrade cython
sudo pip install virtualenv
sudo pip install Jinja2
Для сборки пакета под Android нам понадобится Android SDK. Некоторые его двоичные файлы все еще находятся в 32 битных библиотеках, так что нужно сделать их доступными:
dpkg --add-architecture i386После этого можем установить следующие пакеты:
sudo apt-get update
sudo apt-get install -y build-essential ccache git zlib1g-dev python2.7 python2.7-dev libncurses5:i386 libstdc++6:i386 zlib1g:i386 openjdk-7-jdk unzip
Ну, и теперь, наконец, мы готовы сесть в удобное кресло Бульдозера и схватится за рычаги управления. Заходим в папку проекта и выполняем в терминале команду —
buildozer init… которая создаст в проекте файл спецификации buildozer.spec, где мы будем указывать Бульдозеру с какими параметрами собирать наше приложение.

Откроем данный файл и посмотрим его содержимое:
buildozer.spec
[app]

# (str) Title of your application
title = DemoCleanMaster

# (str) Package name
package.name = democleanmaster

# (str) Package domain (needed for android/ios packaging)
package.domain = org.heattheatr

# (str) Source code where the main.py live
source.dir = .

# (list) Source files to include (let empty to include all the files)
source.include_exts = py,png,kv,jpg

# (list) Source files to exclude (let empty to not exclude anything)
#source.exclude_exts = []

# (list) List of directory to exclude (let empty to not exclude anything)
#source.exclude_dirs = []

# (list) List of exclusions using pattern matching
#source.exclude_patterns = license,images/*/*.jpg

# (str) Application versioning (method 1)
version.regex = __version__ = ['"](.*)['"]
version.filename = %(source.dir)s/main.py

# (str) Application versioning (method 2)
# version = 1.2.0

# (list) Application requirements
# comma seperated e.g. requirements = sqlite3,kivy
requirements = kivy
# (str) Custom source folders for requirements
# Sets custom source for any requirements with recipes
# requirements.source.kivy = ../../kivy

# (list) Garden requirements
#garden_requirements =

# (str) Presplash of the application
presplash.filename = %(source.dir)s/Data/Images/presplash.jpg

# (str) Icon of the application
icon.filename = %(source.dir)s/Data/Images/logo.png

# (str) Supported orientation (one of landscape, portrait or all)
orientation = portrait

# (bool) Indicate if the application should be fullscreen or not
fullscreen = 1

#
# Android specific
#

# (list) Permissions
android.permissions = INTERNET

# (int) Android API to use
android.api = 18

# (int) Minimum API required (8 = Android 2.2 devices)
android.minapi = 8

# (int) Android SDK version to use
android.sdk = 21

# (str) Android NDK version to use
android.ndk = 9

# (bool) Use --private data storage (True) or --dir public storage (False)
android.private_storage = False

# (str) Android NDK directory (if empty, it will be automatically downloaded.)
android.ndk_path = /home/zavulon/Opt/android-ndk-r9

# (str) Android SDK directory (if empty, it will be automatically downloaded.)
android.sdk_path = /home/zavulon/Opt/android-sdk

# (str) python-for-android git clone directory (if empty, it will be automatically cloned from github)
android.p4a_dir = /home/zavulon/Opt/Python/python-for-android

# (list) python-for-android whitelist
#android.p4a_whitelist =

# (str) Android entry point, default is ok for Kivy-based app
#android.entrypoint = org.renpy.android.PythonActivity

# (list) List of Java .jar files to add to the libs so that pyjnius can access
# their classes. Don't add jars that you do not need, since extra jars can slow
# down the build process. Allows wildcards matching, for example:
# OUYA-ODK/libs/*.jar
#android.add_jars = foo.jar,bar.jar,path/to/more/*.jar

# (list) List of Java files to add to the android project (can be java or a
# directory containing the files)
#android.add_src =

# (str) python-for-android branch to use, if not master, useful to try
# not yet merged features.
#android.branch = master

# (str) OUYA Console category. Should be one of GAME or APP
# If you leave this blank, OUYA support will not be enabled
#android.ouya.category = GAME

# (str) Filename of OUYA Console icon. It must be a 732x412 png image.
#android.ouya.icon.filename = %(source.dir)s/data/ouya_icon.png

# (str) XML file to include as an intent filters in <activity> tag
#android.manifest.intent_filters =

# (list) Android additionnal libraries to copy into libs/armeabi
#android.add_libs_armeabi = libs/android/*.so
#android.add_libs_armeabi_v7a = libs/android-v7/*.so
#android.add_libs_x86 = libs/android-x86/*.so
#android.add_libs_mips = libs/android-mips/*.so

# (bool) Indicate whether the screen should stay on
# Don't forget to add the WAKE_LOCK permission if you set this to True
#android.wakelock = False

# (list) Android application meta-data to set (key=value format)
#android.meta_data =

# (list) Android library project to add (will be added in the
# project.properties automatically.)
#android.library_references =

#
# iOS specific
#

# (str) Name of the certificate to use for signing the debug version
# Get a list of available identities: buildozer ios list_identities
#ios.codesign.debug = "iPhone Developer: <lastname> <firstname> (<hexstring>)"

# (str) Name of the certificate to use for signing the release version
#ios.codesign.release = %(ios.codesign.debug)s

[buildozer]

# (int) Log level (0 = error only, 1 = info, 2 = debug (with command output))
log_level = 2

# (int) Display warning if buildozer is run as root (0 = False, 1 = True)
warn_on_root = 0

#    -----------------------------------------------------------------------------
#    List as sections
#
#    You can define all the "list" as [section:key].
#    Each line will be considered as a option to the list.
#    Let's take [app] / source.exclude_patterns.
#    Instead of doing:
#
#[app]
#source.exclude_patterns = license,data/audio/*.wav,data/images/original/*
#
#    This can be translated into:
#
#[app:source.exclude_patterns]
#license
#data/audio/*.wav
#data/images/original/*
#
#    -----------------------------------------------------------------------------
#    Profiles
#
#    You can extend section / key with a profile
#    For example, you want to deploy a demo version of your application without
#    HD content. You could first change the title to add "(demo)" in the name
#    and extend the excluded directories to remove the HD content.
#
#[app@demo]
#title = My Application (demo)
#
#[app:source.exclude_patterns@demo]
#images/hd/*
#
#    Then, invoke the command line with the "demo" profile:
#
#buildozer --profile demo android debug
Теперь рассмотрим подробнее…
title = DemoCleanMasterЭто имя приложение, которое будет отображаться на Android девайсе и которое будет носить установочный apk пакет.
package.name = democleanmaster
package.domain = org.heattheatr
Уникальный домен приложения.
source.dir = .Директория, в которой находится точка входа в приложение — файл main.py. По умолчанию это корневая директория проекта.
source.include_exts = py,kv,jpg,pngРасширение файлов, которые будут включены в сборку apk пакета из вашего проекта. Структура дерева директорий, откуда указанные файлы будут браться, сохраняется.
version.regex = __version__ = ['"](.*)['"]
version.filename = %(source.dir)s/main.py
Версия программы и в каком файле ее (версию) искать. Данный метод говорит, что в файле main.py корневой директории проекта должна быть переменная со значением версии вашего приложения.
# main.py

__version__ = '0.0.1'

# ...ваш код
requirements = kivyСторонние библиотеки, которые будут включены в сборку. Через запятую вы можете указать пакеты библиотек, с которыми работает ваше приложение, например: kivy, opencv, pil, sqlite3.
Полный список доступных библиотек вы можете посмотреть в редакторе спецификации в инструменте для построения UI — Kivy Designer. Очень рекомендую!

presplash.filename = %(source.dir)s/Data/Images/presplash.jpgИзображение, которое будет показано на экране девайса пока запускается ваше приложение, где %(source.dir)s — путь к корневой директории проекта.
icon.filename = %(source.dir)s/Data/Images/logo.pngИконка приложения, которая будет отображаться на девайсе.
orientation = portrait
fullscreen = 1
Ориентация вашего приложения на девайсе. Помимо ‘portrait’, может принимать значение ‘landscape’. ‘fullscreen’ указывает разворачивать Activity на весь экран. Также принимает значение ‘0’.
android.permissions = INTERNETПрава приложения.
android.api = 18Используемая приложением версия Android API (должна быть в Android SDK). Здесь могут возникнуть проблемы, если, например, вы указали версию Android API 10, которая отсутствует в Android NDK.
android.minapi = 8Минимальная версия Android API, поддерживаемая приложением.
android.sdk = 21Версия Android SDK.
android.ndk = 9Версия Android NDK.
android.private_storage = FalseУказывает создавать папку с файлами проекта на девайсе на SD карте. Рекомендую. Потому что в данном случае вы можете заменить байткомпилированое представление *.pyo файлов проекта на исходные тексты, и если будет необходимость внести в проект небольшое изменение, вы можете сделать это прямо на девайсе, отредактировав исходники или перезалив их с компьютера.
android.ndk_path = /home/zavulon/Opt/android-ndk-r9
android.sdk_path = /home/zavulon/Opt/android-sdk

android.p4a_dir = /home/zavulon/Opt/Python/python-for-android
Здесь все понятно. Можете сделать следующим образом:
android.ndk_path =
android.sdk_path =
android.p4a_dir =
В таком случае Бульдозер скачает и Android SDK с указанными в спецификации версиями ANDROID API, и Android NDK, и python-for-android, будет скачан Apache-ant, если Бульдозер его не найдет. Также будут скачаны следующие библиотеки и исходники самого Python и модулей:
Да. Все это несколько хлопотно, но делается это один раз. Потом, для сборки проекта, достаточно просто отредактировать файл спецификации buildozer.spec и закинуть его в проект, который мы хотим собрать. Остальные параметры спецификации я не рассматриваю, поскольку пока я их еще сам не использоавл. И, да, параметры для сборки под iOS тоже остаются за траками, потому что я не имею девайса с данной платформой.
Собственно, эй, вы там — закройте двери Бульдозера с той стороны и прочь со взлетной полосы — мы заходим в папку проекта и выполняем в терминале команду начала компиляции:
buildozer android debugПройдет о-о-очень много времени (пригодились сигареты и кофе), прежде чем вы увидите заветное сообщение:
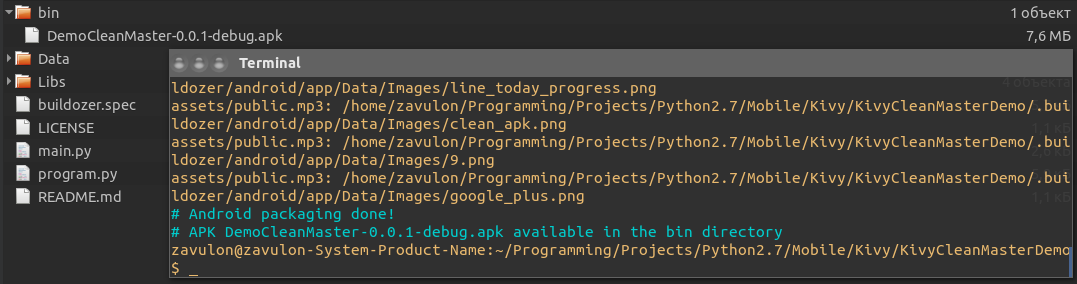
Обратите внимание, что apk-шечка получается дебажная. На Хабре есть статья, в которой описывается процесс создания подписанного пакета. К тому же размер сборки довольно внушительный — 7.6 Мб. Это потому, что Бульдозер включает в сборку весь Python целиком со всеми тестами и не нужными библиотеками. Также сам Kivy включается со всеми API даже если ваше приложение их не использует.
После установки собранного apk на девайсе и его старта, приложение будет довольно долго запускаться. Kivy потребуется время, чтобы извлечь и развернуть все библиотеки. К счачтью, все последующие загрузки программы длятся не более пяти секунд.
В следующей статье я расскажу, за какие рычаги дергать Бульдозер, чтобы увидеть собранный проект, но уже гораздо меньшего размера…

Удачных сборок! Смотрите под траки!
Buildozer is tested on Python 3.8 and above but may work on
earlier versions, back to Python 3.3.
Depending the platform you want to target, you might need more tools installed.
Buildozer tries to give you hints or tries to install few things for
you, but it doesn’t cover every situation.
First, install the buildozer project with:
pip3 install --user --upgrade buildozer
Targeting Android
Android on Ubuntu 20.04 and 22.04 (64bit)
(expected to work as well in later version, but only regularly tested in the latest LTS)
sudo apt update
sudo apt install -y git zip unzip openjdk-17-jdk python3-pip autoconf libtool pkg-config zlib1g-dev libncurses5-dev libncursesw5-dev libtinfo5 cmake libffi-dev libssl-dev
pip3 install --user --upgrade Cython==0.29.33 virtualenv  # the --user should be removed if you do this in a venv

# add the following line at the end of your ~/.bashrc file
export PATH=$PATH:~/.local/bin/
If openjdk-17 is not compatible with other installed programs, for Buildozer the minimum compatible openjdk version is 11.
Android on Windows 10 or 11
To use buildozer in Windows you need first to enable Windows Subsystem for Linux (WSL) and install a Linux distribution: https://docs.microsoft.com/en-us/windows/wsl/install.
These instructions were tested with WSL 1 and Ubuntu 18.04 LTS, and WSL2 with Ubuntu 20.04 and 22.04.
After installing WSL and Ubuntu on your Windows machine, open Ubuntu, run the commands listed in the previous section, and restart your WSL terminal to enable the path change.
Copy your Kivy project directory from the Windows partition to the WSL partition, and follow the Quickstart Instructions. Do not change to the project directory on the Windows partition and build there, this may give unexpected and obscure fails.
For debugging, WSL does not have direct access to USB. Copy the .apk file to the Windows partition and run ADB (Android Debug Bridge) from a Windows prompt. ADB is part of Android Studio, if you do not have this installed you can install just the platform tools which also contain ADB.
- Go to https://developer.android.com/studio/releases/platform-tools and click on “Download SDK Platform-Tools for Windows”.
- Unzip the downloaded file to a new folder. For example, “C:\platform-tools”.
Before Using Buildozer
If you wish, clone your code to a new folder, where the build process will run.
You don’t need to create a virtualenv for your code requirements. But just add these requirements to a configuration file called buildozer.spec as you will see in the following sections.
Before running buildozer in your code folder, remember to go into the buildozer folder and activate the buildozer virtualenv.
Android on macOS
python3 -m pip install --user --upgrade Cython==0.29.33 virtualenv # the --user should be removed if you do this in a venv
TroubleShooting
Aidl not found, please install it.
Buildozer didn’t install a necessary package
~/.buildozer/android/platform/android-sdk/tools/bin/sdkmanager "build-tools;29.0.0"
Then press “y” then enter to accept the license.
Targeting IOS
Install XCode and command line tools (through the AppStore)
Install homebrew (https://brew.sh)
brew install pkg-config sdl2 sdl2_image sdl2_ttf sdl2_mixer gstreamer autoconf automake
Install pip and virtualenv
python3 -m pip install --user --upgrade pip virtualenv kivy-ios
Kivy bulldozer для Windows

Как обычно, для успешной работы с любым фреймворком нужно настроить окружение и установить всё необходимое. И здесь к нам приходит на помощь Kivy bulldozer — инструмент для разработки мобильных приложений на Python с использованием фреймворка Kivy. Он позволяет нам быстро и просто установить и настроить всё необходимое для работы.
Зачем нам Kivy bulldozer для Windows?
Многие Python-разработчики хотят создавать кросс-платформенные мобильные приложения на своём любимом языке. Однако, на Windows это не всегда легко сделать, даже при наличии Kivy.

Здесь и приходит на помощь Kivy bulldozer. Он позволит вам быстро настроить окружение и получить доступ ко всем необходимым инструментам для работы с Kivy на Windows.
Как установить Kivy bulldozer для Windows?
- Первым шагом необходимо установить Python (желательно версии 3.7 и выше) и pip.
- Затем нужно установить необходимые зависимости, включая обновления pip и setuptools.
- Установить Kivy и другие необходимые модули. В этом нам поможет pip.
- Установить Android SDK и NDK, которые нам понадобятся для создания мобильных приложений. Для этого необходимо скачать SDK и NDK с официального сайта Android и установить в нужную директорию на компьютере.
- Теперь можно скачать Kivy bulldozer с официального сайта и установить на свой компьютер. После установки нужно настроить пути для доступа к SDK и NDK. Для этого нужно зайти в меню настроек и указать пути до SDK и NDK.
Как использовать Kivy bulldozer для Windows?
Сначала нужно создать новый проект. Для этого нужно открыть Kivy bulldozer и выбрать New Project. Затем, нужно указать название проекта, путь до директории, где будет создан проект и выбрать тип проекта (консольное приложение, приложение с графическим интерфейсом и т.д.).
После создания проекта, его можно открыть и начать работать. Здесь можно изменять исходный код, добавлять модули, тестировать приложение и многое другое. В Kivy bulldozer есть множество инструментов для разработки, включая редактор кода, консоль, графический симулятор и т.д.
Итог
Kivy bulldozer — удобный и простой инструмент для разработки мобильных приложений на Python с использованием фреймворка Kivy на Windows. Он позволяет быстро и просто установить и настроить окружение, создать новый проект и начать разработку. Если вы хотите разработать кросс-платформенное мобильное приложение на Python, Kivy bulldozer — это то, что вам нужно.
Kivy bulldozer для Windows: как установить и настроить?
Если вы новичок в Kivy, вы вероятно уже задались вопросом, как установить и настроить его на своем компьютере. Киви — это открытая библиотека Python, которая позволяет разрабатывать кросс-платформенные приложения для мобильных устройств и настольных компьютеров. Одним из инструментов, который вы можете использовать при работе с Kivy, является Bulldozer.
Что такое Kivy Bulldozer?

Bulldozer — это готовый к работе набор инструментов для сборки, упаковки и отладки приложений Kivy. Он позволяет создавать экземпляры приложений, которые собраны в один исполняемый файл, который установлен и работает на любом устройстве без необходимости устанавливать Kivy библиотеку.
Как установить Kivy Bulldozer на Windows?
- Киви Бульдозер можно установить на Windows, используя базовое руководство по Windows
- Для начала, необходимо установить Python на ваш компьютер. Вы можете найти последнюю версию Python на официальном сайте (Python.org).
- Кроме того, VС++ Redistributable пакет для Visual Studio также является необходимым для сборки и упаковки приложений. Скачать его можно на сайте Microsoft.
- Когда Python установлен, вы можете начать установку и настройку Kivy и Bulldozer. Сначала запустите команду «pip install kivy» в командной строке. Это установит Kivy на ваш компьютер.
- Затем вы можете установить бульдозер, запустив команду «pip install buildozer».
- Теперь вы готовы к созданию приложения и его упаковке. Ознакомьтесь с документацией Bulldozer, чтобы узнать, как упаковать и отладить ваше приложение.
Как настроить Kivy Bulldozer?

После установки Kivy и Bulldozer на вашем компьютере, следующим шагом является настройка окружения для вашего проекта, чтобы упростить процесс сборки и упаковки вашего приложения. Ниже приведены некоторые основные шаги, которые вы можете выполнить для настройки своего Bulldozer окружения.
- Создайте папку на вашем компьютере для вашего проекта.
- Создайте новый файл в папке вашего проекта и назовите его buildozer.spec.
- Внесите необходимые изменения в файл buildozer.spec для вашего проекта. Это включает определение названия, версии, автора, и других важных параметров проекта
- После того, как вы внесли необходимые изменения в buildozer.spec, запустите команду «buildozer init» в командной строке. Это установит окружение для вашего проекта и загрузит зависимости, необходимые для сборки приложения.
- После того, как установка и загрузка завершены, вы можете запустить сборку приложения, используя команду «buildozer android debug». Это соберет ваше приложение и создаст файл APK для Android.
Итог
Установка и настройка Kivy Bulldozer может быть вызовом для новичков, но мы надеемся, что наша статья помогла вам разобраться с этими технологиями, и вы теперь можете быстро создавать свои собственные кросс-платформенные приложения. Bulldozer — это мощный инструмент, который позволяет разработчикам создавать профессиональное ПО, который может работать на различных платформах — от Android до iOS и настольных ПК.
«Будьте терпеливы, когда настраиваете и упаковываете ваши приложения с Bulldozer и Kivy, и результат может исчисляться в потенциально бесконечном количестве пользователей вашего приложения».
Kivy bulldozer для Windows: как начать работать с фреймворком для мультиплатформенной разработки приложений
Если вы хотите создать приложение для нескольких платформ, Kivy может быть отличным выбором. Kivy позволяет разрабатывать кроссплатформенные приложения для Windows, macOS, Linux, Android и iOS. Используя Python и паттерн проектирования Model-View-Controller, Kivy позволяет быстро создавать интерактивные и интуитивно понятные приложения. В этой статье мы рассмотрим, что такое Kivy bulldozer для Windows и как начать работать с этим фреймворком.
Что такое Kivy bulldozer для Windows?

Kivy bulldozer для Windows — это пакет, который вы можете скачать на свой компьютер для быстрого создания приложений Kivy и удобной работы с ними. Bulldozer дает возможность собирать, публиковать и дистрибутировать ваши приложения на разные платформы. Этот инструментарий удобен для разработчиков, которые предпочитают работать в окружении Windows.
Как начать работать с Kivy bulldozer для Windows?
Чтобы начать работать с Kivy bulldozer для Windows, необходимо выполнить ряд шагов:
- Скачайте и установите Python с официального сайта;
- Скачайте последнюю версию Kivy bulldozer для Windows;
- Установите Kivy bulldozer для Windows, введя команду python -m pip install kivy.deps.sdl2 kivy.deps.glew в командной строке;
- Настраиваем переменные среды:
$Env:CYTHON_CACHE_DIR=»$env:USERPROFILE/.cython_cache»
$Env:GST_PLUGIN_PATH=»$env:PYGST_PATH/lib/gstreamer-1.0″
$Env:PATH=»$env:PYSDL2_DLL_PATH;$env:PYTHONPATH;$env:PATH»
- Начните работу с Kivy!
Чтобы создать новый проект, введите команду buildozer init. Это создаст конфигурационный файл, в котором нужно задать название приложения, версию, разрешения, путь к иконке и другие параметры. Для сборки приложения выполните команду buildozer android debug (для Android), buildozer ios debug (для iOS), buildozer windows debug (для Windows), buildozer macos debug (для macOS) соответственно. Это создаст .apk, .ipa или .exe-файл вашего приложения.
Настройка Kivy bulldozer для Windows
Kivy bulldozer для Windows может быть настроен в соответствии с вашими требованиями. В конфигурационном файле buildozer.spec вы можете настроить различные параметры для вашего приложения, такие как разрешение экрана, специфические функции, требования к версии Python и другие параметры.

Если вы хотите добавить новую библиотеку Python, обнаружил баг или хотите внести передовые инновации пользовательского интерфейса, вы можете отредактировать исходный код Kivy. Исходный код Kivy и bulldozer доступны на Github.
Пример ввода-вывода в Kivy
Рассмотрим простой пример создания приложения в Kivy с использованием разметки (kivy language). Этот код создаст окно с кнопкой и текстовым полем. Имя нашего класса будет MyWindow:
from kivy.app import App
from kivy.uix.boxlayout import BoxLayout
class MyWindow(BoxLayout):
pass
class MyApp(App):
def build(self):
return MyWindow()
MyApp().run()
Создадим файл my.kv, в котором опишем разметку для этого окна:
<MyWindow>
<BoxLayout>
<Label text=»Hello Kivy!» font_size=»20″/>
<Button text=»Click Me!» size_hint_y=None height=50/>
<TextInput></TextInput>
</BoxLayout>
</MyWindow>
Теперь запустим приложение, введя команду python main.py в командной строке:
Вывод
В этой статье мы рассмотрели, что такое Kivy bulldozer для Windows, как начать работать с этим фреймворком, настроить его и создать простое приложение с использованием разметки. Kivy — отличный выбор для разработки кроссплатформенных приложений на основе Python. Если вы только начинаете свой путь как разработчик приложений на Kivy, bulldozer может облегчить вашу работу и ускорить процесс разработки. Приятной работы!
Kivy apps can be used with the Buildozer library to create Android and iOS apps. This article explains how to build a Linux environment with WSL2 and how to install Python 3.12 and Buildozer. If you are having trouble with many errors, please try the installation procedure in this article. If you follow the procedure, you should have no problems.
Contents
- What is Buildozer?
- Using WSL
- Build the Environment for Buildozer
- WSL2 Installation
- How to Start the Ubuntu Terminal Screen
- Python Installed in Ubuntu as Standard
- Installing Python on Ubuntu
- Install the Packages Required for Buildozer
- Creating a Virtual Environment
- Create a Shortcut to the Activated WSL Terminal
- Delete WSL2
- Conclusion
What is Buildozer?
Buildozer is a library that converts Kivy applications into packages for Android and iOS mobile apps, used to package Android apps as APK or AAB format and iOS apps as IPA format.
Buildozer runs on Linux OS and Mac OS. if you want to use it on Windows, you can either build a Linux virtual environment or use WSL provided by Microsoft that can run Linux on Windows. (Windows Subststem for Linux)
Using WSL
Although WSL is basically a command operation, you can use Windows Explorer to access folders and files. Some folders have access restrictions, but it is easy and convenient to use when you want to use them only in specific cases, as in this case.
WSL1 and WSL2 are provided, and with WSL2, GUI operation of the OS and GUI operation of only applications are possible. However, it is sometimes difficult to operate the OS GUI operation due to PC specifications or graphics board. This GUI is not complete, so if you want to use Linux with complete GUI, it is recommended to build a virtual machine (VirtualBox or VMware).
Build the Environment for Buildozer
After a lot of tests, we will use the following environment this time. However, even if you are relieved that the installation is complete, if the dependencies (related libraries) are missing or the configuration file (spec file) is written incorrectly, many errors will occur and the file cannot be created. If the environment is the same, you can convert the mobile app file by following the steps below.
- Windows11
- WSL2
- Ubuntu22.04.5
- Python3.12.7
- Buildozer1.5.1dev0
If you would like to try other versions, please refer to the verification notes I left for you during installation.
WSL2 Installation
Note that the procedure is different for Windows 10. Also, WSL2 will install Ubuntu 24.4.1 (at this time) if you choose the default no install option, but we will install Ubuntu 22.4.5. Version 24 will probably make it difficult to install Buildozer.
Check the Version of WSL2
-
step1
Right-click the Windows Start button and run [Terminal (Administrator)].
PowerShell is launched.
PS C:\Users\user>It appears that WSL is no longer updated by Windows Update, and the following error may occur when executing the install command. Therefore, keep WSL up to date.
Class is not registered. Error Code: Wsl/CallMsi/Install/REGDB_E_CLASSNOTREG -
step2
Windows Subsystem for Linux (WSL) version check
Check the currently installed version of WSL.
wsl --versionWSL version: 2.3.26.0 -
step3
Install the latest WSL
If the “WSL Version” is out of date, download it at the following site.
Select the “latest” version “x64.msi”.


WSL2 Installation Procedure
-
Step1
Right-click the Windows Start button and run [Terminal (Administrator)].
PowerShell will be launched.
PS C:\Users\user> -
Step2
Installation of WSL2
Run the WSL command, specifying the Ubuntu version in the install option.
wsl --install -d Ubuntu-22.04You can also find out which versions are available for installation.
wsl --list --onlineDon’t worry about the following message: WSL2.4.8 or later seems to recommend a tar-based distribution format. tar is a package format used in linux. Legacy distribution is in Appx format package distributed via Microsoft Store.
wsl: Using legacy distribution registration. Consider using tar-based distribution instead. -
Step3
Set Ubuntu login user name
You will be prompted to enter your login user name. *Make a note of it so you don’t forget it.
Enter new UNIX username: -
Step4
Set Ubuntu login password
You will be asked to enter a password, which must be at least 8 characters long due to password restrictions in Ubuntu. Ubuntu recommends a password with a mixture of upper and lower case letters and numbers. Note that if you set a short password, it will not be recognized later and you will have to uninstall the software. Please make a note of the password so that you do not forget it.
New password:You will be asked to enter the password again.
Retype new password: -
Step5
A user with sudo privileges is created.
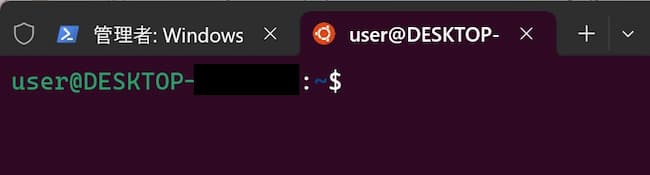
If the display changes as shown below, the installation is complete and a user with sudo privileges has been created. This user is the same as running as an administrator in Windows. This state is the terminal mode of Ubuntu.
User name@PC name:~$ -
Step6
Get the latest information of the package
Get the latest information of Ubuntu packages. Please execute in Ubuntu terminal mode from now on.
sudo apt updateEnter “y” and press “Enter” when a confirmation message is displayed on the way.
[sudo] password for user: -
Step7
Install the latest packages
Update Ubuntu package. Option [-y] skips installation confirmation. Since a significant amount of packages will be installed, it is better to have the [-y] option.
sudo apt upgrade -y
How to Start the Ubuntu Terminal Screen
Right-click the Windows Start button, run “Terminal (Admin)” and select “Ubuntu” from the menu.

Python Installed in Ubuntu as Standard
Python is installed by default on Ubuntu. 22.04.5 has Python 3.10.12 installed in [usr/bin]. Since Ubuntu seems to use Python for other tools, I will leave it as it is and install Python 3.12.
Installing Python on Ubuntu
You can install Python from the Linux install command (apt install), but 3.12.7 is not in the Ubuntu repositories, so we will install from the package.
Python Installation Procedure
-
Step1
Install the Python dependency package.
Run the terminal in Ubuntu mode.
Install the packages required to install Python.
Below is a list of packages that you may need. (Some packages may not be necessary.)
- build-essential: C/C++ compiler (required to build Python)
- zlib1g-dev: compression and decompression
- libgdbm-dev: database-related
- libnss3-dev: security-related
- libssl-dev: SSL/TLS communication
- libreadline-dev: interactive command line editing
- libffi-dev: external function interface
- libsqlite3-dev: SQLite support
- libbz2-dev: support for BZ2 compression format
sudo apt update sudo apt install -y build-essential zlib1g-dev libgdbm-dev libnss3-dev libssl-dev libreadline-dev libffi-dev curl libsqlite3-dev wget libbz2-dev -
Step2
Check the version of the package for Linux from the official Python website
Check the version of Python from the official Python website. In this case, we will install 3.12.7, the last version of 3.12. You do not need to download it here, as it will be downloaded from the command line.
-
Step3
Download Python
Navigate to the folder where you want to save the downloaded files; in Linux, folders are called “directories,” but in this manual they are referred to as “folders” .
cd /usr/local/binDownload Python using the wget command. If you are installing a different version, change it. You will be asked to enter your password on the way.
sudo wget https://www.python.org/ftp/python/3.12.7/Python-3.12.7.tgzPython is now downloaded to [/usr/local/bin].
-
Step4
Extract the compressed file
Extract the downloaded compressed file.
sudo tar xzf Python-3.12.7.tgzYou will not see anything, but the decompression is probably complete.
Move to the folder where you extracted the filecd Python-3.12.7 -
Step5
Install Python
Check the installation environment and build and install. If you want to specify the installation location, specify the option [–prefix=PREFIX].
sudo ./configure --enable-optimizations
sudo make -j $(nproc)
sudo make altinstall
Python is now installed in [/usr/local/bin]. If you are concerned about the remaining downloaded files, delete them with the rm command.
sudo rm -r /usr/local/bin/Python-3.12.7.tgz -
Step6
Confirmation of installation
Check the Python version.
python3.12 --versionConfirm that the version you have installed is displayed.
-
Step7
Change the default Python version
Use the update-alternatives command to register Python 3.10 and 3.12 so that you can switch between them.
sudo update-alternatives --install /usr/bin/python3 python3 /usr/local/bin/python3.12 2 sudo update-alternatives --install /usr/bin/python3 python3 /usr/bin/python3.10 1 sudo update-alternatives --config python3 -
Step8
Register default Python
Make sure to use 3.12 by default.
Enter “0” and press “Enter”.
Selection Path Priority Status ------------------------------------------------------------ 0 /usr/local/bin/python3.12 2 auto mode 1 /usr/bin/python3.10 1 manual mode * 2 /usr/local/bin/python3.12 2 manual mode Press <enter> to keep the current choice[*], or type selection number: -
Step9
Confirmation of python3 command
Check if 3.12 can be used with the python3 command. Be careful, otherwise it will not work later.
python3 --versionConfirm that the version is shown as 3.12.7.
Python 3.12.7
Install the Packages Required for Buildozer
Install the packages required by Buildozer.
Procedure for installing packages required by Buildozer
-
Step1
Packages required by Buildozer
The following is a list of packages that may be required. (There may be some packages that you do not need.)
- Java Development Kit (JDK): JDK is required for Android build.
- Git: Install Python packages directly from the Git repository
- Python Dev Header: Python development header is required
- SDL2 library: Multimedia library that Kivy depends on
- Zlib: Library required for compression
- Autoconf: Required for building Android dependencies
- libtool: Required to build Android dependencies
- unzip: unzipping
- libncurses5-dev: screen control
sudo apt update
sudo apt install -y openjdk-17-jdk python3-dev libsdl2-dev libsdl2-image-dev libsdl2-mixer-dev libsdl2-ttf-dev autoconf cmake automake libtool pkg-config unzip zip python3-venv python3-pip libtinfo5 libncurses5-dev
Creating a Virtual Environment
Create a virtual environment. At this time, installing Buildozer from pip will install 1.5.0, but since it includes libraries deprecated in Python 3.12, install 1.5.1dev0 from GitHub.
Virtual environment creation procedure
-
Step1
Create a virtual environment folder
Go to the user folder. This folder is an unprivileged folder and will be the current folder of the console. You can easily refer to it by typing the tilde as shown below.
cd /home/ < User Name >
cd ~Create a virtual environment folder with the venv command. Here we use “venv-py312”.
python3 -m venv < virtual environment folder name >
python3 -m venv venv-py312The specified folder is created in [home/username].
-
Step2
Activate the virtual environment
Activate the virtual environment with activate.
source /home/ < User Name > / < virtual environment folder name > /bin/activate
source /home/user/venv-py312/bin/activateAfter activating, “(virtual environment folder name)” will be appended to the command line display, and you will be in virtual environment mode.
(venv-py312) < User Name > @ < PC Name > :~$The virtual environment session is disconnected when the console screen is closed, so it is necessary to ACTIVATE each time the console is launched.
The following chapter shows you how to create a shortcut to start the terminal in an ACTIVATED state.
-
Step3
Update pip package
From now on, run in virtual environment mode.
Update the pip library to the latest version.
pip install --upgrade pip -
Step4
Install buildozer and related libraries
Install buildozer1.5.1.dv0 and necessary libraries.
pip install kivy cython python-for-android pip install git+https://github.com/kivy/buildozer.git pip install --upgrade buildozer python-for-android -
Step5
Check the installed libraries
Check to see if the libraries have been successfully installed.
pip listThe following information is displayed.
Package Version ------------------ ----------- appdirs 1.4.4 build 1.2.2.post1 buildozer 1.5.1.dev0 certifi 2024.8.30 charset-normalizer 3.4.0 colorama 0.4.6 Cython 0.29.37 docutils 0.21.2 idna 3.10 Jinja2 3.1.4 Kivy 2.3.0 Kivy-Garden 0.1.5 MarkupSafe 3.0.2 packaging 24.2 pexpect 4.9.0 pip 24.3.1 ptyprocess 0.7.0 Pygments 2.18.0 pyproject_hooks 1.2.0 python-for-android 2024.1.21 requests 2.32.3 setuptools 59.6.0 sh 1.14.3 toml 0.10.2 tomli 2.2.1 urllib3 2.2.3 -
Step6
To exit virtual environment mode
To exit from the virtual environment mode, execute the deactivate command.
deactivate
Create a Shortcut to the Activated WSL Terminal
Since it is troublesome to activate the virtual environment every time, this section describes how to create a shortcut for the WSL terminal in the activated state.
Please note that the names of buttons and items in the Window described below may be different from the names of the buttons and items in the Window.
Shortcut creation procedure
-
Step1
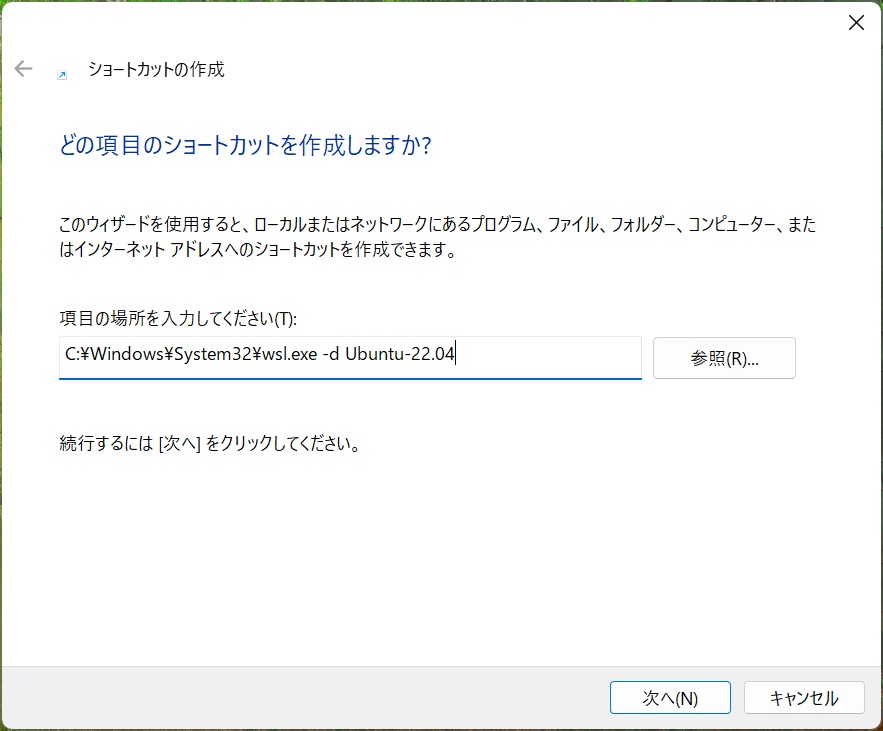
Enter the source of the shortcut
Right-click anywhere on the desktop, etc. New > Create Shortcut > Create Shortcut screen, enter the following information, and press the [Next] button.
C:\Windows\System32\wsl.exe -d Ubuntu-22.04
-
Step2
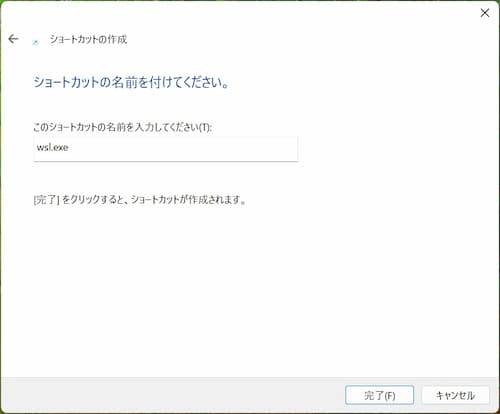
Enter a name for the shortcut
Enter a name for the shortcut.
-
Step3
Enter a working folder
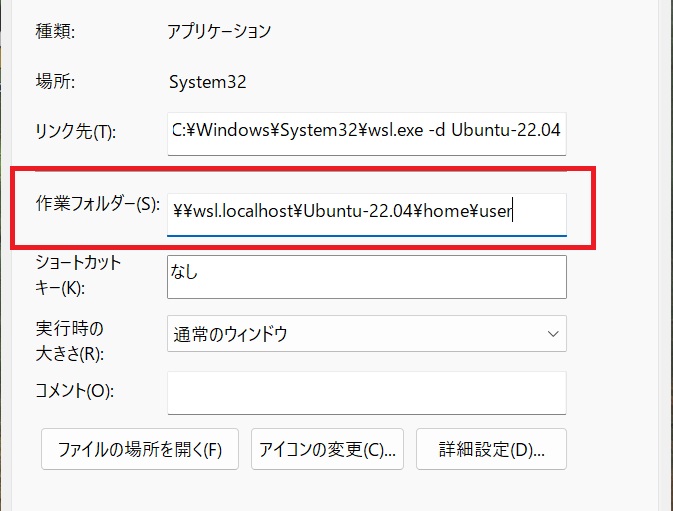
Right-click on the created shortcut > select Properties, enter the following in the [Working Folder] field, and press the [Apply] button. (Enter your Ubuntu user folder)
\\wsl.localhost\Ubuntu-22.04\home\ < User Name >
-
Step4
Set the icon
Launch the shortcut properties screen again, press the [Change Icon] button, enter the following in the [Search for icons in this file] field and press [Enter].
In this case, the icon is set to the Linux penguin, but you can set any icon you like.
C:\Windows\System32\wsl.exeSelect Penguin in the [Select an icon from the list below] field and press [OK].
-
Step5
Access Ubuntu from Windows Explorer
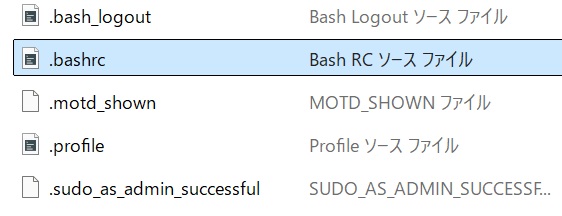
Access Ubuntu from Windows Explorer and go to the following folder and open the bash file.
If you open the file with VSCode, a warning message will appear, but press the [Allow] button.
\wsl.localhost\Ubuntu-22.04\home\ < user_name >

-
Step6
Edit the bash file
Add the following to the last line of the bash file and save it.
The “venv-py312” part is the name of the virtual environment folder. If you have chosen a different name, change it in two places.
if [ -d "$HOME/venv-py312/" ]; then source "$HOME/venv-py312/bin/activate" fi -
Step7
Launch the shortcut
Start from the shortcut you created and check that you are in virtual environment mode.
Delete WSL2
If you want to delete WSL2, it is easy to do so. all data on Ubuntu will be deleted, soplease moveimportantdata to Windows.
How to delete WSL2
-
Step1
Launch Poser Shell.
Right-click the Windows Start button and start Power shell from [Terminal (Administrator)], then execute the following command: “Unregister. This operation has been completed successfully. Confirm the message “This operation was completed successfully.
If you installed without specifying the version of Ubuntu, only “ubuntu” will be used.
wsl --unregister ubuntu-22.04 -
Step2
Launch the installed application screen.
From the Windows Start button, launch the [Settings] > [Apps] > [Installed Apps] screen from the left menu.
-
Step3
Remove Ubuntu
- Enter “ub” in the search field.
- Press the button marked […].
- Select [Uninstall].
- Confirm the message “Deleted”.


Conclusion
We have described how to set up a Linux and Python environment with MSL2. I spent 4 days to try one library. And it’s been four days since I made my Ubuntu debut! Please forgive me if there are some funny expressions. In the next article, I will explain how to create APK and AAB for Android applications using Buildozer.