

A400 SSD (SA400)
A400 SSD (SA400)
-
Resources
-
PCN
-
Videos
-
FAQ
-
Contact us

1:10
How to install an M.2 SSD in a desktop PC

1:29
How to install a 2.5″ SATA SSD in a laptop

1:30
How to Install a 2.5″ SATA SSD in a Desktop PC

1:29
How to install an M.2 SSD in a laptop
1. Download Kingston SSD Manager from https://www.kingston.com/support/technical/ssdmanager to confirm if there is a firmware update available for your drive, and if so, apply the update (if recommended).
2. Consult your system manufacturer’s support page to confirm if there is a BIOS update available for your system.
3. Confirm you’re running the latest version of your operating system and ensure that you don’t have any pending updates.
4. Confirm you are running the latest drivers for your system. You can do this by visiting your system manufacturer’s support page and looking for the latest driver updates.
If you’re still encountering issues with your system after these steps, please contact Kingston Technical Support.
FAQ: KSD-012010-001-21
This is common for flash storage, whether internal SSD or external USB storage. It is due in part to a variance in how flash memory vs spinning platter hard drive manufacturers calculate megabyte. Hard drive manufacturers calculate a megabyte (or 1,000×1,000 bytes) as 1,000KBs, whereas the binary calculation for flash-based storage is 1,024KBs.
Example: For a 1TB flash-based storage device, Windows will calculate it as having a capacity of 931.32GB. (1,000,000,000,000÷1,024÷1,024÷1,024=931.32GB).
Furthermore, Kingston reserves some of the listed capacity for formatting and other functions, such as firmware and/or controller-specific information, and thus some of the listed capacity is not available for data storage.
FAQ: KDT-010611-GEN-06
SSDs do not require defragmentation.
Since they do not contain a physical disk, there is no need to organise the data in order to reduce seek time.
Therefore defragmenting an SSD is not effective.
Also, defragmenting an SSD can put undue wear on specific areas of the drive.
SSDs are designed to write data as evenly as possible over the entire drive to reduce undue wear to any one location.
Defragmenting your SSD drive a couple of times will not harm it.
However, if it is done continuously over a long period, it may reduce the life of the drive.
FAQ: KSD-011411-GEN-03
Kingston SATA III (6Gb/s) drives are backwards compatible to SATA II (3Gb/s) ports. However, the Kingston SATA III drive will be limited to SATA II performance. Unfortunately, we cannot guarantee the Kingston SATA III will function on a SATA I port.
FAQ: KSD-012010-001-10
In Windows — Open the control panel, open administrative tools and then open computer management. Click on Disk Management and see if the SSD drive is seen in the right window pane. If it is, right click on where it is labeled as disk 1, disk 2, etc and select «Initialise disk» (this may come up automatically when you go to Disk Management). Next, right-click on the area to the right of the disk label and choose «New Simple Volume». Continue with the wizard by choosing the size, drive letter and formatting of the partition.
In macOS — A «disk insertion» window will appear. Click on the «initialize» button. This will take you to the disk utility. Select the Kingston drive from the list of drives on the left side of the Window. From the actions available, choose partition. For the «Volume Scheme», choose «1 partition». For the format, choose MacOS extended for a permanent drive. Choose ExFAT for an external drive (available on MacOS 10.6.6 and above). Click Apply. A warning windows will appear stating you will erase all data from the drive. Click on the partition button at the bottom.
FAQ: KSD-060314-GEN-14
Our SATA III (6Gbit/s) SSDs are tested to be backwards compatible to SATA II (3Gbit/s). They are not designed or tested to be backwards compatible with SATA I ports (1.5Gbit/s). Most systems made before 2008 used SATA I ports. Our SSDs will likely not work in these systems.
FAQ: KSD-022714-LSI-03
When the SSD is recognised in the BIOS, but the Windows 7 installation does not detect the drive:
Follow these steps:
Disconnect any other hard drives or SSDs. Boot the Windows 7 installation disk. Choose repair, then advanced, then command prompt. Type: «diskpart» without quotes and press Enter. You will see a prompt labeled «diskpart». Type the following commands and press Enter after each one.
Diskpart > Select Disk 0
Diskpart > Clean
Diskpart > Create Partition Primary Align=1024
Diskpart > Format Quick FS=NTFS
Diskpart > List Partition
Diskpart > Active
Diskpart > Exit
Then, reboot the computer to the Windows 7 installation disk.
KSD-100214-GEN-20
FAQ: KSD-100214-GEN-20
To determine which NVMe driver is in use, you can run the AS SSD benchmark tool and select your Kingston NVMe SSD from the drop-down menu. This will report the driver being used for that drive. If the driver is «iaStorAC», then your drive is using the Intel driver. If the driver is «stornvme», then your drive is using the Microsoft driver. Please note: Kingston’s NVMe SSD drives are plug and play and therefore we do not provide additional drivers.
FAQ: KSD-001525-001-00
Kingston SATA III (6Gb/s) drives are backwards compatible to SATA II (3Gb/s) ports. However, the Kingston SATA III drive will be limited to SATA II performance. Unfortunately, we cannot guarantee the Kingston SATA III will function on a SATA I port.
FAQ: KSD-012010-001-10
For best performance and reliability, Kingston recommends avoiding any power-splitting Molex cables, and instead using the standard 15-pin SATA connector which is usually directly connected to the power supply.
FAQ: KSD-012010-001-09
The easiest way to ensure that your new SSD appears as your boot drive is to ensure that it is the only storage device connected during installation.
If this is not possible, or if you previously cloned your old data to your new drive, confirm that the new drive appears as a boot device in the system BIOS, then select it for booting.
FAQ: KSD-012010-001-03
- AHCI stands for Advanced Host Controller Interface and is a technical standard that allows software to communicate with SATA devices. It offers features not available in older IDE modes.
- AHCI is important because it allows for increased SATA drive performance through Native Command Queueing (NCQ), reduced latency, and the ability to hot-swap drives connected to the SATA bus.
- To confirm that your SATA drive is running in AHCI mode, you need to enter your Computer’s BIOS (often Del, F2, F10, or F12), locate the SATA or Storage Configuration menu and confirm “AHCI” mode is enabled.
- If you have already installed your operating system, and your BIOS indicates that IDE mode is enabled, your SSD will still function, but may not be operating at peak performance.
- Kingston does not recommended changing from IDE to AHCI mode within the BIOS if your operating system is already installed, as this modification may cause the operating system not to boot.
FAQ: KSD-012010-001-08
First, you should confirm that the SSD is seen within the system BIOS. Enter your BIOS (usually, Del, F2, F10, or F12 key) and navigate through your storage configuration menu(s) to see if the drive is correctly identified and present. If the drive isn’t present, power off the system, check the installation and connections to confirm the drive is seated and/or connected properly.
If the drive is present in the BIOS, you may need to initialise the disk within the operating system.
For Windows:
Step 1: Confirm the drive is properly attached, and power on the system, then boot into Windows OS.
Step 2: Press Windows + X and choose Disk Management.
Step 3: If the SSD is new and not initialised, a popup will appear saying «Initialize Disk».
Step 4: Choose between: MBR (Master Boot Record): Suitable for drives under 2TB and older systems. GPT (GUID Partition Table): Recommended for modern systems and drives larger than 2TB.
Step 5: Click OK to initialize the disk.
Step 6: Once initialised, you’ll see the SSD as «Unallocated». Right-click on it and select New Simple Volume.
Step 7: Follow the on-screen prompts (keeping all defaults is Okay) to format and assign a drive letter to the SSD.
For macOS:
Step 1: Confirm the drive is properly attached, and power on the system, then boot into Mac OS.
Step 2: Open Disk Utility (you can find it using Spotlight with Cmd + Space and then typing «Disk Utility»).
Step 3: In the left pane, select your SSD.
Step 4: Click on Erase.
Step 5: Provide a name for the drive, and under Format, choose: APFS for newer Macs and SSDs. Mac OS Extended (Journaled) for older systems or HDDs.
Step 6: Click Erase. Once the process completes, the SSD will be ready for use.
For Linux:
Step 1: Confirm the drive is properly attached, and power on the system, then boot into Linux OS.
Step 2: Open a terminal.
Step 3: Enter sudo fdisk -l to list all connected drives. Identify your SSD by its size and note the device name, e.g., /dev/sdb.
Step 4: Initialize the SSD using fdisk or parted. Here’s a basic guide using fdisk: Enter sudo fdisk /dev/sdb (replace /dev/sdb with your SSD’s device name). Press g to create a new GPT partition table. Press n to create a new partition. Follow the prompts to specify the size and type. Press w to write the changes.
Step 5: Format the new partition on the SSD (e.g., /dev/sdb1). You can format it with the filesystem of your choice: For ext4: sudo mkfs.ext4, For ext3: sudo mkfs.ext3 /dev/sdb1 /dev/sdb1, For FAT32: sudo mkfs.vfat /dev/sdb1
Step 6: Mount the SSD: Create a mount point: sudo mkdir /mnt/myssd, Mount the SSD: sudo mount /dev/sdb1 /mnt/myssd, Remember to replace /dev/sdb1 with your SSD’s partition name.
FAQ: KSD-012010-001-15
Certain motherboards restrict SATA ports when other devices are populated elsewhere on the motherboard. For example, a SATA connector may be disabled when using an NVMe or M.2 SATA-based SSD in the M.2 slot on your motherboard. Consult your motherboard support documentation and review the storage installation section and/or charts.
FAQ: KSD-012010-001-17
There are a variety of external enclosures available on the market. While Kingston aims to be compatible with all system types, occasionally, there may be an incompatibility. If you continue to have trouble with your external SSD enclosure, you may want to try a different enclosure.
FAQ: KSD-012010-001-18
Secure Erase User Guide for Linux
This guide will walk you through securely erasing your Kingston SSD using Linux tools.
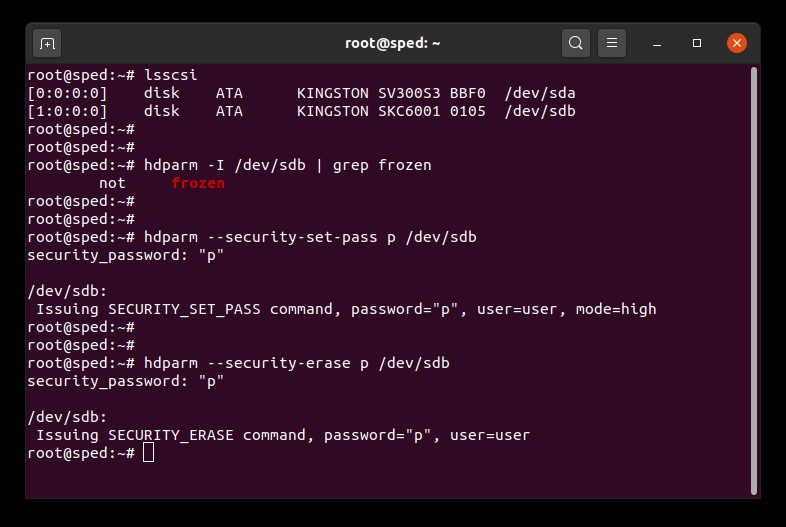
SATA Secure Erase Procedure
Warning
Please make sure to have a full backup of any important data before you proceed!
Prerequisites
- You must have root privileges.
- You must have your SSD connected to the system as a secondary (non-OS) drive.
- You must have lsscsi and hdparm installed. You may need to install them with your distribution’s package manager.
- Your drive must not be in a security freeze.
- Your drive must not be password protected.
Instructions
1. Find the device name (/dev/sdX) of the drive you wish to erase:
# lsscsi
2. Make sure drive security is not frozen:
# hdparm -I /dev/sdX | grep frozen
If the output shows «frozen» (instead of «not frozen») then you cannot continue to the next step. You must try to remove the security freeze by trying one of the following methods:
Method 1:
Put the system to sleep (suspend to RAM) and wake it up. On most distributions the command to suspend is:
# systemctl suspend
Now issue the hdparm command again. If it worked the output will show «not frozen» (instead of «frozen»).
Method 2:
Hot plug the drive. This is done by physically unplugging the SATA power cable from the drive and plugging it back in while the system is powered on. You may need to enable hot plug in BIOS. Not all systems support hot plug.
Now issue the hdparm command again. If it worked the output will show «not frozen» (instead of «frozen»).
3. Set a user password on the drive. The password can be anything. Here we are setting the password to «p»:
# hdparm --security-set-pass p /dev/sdX
4. Issue the secure erase command to the drive using the same password: 1234567890 — 1234567890 —
# hdparm --security-erase p /dev/sdX
This command may take a few minutes to complete. The drive password is removed upon successful completion.
If the secure erase is interrupted or otherwise fails your drive may become security locked. In this case you can remove the security lock using the command below and then try the secure erase procedure again:
# hdparm --security-disable p /dev/sdX
SATA Secure Erase Example
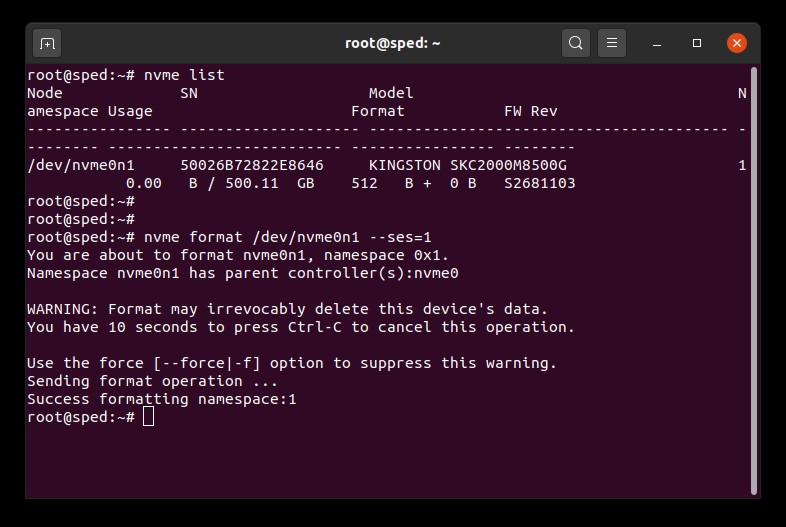
NVMe Secure Erase Procedure
Warning
Please make sure to have a full backup of any important data before you proceed!
Prerequisites
- You must have root privileges.
- You must have your SSD connected to the system as a secondary (non-OS) drive.
- You must have nvme-cli installed. You may need to install it with your distribution’s package manager.
- Your drive must not be password protected.
Instructions
1. Find the device name (/dev/nvmeXn1) of the drive you wish to erase:
# nvme list
2. Issue the format command to the drive. Here we set the secure erase setting to 1 which indicates a user data erase:
# nvme format /dev/nvmeXn1 --ses=1
This command may take a few minutes to complete.
NVMe Secure Erase Example
FAQ: KSM-SE-LIX
First, open an Elevated Command Prompt window.
To open an Elevated Command Prompt window: Click on Start Orb > Type «CMD.exe» in Search box > Right click on «CMD» and select «Run as Administrator» (If you receive a prompt confirmation, click YES)
To verify that the TRIM command is enabled, type the following and press enter in the Elevated command:
fsutil behavior query disabledeletenotify
The results will be as follows:
DisableDeleteNotify = 1 (Windows TRIM commands are disabled)
DisableDeleteNotify = 0 (Windows TRIM commands are enabled)
To enable the TRIM command,type the following and press enter in the Elevated command:
fsutil behavior set disabledeletenotify 0
To disable the TRIM command,type the following and press enter in the Elevated command:
fsutil behavior set disabledeletenotify 1
FAQ: KSD-072211-GEN-18
Kingston realises the importance of keeping our customers’ personal data and information confidential and secure.
Kingston takes measures to ensure the security of all of our customers’ personal information when a Solid State Drive (SSD) is returned to our RMA facility for warranty replacement or repair.
When an SSD reaches our repair centre, it will undergo a thorough testing process.
During the first phase of testing, an ATA Secure Erase is performed on the SSD, which erases all data and information.
ATA Secure Erase is federally approved by the National Institute of Standards and Technology (NIST 800-88) for legal sanitisation of confidential user data.
If the SSD is not in a functional state and not capable of undergoing an ATA Secure Erase, the SSD is dismantled and the NAND Flash Memory is destroyed.
FAQ: KSD-022411-GEN-15
Any of our SSDs can be used in RAID.
However, due to endurance specifications, only certain part numbers should be used in RAID. For servers, please contact Kingston to determine the best Kingston SSD to use for your workload.
FAQ: KSD-052511-GEN-17
Self-Monitoring Analysis and Reporting Technology (SMART) is a built-in monitoring capability in hard drives and SSDs.
It can allow users to monitor the health of a device.
It does this through monitoring software designed specifically for the SMART feature. All of our SSDNow drives support SMART.
FAQ: KSD-011411-GEN-10
SSD firmware is the integrated software within an SSD that manages its operations, including communication with the host system, data storage and retrieval, wear levelling and error correction. Kingston recommends that you always maintain the latest firmware.
If your SSD requires new firmware, you will receive a notification when running Kingston’s SSD Manager software, located here: www.kingston.com/ssdmanager
FAQ: KSD-012010-001-11
Self-Monitoring Analysis and Reporting Technology (SMART) is a built-in monitoring capability in hard drives and SSDs.
It can allow users to monitor the health of a device.
It does this through monitoring software designed specifically for the SMART feature. All of our SSDNow drives support SMART.
FAQ: KSD-011411-GEN-10
Trim and garbage collection are technologies that modern SSDs incorporate to improve both their performance and endurance. When your SSD is fresh out of the box, all of the NAND blocks are empty so the SSD can write new data to the empty blocks in a single operation. Over time, most of the empty blocks will become used blocks that contain user data. In order to write new data to used blocks, the SSD is forced to perform a read-modify-write cycle. The read-modify-write cycle hurts the SSD’s overall performance because it must now do three operations instead of a single operation. The read-modify-write cycle also causes write amplification, which hurts the SSD’s overall endurance.
Trim and garbage collection can work together to improve SSD performance and endurance by freeing up used blocks. Garbage collection is a function built into the SSD controller that consolidates data stored in used blocks in order to free up more empty blocks. This process happens in the background and is completely handled by the SSD itself. However, the SSD may not know which blocks contain user data and which blocks contain stale data that the user has already deleted. This is where the trim function comes in. Trim allows the operating system to inform the SSD that data has been deleted so that the SSD can free up those previously used blocks. For trim to work, both the operating system and the SSD must support it. Most modern operating systems and SSDs support trim, although most RAID configurations do not.
Kingston SSDs take advantage of both garbage collection and trim technologies in order to maintain the highest possible performance and endurance over their lifetime.
Learn More
FAQ: KSD-011411-GEN-13
ElectroStatic Discharge, ESD is simply the discharge of built-up static electricity. ESD should not be taken lightly as this is one of the few things that an individual can do to damage or destroy their computer or hardware components. It is like when you rub your feet on the carpet and you touch something metal. ESD can occur without the user feeling a shock and will occur when only working on the inside of the computer or handling hardware.
How to help prevent ESD
The best method of preventing ESD is to use an ESD wrist strap or an earthing mat or table. However, because most users do not have access to these items, we have included the below steps to help reduce the chance of ESD as much as possible.
- Standing – We recommend that you are standing at all times when working on the computer. Sitting on a chair can generate more electrostatic.
- Cables – Make sure that everything is removed from the back of the computer (power cable, mouse, keyboard, etc).
- Clothes – Do not wear any clothing that conducts a lot of Electrical Charge, such as a wool jumper.
- Accessories – To help reduce ESD and prevent other problems, it is also a good idea to remove all jewellery.
- Weather – Electrical storms can increase the ESD risk; unless absolutely necessary, try not to work on a computer during an electrical storm. In very dry areas, the air itself becomes a part of the electrostatic build-up mechanism every time there is an air flow (wind, air conditioning, blower) passing over an insulated surface. Do not let high humidity levels build false confidence, and beware of corrosion problems with interconnects and other electrical interfaces.
To learn more about ESD and how to protect your electronics, please refer to the below site.
ESD Association
https://www.esda.org
FAQ: KTC-Gen-ESD
- AHCI stands for Advanced Host Controller Interface and is a technical standard that allows software to communicate with SATA devices. It offers features not available in older IDE modes.
- AHCI is important because it allows for increased SATA drive performance through Native Command Queueing (NCQ), reduced latency, and the ability to hot-swap drives connected to the SATA bus.
- To confirm that your SATA drive is running in AHCI mode, you need to enter your Computer’s BIOS (often Del, F2, F10, or F12), locate the SATA or Storage Configuration menu and confirm “AHCI” mode is enabled.
- If you have already installed your operating system, and your BIOS indicates that IDE mode is enabled, your SSD will still function, but may not be operating at peak performance.
- Kingston does not recommended changing from IDE to AHCI mode within the BIOS if your operating system is already installed, as this modification may cause the operating system not to boot.
FAQ: KSD-012010-001-08
Kingston SATA III (6Gb/s) drives are backwards compatible to SATA II (3Gb/s) ports. However, the Kingston SATA III drive will be limited to SATA II performance. Unfortunately, we cannot guarantee the Kingston SATA III will function on a SATA I port.
FAQ: KSD-012010-001-10
When cloning to a new drive larger than the source drive, the software may not properly scale partition size. When this occurs, you might end up with unused space. To avoid this, follow our cloning instructions located here: www.kingston.com/cloning
FAQ: KSD-012010-001-04
Kingston SSD Manager (KSM) is ending support for Microsoft Windows 7. The latest version of KSM with Windows 7 support is v1.1.2.5. If you are using Windows 7 and experience complications with KSM, please make sure you have AHCI mode enabled in BIOS and install the latest Intel RST storage driver provided by your system manufacturer. If you still need assistance, feel free to contact our Kingston Technical Support department.
FAQ: KSM-001125-001-00
Your system may be loading the Intel RST driver instead of the Microsoft NVMe driver. There is a known compatibility issue with the Intel RST driver that interferes with NVMe firmware update commands. Additionally, KSM is only supported on Windows-based systems. Therefore, if you are attempting to run KSM on a macOS or Linux-based system, unfortunately these operating systems are not compatible with KSM.
FAQ: KSM-001125-002-01
Kingston SSD Manager 1.1.2.6 will not offer firmware updates for NVMe SSDs until IEEE 1667 support has been disabled. In order to complete the firmware update you must do the following:
1. First, we recommend you backup your data.
2. Then use a secondary system to complete a REVERT using the PSID on the drive label. Note: Performing a REVERT will securely erase all data on the drive.
3. Disable IEEE 1667 support
4. The firmware update will become available upon refresh or restart of KSM
FAQ: KSM-001125-001-01
Caution! The workarounds below will break RST RAID arrays and could lead to data loss. If your system has RST RAID arrays you should consider an alternate solution.
Workaround 1: Disable RST Control in BIO
This workaround requires BIOS options to enable or disable RST Control and is not available on all systems
Note: Please backup all important data before you proceed!
- Restart and enter the system BIOS
- Locate the RST Configuration settings in BIOS
- Change «RST Controlled» to «Not RST Controlled»
- Save and exit BIOS
- Open KSM and update the drive firmware
Once these steps are completed you may optionally switch back to «RST Controlled» in BIOS.
Workaround 2: Switch from RAID to AHCI in BIOS
This workaround is to change your system storage mode from RAID to AHCI and should work on all systems.
Note: Please backup all important data before you proceed!
- Open msconfig
- Select the Boot tab
- Check Safe boot (minimal)
- Click OK and Restart
- When the system restarts go into the system BIOS
- Change the storage mode from RAID to AHCI
- Save and exit BIOS
- Wait for Windows to boot into safe mode
- Open msconfig
- Select the Boot tab
- Uncheck Safe boot
- Click OK and Restart
- Wait for Windows to boot normally
- Open KSM and update the drive firmware
Once these steps are completed you may optionally switch the storage mode back to RAID in BIOS.
FAQ: KSD-001525-001-01
SSD firmware is the integrated software within an SSD that manages its operations, including communication with the host system, data storage and retrieval, wear levelling and error correction. Kingston recommends that you always maintain the latest firmware.
If your SSD requires new firmware, you will receive a notification when running Kingston’s SSD Manager software, located here: www.kingston.com/ssdmanager
FAQ: KSD-012010-001-11
Kingston does not offer DOS-based firmware updates at this time.
FAQ: KSD-012010-001-12
Unless explicitly indicated, no, an SSD update will not erase data from the drive. However, before performing any SSD firmware updates, Kingston recommends all data on the target drive be backed up before proceeding with the firmware update.
FAQ: KSD-012010-001-13
While it may be possible to update your target drive’s firmware via USB storage enclosure, Kingston does not recommend it. Proper update procedure involves having your target SSD connected directly to the system ports (e.g., SATA or NVMe).
FAQ: KSD-012010-001-14
When cloning to a new drive larger than the source drive, the software may not properly scale partition size. When this occurs, you might end up with unused space. To avoid this, follow our cloning instructions located here: www.kingston.com/cloning
FAQ: KSD-012010-001-04
For best performance and reliability, Kingston recommends avoiding any power-splitting Molex cables, and instead using the standard 15-pin SATA connector which is usually directly connected to the power supply.
FAQ: KSD-012010-001-09
- AHCI stands for Advanced Host Controller Interface and is a technical standard that allows software to communicate with SATA devices. It offers features not available in older IDE modes.
- AHCI is important because it allows for increased SATA drive performance through Native Command Queueing (NCQ), reduced latency, and the ability to hot-swap drives connected to the SATA bus.
- To confirm that your SATA drive is running in AHCI mode, you need to enter your Computer’s BIOS (often Del, F2, F10, or F12), locate the SATA or Storage Configuration menu and confirm “AHCI” mode is enabled.
- If you have already installed your operating system, and your BIOS indicates that IDE mode is enabled, your SSD will still function, but may not be operating at peak performance.
- Kingston does not recommended changing from IDE to AHCI mode within the BIOS if your operating system is already installed, as this modification may cause the operating system not to boot.
FAQ: KSD-012010-001-08
There are a variety of external enclosures available on the market. While Kingston aims to be compatible with all system types, occasionally, there may be an incompatibility. If you continue to have trouble with your external SSD enclosure, you may want to try a different enclosure.
FAQ: KSD-012010-001-18
Certain motherboards restrict SATA ports when other devices are populated elsewhere on the motherboard. For example, a SATA connector may be disabled when using an NVMe or M.2 SATA-based SSD in the M.2 slot on your motherboard. Consult your motherboard support documentation and review the storage installation section and/or charts.
FAQ: KSD-012010-001-17
First, you should confirm that the SSD is seen within the system BIOS. Enter your BIOS (usually, Del, F2, F10, or F12 key) and navigate through your storage configuration menu(s) to see if the drive is correctly identified and present. If the drive isn’t present, power off the system, check the installation and connections to confirm the drive is seated and/or connected properly.
If the drive is present in the BIOS, you may need to initialise the disk within the operating system.
For Windows:
Step 1: Confirm the drive is properly attached, and power on the system, then boot into Windows OS.
Step 2: Press Windows + X and choose Disk Management.
Step 3: If the SSD is new and not initialised, a popup will appear saying «Initialize Disk».
Step 4: Choose between: MBR (Master Boot Record): Suitable for drives under 2TB and older systems. GPT (GUID Partition Table): Recommended for modern systems and drives larger than 2TB.
Step 5: Click OK to initialize the disk.
Step 6: Once initialised, you’ll see the SSD as «Unallocated». Right-click on it and select New Simple Volume.
Step 7: Follow the on-screen prompts (keeping all defaults is Okay) to format and assign a drive letter to the SSD.
For macOS:
Step 1: Confirm the drive is properly attached, and power on the system, then boot into Mac OS.
Step 2: Open Disk Utility (you can find it using Spotlight with Cmd + Space and then typing «Disk Utility»).
Step 3: In the left pane, select your SSD.
Step 4: Click on Erase.
Step 5: Provide a name for the drive, and under Format, choose: APFS for newer Macs and SSDs. Mac OS Extended (Journaled) for older systems or HDDs.
Step 6: Click Erase. Once the process completes, the SSD will be ready for use.
For Linux:
Step 1: Confirm the drive is properly attached, and power on the system, then boot into Linux OS.
Step 2: Open a terminal.
Step 3: Enter sudo fdisk -l to list all connected drives. Identify your SSD by its size and note the device name, e.g., /dev/sdb.
Step 4: Initialize the SSD using fdisk or parted. Here’s a basic guide using fdisk: Enter sudo fdisk /dev/sdb (replace /dev/sdb with your SSD’s device name). Press g to create a new GPT partition table. Press n to create a new partition. Follow the prompts to specify the size and type. Press w to write the changes.
Step 5: Format the new partition on the SSD (e.g., /dev/sdb1). You can format it with the filesystem of your choice: For ext4: sudo mkfs.ext4, For ext3: sudo mkfs.ext3 /dev/sdb1 /dev/sdb1, For FAT32: sudo mkfs.vfat /dev/sdb1
Step 6: Mount the SSD: Create a mount point: sudo mkdir /mnt/myssd, Mount the SSD: sudo mount /dev/sdb1 /mnt/myssd, Remember to replace /dev/sdb1 with your SSD’s partition name.
FAQ: KSD-012010-001-15
When cloning to a new drive larger than the source drive, the software may not properly scale partition size. When this occurs, you might end up with unused space. To avoid this, follow our cloning instructions located here: www.kingston.com/cloning
FAQ: KSD-012010-001-04
For best performance and reliability, Kingston recommends avoiding any power-splitting Molex cables, and instead using the standard 15-pin SATA connector which is usually directly connected to the power supply.
FAQ: KSD-012010-001-09
Kingston SATA III (6Gb/s) drives are backwards compatible to SATA II (3Gb/s) ports. However, the Kingston SATA III drive will be limited to SATA II performance. Unfortunately, we cannot guarantee the Kingston SATA III will function on a SATA I port.
FAQ: KSD-012010-001-10
- AHCI stands for Advanced Host Controller Interface and is a technical standard that allows software to communicate with SATA devices. It offers features not available in older IDE modes.
- AHCI is important because it allows for increased SATA drive performance through Native Command Queueing (NCQ), reduced latency, and the ability to hot-swap drives connected to the SATA bus.
- To confirm that your SATA drive is running in AHCI mode, you need to enter your Computer’s BIOS (often Del, F2, F10, or F12), locate the SATA or Storage Configuration menu and confirm “AHCI” mode is enabled.
- If you have already installed your operating system, and your BIOS indicates that IDE mode is enabled, your SSD will still function, but may not be operating at peak performance.
- Kingston does not recommended changing from IDE to AHCI mode within the BIOS if your operating system is already installed, as this modification may cause the operating system not to boot.
FAQ: KSD-012010-001-08
The easiest way to ensure that your new SSD appears as your boot drive is to ensure that it is the only storage device connected during installation.
If this is not possible, or if you previously cloned your old data to your new drive, confirm that the new drive appears as a boot device in the system BIOS, then select it for booting.
FAQ: KSD-012010-001-03
First, you should confirm that the SSD is seen within the system BIOS. Enter your BIOS (usually, Del, F2, F10, or F12 key) and navigate through your storage configuration menu(s) to see if the drive is correctly identified and present. If the drive isn’t present, power off the system, check the installation and connections to confirm the drive is seated and/or connected properly.
If the drive is present in the BIOS, you may need to initialise the disk within the operating system.
For Windows:
Step 1: Confirm the drive is properly attached, and power on the system, then boot into Windows OS.
Step 2: Press Windows + X and choose Disk Management.
Step 3: If the SSD is new and not initialised, a popup will appear saying «Initialize Disk».
Step 4: Choose between: MBR (Master Boot Record): Suitable for drives under 2TB and older systems. GPT (GUID Partition Table): Recommended for modern systems and drives larger than 2TB.
Step 5: Click OK to initialize the disk.
Step 6: Once initialised, you’ll see the SSD as «Unallocated». Right-click on it and select New Simple Volume.
Step 7: Follow the on-screen prompts (keeping all defaults is Okay) to format and assign a drive letter to the SSD.
For macOS:
Step 1: Confirm the drive is properly attached, and power on the system, then boot into Mac OS.
Step 2: Open Disk Utility (you can find it using Spotlight with Cmd + Space and then typing «Disk Utility»).
Step 3: In the left pane, select your SSD.
Step 4: Click on Erase.
Step 5: Provide a name for the drive, and under Format, choose: APFS for newer Macs and SSDs. Mac OS Extended (Journaled) for older systems or HDDs.
Step 6: Click Erase. Once the process completes, the SSD will be ready for use.
For Linux:
Step 1: Confirm the drive is properly attached, and power on the system, then boot into Linux OS.
Step 2: Open a terminal.
Step 3: Enter sudo fdisk -l to list all connected drives. Identify your SSD by its size and note the device name, e.g., /dev/sdb.
Step 4: Initialize the SSD using fdisk or parted. Here’s a basic guide using fdisk: Enter sudo fdisk /dev/sdb (replace /dev/sdb with your SSD’s device name). Press g to create a new GPT partition table. Press n to create a new partition. Follow the prompts to specify the size and type. Press w to write the changes.
Step 5: Format the new partition on the SSD (e.g., /dev/sdb1). You can format it with the filesystem of your choice: For ext4: sudo mkfs.ext4, For ext3: sudo mkfs.ext3 /dev/sdb1 /dev/sdb1, For FAT32: sudo mkfs.vfat /dev/sdb1
Step 6: Mount the SSD: Create a mount point: sudo mkdir /mnt/myssd, Mount the SSD: sudo mount /dev/sdb1 /mnt/myssd, Remember to replace /dev/sdb1 with your SSD’s partition name.
FAQ: KSD-012010-001-15
Certain motherboards restrict SATA ports when other devices are populated elsewhere on the motherboard. For example, a SATA connector may be disabled when using an NVMe or M.2 SATA-based SSD in the M.2 slot on your motherboard. Consult your motherboard support documentation and review the storage installation section and/or charts.
FAQ: KSD-012010-001-17
There are a variety of external enclosures available on the market. While Kingston aims to be compatible with all system types, occasionally, there may be an incompatibility. If you continue to have trouble with your external SSD enclosure, you may want to try a different enclosure.
FAQ: KSD-012010-001-18
While it may be possible to update your target drive’s firmware via USB storage enclosure, Kingston does not recommend it. Proper update procedure involves having your target SSD connected directly to the system ports (e.g., SATA or NVMe).
FAQ: KSD-012010-001-14
Unless explicitly indicated, no, an SSD update will not erase data from the drive. However, before performing any SSD firmware updates, Kingston recommends all data on the target drive be backed up before proceeding with the firmware update.
FAQ: KSD-012010-001-13
Kingston does not offer DOS-based firmware updates at this time.
FAQ: KSD-012010-001-12
SSD firmware is the integrated software within an SSD that manages its operations, including communication with the host system, data storage and retrieval, wear levelling and error correction. Kingston recommends that you always maintain the latest firmware.
If your SSD requires new firmware, you will receive a notification when running Kingston’s SSD Manager software, located here: www.kingston.com/ssdmanager
FAQ: KSD-012010-001-11
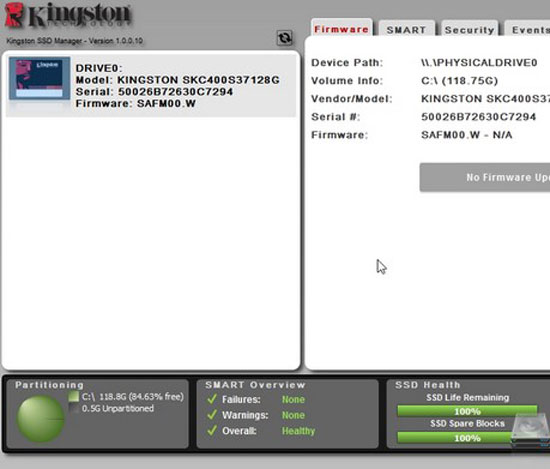
Written by . Posted in KINGSTON
Kingston SSD Manager Version 1.1.2.5. — This software allows you to view many useful information about Kingston SSD as their reference, serial number, firmware version, their health … It also provides access to monitoring data and analysis and SMART export a report in CSV format. A function firmware update is also present as well as tools to run diagnostics and perform a secure erase.
Support OS: Windows 7, Windows 8, Windows 8.1, Windows 10 — 32/64 bit.
SSD Toolbox supported Solid-State Drive (SSD) Kingston:
- A400 2.5″ 120 Go (SA400S37/120G)
- A400 2.5″ 240 Go (SA400S37/240G)
- A400 2.5″ 480 Go (SA400S37/480G)
- A400 2.5″ 960 Go (SA400S37/960G)
- A400 M.2 120 Go (SA400M8/120G)
- A400 M.2 240 Go (SA400M8/240G)
- A1000 240 Go (SA1000M8/240G)
- A1000 480 Go (SA1000M8/480G)
- A1000 960 Go (SA1000M8/960G)
- A2000 250 Go (SA2000M8/250G)
- A2000 500 Go (SA2000M8/500G)
- A2000 1 To (SA2000M8/1000G)
- DC400 400 Go (KG-S41400-1L)
- DC400 480 Go (SEDC400S37/480G)
- DC400 800 Go (KG-S41800-1L)
- DC400 960 Go (SEDC400S37/960G)
- DC400 1600 Go (SEDC400S37/1600G)
- DC400 1800 Go (KG-S411T8-1L)
- DC450R 480 Go (SEDC450R/480G)
- DC450R 960 Go (SEDC450R/960G)
- DC450R 1,92 To (SEDC450R/1920G)
- DC450R 3,84 To (SEDC450R/3840G)
- DC500M 480 Go (SEDC500M/480G)
- DC500M 960 Go (SEDC500M/960G)
- DC500M 1,92 To (SEDC500M/1920G)
- DC500M 3,84 To (SEDC500M/3840G)
- DC500R 480 Go (SEDC500R/480G)
- DC500R 960 Go (SEDC500R/960G)
- DC500R 1,92 To (SEDC500R/1920G)
- DC500R 3,84 To (SEDC500R/3840G)
- DC1000B 240 Go (SEDC1000BM8/240G)
- DC1000B 480 Go (SEDC1000BM8/480G)
- DCP1000 800 Go (SEDC1000H/800G)
- DCP1000 1600 Go (SEDC1000H/1600G)
- DCP1000 3200 Go (SEDC1000H/3200G)
- HyperX Fury 120 Go (SHFS37A/120G)
- HyperX Fury 240 Go (SHFS37A/240G)
- HyperX Fury RGB 240 Go (SHFR200/240G)
- HyperX Fury RGB 480 Go (SHFR200/480G)
- HyperX Fury RGB 960 Go (SHFR200/960G)
- HyperX Predator M.2 2280 240 Go (SHPM2280P2/240G)
- HyperX Predator M.2 2280 480 Go (SHPM2280P2/480G)
- HyperX Predator M.2 PCIe HHHL 240 Go (SHPM2280P2H/240G)
- HyperX Predator M.2 PCIe HHHL 480 Go (SHPM2280P2H/480G)
- HyperX Savage 120 Go (SHSS37A/120G)
- HyperX Savage 120 Go (SHSS3B7A/120G)
- HyperX Savage 240 Go (SHSS37A/240G)
- HyperX Savage 240 Go (SHSS3B7A/240G)
- HyperX Savage 480 Go (SHSS37A/480G)
- HyperX Savage 480 Go (SHSS3B7A/480G)
- HyperX Savage 960 Go (SHSS37A/960G)
- HyperX Savage 960 Go (SHSS3B7A/960G)
- KC600 256 Go (SKC600/256G)
- KC600 256 Go (SKC600B/256G)
- KC600 512 Go (SKC600/512G)
- KC600 512 Go (SKC600B/512G)
- KC600 1 To (SKC600/1024G)
- KC600 1 To (SKC600B/1024G)
- KC600 2 To (SKC600/2048G)
- KC600 2 To (SKC600B/2048G)
- KC1000 HHHL 240 Go (SKC1000H/240G)
- KC1000 HHHL 480 Go (SKC1000H/480G)
- KC1000 HHHL 960 Go (SKC1000H/960G)
- KC1000 M.2 240 Go (SKC1000/240G)
- KC1000 M.2 480 Go (SKC1000/480G)
- KC1000 M.2 960 Go (SKC1000/960G)
- KC2000 250 Go (SKC2000M8/250G)
- KC2000 500 Go (SKC2000M8/500G)
- KC2000 1 To (SKC2000M8/1000G)
- KC2000 2 To (SKC2000M8/2000G)
- SSDNow E50 100 Go (SE50S37/100G)
- SSDNow E50 240 Go (SE50S37/240G)
- SSDNow E50 480 Go (SE50S37/480G)
- SSDNow E100 100 Go (SE100S37/100G)
- SSDNow E100 100 Go (SE100S37/100GBK)
- SSDNow E100 200 Go (SE100S37/200G)
- SSDNow E100 200 Go (SE100S37/200GBK)
- SSDNow E100 400 Go (SE100S37/400G)
- SSDNow E100 400 Go (SE100S37/400GBK)
- SSDNow KC310 960 Go (SKC310S37A/960G)
- SSDNow KC310 960 Go (SKC310S3B7A/960G)
- SSDNow KC380 60 Go (SKC380S3/60G)
- SSDNow KC380 120 Go (SKC380S3/120G)
- SSDNow KC400 128 Go (SKC400S37/128G)
- SSDNow KC400 128 Go (SKC400S3B7A/128G)
- SSDNow KC400 256 Go (SKC400S37/256G)
- SSDNow KC400 256 Go (SKC400S3B7A/256G)
- SSDNow KC400 512 Go (SKC400S37/512G)
- SSDNow KC400 512 Go (SKC400S3B7A/512G)
- SSDNow KC400 1 To (SKC400S37/1T)
- SSDNow KC400 1 To (SKC400S3B7A/1T)
- SSDNow M.2 SATA G2 120 Go (SM2280S3G2/120G)
- SSDNow M.2 SATA G2 240 Go (SM2280S3G2/240G)
- SSDNow M.2 SATA G2 480 Go (SM2280S3G2/480G)
- SSDNow mS200 30 Go (SMS200S3/30G)
- SSDNow mS200 60 Go (SMS200S3/60G)
- SSDNow mS200 120 Go (SMS200S3/120G)
- SSDNow mS200 240 Go (SMS200S3/240G)
- SSDNow mS200 480 Go (SMS200S3/480G)
- SSDNow UV300 120 Go (UV300S37A/120G)
- SSDNow UV300 240 Go (UV300S37A/240G)
- SSDNow UV300 480 Go (UV300S37A/480G)
- SSDNow UV400 120 Go (SUV400S37/120G)
- SSDNow UV400 120 Go SUV400S3B7A/120G)
- SSDNow UV400 240 Go (SUV400S37/240G)
- SSDNow UV400 240 Go SUV400S3B7A/240G)
- SSDNow UV400 480 Go SUV400S37/480G)
- SSDNow UV400 480 Go SUV400S3B7A/480G)
- SSDNow UV400 960 Go SUV400S37/960G)
- SSDNow UV400 960 Go SUV400S3B7A/960G)
- SSDNow V300 60 Go (SV300S3B7A/60G)
- SSDNow V300 60 Go (SV300S3D7/60G)
- SSDNow V300 60 Go (SV300S3N7A/60G)
- SSDNow V300 60 Go (SV300S37A/60G)
- SSDNow V300 120 Go (SV300S3B7A/120G)
- SSDNow V300 120 Go (SV300S3D7/120G)
- SSDNow V300 120 Go (SV300S3N7A/120G)
- SSDNow V300 120 Go (SV300S37A/120G)
- SSDNow V300 240 Go (SV300S3B7A/240G)
- SSDNow V300 240 Go (SV300S3D7/240G)
- SSDNow V300 240 Go (SV300S3N7A/240G)
- SSDNow V300 240 Go (SV300S37A/240G)
- SSDNow V300 480 Go (SV300S3B7A/480G)
- SSDNow V300 480 Go (SV300S3D7/480G)
- SSDNow V300 480 Go (SV300S3N7A/480G)
- SSDNow V300 480 Go (SV300S37A/480G)
- SSDNow V310 960 Go (SV310S37A/960G)
- SSDNow V310 960 Go (SV310S3B7A/960G)
- SSDNow V310 960 Go (SV310S3D7/960G)
- SSDNow V310 960 Go (SV310S3N7A/960G)
- UV500 2.5″ 120 Go (SUV500/120G)
- UV500 2.5″ 240 Go (SUV500/240G)
- UV500 2.5″ 480 Go (SUV500/480G)
- UV500 2.5″ 960 Go (SUV500/960G)
- UV500 2.5″ 1920 Go (SUV500/1920G)
- UV500 2.5″ 120 Go (SUV500B/120G)
- UV500 2.5″ 240 Go (SUV500B/240G)
- UV500 2.5″ 480 Go (SUV500B/480G)
- UV500 2.5″ 960 Go (SUV500B/960G)
- UV500 2.5″ 1920 Go (SUV500B/1920G)
- UV500 M.2 120 Go (SUV500M8/120G)
- UV500 M.2 240 Go (SUV500M8/240G)
- UV500 M.2 480 Go (SUV500M8/480G)
- UV500 M.2 960 Go (SUV500M8/960G)
- UV500 mSATA 120 Go (SUV500MS/120G)
- UV500 mSATA 240 Go (SUV500MS/240G)
- UV500 mSATA 480 Go (SUV500MS/480G)
Kingston SSD Manager Version 1.1.2.5
KINGSTON SA400S37240G ATA Device driver is a windows driver .
Common questions for KINGSTON SA400S37240G ATA Device driver
Q: Where can I download the KINGSTON SA400S37240G ATA Device driver’s driver?
Please download it from your system manufacturer’s website. Or you download it from our website.
Q: Why my KINGSTON SA400S37240G ATA Device driver doesn’t work after I install the new driver?
1. Please identify the driver version that you download is match to your OS platform.
2. You should uninstall original driver before install the downloaded one.
3. Try a driver checking tool such as DriverIdentifier Software .
As there are many drivers having the same name, we suggest you to try the Driver Tool, otherwise you can try one by on the list of available driver below.
Please scroll down to find a latest utilities and drivers for your KINGSTON SA400S37240G ATA Device driver.
Be attentive to download software for your operating system.
If none of these helps, you can contact us for further assistance.
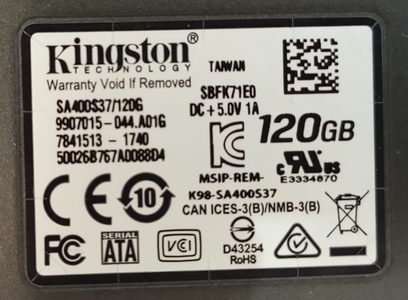
Попал в руки SSD диск Kingston SA400S37120G отработавший пару лет в рабочей станции и ушедший в Read only, данные считываются, но записать ничего невозможно. При более детальном изучении выяснилось, что диск в системе определяется как Satafirm 11. В устройстве установлен контроллер Phison PS3111-S11 и проблема прошивки на этих контроллерах не редкий случай, часто это бывает при проблемах с электропитанием. Хорошая новость — работоспособность диска можно восстановить.
- Подготовка
- Восстановление прошивки
- Прошивка диска
- Зеркало файлов для скачивания
Подготовка
Подключаем диск к SATA порту компьютера, работающем в режиме AHCI, в режиме RAID не работает 100%.
По возможности скачиваем все необходимые данные с диска, т.к. после последующих действий вся информация будет утеряна!
Первым делом определяем конфигурацию диска, т.к. после неудачных манипуляций данная информация может быть утеряна. Скачиваем и распаковываем программу phison_flash_id. Запускаем phison_flash_id.exe, для работы программы нужны права администратора. Сохраняем результат работы программы:
Drive: 2(ATA)
Model: SATAFIRM S11
Fw   : SBFK71W0
Size : 114473 MB
P/N  : 7841513
S11fw: SBFK71E0, 2017Feb23
Original Model: KINGSTON SA400S37120G
Bank00: 0x2c,0xb4,0x78,0x32,0xaa,0x4,0x0,0x0 - Micron 32L(B0KB) TLC 384Gb/CE 384Gb/die
Bank01: 0xff,0xff,0xff,0xff,0xff,0xff,0xff,0xff -
Bank02: 0xff,0xff,0xff,0xff,0xff,0xff,0xff,0xff -
Bank03: 0xff,0xff,0xff,0xff,0xff,0xff,0xff,0xff -
Bank04: 0x2c,0xb4,0x78,0x32,0xaa,0x4,0x0,0x0 - Micron 32L(B0KB) TLC 384Gb/CE 384Gb/die
Bank05: 0xff,0xff,0xff,0xff,0xff,0xff,0xff,0xff -
Bank06: 0xff,0xff,0xff,0xff,0xff,0xff,0xff,0xff -
Bank07: 0xff,0xff,0xff,0xff,0xff,0xff,0xff,0xff -
Bank08: 0x2c,0xb4,0x78,0x32,0xaa,0x4,0x0,0x0 - Micron 32L(B0KB) TLC 384Gb/CE 384Gb/die
Bank09: 0xff,0xff,0xff,0xff,0xff,0xff,0xff,0xff -
Bank10: 0xff,0xff,0xff,0xff,0xff,0xff,0xff,0xff -
Bank11: 0xff,0xff,0xff,0xff,0xff,0xff,0xff,0xff -
Bank12: 0xff,0xff,0xff,0xff,0xff,0xff,0xff,0xff -
Bank13: 0xff,0xff,0xff,0xff,0xff,0xff,0xff,0xff -
Bank14: 0xff,0xff,0xff,0xff,0xff,0xff,0xff,0xff -
Bank15: 0xff,0xff,0xff,0xff,0xff,0xff,0xff,0xff -
Controller   : Possible PS3109 or PS3111
Flash CE     : 3
PS3105/3108/3109/3111 only:
Flash Channel: 2
Dram Size,MB : 32
PS3110 only  :
Flash Channel: 3
Interleave   : 2
Flash Mode/Clk: 0/0 (S9) or 5/7 (S11)
Восстановление прошивки
Сначала пробуем восстановить оригинальную прошивку. Скачиваем и распаковываем программу repairs11. Запускаем repairS11.exe, программа запросит права администратора. Будет выведен список подключенных дисков, выбираем номер диска Satafirm 11. При завершении работы программы выключаем компьютер и отключаем питание от диска. Подключаем питание обратно к диску и включаем компьютер, если повезло, то диск определится как раньше.
Некоторым этого достаточно, но к сожалению, с этим диском произведенные манипуляции не помогли.
Прошивка диска
После попытки восстановления диск был виден в BIOS и устройствах ОС, но стал неопределенным. Программой phison_flash_id данные считать тоже не получилось. Отключаем диск и разбираем его. Диск необходимо перевести в режим обслуживания, для этого скрепкой замыкаем контакты на плате.
С замкнутыми контактами диск подключаем к компьютеру, в системе он должен определиться как PS3111. После загрузки ОС перемычку необходимо удалить.
Скачиваем и распаковываем программу s11-flasher и архив с прошивками firmware_ps3111. Необходимо внимательно прочитать файл s11-flasher2-howto.txt и s11-flasher2-readme.txt. Из полученных ранее данных, у рассматриваемого диска текущая прошивка была SBFK71E0 и чипы Micron 32L(B0KB), в соответствии с таблицей в файле s11-flasher2-readme.txt в диск необходимо шить прошивку 7x.x. В архиве с прошивками находим подходящую прошивку, для этого диска подойдет SBFK71F1_27062019.BIN. Копируем этот файл в папку s11-flasher и переименовываем его в FW.BIN. Данный файл размером 1479168 байт и согласно описанию, в файле s11-flasher2-howto.txt дополнительных действий по сборке прошивальщика не требуется, если это не так, то внимательно читать s11-flasher2-readme.txt. Запускаем s11-flasher2-micron.cmd, на выходе получим файл FW.exe — это прошивальщик, которым будет прошиваться диск.
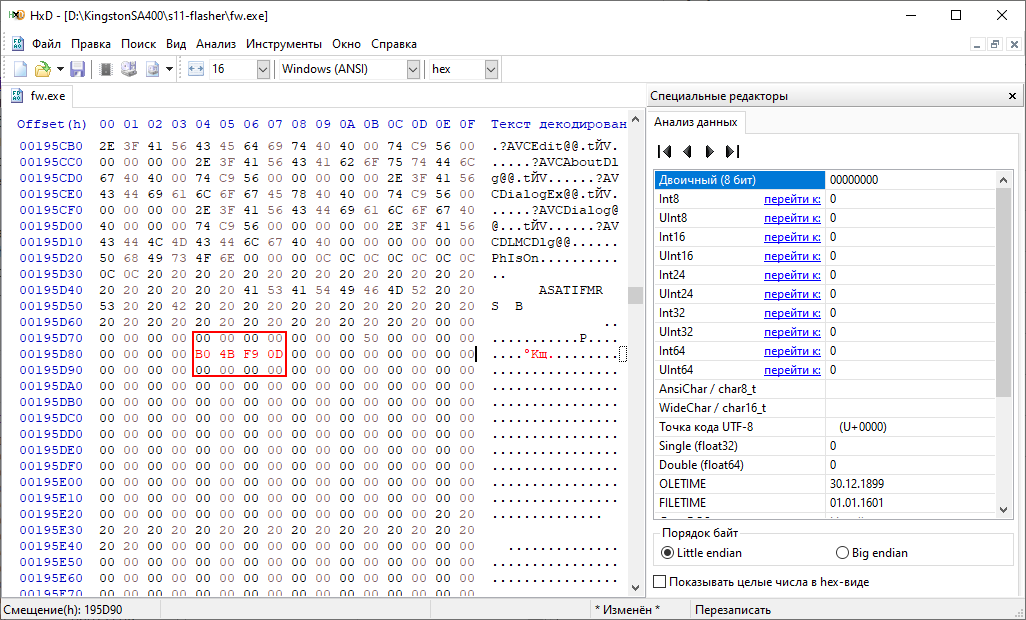
Теперь, согласно howto, для флеша Micron 32L(B0KB) необходимо указать размер жесткого диска. Открываем в Hex редакторе полученный прошивальщик FW.exe (Hex редактор можно взять здесь). Согласно файлу s11-flasher2-techinfo.txt информация об объеме находится по адресу 0x195D84..7. Для диска 120Gb необходимо записать информацию 0x0DF94BB0, байты отсчитываются с конца!! (0D — 0x195D87, F9 — 0x195D86, 4B — 0x195D85, B0 — 0x195D84). Сохраняем файл.
Если перемычка не удалена, то ее нужно удалить! Запускаем файл FW.exe, в поле Device выбираем диск PS3111 и прошиваем диск нажав кнопку Update firmware. После прошивки выключаем компьютер и отключаем диск полностью (обязательно отключить питание). Собираем диск в корпус и подключаем, в системе он должен будет определиться как SATA SSD, в управлении дисками должен появиться наш диск.
Создаем на нем раздел и записываем на него данные. Проверяем, что данные сохраняются и не теряются после перезагрузки.
Файлы для скачивания
Программа для определения конфигурации флеш-памяти у ssd дисков на контроллере Phison 3105/3108/3109/3110/3111 (phison_flash_id) — Формирование ссылки…
Программа для восстановления работоспособности дисков на контроллере Phison 3111(S11) — Формирование ссылки…
Программа для создания прошивальщика для дисков на контроллере Phison 3111(S11) — Формирование ссылки…
Архив с прошивками — Формирование ссылки…
Download & Upgrade Samsung Galaxy S5 Firmware
How to download and update firmware Firmware kingston ssd a400 Download Samsung Galaxy S5 firmware almost everyone today knows what is Operation System Android, why it s so popular among millions of users and how to use its full potential, how to root Android Samsung Galaxy mobile phone and unroot it backing to stock firmware or ROM. There are a lot of different mobile firmwares and customized ROMs for rooted Android devices. But sometimes we have to back to Stock Firmware. INTERNAL_LINK LINK There can be different reasons to Download and Upgrade Samsung Galaxy S5 Firmware: To backup to original Stock Firmware To unroot phone To recover bricked phone To use stock apps and OS upgrade Quick Access Required Content Free download stock ROM …
Zte firmware download & update software
Download ZTE firmware update gadget is very important as many of its owners regularly make the upgrades in order to make their gadgets to function better. ZTE firmware upgrade Stock ROM (Flash File) is the company s policy, so that clients who decide to keep the phones or tablet for a long period of time could enjoy its better capabilities. LINK In this article that will be explained why it is needed, how to check the upgrade as well as how to download and install it. INTERNAL_LINK Quick Access Required Content Check ZTE firmware version Download ZTE firmware Stock ROM (Flash File) Watch Video Tutorial on Youtube How to download and install Zte firmware Stock ROM (Flash File)? How to …
Update firmware Vodafone cell phone & Download Stock ROM (Flash File)
Download Vodafone firmware is clearly the largest mobile phone and internet service provider hence any individual who becomes the company s client might wonder how to do firmware update for Vodafone . LINK Usually, individuals may be interested and in need of downloading and installing firmware for modem, router, broadband or some phones that are made by major manufactures specifically for Vodafone and bear only company s name on it. Here, we will have a look at how to do these things efficiently and safely. INTERNAL_LINK Quick Access Required Content Check Vodafone firmware version Download Vodafone firmware Stock ROM (Flash File) Watch Video Tutorial on Youtube How to download and …
Update firmware on Coolpad phone or tablet & Download firmware
Download and update firmware Coolpad firmware produces very popular mobile phones and tablets that are extremely popular in many countries around the world, hence firmware updates for Coolpad might be useful for every owner of the devices. Just like any other manufacture. LINK Coolpad is trying to keep its products up to date therefore even if you are an owner of a phone for several years it still could be upgraded to increase its working efficiency and capabilities. In this article we will try to explain how to check, download and install the Coolpad firmware. INTERNAL_LINK Quick Access Required Content Check Coolpad firmware versions Download Coolpad Stock ROM (Flash File) Watch Video …
Firmware Update For Lg Phones & download LG firmware
Update LG firmware may be needed for anyone who uses the firm s gadgets and products for extended period of time. The company gives a lot for customer care services and provides maximum effort that its products stay intact with current market requirements, despite the fact that it was released long before. LINK Customers can always be certain that gadgets capabilities can be increased by downloading and installing upgraded firmware, whereas in this article we will explain how to do it. INTERNAL_LINK Quick Access Required Content Check LG firmware version Download LG firmware Stock ROM (Flash File) Watch Video Tutorial on Youtube How to download and install LG firmware? How to install and …
Download and update Samsung firmware latest version
Samsung firmware : being one of the leading producers of electronic gadgets including mobile phones, Samsung very often releases Stock Firmware ROM (Flash File) for its products. Large number of individuals might have some questions regarding how to download Samsung firmware update mobile, therefore we will try to explain it bellow. The procedure is pretty simple and most of the times the success is guaranteed even not for advanced users. INTERNAL_LINK LINK Quick Access Required Content Check Samsung firmware versions Download Samsung Stock Firmware ROM (Flash File) Watch Video Tutorial on Youtube How to download and install samsung firmware? How to install Samsung firmware on mobile? …
Download Stock ROM Firmware for Coolpad Catalyst 3622A
Download Stock ROM Firmware for Coolpad Catalyst 3622A android is very simple opened OS. Millions of people all over the world use Android devices, custom it and get root rights to full control. But sometimes they need to back up smartphone to stock firmware because of different reasons: Brick phone by rooting New ROM Firmware does not work correctly Wanna make data backup Need warranty service LINK Everything you need Download Stock ROM Firmware and install it on your phone. Today we ll talk about How to Download Stock ROM Firmware for Coolpad Catalyst 3622A . About Features of update Coolpad Catalyst 3622A Firmware and about how to install stock ROM Firmware on your Coolpad Catalyst …
Update firmware for router
Download router firmware: very often individuals may need to change firmware for their gadgets by themselves. One of the most commonly used devices at home is a router and firmware upgrade for a router can be done with ease taking very little time to do that. The whole procedure is safe and simple, so if basics steps are taken it should not be very difficult to accomplish the mission. INTERNAL_LINK LINK Quick Access Required Content Check router firmware versions Watch Video Tutorial on Youtube How to download and install router firmware? Download router firmware How to install router firmware? Watch Video Tutorial on Youtube How to download and update router firmware? Check …
How to update firmware for Digital photo Cameras?
Download digital photo Cameras firmware : most of the camera s internal parts including lenses, autofocus, LCD screens etc. are controlled by microprocessors. Microprocessors are controlled by firmware that enables the device to do the job it was purchased for. By making firmware upgrade for digital photo cameras users can expand the functionality of the device and keep its technical characteristics up to date. INTERNAL_LINK LINK Quick Access Required Content Check download digital photo Cameras firmware versions Download firmware for a digital photo camera How to install firmware for a digital camera? Watch Video Tutorial on Youtube How to download and update Digital photo Cameras firmware? …
Upgrade and download TV firmware latest version
Upgrade and download TV firmware : Just like all modern gadget, modern TVs can be updated by downloading and installing firmware upgrade for TV at home. Usually it does not take a long time and even these who are not familiar with the process will be able to go through this process quickly and efficiently. It will help to keep the device up to date and make it to expand its capability. INTERNAL_LINK LINK Quick Access Required Content Check TV firmware versions Download TV firmware Watch Video Tutorial on Youtube How to download and install TV firmware? How to install TV firmware? Watch Video Tutorial on Youtube How to download and update TV firmware? Check TV firmware versions …
Upgrade canon firmware & download latest canon drivers
Canon firmware is a world s leading manufacturer of photo cameras and regularly releases updates for their products, hence client can always be sure that they get firmware update for cannon on time. LINK Firmware is an important part of making internal elements of any electronic device work in a way manufacture intends them to work and regular updates will make sure that these devices operate properly and up to date. In this article we will have a look at how to get sup upgrades for Cannon cameras and how to install it. INTERNAL_LINK Quick Access Required Content Check Canon firmware version Download Canon firmware and drivers Watch Video Tutorial on Youtube How to download and install Cannon …
Download firmware for printer
Download printer firmware to make sure a printer at home or office works perfectly and does its work efficiently it is important to install firmware upgrade for a printer on time. Upgrades can bring a lot of efficiency in daily work that the device does and make it compatible with other upgrades that can be done on individual s computer. Hence, procedure should be done on time as it is pretty simple and safe thing to do. INTERNAL_LINK LINK Quick Access Required Content Check download printer firmware versions Download printer firmware How to install printer firmware? Watch Video Tutorial on Youtube How to download and update printer firmware? Check download printer firmware …