
In this article, you will discover the reasons for Kingston SSD not detected or not showing up on Windows, along with effective solutions. Additionally, we will introduce professional data recovery software to assist you in recovering data from your Kingston SSD.
Are you bothered by a (new) Kingston SSD not detected or showing up on Windows? Don’t worry! You can find the reasons and fixes here.
PC Won’t Detect Kingston SSD
Solid State Drives (SSDs) have revolutionized data storage with their speed, durability, and reliability. Kingston, a reputable brand in the storage industry, offers a range of SSDs that promise to enhance your computer’s performance.
However, like any hardware component, Kingston SSDs may sometimes encounter issues, with one of the most common being the Kingston SSD not showing up or detected by your computer. Another common issue is: Kingston SSD manager not detecting SSD.
MiniTool Software will explore the potential reasons behind this problem and provide solutions to help you get your Kingston SSD up and running.
Reasons for Kingston SSD Not Detected / Showing up in Computer or Kingston SSD Manager
Here is a breakdown of some common reasons why a Kingston SSD may not be detected:
- Hardware Connection Issues: Loose or damaged cables, such as SATA or power cables, can lead to connection problems, resulting in the SSD not being detected.
- Faulty Port: The SATA or NVMe port on the motherboard may be malfunctioning, preventing proper detection. Trying a different port can help diagnose this issue.
- Missing Drive Letter: If the SSD has no drive letter, it will not show up in File Explorer. But you can see it in Disk Management and add a drive letter then.
- BIOS/UEFI Settings: Incorrect BIOS or UEFI settings, like a disabled port or an incorrect boot order, can cause the SSD not to be recognized.
- Outdated Firmware: An outdated firmware version on the Kingston SSD can lead to compatibility issues. Keeping the firmware up to date is essential for proper functioning.
- Partition and Drive Initialization: Sometimes, the SSD is detected but not initialized or formatted. This can happen if the drive is brand new or has lost its partition information.
- Hardware or Compatibility Issues: In rare cases, the SSD may be faulty, or it might be incompatible with your system, leading to detection problems. Testing the SSD on another computer can help diagnose this.
Knowing the reasons can help you effectively solve the issue of Kingston SSD not detected. Now, we will introduce some effective solutions to make the Kingston SSD work normally again.
Fix 1: Some Simple Checks
Check the Connection
In order to thoroughly investigate and potentially rectify the issue, it’s advisable to perform a comprehensive connectivity check. To accomplish this, you can take the following steps: first, gently unplug the Kingston SSD from its current port, ensuring that there are no loose or improperly seated connections; next, carefully reinsert and secure the SSD into the same port or an alternate one, depending on your discretion. After these measures have been taken, assess whether the problem persists or if the issue has been successfully resolved.
Use Another Computer
If you happen to have access to another computer, you can disconnect the Kingston SSD from the current PC and subsequently connect the drive to the alternative computer. Next, you can proceed to verify whether the second computer can effectively detect and recognize the SSD as a functional storage device. This method can help in isolating whether the issue lies with the Kingston SSD itself or if it is related to the initial computer’s hardware or software configuration.
If the issue persists, you can continue with the following solutions.
Preparations Before Implementing Follow-Up Solutions
If there are important files in the SSD, you’d better recover files from it to protect your data. You can try MiniTool Power Data Recovery, the best free data recovery software, to do this job.
This SSD data recovery tool can retrieve files like images, videos, audio files, music files, documents, and more from hard drives, SSDs, SD cards, USB flash drives, etc. If the files have not been overwritten by new data, you can use this software to get your needed files back.
Maybe you will ask whether the software can detect that SSD. We’re not sure because the situations vary, but you can first try MiniTool Power Data Recovery Free. With the free edition, you can scan the Kingston SSD and see if this tool can find files in it. You can also recover up to 1GB of files without paying any cent.
MiniTool Power Data Recovery FreeClick to Download100%Clean & Safe
How to Recover Data from a Kingston SSD Using MiniTool Power Data Recovery?
Now, we will walk you through how to use this tool to recover data from a Kingston SSD:
Step 1. Download and install MiniTool Power Data Recovery Free Edition on your PC.
Step 2. Make sure you have connected the Kingston SSD to your PC.
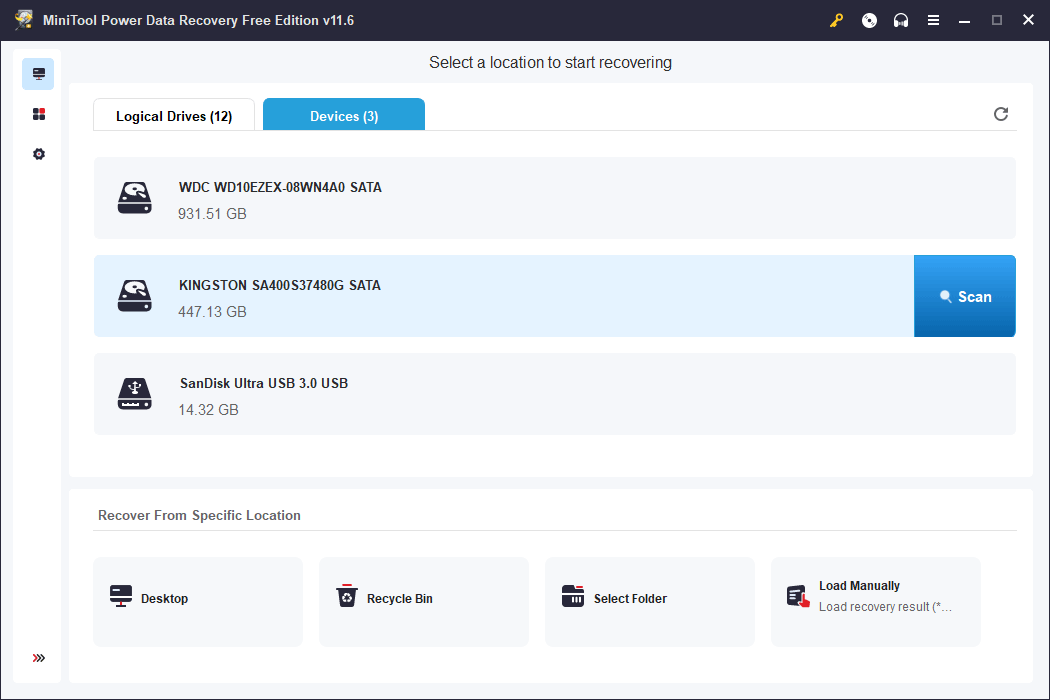
Step 3. Launch the software to enter its main interface. This software will display all drives it can detect under the Logical Drives tab. You can also switch to the Devices tab to check all the detected disks.
If you find the Kingston SSD, you can move your mouse cursor to it and then click the Scan button to start scanning it.
The entire scanning process will take a few minutes. For the best data recovery results, it is advisable to wait until the scanning process completes.
Step 4. After scanning, this software will show all the found files (including lost, deleted, and existing files) in the scan results interface. By default, the software displays these files by path. If necessary, you can switch to the Type tab to make this MiniTool data recovery software display files by type, and then you can find files by type.
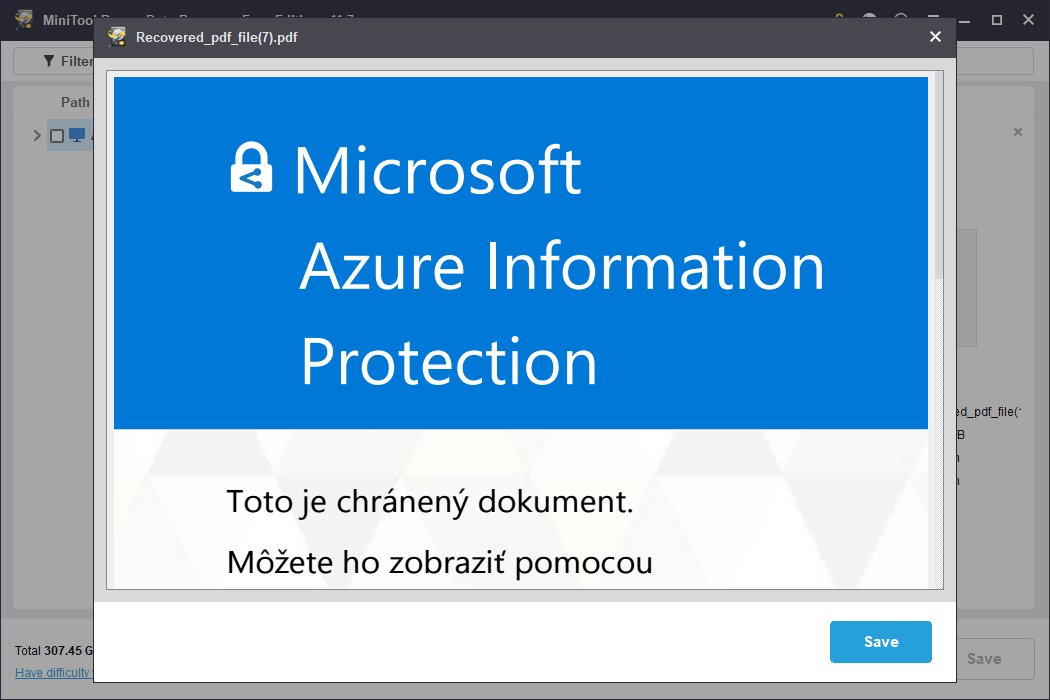
Additionally, if you are not sure if the file is your needed file, you can preview it for confirmation.
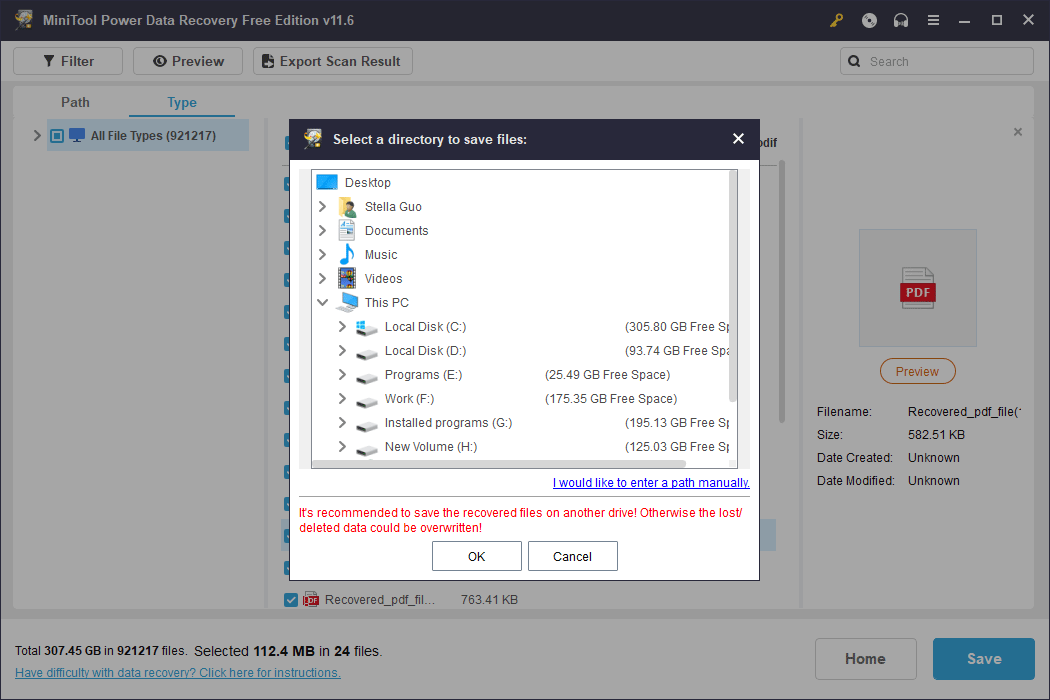
Step 5. Select the needed files. You can select multiple files from different paths.
Step 6. Click the Save button, and then choose another location to save the selected files.
You can see it is easy to rescue your files from a Kingston SSD.
MiniTool Power Data Recovery FreeClick to Download100%Clean & Safe
If you want to use this software to recover more files, you can go to MiniTool Store to select a suitable edition. For personal users, the Personal Ultimate edition is a good choice, because you can use the license key on 3 PCs and enjoy a lifetime free upgrade.
Fix 2: Initialize the Kingston SSD
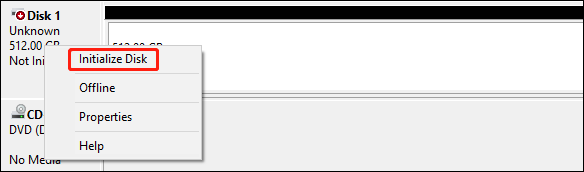
You can go to Disk Management to see if the Kingston SSD is detected. If yes, you can check the status of the drive. If the drive shows as: Unknown and Not Initialized, it will not show up in File Explorer. You need to initialize it to MBR or GPT, then create partitions on it to make it available.

How to Initialize a Kingston SSD?
Step 1. In Disk Management, right-click the uninitialized SSD, then select Initialize Disk.
Step 2. Select MBR or GPT according to your requirement.
Step 3. Click OK to save the setting.
Up to this point, the SSD remains invisible in File Explorer because it is recognized as Unallocated. You need to create one or more partitions with assigned drive letters to make it visible.
How to Create Partitions on a Kingston SSD?
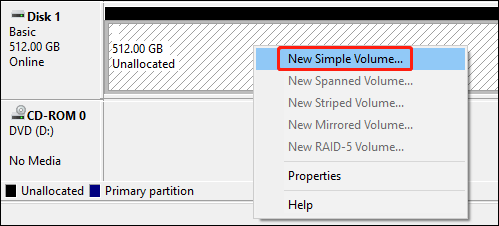
Step 1. Right-click the unallocated space and select New Simple Volume.
Step 2. Click the Next button on the pop-up interface.
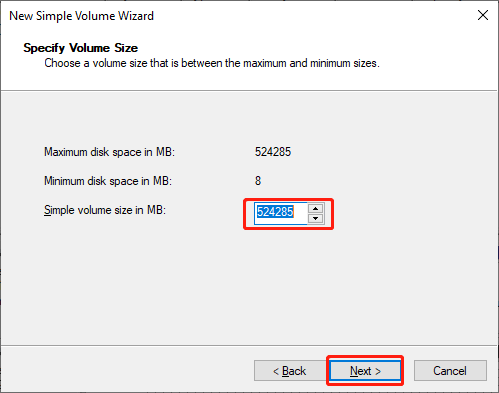
Step 3. Specify the volume size, then click the Next button to continue.
Step 4. Assign a drive letter for the partition on the next interface. Then, click the Next button to continue.
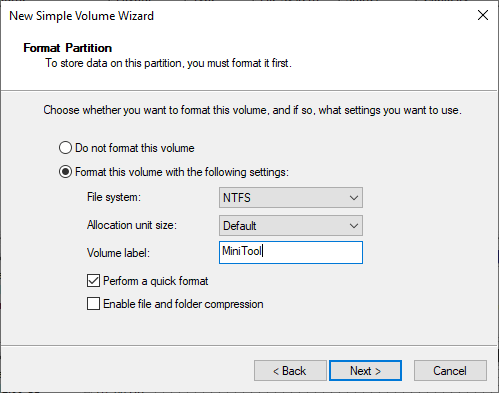
Step 5. Select a file system for the partition and add a volume label. Then click the Next button to continue.
Step 6. Click the Finish button to complete the whole process.
An Alternative Way: Use MiniTool Partition Wizard
In addition, you can also use a third-party partition manager to initialize the SSD and then create partitions on it. You can try MiniTool Partition Wizard. The initialize disk to MBR or GPT features and the create partition feature are available in the free edition of this software.
MiniTool Partition Wizard FreeClick to Download100%Clean & Safe
See these guides:
- How to Initialize to MBR Disk?
- How to Initialize to GPT Disk?
- How to Create Partition?
Fix 3: Add a Drive Letter to the Kingston SSD
If the SSD has no drive letter, Windows will hide it in File Explorer. To make it visible, it can add a drive letter to it.
You can add a drive letter to the Kingston SSD in Disk Management:
Step 1. Open Disk Management.
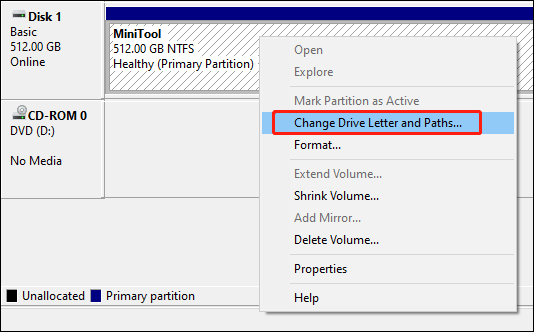
Step 2. Right-click the drive that has no drive letter and then select Change Drive Letter and Paths from the context menu.
Step 3. Click the Add button to continue.
Step 4. Assign a drive letter, and then click the OK button.
After these steps, you can check if the Kingston SSD appears in File Explorer.
An Alternative Way: Use MiniTool Partition Wizard
In addition, you can also use the Change Drive Letter feature of MiniTool Partition Wizard to add a drive letter to the SSD.
MiniTool Partition Wizard FreeClick to Download100%Clean & Safe
Fix 4: Correct the Wrong BIOS/UEFI Settings
Incorrect BIOS or UEFI settings, such as a disabled port or an incorrect boot order, can indeed result in the issue of Kingston SSD not recognized. If you want to use the SSD as a boot drive, you will need to change the BISO or UEFI settings to set your PC to boot from the drive.
To resolve this issue, follow these steps:
Step 1. Restart your computer and enter the BIOS or UEFI settings. Typically, you can do this by pressing a specific key during the startup process, such as F2, F12, or Delete. The exact key may vary depending on your computer’s manufacturer.
Step 2. Navigate to the Advanced or Integrated Peripherals section in the BIOS/UEFI. Ensure that the SATA or PCIe port to which your SSD is connected is enabled. If it’s disabled, enable it.
Step 3. Go to the Boot or Boot Order section and confirm that the SSD is listed as a bootable device. If it’s not, you should adjust the boot order to prioritize the SSD.
Step 4. Depending on your system, you may need to adjust settings related to Secure Boot or Legacy/UEFI Boot. Make sure these settings are configured appropriately for your SSD and system configuration.
Step 5. Save the settings and exit the BIOS/UEFI. Your computer will restart.
Once your computer boots up, check if the SSD is now recognized.
Fix 5: Update the Firmware of the Kingston SSD
If an outdated firmware version on the Kingston SSD is causing compatibility issues, you can address this problem by updating the Kingston SSD’s firmware.
Back up Your SSD Regularly
To protect your data on the SSD, we think you’d better back up your data on it regularly. You can use MiniTool ShadowMaker to backup files on the drive.
MiniTool ShadowMaker is capable of backing up files, folders, partitions, disks, and systems. In the event of issues such as system crashes or hard drive failures, you can easily restore your files and system from the backup.
MiniTool ShadowMaker TrialClick to Download100%Clean & Safe
Conclusion
Having your Kingston SSD not detected can be frustrating, but with some careful troubleshooting, you can often identify and resolve the issue. It’s crucial to check both hardware and software aspects, as the problem can stem from various sources.
If you’ve exhausted all troubleshooting options and your SSD remains undetected, consider reaching out to Kingston’s customer support or the retailer where you purchased the SSD for further assistance.
Remember to back up your data regularly to prevent data loss in case of unexpected SSD issues. However, if you need to recover your data but there is no available backup, you can try MiniTool Power Data Recovery to rescue your files.
If you encounter issues when using MiniTool software, you can contact us via [email protected].
Проблема такова:
Установил через steam игру, хотел запустить, по итогу она не запустилась, а ssd отвалился (перестал быть виден в «Этот компьютер»)
Я перезагрузил ПК, переподключал ssd, менял провода (к пк подключено только 2 ssd), один для windows, второй для всего остального, следовательно который для windows, грузится без проблем, хотя в программах вроде crystal показывает, что у него уже 18% здоровья, в отличии от того, который сломался, на нем 95% здоровья, и он был куплен около года назад, при включении ПК была надпись «Сделайте бэк-ап данных с этого диска *тут название ssd на 480гб, который сломался», я отключил проверку smart в bios, зашел на рабочий стол, в «этот компьютер» оба SSD видны, сломанный ссд можно открыть, но, при открытии любой папки или файла на нем, сразу же выдает ошибку, мол «Этого устройства не существует». После этого, если сделать «повторить проверку дисков» в винде, то ссд пропадает из «этот компьютер» и не обнаружается, через время (по разному), может 5 минут, может 2, может 10, может после переподключения, он становится виден, но любые действия на нем приводят к его отваливанию от пк и зависанию пк, что это может быть? Перечитал все, перепробовал тоже все, к слову старый HDD работает на этих же проводах, т.е. дело в SSD, судя по этому. Если например нажать «восстановление диска», то он тоже выдает ошибку и не дает этого сделать, прилагая к этому зависание пк (пока не отключишь от ssd провода)
Также, в данный момент, пробую открыть Crystal, чтобы заскринить данные для вопроса, в программе не виден проблемный ссд, при том, что в винде в «управление дисками» он отображается, и написано «исправен»,
Переподключил ssd, зашел в кристал,
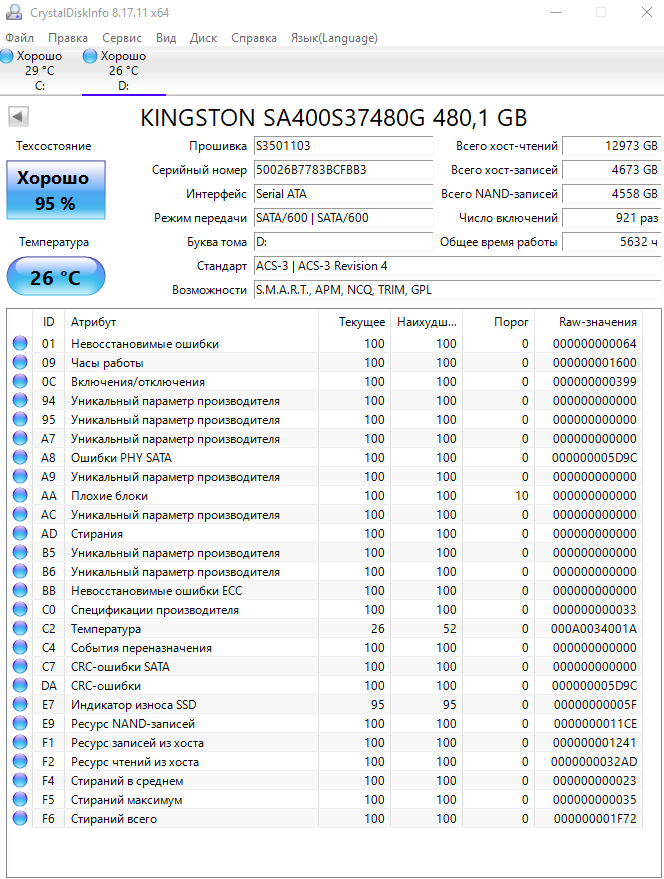
Тут я вижу «невосстановимые ошибки 64», что это значит и из-за чего это может быть? На другом ссд (винда), таких ошибок 0 (с учетом того, что рабчоему ссд около 3-4 лет)
-
Вопрос задан
-
1470 просмотров
Все способы:
- Kingston SSD Manager не видит SSD
- Причина 1: Некорректные настройки BIOS
- Причина 2: Поддельный накопитель
- Причина 3: Неисправность накопителя
- Вопросы и ответы: 4
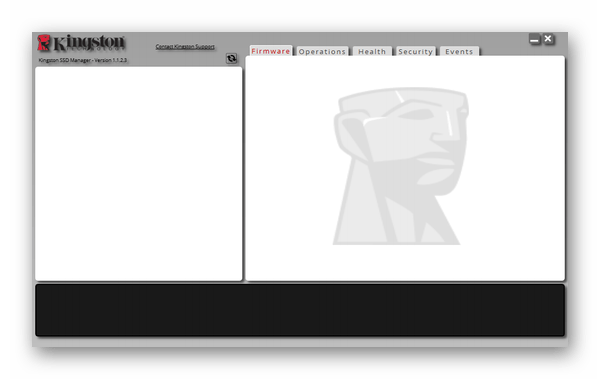
Специальная утилита для взаимодействия с фирменными твердотельными накопителями от компании Kingston контролирует исправность, состояние и различные аспекты использования дисков. О том, почему Kingston SSD Manager не видит SSD, и как выйти из такой ситуации, мы сегодня и расскажем.
Kingston SSD Manager не видит SSD
Программа-менеджер должна автоматически определять наличие SSD в вашем компьютере. Так что в штатном режиме функционирования системы от вас не должны требоваться какие-либо дополнительные действия кроме подключения твердотельного накопителя от Kingston.
Читайте также:
Подключение SSD в слот PCI Express x4 SSD
Как подключить SSD M.2
Если при запуске Kingston SSD Manager не обнаруживает вновь подключённый диск или вовсе не видит ни одного устройства, значит, имеет место какой-то аппаратный сбой или кое-что похуже.
Но не стоит отчаиваться. Если сама операционная система может определить твердотельный накопитель, всё уже не так плохо. Осталось понять причину, почему специализированный фирменный софт не может обнаружить SSD. Следует поискать предпосылки сбоя в BIOS или Windows, конкретно – в настройках соединения диска с компьютером, а также в самом устройстве, которое может таить в себе изъян.
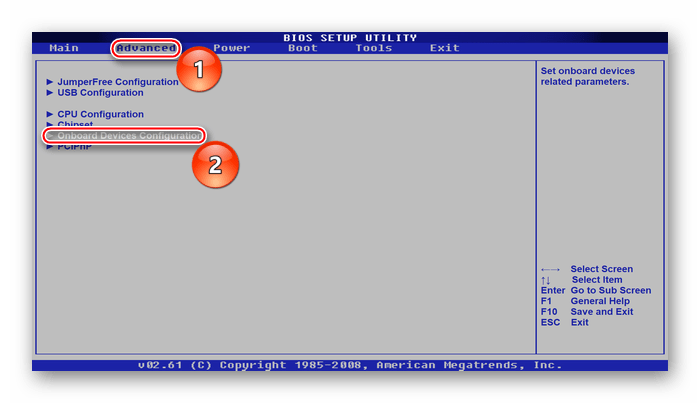
Причина 1: Некорректные настройки BIOS
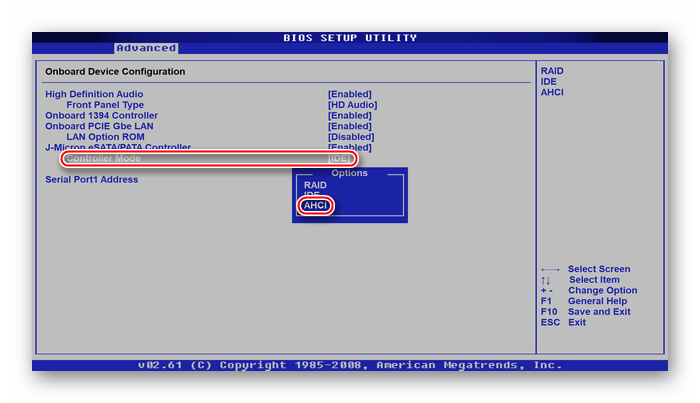
Несмотря на отсутствие надобности в активных действиях для непосредственного обнаружения устройств Kingston SSD Manager, разработчики ставят такое системное требование: включённый в BIOS режим AHCI. Это означает, что связь по устаревшим протоколам соединения не поддерживается, и если вы ранее пользовались более архаичными накопителями, скорее всего, у вас стоят соответствующие настройки. Для того чтобы это изменить, войдите в BIOS и совершите описываемый ряд действий:
Читайте также: Как попасть в BIOS на компьютере
- Перейдите на вкладку «Advanced», после чего наведите выделенную область на «Onboard Devices Configuration» и нажмите «Enter».
- Найдите строку «Controller Mode», и если там стоит не тот режим, который указан в системных требованиях Kingston SSD Manager, например, «IDE», источник проблемы выявлен. Переведите данный параметр на «AHCI».
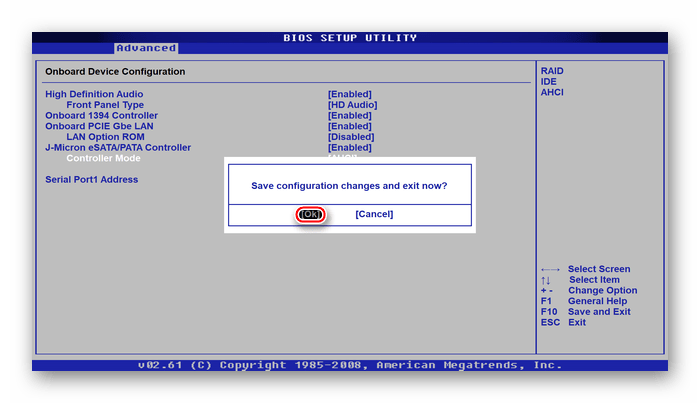
- Нажмите клавишу «F10», чтобы инициализировать выход с сохранением выполненных изменений, и нажмите «OK».
Перевод типа соединения должно быть достаточно для того, чтобы фирменная программа увидела накопитель и начала взаимодействие с ним, если проблема крылась именно в этом. Имейте в виду, что расположение конкретных и даже общих настроек в вашем BIOS может отличаться от описываемого в инструкции. Поэтому, если обнаружить наименования строк не удалось, постарайтесь найти наиболее приближённые или воспользуйтесь ещё одной инструкцией по ссылке ниже.
Читайте также:
Включаем AHCI режим в BIOS
Что такое режим AHCI в BIOS
Причина 2: Поддельный накопитель
В случае присутствия проблемы при включённом режима Advanced Host Controller Interface (или же подключении SSD через интерфейс PCI Express или M.2) проблема не может крыться в особенностях SATA-протоколов. К сожалению, на рынке множество подделок, которые лишь выдают себя за диск фирмы Kingston, на деле являясь устройствами от Transcend или же от совсем неизвестных и не пользующихся доверием компаний.
Для того чтобы отличить оригинальный накопитель Kingston от подделки, следует проверить ряд признаков:
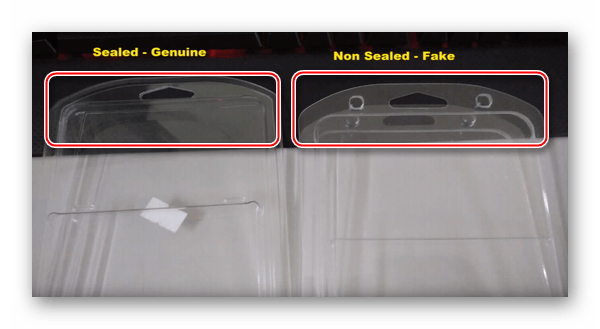
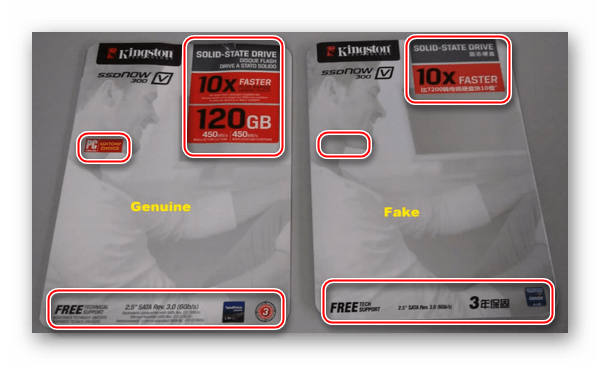
- Фирменная упаковка от Kingston запечатана и её невозможно просто открыть. Поддельная пластиковая оболочка держится на чём-то вроде заклёпок.
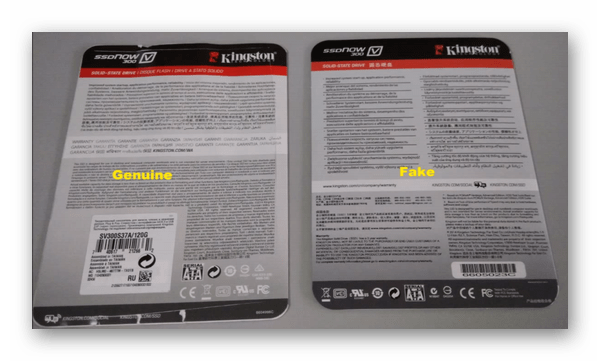
- Оригинальная картонная подложка содержит на порядок больше информации и текста, чем контрафакт.
- Структура подачи информации на обратной стороне подложки полностью отличается от поддельной.
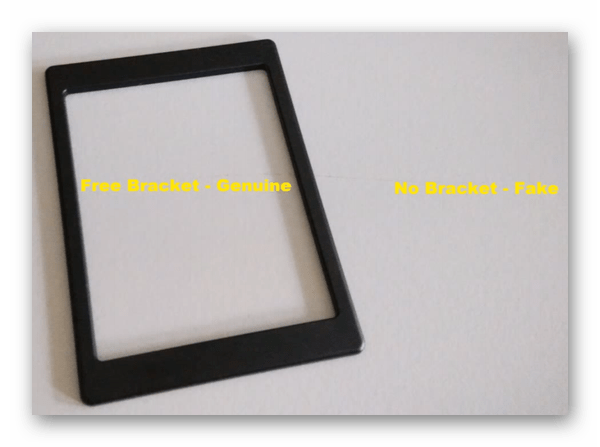
- В комплекте с оригинальным SSD идёт бесплатный кронштейн, чего нет в контрафактной упаковке.
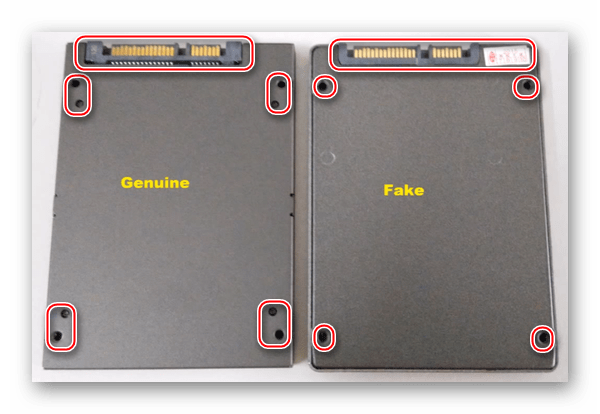
- Настоящий диск имеет два ряда гнёзд для крепления, когда ненастоящий лишён второго, сам SATA-разъём впаян глубже, а возле него могут находиться посторонние наклейки.
- На оригинальном накопителе присутствует переливающаяся цветами на свету зона розового и красного цвета.
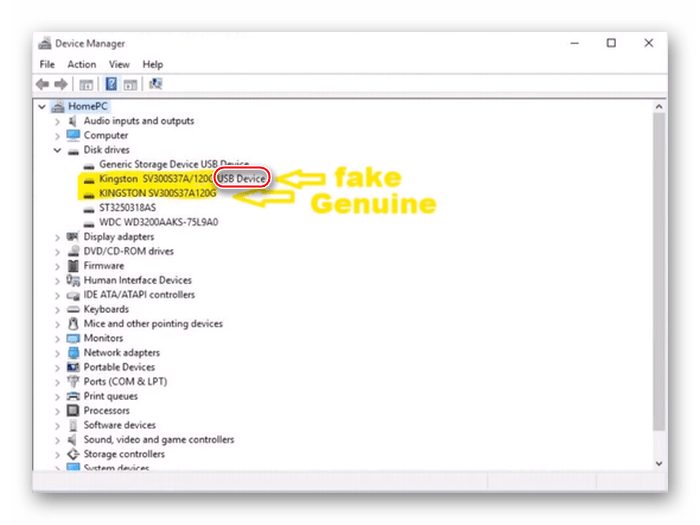
- Фирменный диск отображается в «Диспетчере устройств» без всяких лишних приписок, а контрафактный может иметь дополнение в имени, например: «USB Device».
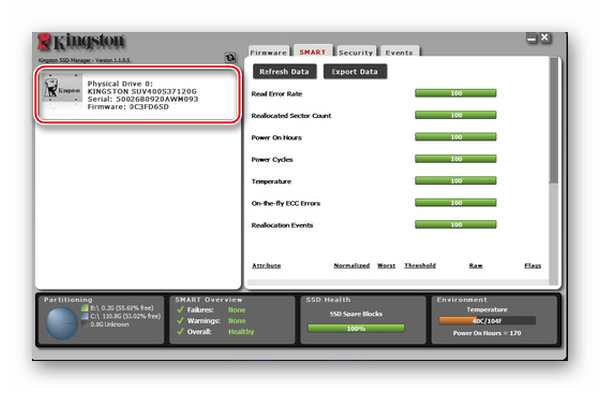
- Настоящий SSD от Kingston корректно отображается в фирменном софте, а ненастоящий будет полностью проигнорирован программой, что и является нашей проблемой.
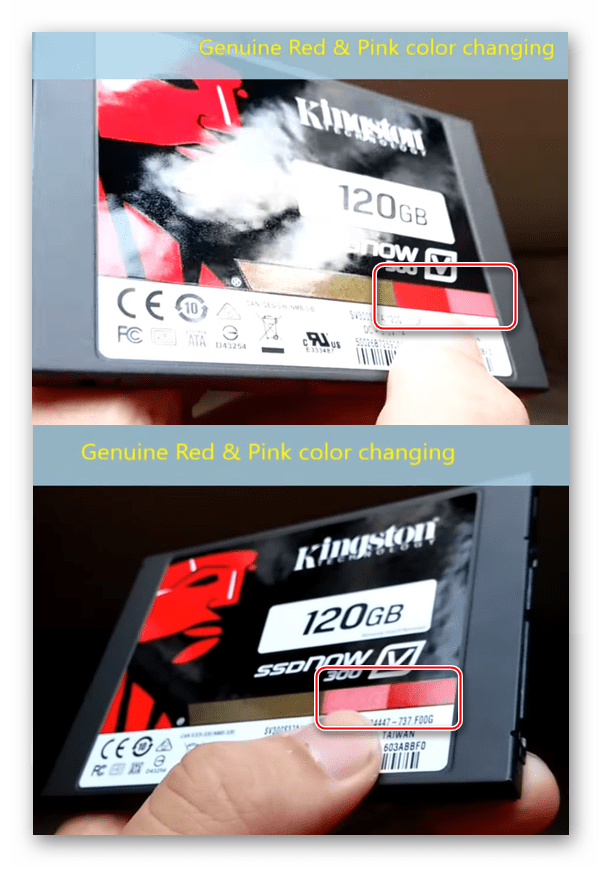
У поддельного устройства цвета не меняются:
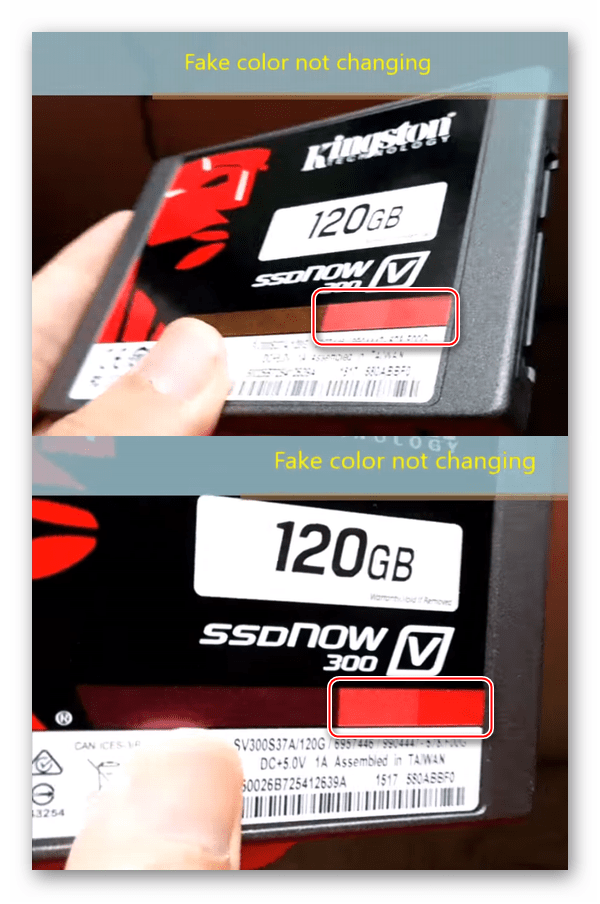
По совокупности вышеизложенных отличий оригинально и поддельного устройства вы сможете определить, какой у вас SSD, от Kingston или нет, если хотя бы две черты ненастоящего диска применимы к вашему конкретному девайсу. И именно это является причиной того, что Kingston SSD Manager не видит твердотельный накопитель. Однако не стоит сбрасывать со счетов производственный брак, и если диск всё же обладает всеми чертами фирменного, но не функционирует в полной мере, это повод обратиться в службу техподдержки по гарантии от производителя.
Причина 3: Неисправность накопителя
Если раньше SSD успешно определялся программой от Kingston и проблема возникла не внезапно и/или с не вновь подключаемым устройством, а дала о себе знать лишь по прошествии какого-то времени, могли возникнуть неполадки в аппаратной части устройства. Твердотельные накопители на данный момент своего развития не являются устройствами с абсолютной степенью надёжности и большим ресурсом. У них, как и у их предшественников жёстких дисков, могут возникать различные сбои во время работы, особенно если эксплуатировать их неправильно или в стрессовых условиях под влиянием негативно воздействующих факторов.
Важно сделать проверку диска на работоспособность и по необходимости исправить ошибки, которые можно устранить программно в домашних условиях. Разумно изменить манеру использования твердотельного накопителя, если тот используется как жёсткий диск, форматируется, дефрагментируется, содержит файл подкачки и так далее. Для этого рекомендуем вам ознакомиться со специальным материалом в отдельных статьях.
Подробнее:
Проверка работоспособности SSD
Проверяем SSD на наличие ошибок
Можно ли форматировать SSD
Настройка SSD для работы в Windows 7 / Windows 10
Изучив поданный материал, вы сможете диагностировать и исправить ошибки устройства, лучше настроить взаимодействие системы и SSD узнав, какие службы лучше оставить, а какие, наоборот, отключить. Кроме того, важно понимать, каким системным файлам стоит находиться на твердотельном накопителе, а каким — на жёстком диске.
В материале, изложенном выше, мы рассказали, почему Kingston SSD Manager не видит накопитель. Это может быть из-за некорректных настроек в подсистеме, неоригинальности твердотельного накопителя или же из-за повреждений или производственного брака. Если описанных для реализации мер окажется недостаточно и диск всё равно не будет видим для нужной программы, остаётся лишь отнести его в сервис. Там ему поставят точный диагноз и произведут починку или же замену по гарантии.
Читайте также:
Почему компьютер не видит SSD
Что делать, если BIOS не видит SSD
Наша группа в TelegramПолезные советы и помощь
Readers help support Windows Report. We may get a commission if you buy through our links.
Read our disclosure page to find out how can you help Windows Report sustain the editorial team. Read more
The Kingston SSD is one of the most used drivers, but some complain it is not detected by their PC. The Drive may not show in Disk Management or it is not detected in BIOS.
If you’re facing something of the sort, we got you covered. In this guide, we’ll explain step by step how to make your PC recognize your Kingston SSD. Let’s get right to it.
How can I fix the Kingston SSD not detected?
Before proceeding to the solutions in this section:
- Test the Kingston SSD drive that is not showing up on another computer. The problem might be with the drive if it does not work.
- You can also test with another cable on different ports. If it passes these hardware tests, you can explore the solutions below:
1. Change onboard SATA mode
NOTE
Note that some steps and parameters might vary depending on your BIOS. However, the general concept should be the same.
- Press the Windows key, click the Power icon, and select the Restart option.

- Power on your PC and press the appropriate key (F1, F2, F10, or F12, depending on your PC) to enter BIOS.
- Select the System or Hardware Configuration option.
- Then, navigate to the AHCI or SATA Mode.
- Choose Enable AHCI if you find it there. If not, set the SATA Mode to AHCI.

If your Kingston SSD is not detected on BIOS, it might be because your PC’s SATA mode is still set to the old IDE configuration. You must change the settings to the modern AHCI mode to fix it.
2. Initialize the drive
- Press the Windows key + R, type diskmgmt.msc, and press Enter.
- Right-click your SSD drive and select Initialize Disk.

- Select all the partition style and click OK.
- Right-click the newly allocated space and choose New Simple Volume.

- Select the proper size and drive letter and that’s it.


3. Set disk drive letter
- Press the Windows key + R, type diskmgmt.msc, and hit Enter.
- Right-click on the SSD drive and choose Change drive letter and path…

- If it does not have a drive letter, click the Add… button. If it has, choose the Change… button instead.

- Choose the drive letter you want and click the OK button to save the changes.
- Finally, restart your PC.


The drive letter is essential for your PC to access the SSD. So, if your Kingston SSD is not detected, changing or adding a drive letter might help fix the issue.
- Microsoft wants Windows 10 users to upgrade to Windows 11 or Copilot + PCs
- Deleting ‘inetpub’ folder lets hackers permanently stop Windows updates, Microsoft warns
- The latest KB5055612 for Windows 10 22H2 brings huge stability to the OS
- Microsoft April 2025 Patch Tuesday: Fixes for 134 security vulnerabilities, one exploited Zero-Day
- With KB5055518, Windows 10 finally fixes a basic File Explorer issue
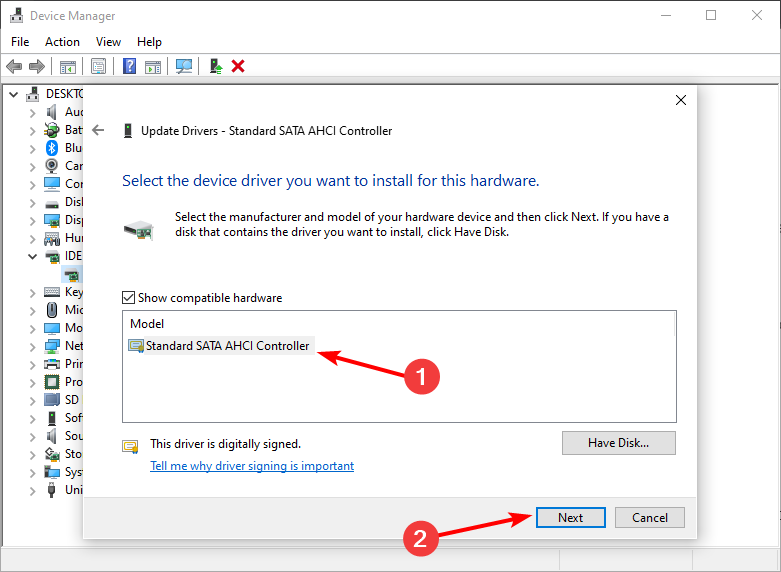
4. Update drivers
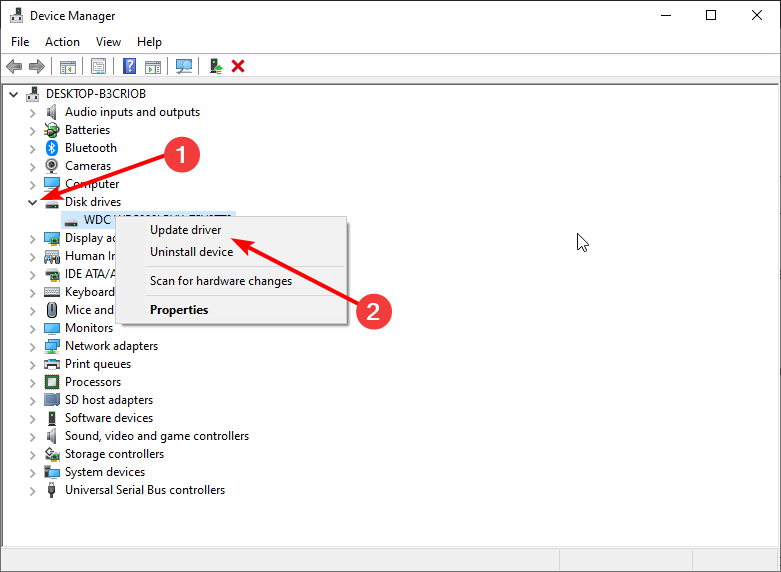
- Press the Windows key + X and select Device Manager.
- Click the arrow next to the Disk drives option to expand it and right-click the driver there.
- Choose the Update driver option.

- Now, select Search automatically for drivers and install any available update.
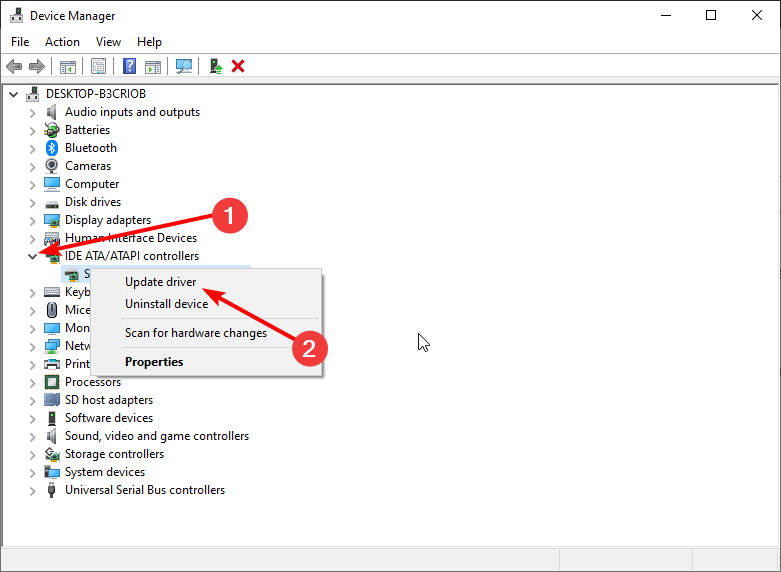
- Go back to the Device Manager window and expand the IDE ATA/ATAPI controllers option.
- Right-click the driver there and select Update driver.
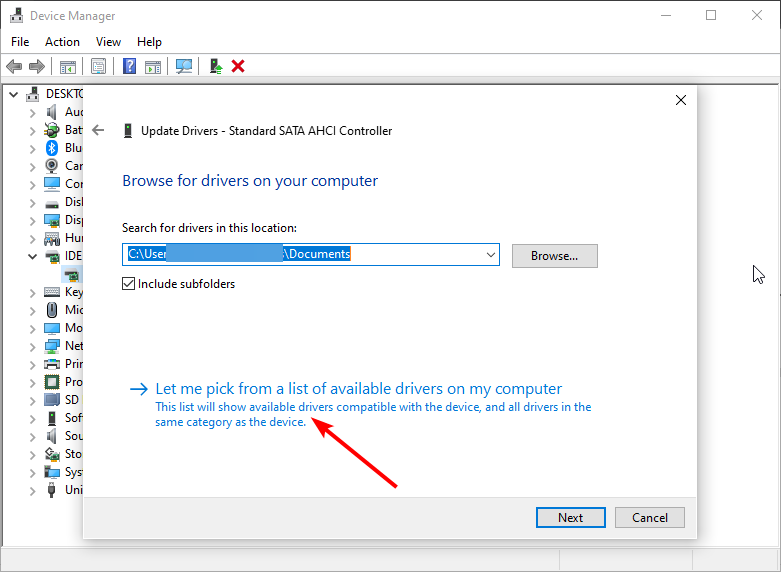
- Choose Browse my computer for drivers.
- Now, select Let me pick from a list of available drivers on my computer.
- Finally, select the Standard SATA AHCI Controller option and click the Next button.


To avoid these kinds of errors and performance issues as much as possible, try keeping your device drivers up to date.
To make this easier, you can use a driver updater tool like PC Helpsoft Driver Updater. It’s designed to scan and update your drivers automatically, so you won’t run into errors caused by drivers in the future.
5. Run the Memory Diagnostic tool
- Press the Windows key + R, type mdshed.exe, and hit Enter.
- Select Restart now and check for problems (recommended) option.

- Now, wait for the diagnosis to be complete and follow the recommendations.

If your Kingston SSD is not showing up in Disk Management on Windows 10, it might be due to some issues with the drive. The Memory Diagnostic tool should help detect these issues and recommend possible solutions.
6. Download the Kingston SSD Manager
- Head to the Kingston SSD Manager page and pick the app version you want. We recommend the up-to-date one unless your drive is very old.
- Hit the download button to get the exe file.

- Install the app on your PC.

- Go to the Health tab to run a quick troubleshooting test on your SSD. The app will tell you how to fix any issues found.


Another option is to download and install the Kingston SSD Manager. This app will show you if there is a problem with your drive.
The reason why your Kingston M.2 SSD might not be detected could be incorrect BIOS settings, a defective drive, outdated drivers, or a missing drive letter.
Following the steps outlined above should help you fix it. Good maintenance practice can also help with slow SSDs and overall better performance.
Feel free to let us know if the solutions in this guide helped you get past the issue in the comments below.
Vladimir Popescu
Being an artist his entire life while also playing handball at a professional level, Vladimir has also developed a passion for all things computer-related.
With an innate fascination for research and analysis, and realizing many other people share his passion for this subject, he delved into writing Windows-related articles, so other people can also benefit from the acquired information.
When not writing kick-ass articles, Vladimir likes to spend his time doing Crossfit and creating art.
Здравствуйте!
В наличии SSD диск Kingston A400 SA400S37240G.
Симптомы – перестал определяться в системе, не виден в BIOS.
Начинка диска:
From smart: [SMI2258XT] [R0510A0 00] [B1600]
Controller: SM2258 bufferless
FlashID: Micron 64L (B16A) TLC 256Gb/CE 256Gb/die
В режиме RomMode удалось прошить диск с помощью SM2258XT_B16A_PKGR0524A_FWR0510A0
Параметры, которые были установлены при перепрошивке вручную, другие не менялись:
Flash Select — Micron, 512Gbit, MT29F512G08EEHAF (B16A) (SM2258XT) – вариант только один, других не было.
Model Name — Kingston SA400S37240G
Vendor Specific — SSD
Serial Number – указан родной, который был нанесен на корпусе.
Cap Type — IDEMA
Disk Size — 240 Gb
Disk Type — SSD
Pretest — 1. Don’t Reference Original Bad
Прошивка прошла успешно.
До, была прошивка — R0105A (старые данные Crystal Disk Info и отметка на корпусе)
После, стала R0510A0.
Диск стал рабочим, с него грузится система, объем нормальный, нареканий нет.
Но после прошивки его в упор не видит официальная утилита Kingston SSD Manager.
Возможно, я указал не все параметры при перепрошивке или указал неправильно.
Также заметил, что раньше название фирмы в названии модели было в верхнем регистре (KINGSTON), а я указал Kingston SA400S37240G. Имеет ли это значение, не знаю.
Понимаю, что это больше косметика, но хотелось бы, чтобы был виден в фирменном ПО.
Как можно этого добиться?