
Elastic search Kibana installation step by step tutorials on windows ..
This tutorials explains about how to install Elastic search on Windows machine.
This can be installed in two ways.
- Install using Zip file
- Install as window Service
This is developed using java language, So java installation is prerequisite.
Kibana Elastic Search installation on windows
Following are step by step for installation on windows.
- First, Go to here
- Download installer that is zip file
- It downloads elasticsearch-8.6.1-windows-x86_64.zip file into local folder
- Extract and copy to Drive folder, For example,
A:\Java\elasticsearch-8.6.1
How do I start Elasticsearch on Windows?
To install Elasticsearch on Windows, Please follow below steps.
- First download zip file from elastic website
- Unzip downloaded file into local folder
- Go to Directory, Run following command
elasticsearch.bat
A:\Java\elasticsearch-8.6.1\bin>elasticsearch.bat
warning: ignoring JAVA_HOME=A:\Java\jdk1.8.0; using bundled JDK
[2023-02-12T19:30:28,100][INFO ][o.e.n.Node               ] [KIRAN] version[8.6.1], pid[16264], build[zip/180c9830da956993e59e2cd70eb32b5e383ea42c/2023-01-24T21:35:11.506992272Z], OS[Windows 10/10.0/amd64], JVM[Oracle Corporation/OpenJDK 64-Bit Server VM/19.0.1/19.0.1+10-21]
[2023-02-12T19:30:28,130][INFO ][o.e.n.Node               ] [KIRAN] JVM home [A:\Java\elasticsearch-8.6.1\jdk], using bundled JDK [true]
[2023-02-12T19:30:28,130][INFO ][o.e.n.Node               ] [KIRAN] JVM arguments [-Des.networkaddress.cache.ttl=60, -Des.networkaddress.cache.negative.ttl=10, -Djava.security.manager=allow, -XX:+AlwaysPreTouch, -Xss1m, -Djava.awt.headless=true, -Dfile.encoding=UTF-8, -Djna.nosys=true, -XX:-OmitStackTraceInFastThrow, -Dio.netty.noUnsafe=true, -Dio.netty.noKeySetOptimization=true, -Dio.netty.recycler.maxCapacityPerThread=0, -Dlog4j.shutdownHookEnabled=false, -Dlog4j2.disable.jmx=true, -Dlog4j2.formatMsgNoLookups=true, -Djava.locale.providers=SPI,COMPAT, --add-opens=java.base/java.io=ALL-UNNAMED, -XX:+UseG1GC, -Djava.io.tmpdir=C:\Users\Kiran\AppData\Local\Temp\elasticsearch, -XX:+HeapDumpOnOutOfMemoryError, -XX:+ExitOnOutOfMemoryError, -XX:HeapDumpPath=data, -XX:ErrorFile=logs/hs_err_pid%p.log, -Xlog:gc*,gc+age=trace,safepoint:file=logs/gc.log:utctime,pid,tags:filecount=32,filesize=64m, -Xms8111m, -Xmx8111m, -XX:MaxDirectMemorySize=4253024256, -XX:G1HeapRegionSize=4m, -XX:InitiatingHeapOccupancyPercent=30, -XX:G1ReservePercent=15, -Des.distribution.type=zip, --module-path=A:\Java\elasticsearch-8.6.1\lib, --add-modules=jdk.net, -Djdk.module.main=org.elasticsearch.server]
Ставим на клиенты. Для начала, на сервер скачаем и поставим несколько готовых дашбордов Kibana с индексами Beats:
cd ~/ELK/releases/beats/
sudo curl -L -O http://download.elastic.co/beats/dashboards/beats-dashboards-1.1.0.zip
sudo unzip beats-dashboards-1.1.0.zip
cd beats-dashboards-1.1.0/
./load.sh
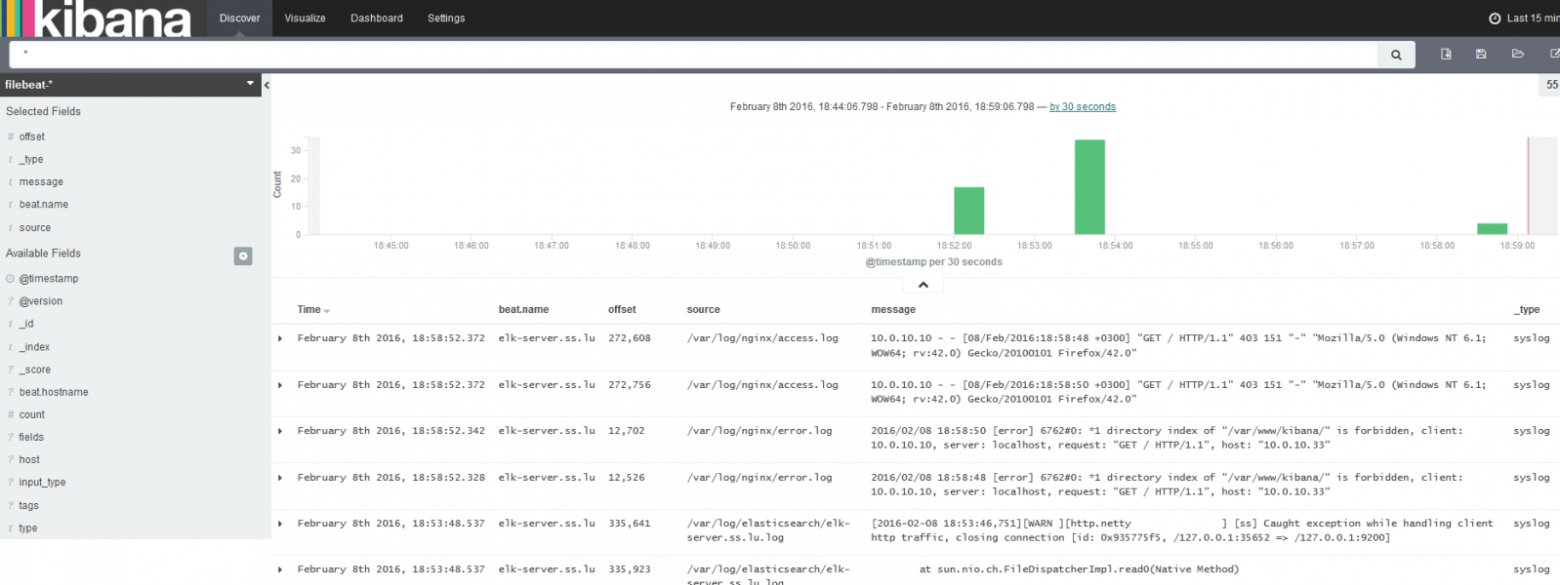
Заходим в web:
http://ip_elk-server.ss.lu:5601
И видим что были добавлены дашборды Kibana с индексами Beats:

Topbeat 1.1.0 (Linux)
Получение данных об инфраструктуре сервера.
Передаёт информацию о работе процессора, использованию памяти. Для каждого процесса отображается информации о родители, pid, состояние и т.д. Также Topbeat позволяет просматривать информацию о файловой системе — состояние дисков, объём свободного пространства и т.д.
Установка (на клиенте):
cd ~/ELK/releases/beats/topbeat/
sudo curl -L -O https://download.elastic.co/beats/topbeat/topbeat_1.1.0_amd64.deb
sudo dpkg -i topbeat_1.1.0_amd64.deb
На сервер нужно добавить шаблоны индексов Topbeat чтобы Elasticsearch стал правильно анализировать информацию на входе:
sudo curl -XPUT 'http://localhost:9200/_template/topbeat' -d@/etc/topbeat/topbeat.template.json
При успешной загрузки мы должны увидеть:
{"acknowledged":true}
Файл topbeat.template.json создаётся при установке Topbeat и имеет расположение по умолчанию /etc/topbeat/topbeat.template.json. Поэтомоу если на сервере ELK мы по каким то причинам не будем устанавливать клиенты Beats, то нам необходимо будет скопировать этот шаблон с клиента на сервер, либо создать этот файл на сервере и скопировать туда его содержимое (с клиента). И далее его загрузить curl -XPUT ‘адрес_сервер_elk:9200/_template/topbeat’ -d@/PATH/topbeat.template.json.
Но будем считать что Битсы установлены на сервер и имеют следующее месторасположение /etc/topbeat/topbeat.template.json.
Редактируем конфиг (на клиенте):
sudo vi /etc/topbeat/topbeat.yml
В блоке output нужно за комментировать обращение к elasticsearch, т.к мы будем использоватеть logstash:
### Elasticsearch as output
  #elasticsearch:
    #hosts: ["localhost:9200"]
Раскомментируем блок с Logstash, укажем его IP-адресс и порт:
  logstash:
    hosts: ["ip_elk-server.ss.lu:5044"]
Важно: не используйте табуляцию для передвижения курсора в конфиге! Только пробелы. Иначе получите ошибку:
Loading config file error: YAML config parsing failed on /etc/topbeat /topbeat.yml: yaml: line 14: found character that cannot start any token. Exiting.
Если сервер Logstash находится во внешней сети, то на фаерволле удалённого сервера нужно настроить форвардиг порта, в данном случаем 5044 (tcp/udp).
Дополнительные опции логирования хорошо описаны в конфигах.
Запускаем сервис:
sudo /etc/ini.d/topbeat start
Открываем интерфейс Kibana и наблюдаем поступающую информацию:

Filebeat 1.1.0 (LINUX)
Транслирует на сервер информацию из динамических файлов, которые мы будем указывать:
Устанвока:
cd ~/ELK/releases/beats/filebeat/
sudo curl -L -O https://download.elastic.co/beats/filebeat/filebeat_1.1.0_amd64.deb
sudo dpkg -i filebeat_1.1.0_amd64.deb
Добавим индексы на сервере (по аналогии с как мы настраивали Topbeat. Т.е. если на сервере шаблон отсутствует — мы его создаём):
sudo curl -XPUT 'http://localhost:9200/_template/filebeat?pretty' -d@/etc/filebeat/filebeat.template.json
Открываем конфиг:
sudo vi /etc/filebeat/filebeat.yml
Указываем из каких файлов будем забирать информацию (по умолчанию стоят все файлы из /var/log c расширение .log):
prospectors:

      paths:
        - /var/log/*.log
Указываем то, что нужно нам на данном клиенте, например:
paths:
      # - /var/log/*.log
        - /var/log/elasticsearch/*.log
        - /var/log/syslog
        - /var/log/nginx/*.log
      # - c:\programdata\elasticsearch\logs\*
Помните про отсутствие табуляции в коде!
Мы также будем использовать logstash для обработки индексов:
### Elasticsearch as output
  #elasticsearch:
    # Array of hosts to connect to.
    # Scheme and port can be left out and will be set to the default (http and 9200)
    # In case you specify and additional path, the scheme is required: http://localhost:9200/path
    # IPv6 addresses should always be defined as: https://[2001:db8::1]:9200
    #hosts: ["localhost:9200"]
...
  ### Logstash as output
  logstash:
    # The Logstash hosts
    hosts: ["ip_elk-server.ss.lu:5044"]
Запустим:
sudo /etc/init.d/filebeat start
Смотрим информацию от Filebeat:
Packetbeat 1.1.0 (Linux)
Очень полезный инструмент. Анализирует трафик между серверами. Моментально выявляет ошибки. Анализирует протоколы DNS, HTTP, MySQL, PostgreSQL, КЗС, Memcache и другие.
Настраивается по той же аналогии что и Topbeat/Filebeat:
sudo apt-get install libpcap0.8
sudo curl -L -O https://download.elastic.co/beats/packetbeat/packetbeat_1.1.0_amd64.deb
sudo dpkg -i packetbeat_1.1.0_amd64.deb
Редактируем кофиг (комментируем Elasticsearch и настраиваем Logstash)
output:
   #elasticsearch:
       #hosts: ["localhost:9200"]
     logstash:
         hosts: ["ip_elk-server.ss.lu:5044""]
Идём на сервер и добавляем индекс для Packetbeat:
sudo curl -XPUT 'http://localhost:9200/_template/packetbeat' -d@/etc/packetbeat/packetbeat.template.json
Запускаем:
sudo /etc/ini.d/packetbeat start
Winlogbeat (Windows)
Скачиваем www.elastic.co/downloads/beats/winlogbeat. Распаковываем в C:\ и переименовываем в Winlogbeat. Запускаем PowerShell от админа и устанавливаем сервис:
PS C:\Users\Administrator> cd 'C:\Winlogbeat'
PS C:\Winlogbeat> .\install-service-winlogbeat.ps1
Если мы видим сообщение о том что скрипты отключены в системе по умолчанию (а так оно и будет), то мы просто создаём политику для Winlogbeat:
PowerShell.exe -ExecutionPolicy UnRestricted -File .\install-service-winlogbeat.ps1
Security warning
Run only scripts that you trust. While scripts from the internet can be useful,
this script can potentially harm your computer. If you trust this script, use
the Unblock-File cmdlet to allow the script to run without this warning message.
Do you want to run C:\Program Files\Winlogbeat\install-service-winlogbeat.ps1?
[D] Do not run  [R] Run once  [S] Suspend  [?] Help (default is "D"): R

Status   Name               DisplayName
------   ----               -----------
Stopped  winlogbeat         winlogbeat
Перед стартом сервиса правим в конфиге — C:\Winlogbeat\winlogbeat.yml.
output:
   #elasticsearch:
   #    hosts: localhost:9200
    logstash:
        hosts: ["ip_elk-server.ss.lu:5044"]
В блоку event_logs перечислены основные журналы системы, которые нужно транспортировать на Logstash:
winlogbeat:
  registry_file: C:/ProgramData/winlogbeat/.winlogbeat.yml
  event_logs:
    - name: Application
    - name: Security
    - name: System
logging:
  to_files: true
  files:
    path: C:/winlogbeat/winlogbeat/Logs
  level: info
В event_logs можно добавить и другие журналы, список которых можно посмотреть так:
PS C:\Users\Administrator> Get-EventLog *
Если система выше Vista, то можно указать каналы:
PS C:\Users\Administrator> Get-WinEvent -ListLog * | Format-List -Property LogName
Далее нам нужно загрузить на сервер индексы для winlogbeat как мы это делали для topbeat, filebeat, packetbeat. Это можно сделать удалённо:
PS C:\Winlogbeat> Invoke-WebRequest -Method Put -InFile winlogbeat.template.json -Uri http://IP_address_elk-server:9200/_template/winlogbeat?pretty
Есть есть проблемы такого метода, то можно сделать следующее:
Создаём на сервере файл индекса winlogbeat.template.json
sudo vi ~/ELK/releases/beats/winlogbeat/winlogbeat.template.json. На клиенте Windows открываем файл C:\winlogbeat\winlogbeat.template.json и копируем его содержимое в файл ~/ELK/releases/beats/winlogbeat/winlogbeat.template.json.
{
  "mappings": {
    "_default_": {
      "_all": {
        "enabled": true,
        "norms": {
          "enabled": false
        }
      },
      "dynamic_templates": [
        {
          "template1": {
            "mapping": {
              "doc_values": true,
              "ignore_above": 1024,
              "index": "not_analyzed",
              "type": "{dynamic_type}"
            },
            "match": "*"
          }
        }
      ],
      "properties": {
        "@timestamp": {
          "type": "date"
        },
        "message": {
          "index": "analyzed",
          "type": "string"
        }
      }
    }
  },
  "settings": {
    "index.refresh_interval": "5s"
  },
  "template": "winlogbeat-*"
}
Далее (на сервере) загружаем этот индекс на elasticsearch, для того чтобы он смог верно проанализировать информацию и предоставить её привычном формате:
Переходим в каталог где у нас лежит созданный файл winlogbeat.template.json.
cd ~/ELK/releases/beats/winlogbeat
ll
итого 12
drwxr-xr-x 2 root root 4096 февр.  8 23:10 ./
drwxr-xr-x 7 root root 4096 февр.  8 16:00 ../
-rw-r--r-- 1 root root  729 февр.  8 23:10 winlogbeat.template.json
# Загружаем индекс
sudo curl -XPUT 'http://localhost:9200/_template/winlogbeat' -d@winlogbeat.template.json
На выходе должно быть:
{"acknowledged":true}
Идём на клиент и запускаем сервис winlogbeat. После это начинаем мониторить данные через Kibana, определяя представление по загруженным индексам:

Смотрим дашборды:

In this article, I will provide a detailed, step-by-step guide on setting up Elasticsearch and Kibana on a Windows system. We’ll begin by downloading the necessary files, and then proceed to installation and configuration on your local machine.
What is Elastic search?
Elasticsearch is an open-source, distributed search engine that helps in searching large-scale data, data visualization, security, logging, and monitoring. Elasticsearch is widely used in large-scale applications like e-commerce website search engines, store log data and event data analysis, and more. Elasticsearch provides a wide range of features, like full-text search, schema-free storage of structured and unstructured data, aggregation, and analytics.
What is kibana?
Kibana is an open-source data visualization tool that is used to analyze large volumes of data in real-time applications. It provides a wide range of features, like data visualization, searching capability based on elastic, dashboarding, and data transformation. It is easy to integrate with Elasticsearch, which helps to leverage powerful search, and Elasticsearch analytics provides quick data exploration to their users.
How to install Elasticsearch and Kibana on a Windows machine?
1. Find elastic search search from Google using the below keywords
2. Download Elasticsearch from this URL: Click here to download elasticsearch
3. Select Windows from the platform dropdown.
4. Click on the Windows button to download the Elasticsearch setup.
5. The Elasticsearch set-up will be downloaded in a zip folder.
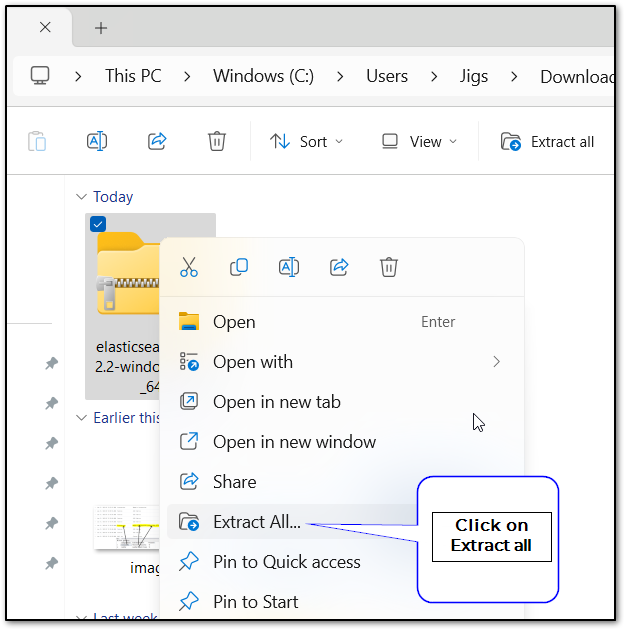
6. Extract all files from the downloaded zip folder.
7. Click on the bin folder and click on the elastic search bat file.
8. If you get a screen like the above, then please click on More Info and then click on the Run button.
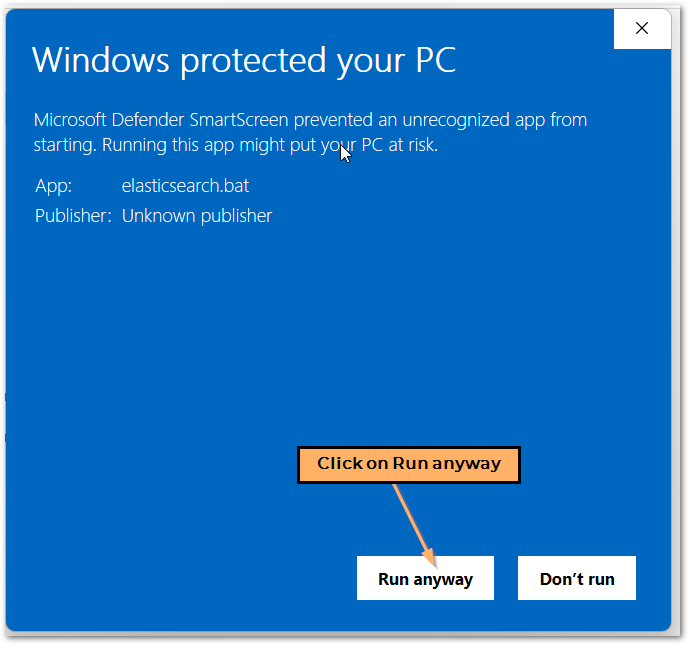
9. Once you click on the Run anyway button, the elastic search setup will start, and you will see the below screen.
10. We are done with the elastic search setup on the local machine, and it is running now. On the above screen, we have some useful information that will be required for kibana and elastic configuration.
There are three items we need to keep in mind.
- User Name: elastic
- Password: Yellow highlighted in the above snippet
- Enrollment Token:Yellow is highlighted in the above snippet, which will be valid for the next 30 minutes from the Elastic search run.
11. Download Kibana from URL: Click here to download kibana
12. Click on the Windows Button to download Kibana Setup.

13. Once you get zip files from the download, extract the Kibana setup and keep it in the same place where we kept the elastic search setup.

14. Click on the Kibana bat file to start the Kibana setup and wait for some time to complete the execution of the bat file.
15. Once execution is done, you will get a localhost URL where you can access Kibana on your local machine.
16. Once you open the URL in your browser, you will get the above screen, where you have to enter the «enrollment token» which we have marked in step no. 8 that we have to enter in the above screen.
17. Click on the Configure Elastic button after the enrollment token is entered.
Note. This enrollment token is valid only for the next 30 minutes. If you get a token invalid error, then you need to re-generate the enrollment token using this command from your command point.
- Make sure your elastic search is running on your system, then run the below command.
- Go to the bin folder of your elasticsearch set-up folder, then run «elasticsearch-create-enrollment-token —scope kibana.»
18. Once you click on the Configure Elasticsearch button, you will see a screen below with the status of the configuration.
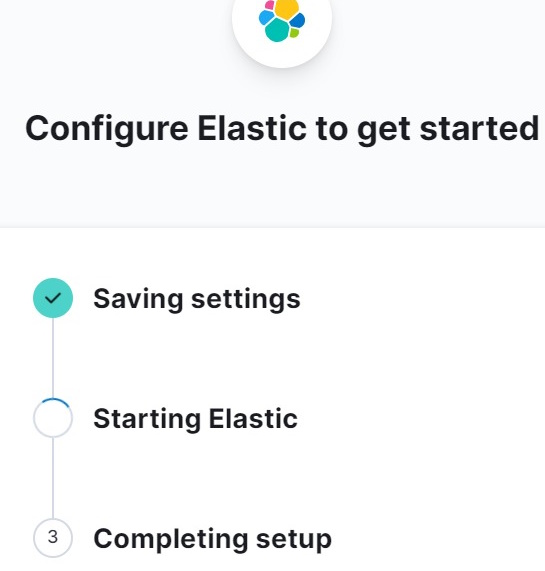
19. Once the configuration is done, you need to enter your username and password to login to Kiban and Elasticsearch.
20. Once you log in to Elasticsearch, you will be able to see the home page of Elasticsearch.

21. Once you click on «Explore on my own,» it will land you on the Elasticsearch home page as below.
22. You can explore more on an Elasticsearch dashboard, as shown below. You can use the Create dashboard button to create a custom dashboard and data visualization. By using Dev Tools, you can create an elastic index and perform CRUD operations (create, read, update, delete). I am planning to write the next article on CRUD operations in Elasticsearch.
Summary
In this article, we have learned how to set up Elasticsearch and Kibana by following the above 20 steps. Elasticsearch and Kibana have been installed on the local machine and are now up and running. I hope this article will help you set up Elasticsearch and Kibana on your Windows machine. Thank you so much for reading. If you wish to read more articles, please refer to my article at this URL: Click Here
You can find my other articles on elasticsearch.net here.
- Getting Started With Elastic In Using .NET Nest Client
- CRUD Operation using Elastic Search And .Net Core API
How to Install Kibana on Windows 10
Kibana is an open source data visualization and exploration tool that provides visualizations and dashboards for Elasticsearch data. In this tutorial, we will guide you through the process of installing Kibana on Windows 10.
Prerequisites
Before we begin, make sure you have the following:
- Windows 10 operating system
- Java 8 or higher installed on your system
- Elasticsearch already installed and running on your system
Step 1: Download Kibana
- Go to https://www.elastic.co/downloads/kibana and download the Kibana package for Windows.
- Extract the downloaded package to your preferred location on your system.
Step 2: Configure Kibana
- Open the
kibana.ymlfile located in the extracted Kibana directory using a text editor. - In the
elasticsearch.hostssetting, enter the URL of the Elasticsearch instance you want to connect Kibana with. For example,elasticsearch.hosts: http://localhost:9200. - Save and close the
kibana.ymlfile.
Step 3: Start Kibana
- Open a Command Prompt window and navigate to the Kibana directory.
- Run the following command to start Kibana:
.\bin\kibana.bat - Wait for a few seconds until Kibana starts up.
Step 4: Access Kibana
- Open a web browser and navigate to
http://localhost:5601, which is the default URL for Kibana. - If everything is configured correctly, you should see the Kibana landing page in your browser.
Congratulations! You have successfully installed Kibana on your Windows 10 system. You can now start visualizing and exploring your Elasticsearch data using Kibana.
If you want to self-host in an easy, hands free way, need an external IP address, or simply want your data in your own hands, give IPv6.rs a try!
Alternatively, for the best virtual desktop, try Shells!
Introduction
The ELK Stack (Elasticsearch, Logstash, and Kibana) has matured into a robust data management and analysis platform.
Docker is the most popular choice for deploying these tools; however, this article will focus on a Windows installation.
Going through the Windows installation process provides an opportunity to grasp the inner workings of the ELK Stack.
Installing Elastic Search on Windows
Installing Elastic Search on your Windows system. Here’s the rundown:
Get Ready: Make sure you have the Microsoft Universal C Runtime library installed. If not, it’s available on Windows Update. Can’t install it? No worries, just disable Elasticsearch’s machine learning feature.
Download Elasticsearch: Get the most recent stable version of Elasticsearch. We’ll use version 8.8.1 for our purposes.
Unpack and Install: Locate and unzip the .zip file. You’ll find a folder called elasticsearch-8.8.1, which we’ll refer to as %ES_HOME%.
Fire it Up: Launch Elasticsearch from the command line with \bin\elasticsearch.bat, or just double click on it. It’ll enable security features and generate a superuser password for you.
Enroll Nodes: If you’re adding more nodes to your cluster, use the elasticsearch-create-enrollment-token tool. This will help the new nodes join the existing cluster.
Tweak Configs: You can adjust Elasticsearch’s settings through the %ES_HOME%\config\elasticsearch.yml file or via the command line.
Check Your Work: Test if Elasticsearch is running by sending an HTTPS request to port 9200 on localhost. From powershell you can use Invoke-RestMethod "http://localhost:9200/_cluster/health?pretty", you could also check from the browser with http://localhost:9200/_cat/health.
Build as a Service: Set up Elasticsearch as a service on your Windows machine using the provided elasticsearch-service.bat command.
You can disable SSL for local development.
Reference: Installation of Elastic Search in Windows
Installing Kibana on Windows
Now for Kibana. Here’s the rundown:
Prerequisites: To set the stage for our journey into Kibana, we first ensure that our Elasticsearch server is operational and ready for action. Kibana is the visualisation layer of the Elastic Stack, designed to work in harmony with Elasticsearch. Therefore, it’s crucial to have Elasticsearch prepared and accessible.
Acquisition: We initiate the process by acquiring the most recent stable version of Kibana. For the purpose of this illustration, we’ll utilise version 8.8.1.
Installation: Upon successfully downloading the .zip file, we then proceed to unzip it. This action creates a new folder kibana-8.8.1-windows-x86_64, a place we’ll refer to as $KIBANA_HOME.
Configuration: We tweak Kibana’s settings via the $KIBANA_HOME\config\kibana.yml file. By default, Kibana starts on port 5601 and seeks connection with the Elasticsearch on localhost:9200.
Initiation: .\bin\kibana.bat is used to launch Kibana from the command line. It may take a few moments to initialize.
Verification: To make sure that Kibana has indeed come alive and is running smoothly, we navigate to http://localhost:5601 in our web browser. The Kibana home page, a sight for sore eyes, should welcome us.
Service Setup: As of the creation of this guide, Kibana lacks an in-built mechanism for running as a Windows service. You could use a third party Windows service wrapper for this.
Reference: The installation process of Kibana on Windows
Update setting of the cluster
In the case that there is not enough free space in your disk, to meet the disk water mark requirement, you could update it:
$uri = "http://localhost:9200/_cluster/settings"
$json = @"
{
"persistent": {
    "cluster.routing.allocation.disk.watermark.low": "99%",
    "cluster.routing.allocation.disk.watermark.high": "99.9%",
    "cluster.routing.allocation.disk.watermark.flood_stage": "99.9%",
    "cluster.info.update.interval": "1m"
  }
}
"@
Invoke-RestMethod -Uri $uri -Method Put -ContentType "application/json" -Body $json
Hello world
We’ve completed the installation, and we are ready to use Elastic Search from the GuI: