
Рассказываем, что делать, если перестала работать клавиша WinKey (или просто Win).
Описанные ниже методы помогут в случае с полностью работоспособной клавиатурой. Если имеет место аппаратная проблема и кнопка не работает сама по себе (сломался подвижный механизм или контакт залит водой), то поможет только квалифицированный ремонт в сервисном центре.
Выключаем «игровой режим»
В некоторых продвинутых клавиатурах и на современных моделях ноутбуков эту кнопку можно отключить программно. Для этого есть специальный режим, который иногда называют игровым.
Суть в том, что клавиша Win вызывает меню «Пуск». И если случайно задеть ее во время игры, то откроется меню «Пуск», а окно с игрой свернется. Чтобы избежать этой неловкости, как раз и нужен «игровой режим».
Как его выключить или включить, вы можете узнать у производителя своего компьютера или клавиатуры. Универсальной инструкции для всех устройств на планете, к сожалению, не существует.
Обычно на компьютер устанавливается отдельное приложение от производителя, которое на постоянной основе отображается в трее (это там, где часы, заряд аккумулятора и прочие мелочи). Можно поискать кнопку включения «игрового режима» там.
Это не относится к игровому режиму, встроенному в операционную систему до Windows 10.
Загрузка …
Снимаем физическую блокировку с клавиши
Аналогично программной блокировке (она описана выше) есть еще и аппаратная.
На некоторых клавиатурах можно найти небольшой переключатель, отключающий клавишу Win. Смысл в нем точно такой же, как и в «игровом режиме» — избежать случайного нажатия.
Главное, не забыть потом этот переключатель вернуть в исходное положение.
Загрузка …
Пересоздаем цифровую карту клавиатуры
- Открываем встроенный поисковик (тот, что справа от меню «Пуск»).
- Ищем там утилиту regedit и запускаем от имени администратора.
- Оказавшись в редакторе заходим в папку HKEY_LOCAL_MACHINE\SYSTEM.
Здесь находятся системные элементы реестра
- Затем открываем подпапку CurrentControlSet\Control.

Почти на месте
- Внутри ищем папку Keyboard Layout и переходим в нее.
- Если внутри нее есть ключ Scancode Map, кликаем по нему правой кнопкой мыши.

Смотрим в правую панель приложения
- Затем выбираем пункт «Удалить».
Готово
Если у вас такого ключа в реестре нет, значит и менять ничего не нужно. Просто закройте реестр и пробуйте другие методы.
Загрузка …
Удаляем, откатываем или обновляем драйверы клавиатуры
Иногда помогают махинации с драйверами. Может помочь их переустановка или откат.
- Открываем встроенный поисковик (тот, что справа от меню «Пуск»).
- Вводим название программы «Диспетчер устройств» и открываем ее.
- Внутри кликаем по меню «Вид».

Сначала включим отображение всех драйверов
- Выбираем пункт «Показать скрытые устройства».

Вот нужный пункт
После этого в категории может появиться еще одна или несколько клавиатур. Это отключенные драйверы. Они выглядят более блекло, чем рабочие. Их надо удалить. Для этого:
- Кликаем правой кнопкой мыши по драйверу.
- Затем выбираем пункт «Удалить».
Клавиатура может заглючить после установки свежей версии драйверов. Чтобы это исправить:
- Открываем диспетчер устройств (как это сделать, я уже рассказал чуть выше).
- Ищем там драйвер своей клавиатуры и дважды кликаем по нему.

Вот и нужный драйвер
- В свойствах клавиатуры переходим во вкладку «Драйвер».

Переходим к параметрам драйверов
- Затем нажимаем на кнопку «Откатить». Если она не доступна, нажимаем на кнопку «Обновить драйвер».

Одно из двух должно помочь
Загрузка …
Post Views: 5 120

Что делать если вы забыли ключ от Windows 10 или Windows 8? Как быть если предыдущий администратор не передал вам ключ от Windows Server 2012 R2? Ноутбук с Windows непонятной версии нужно откатить на заводские настройки, а ключ от операционной системы никто не помнит?
В зависимости от того, как вы получили свою копию Windows 10, для активации может потребоваться 25-значный ключ продукта или цифровая лицензия.
- Цифровая лицензия (в Windows 10 версии 1511 носит название цифрового разрешения) — это способ активации в Windows 10, который не требует ввода ключа продукта.
- Ключ продукта представляет собой 25-значный код, используемый для активации Windows. Вы увидите КЛЮЧ ПРОДУКТА: XXXXX-XXXXX-XXXXX-XXXXX-XXXXX.
Ключ продукта
Если у вас установлен ключ продукта, то можно его узнать. Просто скопируйте текст ниже в файл winkey.vbs и запустите на нужной машине. Если повезёт, то скрипт определит ключ и версию системы.
-
winkey.vbs
Set WshShell = CreateObject("WScript.Shell")
regKey = "HKLM\SOFTWARE\Microsoft\Windows NT\CurrentVersion\"
DigitalProductId = WshShell.RegRead(regKey & "DigitalProductId")

WinProductName = "Windows Product Name: " & WshShell.RegRead(regKey & "ProductName") & vbNewLine
WinProductID = "Windows Product ID: " & WshShell.RegRead(regKey & "ProductID") & vbNewLine
WinProductKey = ConvertToKey(DigitalProductId)
strProductKey ="Windows Key: " & WinProductKey
WinProductID = WinProductName & WinProductID & strProductKey

MsgBox(WinProductKey)
MsgBox(WinProductID)

Function ConvertToKey(regKey)
Const KeyOffset = 52
isWin8 = (regKey(66) \ 6) And 1
regKey(66) = (regKey(66) And &HF7) Or ((isWin8 And 2) * 4)
j = 24
Chars = "BCDFGHJKMPQRTVWXY2346789"
Do
Cur = 0
y = 14
Do
Cur = Cur * 256
Cur = regKey(y + KeyOffset) + Cur
regKey(y + KeyOffset) = (Cur \ 24)
Cur = Cur Mod 24
y = y -1
Loop While y >= 0
j = j -1
winKeyOutput = Mid(Chars, Cur + 1, 1) & winKeyOutput
Last = Cur
Loop While j >= 0
If (isWin8 = 1) Then
keypart1 = Mid(winKeyOutput, 2, Last)
insert = "N"
winKeyOutput = Replace(winKeyOutput, keypart1, keypart1 & insert, 2, 1, 0)
If Last = 0 Then winKeyOutput = insert & winKeyOutput
End If
a = Mid(winKeyOutput, 1, 5)
b = Mid(winKeyOutput, 6, 5)
c = Mid(winKeyOutput, 11, 5)
d = Mid(winKeyOutput, 16, 5)
e = Mid(winKeyOutput, 21, 5)
ConvertToKey = a & "-" & b & "-" & c & "-" & d & "-" & e
End Function
Ключ продукта в BIOS
Лицензионный ключ может быть прописан в BIOS устройства. Узнать его можно через Powershell:
(Get-WmiObject -query 'select * from SoftwareLicensingService').OA3xOriginalProductKey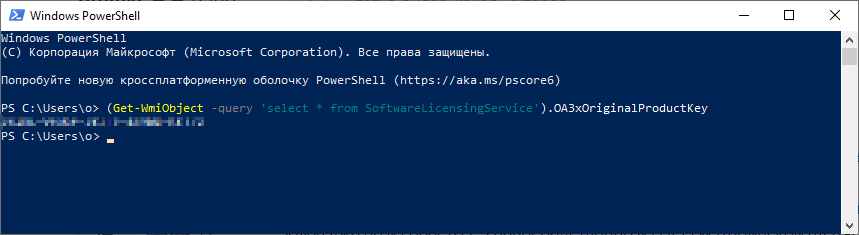
Или в командной строке:
wmic path softwarelicensingservice get OA3xOriginalProductKey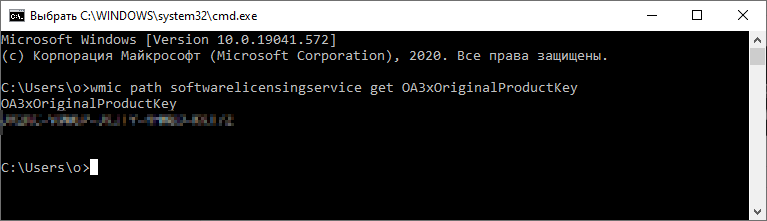
Цифровая лицензия
Если вы бесплатно обновили ОС Windows 7 или Windows 8.1 до Windows 10, вместо ключа продукта вы должны получить цифровую лицензию. Если у вас есть цифровая лицензия для устройства, вы можете переустановить тот же выпуск Windows 10 на этом устройстве без ввода ключа продукта.
В этом случае при попытке запустить скрипт для определения ключа вы получите это: BBBBB-BBBBB-BBBBB-BBBBB-BBBBB.
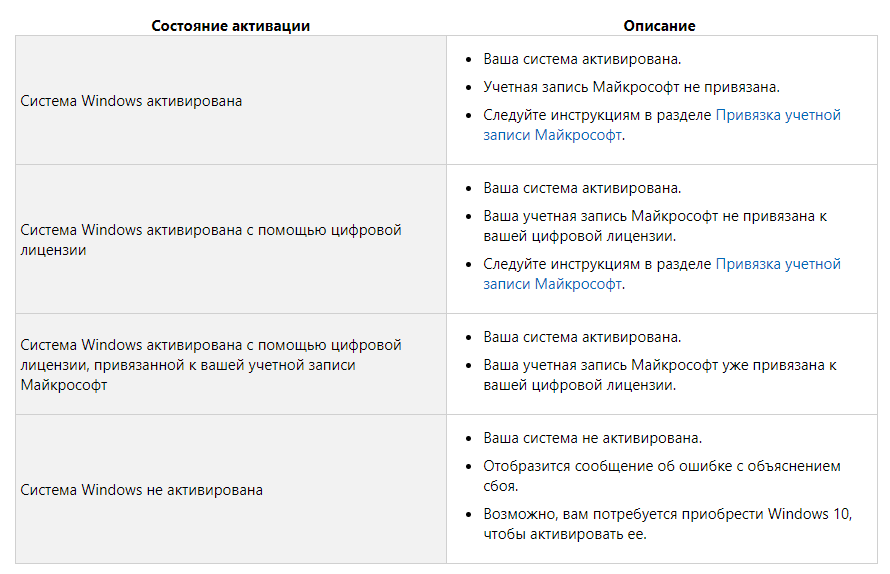
Открываем окно параметров.
Проверить состояния активации в параметрах

Надпись об активации может отличаться:
Ключ по умолчанию
Можно узнать ключ по умолчанию для текущей редакции. Он устанавливается, если вы не указываете свой ключ и сохраняется при получении цифровой лицензии.
Частично:
slmgr -dli
slmgr -dlv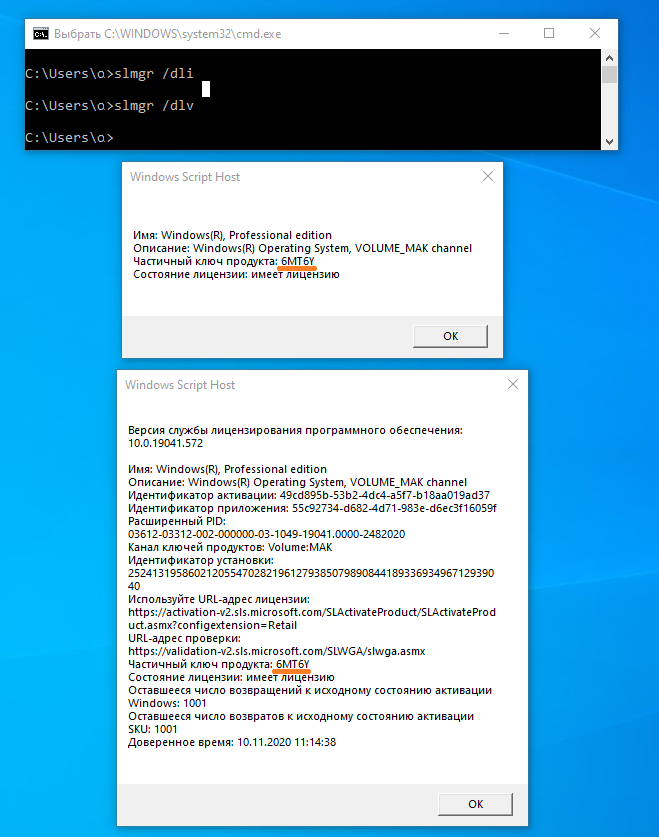
Полную версия ключа можно посмотреть в реестре:
HKEY_LOCAL_MACHINE\SOFTWARE\Microsoft\Windows NT\CurrentVersion\SoftwareProtectionPlatform\BackupProductKeyDefault
Скрипт VBS в помощь. Просто скопируйте текст ниже в файл winkey2.vbs и запустите на нужной машине. Скрипт определит ключ по умолчанию и версию системы.
-
winkey2.vbs
Set WshShell = CreateObject("WScript.Shell")
regKey = "HKLM\SOFTWARE\Microsoft\Windows NT\CurrentVersion\"
regKey2 = "HKLM\SOFTWARE\Microsoft\Windows NT\CurrentVersion\SoftwareProtectionPlatform\"
WinProductKey = WshShell.RegRead(regKey2 & "BackupProductKeyDefault")

WinProductName = "Windows Product Name: " & WshShell.RegRead(regKey & "ProductName") & vbNewLine
WinProductID = "Windows Product ID: " & WshShell.RegRead(regKey & "ProductID") & vbNewLine
strProductKey ="Windows Key: " & WinProductKey
WinProductID = WinProductName & WinProductID & strProductKey

MsgBox(WinProductKey)
MsgBox(WinProductID)
Этот ключ позволит установить windows 10 без проведения активации. Потом автоматически должна активироваться цифровая лицензия, если она привязана к вашей учётной записи Microsoft.
Если служба обновлений Windows работает не корректно, обновления не загружаются или не устанавливаются, то самый простой и эффективней способ решить проблему со службой Windows Update – восстановить ее исходные настройки. В этой статье мы покажем, как сбросить конфигурацию агента и службы обновлений Windows Update.
Содержание:
- Средство устранения неполадок Центра обновления Windows
- Сброс настроек Windows Update с помощью PowerShell
- Утилита Reset Windows Update Tool
- Восстановление исходных настроек Windows Update из командной строки
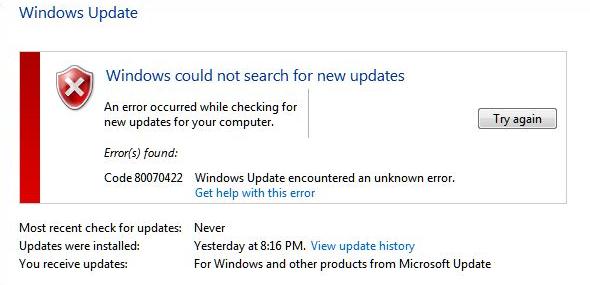
Обычно для отладки и дебага ошибок службы обновления Windows администратору необходимо проанализировать коды ошибок в файле журнала обновлений %windir%\WindowsUpdate.log (в Windows 10 и 11 получить файл WindowsUpdate.log можно таким способом). Количество возможных ошибок, с которыми может столкнуться администратор при анализе журнала обновлений исчисляется десятками (список всех ошибок Windows Update) и процесс их разрешения в основном нетривиальный. В некоторых случаях вместо детального анализа ошибок Windows Update гораздо быстрее и проще сначала произвести полный сброс настроек службы Windows Update. После сброса Windows Update вы можете выполнить сканирование и поиск обновлений.
Средство устранения неполадок Центра обновления Windows
Прежде чем перейти к сбросу конфигурации центра обновления Windows, настоятельно рекомендуем сначала попробовать более встроенное средство для автоматического исправления проблем в службе обновления Windows – средство устранения неполадок Центра обновления Windows (Windows Update Troubleshooter).
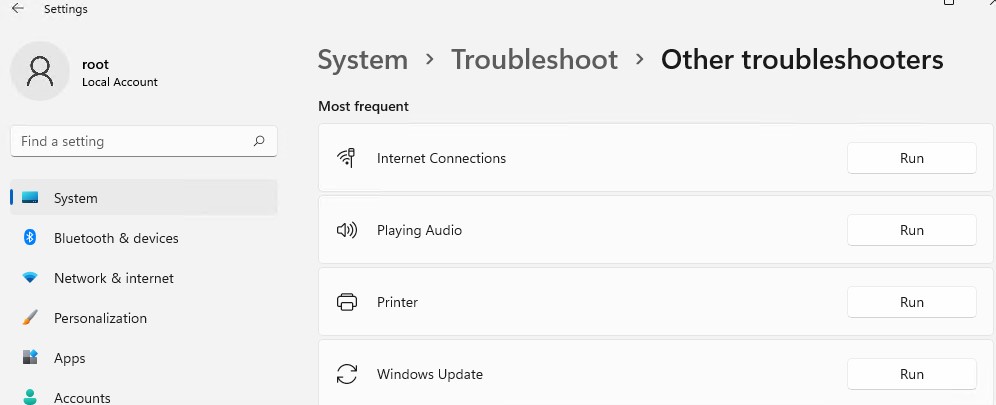
В Windows 10 и 11 Windows Update Troubleshooter уже встроен в современную панель Settings. Для предыдущих версий Windows его придется скачать вручную по ссылкам ниже:
- Windows 11 — Settings -> System -> Troubleshooter -> Other Troubleshooter -> Windows Update;

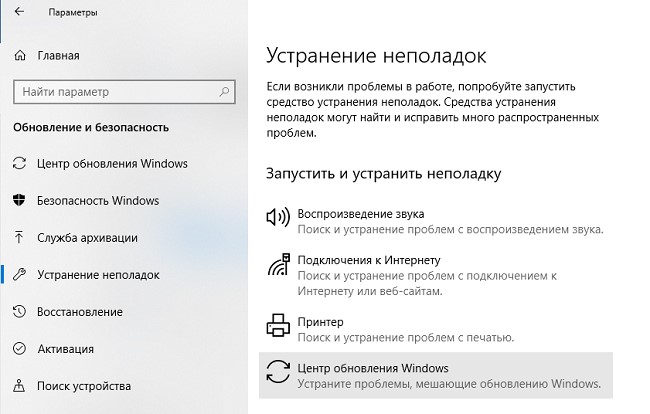
- Windows 10 – скачите wu10.diagcab по ссылке https://aka.ms/wudiag , либо запустите локальную версию инструмента: Пуск -> Параметры -> Обновления и безопасность -> Устранение неполадок -> Центр обновлений Windows (Start -> Settings -> Updates and Security -> Troubleshoot -> Additional Troubleshooters-> Windows Updates – resolve problems that prevent you from updating windows);

Для быстрого доступа к средствам исправления неполадок Windows можно использовать команду ms-settings:
ms-settings:troubleshoot - Windows 7 и Windows 8.1 — WindowsUpdate.diagcab (https://aka.ms/diag_wu).
Дождитесь пока средство устранения неполадок Центра обновления Windows просканирует систему и попытается автоматически исправить все ошибки в службе Windows Update и связанных компонентах.
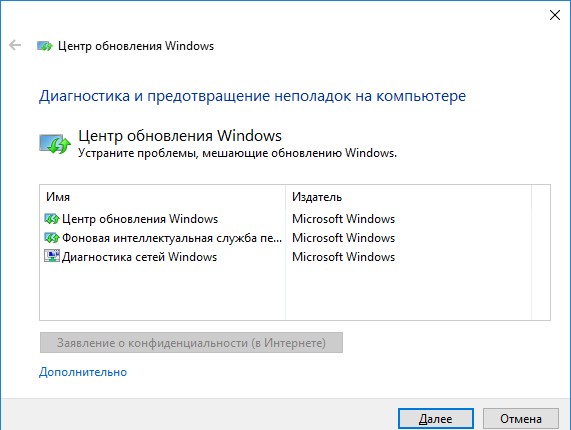
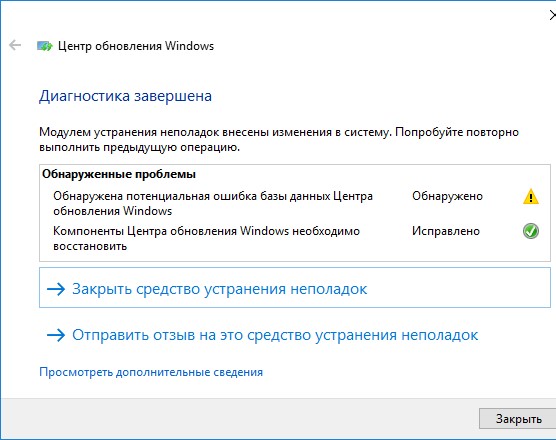
В моем случае была обнаружена и исправлена потенциальная ошибка в базе данных Центра обновления Windows. После этого перезагрузите компьютер и попробуйте выполнить поиск обновлений. Если обновления не загружаются или не устанавливаются, перейдите к следующему этапу.
Сброс настроек Windows Update с помощью PowerShell
Вы можете использовать PowerShell модуль PSWindowsUpdate для сброса настроек агента и службы Windows Update.
Установите модуль на свой компьютер из галереи скриптов PSGallery:
Install-Module -Name PSWindowsUpdate
Разрешите запуск PowerShell скриптов:
Set-ExecutionPolicy –ExecutionPolicy RemoteSigned -force
Выполните команду:
Reset-WUComponents –verbose
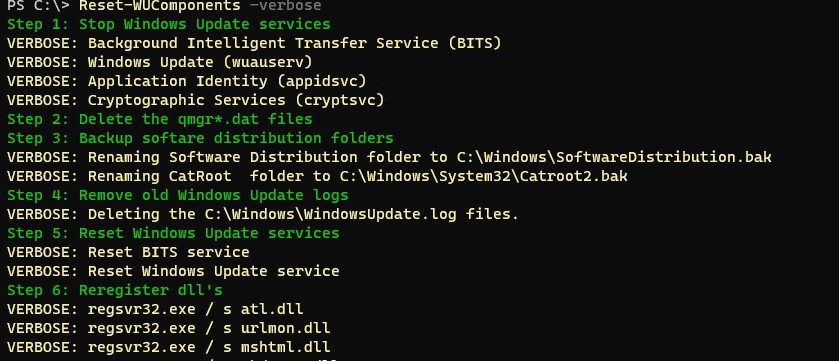
Команда Reset-WUComponents выполняет действия, по остановке служб, перерегистрации dll и очистке каталога C:\Windows\SoftwareDistribution, что и описанный чуть ниже bat скрипт.
VERBOSE: Background Intelligent Transfer Service (BITS)
VERBOSE: Windows Update (wuauserv)
VERBOSE: Application Identity (appidsvc)
VERBOSE: Cryptographic Services (cryptsvc)
Step 2: Delete the qmgr*.dat files
Step 3: Backup software distribution folders
VERBOSE: Renaming Software Distribution folder to C:\Windows\SoftwareDistribution.bak
VERBOSE: Renaming CatRoot  folder to C:\Windows\System32\Catroot2.bak
 Step 4: Remove old Windows Update logs
VERBOSE: Deleting the C:\Windows\WindowsUpdate.log files.
Step 5: Reset Windows Update services
VERBOSE: Reset BITS service
VERBOSE: Reset Windows Update service
Step 6: Reregister dll's
VERBOSE: regsvr32.exe / s atl.dll
VERBOSE: regsvr32.exe / s urlmon.dll
VERBOSE: regsvr32.exe / s mshtml.dll
VERBOSE: regsvr32.exe / s shdocvw.dll
VERBOSE: regsvr32.exe / s browseui.dll
VERBOSE: regsvr32.exe / s jscript.dll
VERBOSE: regsvr32.exe / s vbscript.dll
VERBOSE: regsvr32.exe / s scrrun.dll
VERBOSE: regsvr32.exe / s msxml.dll
VERBOSE: regsvr32.exe / s msxml3.dll
VERBOSE: regsvr32.exe / s msxml6.dll
VERBOSE: regsvr32.exe / s actxprxy.dll
VERBOSE: regsvr32.exe / s softpub.dll
VERBOSE: regsvr32.exe / s wintrust.dll
VERBOSE: regsvr32.exe / s dssenh.dll
VERBOSE: regsvr32.exe / s rsaenh.dll
 VERBOSE: regsvr32.exe / s gpkcsp.dll
VERBOSE: regsvr32.exe / s sccbase.dll
VERBOSE: regsvr32.exe / s slbcsp.dll
VERBOSE: regsvr32.exe / s cryptdlg.dll
VERBOSE: regsvr32.exe / s oleaut32.dll
VERBOSE: regsvr32.exe / s ole32.dll
VERBOSE: regsvr32.exe / s shell32.dll
VERBOSE: regsvr32.exe / s initpki.dll
VERBOSE: regsvr32.exe / s wuapi.dll
VERBOSE: regsvr32.exe / s wuaueng.dll
VERBOSE: regsvr32.exe / s wuaueng1.dll
VERBOSE: regsvr32.exe / s wucltui.dll
VERBOSE: regsvr32.exe / s wups.dll
VERBOSE: regsvr32.exe / s wups2.dll
VERBOSE: regsvr32.exe / s wuweb.dll
VERBOSE: regsvr32.exe / s qmgr.dll
VERBOSE: regsvr32.exe / s qmgrprxy.dll
VERBOSE: regsvr32.exe / s wucltux.dll
VERBOSE: regsvr32.exe / s muweb.dll
VERBOSE: regsvr32.exe / s wuwebv.dll
Step 7: Reset WinSock
VERBOSE: netsh winsock reset
Step 8: Reset Proxy
VERBOSE: netsh winhttp reset proxy
Step 9: Start Windows Update services
VERBOSE: Cryptographic Services (cryptsvc)
VERBOSE: Application Identity (appidsvc)
VERBOSE: Windows Update (wuauserv)
VERBOSE: Background Intelligent Transfer Service (BITS)
Step 10: Start Windows Update services
VERBOSE: wuauclt /resetauthorization /detectnow
Запустите поиск обновлений из панели управления или выполните поиск доступных обновлений с помощью команды PowerShell:
Get-WUList

Утилита Reset Windows Update Tool
Есть еще одни полезный и простой инструмент для сброса настроек Windows Update — Reset Windows Update Tool. Раньше это скрипт был доступен на TechNet. Сейчас автор ведет репозиторий на GitHub (м https://github.com/ManuelGil/Script-Reset-Windows-Update-Tool ).
Для загрузки предлагается скомпилированный exe файл (C++) или обычный скрипт. Я предпочитаю использовать cmd скрипт.
- Скачайте ResetWUEng.zip и распакуйте на диск;
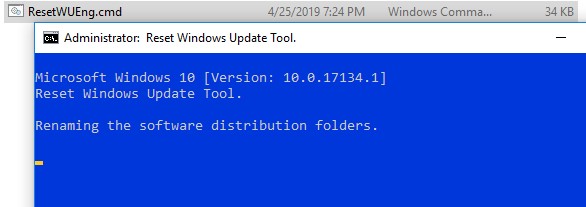
- Запустите файл ResetWUEng.cmd с правами администратора;
- Скрипт определит вашу версию ОС (в моем примере это Windows 10) и предложит 18 различных опций. Некоторые из них напрямую не относятся к сбросу настроек агента WU, но могут быть полезны для исправления различных неисправностей в Windows (проверка диска chkdsk, исправление ошибок в образе Windows с помощью DISM, сброс Winsock, очистка временных файлов и т.д.);

- Для сброса настроек Windows Update достаточно использовать опцию 2 — Resets the Windows Update Components (Сбросить компоненты службы обновления Windows). Нажмите 2 и Enter;
- Скрипт автоматически выполнит все действия, которые мы описали выше при выполнении ручного сброса агента обновлений Windows из командной строки.

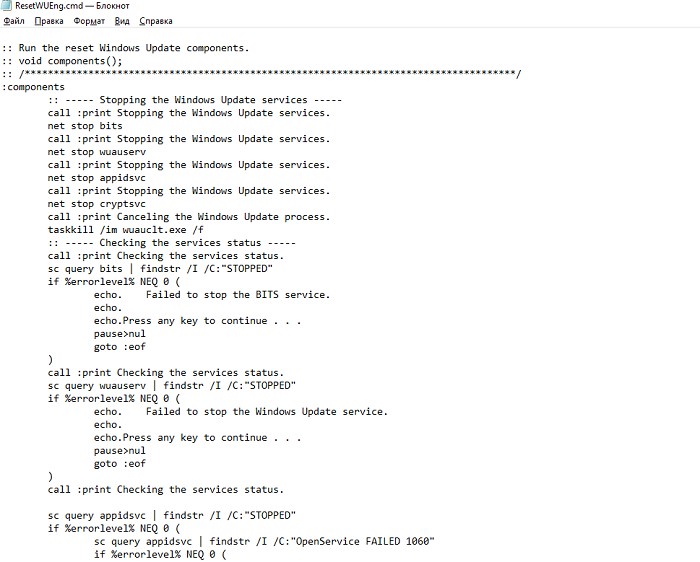
Вы можете самостоятельно посмотреть, что делает скрипт, открыв в файл ResetWUEng.cmd в любом текстовом редакторе и изучив его содержимое. Например, опция 2 отправляет на процедуру components.

- После окончания работы скрипта Reset Windows Update Agent перезагрузите компьютер и проверьте работу службы обновлений.

Скрипт ResetWUEng.cmd универсальный и подходит для всех версий Windows: начиная с Windows XP и вплоть до Windows 11.
Восстановление исходных настроек Windows Update из командной строки
Процесс сброса настроек агента и службы обновления Windows состоит из нескольких этапов. Все описанные операции выполняются в командной строке и собраны в один bat файл (готовый скрипт можно скачать по ссылке ниже).
С помощью данного скрипта можно полностью сбросить конфигурацию службы Центра обновлений Windows, и очистить локальный кэш обновлений. Скрипт является универсальный и будет работать как в Windows 11/10/8.1/7, так и в Windows Server 2022/2019/2016/2012 R2/2008 R2. Скрипт помогает устранить большинство типовых ошибок в работе службы Windows Update, когда центр обновлений перестает загружать новые обновления или пишет, что при установке обновления возникают ошибки.
Убедитесь, что настройки Windows Update на вашем компьютере на задаются с помощью доменных или локальных политик. Для вывода результирующих настроек GPO можно воспользоваться утилитой gpresult или rsop.msc. Можно сбросить настройки локальной GPO по этой инструкции.
Итак, по порядку о том, что делает скрипт:
- Остановить службы Windows Update (Центр обновлений Windows), BITS и службы криптографии:
net stop bits
net stop wuauserv
net stop appidsvc
net stop cryptsvc
taskkill /im wuauclt.exe /f - Удалить служебных файлы qmgr*.dat в каталоге %ALLUSERSPROFILE%\Application Data\Microsoft\Network\Downloader\:
Del "%ALLUSERSPROFILE%\Application Data\Microsoft\Network\Downloader\qmgr*.dat" - Переименовать служебные каталоги, в которых хранятся конфигурационные файлы и кэш обновлений (в случае необходимости их можно будет использовать как резервные копии). После перезапуска службы обновления, эти каталоги автоматически пересоздадутся:
Ren %systemroot%\SoftwareDistribution SoftwareDistribution.bak
Ren %systemroot%\system32\catroot2 catroot2.bak - Удаление старого журнала windowsupdate.log
del /f /s /q %windir%\windowsupdate.log - Сброс разрешений на службы BITS и Windows Update (в случае, если права на службы были изменены)
sc.exe sdset bits D:(A;;CCLCSWRPWPDTLOCRRC;;;SY) (A;;CCDCLCSWRPWPDTLOCRSDRCWDWO;;;BA) (A;;CCLCSWLOCRRC;;;AU) (A;;CCLCSWRPWPDTLOCRRC;;;PU)
sc.exe sdset wuauserv D:(A;;CCLCSWRPWPDTLOCRRC;;;SY) (A;;CCDCLCSWRPWPDTLOCRSDRCWDWO;;;BA) (A;;CCLCSWLOCRRC;;;AU) (A;;CCLCSWRPWPDTLOCRRC;;;PU)
sc.exe sdset cryptsvc D:(A;;CCLCSWLOCRRC;;;AU)(A;;CCDCLCSWRPWPDTLOCRSDRCWDWO;;;BA)(A;;CCDCLCSWRPWPDTLCRSDRCWDWO;;;SO)(A;;CCLCSWRPWPDTLOCRRC;;;SY)S:(AU;FA;CCDCLCSWRPWPDTLOCRSDRCWDWO;;WD)
sc.exe sdset trustedinstaller D:(A;;CCLCSWLOCRRC;;;AU)(A;;CCDCLCSWRPWPDTLOCRSDRCWDWO;;;BA)(A;;CCDCLCSWRPWPDTLCRSDRCWDWO;;;SO)(A;;CCLCSWRPWPDTLOCRRC;;;SY)S:(AU;FA;CCDCLCSWRPWPDTLOCRSDRCWDWO;;WD) - Перерегистрация файлов системных динамических библиотек (dll), связанных со службами BITS и Windows Update:
cd /d %windir%\system32
regsvr32.exe /s atl.dll
regsvr32.exe /s urlmon.dll
regsvr32.exe /s mshtml.dll
regsvr32.exe /s shdocvw.dll
regsvr32.exe /s browseui.dll
regsvr32.exe /s jscript.dll
regsvr32.exe /s vbscript.dll
regsvr32.exe /s scrrun.dll
regsvr32.exe /s msxml.dll
regsvr32.exe /s msxml3.dll
regsvr32.exe /s msxml6.dll
regsvr32.exe /s actxprxy.dll
regsvr32.exe /s softpub.dll
regsvr32.exe /s wintrust.dll
regsvr32.exe /s dssenh.dll
regsvr32.exe /s rsaenh.dll
regsvr32.exe /s gpkcsp.dll
regsvr32.exe /s sccbase.dll
regsvr32.exe /s slbcsp.dll
regsvr32.exe /s cryptdlg.dll
regsvr32.exe /s oleaut32.dll
regsvr32.exe /s ole32.dll
regsvr32.exe /s shell32.dll
regsvr32.exe /s initpki.dll
regsvr32.exe /s wuapi.dll
regsvr32.exe /s wuaueng.dll
regsvr32.exe /s wuaueng1.dll
regsvr32.exe /s wucltui.dll
regsvr32.exe /s wups.dll
regsvr32.exe /s wups2.dll
regsvr32.exe /s wuweb.dll
regsvr32.exe /s qmgr.dll
regsvr32.exe /s qmgrprxy.dll
regsvr32.exe /s wucltux.dll
regsvr32.exe /s muweb.dll
regsvr32.exe /s wuwebv.dll - Сброс параметров Winsock
netsh winsock reset - Сброс параметров системного прокси
netsh winhttp reset proxy - Опционально. При использовании локального сервера WSUS, возможно дополнительно сбросить текущую привязку клиента к серверу WSUS путем удаления следующих параметров в ветке реестра HKLM\SOFTWARE\Microsoft\Windows\CurrentVersion\WindowsUpdate:
REG DELETE "HKLM\SOFTWARE\Microsoft\Windows\CurrentVersion\WindowsUpdate" /v AccountDomainSid /f
REG DELETE "HKLM\SOFTWARE\Microsoft\Windows\CurrentVersion\WindowsUpdate" /v PingID /f
REG DELETE "HKLM\SOFTWARE\Microsoft\Windows\CurrentVersion\WindowsUpdate" /v SusClientId /f
REG DELETE "HKLM\SOFTWARE\Policies\Microsoft\Windows\WindowsUpdate" /v TargetGroup /f
REG DELETE "HKLM\SOFTWARE\Policies\Microsoft\Windows\WindowsUpdate" /v WUServer /f
REG DELETE "HKLM\SOFTWARE\Policies\Microsoft\Windows\WindowsUpdate" /v WUStatusServer /f - Запуск остановленных служб:
sc.exe config wuauserv start= auto
sc.exe config bits start= delayed-auto
sc.exe config cryptsvc start= auto
sc.exe config TrustedInstaller start= demand
sc.exe config DcomLaunch start= auto
net start bits
net start wuauserv
net start appidsvc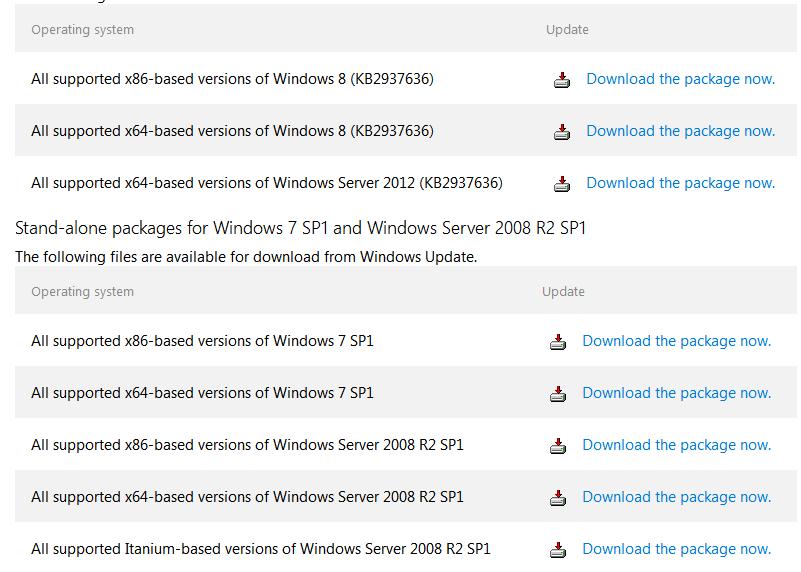
net start cryptsvc - Опционально. Для Windows 7 и 8.1 можно установить/переустановить последнюю версию агента Windows Update Agent (WUA). Скачать актуальную версию агента можно со страницы https://support.microsoft.com/en-us/kb/949104. Нужно скачать файл для вашей версии Windows

Актуальная версия агента WUA для Windows 7 SP1 x64 — 7.6. Принудительная переустановка агента WindowsUpdate выполняется следующими командами:
- для Windows 7 x86:
WindowsUpdateAgent-7.6-x86.exe /quiet /norestart /wuforce - для Windows 7 x64:
WindowsUpdateAgent-7.6-x64.exe /quiet /norestart /wuforce
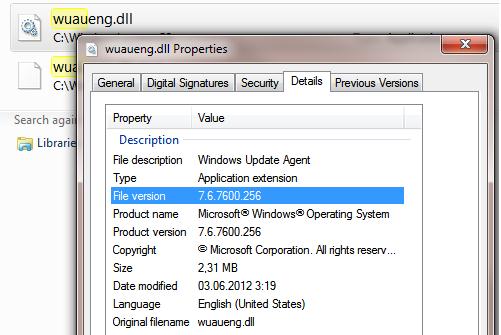
Совет. Текущую версию агента Windows Update Agent (WUA) в Windows 7 можно узнать в свойствах файла %windir%\system32\Wuaueng.dll. В нашем примере это 7.6.7600.256.

- для Windows 7 x86:
Осталось перезагрузить компьютер и запустить синхронизацию с сервером Windows Update /WSUS.
wuauclt /resetauthorization /detectnow
Затем зайдите в Центр обновления и проверьте, пропали ли проблемы при поиске, скачивании и установке обновлений.
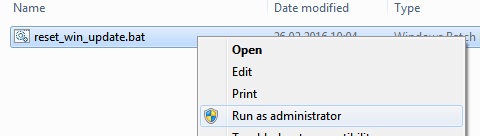
Сам скрипт reset_win_update.bat можно скачать по ссылке reset_win_update.zip (пункты 9 и 11 в скрипте не выполняются, т.к. являются опциональными). Скрипт нужно скачать, распаковать и запустить с правами администратора.
После этого перезагрузите компьютер, затем зайдите в Центр обновлений и проверьте, пропали ли проблемы при поиске, скачивании и установке обновлений.
Если обновления Windows стали скачиваться и устанавливать корректно, можно удалить папки резервные копии папок:
Ren %systemroot%\SoftwareDistribution SoftwareDistribution.bak
Ren %systemroot%\system32\catroot2 catroot2.bak
Если ничего не помогло, попробуйте вручную скачать и установить последнее кумулятивное обновление для вашей версии Windows из каталога обновлений Microsoft Update Catalog.
Windows Key or the WinKey is one of the core keys in Windows which lets you do multiple tasks. Right from launching Start Menu to Win+Tab, Win+R, Win+S, and many others. Many a time this causes a problem, and you cannot use it as you want it to. This nuisance becomes even worse when you are in a remote desktop solution, and it feels like Windows Key or the WinKey is disabled.

In this guide, we look at various solutions to fix the issue where the Windows key or WinKey is not working on Windows 11/10 – maybe in a game. Try the following solutions to resolve the issue.
- Restart Windows Explorer
- Disable Game Mode on your keyboard
- Check if WinKey is disabled
- Use PowerShell to enable WinKey
- Force Windows to rescan the keyboard
- Look for the WinKey Lock Button on your Keyboard
- Check if the issue is associated with your keyboard driver
- Turn off Filter Keys
- Troubleshoot in a Clean Boot State
- Create a new user account
Let’s see all these fixes in detail.
1] Restart Windows Explorer
The first thing that you should try is to restart Windows Explorer. The following steps will guide you on how to restart Windows Explorer on Windows 11/10.

- Open the Task Manager.
- Select the Processes tab.
- Scroll down and locate Windows Explorer.
- Once you find it, right-click on it and select Restart.
Now, check if the issue is fixed.
2] Disable Game Mode on your keyboard
One of the most common scenarios is the Game Mode of Windows. By design, it makes sure that Windows Key is disabled. This makes sure that if you accidentally hit the Windows Key, the Start Menu doesn’t take over the focus, and your gaming experience is ruined. That said, it only works with keyboards that support game mode on a hardware level. Logitech G810 Gaming keyboard offers this.

You will have to use the keyboard software from the OEM to disable the Windows key or WinKey when not gaming.
3] WinKey disabled?
Check if your WinKey has been disabled.
4] Use Powershell to enable Windows Key
Launch Powershell with admin privileges. Copy-paste the below-mentioned command and hit return. Once it executes successfully, you will be able to use the Windows Key as usual.
Get-AppXPackage -AllUsers | Foreach {Add-AppxPackage -DisableDevelopmentMode -Register “$($_.InstallLocation)AppXManifest.xml”}
Make sure to create a restore point before executing this so in case something goes wrong; you can get back to the previous state. The chances for something like this to happen are low.
5] Force Windows to Rescan the Keyboard
Windows understands input from the hardware by keeping a digital map called ScanMap. Every key is mapped into the computer’s memory. The same goes for Windows Key as well. In case Windows is not able to understand, we can force it. This calls in for registry editing, so make sure to take a backup or create a restore point, and then perform this step.
Type REGEDIT on the start menu, and launch it with admin privileges.
Then navigate to:
HKEY_LOCAL_MACHINE\SYSTEM\CurrentControlSet\Control\Keyboard Layout
Expand the Keyboard Layout key, locate Scancode Map registry entry and delete it.
Restart your PC, and it will force it to scan, and then create a new key for it.
6] Look for the WinKey Lock Button on your Keyboard
Many special keyboards come with Win Lock Button. If your keyboard is different from others, check for a hardware button that can disable the Windows key or WinKey. Disable it.
If nothing works, you can always create a new account to see if it’s working on that account or run an SFC scan.
7] Keyboard Driver issue
It may so happen that one of the latest updates of the driver for the keyboard may have caused the issue. You might want to roll back the keyboard driver to see if it fixes it for you.
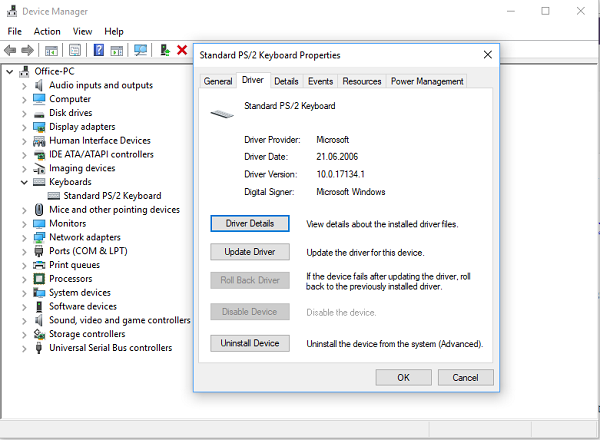
- Right-click on the Windows Key, and open Device Manager.
- Find your keyboard under the keyboard section.
- Right click > Properties > Driver
- See if you can roll back the driver. If this option is disabled, you can uninstall the driver, and let Windows configure it again.
You can also choose to download the latest driver from the OEM website and update it accordingly. This should fix any misconfiguration with the keyboard.
8] Turn off Filter Keys

Filter Keys is a feature that you can turn on to ignore repeated keystrokes. In some cases, Filter Keys also affect the Windows key. Disable Filter Keys if you have enabled it and see if this brings any changes.
9] Troubleshoot in Clean Boot State

Clean Boot is a state of Windows that runs the PC with minimally required drivers, and applications. Once in Clean Boot, follow the steps below:
- Type msconfig in the Run prompt. This will open the System Configuration window.
- Under the Services tab, check the box which says Hide all Microsoft Services.
- Now disable the remaining services one by one, and restart your PC to see if it resolves the issue.
10] Create a new user account
If none of the above solutions worked for you, your user profile might be corrupted. To check this, create a new user account and then log into that account. Now, check if the Windows key works in the new user account. If this resolves your issue, you can keep using the new user account and delete the old one (if you want).
It’s a cumbersome process and will take time, but probably the last on the list if nothing works for you.
How do I fix my Windows key is not working?
If your Windows key is not working, first, check if the Win key is disabled. If you find it disabled, enabling it again will fix the issue. Other fixes that you can try are restarting Windows Explorer, disabling the Game Mode, troubleshooting in a Clean Boot State, etc. We have explained all possible fixes to fix the Windows key or WinKey not working issue on Windows 11/10 in this article.
How do I know if my Windows key is working?
Press the Windows logo key on your keyboard and the Start menu will appear on your screen. Apart from that, you can also try some other keyboard shortcuts, like Win + R opens the Run command box. Moreover, you can also use free keyboard tester software for the same. These methods will let you know if your Windows key is working or not.
If you are talking about the Windows license key, you can check if it is genuine or legit by using the PID Checker tools or via the Software Licensing User Interface.
I am hoping one of these suggestions will help fix the Windows key or WinKey not working issue on Windows 11/10.
Related reads:
- Function keys not working
- WinKey+Space bar combination not working
- Spacebar or Enter key is not working
- Caps Lock key not working
- Num Lock key not working
- Shift key not working.
-
Home
-
News
- 3 Ways to Disable Windows Key on Windows
By Stella | Follow |
Last Updated
Windows Key shortcuts can make your work easier. However, when playing games, you may want to disable Windows key to enjoy gaming without interference. This post will tell you how to disable or enable Windows key when necessary. While MiniTool Solution will offer you some other useful tips and tricks.
You can press the Windows Key on the keyboard to open the start menu. With the combination of WinKey and other keys, you can perform many actions and commands that you can also perform with the mouse.
Usually, the WinKey or Windows Key shortcuts are very useful and convenient if you can operate them smoothly.
However, if you are playing games and someone presses the Windows key by mistake, the open game where the taskbar is not shown will be minimized without existing. This is a nightmare for PC gamers. Here comes a question: how to disable Windows key to improve the gaming experience?
In this post, we will show you 3 ways to disable Windows key. You can select one based on your own needs.
#1. Use WinKey Killer or WinKill
WinKey Killer
WinKey Killer is a free application. You can search for it on the internet and then download it on your computer. However, it doesn’t work on the later versions of Windows.
WinKill
WinKill can work with Windows 10. It locates in the system tray and you can turn it on or off manually to disable or enable Windows Key. You can also search for WinKill on the internet and download it on your computer manually.
#2. Edit the Registry
To disable Windows key, you need to follow these steps:
- Press Cortana and search for regedit.
- Choose the first option to open it.
- Go to HKEY_LOCAL_ MACHINE > System > CurrentControlSet > Control > Keyboard Layout on local machine.
- Press Add Value on the Edit menu. Then, type in Scancode Map, select REG_BINARY as the Data Type.
- Press OK.
- Type 00000000000000000300000000005BE000005CE000000000 in the Data field.
- Press OK.
At last, you need to close the Registry Editor and then reboot your PC.
Indeed, these registry keys are very important. You can first back up individual registry key if you want to keep them safe.
If you want to enable Windows Key, you can follow these steps:
- Use the same method mentioned in the disable Windows key part to open the Registry Editor.
- Go to HKEY_LOCAL_ MACHINE > System > CurrentControlSet > Control > Keyboard Layout on local machine.
- Right-click the Scancode Map registry entry and then select Delete from the popup menu.
- Press Yes.
- Close the Registry Editor and restart your PC.
#3. Use the Group Policy Editor
You can also use the Group Policy Editor to enable and disable Windows Key. Please follow these steps:
- Click Cortana, type in run, and press Enter.
- Choose the first result to open Run.
- Type in msc and press Enter to enter the Group Policy Editor.
- Go to User Configuration > Administrative Templates > Windows Components > File Explorer.
- Find the Turn off Windows+X hotkeys option and double-click on it.
- Choose Enabled.
- When you see the above pop-out window, you need to press Apply and OK successively to keep the change. Then, reboot your PC.
If your computer doesn’t have the Group Policy Editor, you can use the Registry Editor to disable Windows Key shortcuts:
1. After enter the Registry Editor, you need to navigate to:
HKEY_CURRENT_USER\Software\Microsoft\Windows\CurrentVersion\Policies\Explorer
2. Create a DWORD (32-bit) Value, name it as NoWinKeys and define the value as 1.
3. Press OK.
About The Author
Position: Columnist
Stella has been working in MiniTool Software as an English Editor for more than 8 years. Her articles mainly cover the fields of data recovery including storage media data recovery, phone data recovery, and photo recovery, videos download, partition management, and video & audio format conversions.