
Все способы:
- Вход в «Безопасный режим»
- Способ 1: Откат графического драйвера
- Способ 2: Обновление драйверов
- Способ 3: Удаление конфликтного ПО
- Способ 4: Проверка целостности системных файлов
- Способ 5: Увеличение объема файла подкачки
- Способ 6: Возвращение Windows 10 до заводских настроек
- Вопросы и ответы: 0
Вход в «Безопасный режим»
Практически все методы, описанные в рамках данной статьи, осуществляются непосредственно через интерфейс Windows, поэтому важно обеспечить стабильную работу операционной системы хотя бы на несколько минут. Если синий экран смерти с ошибкой «KERNEL_MODE_HEAP_CORRUPTION» появляется довольно быстро или сразу же при запуске, попробуйте запустить Виндовс 10 в «Безопасном режиме». Для этого можно использовать переход через «Параметры» или специальное окно конфигурации системы.
Подробнее: Переход в безопасный режим в Windows 10

В тех случаях, когда действия внутри ОС вообще недоступны, из-за чего не получается зайти и в «Безопасный режим», нужно использовать альтернативные методы его активации. Например, если под рукой есть загрузочный диск с Windows 10, можно применить именно его, чтобы добиться реализации данной задачи.
Читайте также: Входим в «Безопасный режим» через BIOS
Способ 1: Откат графического драйвера
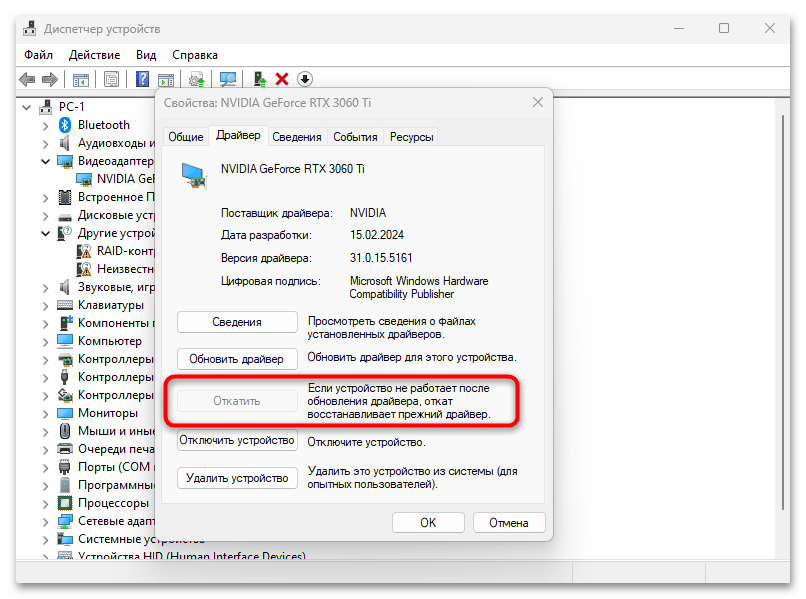
Синий экран «KERNEL_MODE_HEAP_CORRUPTION» мог появиться сразу после установки драйвера видеокарты. В большинстве случаев это означает, что выбранная версия несовместима с железом. Если как раз недавно вы инсталлировали или обновляли графический драйвер, сейчас стоит откатить его до прежней версии или удалить. Для всех моделей это осуществляется одинаково, поэтому трудностей возникнуть не должно.
Подробнее: Как откатить драйвер видеокарты
Для предотвращения подобных ошибок в дальнейшем рекомендуем правильно подбирать обновление драйвера видеокарты. В большинстве ситуаций подойдет загрузка ПО с официального сайта, а в некоторых случаях можно обратиться к сторонним программам. Если у вас возникают проблемы при выборе или выполнении подходящего метода, ознакомьтесь с инструкциями по данной теме в другой статье на нашем сайте, перейдя по ссылке ниже.
Читайте также: Способы обновления драйвера видеокарты в Windows 10
Способ 2: Обновление драйверов
Если выше мы говорили исключительно о программных компонентах видеокарты, то сейчас затронем тему общего обновления драйверов в Windows 10. Ошибка «KERNEL_MODE_HEAP_CORRUPTION» как раз может появляться из-за того, что не все комплектующие функционируют корректно в связи с устаревшими или отсутствующими драйверами. При использовании данного решения лучше всего обратиться к официальному сайту производителя материнской платы, чтобы подобрать последние версии основных драйверов. Однако можно воспользоваться и другими подходящими методами, если вам они покажутся удобнее.
Подробнее: Обновляем драйверы в Windows 10

Способ 3: Удаление конфликтного ПО
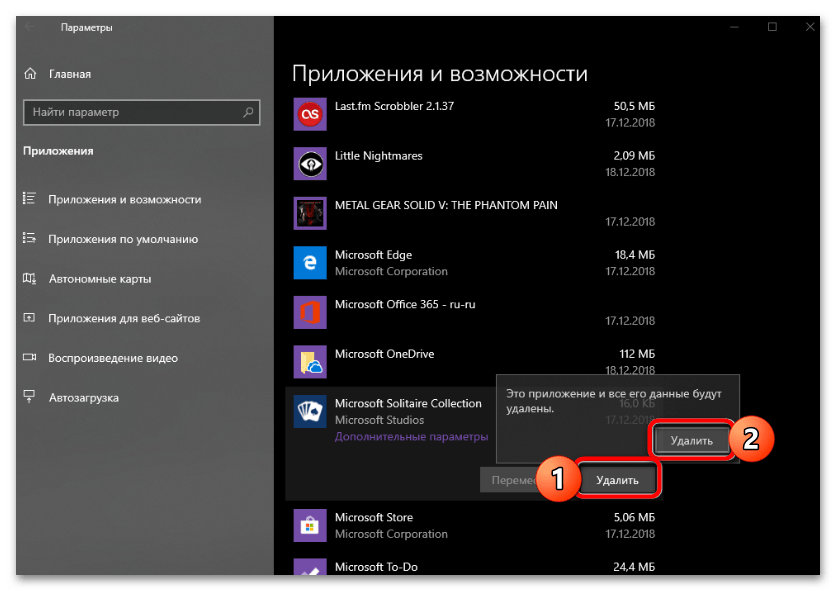
В начале статьи вы были ознакомлены с информацией по загрузке Виндовс 10 в «Безопасном режиме». Если вы сделали это и синий экран смерти не появляется уже какое-то время, возможно, причиной сбоев являются установленные сторонние программы. Сюда относится софт для разгона комплектующих, различные оптимизаторы, работающие в режиме реального времени, или любые приложения, вносящие даже визуальные изменения в операционную систему. Все, что может вызывать подозрения, нужно удалить, и для этого можно не выходить из «Безопасного режима».
Подробнее: Установка и удаление программ в Windows 10
Иногда можно заметить, что при удалении какой-либо сторонней программы появляются ошибки. Это значит, что стандартные методы деинсталляции в данном случае не подходят. Придется прибегнуть к принудительному удалению, что осуществляется как в ручном режиме, так и через специальный софт от сторонних разработчиков.
Читайте также: Методы принудительного удаления программ в Windows 10
Способ 4: Проверка целостности системных файлов
Многие ошибки, сопровождающиеся синим экраном смерти, могут появляться при сбоях в работе системных файлов Windows. Обычно они повреждаются или удаляются, что и приводит к нестабильной работе Windows 10. Самостоятельно проверить это невозможно, поэтому и были разработаны системные утилиты, отвечающие за сканирование всех системных файлов и дальнейшее их восстановление. Вам необходимо прочитать инструкции по следующей ссылке, чтобы понять, как взаимодействовать с этими утилитами и к какой обращаться в разных ситуациях.
Подробнее: Как проверить целостность системных файлов в Windows 10
Способ 5: Увеличение объема файла подкачки
Одна из нераспространенных причин появления синего экрана смерти «KERNEL_MODE_HEAP_CORRUPTION» в Виндовс 10 — недостаток оперативной памяти. Соответственно, сбой появляется исключительно в тот момент, когда на операционную систему оказывается большая нагрузка. В качестве решения можно включить виртуальную память или выделить для нее немного больше объема, отталкиваясь от изначального размера физической памяти. Далее можете проследить за динамикой потребления ресурсов через тот же «Диспетчер задач» и проверить, не будет ли снова сбоев при больших нагрузках.
Подробнее: Увеличение файла подкачки в Windows 10
Способ 6: Возвращение Windows 10 до заводских настроек
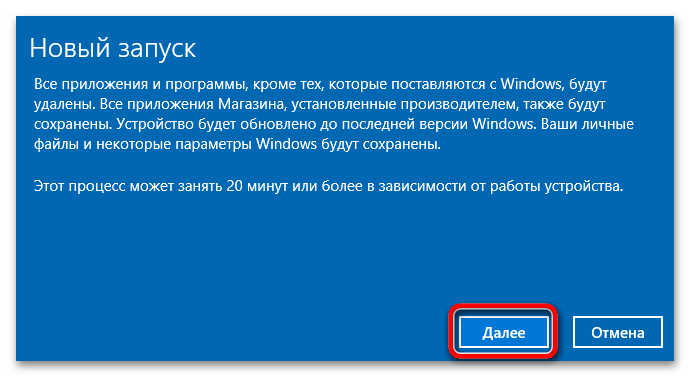
Остается разобрать только самый радикальный метод — переустановку операционной системы. Однако вместо этого мы рекомендуем вернуть ее в исходное состояние. Процесс похож, но займет меньше времени и не требует носителя с установщиком. Вы можете получить все инструкции по данной теме, кликнув по следующему заголовку. Однако учитывайте, что прибегать к такому решению стоит в том случае, если все предыдущие уже были испробованы и не принесли должного результата.
Подробнее: Возвращаем Windows 10 к заводскому состоянию
Сохранение ошибки «KERNEL_MODE_HEAP_CORRUPTION» даже после переустановки ОС свидетельствует о сбоях в работе железа. В первую очередь вытащите и снова вставьте оперативную память или поменяйте слоты. Произведите проверку жесткого диска и убедитесь в том, что мощности блока питания хватает для корректной работы при пиковых нагрузках.
Читайте также: Как проверить на работоспособность: процессор, оперативную память, видеокарту, жесткий диск
Наша группа в TelegramПолезные советы и помощь
There are few things worse than your computer letting you down the moment you need it the most. You might be working on an important project for office or school, or enjoying a multiplayer game with a friend when you get suddenly interrupted by a Blue Screen of Death (BSOD) message that cripples your PC.
BSOD errors can be fixed, depending on the severity of the stop code. But the integrity of your data is not guaranteed, and that’s why it’s essential to regularly perform backups.
Kernel mode heap corruption is a blue screen error code that paralyzes your computer. It indicates a problem with the system kernel, which can be triggered by a software or hardware problem.
Here are some unfortunate events that can trigger stop code Kernel mode heap corruption:
- Incompatible or obsolete graphics driver
- Unsupported or conflicting applications
- Faulty system updates
- Outdated Windows
- RAM issues
- Hard disk or system corruption
- Overclocking
- Outdated or poorly configured BIOS
- New hardware devices
- The GPU card was not correctly inserted
- Malware infection
- Insufficient disk space
How to fix Kernel mode heap corruption on Windows 10
You can try multiple approaches to repair the Kernel mode heap corruption error on your Windows 10 machine by inspecting your hardware and software. It’s important to arm yourself with patience because it might take a while to find the source of the stop code.
Before getting started, it’s wise to back up your files and applications and set up a system restore point. As mentioned at the beginning of this article, the safety of your data is not guaranteed with blue screen errors.
1. Start Windows 10 in safe mode
In severe scenarios when you don’t even get the chance to use your computer at all, you can start Windows 10 in safe mode to disable any non-essential services, processes and drivers that might contribute to stop code Kernel mode heap corruption.
How to boot Windows 10 in safe mode:
- Turn on your PC and immediately switch it off during boot. Do this three times to trigger Windows troubleshooting mode
- Choose Troubleshoot
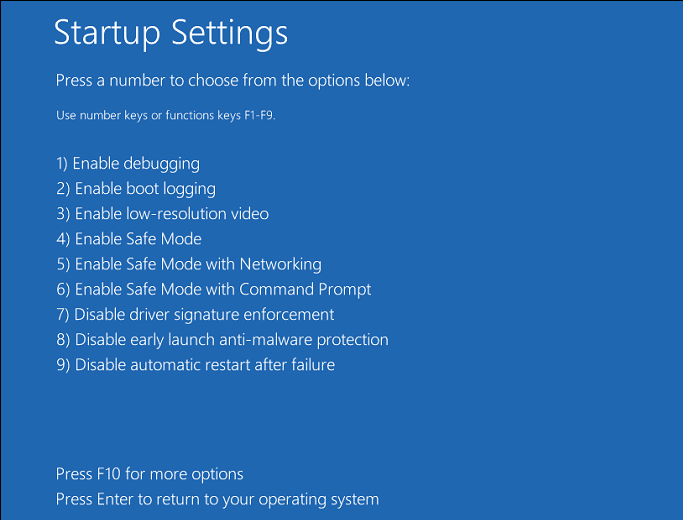
- Select Advanced options and go to Startup Settings
- Click Restart and press F4 to boot Windows in safe mode
2. Roll back your graphics driver
If you have recently updated your graphics driver without using a driver updating tool, you might have accidentally installed an incompatible version that causes display issues. In turn, this can lead to the Kernel mode heap corruption error.
But you should be able to fix this issue by rolling back your graphics driver. Here’s what you need to do:
- Right-click the Start button and go to Device Manager
- Extend the Display adapters group by clicking the arrow next to it
- Select your display driver, right-click it, and go to Properties
- Switch to the Driver tab
- Click Roll Back Driver and follow the on-screen instructions
If the Roll Back Driver button is greyed out, it means that no previous driver versions are saved on your computer, so you can’t use this solution. Proceed to the next.
3. Update your graphics driver
On the other hand, perhaps your graphics driver hasn’t been updated for a long time. Obsolete drivers are the source of all types of computer problems, so you should get on that right away.
How to update your video driver:
- Press Win key + R, type devmgmt.msc, and press Enter
- Right-click your GPU driver and select Update driver
- Click Search automatically for updated driver software
- The online search could take a while. If it comes back empty handed, click Search for updated drivers on Windows Update
- Reboot your PC when it’s done
4. Run Program Compatibility Troubleshooter
If you have recently installed programs that aren’t fully compatible with your operating system, then stop codes like Kernel mode heap corruption are bound to happen.
You may have tried to run such applications in compatibility mode for older Windows versions, but this can be problematic, too. However, you can use the built-in Program Compatibility Troubleshooter to find and eliminate unsupported applications from your PC.
- Right-click the Start button and go to Settings
- Select Update & Security
- Go to Troubleshoot on the left side
- Select Program Compatibility Troubleshooter
- Click Run the troubleshooter and follow the on-screen instructions
- Restart your computer and check for BSOD errors
5. Uninstall recent or suspicious apps
In addition to compatibility issues, programs may conflict with each other, causing blue screen errors like Kernel mode heap corruption. For example, if you have multiple antivirus programs installed, and each comes with a real-time engine, then the apps will likely crash.
Similar problems can be caused by suspicious applications, such as free antivirus or VPN tools for Windows. What you have to do is remove the guilty tools to restore your computer’s stability.
How to uninstall recent programs:
- Right-click the Start button and go to Apps and Features
- Set Sort by to Install date (newest first)
- Click the first unknown or suspicious program in the list and click Uninstall
- Click Uninstall again to confirm and follow the on-screen instructions
- Reboot your PC. If you still get BSOD errors, remove the next suspicious program from the list.
6. Disable startup apps
Startup programs can be problematic because they activate specific processes and services before Windows fully boots. To eliminate this risk, you should prevent applications from automatically running every time you turn on your computer, especially the ones with Internet access like security programs.
How to deactivate startup programs:
- Right-click the Windows 10 taskbar and go to Task Manager
- Switch to the Startup tab
- Click the Status column to sort all apps by status (Enabled first)
- Select each startup app with the Enabled status and click Disable
- Restart your PC and check for BSOD errors
7. Uninstall Windows updates
Although Microsoft has noble attempts when it comes to releasing Windows updates, it sometimes fails miserably. Many users report experiencing computer problems with certain system updates, including blue screen errors.
What you can do is uninstall the most recent updates in order to restore the stability of your operating system. Here’s what you need to do:
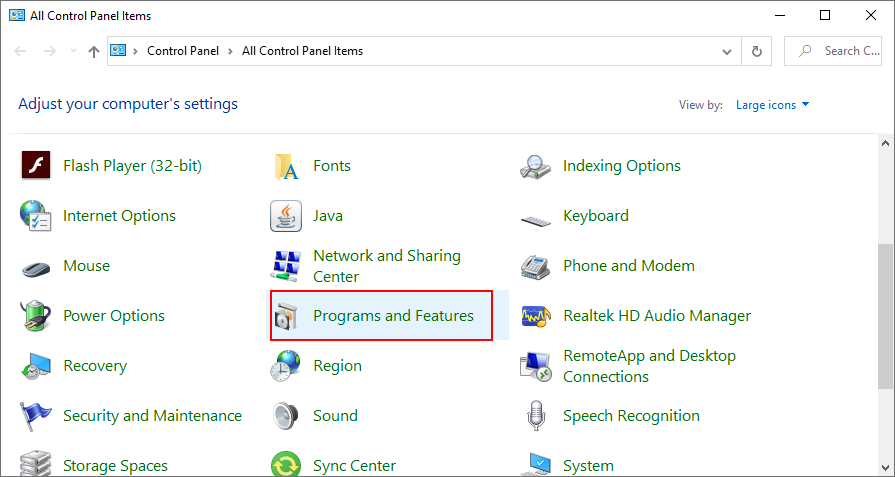
- Press Win key + R, type control panel, and hit Enter
- Click Programs and Features

- Click View installed updates
- Click the Installed On column to sort the items (newest first)
- Double-click the first entry. When prompted to confirm the uninstall, click Yes

8. Run Windows Update
On the other hand, if your operating system is outdated, it’s no wonder that you receive blue screen errors such as Kernel mode heap corruption. It’s necessary to equip your computer with the latest features, improvements, hotfixes, and security patches to get it working properly.
How to use Windows Update:
- Press the Windows key, type check for updates, and press Enter
- Windows should start looking for updates right away. Wait until the task is complete
- If there are any pending updates, click Download. It might take a while, so make sure to not turn off or restart your PC during this time
- When the updates are complete, Windows will prompt you to reboot your PC. You might have to do this several times
- Check if you still receive blue screen errors
9. Fix the system memory
System memory issues affect the entire operating system and running applications. In certain cases, they can even lead to blue screen errors such as Kernel mode heap corruption.
However, you can swiftly check your RAM and fix any errors by turning to a practical tool built into the operating system: Windows Memory Diagnostic. Here’s how to use it:
- Save all ongoing projects and exit all applications
- Press the Windows key, type Windows Memory Diagnostic, and hit Enter to launch this app
- Click Restart now and check for problems (recommended)
- Wait until the diagnosis tool does its job during reboot
- Check your PC for BSOD errors
If you prefer a more advanced tool that shows you in-depth information about your memory card, we suggest using MemTest86.
10. Fix corrupt hard disk and system files
Bad sectors on your hard disk or corrupt files in your operating system can lead to severe PC performance issues as well as Blue Screen of Death errors like Kernel mode heap corruption.
However, it’s possible to fix HDD and OS errors without having to resort to third-party software applications. Windows has built-in repair tools called CHKDSK (Check Disk), SFC (System File Checker), and DISM (Deployment Image Servicing and Management).
How to fix HDD errors with CHKDSK:
- Press Win key + R, type cmd, and press Ctrl + Shift + Enter to launch Command Prompt as admin
- Type
chkdsk c: /f. If your OS is installed on another partition, replacec:with the correct driver letter. Press Enter - When asked to confirm the scheduled task at the next system reboot, type y and hit Enter
- Restart your computer
You can count on CHKDSK to repair damaged files that led to hard drive failure. However, if it doesn’t solve your BSOD problem, you should turn to SFC.
How to fix system errors with SFC:
- Open Command Prompt as admin
- Type
sfc /scannowand press Enter - Wait until the tool does its job
- Exit CMD and reboot your PC
CHKDSK should fix common issues with the system files. But if stop code Kernel mode heap corruption is persistent after using this tool, proceed with DISM.
How to fix component store errors with DISM:
- Launch CMD with elevation rights
- Run
DISM /online /cleanup-image /scanhealthand wait until the scan is complete - If it reports any issues, fix them by running
DISM /online /cleanup-image /restorehealth - Restart your computer and relaunch CMD as admin
- Run SFC and restart your PC one last time
11. Disable overclocking
Overclocking tools are used by gamers to get more juice out of their hardware, in order to improve their gaming performance. However, if it’s not done properly and if a cooling system isn’t supplied, your computer will start displaying blue screen errors to protect itself from overheating.
To fix this problem, you can either amp up your cooler, double-check overclocking settings, or turn off overclocking altogether. The last option is the surest one.
If you have a third-party overclocking tool installed, make sure to turn it off and reset the clock parameters to normal. Otherwise, you can disable overclocking in BIOS.
12. Restore BIOS to default
Since we’re on the topic of BIOS, it’s a good idea to reset its options to default if you or someone else with access to your computer has tampered with BIOS settings.
If you don’t have advanced skills to know exactly what you’re doing there, you could end up causing BSOD errors such as Kernel mode heap corruption. Here’s how to reset BIOS to default:
- Reboot your PC and, before Windows starts, quickly press the key or key combination displayed on the screen to enter your computer’s BIOS mode
- Locate the advanced settings
- Enable the option that resets configuration data
- Save the current BIOS settings and exit
- Wait until Windows boots and check for BSOD errors
13. Update BIOS
It may not seem like it, but BIOS is a very important part of your operating system. And, just like Windows, it needs to be updated every now and then to avoid compatibility and stability issues. Here’s what you need to do:
- Press the Windows key, type system information, and press Enter to open this app
- Go to System Summary and write down the BIOS Version/Date
- Open a web browser and go to the website of your BIOS manufacturer
- Download a newer BIOS version and copy the file to a USB flash drive
- Reboot your computer and enter BIOS mode
- Create a backup of the current BIOS version and copy it to the USB flash drive for safekeeping
- Start the BIOS update and follow the given instructions
- Be careful to not switch off your computer during the update
- Boot Windows and check for BSOD errors
14. Remove peripheral devices
If you have recently purchased or received a new piece of hardware, like a Wi-Fi adapter, a webcam, or a pen drive, it might cause system functionality issues when you connect it to your computer.
For example, the autoplay feature of USB flash drives can be easily infected with malware. To put this theory to the test, shut down your computer and remove all peripheral devices, except your keyboard and mouse.
In the following step, turn your PC back on to confirm that you’re no longer getting blue screen errors. Carefully reconnect one device at a time until you spot the one that causes functionality problems.
15. Reattach the GPU card
Since you’re already checking your hardware components, it might be a good idea to take your computer apart if you’re skilled enough for this task. Remove and reseat all components while paying special attention to the GPU card.
Some users report that they received stop code Kernel mode heap corruption after inserting the GPU card in the wrong slot. But the issue was quickly resolved after making the correction.
16. Check your PC for malware
Cyber-criminal attacks can be devastating for unsuspecting and unprotected computers. Certain malware agents are powerful enough to disarm the antivirus system and take over critical processes and services.
If you were recently infected with malware, it could be the reason why stop code Kernel mode heap corruption is so persistent.
How to run a malware scan with Windows Defender:
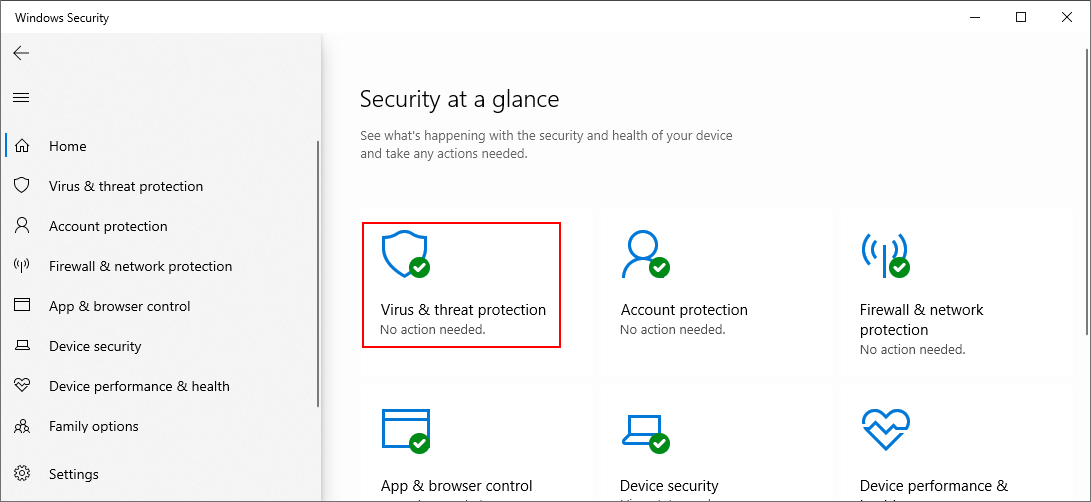
- Press the Windows key, type Windows Security, and launch this app
- Select Virus & threat protection

- Click Scan options
- Select Quick scan and click Scan now
- If nothing shows up in the results, run Windows Defender Offline scan mode
- Restart your PC and check for BSOD errors
If you have another Internet security installed that takes over the role of Windows Defender, use that application instead to check your PC for malware.
17. Check your free disk space
Your operating system needs a constant amount of free disk space. Otherwise, it will not able able to execute its processes properly. In time, this can trigger Blue Screen of Death messages such as Kernel mode heap corruption.
You can easily resolve this matter by allocating more disk space to your Windows partition. To do this, you can turn to a third-party partition manager or use Disk Management, the built-in Windows utility.
How to use Disk Management:
- Press Win key + R, type diskmgmt.msc, and press Enter
- Pick a big partition that doesn’t contain Windows, right-click it, and select Shrink Volume
- Set the new volume size and click Shrink
- Right-click the Windows partition and select Extend Volume
- Specify the new partition size
- Complete the task and reboot your PC
If you can’t afford to redistribute your free disk space, you can either attach an external hard disk or remove existing files from your computer. Think about any non-essential large data that occupies your disk space.
For example, treasured photos and family videos can be copied to an external hard disk or uploaded to a cloud account for safekeeping. You can also uninstall large applications or games you don’t play anymore.
When it comes to junk files found in Windows and programs, you can turn to a system cleaner. Or, if you don’t want to install anything else on your PC, you can use the Disk Cleanup tool instead.
How to use Windows Disk Cleanup:
- Make sure to sign in to Windows 10 using the admin account
- Head over to the Downloads and Recycle Bin folders. Save or restore any files you might need later since these locations will be cleared
- Press Win key + R, type control panel, and hit Enter
- Select Administrative Tools
- Double-click to launch Disk Cleanup
- Select the Windows partition (usually C:) and click OK
- At Files to delete, select everything and click Clean up system files
- Once the file search is over, include everything in the selection again and click OK
- The cleanup job might take a while. Don’t use your computer during this time
- When it’s over, restart your PC
18. Roll back Windows 10
If you haven’t managed to locate the root of stop code Kernel mode heap corruption until this point, it’s time to resort to Recovery mode. It will fix your computer in case it was affected by a software event that happened recently.
You should take some precautions, though, since Recovery mode will remove any programs that you installed after the restore point was created.
How to use System Restore:
- Log in to Windows 10 as the PC admin
- Press Win key + R, type control panel, and hit Enter
- Select Recovery
- Click Open System Restore
- Choose a restore point. You can click Scan for affected programs to see which applications will disappear after the restore
- If you’re not pleased with the displayed options, check Show more restore points
- Click Next and follow the instructions
- Restart your PC. If Recovery mode worked, check if you still get BSOD errors
19. Use BlueScreenView
Further investigation might be needed to find the corrupt files that caused stop code Kernel mode heap corruption. You can do this using BlueScreenView.
It’s a small, practical, and free application that monitors your computer, captures all data about blue screen errors, and gives you the possibility to examine minidumps.
How to use BlueScreenView:
- Download BlueScreenView from the official website
- Fire up the tool and open the DMP file created by Kernel mode heap corruption
- Find out which driver files are connected to the stop code
- Open Device Manager to reinstall and update those drivers
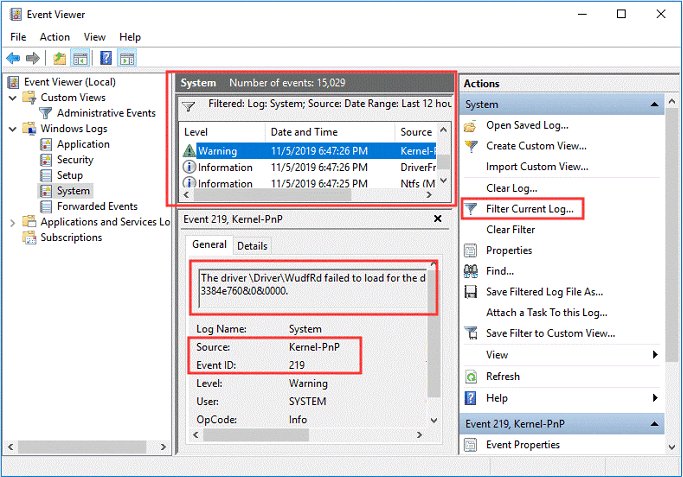
20. Use Event Viewer
If you don’t want to install a third-party application like BlueScreenView, then we suggest using Event Viewer. It’s a reliable tool built into Windows that captures all logs and events, so you can use it to discover more about the Kernel mode heap corruption BSOD error.
How to use Event Viewer:
- Restart Windows right after you get the BSOD error
- Press the Windows key, type Event Viewer, and open this app
- Open the Windows Logs folder and go to System
- Select the first error in the list and check out its description
You can use details from the description to find an online solution. And, if you can’t find one, then you can report it to the Microsoft official forum and wait until you get an answer from an expert.
Conclusion
To sum up, Kernel mode heap corruption is an annoying Blue Screen of Death error that can be triggered by a software or hardware problem. However, you should be able to fix it without performing a factory reset on Windows 10.
For instance, you can start Windows 10 in safe mode, roll back or update your graphics driver, run Program Compatibility Troubleshooter, uninstall recent or suspicious apps, as well as disable startup programs.
It’s also a good idea to run Windows Update and uninstall the faulty updates, fix the system memory, repair corrupt hard disk and system files, disable overclocking, restore BIOS to default, and keep BIOS updated.
Moreover, you can remove peripheral devices, reattach your GPU card, check your PC for malware, inspect your free disk space, and use System Restore. More details can be obtained by using BlueScreenView or Event Viewer.
Did any of these solutions fix stop code Kernel mode heap corruption? Tell us about your experience with this dreadful BSOD error in the comment area below.

KERNEL_MODE_HEAP_CORRUPTION is a BSOD error that appears out of nowhere on a PC. It can be annoying to experience, considering it gives you no warning and interrupts whatever you do on the PC.
Generally, the Blue Screen of Death errors interrupt a user’s experience like nothing else, and the stop code Kernel Mode Heap Corruption is no exception. Fortunately, there are ways to avoid this system crash BSOD error. In this post, let us look at these fixes and try to minimize the damage this issue does.
What Triggers Kernel Mode Heap Corruption error Error on Windows
Sometimes, the issue appears on launching a particular application (usually games), while many have encountered it on startup.
This blue screen of death error attacks your PC when a component crucial to operations is no longer running properly. If we talk specifically about the Kernel heap mode corruption stop code, faulty drivers appear to be the root cause.
Whenever a graphic/display driver malfunctions on a PC, the KERNEL_MODE_HEAP_CORRUPTION is triggered, causing the system to stop working. Other than that, many users have shared that software conflicts or an unsupported third-party application can also cause the stop code to appear.
How to Fix Kernel Mode Heap Corruption Error
There are multiple fixes you can try to stay away from such errors. Look at them closely and identify ways to fix stop code Kernel Mode Heap Corruption Error on Windows.
Fix 1 – Update Graphics Drivers on Your PC
To begin troubleshooting the stop code, you must begin with the root cause, the graphics driver. Usually, the driver stops working to its full potential when it becomes outdated. Needless to say, updating the graphics driver will help you avoid the Kernel Mode Heap Corruption stop code.
To update a driver on your Windows PC, you have two options.
The first is to go the manual route and search for driver updates using the Device Manager. The other is to choose a driver updater tool and let it handle everything.
For several users, the first method turns into a tedious task as they are not well-versed in the process and do not know how to update a driver on Windows. Secondly, those who know about the process understand how lengthy the process is.

Therefore, the automatic way to update drivers appears to be the preferred method. If you are also struggling with the Kernel heap mode corruption stop code, you should download the Advanced Driver Updater and update the existing drivers on your PC.
There are only three steps for you to finish –
Step 1 – Download the Advanced Driver Updater on your PC.
Step 2 – Run a scan for outdated drivers by clicking on Start Scan Now.

Step 3 – Once the Scan is over, click Update All to initiate the process for outdated drivers.
Once you have performed these 3 steps on your PC, restart the PC to apply changes. If this does not help fix the stop code kernel mode heap issue. Don’t worry we have other fixes.
Updating drivers usually does the trick for users and stops the PC from crashing again with a BSOD error. In case it does not help, move on to the next fix.
Fix 2 – Run the SFC Scan to Fix System File Issues
If updating the drivers did not help the stop code might appear due to system file errors. The next best thing is to check the system file for errors. Fortunately, Windows has an internal utility that allows you to check and resolve system errors quickly. All you have to do is –
Step 1 – Go to the Start Menu and search for the command prompt.

Step 2 – Once you have found the command prompt, click on Run as Administrator.
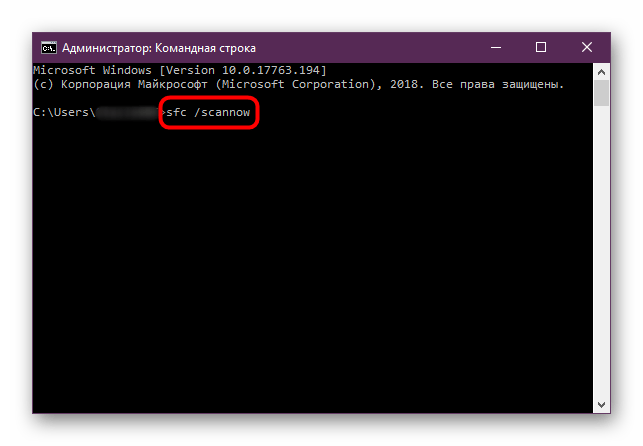
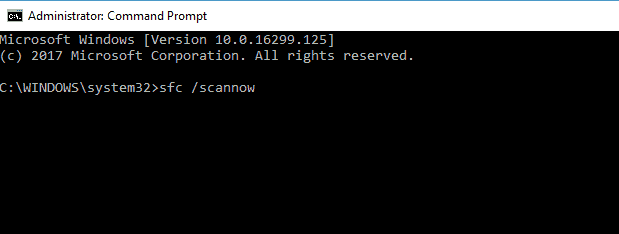
Step 3 – In the Command Prompt window, enter the following command SFC /scannow and hit Enter key.
Step 4 – After you have run the command, wait for the scan to finish.
Step 5 – Restart your computer after the scan to let the changes take effect.
This internal system file checker utility helps you resolve system errors that may be causing the stop code KERNEL_MODE_HEAP_CORRUPTION issue.
Fix 3 – Remove Startup Programs
If you have been experiencing the kernel mode heap corruption issue on startup, a start-up application may be causing the error. The ideal solution is to remove these applications from the startup queue, so they are not triggered as soon as the PC turns on.
Check out the steps to help you disable apps from launching at start-up.
Step 1 – Press Ctrl+Shift+Esc to open the Task Manager on your PC.
Step 2 – Expand the left panel to find multiple options.
Step 3 – Click on Start-up apps to find all the apps that are enabled to launch on the startup.

Step 4 – Disable these apps one at a time and keep restarting your PC.
Step 5 – Once you have disabled all the apps, you may find that the stop code kernel mode heap no longer appears after you have just booted your PC.
Removing the startup apps from the queue will also help you boost your startup time, making your PC faster.
Fix 4 – Uninstall Conflicting Software
Consider removing the conflicting application if the above fix cannot fix your problem. Removing the app from startup only helps you avoid the problem, not resolve it. The best solution is to remove the conflicting software from your PC.
When you remove an application from startup and check if the issue is resolved, you identify the origin of the problem. This means now you know exactly what app is causing the error. Also, if the issue lies in the game or an application you manually open, you should remove it immediately.
Here’s what you need to do –
Step 1 – Press Win+R to open the Run search.
Step 2 – Use the command control appwiz.cpl and hit enter to open programs and features.

Step 3 – Spot the software causing the issue according to you.
Step 4 – You can also sort the apps according to the time they were installed if you know when exactly the issue started.

Step 5 – Select the apps on your PC and uninstall them.
Removing these apps should do the job for you.
Fix 5 – Reset Windows
If you still encounter the KERNEL_MODE_HEAP_CORRUPTION issue on your PC after removing the culprit application, the affected program lies in a system process or a system file. In that case, you have no option but to reset your Windows.
You can find the reset option in your System Settings→ Recovery options.

The stop code KERNEL_MODE_HEAP_CORRUPTION can be a lethal issue that affects your PC. Try out these fixes and get rid of them today! Hope you find the information shared helpful. Feel free to ask for assistance if you feel stuck at any step. Thanks for reading. Good luck!
Recommended :
The Ultimate Guide To Fixing Kernel Security Check Failure Error
Fix – LiveKernelEvent 141 Hardware Error
Have you been a Windows user for years? If so, you must have faced BSOD, aka Bluescreen of Death. Because of the critical characteristics of BSOD, kernel mode heap corruption occurs. Moreover, it happens when there is a hardware incompatibility or software conflict.
This BSOD is a general occurrence in the Windows PC, resulting in system crashes. So, don’t be afraid if you see this blue-screen error! In this guide, we will discuss the reasons for this error to happen and 8 diligent ways to fix kernel mode heap corruption on startup.
| Workable Solutions | Step-by-step Troubleshooting |
|---|---|
| 1. Check Event Viewer | Start Windows or an installation DVD twice in a row without success to boot into WinRE…Full steps |
| 2. Check Graphics Drivers | Choose «Device Manager» from the list after right-clicking the start icon…Full steps |
| 3. Update Device Drivers | Press the Windows key and the letter X on your keyboard to access…Full steps |
| 4. Repair Corrupted System Files | To launch the Run dialogue box on your keyboard, simultaneously hit the Windows logo key…Full steps |
| Other Workable Solutions | Check RAM > Run Driver Verifier Manager > Uninstall Incompatible Software…Full steps |
Why Does Kernel Mode Heap Corruption Happen in Windows 11/10?
First, one of the CPU working modes is called a kernel mode (the other is simply the user mode). The ability to control the hardware is unrestricted by default for processes executing kernel mode. However, the following are some of the most frequent reasons.

Corrupted system files
A damaged hard drive’s directory may cause files to seem to flee, which may cause more data loss or degradation.
Calling a component that is not in the index range
This may occur if your computer tries to read an element that is larger than the collection of indexed items.
Defective or deteriorated hardware components
Over time, especially when they are misused, computer parts are prone to degrade. The software can be used to verify your gear, but you can also closely examine its physical condition.
Memory problems in general or memory leaks
This is the outcome of a computer’s RAM being fragmented. It occurs when applications with inadequate programming or design fail to release memory chunks when they are no longer required.
You may also interested in another BSOD issue related to Kernel Mode Heap Corruption BSOD Error:
How to Fix Kernel Security Check Failure Error | 8 Ways
8 Proven Ways to Fix Kernel Mode Heap Corruption BSOD Error
Here are 8 absolute methods that many Windows users have found to be helpful. Therefore, why not attempt the following techniques and resolve the kernel mode heap corruption installing Windows 10 issue yourself before calling a computer technician? Work your way down the list until you discover the one that suits you.
Fix 1. Check Event Viewer to Fix Kernel Mode Heap Corruption
The PC must be able to boot in Safe Mode in Windows 10 to use this procedure. Whenever you face any issue on Windows, checking Event Viewer is the first thing to do! Please follow the instructions below first to enter Safe Mode if your computer can’t launch Windows normally.
- Start Windows or an installation DVD twice in a row without success to boot into WinRE.
- After entering WinRE, go to Troubleshoot > Advanced options.
- To boot into Safe Mode, click Startup Settings and hit the F5 key to select the Enable Safe Mode with networking option.
Please follow the instructions below to verify the Event Viewer after entering Windows 10 Safe Mode.
Step 1. To open the Run box, press the «Windows + R» with complete control, and then type «eventvwr.» Enter to launch Event Viewer next.
Step 2. Open «Windows Logs > System» and look for the Kernel Mode Heap Corruption BSOD report.
Step 3. As soon as you locate the log, pay close attention to the description because it can reveal the issue’s root cause. To further aid in solving this issue, you should also take note of the Source and Event ID information.
You can properly resolve the issue after reviewing the Windows log.
Fix 2. Check Graphics Drivers to Fix Kernel Mode Heap Corruption
Outdated graphics drivers are a cause that begets Kernel Mode Heap Corruption. So, the steps are given below in order to fix this issue.
Step 1. Choose «Device Manager» from the list after right-clicking the start icon from the Taskbar.
Step 2. Right-clicking twice on the graphics card driver in the Display adapters section will bring up the Properties box.
Step 3. Click «Update Driver» or «Roll Back Driver» after visiting the Driver tab.
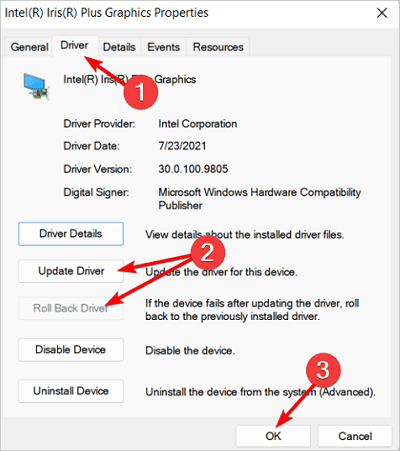
Step 4. Click OK right after the process is over.
Step 5. In case you opt for the «Update Driver» option, hit the «Search automatically for drivers» option after that.
Step 6. Restart the computer and see whether the Kernel Mode Heap Corruption blue screen problem has been resolved.
Fix 3. Update Device Drivers to Fix the BSOD Error
An out-of-date or damaged device driver may be the source of the Kernel Mode Heap Corruption problem. You should check if all of your devices drivers-particularly the drivers for your graphics card are updated. If an out-of-date device driver is causing a BSOD error, do the following steps.
Step 1. Press the Windows key and the letter X on your keyboard to access the Power User menu.
Step 2. Toggle to Device Manager.
Step 3. Increase the issue-causing gadget.
Step 4. Update Driver Software can be found by right-clicking the device.
Step 5. Select automatically check for driver software updates.
Device driver updates through Windows Update take some time to show. As a result, you might need to check the support website of your device’s manufacturer to download and install current drivers if Device Manager was unable to detect any new updates.
Fix 4. Repair Corrupted System Files to Fix Kernel Mode Heap Corruption
System file corruption can occasionally be the reason for this blue screen of death. You should do the following thing to fix them. A built-in program called System File Checker can be used to check for corrupt or damaged system files and, if necessary, restore them. However, this program can only analyze significant system files; it cannot repair a corrupted DLL or an entry in the Windows Registry, for example.
Step 1. Scan with SFC
Windows system file checker utility locates and fixes damaged system files.
- To launch the Run dialogue box on your keyboard, simultaneously hit the Windows logo key and R. Ctrl+Shift+Enter will launch Command Prompt as administrator when you type cmd.
- Hit «Yes» when Windows demands permission to make alterations to your device.
- Type the command. sfc /scannow in the command prompt.
- Press Enter on your keyboard once you have finished inputting the command. The SFC tool will start scanning all system files and replacing those damaged or missing.
- Hold off until the verification procedure is finished. Restarting your computer will make the changes effective.
Step 2. Scan with dism.exe
A built-in Windows utility called Deployment Image Servicing and Management (DISM) may determine whether your Windows installation is faulty and restore it if it is.
To launch the Run dialogue box on your keyboard, hit the Windows logo key and R simultaneously. To launch Command Prompt as administrator, type cmd and hit Ctrl+Shift+Enter.
- If asked for your permission, select Yes.
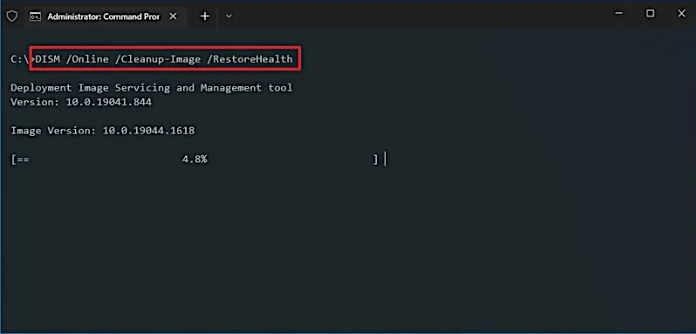
- Type the following command in the Command Prompt window.
Dism /online /cleanup-image /restorehealth
- Press Enter on your keyboard. The DISM utility will then start scanning for issues and attempting to resolve them.
- Hold off till the procedure is over. When your computer restarts, check if the Kernel Mode Heap Corruption issue persists.
This solution can also resolve the Unexpected Store Exception Error in Windows 10.
Fix 5. Repair Kernel Mode Heap Corruption by Checking RAM
The memory problem is considered another significant reason for kernel mode heap corruption. In order to fix this issue, you must find out and solve RAM problems via Memory Diagnostic. Likewise, this strategy can be implemented only when your PC enters Safe or Windows mode. The steps to repair this error are followed by checking RAM.
Step 1. In the Windows search box, type «Memory Diagnostic.» After that, the best-matched icon must be double-clicked for Windows Memory Diagnostic.
Step 2. Opt for «Restart now and search for problems.»
Step 3. The PC will automatically restart and crosscheck the memory. Moreover, it will boot up once the diagnosis procedure is over. After that, you must see the diagnosis report generated in the Event Viewer via the steps mentioned below.
- Activate Event Viewer.
- Open Windows Logs and select System.
- In the box on the right, select Filter Current Log.
- To view all result logs for the memory test, select MemoryDiagnostics-Results in the Event sources box and click the OK button.
- Double-click the most recent result log to check if the diagnostic was successful.
Fix 6. Run Driver Verifier Manager to Fix the Error
Kernel Mode Heap Corruption Windows 10 can also be caused by other faulty drivers. Therefore, if the preceding solution doesn’t work, you can try Driver Verifier to determine if there are any further problematic drivers. Follow the steps below.
Step 1. You can access Driver Verifier Manager in one of two methods.
- Select Windows PowerShell by simultaneously pressing the «Windows + X» keys (Admin). To launch Driver Verifier Manager, enter the command «verifier» and press the Enter key.
- In the Windows search box, type «cmd,» and then pick Run as administrator by right-clicking the Command Prompt application. Then, to launch Driver Verifier Manager, type «verifier» and press the Enter key.
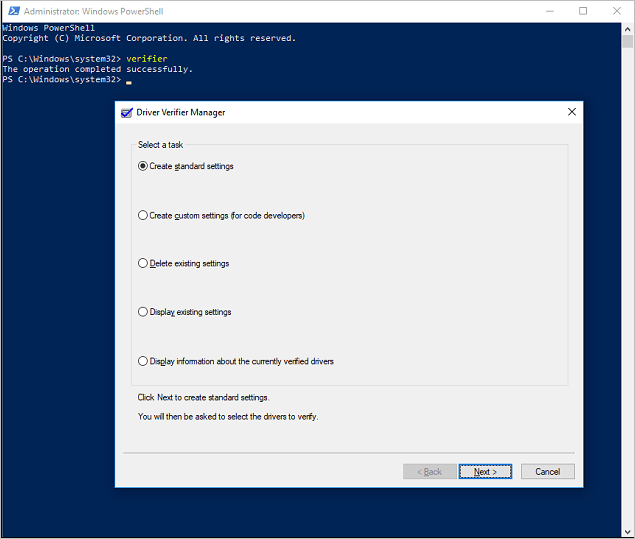
Step 2. Click the «Next» button after checking «Create Standard Settings.» After that, verify «Automatically choose all drivers installed on this PC» and hit the «Finish» button. Once done, Windows will scrutinize the issues in the drivers and reboot your PC if needed.

Step 3. Once your PC reboots, Windows will demonstrate the drivers, which have flaws. After that, you must update, roll back, or reinstall those.
Fix 7. Uninstall Incompatible Software to Fix Kernel Mode Heap Corruption
Running the program in compatibility mode by following these steps will fix the BSOD if the software clash is caused by it being too old and only compatible with Windows 7/8.
Step 1. Select the Open file location from the context menu when you right-click the desktop. software icon.
Step 2. Select Properties by right-clicking the application executable file.
Step 3. Check the box next to Run this program in compatibility mode by moving to the Compatibility tab and doing so. After that, press OK to save your changes.
You should uninstall the incompatible program using the instructions below if other factors are responsible for the software conflict.
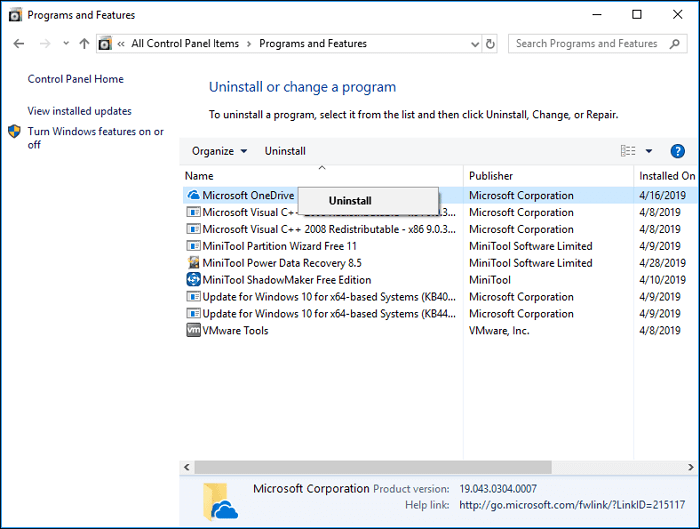
- Run by pressing the Windows + R keys simultaneously.
- The Programs and Features window will open once you enter «cpl» into the Run dialogue box and press Enter.
- Click Uninstall from the context menu of the incompatible application.
Fix 8. Reinstall Windows 10 to Fix the BSOD Error
In case any of the aforementioned solutions don’t work, you might need to reinstall or reset your Windows 10 to resolve Windows 10 BSOD error.
The drive where your system is installed will be completely empty after a clean installation of Windows, including all the apps you’ve installed and your personal data. You’ll need an external storage device, like a USB drive, for the clean installation. The clean installation appears more difficult than the one mentioned before, but it has a greater impact. These are the below-mentioned steps to reinstall Windows 10 to resolve this error.
Step 1. Create an installation ISO file with the Windows 11/10 Media creation tool after downloading it.
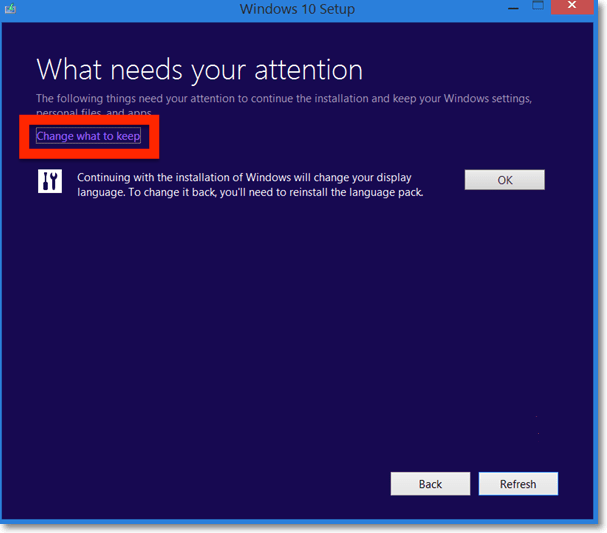
Step 2. Double-click on the «Setup» file to open it.
Step 3. Select «Download and install updates (recommended).»
Step 4. Follow the onscreen prompts.
Watch this video to obtain more assistance if you still have trouble fixing the kernel mode heap corruption error.
- 0.26 Run CHKDSK scan
- 1.03 Update All Drivers
- 1.26 Conduct an SFC scan
- 2.00 Run hardware and devices troubleshooter
Conclusion
Users may become anxious when encountering the Kernel Mode Heap Corruption blue screen issue; however, these problems are more frequent than you might realize. Running the aforementioned diagnostic steps will usually resolve the issue.
In case you lost your data while resolving this error, downloading EaseUS Data Recovery Wizard will help you recover all of them!
Kernel Mode Heap Corruption on Startup FAQs
The FAQs are the following to understand better this Kernel Mode Heap Corruption on Startup error.
1. What is a kernel mode crash?
A. An operating system crash known as a kernel mode crash (KMC) is triggered by a kernel error. Users that encounter a KMC notice a blue screen and an unforeseen computer breakdown.
2. How to fix kernel data inpage error Windows 10?
A. The best ways to fix kernel data inpage error are the following.
- Repair hard disks
- Conduct a virus scan
- Conduct DISM and SFC scan
- Conduct memory diagnostics
- Crosscheck hardware peripherals
3. How to fix Windows 10 BSOD?
A. These are the methods to fix Windows 10 BSOD.
- Repair Windows 10 BSOD After or During the Windows 10 Update
- Remove BSOD from Windows 10 While Using an App or a Device
4. How do I fix kernel security check failure?
A. These are the ways to fix kernel security check failure.
- Fix system files and damaged sectors that are the root of the Kernel Security Check issue
- System hard disc error check and repair
- To resolve the Kernel Security Check failure issue, run the Memory Diagnostic Tool
- To fix the Kernel BSOD issue, try using System Restore
Kernel Mode Heap Corruption is one of the frustrating BSOD issues for Windows 10 and Windows 11 users, ruining your workflow. These kinds of errors generally indicate some sort of problem with the system drivers, hardware issues, or software conflicts. It is, therefore, very important to find out what exactly causes this error and remove it to regain system stability. Now, let’s see what this error is all about, why these kinds of errors occur, and how they can be effectively repaired.
What Is the Windows 10/11 Blue Screen Kernel Mode Heap Corruption?
Kernel Mode Heap Corruption is a BSOD in which some operation goes out of its bounds inside Windows’ kernel mode, responsible for the handling of hardware and process manipulation. It occurs when any process corrupts that part of used memory, called heap utilized by the kernel. If such corruption happens, it will just shut down the system to not allow further damage due to which a BSOD occurs.
This can happen at random times or during event viewings such as gaming, video rendering, or even extreme multitasking. Thus, leading to system crashes and reboots.
What Causes Kernel Mode Heap Corruption Blue Screen in Windows 10/11?
The causes for kernel heap corruption are:
- Incompatible or Corrupted Drivers: The GPU drivers or any system drivers corrupted or outdated.
- Hardware Issues: RAM, a failing GPU, and other components cause memory corruption.
- Overclocking: Most systems could not keep running the components at higher clock frequencies than recommended.
- Software conflict: When different programs and malware conflict with one another, thereby causing a crash of the processes running in a system.
- Windows Updates: Sometimes, updates can cause such incompatibility issues to exhibit themselves through this error.
Knowing these causes identifies and narrows the specific issue that may be affecting your system.
Read about other common Windows Errors:
CRITICAL_PROCESS_DIED Error
DRIVER_POWER_STATE_FAILURE BSOD error
IRQL_NOT_LESS_OR_EQUAL Error
PAGE_FAULT_IN_NONPAGED_AREA Error
DNS_PROBE_FINISHED_NXDOMAIN Error
KMODE EXCEPTION NOT HANDLED Error
How to Fix Kernel Mode Heap Corruption BSOD on Windows 10/11
Start by identifying the likely cause of the error and applying the following solutions:
Method 1: Boot Windows 10/11 into Safe Mode
If you’re unable to access Windows due to the blue screen error, you’ll need to boot into Safe Mode. This mode runs only essential programs and services, preventing conflicts caused by third-party apps.
To enter Safe Mode:
- Hold the Power button for 5 seconds to turn off your computer.
- Repeat this process 2-3 times until the Preparing Automatic Repair screen appears.
- Let the system find the problem and click Advanced options.
- Go to Troubleshoot > Advanced options > Startup Settings and click Restart.
- After your computer restarts, Press F5 for Safe Mode with Networking.
Activate the Safe Mode with Networking since it opens up access to the internet that will come in handy during further troubleshooting or downloading fixes.
Method 2: Roll Back Your Graphics Card Drivers
Well, this is easily done in case it is a recently updated graphics driver-that is, it will roll back to its previous version. Here’s how:
- Press Windows + R to open Run, type in
devmgmt.mscand press OK. Now, in Device Manager, double-click on Display adapters to expand the list. - Right-click your graphics card, then select Properties. Now, go into the Driver Tab, then click Roll Back Driver.
- If the option is grayed out: In that case, that would mean no previous driver available for roll back. Otherwise, follow other methods.
- Choose a reason for rollback then click Yes.
- Restart your computer to take effect changes.
After the driver roll back, check that the Kernel Mode Heap Corruption error was resolved or not. If it does, proceed with other below troubleshooting method.
Method 3: Update or Reinstall Drivers
Often, this is due to corrupted or outdated GPU drivers. Run through Device Manager to check for updates or reinstall the drivers. Certain tools like Outbyte Driver Updater make sure drivers are updated and compatible with Windows 11.
In our Driver library you can find the most suitable GPU drivers for your OS and a short guide on how to install it.
Read also about other popular Graphic cards Drivers:
NVIDIA GeForce 8600 GT drivers
NVIDIA GeForce GTX 1650
Intel UHD Graphics drivers
Method 4: Check Graphics Card for Problems
Since display drivers are one of the main causes of this error, checking if there is any problem with your graphics card is essential. Go through the following steps to discover and fix possible problems:
- Press Win + R hotkeys to open Run dialog.
- Type
devmgmt.mscand press Enter or click OK. - Click on Device Manager and expand it to Display Adapters to see your graphic card.
- Right-click on the video card, updating the driver.
- Then, Windows will automatically search for any available update and download and install it.
In case no updates were found, or there is some error at any point in time, go to your manufacturer’s website and manually download the latest driver for the graphics card.
After updating the driver, please restart your computer and check if the error is gone.
Method 5: Use Driver Verifier Manager
Driver Verifier Manager is a utility tool that could be employed in finding those problematic drivers causing this Kernel Mode Heap Corruption error in Windows 10/11. Here’s how:
- Run Admin Windows PowerShell.
- Type
verifierand press Enter to start the Driver Verifier Manager. - In the Verifier window, select Create Standard Settings and click Next.
- Choose Automatically select all drivers installed on this computer and click Finish.
- Restart your PC when prompted to allow the tool to scan for corrupted or outdated drivers.
After the reboot, Windows will list any drivers with errors. Update, roll back, or reinstall these drivers to resolve the issue.
Method 6: Use the Windows BSOD Troubleshooter (For Windows versions earlier than 1809)
The Blue Screen Troubleshooter diagnoses and fixes hardware, drivers, memory and a lot of other problems. You won’t have access to it if you’re running Windows 10 version 1809 or later but if you’re using an earlier version you can fire up the tool:
- Open Control Panel > Troubleshooting
- Click View all in the left-hand menu
- Right-click Blue Screen > Run as administrator
- Click Advanced > check the box for Apply repairs automatically > Next.
It now opens the troubleshooter to find any issues related to the blue screen. If it finds any, proceed by following the on-screen commands to resolve them.
See Microsoft’s support page entitled “Troubleshoot blue screen errors,” for newer versions of Windows.
Method 7: Use Windows Memory Diagnostic Tool
The Windows Memory Diagnostic tool will check problems on your computer with RAM. To do this, follow these actions below:
- Press Windows + R and open the Run dialog.
- In the field, type in
mdsched.exeand press Enter. - Click Restart now and check for problems (recommended) to run the test straight away or Check for problems the next time I start my computer to schedule it.
- Save your work because the tool will restart your PC right away by choosing Immediate restart.
When the tool finishes running, you will see in the number of passes with the percentage completed. If, after all this process, it doesn’t show errors, then your RAM is OK otherwise you need to consider replacing the RAM or contact your hardware manufacturer for more support.
Method 8: Repair Corrupted System Files
Corrupted system files can cause the Kernel Mode Heap Corruption error. To repair these, use the following two tools:
1. System File Checker (SFC)
- Press Windows + R, type
cmd, and press Ctrl + Shift + Enter to open Command Prompt as administrator. - Type
sfc /scannowand press Enter. The SFC tool will then look for corrupted or missing system files and repair or replace them. Once it’s done, restart your computer to apply changes.
2. DISM Tool
If the above doesn’t work, then implement the DISM tool, which is short for Deployment Image Servicing and Management:
- Do the above to open the Command Prompt as an administrator.
- In the prompt that says, ‘Type’ the following command:
dism.exe /online /cleanup-image /restorehealth, press Enter. - It will then start searching for system problems that it knows it can identify and fixes them.
- Once that’s done, reboot the computer to find the error has vanished.
Method 9: Resolve Software Conflicts
Software conflicts can cause the Kernel Mode Heap Corruption error, especially after installing new apps or running certain programs like games. Resolving these conflicts involves identifying and managing problematic software.
Check for Software Conflicts
Close unnecessary programs and background processes to see if the error persists:
- Press Windows + X and select Task Manager.
- Under the Processes tab, select a program and click End Task to close it. Save your work first if needed.
- Avoid closing unfamiliar programs, as they may be critical system processes.
If the error continues, it’s likely not caused by software conflicts. If it stops, a recently closed program is likely the cause.
Identify Problematic Programs
To track the conflicting program:
- Restart each program one by one and wait to see if the error shows up again.
- If the error happens, this last program restarted is probably the cause.
Leave the suspected program open, if need be, and recreate the steps with other apps to see if there is a conflict.
Manage Conflicting Programs
By identifying the problem, you can
1.De-prioritising the Program
- Press the Windows + R, type in
taskmgr, and press Enter. - Open Task Manager, then Details, look for the program, right-click on it.
- Click Set Priority > Low.
- Avoid changing priorities for system-critical processes.
2. Disable the Program
- Open Task Manager and end the task for the program.
- Prevent it from starting with Windows:
- Press Windows + R, type
msconfig, and hit Enter. - In the Startup tab, click Open Task Manager, select the program, and click Disable.
3. Uninstall the Program
- Press Windows + R, type
appwiz.cpl, and press Enter. - In Programs and Features click the program and then click Uninstall.
After managing the conflicting program, restart your computer to see if the error is resolved. If the issue persists, consider trying additional fixes.
Method 10: Check for Hardware Issues, Including Overheating
Hardware issues, including overheating, can cause the Kernel Mode Heap Corruption error. Diagnosing these problems may require disassembling your computer to inspect components such as the CPU, RAM, or GPU. If you’re unfamiliar with hardware troubleshooting, it’s best to seek help from a local technician.
If no problem in the hardware was found, or if a problem existed but the error refused to go away you will have to reinstall Windows.
Method 11: Reset or Reinstall Windows
If other fixes haven’t worked, resetting or reinstalling Windows can resolve stubborn errors.
Resetting Windows
Resetting returns your PC to its default state, removing installed apps but allowing you to keep or delete personal files. Here’s how to reset:
- Open Settings and go to Update & Security > Recovery.
- Under Advanced Startup, click Restart Now.
- Select Troubleshoot > Reset this PC > Remove everything.
- If prompted, insert Windows installation media.
- Choose whether to remove files from all drives or just the Windows drive.
- Select Just remove my files for a quick reset or Fully clean the drive for a more secure erase.
- Click Reset to start the process. Once complete, follow the on-screen instructions to set up your computer.
Clean Installing Windows
A clean install erases everything on the system drive, requiring a USB or DVD installation media. Steps to perform a clean install:
- Create installation media using the Microsoft Media Creation Tool.
- Insert the media and restart your computer.
- Access the Boot Menu by pressing the appropriate key (e.g., F12 for Dell, F9 for HP).
- Select the installation media to boot from. Follow the installation prompts, selecting the Custom option when asked. Select the primary partition to install to and continue.
Once installed, activate Windows with your product key or run slmgr.vbs /ato through Command Prompt. Both Windows reset and reinstall will remove system errors; however, clean installs are deeper, particularly where the problems remain constant.
FAQs
What is a kernel mode heap corruption?
That is the condition when Windows has problems with the memory of the kernel mode, and some kind of process corrupted the heap that led to this crash.
Is kernel mode heap corruption a common problem on Windows 11?
Yes, this error can occur both in Windows 10 and 11 because of similar issues with drivers or hardware.
How do I fix kernel mode heap corruption on my PC?
Update the drivers, look for hardware issues, and deactivate overclocking. Scanning for malware and employing System File Checker should help.
Could this error be a result of outdated GPU driver?
Outdated/ Faulty GPU driver is the most generalized reason behind kernel mode heap corruption Windows 11 errors.
Is disabling Overclocking to fix this issue safe?
By disabling overclocking, your system will be stabilized, and this is advisable when overclocking has caused instability.