
At present1page, Share1page, Share2Bar record
Home
<
1
>
End
Jump ToPage
Сенсорные экраны KeeTouch
ПАВ / SAW сенсорная панель KeeTouch (на акустических волнах):
Технология работы экрана: Поверхностно-акустические волны (ПАВ)
Толщина антивандального сенсорного стекла: 6мм
Интерфейс: USB или RS232
Разрешение: 4096*4096
Внешние размеры: 382 Х 312мм
Активная область: 340 Х 272мм
Материал: высококачественное стекло
Прозрачность: >90%
Точность позиционирования: Стандартная точность составляет менее 2 мм
Время отклика: 10 мс
Рабочая температура: 20°C до +60°C
Температура хранения: -40°С до +70°C
Допустимая влажность: 10% -90% при 40°С, без конденсата
Износостойкость: экран не подвержен износу
Рабочий ресурс: более 50 миллионов касаний в одной точке
Реагирует: палец, в т.ч. в перчатке
Комплектация: Провода, двухсторонний скотч, акустический скотч
Сертификаты: UL, CE, FCC, RoHS, CB

INSTALLING THE TOUCH TECHNOLOGY SOFTWARE DRIVERS FOR RE DEVICES
Driver installation guide for devices with Resistive touch displays.

Where to get the driver for Resistive touch displays
Click the Download drivers button on the page of the touch device for which you want to install the driver (the button is located under the device images) or go to the page with all drivers for Keetouch hardware. Download the archive with software drivers for RE devices. Open the folder where you downloaded the archive. Unzip the archive to a convenient location.
YOU MUST LOG IN AS ADMINISTRATOR BEFORE INSTALLING THE DRIVER.
How to install the driver
Navigate to the folder of the previously unzipped archive. Double-click the setup.exe file to start the installation. When the installation window opens, click Next to continue.
CHOOSING THE RIGHT TYPE OF INSTALLATION
Depending on what type of touch screen IN interface your device has, select or clear the “Install PS/2 interface driver” checkbox:
- • if your device connects via RS-232 interface, select the «Install PS/2 interface driver» checkbox
- • if your device connects via USB interface, clear the «Install PS/2 interface driver» checkbox
After selecting the installation type, click Next to continue.
WHICH DRIVER TO CHOOSE
Depending on the type touch screen IN interface selected in the previous step, select or clear the “Install RS232 interface driver” checkbox:
- • if your device connects via RS-232 interface, select the «Install RS232 interface driver » checkbox
- • if your device connects via USB interface, clear the «Install RS232 interface driver » checkbox
After selecting the installation type, click Next to continue.

Choosing the right CALIBRATION METHOD
The program offers several options for calibrating resistive touch displays. Choose the appropriate calibration method that suits your device:
- • Every system boot up — after every time you reboot your computer
- • Next system boot up – a single time after the next computer startup
- • None – a single time immediately after the installation process is finished.
Select the appropriate option and click Next to continue… Immediately after that A pop up window shell appear. Make sure that you monitor or touch controller’s USB cable is plugged and click OK to continue.
Supporting multi-monitor system
If you have two or more resistive touch displays connected to the same computer, select the “Support Multi-Monitor System” checkbox. Then click Next to continue.
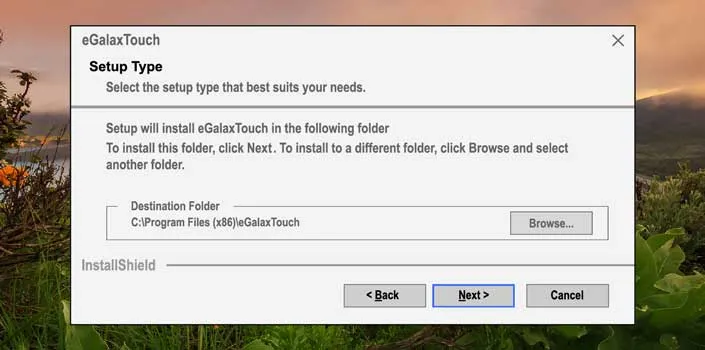
Which folder to install the program to
The program can be installed to any PC drive. Select the directory where the program shall be installed. Click Next to install the program to the default folder. To install the program to a different folder, click Browse and select another drive and folder.
Finishing driver installation
The installer will add program shortcuts to the Start menu. Select one of the existing directories or create a new folder. Click Next to continue. The installer will then prompt you to create a desktop shortcut. Select or clear the checkbox depending on whether you want the utility icon on your desktop.
THE PROGRAM WILL INSTALL ALL AVAILABLE RESISTIVE CONTROLLERS, AFTER THE INSTALLATION PROCESS IS FINISHED ALL THE AVALIABLE CONTROLLERS WILL BE SHOWN.
Writen by: Diana Strizh, Technical Content Developer
Content developer at Keetouch GmbH who brings her expertise to the company for over 6 years. With a technical degree in Technology of Mechanical Engineering of Metal-Cutting Machines, Diana’s background in machine-building enterprises has honed her proficiency in writing technical manuals, specification files, user guides, and instructions for Keetouch equipment.
linkedin
More articles by Diana Strizh, technical content developer
Writen by: Romans Berzins, Technical Director
Esteemed Technical Director,with a degree in Industrial Engineering, Romans is a go-to resource within the company due to his ability to troubleshoot and provide effective solutions to complex technical issues. Having spent years working in Keetouch Technical Support department, Romans possesses invaluable hands-on experience with every Keetouch product imaginable. His direct interaction with customers has allowed him to understand their needs and challenges, enabling him to deliver comprehensive instructions, tutorials, and training materials.
chat
More articles by Romans Berzins, Technical Director
Learn how to pair Bluetooth devices with your PC in simple steps. Enable Bluetooth in settings, set your device to pairing mode, and connect seamlessly. Troubleshoot common issues for a smooth wireless experience.
Learn how to quickly enable or disable Bluetooth on your Windows device. Discover step-by-step methods using the taskbar icon, Settings app, or keyboard shortcuts for seamless control. Perfect for connecting devices or conserving battery life effortlessly.
Create bootable Windows installation media effortlessly with the official Microsoft Windows USB/DVD Tool. This free ISO burner utility lets you convert ISO files to bootable USB drives or DVDs, ensuring reliable setup for OS installations or repairs. Trusted, user-friendly, and designed for seamless Windows deployment.
Struggling with audio problems on your Windows 10 PC? Learn step-by-step solutions to fix sound driver issues, including updating drivers, reinstalling software, using Windows troubleshooter, and restoring default settings. Resolve no-sound errors, distorted audio, or unrecognized devices quickly for seamless playback and optimal system performance.
The Logitech Unifying Receiver simplifies your workspace by enabling wireless connectivity for up to six compatible devices—like keyboards, mice, and more—through a single USB port. Enjoy clutter-free convenience, reliable performance, and effortless device management across Logitech peripherals.
Epson Print and Scan delivers unmatched precision and rapid performance, empowering professionals to achieve peak efficiency. Engineered for reliability, its advanced technology ensures crisp prints, swift scanning, and seamless workflow integration—transforming complex tasks into effortless processes for uninterrupted productivity.
Learn how to set up your Epson L3250 all-in-one printer with ease. This guide covers unboxing, installing ink cartridges, connecting to power, and configuring via USB or Wi-Fi. Follow step-by-step instructions to install drivers, download software, and troubleshoot common issues for seamless printing, scanning, and copying.
Discover the ultimate photo viewer for Windows 10/11 designed to simplify image management. Enjoy lightning-fast loading, intuitive organization tools, and seamless browsing with support for all major formats. Effortlessly sort albums, tag favorites, and enhance visuals with built-in editing features—perfect for photographers and casual users alike. Streamline your workflow today!
Learn how to set up your Epson L3250 printer quickly and efficiently with this step-by-step guide. From unboxing to connecting power, installing software, and configuring settings, we’ll walk you through each stage for a smooth, hassle-free installation. Perfect for beginners and experts alike!
Learn step-by-step methods to update drivers on Windows 10 for optimal hardware performance. Discover manual updates via Device Manager, automatic updates through Windows, and manufacturer tools. Ensure system stability, fix bugs, and enhance compatibility with the latest driver versions.
See all queries