
Меню «Пуск» — важнейшая часть Windows, с которой миллионы людей по всему миру взаимодействуют каждый день. Однако, несмотря на все улучшения в последних версиях системы, многим оно по-прежнему не нравится. Некоторые пользователи банально привыкли к «Пуску» из Windows 7 с ярлыками для папок и без плиток, пользы от которых мало. На этот случай есть достаточно сторонних утилит, что могут заменить стандартное меню «Пуск» на более функциональное.
Start10 — современное и удобное меню
- Стоимость: 4,99 доллара на 1 ПК.
- Пробный период: 30 дней.
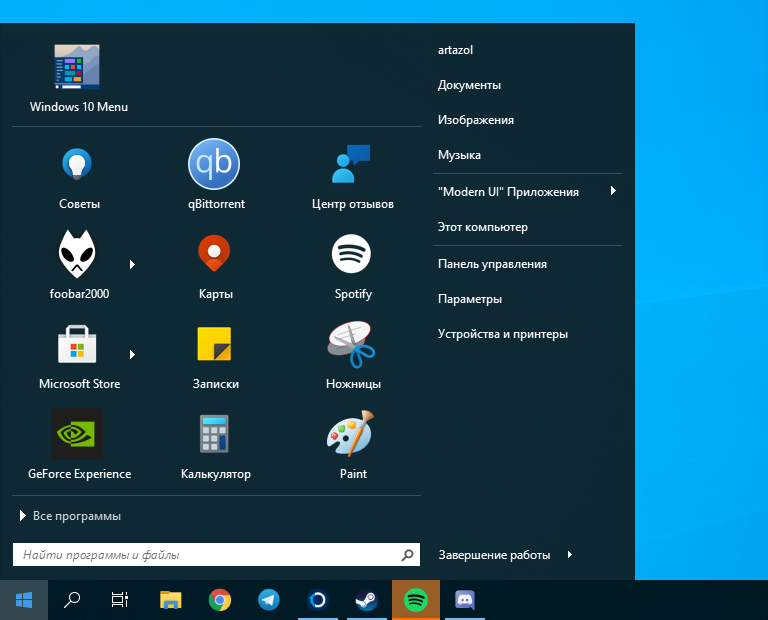
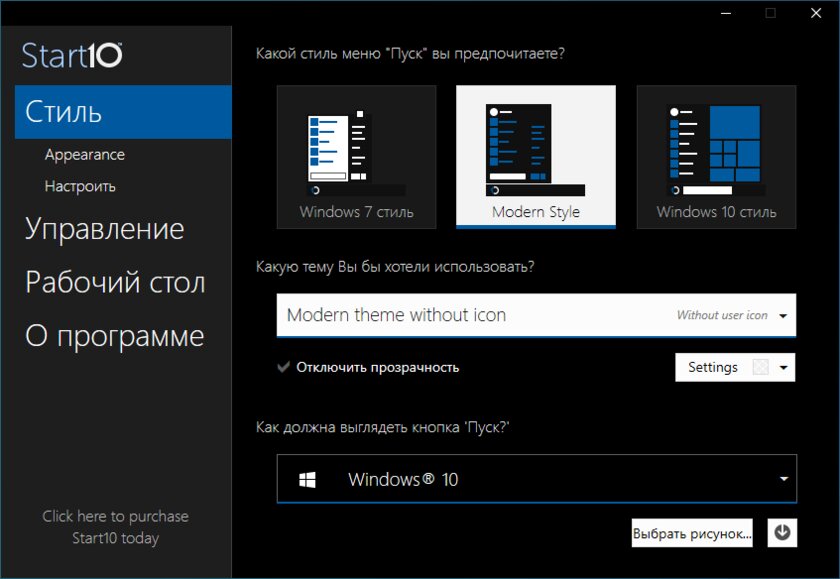
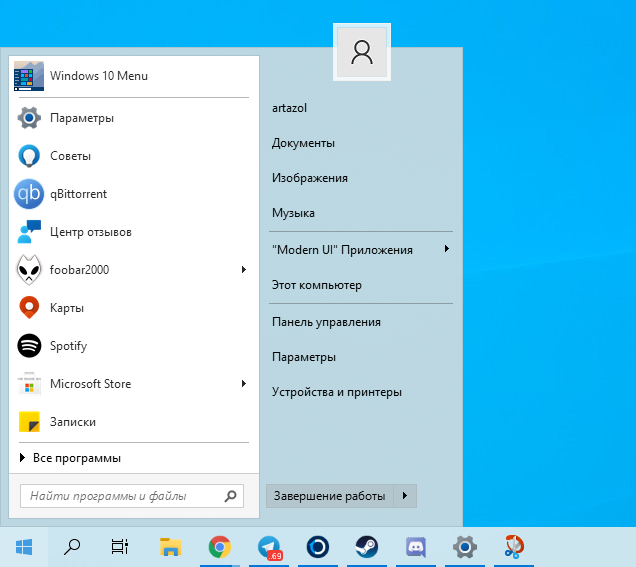
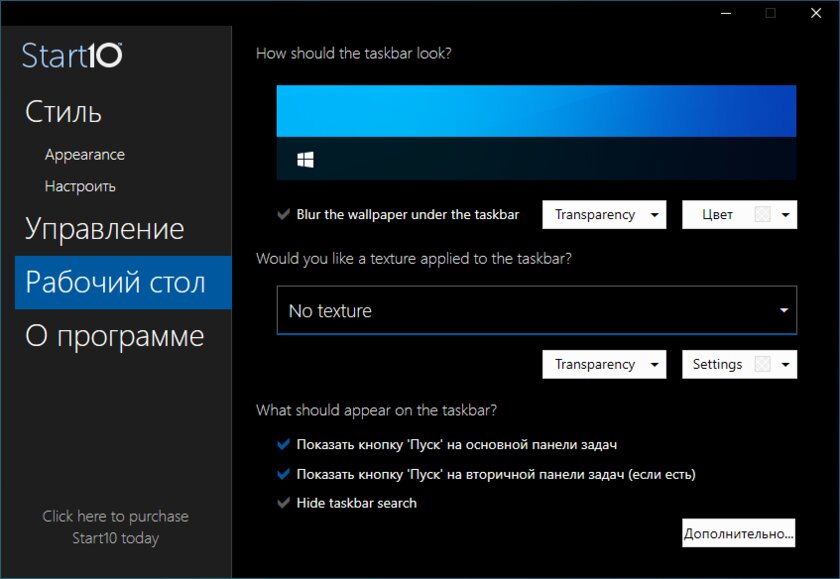
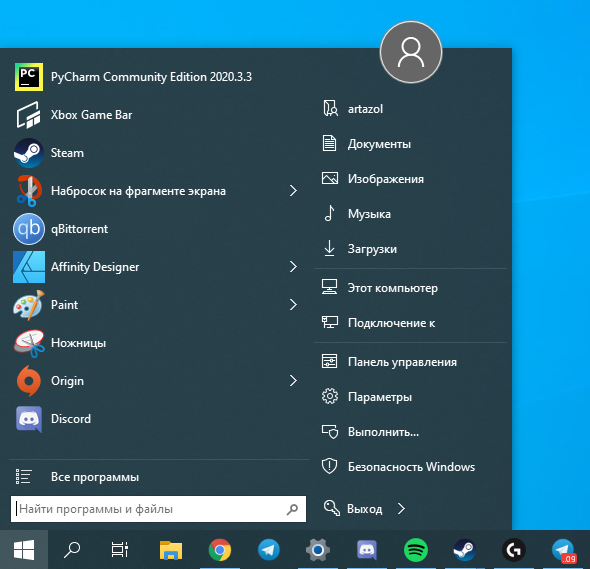
Start10 — это новая утилита, разработанная специально под Windows 10 для замены стандартного «Пуска» на более компактный и красивый.
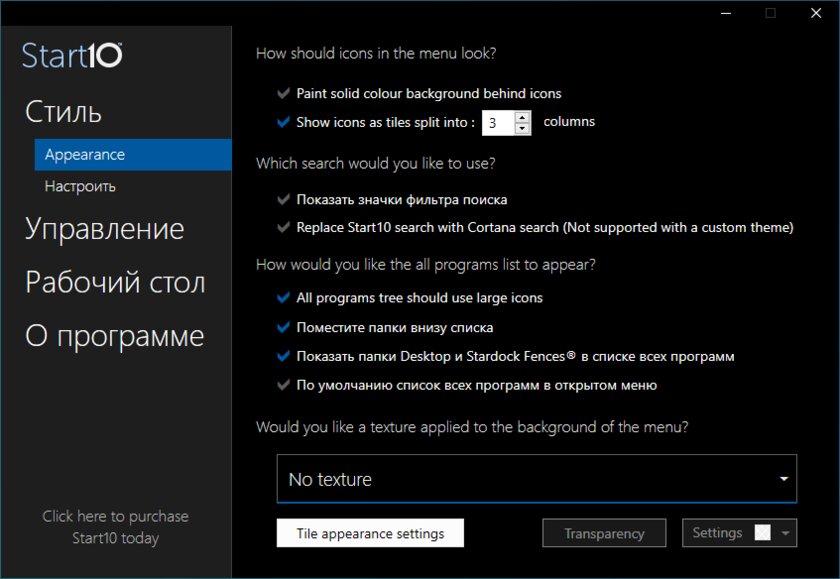
Вместо необъемлемого полотна из разноразмерных плиток, приложение предлагает пользователю компактное и привычное меню с быстрым доступом к избранным папкам и системным настройкам. Кроме этого, в отличие от других утилит эта позволяет отображать установленные программы и в виде сетки, напоминающей Windows 10X.
Пользоваться приложением легко, а с недавнего обновления Start10 получил поддержку новой белой темы одного из обновлений Windows 10. Также, пользователю доступно огромное множество предзагруженных иконок «Пуска» и отдельная галерея на случай, если стандартных будет мало.
StartIsBack — самая функциональная замена «Пуску»
- Стоимость: 3,99 долларов на 1 ПК.
- Пробный период: 30 дней.
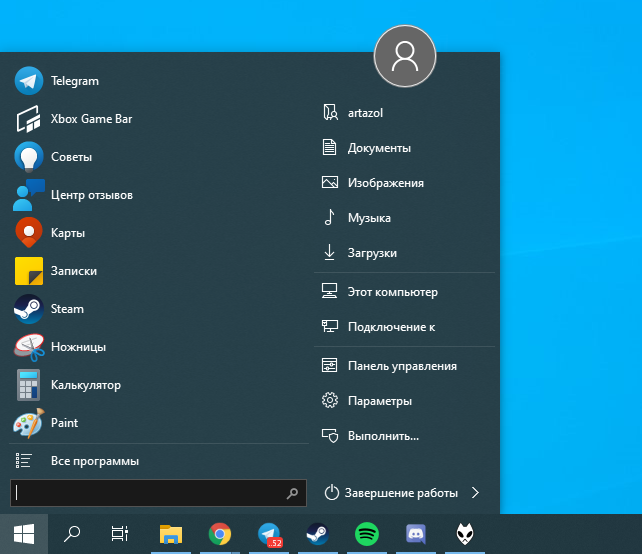
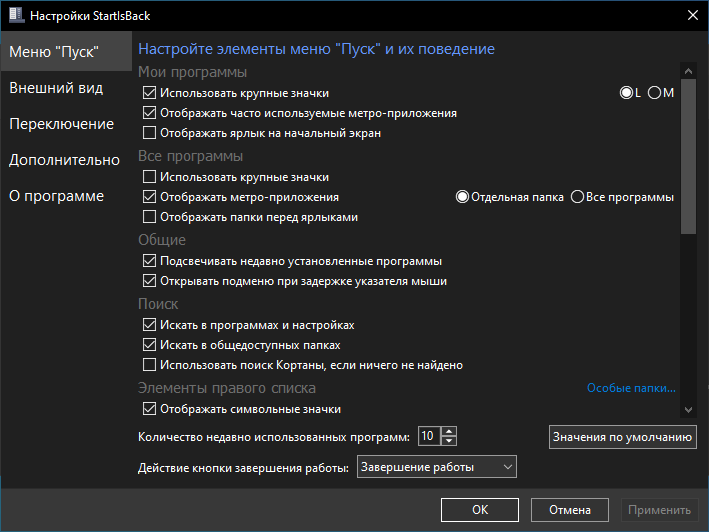
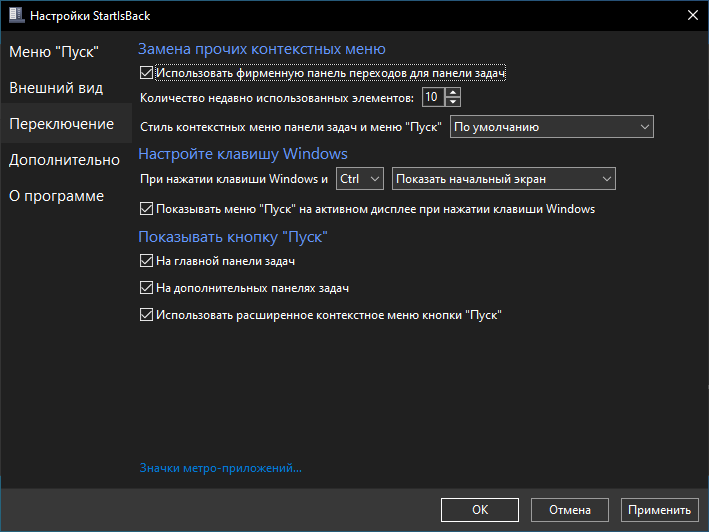
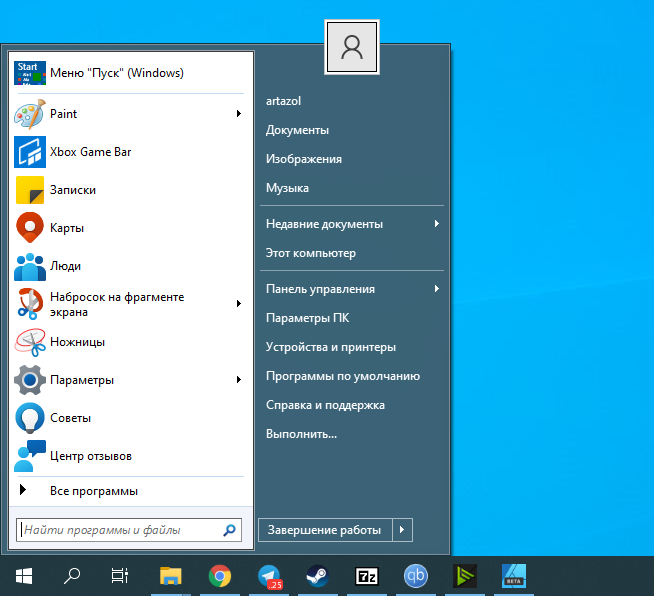
StartIsBack — пожалуй, самое мощное приложение для замены стандартного меню «Пуск».
Программа кардинально меняет стандартное меню Windows 10. На место списка приложений с плитками приходит полюбившееся многим меню с панелью быстрого доступа к избранным папкам и недавним документам, а также отдельное меню с избранными программами.
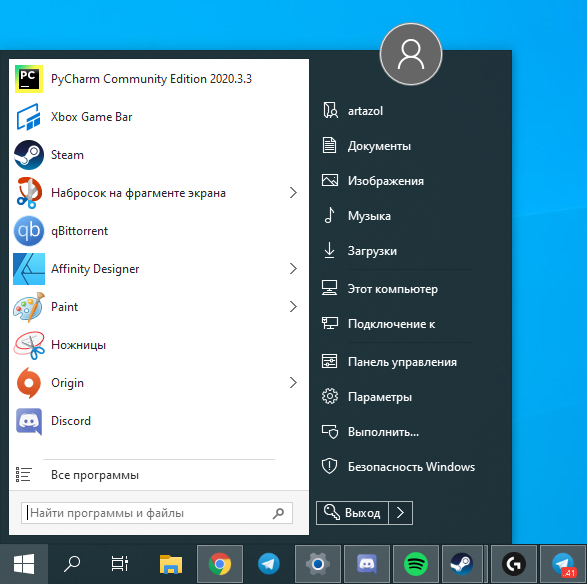
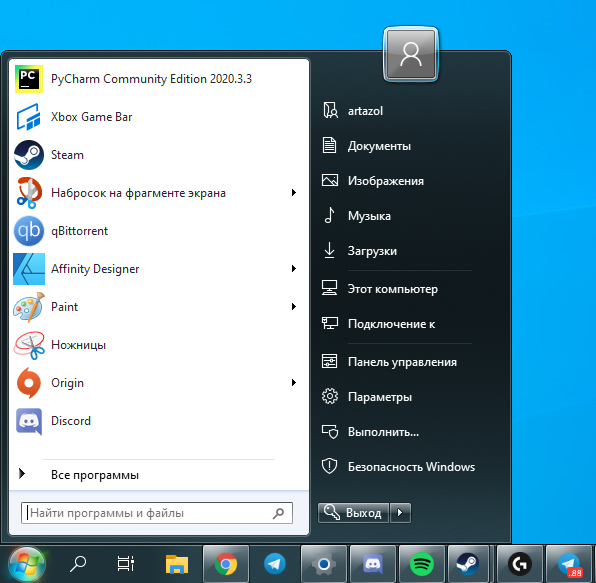
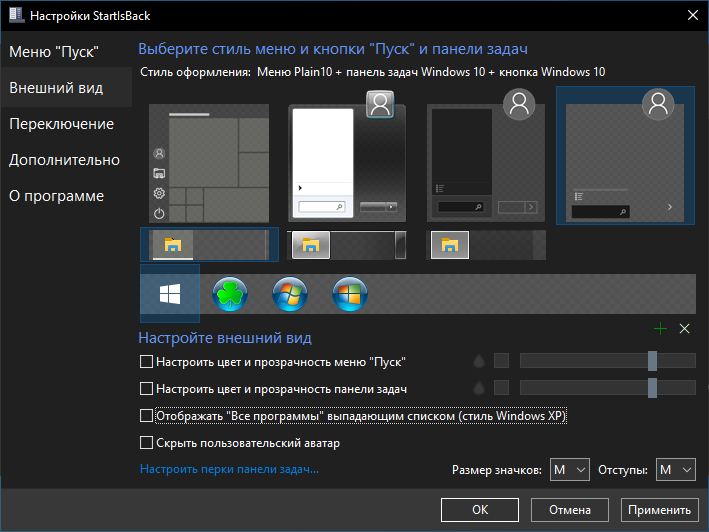
В отличие от других утилит с подобным функционалом, эта может невероятно гибко настраивать внешний вид панели задач — не составит труда максимально приблизить ее к фирменному дизайну Aero из Windows 7. Кроме этого, в приложении есть много встроенных тем, а также поддержка размытия, похожего на Fluent Design последних версий Windows 10.
Open Shell — лучшее бесплатное меню для Windows
- Стоимость: бесплатно.
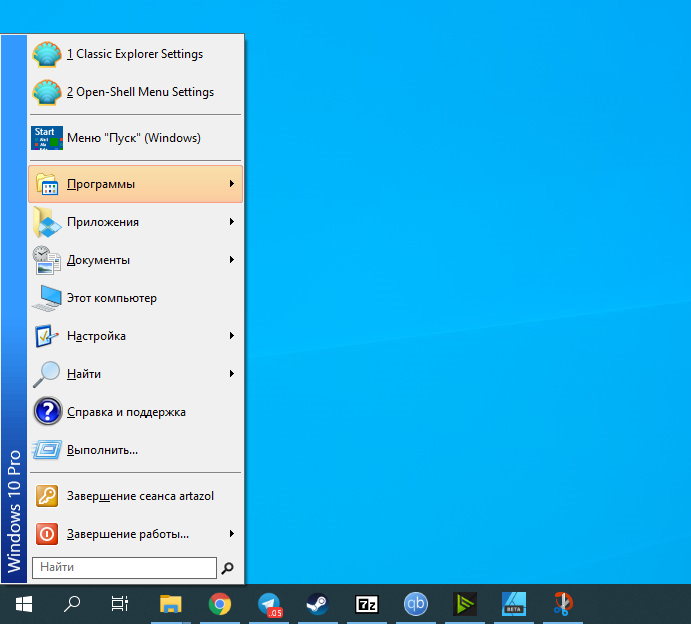
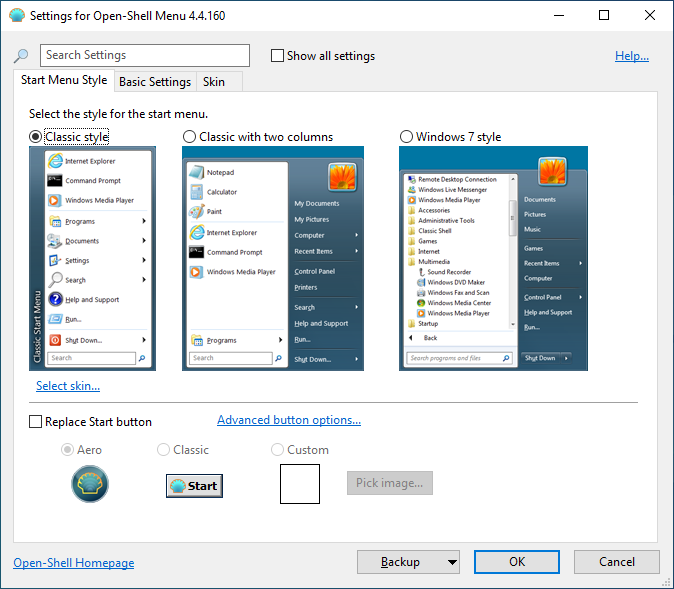

Open Shell — это отличная замена стандартного меню «Пуск» на основе исходного кода некогда популярной утилиты Classic Shell.
Одним из преимуществ перед другими приложениями будет возможность скопировать внешний вид главного меню не только из Windows 7, но и XP. Конечно, пользы от него будет мало, но чувство ностальгии вызовет у каждого. А обилие настроек и встроенных тем поможет настроить «Пуск» под любой вкус.
Кроме этого, у Open Shell нет пробного периода, как и необходимости платить за её использование.
The Windows Start menu is a key feature of the operating system, providing quick access to your apps, settings, and files. It includes a powerful search function and allows you to pin your favorite apps, folders, and websites for easy access. Customization options let you organize your pins into groups and change the Start menu layout to fit your preferences.
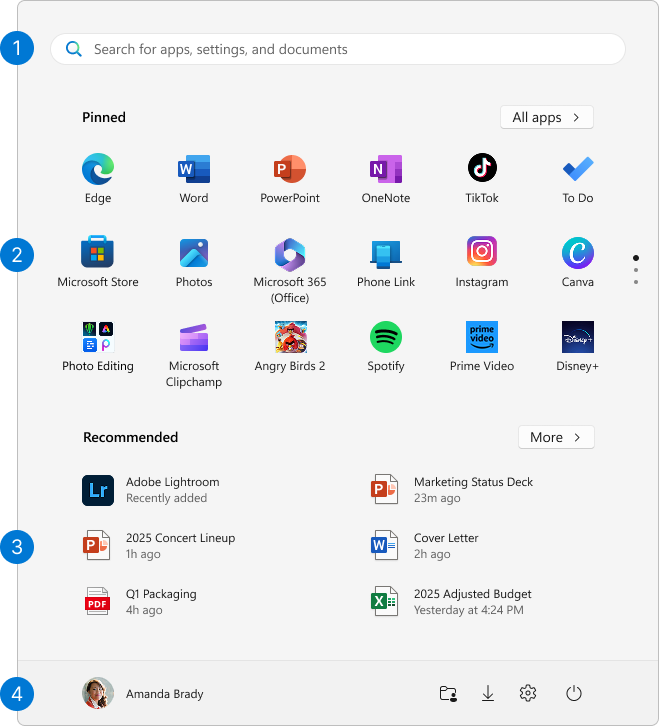
Start menu areas
The Start menu is organized into four main areas:
-
Search: Quickly find apps, files, and settings by typing keywords
-
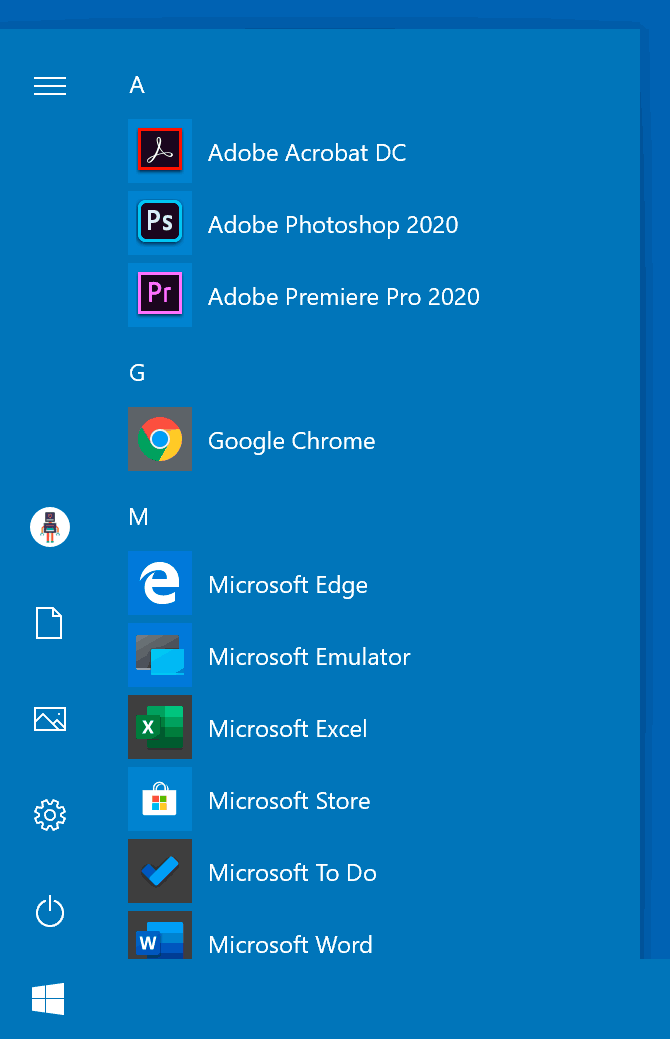
Pins: Pinned apps, files, folders and websites in a grid format for easy access. All apps shows an alphabetical list of all installed applications
-
Recommendations: Recently added and frequently used apps, plus recently opened files
-
Account: Profile icon for account settings, switching accounts, or signing out. You can also add shortcuts for easy access to common folders. The power button lets you lock, sleep, shut down, or restart your device
Configure the Start menu
Here are common customizations for the Start menu. Expand each section to learn more.
There are different ways to pin apps or shortcuts to the Start menu. For example:
-
In the Search box on the taskbar or on the Start menu, type the name of the app you want to pin. Right-click on the app, then select Pin to Start
-
From Explorer, right-click on a folder and select Pin to Start
-
For websites, open Edge and navigate to the website you want to pin. Then select the more options menu > More tools > Pin to Start
Unpin an item from the Start menu
To remove a pinned app or shortcut from the Start menu, right-click on it and select Unpin from Start .
Whenever you want to change the order of pins on the Start menu, drag the pin from its current position to a different one.
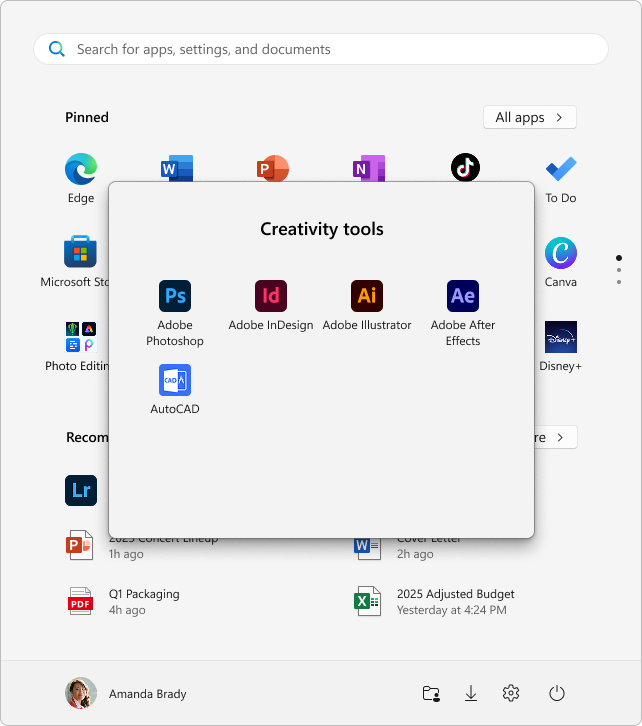
Organize your pins into folders
Grouping pins into folders in Start menu helps keep your apps organized, reduces clutter, and makes it easier to find and access related apps quickly. It also allows for better space management and personalization, giving your Start menu a cleaner and more efficient layout.
-
To create a folder, drag one pinned item over another to create a folder. The folder will automatically be created, and you can rename it
-
To add more pins to the folder, drag them into it
-
To remove a pin from a folder, open the folder and drag the pin out of it
-
Once only one pin is left, the folder is removed from the Start menu
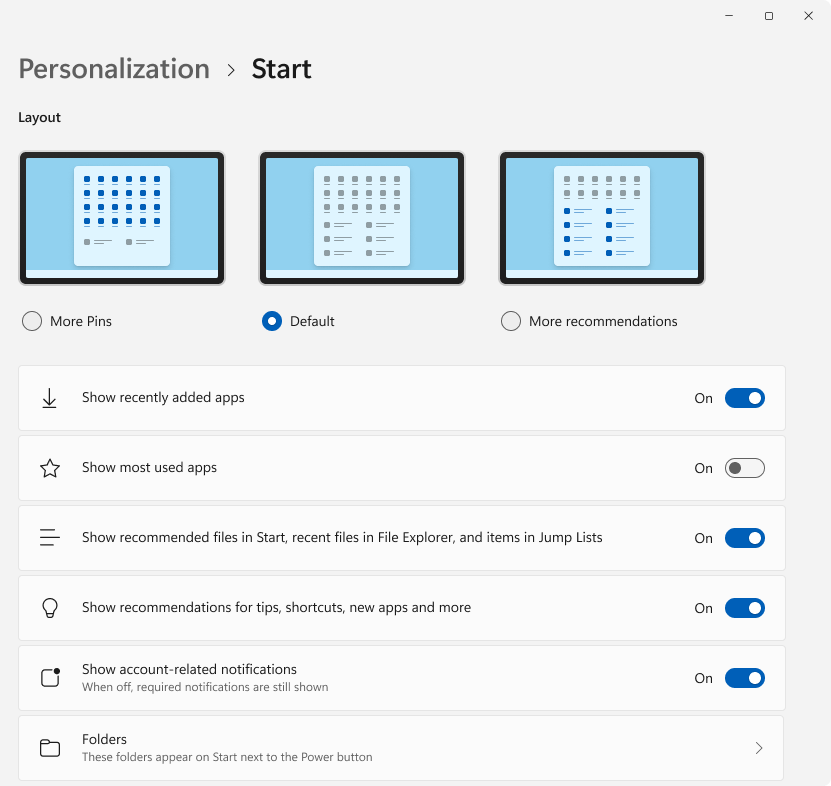
You can customize the Start menu layout to show more pins, more recommendations, or keep the default layout.
-
Select Start , right-click on the bottom of the Start menu and select Start settings or use the following shortcut:
Start
-
Select one of the layout options:
-
More Pins: prioritizes showing more pinned apps
-
More Recommendations: This layout focuses on showing more recommended items, such as recently added apps and files
-
Default: balances between pinned apps and recommended items

-
-
Toggle on or off the other layout options, which include
-
Show recently added apps
-
Show most used apps
-
Show recommended files in Start, recent files in File Explorer, and items in Jump Lists
-
Show recommendations for tips, shortcuts, new apps, and more
-
You can choose which folders appear next to the power button on the Start menu. These folders can include common locations such as Documents, Downloads, Music, Pictures, Videos, Network, and Personal folder.
Simply toggle the switches for the folders you want to add. This customization allows you to quickly access frequently used folders directly from the Start menu, enhancing your workflow and making navigation more efficient.
-
Select Start , right-click on the bottom of the Start menu and select Start settings or use the following shortcut:
Start
-
Select Folders then toggle to On all the folders that you want to appear next to the Power button
Typically, the Start menu is centered, but you can change the alignment to the side of the taskbar.
-
Right-click on the taskbar and select Taskbar settings, or use the following shortcut:
Taskbar
-
Expand Taskbar behaviors and select your desired option for Taskbar alignment
To learn more, see Customize the Taskbar in Windows.
Need more help?
Want more options?
Explore subscription benefits, browse training courses, learn how to secure your device, and more.
Start11 — очередная утилита от компании Stardock, известной своими решениями по кастомизации меню Пуск для различных версий операционной системы Windows. Программа включает в себя настраиваемый внешний вид меню (в стиле Windows 7, 10 или 11), а ткже расширить его рядом дополнительных функций.
Присутствует возможность вернуть недостающие функции из предыдущих версий Windows, например перемещение панели задач в верхнюю часть экрана или контекстное меню панели задач в стиле Windows 10. Можно добавлять папки, страницы или разделители в меню Пуск, доступен интегрированный поиск.
Пользователь может по своему усмотрению изменять стили, цвета, прозрачность, ссылки на ярлыки, закругленные или квадратные углы, изменять размер панели задач, размытие и многое другое, чтобы сделать ваше меню Пуск по настоящему индивидульным и при этом максимально функциональным.
Также можно управлять расположением кнопки Пуск, перемещая ее в центр или влево, в верхнюю часть экрана, менять функции кнопки Пуск на нажатия клавиш и многое другое. Кроме этого приложение дает возможность изменять стили сетки значков, чтобы подобрать конфигурацию, подходящую для вашего рабочего процесса.
Windows 10 comes with a decent range of customization options. Some of these customization options are not easy to access. As well as that, some parts of Windows 10 aren’t as easily customizable, such as the Windows 10 Start Menu tiles.
Although many users prioritize custom Windows 10 Start Menu tiles, Microsoft doesn’t make it easy to personalize. There are some Start Menu tile customization options, for sure. But third-party Windows 10 Start Menu tile customization tools offer way more options.
Here’s how you create custom Start Menu tiles in Windows 10.
The Windows 10 system settings contain several Start Menu live tile settings you can tweak before you opt for custom live tiles. While these aren’t custom Start Menu live tiles, you might find the tweaks you make here are what you need.
Default Windows 10 Start Menu settings are found under Start > Settings > Personalization > Start.
Some of these settings, such as Use Start full screen, are great options if you are using a Windows 10 tablet.
There is also the option to Show more icons, which increases the number of programs you can add to a row from three medium tile spaces to four.
If you’re annoyed by how often you have to open File Explorer to access your Downloads folder, click on the Choose which folders appear on Start option to add certain folders directly onto your Start Menu.
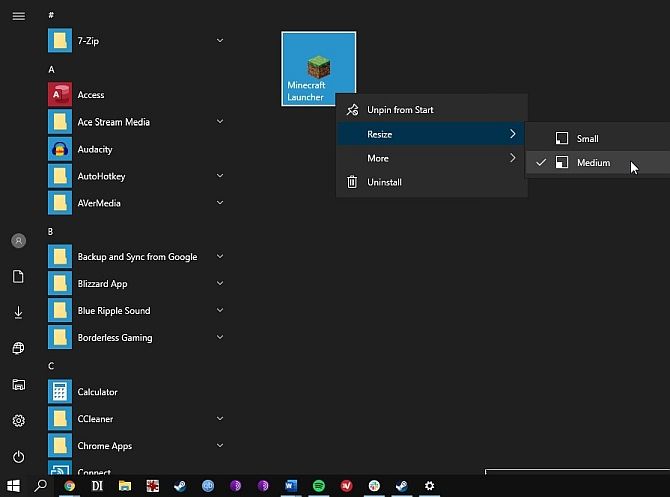
If you’d like to add tiles to your Start Menu, right-click on any program and select Pin to Start. Once a program is added to the Start Menu, you can resize the icon by right-clicking the tile selecting Resize.
Programs like weather applications downloaded through the Windows Store even have built-in live tile features. You can add Chrome applications and Universal Windows Platform (UWP) apps to the Start Menu as well, along with any program located on your PC.
However, other programs, like Steam, require some additional tweaking. Read on to find out how you can add Steam live tiles to your Windows 10 Start Menu.
By default, you can also activate the fence feature in Windows 10 by dragging a tile below or above another to create a section. You can label the tile grouping in the space provided as well.
Better StartMenu is a popular Windows 10 Start Menu customization tool. It offers easy to use live tile customization options.
The tool comes in two parts: Better StartMenu and StartMenu Helper.
The Helper program saves the tile data, including the name, icon, and path of the program, while Better StartMenu adds the tile onto your Start Menu. You must install both to add a custom live tile to your Windows 10 Start Menu using this method.
Better StartMenu lists for $2.99. However, the trial version has no limitations. For now, download the free trial. If you enjoy the software, consider donating to the developer.
Download: Better StartMenu for Windows (Free Trial/$2.99)
You must also download the StartMenu Helper. Better StartMenu doesn’t work properly without these files.
Download: StartMenu Helper for Windows (Free)
Once the StartMenu Helper finishes downloading, right-click, and extract the file contents. Once you extract the contents of the archive, run BetterStartMenuHelper.
Better StartMenu Helper is the tool you use to create a live tile icon. It helps you resize and modify an image to fit the various live tile sizes. But to create custom live tiles, you need some custom live tile icons.
The easiest way to find a large selection of free high-quality icons is through Flaticons, who provide free downloadable icon packs.
For this tutorial, I’m using Pixel Perfect’s Logos and Brands pack. You’ll have to create a free Flaticons account to complete the download. Once your download completes, extract the archive contents, then head back to Better StartMenu Helper.
Select New Tile to create a new live tile. Then, select Auto Generate all from a single image. Please note that Better StartMenu requires PNG files to create custom Start Menu live tiles.
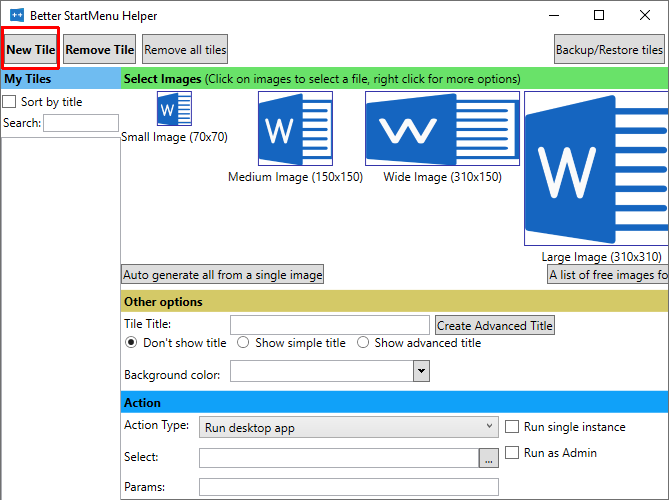
Configure Your Custom Live Tile Icon
Now, under Other options, give your new custom live tile a name, and decide whether you want to display the title on the tile. Next, choose the live tile a custom background, or stick to a transparent background.
The Action section is where you define which program your new custom live tile opens. First, select an option from the dropdown menu. In this case, Run desktop app is what you want, but you can see the options to open a folder, file location, and so on.
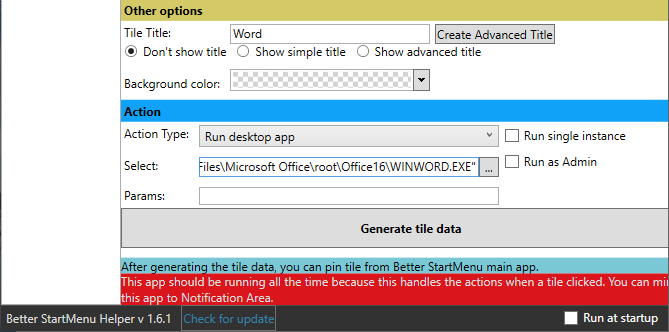
Now, Select the file path of the software you want to open. Click the three-dot icon and browse to the program, select it, and press OK.
Alternatively, browse to the software in your Start Menu, then right-click and select More > Open file location. Then, right-click the application and select Properties.
You’ll find the exact file location alongside Target. You can copy and paste this file path into Better StartMenu Helper.
Underneath, you can set any specific opening parameters for the software. Only do this if you know what you’re doing.
Finally, hit Generate tile data.
You now need to open the Better StartMenu software. However, do not close the Better StartMenu Helper. Better StartMenu requires the helper to remain open to process the custom live tile links.
In the bottom right corner of Better StartMenu Helper, make sure to check Run at startup. That way, you know your custom live tiles will always work.
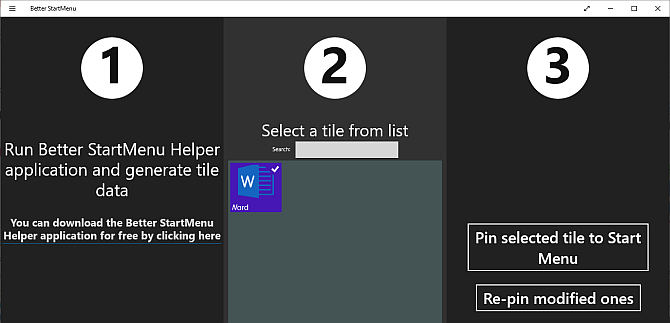
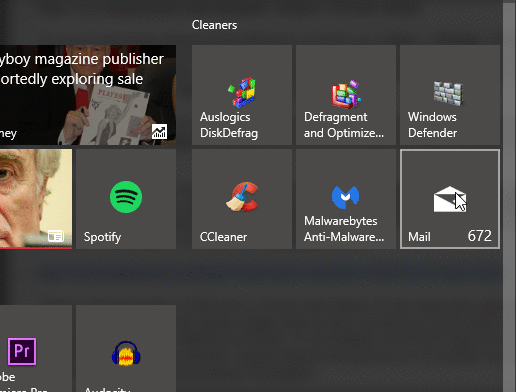
After you open Better StartMenu, you should spot your custom live tile. Select the custom live tile, then in the third column, hit Pin select tile to Start Menu.
Confirm that you want to add the live tile, and you’re good to go.
There are three alternatives to Better StartMenu, some with different qualities. The biggest pro that most alternatives have is allowing custom live tile links to work without a secondary background program.
Here are three Better StartMenu alternatives:
- Pin More: build large custom live tile grids, including multiple sources, and pin them all to your Start screen
- Win10Tile: create and pin custom live tiles to your Windows 10 Start Menu
- TileIconifier: open-source custom live tile app for Windows 10
You can use Better StartMenu to add custom game icon tiles to your Windows 10 Start Menu. However, a better option is the free tool Steam Tile, which takes information from your Steam account direct to provide in-live tile data.
Download: Steam Tile for Windows (Free)
Steam Tile requires your SteamID to function. You must also set your profile to public. To find your SteamID, open Steam, then head to Account Name > Profile > Edit Profile > Custom URL. Add your preferred URL and click Save Changes.
After creating your SteamID, enter it into the Steam Tile welcome screen, and you can begin pinning custom live Steam tiles to your Windows 10 Start Menu.
The difference between simply adding gaming programs to your Start Menu and using Steam Tile is stark and impressive. Steam Tile also allows you gaming access without having to open the Steam library.
Use more than one gaming client? Check out Pin More, as mentioned in the previous section as an alternative to Better StartMenu.
In mid-2019, Microsoft accidentally released an internal Windows 10 build, meant for in-house testers only. Windows 10 build 18947 included a completely new Start Menu design—without any live tiles. The new Start Menu design replaces live tile with static icons, favoring a simplified look over the current iteration.
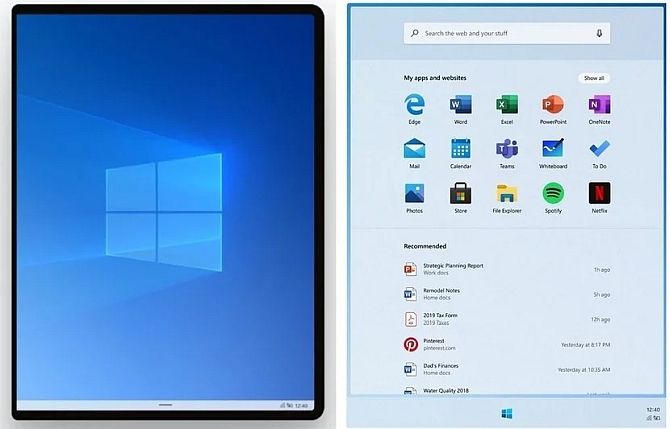
Later in 2019, Microsoft announced Windows 10X, a version of Windows 10 designed for dual-screen and foldable devices. Windows 10X uses the leaked version of the Windows 10 Start Menu. However, it isn’t clear if the static Windows 10X Start Menu will make its way into the regular Windows 10 build (along with the new taskbar and other Windows 10X features).
Even if Microsoft is considering removing live tiles from a future Windows 10 build, you can still make the most of them for now. With these programs, you can customize your Windows 10 Start Menu, making it the dynamic feature it has the power to become.
If the Windows 10 Start Menu isn’t your cup of tea, why not try a complete Windows Start Menu alternative? Alternatively, check out our guide to Windows 10 customization for the best Windows 10 personalization hacks.
Меню Пуск Windows 10 с настройками по умолчанию кому-то может нравиться, кому-то — нет, но почти всегда содержит массу ненужных элементов, может иметь не оптимальный вид и, о чем некоторые начинающие пользователи порой не догадываются, имеет самые различные варианты настройки.
В этой инструкции подробно о различных методах, которые позволят настроить стандартное меню Пуск в Windows 10 так, чтобы его было удобно использовать вам, а также дополнительная полезная информация, на случай, если даже после всех настроек новое меню Пуск вас не устраивает. Внимание: даже если вы не относите себя к начинающим пользователям, с большой вероятностью среди описанных ниже возможностей вы найдете что-то новое для себя.
- Изменение цвета меню Пуск (светлый, темный, на выбор, прозрачность)
- Удаление ненужных элементов из списка приложений меню Пуск
- Настройка плиток в меню Пуск (удаление, добавление, группировка и изменение размеров, создание собственных)
- Работа с контекстным меню кнопки Пуск (открывается правым кликом по кнопке или сочетанием клавиш Win+X)
- Дополнительные возможности настройки
- Как сделать меню Пуск в Windows 10 как в Windows 7
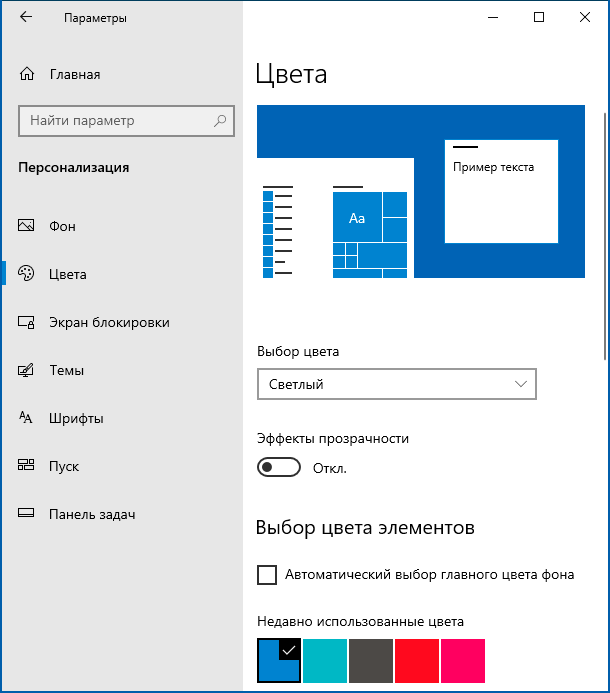
Изменение цвета меню Пуск Windows 10
По умолчанию, если вы не применяли никаких тем оформления, меню Пуск в последних версиях Windows 10 темное и с эффектами прозрачности. Всё это можно поменять.
Доступные варианты действий, касающиеся изменения цвета меню Пуск:
- Зайдите в Параметры — Персонализация (либо нажмите правой кнопкой мыши по рабочему столу и выберите пункт «Персонализация»). Зайдите в раздел «Цвета».

- Здесь вы можете выбрать тему оформления, которая сразу применится к меню Пуск (и не только) в разделе «Выбор цвета» — «Темный» или «Светлый». При выборе «Настраиваемый» вы можете задать темную и светлую тему отдельно для разных элементов. На изображении ниже — пример светлой темы оформления для меню Пуск.

- Чуть ниже вы можете включить или отключить эффекты прозрачности для меню Пуск и некоторых других элементов Windows 10. Некоторым без них оформление кажется лучше, попробуйте.
- Выбрав какой-либо цвет в разделе «Выбор цвета элементов» вы можете использовать его также для панели задач и меню Пуск, для этого ниже отметьте пункт «Отображать цвет элементов на следующих поверхностях — В меню Пуск, на панели задач и в центре уведомлений». Пример возможного результата на скриншоте. Примечание: пункт не активен, если у вас выбрана светлая тема оформления.

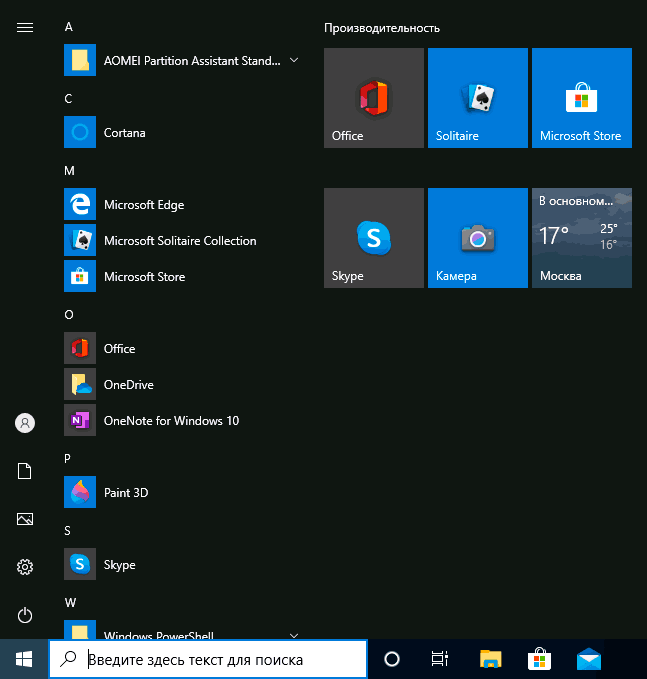
Удаление ненужных элементов из меню Пуск
В этом разделе — про удаление ненужных программ и папок из меню Пуск в левой части, то есть из списка приложений, где часто добавляется значительное количество ярлыков, многие из которых никогда не используются.
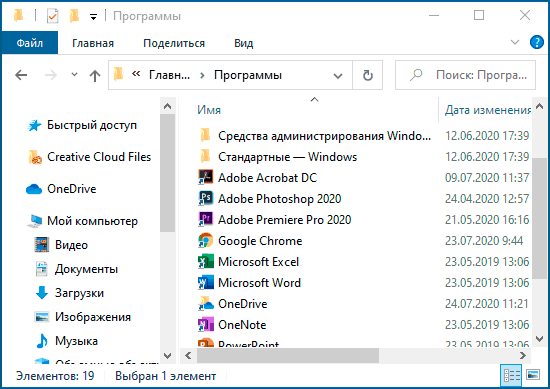
Эти папки и ярлыки находятся в следующих папках (достаточно скопировать путь в адресную строку проводника и нажать Enter, чтобы сразу перейти в папку):
- %ProgramData%\Microsoft\Windows\Start Menu\Programs\
- %AppData%\Microsoft\Windows\Start Menu\Programs\
Ярлыки из первой папки применяются ко всем пользователям, из второй — только к текущему пользователю.
К сожалению, ярлыки некоторых приложений в этих папках вы обнаружить не сможете (они хранятся в специальной базе данных Windows 10), но, в случае если эти приложения вам не нужны, вы можете удалить их, используя стандартные средства системы или специальные программы-деинсталляторы.
Дополнительно вы можете:
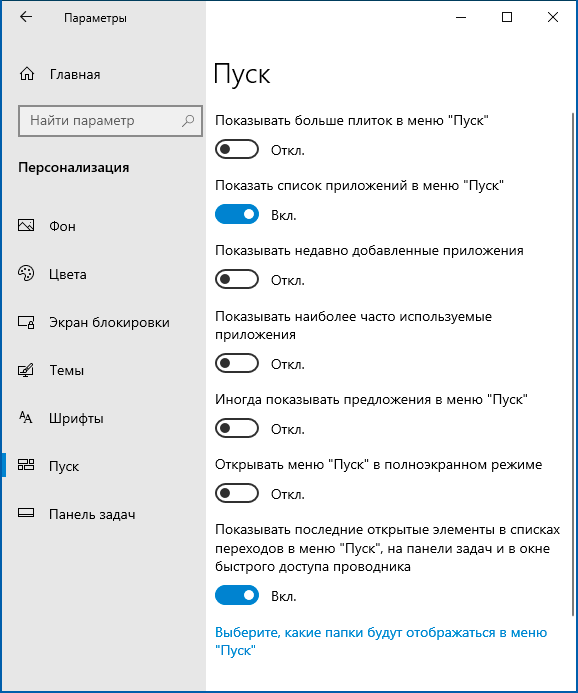
- Отключить добавление вверху меню ярлыков недавно установленных программ в Параметры — Персонализация — Пуск — Показывать недавно добавленные приложения.
- Организовать ярлыки по папкам так, как удобно вам, а также, изменив их имена, изменить и их порядок в меню (в нем ярлыки расположены по алфавиту, а самыми первыми показываются те, имена которых начинаются с цифр и специальных символов).
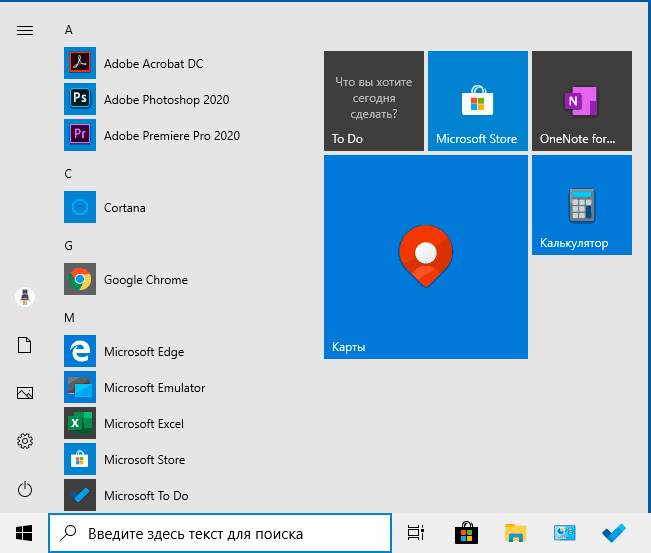
Настройка плиток в меню Пуск
Элементы, расположенные в правой части меню Пуск Windows 10 называются Плитками. Вы можете удалять их, добавлять, изменять размеры плиток, группировать их и создавать папки.
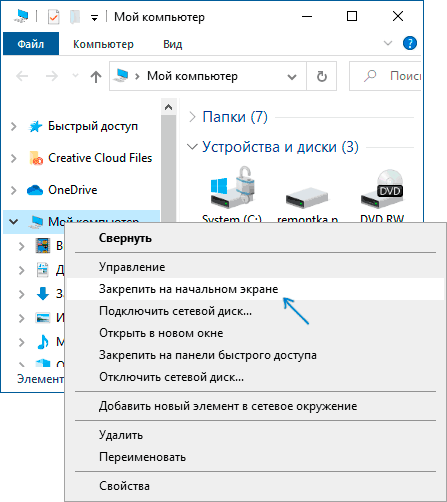
- Для добавления новой плитки вы можете нажать по программе в меню Пуск, по ярлыку или файлу .exe в любом расположении Windows 10 и выбрать пункт «Закрепить на начальном экране». Это действие доступно и для некоторых других элементов, например, для «Мой компьютер», как на изображении ниже.

- Для того, чтобы удалить плитку с начального экрана (из правой части меню Пуск), нажмите по ней правой кнопкой мыши и выберите пункт «Открепить от начального экрана».
- Для помещения нескольких плиток в одну папку (недоступно в ранних версиях Windows 10), перетащите одну плитку на другую. Затем, при желании, добавьте больше плиток в папку и укажите имя папки.
- Для создания групп плиток перетащите одну из плиток дальше от других в свободное место вправо или вниз (зависит от ширины и высоты меню Пуск), пока не появится разделитель, отделяющий её от других плиток. Затем отпустите. Плитка окажется в отдельной группе, куда можно перетащить и другие плитки, переименовать группы, изменить их порядок (подводим указатель мыши к названию группы, тянем за две линии справа от имени).
- Некоторые плитки постоянно обновляют свое содержимое, это называется «Живые плитки». Если вы хотите отключить такое обновление, нажмите по плитке правой кнопкой мыши и в разделе «Дополнительно» отключите живые плитки.
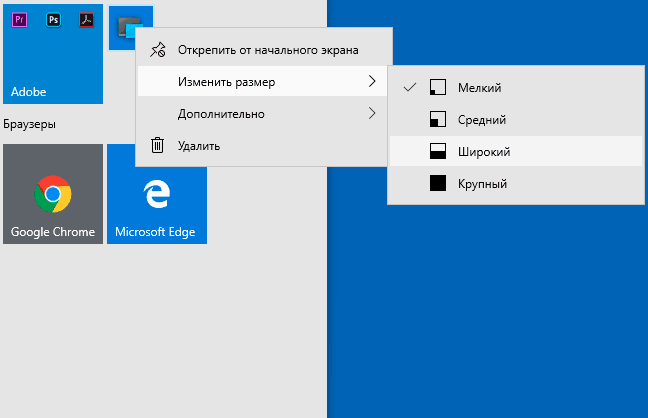
- В контекстном меню плиток вы также можете изменить их размер и организовать их удобным для вас образом в правой части меню Пуск.

- Если вам не нужны плитки в меню Пуск, вы можете открепить их все от начального экрана, а затем изменить размер (ширину и, при желании, высоту) меню Пуск и получит результат, похожий на скриншот ниже.
Дополнительно, существуют возможности создания собственного оформления плиток в меню Пуск Windows 10 для программ, которые отображают там лишь ярлыки, подробнее об этом в инструкции Как создать свои плитки в меню Пуск Windows 10.
Работа с контекстным меню кнопки Пуск
Контекстное меню кнопки Пуск — очень полезная вещь, когда вам нужно быстро открыть какие-то часто используемые системные элементы. Открыть это меню можно, нажав правой кнопкой мыши по кнопке «Пуск» или сочетанием клавиш Win+X, где Win — клавиша с эмблемой Windows.
В самой Windows 10 есть не так много возможностей настройки этого меню: вы можете зайти в Параметры — Персонализация — Панель задач и отключить пункт «Заменить командную строку оболочкой Windows PowerShell в меню» и тогда в контекстном меню Пуск будет более часто используемая многими командная строка с возможностью запуска от имени Администратора.
Однако, при желании, вы можете настроить это меню более тщательно, об этом отдельные инструкции:
- Как редактировать контекстное меню Пуск Windows 10
- Как вернуть панель управления в контекстное меню Пуск
Дополнительные возможности настройки меню Пуск Windows 10
Среди дополнительных возможностей, позволяющих изменить вид и поведение меню Пуск в Windows 10:
- Пункты в Параметры — Персонализация — Пуск. Большинство из них очень понятны (или можно попробовать и посмотреть на результат: например, увидеть, как именно пункт «Показать список приложений в меню Пуск» повлияет на внешний вид), но некоторым не ясен пункт «Выберите, какие папки будут отображаться в меню Пуск». Под этими папками подразумеваются папки в левом узком столбце, раскрывающиеся при наведении в последних версиях Windows 10.

- Вы можете отключить автоматическое раскрытие этого левого столбца, подробнее — Как отключить раскрывающуюся панель слева меню Пуск.
- Также могут оказаться полезными материалы: Как убрать поиск и пуск на весь экран в Windows 10, Что делать, если вместо рабочего стола плитки в Windows 10.
- Не забывайте о возможности изменения высоты и ширины меню Пуск (мышью, за край меню).
Классическое меню Пуск из Windows 7 в Windows 10
Если не под каким предлогом вы не хотите использовать новое меню Пуск в Windows 10, а хотите, чтобы оно выглядело как в Windows 7, для этого вы можете использовать сторонние программы.
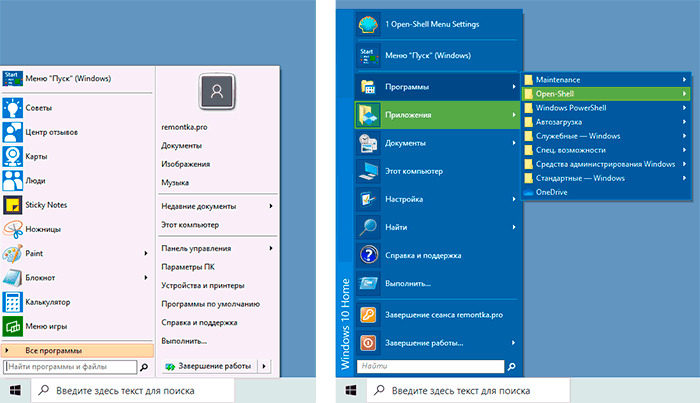
- Как сделать меню Пуск из Windows 7 в Windows 10 с помощью Open Shell (отличный бесплатный вариант).
- Классическое меню Пуск для Windows 10 (обзор нескольких программ, платных и бесплатных).
Если вы можете предложить дополнительные методы изменения внешнего вида, поведения или других аспектов работы меню Пуск в Windows 10, буду рад, если вы сможете ими поделиться в комментариях к статье: не исключено, что информация пригодится другим читателям.