
Как сделать Windows похожей на MacOS

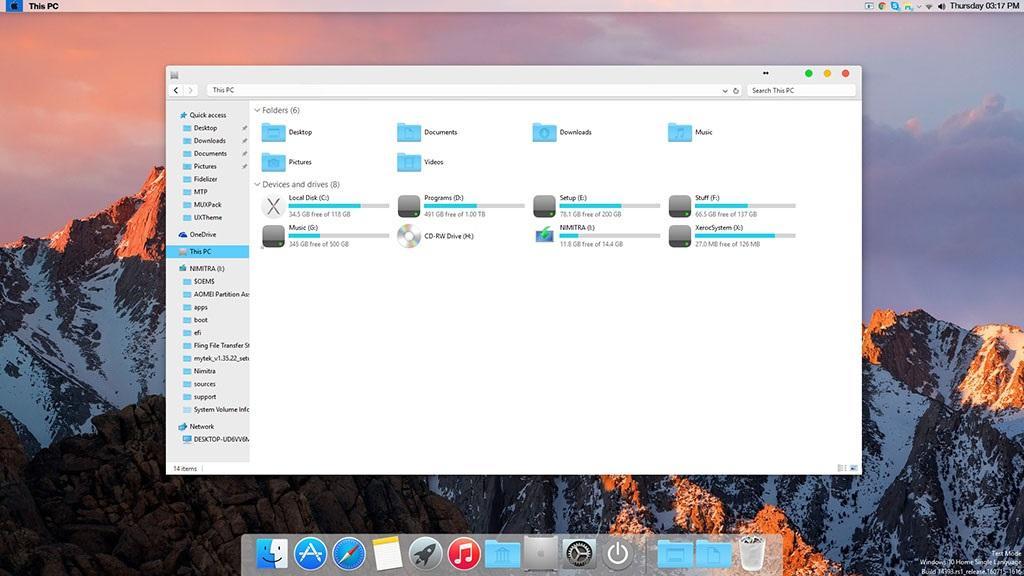
На фото: рабочий стол компьютера с операционной системой Windows 11, стилизованный под операционную систему MacOS от Apple.
Точка восстановления
Перед любыми серьезными изменениями в вашем устройстве мы всегда рекомендуем создавать резервную копию ваших данных
На Windows это называется «Точка восстановления»
После создания резервной точки можем переходить к установке темы
Как установить?

Скачиваем тему MacOS
2. Нажимаем кнопку «Скачать» (Стрелка вниз под фотографией)
3. Сайт попросит вас авторизоваться, вводим свою почту или выбираем удобный способ авторизации (Apple, Google и т.д.)
4. Проходим процесс регистрации и выбираем режим использования и ваши интересы (занимает 15 секунд)
5. Нажимаем кнопку «Скачать» (Стрелка вниз под фотографией)
6. Файл скачивается
Скачиваем Blur-эффект для окон
2. Не пугаемся сложного интерфейса
3. Кликаем на зеленую кнопку Code
4. Нажимаем Download Zip
Скачиваем панель Doc
2. Листаем ниже и выбираем скачать New Version
Теперь вам осталось все это установить и настроить, в этом вам поможет пошаговый видеогайд:
а если оно оказалось для вас непонятным, мы нашли рускоязычного блогера, который довольно понятно рассказал про процесс установки

Macified Windows
This repository contains information and tools that I use to make my Windows 11 desktop look like macOS. I will share the steps and resources that I followed to achieve this transformation, as well as some screenshots of the final result. Lets begin macifying your Windows 11 desktop  .
.
Table of Contents
- Final Look
- Themes
- Wallpapers
- Rainmeter widgets
- Dock and menu bar
- Stage manager
- System & dock icons
- File Explorer
- Cursors
- Extra customisations
- Credits
- Feedback
Final Look
So this is how the final look on your windows desktop will come out. Its always subject to the amount of customisations you do. If you follow instructions as given below in every segment, you will accomplish the same as in screenshots below:

Themes
Step 1: extract the zip file and you will find a file called ThemePatcher. Open it, give permissions and patch the «Themeui» and «uxinit» by clicking on install button. Let it do its work. when its done, it will ask to reboot your pc which you gotta do.
Step 2: After rebooting, go to same folder and find the Themes zip file. Extract it, and go to following path: Themes_MacifiedWindows\macOS for Windows 11 22H2 — Mar 12 2023. In this folder you will find a folder called «Windows 11 22H2 Themes». Copy all files inside it and paste it to C:\Windows\Resources\Themes folder.
Step 3: Go to settings>personalisation>themes and select the 2nd dark theme of MacOS (MacOS-dark solid, 6 images) as first one has some bugs. Apply and with this, you will notice some changes in UI elements.
Lets move ahead to wallpapers now
Wallpapers
Setting the MacOS Wallpaper in beginning will start giving you a vibe of it so you dont get lazy and bored while doing all steps. So go download the zip file of wallpapers or if you have downloaded the full package, you can simply find wallpapers zip inside it. extract it and choose any wallpaper which suits your taste.
i added around 50+ high quality wallpapers originally extracted from MacOS. These are my favs so you dont have to look out for more.
still incase you dont like them or dont wanna spend 200mb on walpaper alone, you can get individual files here
Rainmeter widgets
Firstly you have to setup rainmeter app. Download it from here and install it.
open the Macified Windows folder and look for widgets file (rmskin extension) . Double click on it and simply install the widgets.
These widgets are already set according to the values i have filled (size and position) . Incase they dont load on their own after installing, open rainmeter app, select Macified windows from sidebar, expand it and load individual widgets seprately as per your choice.
Note: These widgets belong to different rainmeter skins i found from various sources. i combined all of them into one and removed those which arent useful. There might be some bugs in it related to settings. But you can easily change their shape by right clicking on widget and choosing «alternative» option. You can change their position too by dragging them (double click + hold + drag).
Note: This is my first rainmeter project so this package include some basic skins only. i will update this widgets package with more skins as i learn more. You can also suggest rainmeter widgets of macOS style you want to add in this skin (do provide link of that existing skin you wish to add it in this widget pack)
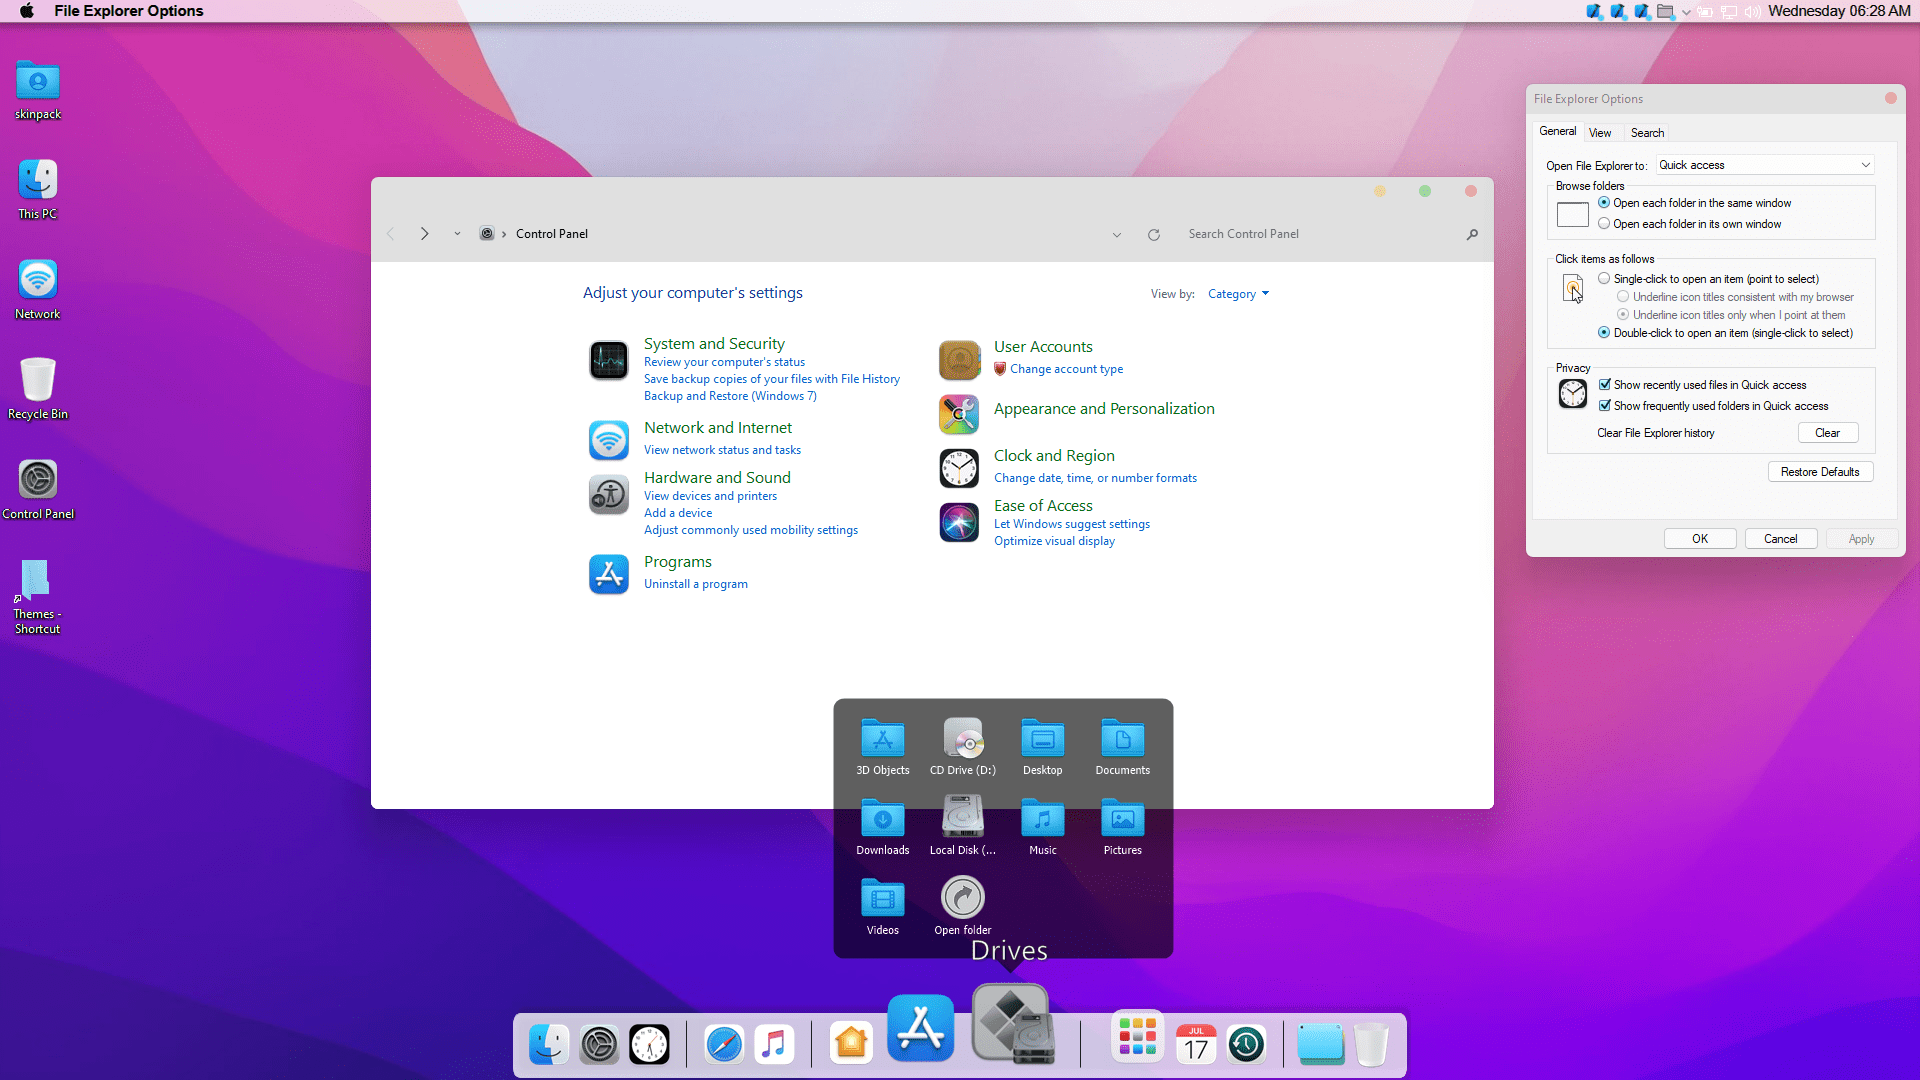
Dock and menu bar
This is the most demanded thing.So yes, lets get started.
Step 1: Extract the dock_MacifiedWindows.rar file. There will be «dock_macifiedwindows» folder which you gotta open. Again same folder (same name) will appear and open it again. (sorry for this duplication, i forgot to fix)
Step 2: Inside that folder, there will be many folders and files. Find the dock_64.exe file or dock.exe and open it.
Step 3: Boom, thats it. Dock and menu bar will appear.
You will notice taskbar overlaying on dock or menu bar not appeared. So you have to change some settings
Step 4: Bring your mouse over dock and right click on some empty space. Select «preferences» from the list that appears which will open a settings page.
Step 5: Open advanced settings on sidebar (leftside) and scroll to last where you will find an option called «dock layout backup». Open the drop down list there and select «Macified Windows». It will ask to restore that backup and then the app will restart itself. Thats all, your dock is now fully setup
Note: You might notice that some applications on dock dont open. This is because they arent installed in your PC/laptop. You can remove that icon and add your favourite ones. Menubar doesnt need much changes. you can customise it as per your likings.
Stage Manager
Open preferences option as you did in step 4 of Dock and menu bar. Keep the same settings as shown in screenshot below

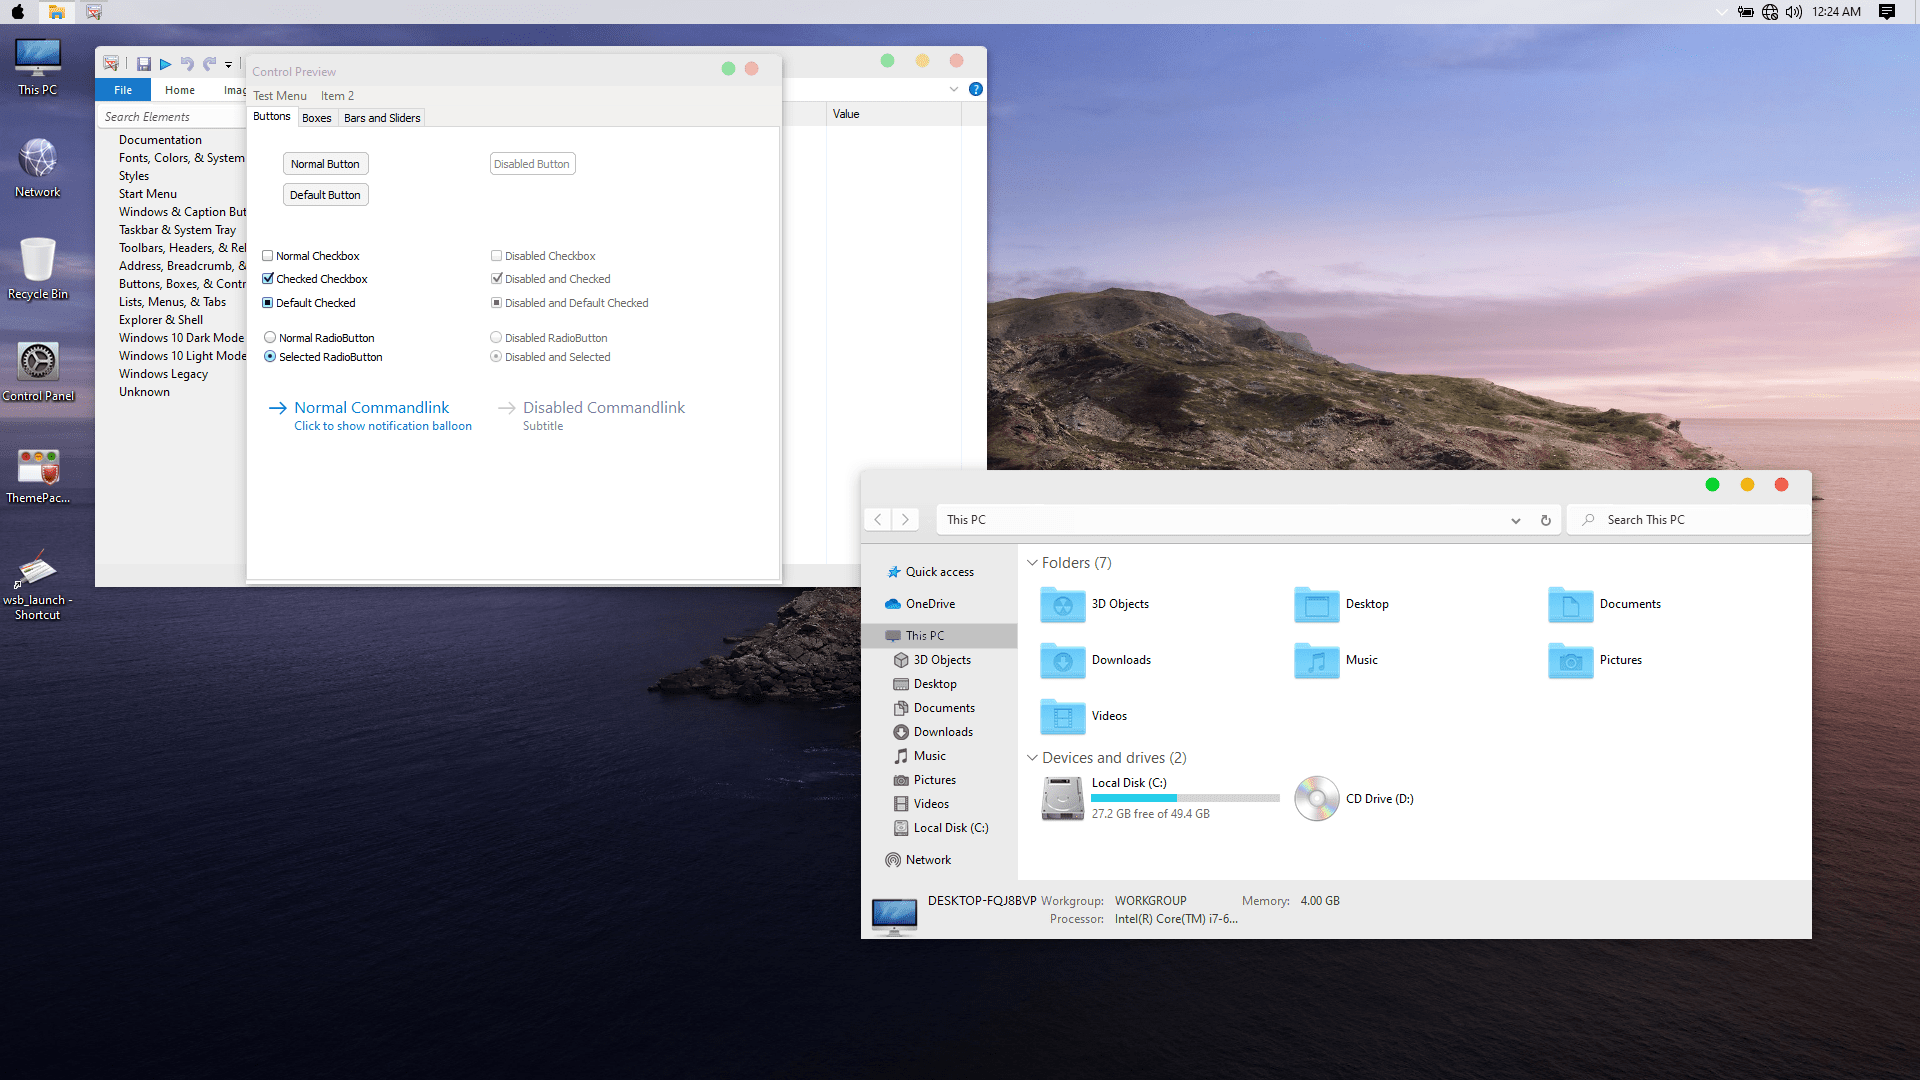
System & dock icons
Lets change system icons first, to that of macOS.
Step 1: You extracted themes_macifiedwindows.zip in #Themes segment. Open the extracted folder which will open folder «macOS for Windows 11 22H2 — Mar 12 2023» . open this folder too and then open folder called «7tsp for Control Panel and Winver Colors» . Inside it rename the file «7tsp macOS Day & Dark EXTRAS.7z.remove» by deleting «.remove» so its extension changes to 7z
Step 2: Go back one step and open folder called «7tsp icon themes» . Do the same thing here by deleting .remove so its extension changes to 7z.
Step 3: Go back to main folder and extract «7tsp_MacifiedWindows.zip». Extract it, rename the 7tsp.ee file to 7tsp.exe (add x in between the extension «ee» ) . Now its an exe file and open it, give permissions and wait a sec for it to open.
Step 4: When its launched, you will see a button called «add a custom pack» . click it and select the 7z file you got in step 1. Patch it and reboot pc. Do the same process again with 7z file in step 2. With this, you will have MacOS icon pack installed in your pc.
Now time for dock icons. This is a tough job as you gotta download icon for every app (you want to have on dock) and then apply it manually.
Step 1: To do this, download icon (png or jpg) from google search. Make sure they are with transparent background or you can remove background using edit feature of photos app.
Step 2: Right click on app icon on dock whose icon you wanna edit. Choose «edit this icon» and a windows will pop-up.
Step 3: click on existing icon which will take you to file explorer to choose new icon. CHoose the downloaded icon file and select ok.
Step 4: Now its applied but wait, dont close the windows. You will see an option «scale icon to macOS standards» which will be already ticked. untick and tick it back. Now click ok on top right corner.
Step 5: All done, your new icon is applied.
File Explorer
You can achieve blurry macOS look in file explorer using ExplorerBlurMica shared in releases tab. Extract the zip file and follow this guide . choose effects as blur (put value as 0) . More instructions in Extra customisations shared in the end.
Cursors
Step 1: Extract cursors zip file and open the folder which appears. You will see a file called «install.inf». Right click on it and choose install option. Now the cursor pack is installed
Step 2: Go to settings>personalisation>Themes>Mouse cursors which will open a new window called «mouse properties» . open the drop-down list in scheme under «pointers» category. Select «mac :)» from there and apply. click ok and now its done.
Extra customisations
Coming soon
Credits
This repo is all written and maintained by me aka Sahil
Aqua and blueboy for testing some tools.
Unknown for project name.
Samcux on youtube for guides.
and respective app/softwares developers whose products i used in this project.
Feedback
If you find any broken or wrong text or link Please report me or if you want to add suggestions, open a new issue or text me in Telegram @MaybeSahil
You can join our support channel where i will post beta updates to test new versions. here is the link
Do star this repo to show your support and share as well, means a lot. Thanks, see yaa 💝
Looking to Use Mac OS Themes on Windows 11? Here are the Best MacOS Skins to Install on Windows 11.
If you have been one of the billions across the world, who make use of a Windows OS computer over a macOS computer, then there isn’t much you missing here. Instead, Windows operating system provides more options and flexibility as compared to macOS. However, you may get bored with the same Windows OS themes on your computer.
Thanks to the plethora of themes available that allows you to modify your Windows OS, you can get the look of macOS on your Windows 11 computer. You can apply themes from macOS Sierra, High Sierra, or even Mojave. This guide will list down 5 of the best macOS skin/launcher for Windows 11 you can download to change the way your Windows OS laptop looks. Let us get into it.
1. macOS Transformation Pack
One of the best ways to transform your Windows 11 PC into a macOS look is to download the macOS transformation pack. It will change the look of your Windows 11/10/8/7 PC user interface exactly like a macOS PC. Once you apply this transformation pack, it will change the Windows 11 PC elements such as Login Screen, Wallpapers, Cursors, Themes, Fonts, Sounds, Icons, Dock, Finderbar, Dashboard, Spaces, Launchpad, and more.
The installation is pretty easy, and all you need to do is to download the macOS transformation pack and configure it as per your need. Thanks to the intelligent Metro UI design, you can configure or tweak the macOS theme as per your wish, with just a few clicks. It includes high-quality macOS wallpapers and other customization elements.
Download
2. macOS Monterey Skin Pack
A new and updated skin pack that you can install on your Windows 11 machine to give it a macOS look is the macOS Monterey skin pack. This theme changes every element of the Windows 11 theme like it adds a high-quality bottom dock, icons, wallpapers, etc. The best setting for this skin pack is to set it at 100% scale and layout size. You can tweak this setting from the display setting.
Do note that you need to first install the UXTheme patcher before you can apply this skin pack. The full version with icons and extra features for Windows 11 is available to download for $4.99, and the Lite version without extra icons is available to download for free. So, first, try out the free version of the theme and check if this works perfectly before going for the paid version.
Download
3. macOS Sierra for all Windows OS
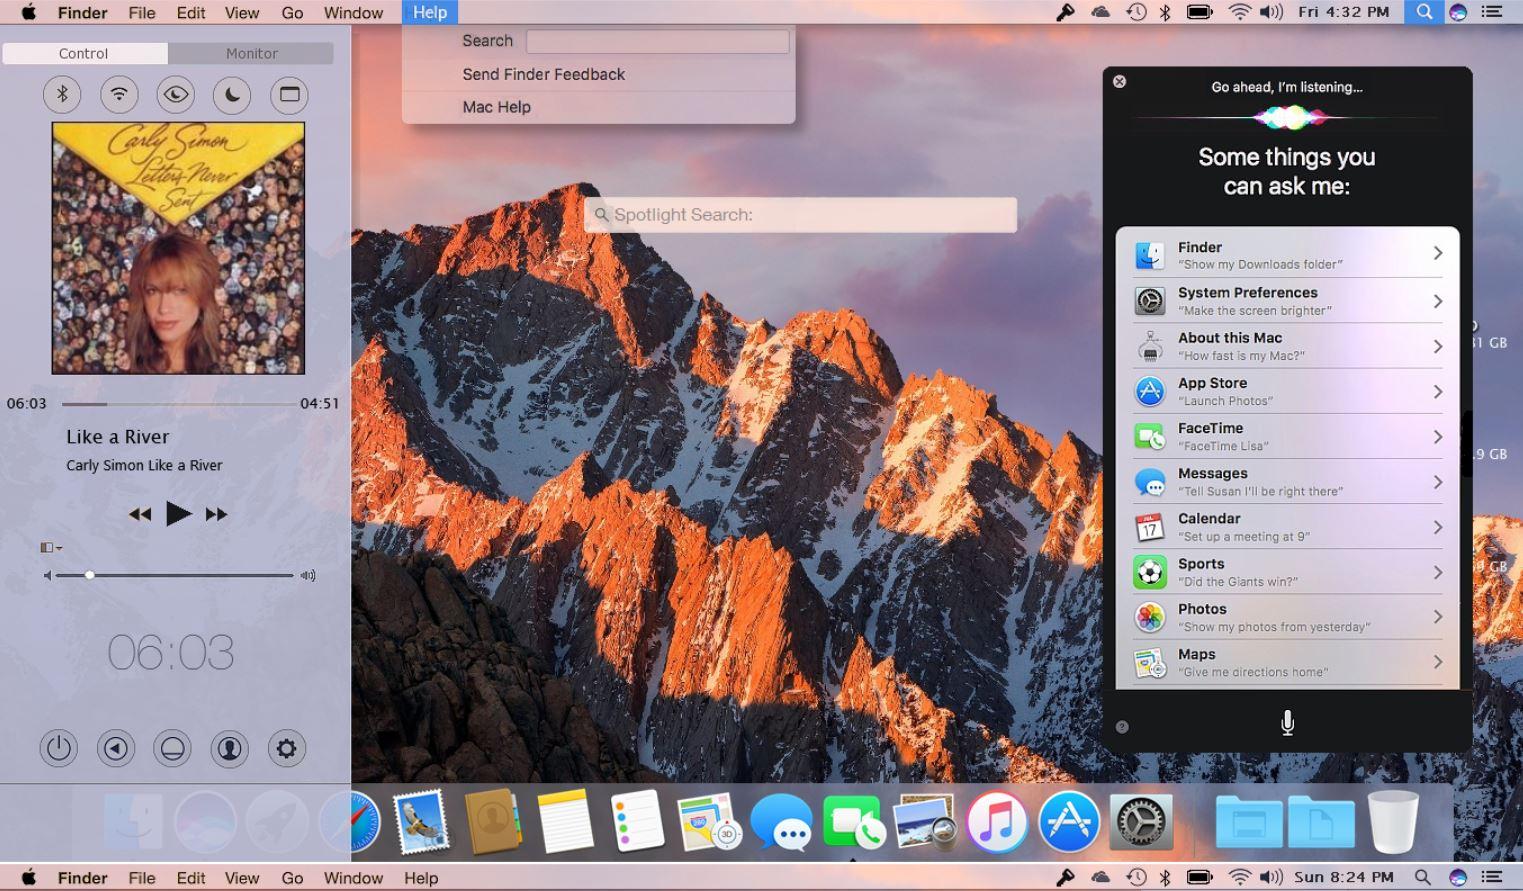
From the house of popular theming website, DevianArt, comes a brilliant Windows 11 macOS theme. All the elements included with this theme are of high quality, and you get a working notification center, fully working Finder bar, lock screen, system properties, launchpad, etc. Moreover, this theme also supports picture-in-picture mode for all sizes of videos.
There is a Siri voice assistant clone as well. Do note that in order to install this theme, you need to first install Samurize. After installing Samurize, you need to grab the macOS Sierra DevianArt theme and follow the on-screen instructions for a successful installation.
Download
4. macOS theme (DevianArt)
Another favored transformation pack that you can make use of to change the look of your Windows 11 PC to macOS is the macOS theme by DevianArt. This theme is a package that includes wallpapers, themes, icons, supported macOS features, and more. It applies all the macOS elements without tweaking any system file, meaning your system isn’t harmed if you use this transformation pack.
Before you could apply this theme, you need to install the UXTheme patcher, then copy all the theme files to the C:\Windows\Resources\Themes destination. Finally, select the themes by heading over to Settings > Personalization > Themes. Bam! This will transform your Windows 11 PC to macOS.
Download
5. macOS UX Pack 5.0
One of the best theme packs, and the one that stays updated, is the macOS UX Pack 5.0. It comes with everything that will help you to transform your so-called bored Windows OS look into a macOS look.
Applying this UX pack will change everything from the login screen to the dashboard to your wallpaper. Talking about wallpapers, it includes high-quality wallpapers of High Sierra and Mojave. This transformation pack also includes day, night, and dark modes as well.
Download
If you’ve any thoughts on 5 Best macOS Skin and Launcher for Windows 11, then feel free to drop in below comment box. Also, please subscribe to our DigitBin YouTube channel for videos tutorials. Cheers!
Making your Windows 11 interface resemble macOS is easier than you might think. With a few simple tweaks and the right tools, you can transform your Windows environment to mimic the sleek design of Apple’s operating system. The process involves changing themes, icons, and adding a dock, all of which can be done with readily available software and customization options. You’ll be able to enjoy the aesthetic feel of macOS without buying a new computer. Ready to give your PC a fresh, Apple-inspired look? Let’s dive in!
To give your Windows 11 desktop that sleek macOS look, you’ll be making some visual changes and adding a dock. Follow these steps to transform your user interface:
Step 1: Download a macOS Theme
Start by downloading a macOS theme for Windows.
There are several macOS themes available online that mimic the clean and modern look of Apple’s interface. These themes typically change the color scheme, window borders, and other visual elements to resemble macOS. Be sure to download from a reputable source to avoid any potential security risks.
Step 2: Install the macOS Theme
Once downloaded, install the theme onto your Windows 11 system.
After downloading your chosen theme, unzip the files and follow the installation instructions specific to the theme. You might need to patch your system with a third-party tool to allow custom themes if requested. Always back up your system before making changes to system files.
Step 3: Change Icons to Mac Style
Replace your Windows icons with macOS icons for a more authentic look.
Download a set of macOS icons and use a tool like IconPackager to apply them. This step will change the look of your desktop and system icons, giving them the rounded edges and minimalist style characteristic of macOS.
Step 4: Add a macOS Dock
Install a dock application like RocketDock to replicate the macOS dock.
RocketDock or similar applications can replicate the functionality and appearance of the macOS dock. Customize it by adding your favorite applications and adjusting the size and position to your liking.
Step 5: Customize Wallpaper and Fonts
Apply a macOS wallpaper and adjust fonts for even more authenticity.
Find a high-resolution macOS wallpaper and set it as your desktop background. Additionally, you might consider adjusting system fonts to mimic Apple’s typography style, giving your system that final touch of authenticity.
Once you’ve completed these steps, your Windows 11 desktop should look and feel more like macOS. You’ll notice the sleek design, unique icons, and functional dock that are hallmarks of the Apple interface, all running smoothly on your PC.
Tips for Making Windows 11 Look Like macOS
- Always back up your system before making significant changes.
- Use trusted sources for downloading themes and icons to avoid malware.
- Experiment with different docks to find one that best suits your needs.
- Customize your settings gradually to ensure everything runs smoothly.
- Keep track of any changes so you can revert them if necessary.
Frequently Asked Questions
Can I make Windows 11 look exactly like macOS?
While you can make Windows 11 look very similar, it won’t be identical due to system differences.
Is it safe to install custom themes?
Yes, as long as you download them from reputable sources and back up your system beforehand.
Will these changes slow down my computer?
Not usually, but performance can vary depending on your system’s specs and the tools used.
How can I revert back to the original Windows 11 look?
You can revert by uninstalling the theme and dock, and restoring your system icons and settings.
Does Microsoft support these visual changes?
Microsoft does not officially support third-party themes, so proceed with caution.
Summary
- Download a macOS theme.
- Install the macOS theme.
- Change icons to Mac style.
- Add a macOS dock.
- Customize wallpaper and fonts.
Conclusion
Transforming your Windows 11 into a macOS look-alike isn’t just about aesthetics—it’s about bringing a touch of Apple’s sleek design to your everyday computing experience. Not only does this transformation offer a fresh perspective, but it also allows for a personalized and unique desktop environment. Whether you’re a fan of Apple’s clean lines or just want a change, these steps make it easy to achieve your ideal setup without switching operating systems. Remember, customization is about making your digital space work for you, so feel free to tweak and adjust until it fits just right. If you’re intrigued by the possibilities, why not explore further customization options and see how you can make Windows 11 look like macOS in even more unique ways? As always, keep your system backed up and enjoy the creative process. Happy transforming!
Matthew Burleigh has been writing tech tutorials since 2008. His writing has appeared on dozens of different websites and been read over 50 million times.
After receiving his Bachelor’s and Master’s degrees in Computer Science he spent several years working in IT management for small businesses. However, he now works full time writing content online and creating websites.
His main writing topics include iPhones, Microsoft Office, Google Apps, Android, and Photoshop, but he has also written about many other tech topics as well.
Read his full bio here.
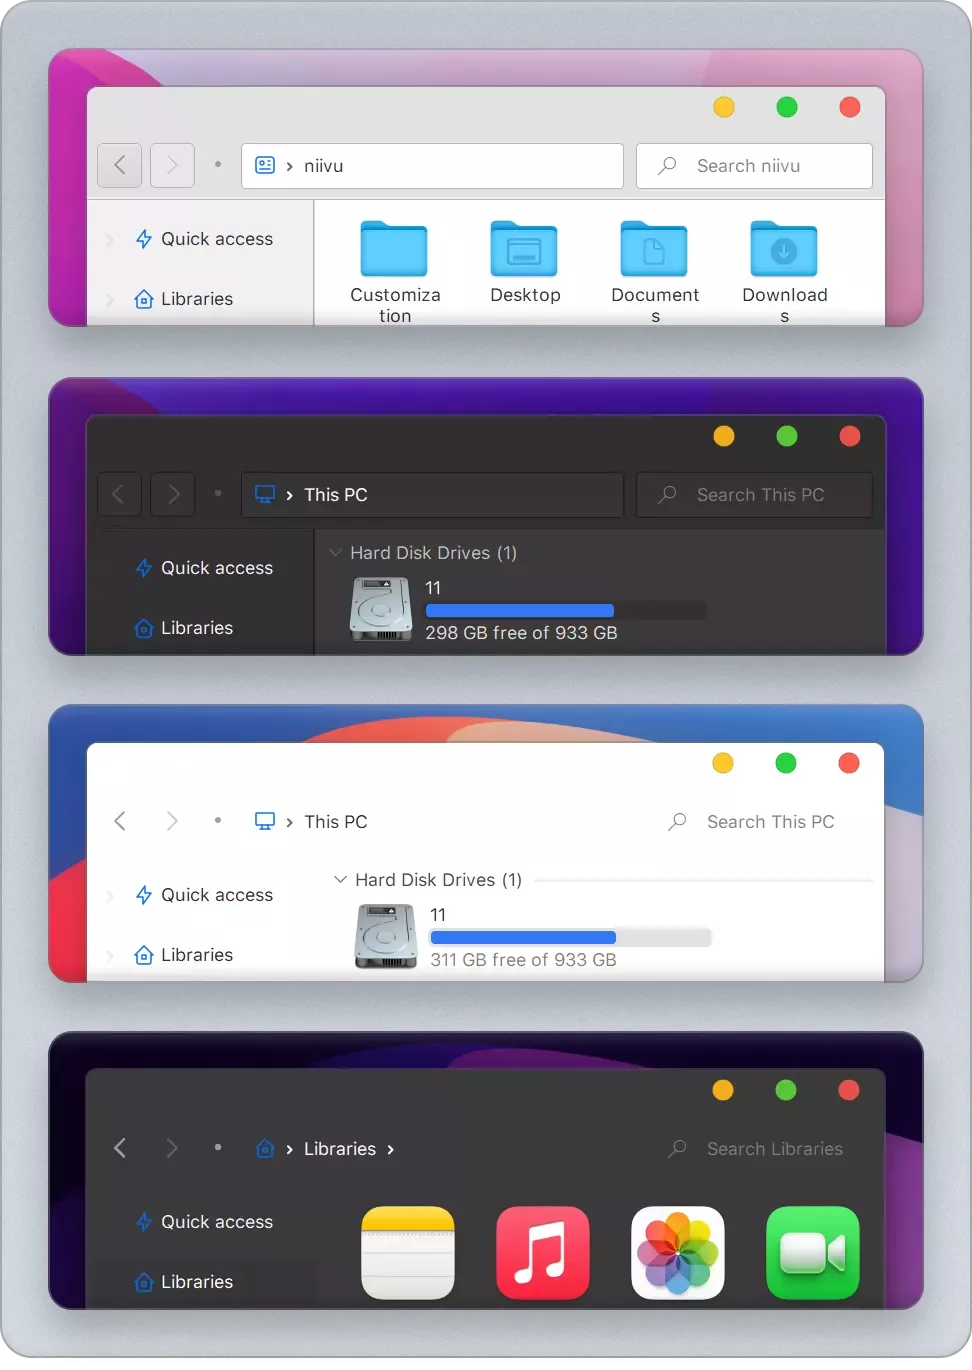
Самая лучшая тема MacOS для Windows 11. Она полностью изменяет интерфейс Операционной системы, в том числе и иконки. С ней, вы получите красоту и элегантность MacOS и работоспособность и совместимость Windows. Она является идеальным выбором для тех, кому не хватает денег на новую технику компании Apple. Сама тема предоставляется в двух вариантах — темном и светлом. Для установки не потребуется никаких дополнительных программ. Все находится в архиве. Что делает установку данной темы очень легкой.
Как поставить оформление Windows 11
- Скачайте и распакуйте macos_for_windows_by_niivu_dewgzkn.zip с помощью WinRar.
- Если Вы устанавливаете темы первый раз: пропатчите систему с помощью UltraUXThemePatcher.
- Переместите файлы *.theme, а также папку с содержанием ресурсов *.msstyles по адресу: C:\Windows\Resources\Themes.
- Нажмите в пустой области на рабочем столе и выберите пункт «Персонализация» в контекстном меню.
- Перейдите в раздел «Темы» и примените добавленную тему.
Внимание! Для установки кнопки пуск, панели быстрого доступа и других ресурсов Вам потребуются специальные программы. Ссылки на них указаны в блоке «Дополнения», в правой колонке.
Список файлов
- macOS for Windows — niivu — UPDATED — DECEMBER 18 2021
- 7TSP Icons Themes
- 7tsp macOS blue.7z.remove8.87 Mb
- 7tsp macOS Dark Mode.7z.remove8.95 Mb
- 7tsp macOS Light Mode.7z.remove8.95 Mb
- 7tsp macOS Regular.7z.remove8.93 Mb
- Folder Thumbnail Remover
- disable_folder_thumbs.reg380 b
- enable_folder_thumbs.reg174 b
- Reload Icons.exe.remove271.92 Kb
- Dock
- macOS Day
- Background.ini215 b
- bg.png4.66 Kb
- sep.png2.71 Kb
- Separator.ini63 b
- macOS Indicator.png690 b
- macOS Night
- Background.ini215 b
- bg.png4.64 Kb
- sep.png2.72 Kb
- Separator.ini63 b
- macOS Day
- Stardock Curtains (windows 10)
- macOS day II.curtainsstyle59.63 Kb
- macOS day.curtainsstyle58.46 Kb
- macOS night II.curtainsstyle56.9 Kb
- macOS night..curtainsstyle55.76 Kb
- StartAllBack or StatIsBack
- Orbs
- apple dark taskbar.svg2.98 Kb
- apple light taskbar.svg2.98 Kb
- dark taskbar.svg4.79 Kb
- light taskbar.svg4.79 Kb
- macindows.png974 b
- Styles
- MAC DAY SAB.msstyles1.1 Mb
- MAC NIGHT SAB.msstyles1.11 Mb
- Orbs
- Tools
- RemoveAddressBar.exe.remove1.23 Mb
- Windows Themes (windows 10 or 11)
- macOS dark (mica).theme2.02 Kb
- macOS dark II.theme2.01 Kb
- macOS dark.theme2 Kb
- macOS day (mica).theme2.02 Kb
- macOS day II.theme2 Kb
- macOS day.theme1.99 Kb
- macOS
- macOS dark (mica).msstyles1.09 Mb
- macOS dark II.msstyles1.08 Mb
- macOS dark.msstyles1.09 Mb
- macOS day (mica).msstyles1.09 Mb
- macOS day II.msstyles1.09 Mb
- macOS day.msstyles1.09 Mb
- Shell
- NormalColor
- shellstyle.dll140 Kb
- NormalColor
- Wallpapers
- dark
- macOS dark niivu.png14.09 Mb
- macOS dark.jpg4.34 Mb
- day
- mac OS Big Sur niivu.png4.69 Mb
- macOS day niivu.png11.78 Mb
- macOS day.jpg4.17 Mb
- dark
- 7TSP Icons Themes
Установить наше приложение