
File Explorer is one of the best features in the Windows operating system. If you’re a Windows user, you’ll end up using it to view what’s on your hard drive, open all your software, and manage your files. Therefore, File Explorer is one of the Windows 11 apps you really can’t do without.
Microsoft has given File Explorer a new look in Windows 11. It still retains all its customization options, but how you access them has changed slightly. These are the various ways you can customize Explorer with those options.
Change File and Folder Icon Sizes
Windows 11’s File Explorer app includes all the same view options it did before, along with one new one. Those view options enable you to choose different icon sizes for folders and files displayed in Explorer. You can also select different layouts for viewing folders’ contents.
To change the icon sizes, click the File Explorer taskbar button. Then click the View button on Explorer’s new command bar to bring up the menu shown directly below. There you can select extra-large, large, medium-sized, and small icon options.
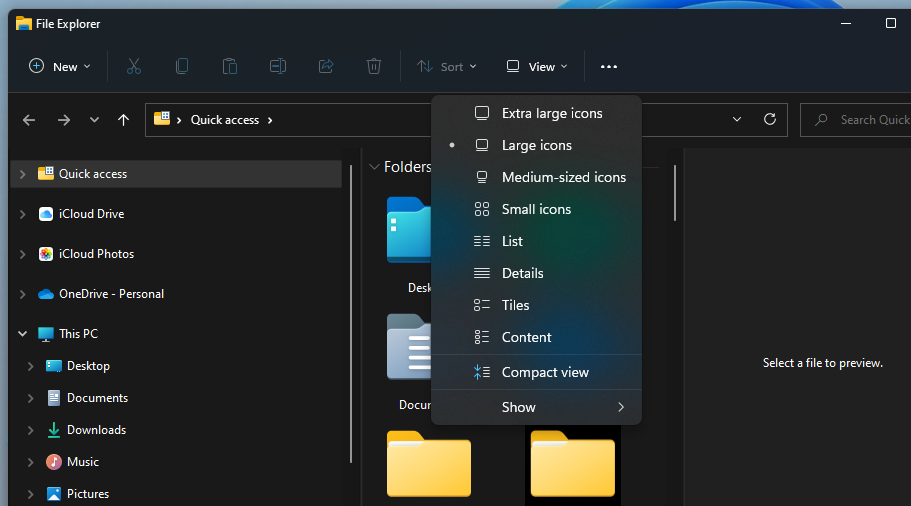
There are four layout options just below those icon size settings. You can select to view files with alternative list, detail, tile, or content layouts in Explorer. The List and Details options display additional date modified and size information for folders and files.
Compact view is the new File Explorer customization you can also select on that menu. That option removes the additional visual element padding added to Explorer in Windows 11. Selecting it makes the left panel’s folder navigation more compact as in the snapshot directly below.
Show or Hide Panes, Item Check Boxes, and File Extensions
The View menu includes an additional Show submenu. Select Show on that menu to reach the options in the snapshot directly below. Clicking Navigation, Details, and Pane options there will show or hide those Explorer features.
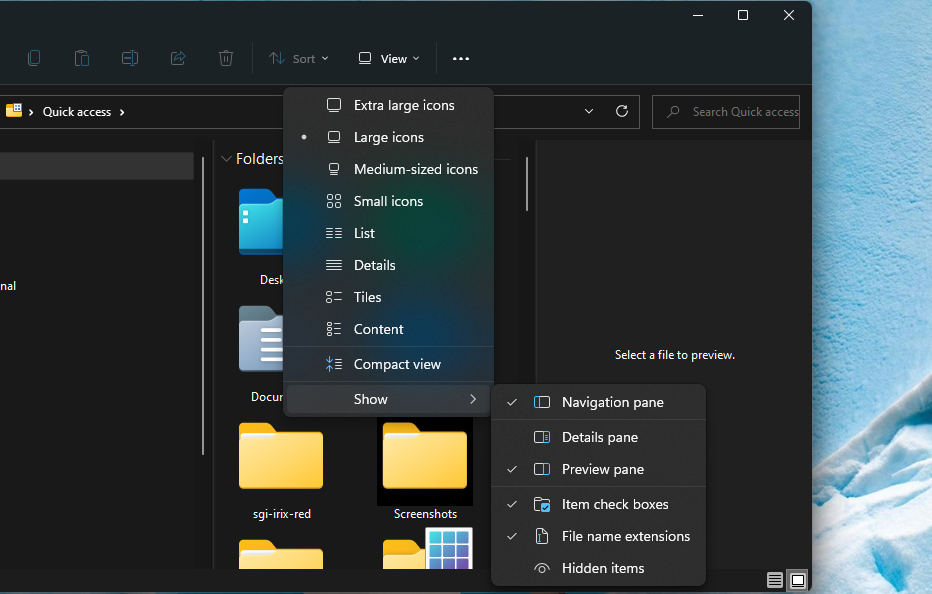
There are three other noteworthy customization settings below the pane options. Selecting the Item check boxes option will display small checkboxes beside selected folders and files. If you select File Name options, Explorer will include extensions for identifying formats at the end of all files. The Hidden Items option there shows all files and folders marked as hidden.
Change Folders’ Icons
There isn’t much variation in Explorer’s default folder icon scheme. However, you can customize folders by changing their icons. Adding new icons to your most important folders will make them more identifiable. This is how you can change folder icons in Explorer.
- Right-click a folder in Explorer and select Properties.
-
Then select the Customize tab shown directly below.

- Press the Change Icon button.
-
Choose an alternative icon for the folder from the System32 folder.

- Click the OK option.
- Select Apply on the properties window.
If you want to look for new File Explorer folder icons beyond the System32 folder, check out the IconArchive website. That site includes a multitude of visually appealing icons you can freely download and add to your folders. Enter the keyword folders in the IconArchive search box to find some new icons. To download one from there, select it and click the ICO button.
When you’ve downloaded some new icons, you can add them to your Explorer folders as outlined above. However, you’ll need to click Browse on the Change Icon window. Then select the downloaded icon from a different folder, and press the Open button.
Change Advanced Settings for Files and Folders
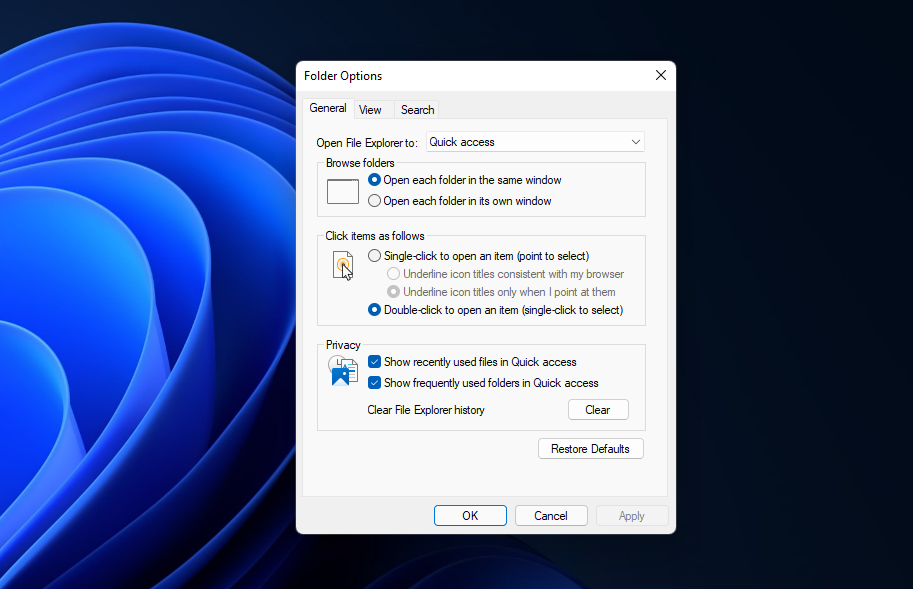
Explorer’s Folder Options window includes many advanced settings for folders and files. From that window’s View tab, you can configure how Explorer displays files and folders in greater detail. This is how you can change the way Explorer displays files and folders via Folder Options.
-
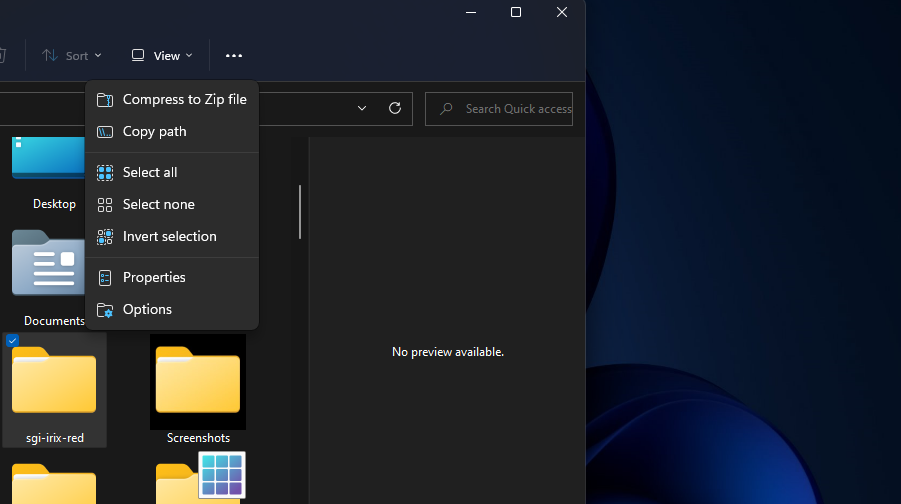
Click Explorer’s See more button (with three dots) to open the menu in the screenshot directly below.

- Select Options on that menu.
-
Then click the View tab shown directly below there.

- Select or deselect the advanced settings there to configure how Explorer displays files and folders.
- Press the Apply button to save your new settings.
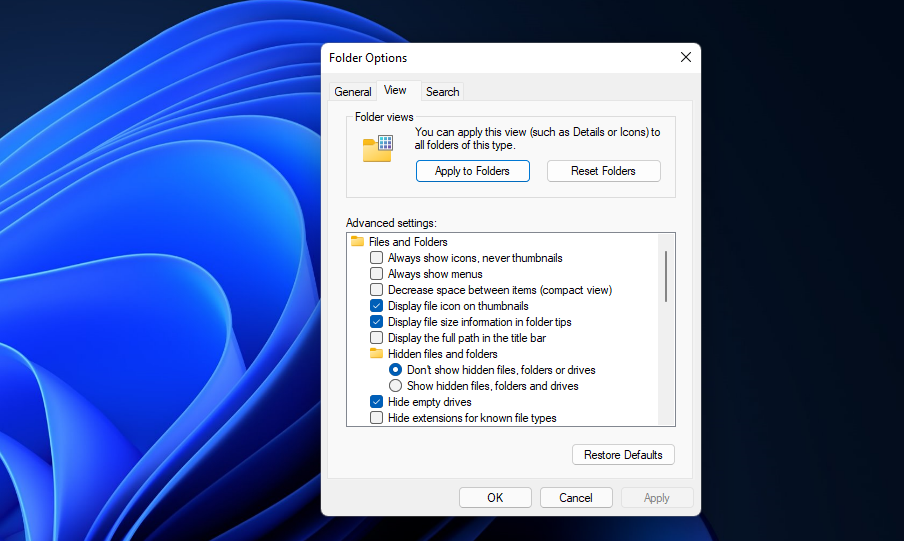
To get a better idea of how those advanced options change the way Explorer displays folders and files, experiment a bit by selecting and deselecting them. Then have a look through Explorer to see the effects. You can always restore the default configuration by clicking the Restore Defaults button.
Enable Single-Click For Opening Files and Folders
By default, Explorer is configured to open items when you double-click them. However, you can change that by selecting a Single-click to open an item option. Then Explorer will open files and folders when you single-click them instead. This is how you can enable single-click for opening items.
- Open Folder Options by clicking the See more button and Options in Explorer.
-
Select the Single-click to open an item radio button on the General tab.

- Then select either the Underline icon titles consistent with my browser or Underline icon titles only when I point at them option.
- Click Apply to save the new settings.
- Select OK to close Folder Options.
Customize File Explorer With Winaero Tweaker
If you want more File Explorer customization options, check out the freeware Winaero Tweaker. That’s an advanced customization program with which you can further tweak File Explorer to your liking. You can download and install Winaero in the following steps.
- Open the Winaero Tweaker website.
- Click the Download Winaero Tweaker option on that site to save the program’s ZIP archive.
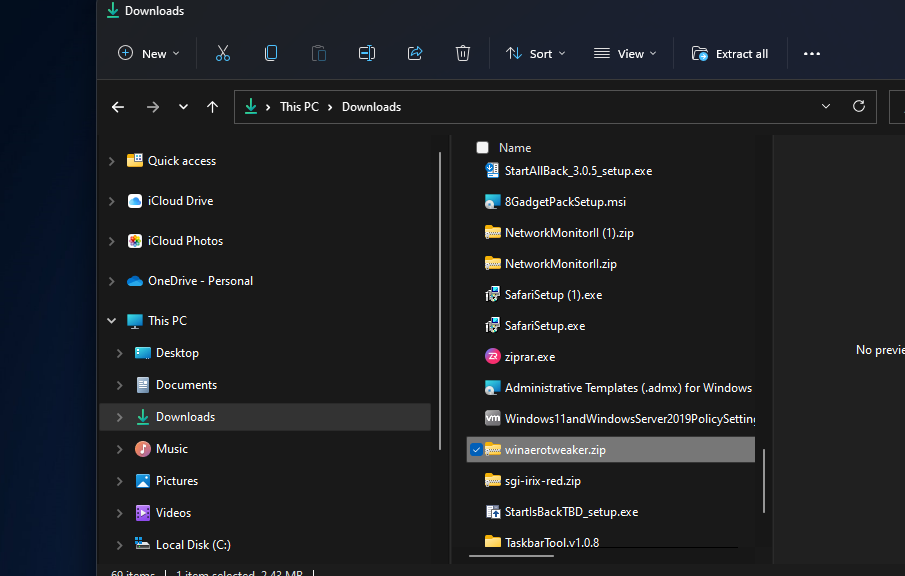
- Bring up File Explorer’s window.
- Open the Winaero ZIP archive you just downloaded.
-
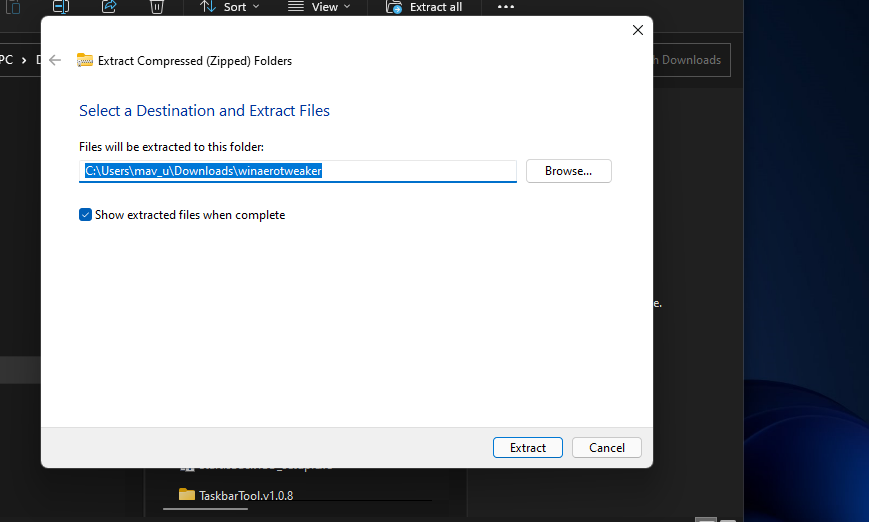
Click the Extract all option on Explorer’s command bar.

-
Select the checkbox for the Show extracted files when complete option.

- Click Extract to finish.
- Then double-click WinaeroTweaker-1.33.0.0-setup.exe in its extracted folder.
- Go through the setup wizard to install the Winaero Tweaker.
- Open the Winaero Tweaker software.
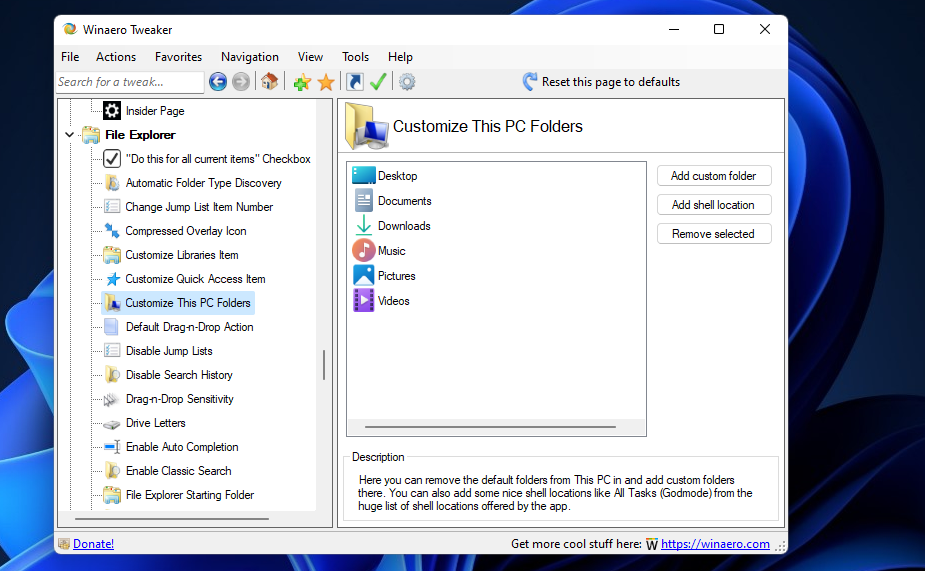
The File Explorer section of Winaero Tweaker includes 21 customization settings. Double-click File Explorer on the left side of the window to view its options. Winaero Tweaker includes full descriptions of what all those options do. These are some of its more notable customization settings or Explorer:
- Navigation Pane – Custom Items: A setting for adding Control Panel applets, system locations, or user folders to the navigation pane.
- Navigation Pane – Default Items: This option enables you to selectively remove default items from Explorer’s navigation pane.
- Customize This PC Folder: You can add custom icons to This PC folders with this setting.
- Customize Quick Access Item: This setting enables you to add a new icon to the Quick Access item and rename it.
- Customize Libraries Item: Select this option to change the Libraries item’s icon and rename it.
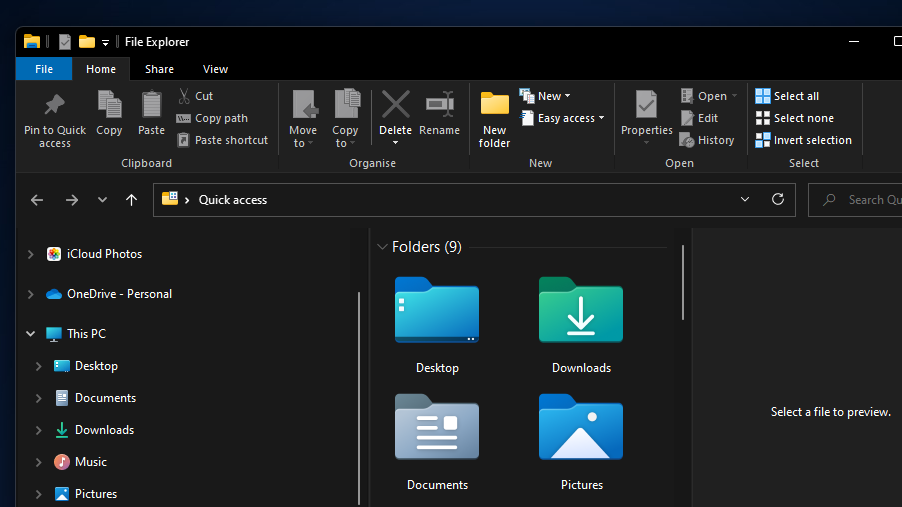
You can also restore the ribbon tabs from the old File Explorer with Winaero Tweaker. To do so, double-click the Windows 11 category and select Enable Ribbon in Winaero. Click the Enable the Ribbon UI in File Explorer checkbox. Then press the Restart Explorer button to apply.
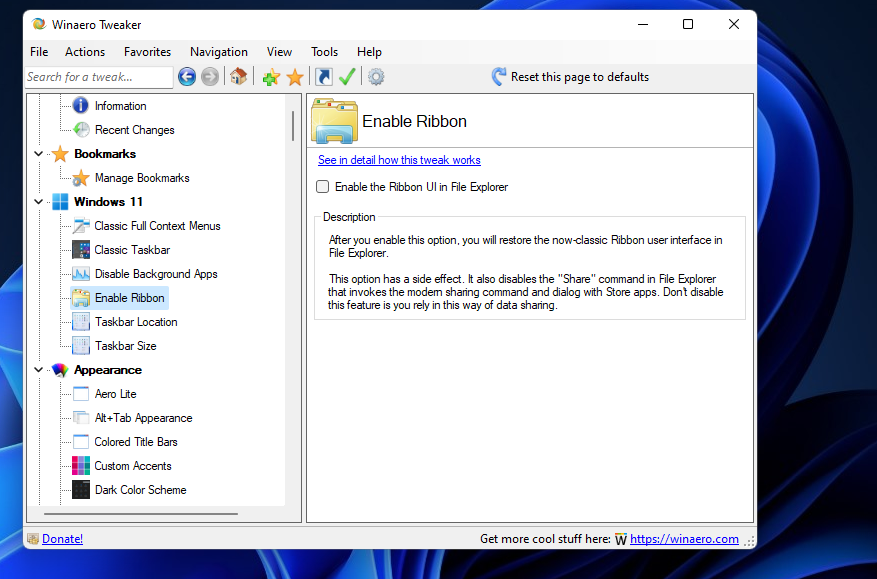
Now you’ll see the old View, Share, File, and Home tabs in File Explorer. You can select Explorer’s aforementioned customization options on the View tab. Press the Options button there to open the Folder Options window.
Configure File Explorer to Suit Your Preferences
So, there are many ways you can customize File Explorer with its built-in options and third-party software. With Explorer’s built-in customization settings, you can reconfigure how it displays files and folders. Winaero Tweaker’s additional settings are also a good extension to Explorer’s built-in options. You can make Explorer better suit your preferences with all those customization options.
Неочевидные функции, которые сделают работу с файлами удобнее.
1. Множественный выбор файлов

В Windows есть много способов быстро выбрать несколько файлов. Например, удерживая кнопку Ctrl, указать нужные документы. Также можно выбрать диапазон файлов: удерживая Shift, щёлкнуть первый и последний документ или папку в списке. Наконец, можно выделить все документы сразу, нажав Ctrl + A.
Но существует и менее очевидный способ — флажки в «Проводнике». Откройте его и выберите «Просмотреть» → «Показать» → «Флажки элементов». После этого наведите курсор на файл. Рядом появится флажок, и вы сможете выбрать несколько документов, отметив чекбоксы рядом с ними.
2. Перемещение «Корзины»

Обычно в Windows «Корзина» располагается на рабочем столе. Это неудобно, потому что для доступа к ней каждый раз необходимо закрыть или свернуть все окна.
Вместо этого вы можете добавить «Корзину» на боковую панель навигации «Проводника». Там вы сможете открыть ее или просто перетащить в неё документы и папки прямо из окна файлового менеджера, что, согласитесь, куда удобнее.
Есть два способа добавить «Корзину» в «Проводник». Первый: перетащите её на панель быстрого доступа — туда, где находятся ваши папки. И она останется там.
Второй вариант: щёлкните правой кнопкой мыши по пустому месте на панели «Проводника» и выберите опцию «Отобразить все папки». После этого вы увидите, что «Корзина» появилась среди элементов.
3. Настройка компактного вида

Если вам кажется, что между файлами в вашем «Проводнике» многовато свободного места, это можно исправить, включив компактный вид. Нажмите «Просмотреть» и выберите опцию «Компактное представление».
Лишнее пространство между файлами исчезнет, и они будут располагаться ближе друг к другу. Это полезно на небольших экранах, например на планшетах и 13‑дюймовых ноутбуках. Имейте в виду, что компактный вид работает только в случае, если папки у вас отображаются в виде списка или таблицы.
4. Скрытие недавних папок и файлов

Если вам кажется, что область быстрого доступа в «Проводнике» загружена ненужными файлами и папками, вы можете скрыть последние использованные элементы.
Для этого нажмите на три точки на верхней панели «Проводника» и выберите «Параметры». В появившемся окне снимите флажки с опций «Показать недавно использованные файлы» и «Показывать часто используемые папки в быстром доступе». Нажмите кнопку ОК, чтобы сохранить изменения.
Теперь последние использованные файлы и папки не будут отображаться в разделе быстрого доступа. И в этом есть несомненный плюс: никто из посторонних не сможет в ваше отсутствие увидеть, с какими документами вы работали.
5. Добавление папок на панель навигации

По умолчанию на панели «Проводника» закреплены стандартные «Документы», «Музыка» и прочие варианты. Но вы можете закинуть туда и собственные папки, чтобы всё время иметь к ним доступ.
Щёлкните правой кнопкой мыши по папке, которую вы хотите закрепить в «Проводнике». В появившемся контекстном меню выберите опцию «Закрепить на панели быстрого доступа».
Теперь выбранная папка будет всегда отображаться на панели сбоку. Кроме того, вы можете закреплять папки, просто перетаскивая их на панель мышью.
Если же вам нужно открепить папку, щёлкните по ней правой кнопкой и выберите «Удалить из панели быстрого доступа».
6. Добавление «Библиотеки» на панель навигации

«Библиотеки» в Windows — это набор ваших основных папок, таких как «Документы», «Музыка», «Изображения» и «Видео». Чтобы добавить её на панель навигации в «Проводнике», щёлкните правой кнопкой мыши в любом пустом месте на левой панели и в контекстном меню выберите опцию «Показать библиотеки».
После этого папка «Библиотеки» будет добавлена на панель навигации, что позволит вам быстро получить доступ к вашим каталогам.
7. Массовое переименование файлов

Массовое переименование файлов может быть утомительной задачей, особенно если их у вас много. Обычно для этого приходится щёлкать каждый документ правой кнопкой мыши, выбирать опцию «Переименовать», вводить новое имя и нажимать клавишу «Enter».
Однако есть более простой способ. Вместо нажатия клавиши «Enter» после переименования файла можно нажать клавишу «Tab». Это позволит выделить следующий документ и сразу перейти к его названию.
8. Поворот изображений

Если вам необходимо повернуть несколько изображений одновременно, есть удобный способ сделать это. Просто выделите все нужные картинки, зажав клавишу Shift или Ctrl, затем щелкните правой кнопкой мыши по одному из них и выберите «Повернуть влево» или «Повернуть вправо». И никакой утомительной ручной работы.
9. Изменение изображения папки

По умолчанию «Проводник» выбирает в качестве изображения для иконки папки первую картинку, которая в ней лежит. Но вам может захотеться изменить её. Для этого щёлкните правой кнопкой мыши по папке, которую вы хотите изменить, затем выберите опцию «Свойства». В открывшемся окне перейдите на вкладку «Настройка» и найдите раздел «Изображения папки». Там вы увидите кнопку «Выбрать файл».
Щёлкните по этой кнопке и найдите изображение, которое вам нужно — при этом оно не обязательно должно лежать в той папке, которую вы редактируете. Нажмите «Открыть». После выбора изображения нажмите «OK», чтобы закрыть окно свойств и применить изменения.
Теперь выбранное изображение будет использоваться в качестве новой миниатюры для папки.
10. Замена значка папки

Аналогичным образом можно заменить значок папки. Щёлкните по ней правой кнопкой мыши и выберите «Свойства» из контекстного меню. В открывшемся окне перейдите на вкладку «Настройка» и нажмите на кнопку «Сменить значок».
Далее вы сможете остановиться на предлагаемых системой иконках либо нажать на кнопку «Обзор» и выбрать собственное изображение, которое будет использоваться в качестве значка папки. Во втором случае убедитесь, что оно имеет расширение .ico (формат иконок).
Либо после нажатия на кнопку «Обзор» вы можете указать EXE‑файл или ярлык любой установленной у вас программы. Так для папки вы сможете выбрать значок этого приложения.
После выбора желаемого значка нажмите «OK» во всех открытых окнах, чтобы применить изменения.
11. Использование опции «Поделиться»

В Windows 11 Microsoft упростила процесс обмена файлами прямо из «Проводника». Щёлкните правой кнопкой мыши по любому файлу, который вы хотите отправить, и выберите опцию «Поделиться», расположенную в верхней части контекстного меню. После этого появятся варианты для обмена документом с ближайшими устройствами, вашими контактами или через подходящее приложение.
12. Замена стартовой папки

По умолчанию «Проводник» при запуске показывает «Быстрый доступ». Это может быть не очень удобно, если вы предпочитаете работать не со стандартными папками Windows 11, а с дисками. Но стартовый каталог можно легко заменить на «Этот компьютер».
Для этого в верхнем меню «Проводника» нажмите на иконку с тремя точками. В раскрывающемся меню выберите «Параметры». В появившемся окне найдите раздел «Открыть проводник для» и в раскрывающемся списке выберите «Этот компьютер». Нажмите ОК, чтобы сохранить изменения.
Теперь каждый раз, когда вы открываете «Проводник», он будет автоматически открывать раздел «Этот компьютер» вместо «Быстрого доступа».
Windows 11 introduces a sleek, modern interface that enhances user experience and productivity. One of the vital components of this operating system is File Explorer, which serves as the gateway to all your files and folders. While the default settings are already user-friendly, customizing File Explorer to suit your preferences can streamline your workflow and improve efficiency. This article provides a comprehensive guide on how to customize File Explorer in Windows 11, diving into various aspects such as interface adjustments, folder views, navigation settings, and more.
Understanding File Explorer in Windows 11
Before we delve into customization, it is essential to understand what File Explorer is and its importance. File Explorer allows users to navigate through drives, folders, files, and manage their data efficiently. With various features integrated into Windows 11, such as a redesigned taskbar and enhanced search capabilities, taking the time to personalize File Explorer can truly optimize your experience.
Key Features of File Explorer
-
New Design: Windows 11 brings a refreshed interface with rounded corners, new icons, and a centered taskbar, making the overall look cleaner and more modern.
-
Navigation Pane: This is the vertical section on the left side that helps you quickly access frequently used folders, quick access items, and storage devices.
-
Tabs: File Explorer in Windows 11 supports tabs, allowing users to open multiple folders in one window for easier file management without cluttering the desktop.
-
Integrated Search: The search function has been enhanced, making it easier to find files and folders using keywords or file types.
Customizing the Look and Feel of File Explorer
1. Changing the Theme
One of the first steps to customize File Explorer is to change the theme to suit your taste.
-
Dark or Light Theme: Windows 11 allows you to choose between a dark or light theme, affecting the appearance of File Explorer as well.
- Go to Settings > Personalization > Colors.
- Select your desired theme under «Choose your mode». The changes will apply throughout the interface, including File Explorer.
2. Adjusting Folder Options
File Explorer has built-in features to change how folders are displayed and how files are handled.
-
Open Folder Options:
- Launch File Explorer, click on the three-dot menu in the toolbar, and select Options.
-
In the Folder Options window, you can customize various settings, such as:
-
General Tab:
- Choose how to open File Explorer (This PC or Quick Access).
- Decide whether to open each folder in the same or new window.
- Select your desired options for navigation and visibility of hidden items.
-
View Tab:
- Change how files and folders are displayed (e.g., list, details, tiles).
- Show or hide hidden files, extensions, and protected operating system files.
-
Search Tab:
- Adjust how search works in the folders to suit your needs.
-
3. Creating Quick Access Shortcuts
Quick Access is a convenient feature that allows you to pin frequently used folders for easier access.
-
Pinning Folders:
- Navigate to the folder you want to pin.
- Right-click on the folder and select Pin to Quick access. It will appear in the Quick Access section of the Navigation Pane.
-
Removing Folders:
- If you want to remove a pinned folder, right-click on it in Quick Access and select Unpin from Quick Access.
4. Customizing the Navigation Pane
The Navigation Pane is the key component for quick navigation through your files. You can customize it to include the most relevant items.
-
Show or Hide Items:
- Right-click the Navigation Pane and check or uncheck options such as “Show all folders” and “Show favorites” to customize what appears.
-
Arrange Items:
- You can drag and drop items in the Navigation Pane to rearrange their order for easier access.
Enhancing File Explorer Functionality
5. Utilizing Tabs in File Explorer
One of the standout features in Windows 11 is the tabbed browsing in File Explorer, similar to that of web browsers.
- Using Tabs:
- To open a new tab, click the plus icon (+) next to existing tabs at the top of the window or use the keyboard shortcut Ctrl + T.
- You can switch between tabs with ease, drag tabs out to create new windows, or right-click to close a tab or open a new one.
6. Mastering the Search Functionality
Windows 11 enhances the search capabilities within File Explorer, making it quicker and easier to find files and folders.
-
Using Filters:
- When you type a query in the search box, you can filter by categories like «Images», «Documents», «Videos», etc. This speeds up the search process.
-
Advanced Search Options:
- After performing a search, you can use the Search Tools tab that appears to further refine your results based on file type, date modified, and more.
7. Customizing the Ribbon Toolbar
The Ribbon Toolbar in File Explorer contains various commands and options for file management. You can customize it to fit your workflow better.
-
Adding and Removing Commands:
- Right-click the Ribbon and select Customize the Ribbon. Here, you can choose to add or remove commands according to your needs.
-
Reorganizing Commands:
- You can also rearrange commands by dragging them in the customization menu.
Shortcuts and Keyboard Navigation
8. Utilizing Keyboard Shortcuts
Using keyboard shortcuts can significantly speed up your workflow while navigating through File Explorer. Familiarizing yourself with these can help you accomplish tasks more efficiently.
-
Basic Shortcuts:
- Ctrl + N: Open a new window
- Ctrl + E: Focus on the search bar
- Ctrl + W: Close the current tab
- Ctrl + Shift + N: Create a new folder
-
Navigation Shortcuts:
- Alt + Up Arrow: Go up one folder level
- Alt + Left Arrow: Go back
- Alt + Right Arrow: Go forward
- Ctrl + Shift + Esc: Open Task Manager for managing apps without cluttering your file explorer.
Advanced Customization Options
9. Changing the Default Open Behavior of Files
You can customize how different file types open within Windows 11, enhancing your overall experience with File Explorer.
- Default Apps:
- Go to Settings > Apps > Default apps. Here, you can choose which apps open certain file types.
10. Creating Custom Libraries
Libraries provide a centralized location to access related folders. You can create custom libraries specifically for your needs.
- Creating a Library:
- Right-click on the Libraries folder within the Navigation Pane, select New Library, and name it appropriately.
- Right-click on the newly created library, select Properties, and add folders that you want to include in this library.
11. Personalizing Folder Icons
Customizing folder icons can help visually distinguish items quickly.
- Changing Folder Icons:
- Right-click on a folder, select Properties, go to the Customize tab, and click on Change Icon. From here, you can choose from a selection of icons or upload your own.
12. Adding Integration with Cloud Services
If you utilize cloud storage services such as OneDrive, Google Drive, or Dropbox, you might want to integrate them with File Explorer for easier access.
- Integrating Cloud Providers:
- Install the client application for your cloud service, and it will automatically create a dedicated folder within File Explorer, allowing you to manage files directly.
Ensuring Performance
13. Tuning File Explorer for Better Performance
Customization also involves ensuring that File Explorer runs smoothly and efficiently.
-
Clearing File Explorer History:
- In the Folder Options window, go to the General tab and click on Clear to clear the file explorer history if it starts lagging or behaving unexpectedly.
-
Using the Disk Cleanup Tool:
- Regularly use the built-in Disk Cleanup tool by searching for “Disk Cleanup” in the Start menu to free up space and enhance performance.
14. Backing Up Your Customizations
Once you’ve achieved the desired setup, consider backing up your customization settings.
- Using File History:
- Go to Settings > System > Storage > Advanced Storage Settings > Backup Options and set up File History or use third-party software to ensure your settings are preserved.
Conclusion
Customizing File Explorer in Windows 11 is not only about aesthetic enhancements but also about improving efficiency and functionality. By following the steps outlined in this guide, you can tailor the File Explorer experience to align with your specific needs, making file management more seamless and productive. Whether you are a casual user or a power user, these customizations will undoubtedly contribute to a more enjoyable and streamlined interaction with your device. As you explore further, don’t hesitate to experiment with other features and settings in Windows 11 to optimize your digital workspace fully. Happy customizing!
Microsoft has designed Windows 11 with a generic configuration, attempting to cater to the broad spectrum of users. However, user needs and preferences can significantly differ. Fortunately, Windows 11 offers a range of customization options that enhance the functionality of the File Explorer. In this article, we’ll explore nine practical tricks that allow you to tailor your File Explorer experience according to your specific requirements.

1. Change the Default Folder
By default, File Explorer opens to the Home folder, displaying Quick Access, Favorites, and Recent Items. If you prefer it to open to a more relevant location, such as «This PC,» you can change this setting easily:
- Open File Explorer.
- Click on the three dots in the top bar and select Options.
- Under Open File Explorer to, choose This PC.
- Click Apply.
2. Delete the «Recent Items» Folder
The Recent Items folder can serve a practical purpose, but it also raises privacy concerns by displaying files you’ve accessed recently. To disable this feature:
- While still in Folder Options, navigate to the Privacy section.
- Uncheck Show recently used files.
- Click Apply.
3. Stop Showing Frequently Used Folders
Just as with recent items, Explorer displays frequently used folders which can also be a privacy concern. To stop this from being shown, you can do the following:
- In the Folder Options, find the same Privacy section.
- Uncheck Frequently used folders.
- Click Apply.
4. Disable or Enable the Navigation, Preview, and Details Panels
Windows 11 comes with several panes in File Explorer that can help you navigate your files efficiently. Here is how you can enable or disable them as per your needs:
- Open File Explorer.
- Go to the View menu in the top bar.
- You can toggle the Navigation Panel, Preview Panel, and Details Pane from there. These panes can enhance your workflow, allowing quick previews or details about files without needing to open them.
5. Open Files and Folders in One Click
File Explorer defaults to needing a double-click to open folders or files, but you can streamline your experience by switching to a single-click option:
- Open File Explorer, click on the three dots, and go to Options.
- In the Actions when clicking on an item section, select Single-click to open an item. This may enhance speed and reduce frustration for users often interacting with numerous files.
6. Select Items Using Checkbox
Selecting multiple files in File Explorer typically requires holding down the Ctrl key. However, you can activate checkboxes to simplify selection:
- Open File Explorer, head to View, hover over Show, and then select Item check boxes. You will now see a checkbox next to each item for easier selection, accommodating bulk actions with less hassle.
7. Customize Folder Icons
Standard folder icons can become monotonous. Windows 11 offers numerous icons to customize your folders, making it easier to identify them:
- Right-click the folder you want to customize, choose Properties, and navigate to the Customize tab.
- Click Change Icon and browse through the available icons. Apply your choice to distinguish folders better. This can be particularly helpful for users managing various projects or types of files.
8. Pin or Unpin Quick Access Folders
For those who frequently access certain folders, pinning them to Quick Access can save time:
- Right-click on the folder and select Pin to Quick Access. To remove it, right-click again and choose Unpin from Quick Access. This feature can significantly accelerate workflow by providing one-click access to the most important locations.
9. Activate Dark Mode in File Explorer
While many users enjoy the aesthetics of dark mode, some complain that File Explorer doesn’t consistently adhere to these settings. You can switch to dark mode with these steps:
- Right-click the Start button and select Settings.
- Go to Personalization, then click on Colors.
-
In the Choose your mode dropdown, select Custom, and ensure the default app mode is set to Dark. By adopting these settings, you can enhance contrast and reduce strain on the eyes, especially in low-light conditions.
Conclusion
Each user has unique requirements and preferred ways of navigating and utilizing Windows. With the nine tricks mentioned above, you can significantly enhance the functionality of File Explorer in Windows 11. From adjusting what you see when you open File Explorer to customizing how you interact with files and folders, these tips can help tailor your user experience to be more efficient and enjoyable. Feel free to revisit these settings to ensure that your File Explorer remains aligned with your evolving preferences, making the most of what Windows 11 has to offer. Source: Gearrice GEARRICE — Explore the Tech World
Last edited:
The Windows 11 File Explorer Right Click Menu Customize feature offers users the ability to personalize their file navigation experience like never before. With a simple right-click, users can tailor the context menu to suit their specific needs, streamlining their workflow and enhancing productivity.
As we delve into the significant aspects of Windows 11 File Explorer Right Click Menu Customize, it is important to recognize the evolution of this feature. Windows has long provided users with the ability to customize their context menus, but with the introduction of Windows 11, the customization options have expanded even further. Now, users can add, remove, or rearrange the items in the context menu, giving them more control over their file management process. This customization empowers users to create a tailored experience that aligns with their unique requirements and preferences.
Customizing the right-click menu in Windows 11 File Explorer gives you quick access to commonly used actions. To customize it, right-click on any empty space in File Explorer, select «New,» and then choose «Key» to create a new key entry. Name the key anything you want and set its value to the path of the program or action you want to add. You can also create submenus by creating a new key within the main key. Restart File Explorer to see the changes take effect.

Customizing the Windows 11 File Explorer Right Click Menu
The Windows 11 File Explorer is a powerful tool that allows users to navigate and manage their files and folders efficiently. One of the most convenient features of File Explorer is the right-click menu, which provides quick access to various options and actions. However, did you know that you can customize the right-click menu in Windows 11 to suit your preferences and workflow? In this article, we will explore how you can personalize and optimize your File Explorer right-click menu in Windows 11.
Adding and Removing Options
By default, the Windows 11 File Explorer right-click menu contains a wide range of options that cover common tasks such as copying, cutting, pasting, and deleting files, as well as opening files with specific programs and creating new folders. However, if you find that certain options are not useful to you or if there are additional actions you frequently perform, you can easily add or remove items from the right-click menu.
To customize the right-click menu, follow these steps:
- Open File Explorer by clicking on the folder icon in the taskbar or by pressing the Windows key + E on your keyboard.
- In File Explorer, navigate to the location where you want to customize the right-click menu.
- Right-click on an empty space to open the context menu, then click on «Customize» at the bottom of the menu.
- A «Customize» window will appear, showing the available options for the right-click menu.
- To add an item, simply tick the checkbox next to it.
- To remove an item, untick the checkbox next to it.
- You can also rearrange the order of the items by dragging and dropping them.
- Once you have made your customizations, click «Apply» and then «OK» to save the changes.
By following these steps, you can tailor the right-click menu to include only the options that are relevant to your workflow, making it more efficient and user-friendly.
Adding Custom Commands with Registry Editor
While the built-in customization options are usually sufficient for most users, advanced users can take customization a step further by adding custom commands to the right-click menu using the Registry Editor. This method requires modifying the Windows registry, so it is important to proceed with caution and create a backup of your registry before making any changes.
To add custom commands to the right-click menu using the Registry Editor:
- Press the Windows key + R on your keyboard to open the Run dialog box.
- Type «regedit» (without the quotes) and press Enter to open the Registry Editor.
- In the Registry Editor, navigate to the following key:
HKEY_CLASSES_ROOT\*\shell. - Right-click on the «shell» key, hover over «New,» and click on «Key» to create a new key.
- Name the new key with the name you want to appear in the right-click menu.
- Double-click on the «(Default)» value in the right pane and enter the command you want to associate with the custom key. For example, if you want to open a specific program, you would enter the path to the program’s executable file.
- Click «OK» to save the changes.
After following these steps, the custom command will appear in the right-click menu for all file types. You can repeat these steps to add multiple custom commands.
Removing Custom Commands
If you want to remove a custom command from the right-click menu, you can simply delete the corresponding key in the Registry Editor. To do this:
- Open the Registry Editor by pressing the Windows key + R and typing «regedit» (without the quotes).
- Navigate to the following key:
HKEY_CLASSES_ROOT\*\shell. - Find the key that corresponds to the custom command you want to remove and right-click on it.
- Click on «Delete» and confirm the deletion.
Removing the key will remove the custom command from the right-click menu.
Using Third-Party Tools for Advanced Customization
While the built-in options and Registry Editor allow for basic and advanced customization, there are also third-party tools available that offer even more extensive options and features for customizing the Windows 11 File Explorer right-click menu. These tools often provide a user-friendly interface and additional functionality such as adding submenus, creating custom shortcuts, and integrating with cloud storage services.
Some popular third-party tools for customizing the right-click menu include:
- Ultimate Windows Context Menu Customizer
- Right Click Enhancer
- Easy Context Menu
- FileMenu Tools
These tools can provide a more streamlined and comprehensive approach to customizing the right-click menu, giving you greater control over the options and actions available.
Exploring Additional Customization Options
Aside from customizing the right-click menu in Windows 11 File Explorer, there are numerous other customization options available to enhance your overall file management experience. These include:
Changing the File Explorer View
The default view in File Explorer is the «Icon» view, but you can switch to other views such as «List,» «Details,» or «Tiles» depending on your preference.
To change the view, open File Explorer and click on the «View» tab in the ribbon. From there, select the desired view from the available options.
Customizing the Quick Access Toolbar
In addition to customizing the right-click menu, you can also customize the Quick Access Toolbar in File Explorer. The Quick Access Toolbar is a customizable toolbar located at the top of the File Explorer window, which provides quick access to frequently used commands.
To add commands to the Quick Access Toolbar, right-click on any command in the ribbon and select «Add to Quick Access Toolbar.» You can also remove commands from the toolbar by right-clicking on them and selecting «Remove from Quick Access Toolbar.»
Applying Folder Templates
You can customize the appearance and behavior of specific folders by applying folder templates. Folder templates allow you to define settings such as the view layout, column headings, and sorting options for a particular folder and its subfolders.
To apply a folder template, right-click on a folder, select «Properties,» go to the «Customize» tab, and choose a template from the drop-down menu.
Creating Custom Libraries
Libraries in Windows 11 allow you to organize and access files from different locations in a single unified view. You can create custom libraries to group related folders and files together, making it easier to navigate and manage your data.
To create a custom library, open File Explorer, right-click on «Libraries» in the navigation pane, and select «New» followed by «Library.» Give the library a name and add the desired folders to the library.
Applying Folder and File Customizations Globally
If you want to apply your customizations globally across all folders and file types, you can do so by modifying the default folder template and file type associations. This will ensure that your customizations are automatically applied to new folders and files.
To modify the default folder template, open any folder, customize it according to your preferences (e.g., change the view, add or remove columns), then go to the «View» tab in the ribbon and click on «Options.» In the «Folder Options» window, go to the «View» tab and click on «Apply to Folders.»
To modify file type associations, open the default application for a specific file type, customize the settings (e.g., change the default program), and close the application. The changes will be applied to all files with that file type.
Using File Explorer Add-Ons and Extensions
In addition to the built-in customization options, there are various add-ons and extensions available that can enhance the functionality and appearance of File Explorer in Windows 11. These can range from simple tools that add new features or shortcuts to comprehensive extensions that completely overhaul the user interface.
Some popular File Explorer add-ons and extensions include:
- Clover
- QTTabBar
- Directory Opus
- XYplorer
These add-ons and extensions can significantly enhance your File Explorer experience by providing additional features, customization options, and improved navigation.
Customizing the Windows 11 File Explorer right-click menu is just one of the many ways you can optimize and personalize your file management workflow. Whether it’s adding custom commands, changing views and toolbars, applying folder templates, or installing third-party tools, Windows 11 offers a range of options to tailor File Explorer to your specific needs. With a customized right-click menu and other personalized settings, you can navigate, organize, and manage your files with ease and efficiency.

Customize the Right Click Menu in Windows 11 File Explorer
Windows 11 introduces a revamped File Explorer interface with new features and customization options. One of the key areas where users can personalize their experience is the right-click menu within the File Explorer.
The right-click menu provides a convenient way to access various actions and options for files and folders. Users can customize this menu to add or remove items based on their preference and workflow.
To customize the right-click menu in Windows 11 File Explorer, follow these steps:
- Open File Explorer by clicking on the folder icon in the taskbar or pressing Windows key + E.
- Right-click on any blank space within the File Explorer window.
- Click on «Customize» and select «Edit» from the drop-down menu.
- A new window will open, allowing you to add, remove, or rearrange items in the right-click menu.
- Click «Apply» or «OK» to save the changes.
By customizing the right-click menu in Windows 11 File Explorer, you can streamline your workflow and access frequently used actions more efficiently.
Key Takeaways — Windows 11 File Explorer Right Click Menu Customize
- You can customize the right-click menu in Windows 11 File Explorer.
- Customizing the right-click menu allows you to add or remove options according to your preferences.
- Windows 11 provides built-in options to customize the right-click menu, making it easier to access frequently used tools and functions.
- You can add shortcuts to specific folders or files, making them easily accessible directly from the right-click menu.
- Customizing the right-click menu can improve your workflow and increase productivity by providing quick access to commonly used actions.
Frequently Asked Questions
In this section, we will answer some common questions related to customizing the right-click menu in Windows 11 File Explorer.
1. How can I customize the right-click menu in Windows 11 File Explorer?
To customize the right-click menu in Windows 11 File Explorer, you can follow these steps:
1. Open File Explorer by clicking on the File Explorer icon or by pressing the Windows key + E on your keyboard.
2. In File Explorer, click on the «View» tab in the top menu.
3. On the far right of the top menu, click on «Options» and select «Change folder and search options».
4. In the Folder Options window, go to the «View» tab.
5. Scroll down in the list of Advanced settings and find the «Context menu» section.
6. Here, you can customize the context menu by adding or removing items. To add an item, click on «New» and enter the desired name for the item. To remove an item, select it and click on «Remove» or «Disable».
7. Click «Apply» and then «OK» to save your changes.
2. Can I add specific applications to the right-click menu in Windows 11 File Explorer?
Yes, you can add specific applications to the right-click menu in Windows 11 File Explorer. Here’s how:
1. Follow the steps mentioned in the previous question to open the Folder Options window.
2. In the Folder Options window, go to the «View» tab.
3. Scroll down to the «Context menu» section.
4. Click on «New» and enter the desired name for the application you want to add.
5. In the «Command» field, browse for the executable (.exe) file of the application you want to add.
6. Click «Apply» and then «OK» to save your changes.
7. The application will now appear in the right-click menu when you right-click on files or folders in File Explorer.
3. Is it possible to remove certain options from the right-click menu in Windows 11 File Explorer?
Yes, you can remove certain options from the right-click menu in Windows 11 File Explorer. Here’s how:
1. Open the Folder Options window by following the steps mentioned in the first question.
2. Go to the «View» tab in the Folder Options window.
3. Scroll down to the «Context menu» section.
4. Select the option you want to remove from the right-click menu.
5. Click on «Remove» or «Disable».
6. Click «Apply» and then «OK» to save your changes.
7. The removed option will no longer appear in the right-click menu in File Explorer.
4. Can I rearrange the order of options in the right-click menu in Windows 11 File Explorer?
No, it is not possible to rearrange the order of options in the right-click menu in Windows 11 File Explorer. The order of options is predefined and cannot be changed through the File Explorer settings. However, you can use third-party software or registry tweaks to customize the order of options, but these methods are not recommended for inexperienced users.
5. Will customizing the right-click menu in Windows 11 File Explorer affect other applications?
No, customizing the right-click menu in Windows 11 File Explorer will only affect the File Explorer application. It will not impact the right-click menus in other applications or system-wide right-click functionality. Each application has its own set of context menu options, and customizations made in File Explorer will not carry over to other applications.
In conclusion, customizing the right-click menu in Windows 11 File Explorer provides users with a convenient way to access commonly used actions and personalize their workflow. By adding or removing options in the context menu, users can streamline their file management tasks and improve productivity.
The customizable right-click menu in Windows 11 File Explorer allows users to tailor their file management experience to their specific needs. Whether it’s adding shortcuts to frequently used tools or removing irrelevant options, customization empowers users to optimize their workflow and access key actions with just a right-click.