
Download Windows Speedup Tool to fix errors and make PC run faster
Microsoft Surface tablet owners using a pen, stylus, or finger as touch mode for providing input to the device may sometimes find the screen doesn’t respond appropriately. Touch input is on by default and can’t be turned off. Probably there’s a change in accessibility settings and programs; hence, you need to calibrate such settings. Also, check if you have the correct drivers installed.
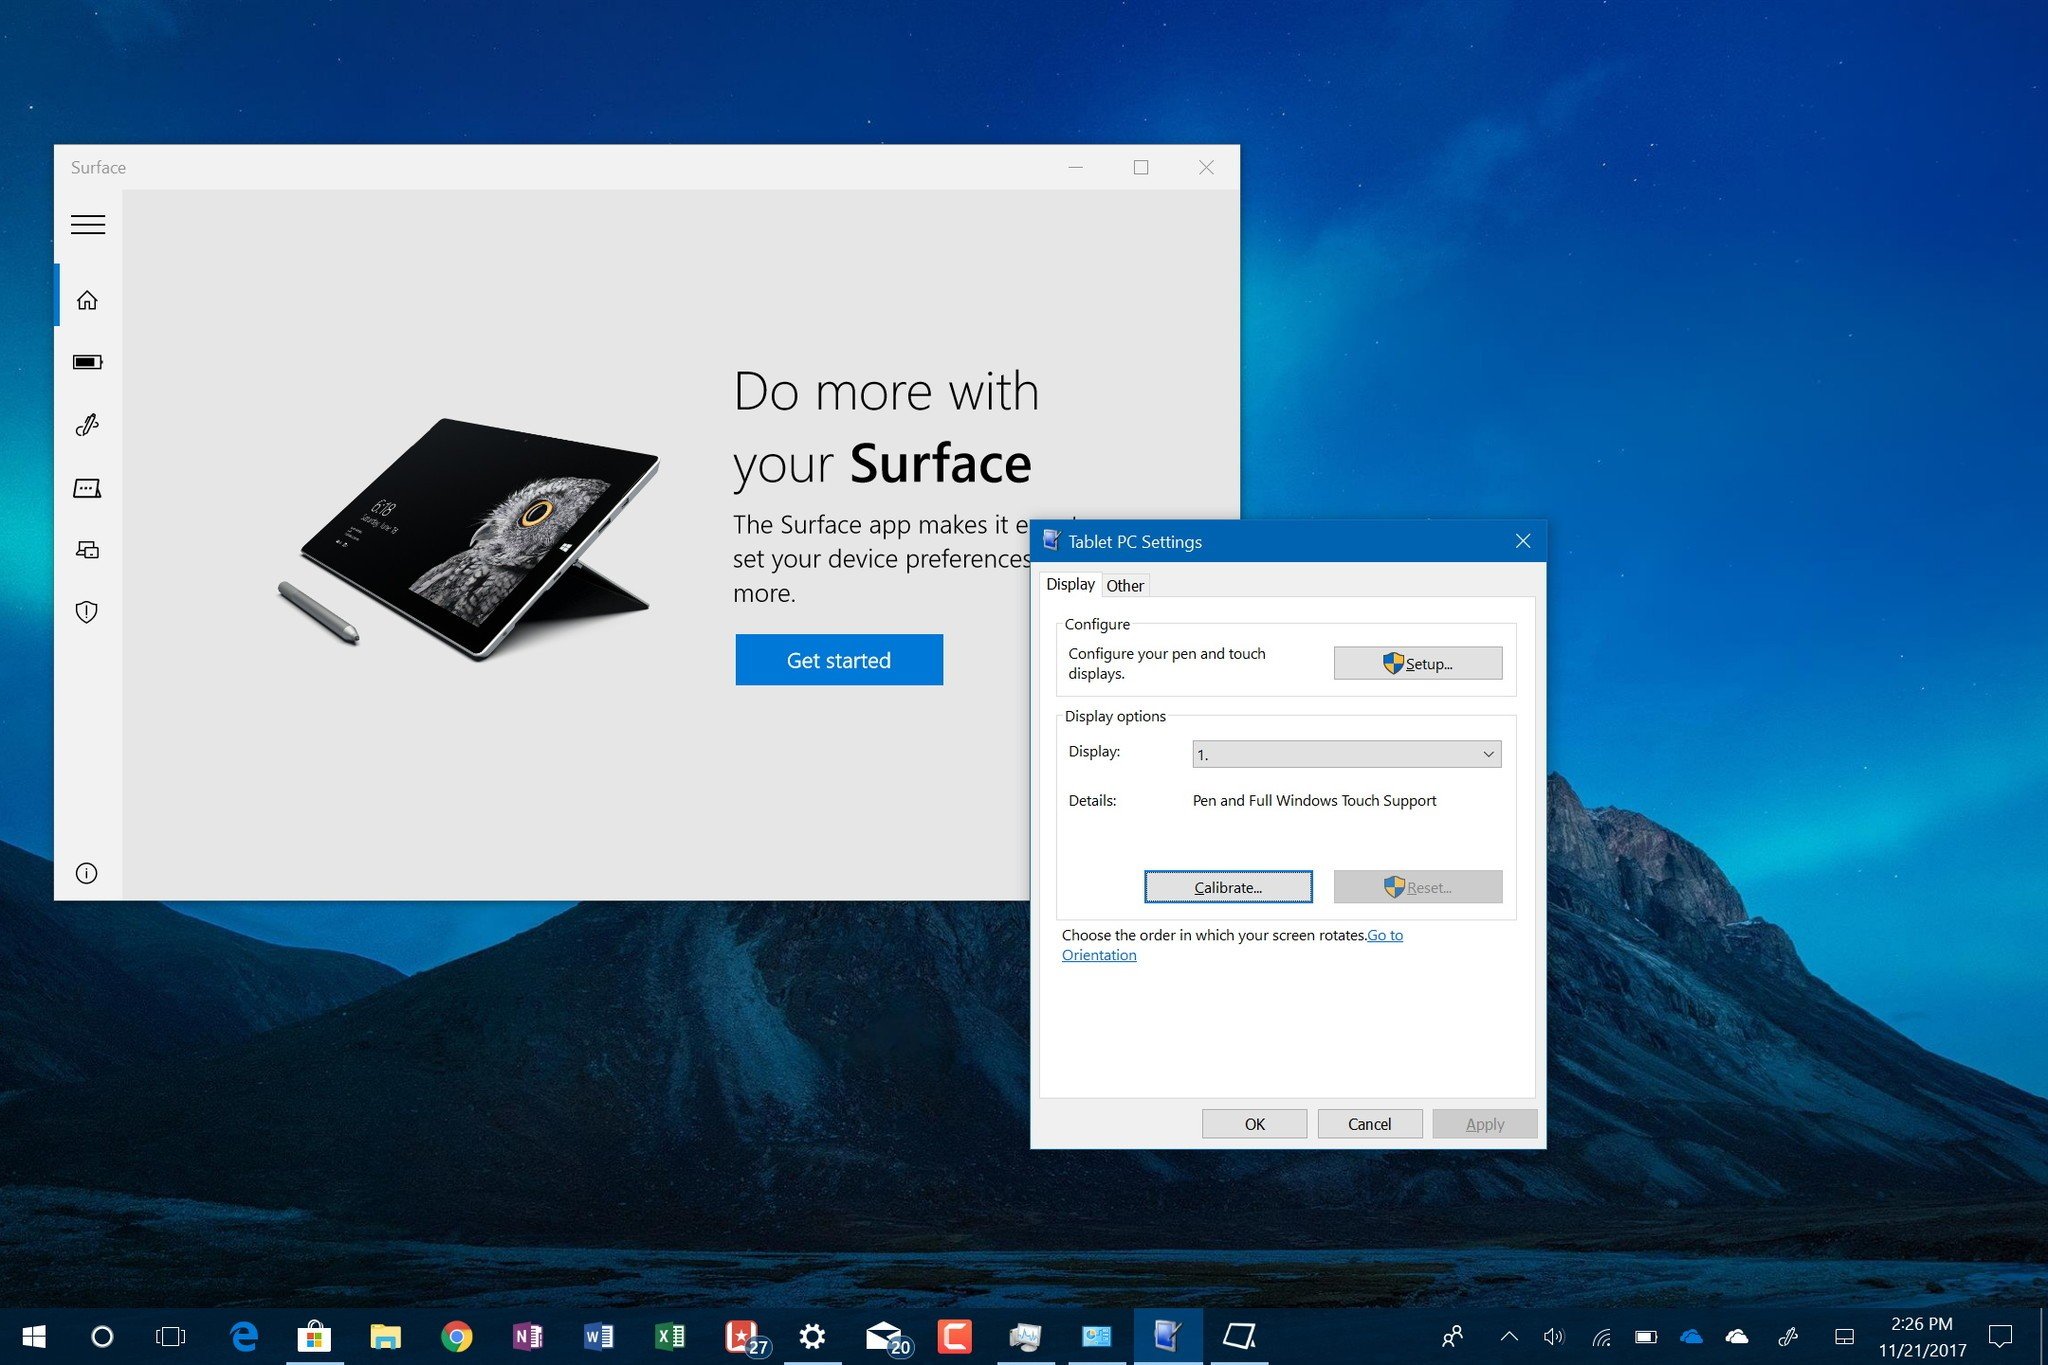
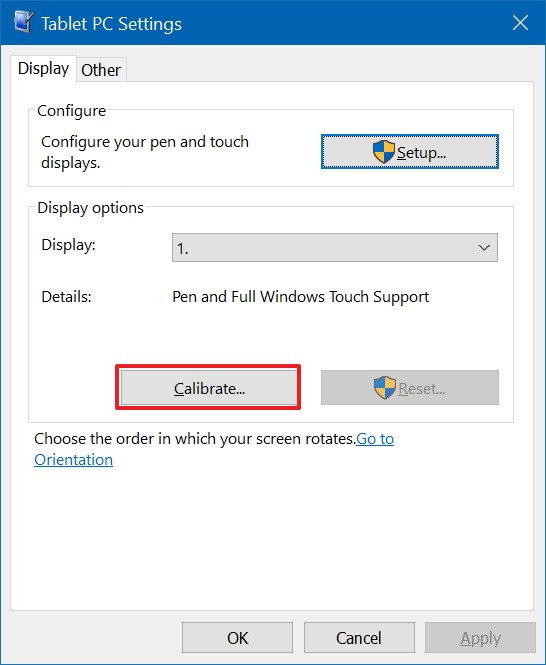
To adjust how accurately your screen senses when you use a pen or finger, swipe in from the right edge of the screen and then tap Search.
Enter Calibrate in the search box, tap Settings, and then Calibrate the screen for pen or touch input to open Tablet PC Settings. Check that the monitor shown in the Display field matches the screen you want to calibrate.

Tap Calibrate, and follow the on-screen instructions.
Get touchscreen to go to the correct screen
Follow the above mentioned steps (1,2 and 3). Next, tap Setup, and follow the on-screen instructions.

You can also change Pen and Touch actions, if you want to.
Change Pen and Touch actions
To change or adjust how fast, far, or long an action takes, swipe in from the right edge of the screen, and then tap Search.
Enter pen and touch in the search box, tap Settings, and then tap Pen and Touch. Tap the action you would like to configure, and choose Settings.
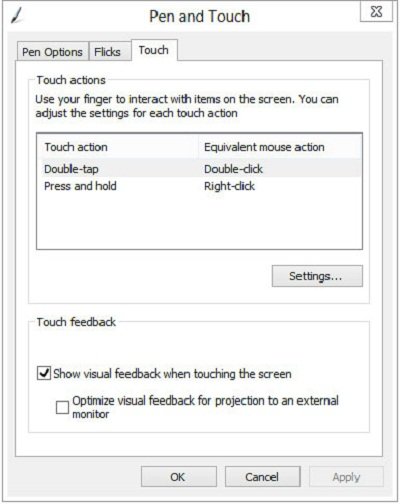
From there, simply follow the on-screen instructions to complete the task.
Check out the Surface app too! It lets you customize the Surface Pen.
See this post if Windows laptop or Surface Touch Screen not working.
Anand Khanse is the Admin of TheWindowsClub.com, a 10-year Microsoft MVP (2006-16) & a Windows Insider MVP (2016-2022). Please read the entire post & the comments first, create a System Restore Point before making any changes to your system & be careful about any 3rd-party offers while installing freeware.
Reader Interactions
Touch function stops working suddenly when you use the touch monitor or laptop? Have troubles such as touchscreen is unresponsive, touch screen input is offset or writing is intermittent? Let’s troubleshoot these common touch issues and fix them pronto!
1. Check the Hardware ─ Connector and Wiring
If the external monitor can not work touch function properly, the common hardware issues are as follows:
When encountering touch problems, please check whether the hardware connection is correct first.(The screen of touchscreen laptop is integrated all-in-one, and the wiring is inside the case. Usually, it is not necessary to check hardware connection problems. You can move forward to next part for software settings.)

● Poor Contact of the USB Connection
External touch monitors usually adopt the USB interface to transmit touch signals. If the USB ports on either side of the computer or touch monitor is faulty, the solder pins are tin stripped, the pin tongue is loose, etc., the touch may be intermittent, unusable, or the screen may not light up at all.

● Disconnected, Mis-Plugged or Faulty Cables
This happens more likely if you plug and unplug the cables frequently. Please re-insert the cables again to ensure the cables are inserted into the right ports and the plugs are not shaky or loose. If the touch screen still does not work, try to buy a new cable from the original manufacturer!

● Clean the Screen from Dirt and Dust
Grease and dust can potentially cause poor electrical sensing on touch surfaces. Use a lens cloth to gently wipe the touch screen and wipe with a little water for the tough stains. Do not spray too much water or detergent.
2. Check the Software Settings ─ Unresponsive Touch
When touch function stops working, check whether Windows Update and BIOS are updated to the latest version. If it still does not work, follow the following settings step by step to resolve possible problems!
● Update the USB Driver
If the USB driver on Windows 10 is not successfully updated, not only the external touch screen cannot be activated, but other USB devices may encounter problems.
Right click [Start] → [Device Manager] → [Universal Serial Bus controllers], you can select [Update driver] directly or select [Uninstall device] and then restart the computer. Windows will automatically install the driver after rebooting.
")


● Update the «Human Interface Devices» Driver
Connect the monitor to the computer and go to [Device Manager] → [Human Interface Device]. If the touch monitor connection is successful, the touch screen will appear in the list of Human Interface Devices. Right click the touch screen and follow the steps to update the driver.
")
")
◆ If you can’t find the touch screen device in the Human Interface Devices, please try to enable «Show hidden devices» in the view setting.

● Make the Computer Identify the Touch Screen
Click [Start] → [Control Panel] → [Tablet PC Settings], and then click [Setup] under the display tab. When «Tap this screen with a single finger to identify it as the touchscreen» appears on the screen, just touch the screen.
")
")


3. Software Setting ─ Calibrate Touch Input When the Touch Screen Input is Offset
● Step 1. Check the Resolution Setting
If the resolution setting does not match the screen, the touch position will also be affected. For example, when you touch certain positions on the screen, it responds on correct points, but clicks on other positions may activate other areas next to them instead.
When the cursor is on the desktop, right click for the setting menu → click [Display settings ] → choose the touch screen (number 2 screen) and select the corresponding resolution(for example, On-Lap M505T resolution is 1920×1080), and then click «Apply».
")
")

● Step 2. Calibrate Touch Input
Click [Start] → [Control Panel] → [Tablet PC Settings], or search for [Calibrate the screen for pen or touch input]. Open [Tablet PC Settings] and select your external monitor from the drop-down menu of Display → Click [Calibrate] → Tap the crosshair each time that it appears on the screen. → click «Yes» to save the calibration data .
")
")
")
4. When the Stylus does Not Work or is Not Sensitive
Touchscreen laptops and smartphones usually need to be paired with a dedicated stylus. For On-Lap series touch monitors, you can choose a passive stylus with a conductive rubber or plastic disc greater than 6mm diameter. The induction of active styluses differs from brand to brand. If your writing or drawing is intermittent, it is recommended to use a stylus with stronger induction (e.g., Adonit Dash3)

5. Confirm the Main Device Supports External Touch Screen
● iMac or MacBook
The Mac OS system does not support external touch signals, and the touch monitor can only display images when connected to the computer. This is a limitation of OS compatibility. If you need an external touch monitor for Mac, you can use BootCamp, a multi boot utility that comes with Mac OS. It assists you in installing Windows 10 on Intel-based Mac computers . When you switch your MacBook to Windows 10, you can operate the external touch monitor!
")
")
● Android Smartphone
When you connect 15.6-inch On-Lap M505T touch monitor to an Android phone supporting USB Type-C DP Alt, M505T can receive touch, video and audio signals at the same time. However, in case the Android phone OS is not updated to Android 8.0 or latest, you cannot use the touchscreen function on M505T touch monitor.
Note! Not every smartphone with a USB-C connector can be connected to a touch screen. You must inquire your smartphone manufacturer about whether the model supports DisplayPort Alt mode for outputting video signals.
6. Eliminate Environmental Interference ─ Flicker or Touch Ghost Clicks
As the projected capacitive touch technology is sensitive to electricity difference, the electromagnetic interference or unstable power current input may cause touch ghost clicks—the screen responds to touches you’re not making. In this case, please eliminate the following interference from your environment :

Unstable electric current
Sockets in public spaces usually have complicated wiring and power adoption. you may experience current fluctuations occasionally. When the power input to the touch monitor comes from these sockets or extension cords, you may encounter problems of not being able to operate touch screen normally.

High-Power-Consumption Appliances
Please try to stay away from kitchen appliances in use, such as electric cookers, microwave ovens, etc. Even table lamps may emit a lot of low-frequency electromagnetic waves. These electrical appliances that emit electromagnetic interference during operation may affect the use of your touch screen.
We hope the article has helped you to solve the problems of using touch monitors. If you have any other questions about touch screens, please write to GeChic Customer Service or contact us via FB.

This may have happened to you:
You click on a button or menu option and “miss”. Maybe you’re using Fresh Paint and notice that your Surface Pro stylus is drawing just “a little to the left”.
The cause? Your touch inputs are out of calibration.
The touchscreen and pen inputs on your Surface are pretty accurate out of the box so, you may not have seen any problems with this. However, that doesn’t mean it won’t happen in the future.
Fortunately, it’s an easy fix that you can do in less than two minutes. The same procedure works for Windows 8 and Windows 10 (technically, it works for Windows RT as well but you won’t get a prompt for Pen or Touch Calibration).
Calibrate Touchscreen or Pen input on a Surface
- Search for “calibrate“
- Tap on “Calibrate the screen for pen or touch input“
- The following screen will appear
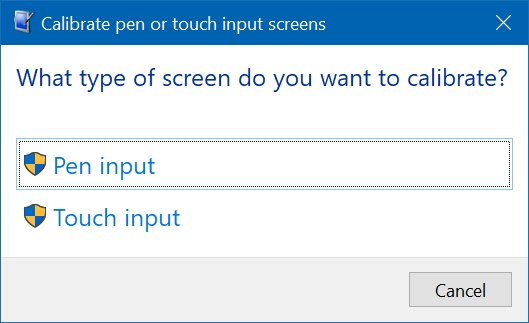
- Tap on Calibrate. When you do, you’ll get the following window
- The procedure for doing the Pen or touch inputs are similar so select which one you want to calibrate. For this example, I’m going to do Touch Input
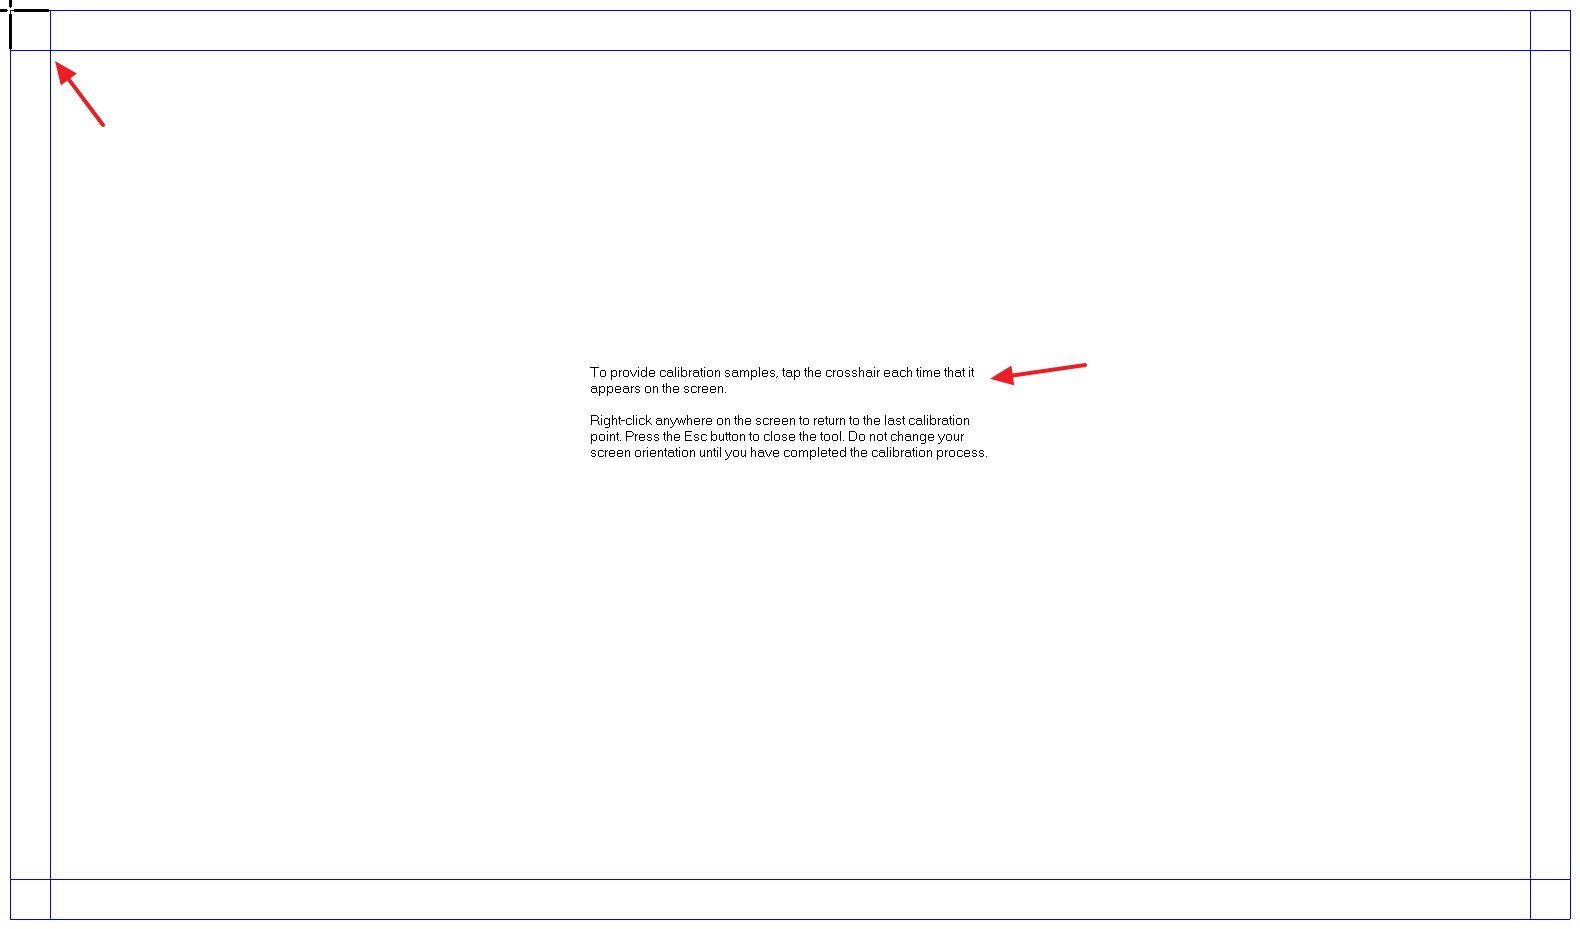
- Next you’ll see a screen a lot like the one below (I enlarged the text to make it easier to read)
- Start in the upper left corner and touch (or tap with the pen) the cross-hairs as they appear. There will be 16 in all. If you make a mistake, right-click on the screen to back up and try again
- After you’re done, you’ll get a popup asking if you want to save your configuration. Tap OK
- Repeat for the touch or pen input as needed
That’s it. Hopefully, you won’t need to do this very often but if you do, now you know what to do.
Let me know if this helps you at some point and don’t be afraid to post a comment if you have any questions.
Tim
You may also like
Windows 10-powered devices with touch-enabled displays are virtually everywhere, and they help us to do away without the mouse and keyboard to interact with applications more naturally using a pen or just our fingers.
Although there have been numerous advances in display technologies to make touch more reliable, eventually no matter the computer you’re using, the screen can lose its accuracy. It may result in touch input not working at all, taps or swipes not registering, or the screen not responding with the same accuracy as it once did when the device was fresh out of the box.
The good news is that unless it’s a mechanical problem, it’s an issue that usually can get fixed by simply re-calibrating the screen. If you own a Surface Book 2, Surface Pro, Surface Pro, a Dell laptop, or any other touch-enabled device running Windows 10, you can use the built-in calibration tool to resolve this issue.
In this Windows 10 guide, we’ll walk you through the easy steps to calibrate a display that uses touch technology without having to use third-party tools.
How to fix touch input accuracy on Windows 10
If you’re having an inaccurate response using touch, use these steps to re-calibrate the device:
- Open Control Panel.
- Click on Hardware and Sound.
- Under «Tablet PC Settings,» click the Calibrate the screen for pen or touch input link.
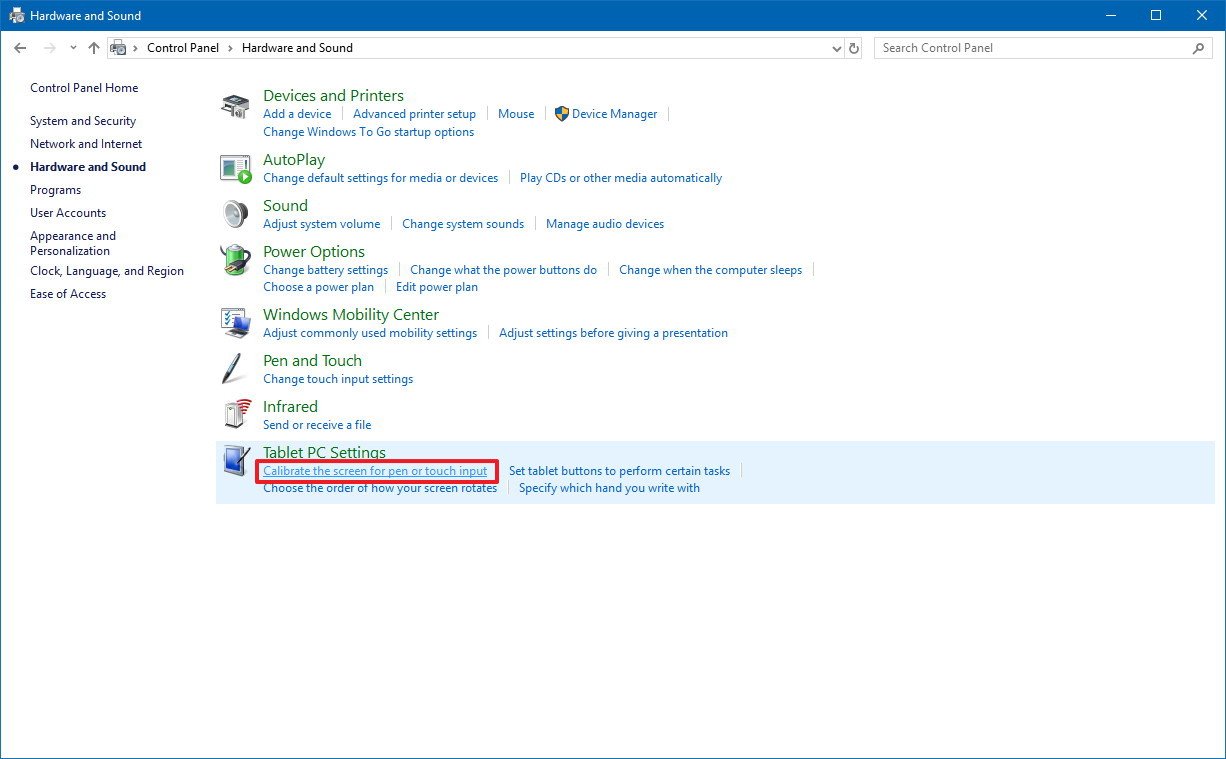
- Under «Display options,» select the display (if applicable).Quick Tip: Under «Details,» you can tell whether your screen has full support for pen and touch with Windows 10.
- Click the Calibrate button.
- Select the Touch input option.
- In the white screen, tap the crosshair each time that is appears on the screen, and do not change the resolution during this process.
- After the calibration process concludes, you’ll be given the choice to save the calibration data.
Once you’ve completed the steps, your touch-enabled device should more accurately register touch inputs.
It’s worth noting that using the same calibration tool, you can calibrate the pen input with Surface or another device that includes stylus support.
All the latest news, reviews, and guides for Windows and Xbox diehards.
More Windows 10 resources
For more helpful articles, coverage, and answers to common questions about Windows 10, visit the following resources:
- Windows 10 on Windows Central – All you need to know
- Windows 10 help, tips, and tricks
- Windows 10 forums on Windows Central
Mauro Huculak has been a Windows How-To Expert contributor for WindowsCentral.com for nearly a decade and has over 15 years of experience writing comprehensive guides. He also has an IT background and has achieved different professional certifications from Microsoft, Cisco, VMware, and CompTIA. He has been recognized as a Microsoft MVP for many years.
Calibrating the touch screen on Windows 10 is a simple process that ensures your touch inputs are accurately recognized. You’ll need to access the control panel, find the tablet PC settings, and follow the calibration wizard. All in all, it shouldn’t take more than a few minutes, and it helps keep your touch screen working perfectly.
In this section, we’ll walk you through the steps to calibrate your touch screen in Windows 10. Each step is straightforward, ensuring your touch inputs align correctly with the screen’s display.
Step 1: Open Control Panel
First, open the Control Panel from the start menu.
You can find the Control Panel by clicking on the Start menu and typing «Control Panel» in the search bar. Click on the application when it appears in the search results.
Step 2: Access Tablet PC Settings
Next, navigate to the «Tablet PC Settings» in the Control Panel.
Look for the «Hardware and Sound» section, then click on «Tablet PC Settings.» This is where you’ll find all the touch-related settings.
Step 3: Begin Calibration
Click the «Calibrate» button in the Tablet PC Settings window.
A new window will pop up, prompting you to calibrate your screen. Make sure to select «Touch Input» if prompted, as this ensures the calibration is for touch and not pen input.
Step 4: Follow Calibration Screen Prompts
Follow the on-screen prompts to tap targets that appear on the screen.
These targets will guide you through the calibration process. Tap each target as accurately as possible for best results.
Step 5: Save the Calibration Data
After tapping all the targets, save the calibration data when prompted.
This ensures that your new calibration settings are applied. If you’re happy with the results, confirm and exit the calibration tool.
After completing these steps, your touch screen should be more responsive and accurate to your touch inputs. This is especially useful if you’ve noticed your touch screen behaving erratically or not registering touches correctly.
Tips for Calibrating Touch Screen Windows 10
- Make sure your hands are clean to avoid smudging the screen during calibration.
- Use a stylus if you have one for more precise tapping during the calibration process.
- Calibrate your screen in a stable environment to avoid shaking or moving the device.
- Turn off any external devices that might interfere with the touch screen during calibration.
- Repeat the calibration process if you notice any inaccuracies after the first attempt.
Frequently Asked Questions
How often should I calibrate my touch screen?
Typically, you only need to calibrate your touch screen if you notice inaccuracies or after a significant system update.
Can I use a mouse to calibrate the touch screen?
No, you should use your finger or a stylus since the calibration process is specifically for touch input.
What if my touch screen is still inaccurate after calibration?
Try recalibrating a couple of times. If the problem persists, there may be hardware issues with your touch screen.
Can I undo a calibration?
Yes, you can reset to the default calibration settings by accessing the same Tablet PC Settings where you started the calibration.
Is there a way to calibrate using third-party software?
Windows 10’s built-in calibration tool is usually sufficient, but there are third-party options available if you need more advanced features.
Summary of Steps
- Open Control Panel.
- Access Tablet PC Settings.
- Begin Calibration.
- Follow Calibration Screen Prompts.
- Save the Calibration Data.
Conclusion
Calibrating your touch screen in Windows 10 is a quick and easy way to ensure your device accurately registers your touch inputs. Whether you’re swiping, tapping, or scrolling, a properly calibrated screen makes your experience smoother and more enjoyable.
If you find your touch screen acting up, don’t hesitate to recalibrate it using the steps outlined above. Accurate touch input is crucial for both casual use and productivity, so keeping your screen in tip-top shape is worth the few minutes it takes to calibrate. For more tips and tricks on maintaining your Windows 10 devices, keep exploring and learning—you’ll be a tech whiz in no time!
Matthew Burleigh is the head writer at solveyourtech.com, where he covers topics like the iPhone, Microsoft Office, and Google apps. He has a Bachelor’s and Master’s degree in Computer Science and has over 15 years of IT experience.
He has been writing online since 2008 and has published thousands of articles that have been read millions of times.
You can read his full bio here.