
Все способы:
- Способ 1: Встроенные возможности
- Способ 2: Сторонние программы
- Вариант 1: Xpadder
- Вариант 2: X360CE
- Способ 3: Настройки игрового клиента
- Вопросы и ответы: 0
Способ 1: Встроенные возможности
В Windows 11 реализован встроенный инструмент, с помощью которого есть возможность проверить работоспособность геймпада и откалибровать его. Он поддерживает большинство устройств различных моделей и от разных производителей, и, несмотря на небольшое количество доступных настроек, выполняет свою основную задачу без установки дополнительного софта.
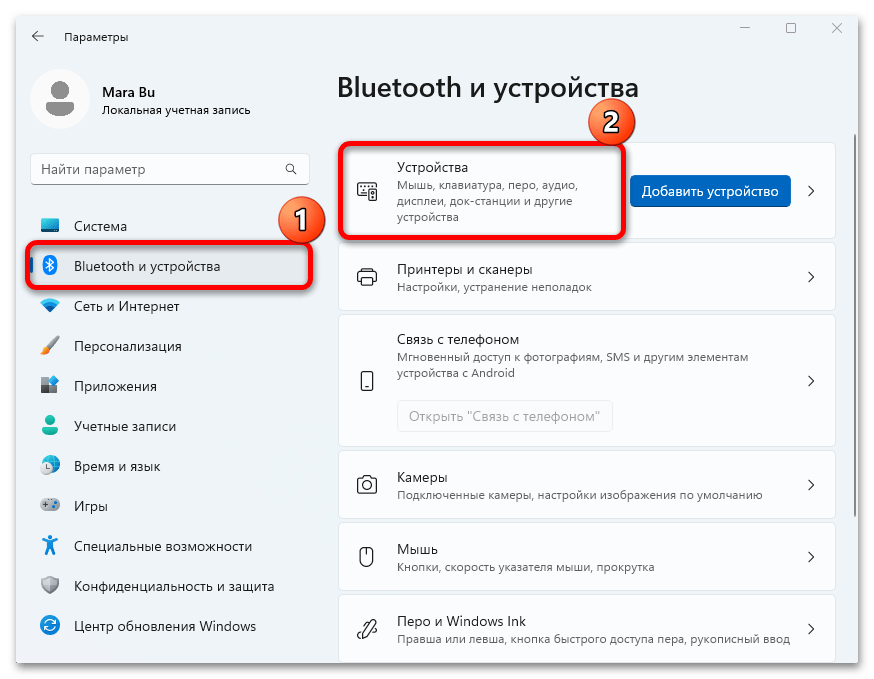
- Нажмите на кнопку «Пуск» и запустите штатные «Параметры».
- На панели слева выберите вкладку «Bluetooth и устройства», а в центральной части окна кликните по строке «Устройства».
- Нажмите на «Дополнительные параметры устройств и параметров» внизу.
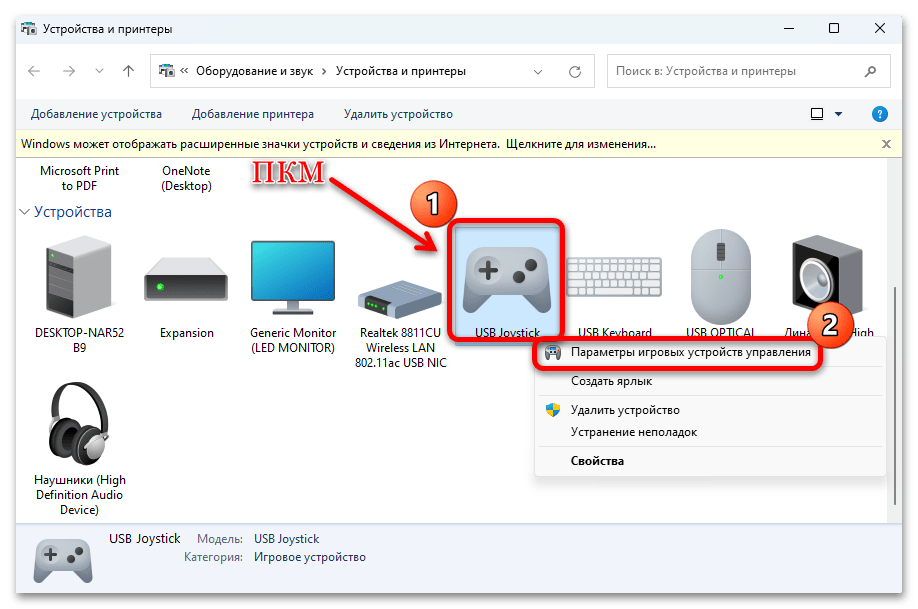
- Отобразится раздел с девайсами классической «Панели управления». В списке найдите ваш геймпад и кликните по нему правой кнопкой мыши, затем из контекстного меню выберите пункт «Параметры игровых устройств управления».
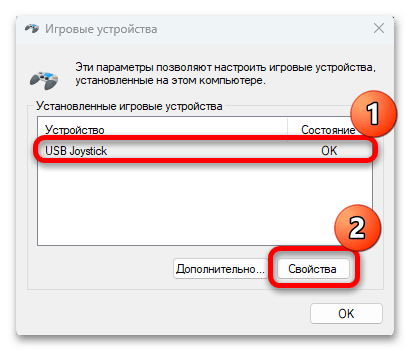
- В отобразившемся системном окне убедитесь, что устройство работает нормально (напротив названия геймпада в столбце «Состояние» должно быть значение «ОК»), после чего выделите девайс нажатием левой кнопкой мыши и кликните по «Свойства».
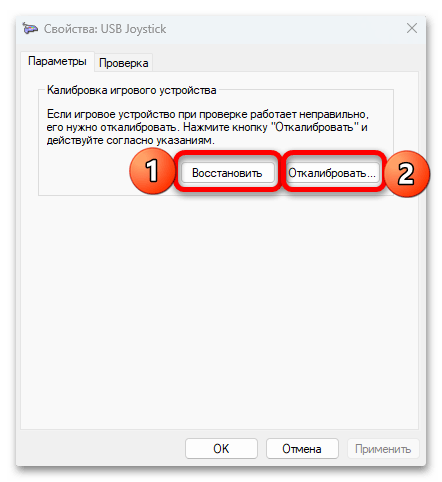
- Далее на вкладке «Параметры» сначала выберите функцию «Восстановить», что позволит сбросить все ранее произведенные с геймпадом настройки, затем нажмите на «Откалибровать».
- Запустится мастер, инструкциям которого нужно следовать. С помощью встроенного средства получится откалибровать и проверить оси стиков.


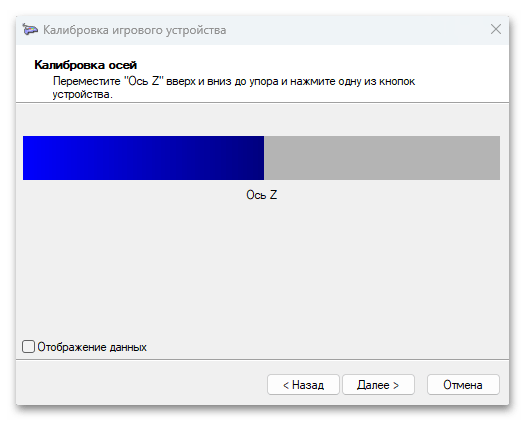
По завершении настройки геймпада будет возможность протестировать также чувствительность и точность устройства. Если новые параметры не подходят, тогда можно вновь открыть окно из Шага 5, затем нажать на кнопку восстановления, чтобы сбросить ранее выставленные настройки и при необходимости вновь откалибровать девайс.
Способ 2: Сторонние программы
Как видно, предыдущий способ не отличается широким набором возможностей, поэтому, если нужно настроить конфигурацию кнопок, придется воспользоваться решениями от сторонних разработчиков. Также такой софт может эмулировать различные контроллеры. У нас на сайте есть отдельный обзор на такие программы, но ниже мы разберем алгоритм действий на примере нескольких эффективных вариантов.
Подробнее: Программы для настройки геймпада на компьютере

Вариант 1: Xpadder
Программа Xpadder является довольно многофункциональным инструментом, позволяющим откалибровать геймпады для любых игр, будь то обычная, Flash-игра или эмулированная. Также она позволяет симулировать нажатия на клавиши клавиатуры и кнопки мыши посредством геймпада. Здесь предлагается широкий набор дополнительных функций.
Скачать Xpadder с официального сайта
- Скачайте исполняемый файл и запустите его, после чего следуйте инструкциям пошагового мастера установки.
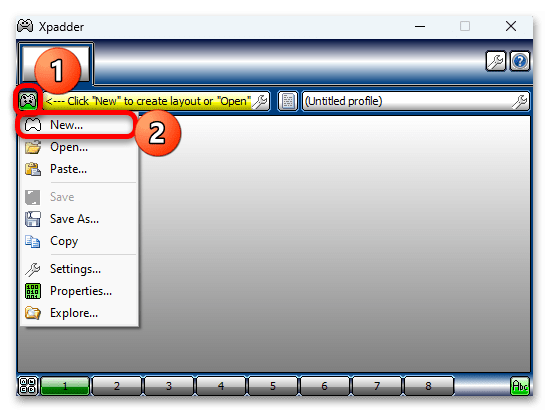
- После первого запуска потребуется указать директорию в локальном хранилище, куда будут сохраняться файлы программы. Затем в главном оке нажмите на значок в виде геймпада и из выпадающего меню выберите пункт «New».
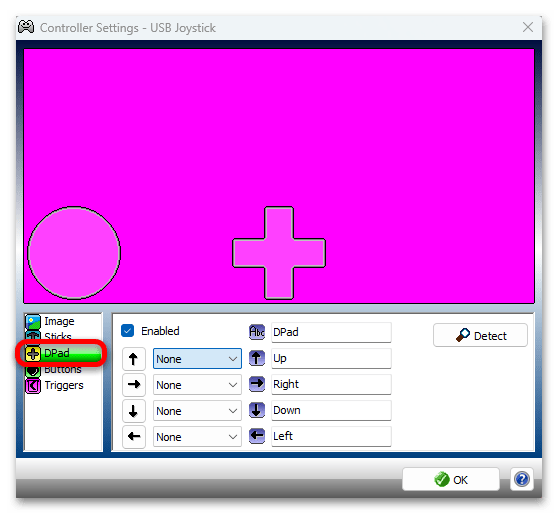
- Далее останется настроить кнопки геймпада. Например, на вкладке «Sticks», расположенной в нижней части окна, настраивается поведение стиков, проверяется их чувствительность и происходит калибровка.
- На других вкладках можете отрегулировать кнопки и крестовину, задав для них действия. После настройки геймпада нажмите на «ОК», чтобы новые параметры для устройства вступили в силу.


В Xpadder можно создавать неограниченное количество шаблонов настройки и переключаться между ними в зависимости от управления в игре. Программа распространяется на бесплатной основе и поддерживает большинство моделей геймпадов.
Вариант 2: X360CE
Еще одно популярное решение от сторонних разработчиков – программа X360CE, которая позволяет откалибровать и настроить геймпад от различных производителей, даже малоизвестных. Также есть возможность синхронизировать настройки устройства с определенными играми, установленными на компьютер.
Скачать X360CE с официального сайта
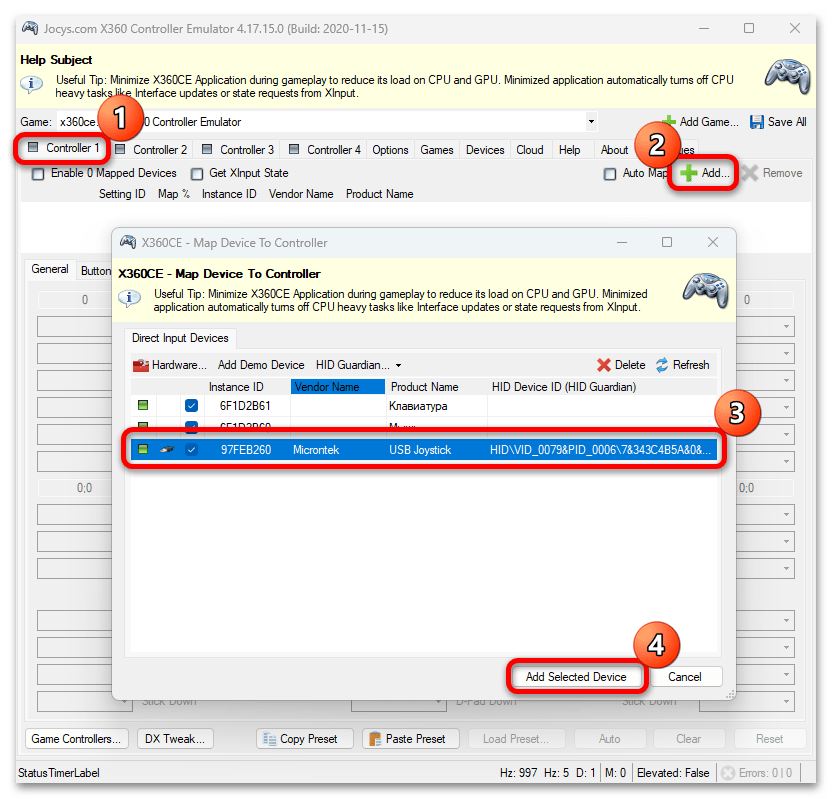
- Нажмите на кнопку и перейдите к скачиванию файла, который после загрузки достаточно запустить — установка софта не требуется. Главное окно разделено на несколько вкладок, где можно по отдельности настраивать различные параметры. Выберите одну из них, к примеру «Controller 1», затем нажмите на «Add», а из отобразившегося окна в списке доступных устройств выберите нужное и кликните по «Add Selected Device».
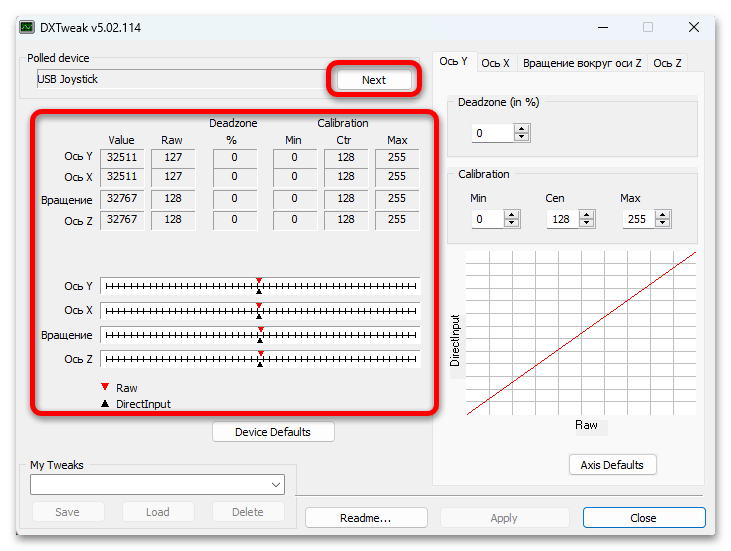
- После станет доступно окно, где можно задать действия для каждой кнопки подключенного геймпада. Для калибровки стиков нажмите на кнопку «DX Tweak», расположенную в нижней части интерфейса.
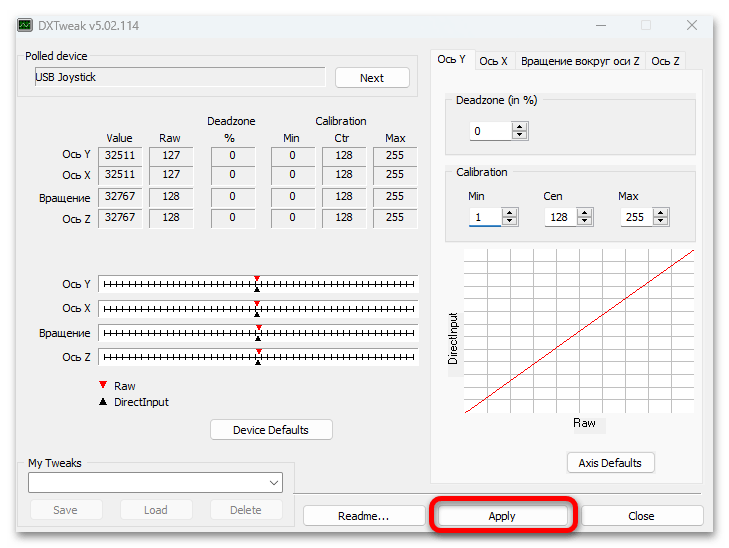
- Если потребуется, нажмите на «Next» в блоке «Polled device», чтобы перейти к геймпаду, который надо откалибровать. Ниже отображаются параметры, отвечающие за калибровку стиков. С их помощью измените настройки, чтобы избавиться от «мертвых» зон и отрегулировать чувствительность. В центральной части окна есть график, с помощью которого можно наблюдать за изменениями. Используя стики, нужно синхронизировать поведение геймпада с показателями на экране.
- По окончании щелкните по «Apply», чтобы настройки вступили в силу.

При необходимости можно вернуться в данное окно и снова откалибровать геймпад. Для достижения наибольшей эффективности лучше использовать инструмент в совокупности с инструкцией из Способа 1, поскольку параметры по умолчанию напрямую связаны с системными настройками.
Способ 3: Настройки игрового клиента
Игровой клиент (за пример возьмем Steam) также стоит рассмотреть, поскольку в нем предусматриваются параметры для геймпада. С помощью встроенных средств можно протестировать кнопки, включить/выключить вибрацию, выбрать раскладку или настроить взаимодействие с приложением.
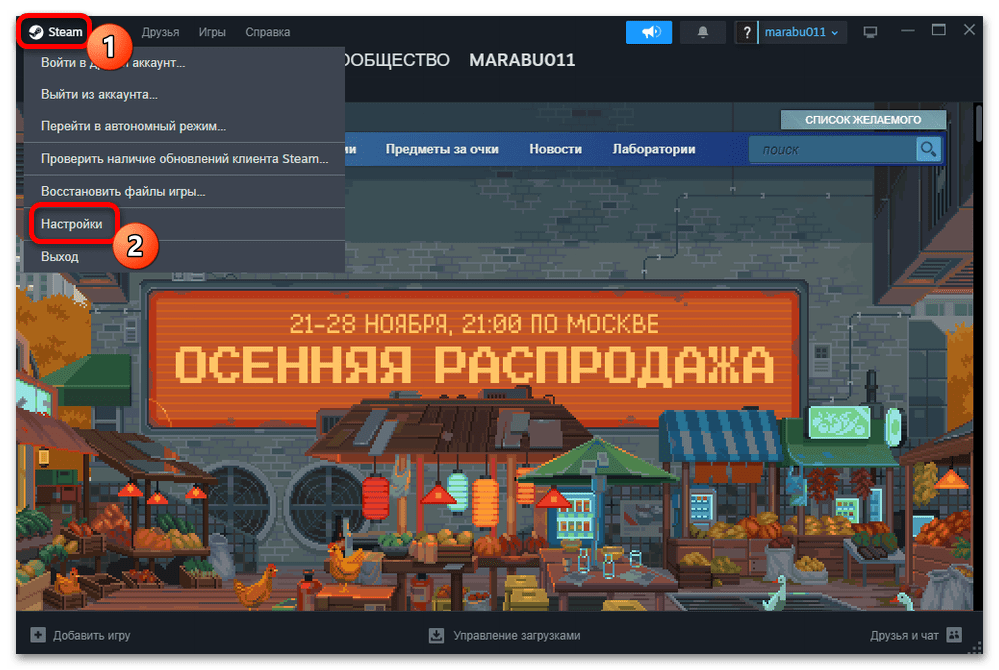
- Запустите Steam с предварительно подключенным геймпадом, затем кликните по вкладке «Steam» вверху и выберите пункт «Настройки».
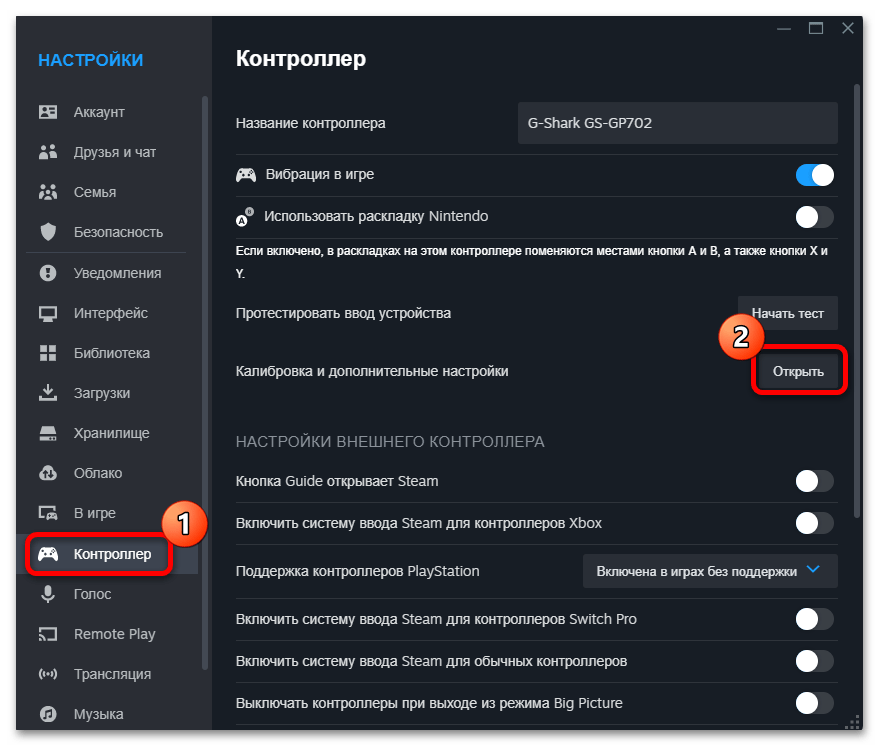
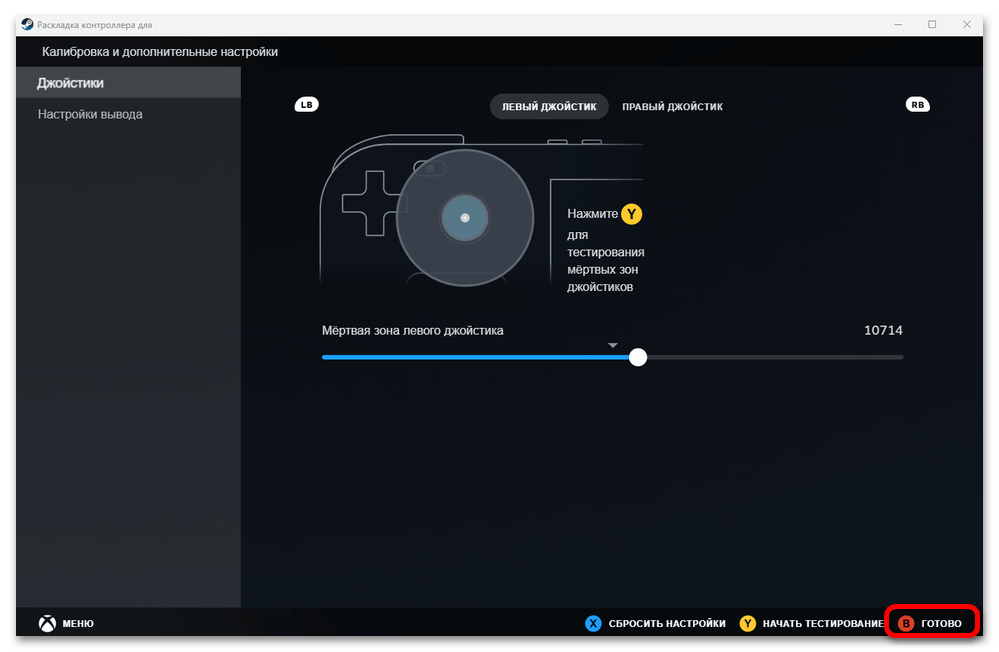
- На панели слева переключитесь в раздел «Контроллер», а в центральной части окна кликните по кнопке «Открыть» напротив строки «Калибровка и дополнительные настройки».
- В открывшемся окне можно откалибровать левый и правый стики, отметив «мертвую» зону, после чего протестировать работу.
- Щелкните по «Готово» (или выберите на контроллере кнопку «B»), чтобы применить новые настройки.

Другие возможности, которые предлагаются в разделе «Настройки» в Steam, рассматривать не будем, поскольку их доступно довольно много. Достаточно изучить дополнительные опции и активировать с помощью тумблера нужные.
Наша группа в TelegramПолезные советы и помощь

This tutorial will show you how to calibrate a Xbox Wireless Controller for your account on a Windows 10 or Windows 11 PC.
If you are having trouble (this could include joystick drift, awkward calibration, or controls not responding as expected) with your Xbox Wireless Controller connected to your PC, you can calibrate the controller to help get 100% accuracy again.
Movement accuracy issues with a game controller can happen with wear and tear.
Contents
- Option One: Calibrate Xbox Wireless Controller
- Option Two: Reset Xbox Wireless Controller Calibration to Default
Option One
Calibrate Xbox Wireless Controller
1 Connect the Xbox Wireless Controller you want to reset its calibration.
2 Open Game Controllers (joy.cpl) settings.
3 Select the game controller you want to reset, and click/tap on Properties. (see screenshot below)

4 Click/tap on the Settings tab, and click/tap on the Calibrate button. (see screenshot below)

5 Click/tap on Next. (see screenshot below)

6 Leave the left thumbstick centered on the controller, then press a button on the controller. (see screenshots below)

7 Move the left thumbstick around all corners on the controller, then press a button on the controller. (see screenshots below)
8 Leave the left thumbstick centered on the controller, then press a button on the controller. (see screenshots below)
9 Press the left trigger (z axis up) and right trigger (z axis down) on the controller, then press a button on the controller. (see screenshots below)

10 Press the right thumbstick (X Rotation) left and right on the controller, then press a button on the controller. (see screenshots below)
11 Press the right thumbstick (Y Rotation) up and down on the controller, then press a button on the controller. (see screenshots below)
12 Click/tap on Finish to save your calibration. (see screenshot below)
13 Test your calibration by moving the thumbsticks and pressing buttons on your game controller. Click/tap on OK when finished. (see screenshot below)
14 Click/tap on OK. (see screenshot below)
Option Two
Reset Xbox Wireless Controller Calibration to Default
1 Connect the Xbox Wireless Controller you want to reset its calibration.
2 Open Game Controllers (joy.cpl) settings.
3 Select the game controller you want to reset, and click/tap on Properties. (see screenshot below)
4 Perform the following steps: (see screenshot below)
- Click/tap on the Settings tab.
- Click/tap on the Reset default button.
- Click/tap on OK.
5 Click/tap on OK. (see screenshot below)
That’s it,
Shawn Brink
By Marie Gabrielle
0 comments

Microsoft has done an excellent job ensuring compatibility between Xbox and Windows. However, before you can utilise the Microsoft answer, you’ll need to calibrate the Xbox One controller. Problems with the game’s axis, drifting controls, thumbstick sensitivity, and so on are all corrected. The controller may be returned to restore its silky smoothness.

My Xbox One Controller Cannot be Calibrated; What Do I Do?
The controller being out of calibration is a typical cause of these problems. You have upgraded the controller for your Windows computer. If you haven’t used the PC controller in a while, it may not recognise your movements. After installing an update, Steam, Epic Games, or Windows may alter your controller’s settings automatically. Wearing and tear, dust, and rust may all be indicators of physical damage to a controller.
The Tool to calibrate Xbox One controller comes included with Windows 10 and Windows 11. If you have a USB-compatible gamepad, you can use it with this.
Please make sure your Windows computer can detect the controller before attempting any other alternatives.
In what ways can you adjust the sensitivity of your Xbox One controller?
Resetting the preferences is the first option. Manually calibrating a peripheral device may be challenging. Thus, testing it beforehand is recommended. Furthermore, the option may be used in case the manual calibration fails.
- Just connect the USB wire from your controller to your computer. These procedures are not Bluetooth or wifi compatible. To calibrate Xbox One controller in Windows can only be activated by physically attaching a controller to the computer.
- Simply put «Control Panel» into the search bar on Windows to open it.
- Select «Printers and Other Devices.» From the menu that displays, select «Devices and Printers.»
- Select Game Controller Settings by right-clicking the controller icon in the Devices and Printers menu.
- Select the Settings option from the menu. Select Properties from the menu on the controller’s right side.
- You may return to factory settings by accessing the settings menu. To access the settings, choose the cogwheel in the upper left corner. You may choose between Default Settings and Calibrate Xbox One controller on the menu. Choose your default settings by clicking the button.
- Put away the equipment Select the Default option, and then hit OK twice to exit the tool.
- Perform a check of the calibration. Finally, you should try out your controller on a PC. The only way to see how well it works is to utilize it.
Please go on to the next solution if this one doesn’t work. Instead of starting over with a factory reset, you might instead do a manual calibration.

Methods for Manually Adjusting the Calibrate Xbox One controller Dial
For a manual adjustment, we’ll use the same menu as before:
- Enter the Settings Menu and navigate to the Options menu on your Game Controller. Keep in mind that you need to right-click the device in the hardware menu under Devices and Printers. After that, choose the primary menu item.
- We need to go back into the settings menu and choose «Calibrate.» Just keep clicking «next» and doing what it says.
- The next step is to navigate by circling each corner with the D-Pad (the left thumbstick) while pressing a button on the controller. You may also see raw data by selecting the option down below.
- If you want to make sure the D-Pad is centered, you need to do what you already did, which is to keep your left thumbstick in its original position.
- The following step is to raise and lower the Z-Axis, then shift it completely to the left and right. When you’re finished, go to your controller’s «next» button and pick «raw data.» When you calibrate the Xbox One controller of the motion parameters, the wizard will show a % box.
- To move the right thumbstick left and right after adjusting the X axis, press and release the thumbstick’s middle button. To achieve this, press a controller button and then choose «Next» from the menu that appears. The level of accuracy you have reached will be shown as a percentage by the wizard.
- Adjust the Y-Axis It’s now time to address the Y-Rotation. The right thumbstick may be moved down and up. When you’re done, hit a controller button and then click Next.
- Click on the Test tab to test it out, then Apply to apply the adjustments and OK to complete the process.
Reading next
Microsoft has done a fantastic job to ensure Xbox and Windows work together. Pairing controllers to your PC is often super easy, often a matter of plugging a USB cable or turning on the Bluetooth. However, sometimes, you may need to intervene for some manual changes.
Gamers know how important it is to maintain and care for their gear. Part of the job is making sure your controllers are in great condition. In particular, wrong settings can damage your aiming, precision, movement, and more.
Therefore, one of the most significant manual changes is calibrating Xbox One controllers. It fixes axis issues, drift movement, thumbstick sensitivity, and similar. In essence, recalibrating the controller will bring back the smooth feel of a factory condition controller.

Why Is My Xbox One Controller Not Calibrated?
You will know you need to calibrate Xbox One controller when you’re having trouble playing. Wrong calibration settings produce random movement during your playtime.
In particular, the issue may rely on the Axis, which is your X-Y-Z movement and perspective.
A non-calibrated controller is a common issue on these occasions:
- You’re using a new controller on your Windows PC
- You’re using a very old controller on your Windows PC
- You haven’t used the controller for a while on your PC
- Steam, Epic Games, or Windows automatically changed your controller’s settings after an update
- There’s physical damage like wear, tear, dust or rust in the controller.
For all causes, the steps are the same. Bear in mind that Xbox One calibration has nothing to do with your PC’s drivers or the controller’s firmware. Either way, keeping both up to date is best to avoid connectivity issues.

How to Calibrate Xbox One Controller?
Windows 10 and Windows 11 PCs have a built-in program for the job, the Calibration Tool.
This works with any controller you plug via a USB cable, including any PlayStation, Xbox One, Xbox Series, Nintendo Switch, or any generic controller. So, our instructions can help you calibrate any controller you have.
There’re three ways to calibrate Xbox One controller on Windows 10:
- Reset the settings to default
- Calibrate the controller manually
- Calibrate the controller via Steam
Before trying one of the three solutions, please make sure your Windows PC recognizes the controller.
How to Reset the Xbox One Controller Calibration?
The first method is resetting the settings. It’s a good idea to test it before manually calibrating the peripheral, as it can be tough. Additionally, you can always engage the option if the manual calibration goes wrong.
- Plug your controller into the PC via a USB cable.
These steps don’t work wireless or via Bluetooth. Only by connecting a controller to the PC can Windows engage the Calibration tool. - Open the Control Panel
Type “Control Panel” on your Windows search bar and open “Control Panel.” - Go to “Devices and Printer.”

Click on “Devices and Printers” on the Control Panel menu.
- Go to your Game Controller Settings
On the Devices and Printers menu, right-click on your controller’s icon and select Game Controller Settings.
- Go to Properties
Inside the controller’s menu, click on Properties at the bottom right. - Go to Settings and Reset to Default
Click at the top left for the Settings menu. The menu has two options: Reset to Default and Calibrate. Click on Reset to Default. - Close the tool
After selecting the Default option, press OK to close the tool and OK again. - Test the calibration
Finally, test your controller by playing on your PC. There’s no better way to see its performance than actually using it.


If it’s not working properly, please continue to the next method. Alternatively, you could start with a manual calibrate instead of resetting to default.
How to Calibrate Xbox One Controller Manually?
We’re going back to the same menu as before for a manual calibration:
- Go to Control Panel
- Select Devices and Printers
- Go to your controller’s Game Controller Settings
Remember to right-click on the peripheral at the Devices and Printers hardware menu. Then, click on the first option in the drop-down menu. - Choose to Calibrate on Settings
Back at the settings menu, we’re now to press the Calibrate option.
- Follow the wizard

Your PC will launch a calibration wizard. Click next, and follow the instructions.
- Center the D-Pad

The first instruction is leaving the D-Pad (or the left thumbstick) centered and then pressing a button on the controller. After you’re done, click Next.
- Find the corners with the D-Pad

Next, you need to move the D-Pad (the left thumbstick) around the corners. Then, press a button on the controller and click next. Additionally, you can check the Display Raw data box below to see your progress.
- Verify D-Pad center
You need to repeat a previous step by leaving the left thumbstick at the center.
- Calibrate the Z-Axis

The next step is moving the Z-Axis up and down. That means moving the left and right sticks all the way and then down. After you finish, press a button on your controller, and click next. Once again, check the raw data box.
The wizard will display a percentage box, letting you know when you finish calibrating the Z-Axis movement settings.
- Calibrate the X-Axis
Now, it’s time to set up the X Rotation. That means moving the right thumbstick left and right. After you finish, press a button on the controller, and click on next.
As before, the wizard showcases a percentage bar to let you know your completion. - Calibrate the Y-Axis
Now it’s time to fix the Y-Rotation. You can move the right thumbstick down and up. After you finish, press a controller button and then click on Next.
- Finish the process

Lastly, click on Finish to close the wizard and save its settings.
- Test the settings
Now, go to the Test tab and test the calibration. You can press your buttons to try it out. When you finish, click on Apply and then on OK.
- Test the controller on games
If everything goes your way, you could test the controller on your games. Often, after you calibrate Xbox One controller, it will be as good as new.


How to Calibrate Xbox One Controller on Steam?
There’re various third-party software calibration features, but we recommend using Stream to calibrate the Xbox One controller. Bear in mind that the Epic Games launcher doesn’t have calibration options.
So, we’re recommending Valve’s storefront, as most PC games already have a Steam account and use the app to buy and play games.
Moreover, Steam allows you to fine-tune the controller on a game-by-game basis, even if these games don’t support USB controllers. It’s a great all-around tool to use.
Here’re the steps:
- Open the Steam app
Type “Steam” on your Windows search bar, and open Steam.
- Open Big Picture Mode
Click on View on the top menu and click on Big Picture Mode. It will open a windowless, full-screen Steam UI.
- Go to Settings
Click on the settings cog at the top right of the Big Picture Mode.
- Go to Controller Settings
On the Settings menu, click on Controller Settings.
- Open the calibration tool
Check on the controller you want to activate (for example, Xbox), and click Calibrate.
Checking the Configuration box of a controller will make Steam install the drivers it needs. However, it will ask you to restart the app to apply the changes. - Enable “Lock Out Joystick Navigation.”
Start by clicking the Joystick Navigation option. It will allow Steam to complete the process automatically.
- Enable the Full Auto Calibration
Press the Full Auto Calibration button next.
- Follow the calibration wizard instructions
The first part of the wizard will ask you to move the analog sticks in different directions. It will complete the basic Xbox One controller calibration.
When the wizard finishes, Steam will close it automatically. - Select Calibrate again
Now, we’re going through a more complex process. For that, you need to click on the Calibrate option again. - Lock Joystick Navigation
This time around, lock the Joystick Navigation option by clicking the box.
- Adjust the sticks’ “deadzones”
Now, you can move the sliders to adjust the stick’s deadzones. These areas around your controller’s thumbstick don’t respond to movements.
It helps worn-out sticks to function if they can’t sit still. If your controller is fresh-new, you can leave the setting at zero or near zero. Better yet, adjust it until you feel comfortable.
- Return to the Controller Settings menu
After adjusting the deadzones, go back to the Controller Settings menu. There’re, you’ll see the games you have in your library, and you can choose each one to adjust the exact settings you want.


While playing games, precise and accurate movements are very important for a frequent game player.
We always recommend a controller to play video games. So calibration is very important when you connect your controller to your PC, but it does not matter whether you connect it through a USB cable or through Bluetooth.
Many players don’t know how to calibrate the controller. This article will assist you in calibrating your controller effectively in different ways.
Why Do You Need Calibration on Your Xbox One Controller?
In some circumstances, like trouble playing, you can identify that your controller needs to be calibrated. If you experience any random movement while playing, it is because of the wrong calibration.
When you are using a new controller on your PC, the controller may not be calibrated. If your controller is an old one, it may also suffer from non-calibration issues. The non-using controller also shows the same defect.
After the update to Windows, Steam, or Epic Games, the settings of the controller may change automatically. Tears, dust, and wear can cause physical damage. In these situations, calibration is very essential for proper functioning.
How Do I Reset My Xbox Controller Calibration?
Windows 10 PCs have features like the calibration tool. It is suitable for all USB controllers, including PlayStation and Xbox controllers.
Before doing the calibration, you need to reset the controller calibration to default. This can solve minor issues and give a refreshment.
To reset controller calibration by default follow below steps.
- Be sure that your controller is connected perfectly to your PC and that it is readable by it.
- Then navigate to the device and printer settings.
- Click on your controller after finding it by pressing the right button of your mouse.
- From the dropdown option, go to game controller settings.
- Choose properties from the new window.
- The properties window will open; from there, click on the settings tab.
- Now you will get the option to “reset to default” and hit the OK button to end it.
- Again, click OK on the game controller window.
Now the controller is in factory calibration, and you can close the window for devices and printers.
Using Windows Inbuilt Setting
First, connect your controller to your PC, so you can find it in the device manager section.
- Open the “Control Panel”.
- Navigate to the “Devices and Printers” option.
- In the hardware section, go to your “Game Controller” and right-click on it.
- Choose “Controller Settings” from the dropdown box.
- The right controller is a must. Go to “Properties”.
- From the window, select “Settings” and then click on “Calibrate”.
- A new window will appear.
- Wait a few seconds to execute the calibration process, and then the option will appear next. Select it.
- First calibration of your D-Pad. If you press next, they will ask you to press all D-Pad buttons. After one button press, hit the next option. It will proceed with the calibration process.
- Next X Rotation is the right-hand joystick. To calibrate this axis, you need to move the right joystick left and right, but after you see a blue bar moving left and right on the screen, go to Next.
- Y Rotation. Here, you should move your joystick up and down. When the blue bar appears and moves left and right, click on the next option on the bottom right side.
- Z Rotation. You can pull the left trigger of your controller, and it will be considered the Z axis by your PC. You will see a blue bar increase and decrease on the screen when you hit the next button.
- Now you will get a message in the window. That means you have calibrated your device.
- Choose the finish option to finish the process.
- Check that everything is working properly, then click “OK” on that window.
- Now you will reach the actual controller settings window; click “OK” there also.
Using the Steam App
First, connect your controller to your PC, so you can find it in the device manager section.
- Open the “Steam” client.
- Click on the view section at the top and choose “Big Picture Mode“ from the options.
- From the new window, select the “settings” icon. Select “controller settings” from the “Controller” menu.
- Find your controller, then click on “Calibrate”.
- Allow the option “Lockout Joystick Navigation”.
- Then choose “Start Full Auto Calibration“.
- Now you need to follow the instructions and move the analog sticks in different directions, each 10 times.
- Once you finish it, go back.
- Again, select “Calibrate”.
- You can see the option “Lockout Joystick Navigation” on the screen; select that option to turn it off.
- You need to adjust both sticks’ dead zones until you feel comfortable with the settings.
- Proceed to the “Controller Settings” screen after you finish the above step.
- Note: On Xbox, you can adjust settings for a specific game.
- For this from the controller settings window, select “Xbox Configuration Support” or any option that you want according to your controller.
- Then choose the game you want to adjust, and then go through the settings if you want.
Calibrate The Controller Device Checker Tool
There are some websites that you can use to calibrate your controller. Controller Tester is one of those programs.
It is a web based tool which your browser will support to execute, and it is very tough to use. Even though it works perfectly to calibrate your controller.
Loading an FPS or any racing game needs precise inputs to excel in playing games.
- First, connect your controller to your PC.
- Then open your browser and go to the Device Checker Gamepad Tester Webpage to calibrate your controller.
- Hit the button that shows on the screen, or the START button will be there on the screen.
- After the process, you will get a better gameplay experience when you check it out.
FAQs
Can You Recalibrate Your Xbox One Controller?
- Click the controller with the right mouse button, then choose “Game Controller Settings”.
- Make sure you choose the appropriate controller.
- After that, select “Properties.” In the new window, select the “Settings” tab.
- Choose the “Calibrate” option to recalibrate your controller.
How Do I Calibrate My Xbox One Controller Drift?
- First, you need to check the button mapping on your console.
- You must open the guide by tapping the Xbox button..
- Then select settings, which will be located under the profile and system options.
- From the options, go to device and connections and click on accessories.
- Select the Xbox wireless controller to open the option.
- From the open window, select the configure option.
- Go through the current mapping for each of the buttons on your controller thoroughly.
How Do I Reset My Xbox Controller Sensitivity?
- Launch the Xbox Accessories application.
- Select Configure when you’ve scrolled to your Xbox Adaptive Controller.
- Choose a profile to modify or start a new one.
- Choose the Edit button, then pick a sensitivity setting from the Left Stick or Right Stick tabs.
Does Calibration Fix Drift?
Yes,we can resolve the controller drift issue by recalibrating your control sticks in the Switch settings.
Conclusion
If you are a frequent videogame player, the calibration of your controller is an important and effective feature to get accuracy in gameplay.
The methods that I mentioned above will definitely direct you to calibrate your controller in a perfect way within a few minutes and without any failure.