
Connect the Windows 11 or 10 remote desktop from Kali to access it like we have physical access to the remote machine. In this tutorial, we will use Remmina to easily use the Remote Desktop Protocol on Kali Linux.
Remote Desktop to Windows from Kali Linux1. Enable RDP on Windows 11 or 102. Allow RDP in Windows Firewall3. Access Kali Command terminal4. Installing Remmina on Kali Linux5. Connect Windows from KALI via RDP6. Adjusting Resolution
Remote Desktop Protocol (RDP) is available on all Windows systems because it was developed by Microsoft to connect and use remotely available Windows systems like physical ones. But we can use this protocol on Linux systems as well with the help of some third-party applications such as RDesktop, Remmina, and more…
Making our Linux system capable of using RDP will streamline the job of technical support representatives, IT professionals, and network administrators who need to maintain and troubleshoot remote systems without being physically present.
Before performing this tutorial, you should have the following:
- A Kali Linux machine with internet connectivity.
- Sudo Access User account
- Network access between the Windows and Kali Linux machines (they must be able to communicate).
1. Enable RDP on Windows 11 or 10
By default, Windows will not allow remote computers to access it using the RDP because it is not enabled. Also, make sure you are using at least the Windows Pro edition because the Home edition doesn’t have this feature.
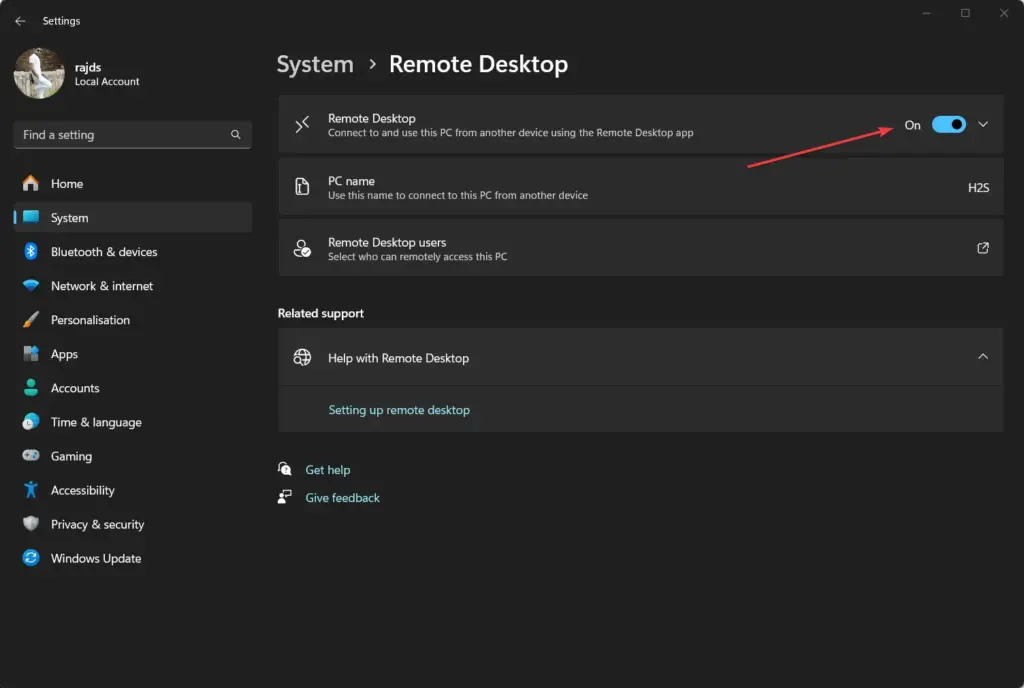
To turn ON the Remote Desktop Protocol, press the “Win+I” key on your keyboard to open Settings. After that navigate to System and from the right side given options, select “Remote Desktop“.
After that, use the mouse to click on the toggle button given for “Remote Desktop” to enable it.
2. Allow RDP in Windows Firewall
Even though by default RDP will be whitelisted in the Windows firewall to accept the remote connections. However, to check whether it is allowed in the Firewall or not, you can go to the Windows Start menu and search for “Allow an App through the Firewall“, as it appears, click to open it.
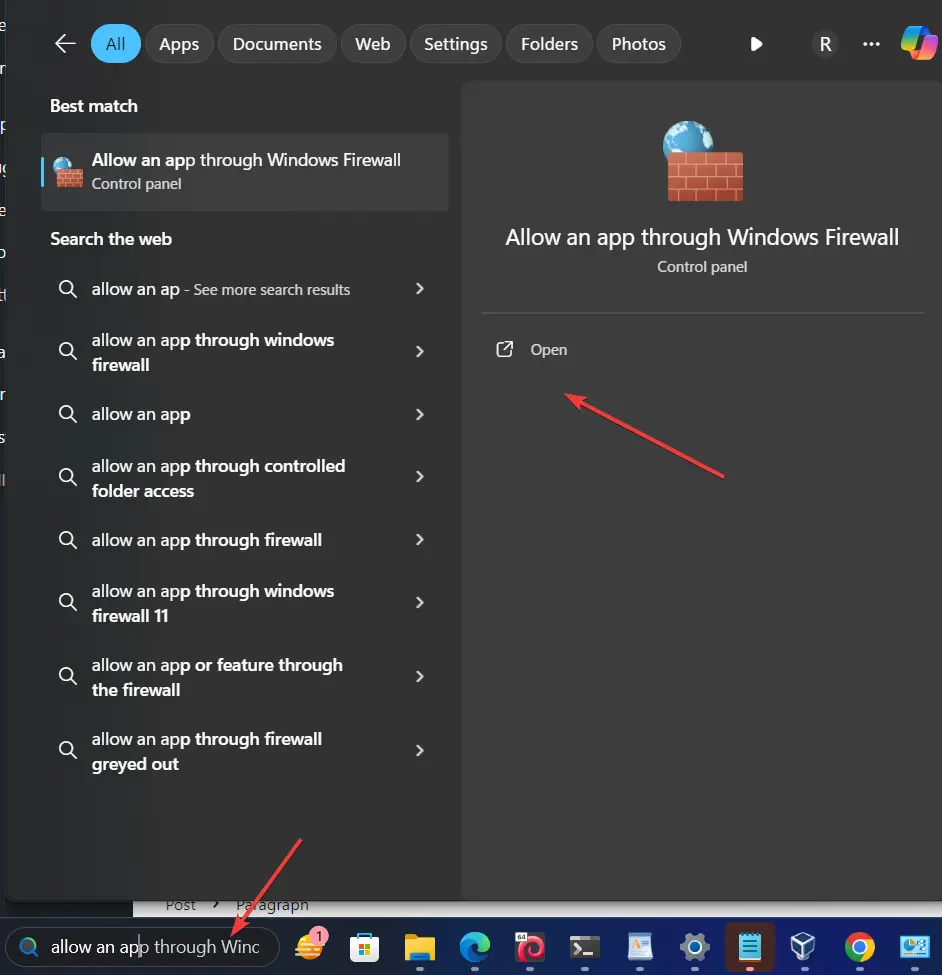
Click on the Change Settings button and then mark the “Remote Desktop” box; after that click on the OK button to apply the changes.

3. Access Kali Command terminal
Kali Linux already comes with a command line tool called “Rdesktop” to access the remote machines using RDP, however, Remmina is much better and easy because of GUI. Therefore, open your command terminal and first run the system update command:
sudo apt update && sudo apt upgrade4. Installing Remmina on Kali Linux
After updating the system, use the system’s default APT package manager to install the Remmina software which is available to install through the default system repository of Kali Linux.
sudo apt install remmina5. Connect Windows from KALI via RDP
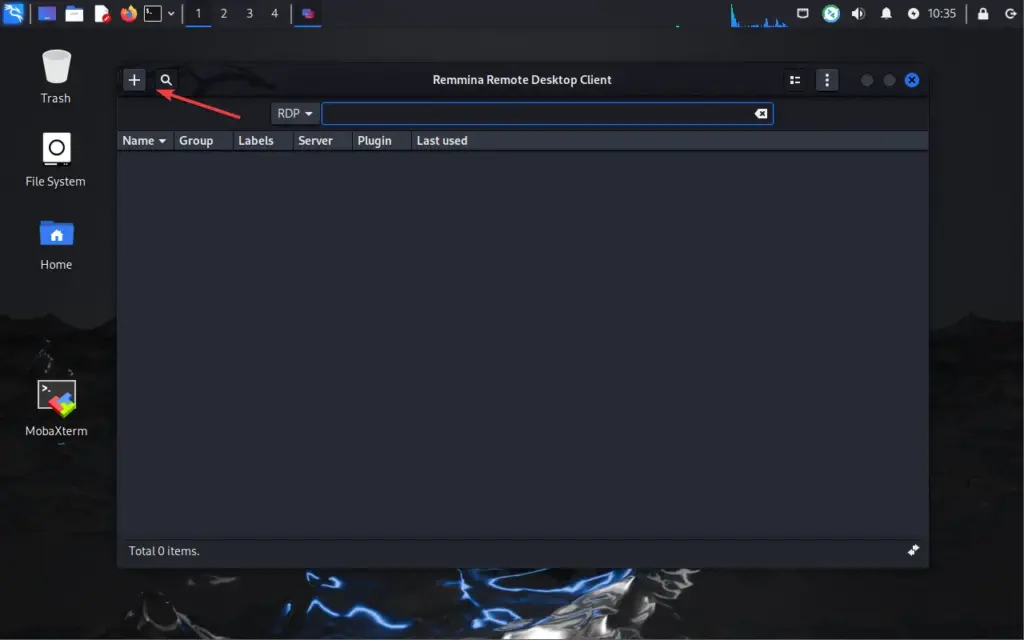
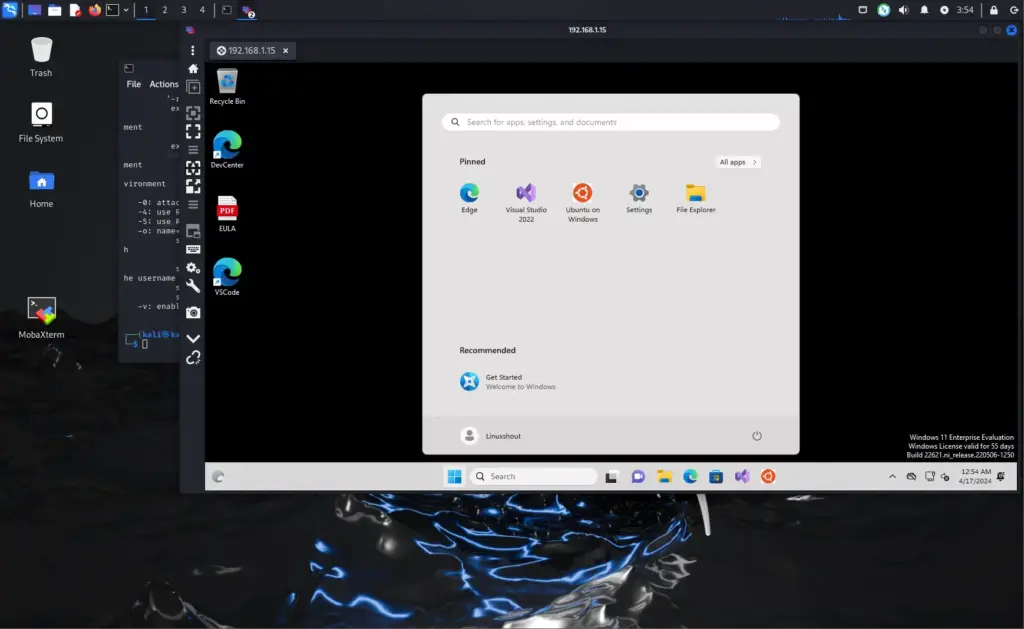
Finally, after installing the Remmina, go to the Application menu and search to open it. There on the software, click on the icon given on the top left side of Remmina to create a “New Connection profile“.
In the Server column, add the IP address of the Windows 11 or 10 system that you want to access using RDP on a Linux system. Let the protocol be RDP selected.

Moving forward, also add the username and password of the user account of the same Windows system as well. Once done, click on the “Save and Connect“. Accept the Certificate, to establish the connection by trusting the remote computer.
6. Adjusting Resolution
If you are facing any problems, in terms of resolution, after adjusting the remote display, click on the icon – “Toggle dynamic resolution update” given on the menu.
This was the simplest way to log in to Windows remotely from Kali Linux and access its Display using the Remote Desktop protocol. Although we tried to make this guide as simple as possible, if you are facing any problem the comment section is all yours…
If you want to access the Kali from windows then can refer to our article – Access Kali Linux Remote Desktop from Windows via RDP
DesktopECHO/Kali-xRDP
Use Git or checkout with SVN using the web URL.
Work fast with our official CLI. Learn more.
Launching GitHub Desktop
If nothing happens, download GitHub Desktop and try again.
Launching GitHub Desktop
If nothing happens, download GitHub Desktop and try again.
Launching Xcode
If nothing happens, download Xcode and try again.
Launching Visual Studio Code
Your codespace will open once ready.
There was a problem preparing your codespace, please try again.
Latest commit
Git stats
Files
Failed to load latest commit information.
README.md
Other distributions available: KDE Neon (kWSL) and Ubuntu 20.04 (xWSL)
Kali-xRDP is a script that installs xRDP and XFCE 4.16 on top of Kali Linux from the Windows Store. Win-KeX is the better-known method for running a GUI in WSL, but only works with Windows 10 1903+ on WSL2, whereas this project was created to work well in WSL1 or WSL2. It includes optimizations and visual tweaks for a smooth and responsive desktop experience. Display scaling is configured automatically and works on everything from standard unscaled displays all the way to xHiDPI (250%+) displays such as the Microsoft Surface.

Kali-xRDP works with Windows 10 version 1809 onwards, Windows Server 2019/2022, Server Core, or Hyper-V Server. Running Kali in WSL1 may be useful for users on older hardware without VT-d, or in a virtual machine without nested virtualization support. Note that WSL1 has limitations in its networking stack that prevent some of Kali’s included tools from working as they should, so it’s advisable to run Kali in WSL2 unless you’re prevented from doing so for the reasons listed above. That said, ZenMap is pre-installed and able to run TCP-only portscans in WSL1.
The install script is meant to be run on a new Kali Linux installation from the Microsoft Store. If Kali is not installed on your system it will download the .AppX image directly from Microsoft and install it for you.
INSTRUCTIONS: Open a NEW elevated command prompt window (admin rights are required to open firewall ports for RDP and SSH) then type/paste the following command:
You will be asked a few questions. The installer script determines the current Windows DPI scaling of your system but you may set your own if preferred:
The script will download the LxRunOffline distro manager to bootstrap the installation. Install times will vary depending on system performance and the presence of antivirus software. A fast system with broadband Internet can complete the install in under 10 minutes and most machines will complete within 20 minutes. Expect it to take 30+ minutes if Windows Defender is running. If you want to track progress logs are located in %TEMP%\Kali-xRDP.
At the end of the script you will be prompted to create a non-root user which will automatically be added to sudo’ers.
A fullscreen remote desktop session will launch Kali using your stored credentials.
Configure Kali-xRDP to start at boot (like a service, no console window)
- Open the Windows Task Scheduler
- Right-click the task in Task Scheduler (kali-linux) and click properties
- Click the checkbox for Run whether user is logged on or not and click OK
- Enter your Windows credentials when prompted
Reboot your PC when complete and the xRDP service in Kali will startup automatically with your system.
Start/Stop Operation
- Start (or restart) the instance: schtasks /run /tn kali-linux
- Terminate the instance: wslconfig /t kali-linux
Convert to WSL2 instance
If your computer has virtualization support you can convert the instance to WSL2 (and back to WSL1 if needed.)
- Terminate the instance: wslconfig /t kali-linux
- Convert the instance to WSL2: wsl —set-version kali-linux 2
- Restart the Instance: schtasks /run /tn kali-linux
Make it your own:
From a security perspective, you should fork this project so you control the packages and files in the repository. This also allows you to customize the installer in any way you prefer:
- Sign into GitHub and fork this project
- Edit Kali-xRDP.cmd . On line 2 you will see SET GITORG=DesktopECHO — Change DesktopECHO to the name of your own repository.
- Customize the script any way you prefer.
- Launch the script using your repository name: PowerShell -executionpolicy bypass -command «wget https://github.com/YOUR-ORG/Kali-xRDP/raw/main/Kali-xRDP.cmd -UseBasicParsing -OutFile Kali-xRDP.cmd ; .\Kali-xRDP.cmd»
Additional Info:
- Rebuilt WebKitGTK 2.32 for WSL
- When you log out out of a desktop session the entire WSL instance is restarted, equivalent to a clean-boot at every login.
- Disconnected sessions continue to run in the background and resuming your session works reliably.
- Enabled gksu for apps needing elevated rights (Synaptic, root console) to work around limitations in WSL1.
- apt-fast added to improve download speed and reliability.
- Mozilla Seamonkey included as a stable browser that’s kept up to date via apt. Current versions of Chrome/Firefox do not work in WSL1.
- Installed base image consumes approximately 3GB of storage
- Minor visual tweaks were made and fonts in XFCE4 are supplied by the host OS (Segoe UI / Cascadia Code)
Источник
Ethical hacking and penetration testing
InfoSec, IT, Kali Linux, BlackArch
How to connect to Windows remote desktop from Linux
RDP (Remote Desktop Protocol) clients exist for many platforms, even for mobile phones, of course, there are RDP clients for Linux as well
We will look at 2 RDP clients for Linux
- freerdp is a free implementation of the Remote Desktop Protocol (RDP)
- rdesktop is an open source client for remote desktop windows services
How to use freerdp
To install freerdp on Debian, Kali Linux, Linux Mint, Ubuntu and derivatives, run the command:
If the freerdp2-x11 and freerdp2-shadow-x11 packages are not found, look for a package named freerdp.
To install freerdp on Arch Linux and derivatives, run the command:
How to connect with freerdp command
To connect to the remote desktop using xfreerdp, run a command of the form:
In this command:
- /f is option means to open the remote desktop in full screen mode
- /u:USERNAME is a name of the account on the computer to which we are connecting
- /p:PASSWORD is a password of the specified account
- /v:HOST[:PORT] is an IP address or name of the computer to which the remote table is connected. PORT optional (recommended: “Windows Computer name: how to change and use”)
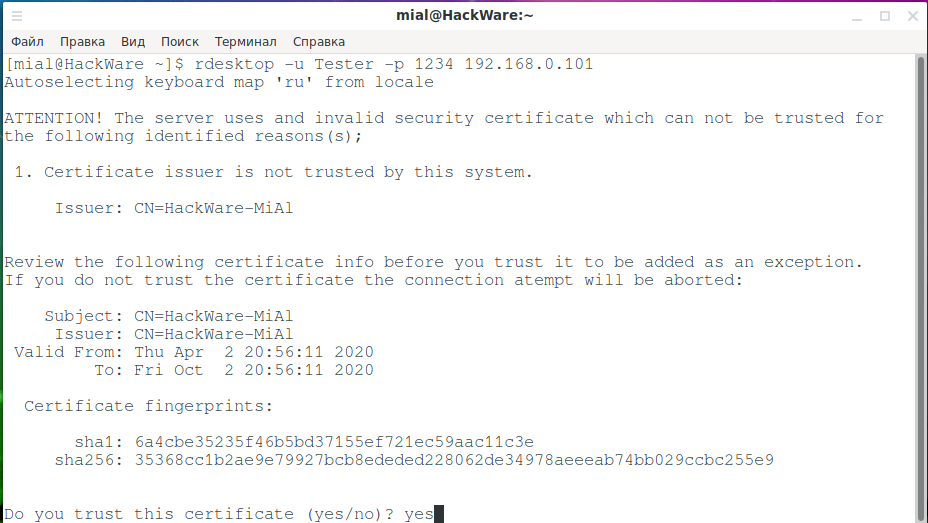
For example, I want to open a remote computer desktop with IP address 192.168.0.101, on which there is a Tester user with a password of 1234, and I want to open a remote working collision in full screen mode, then the command is as follows:
To toggle between full-screen and windowed modes, use the keyboard shortcut Ctrl+Alt+Enter.
When connecting for the first time, the following message about the problem with the certificate appears:

Since self-signed certificates are used without a private CA (authentication center, certification authority) added to the store, the only choice is to agree to trust the specified certificate, enter Y for this.
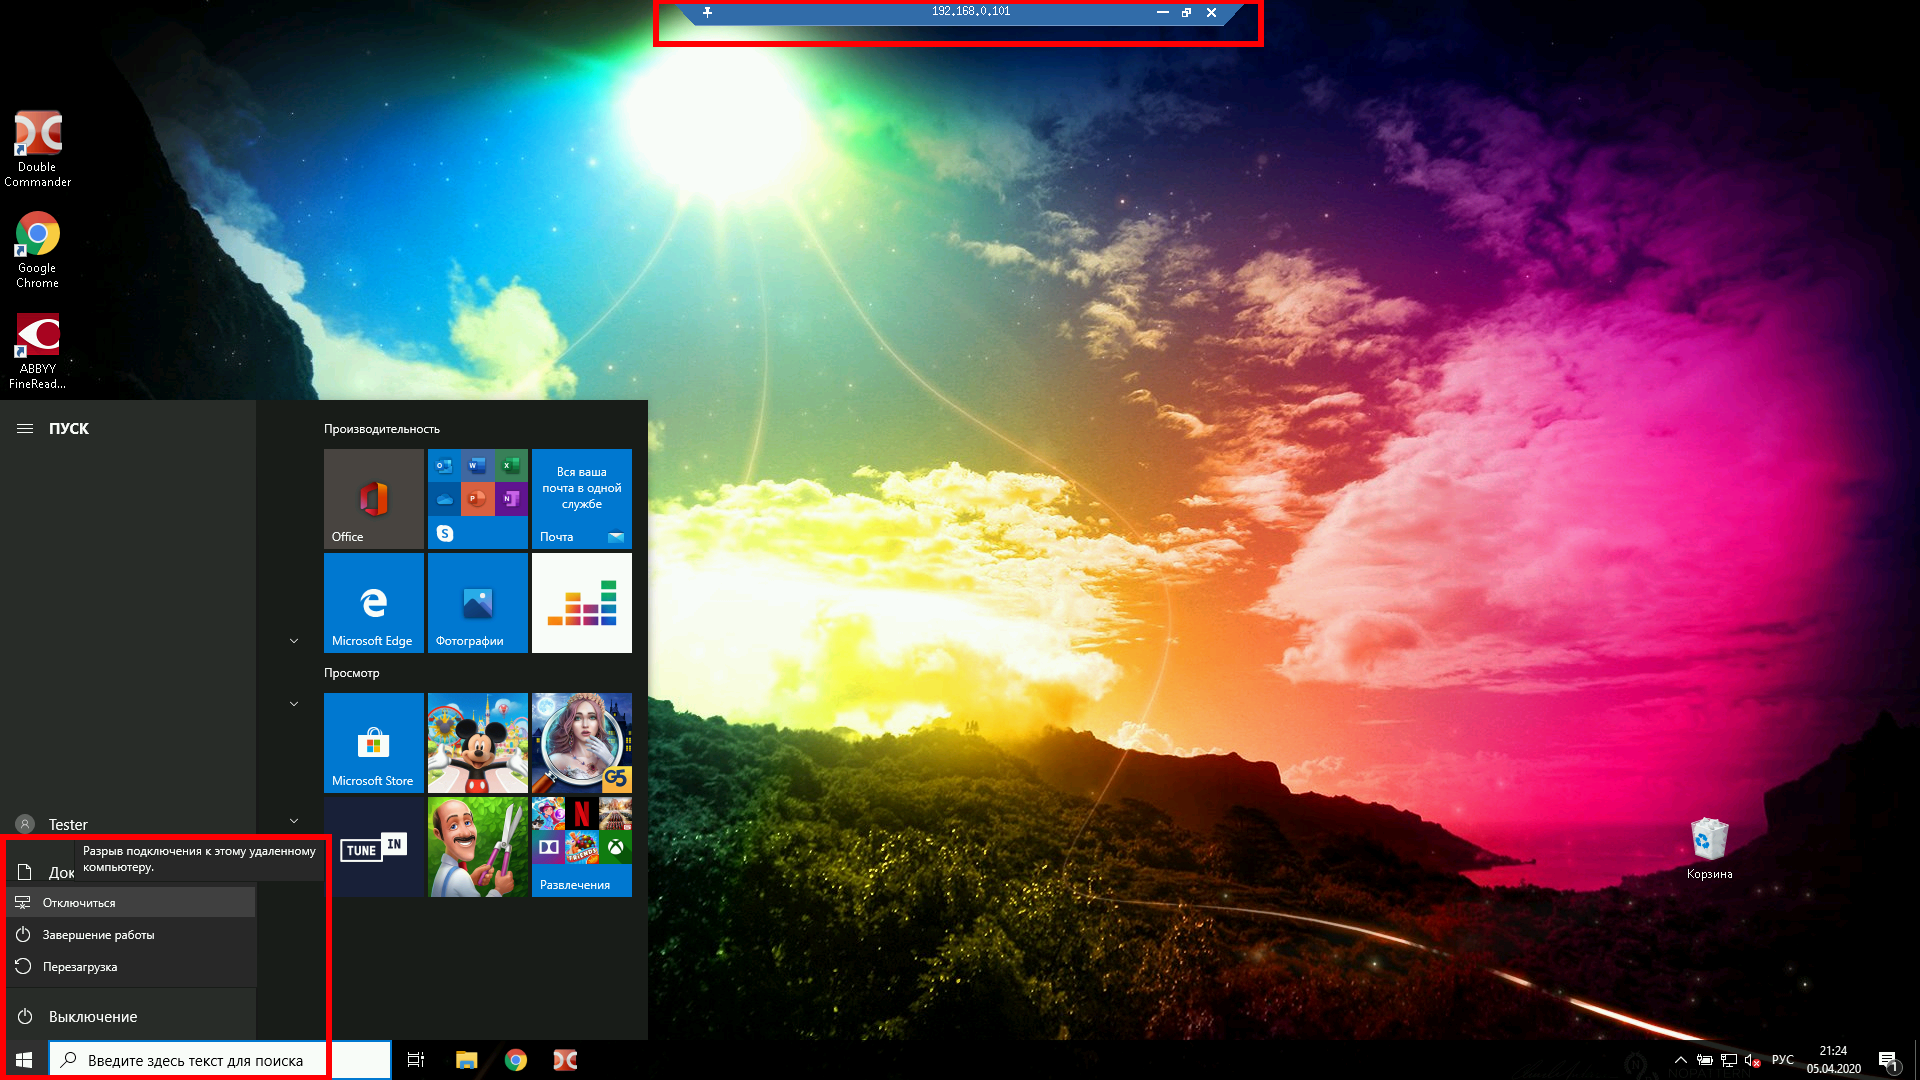
In full screen mode, you can disconnect from the remote desktop in two ways:
- press the cross on the top panel
- Start button → Shutdown → Disconnect
To run in windowed mode, do not use the /f option:
Xfreerdp options
The xfreerdp program has many options,I picked up the most interesting of them:
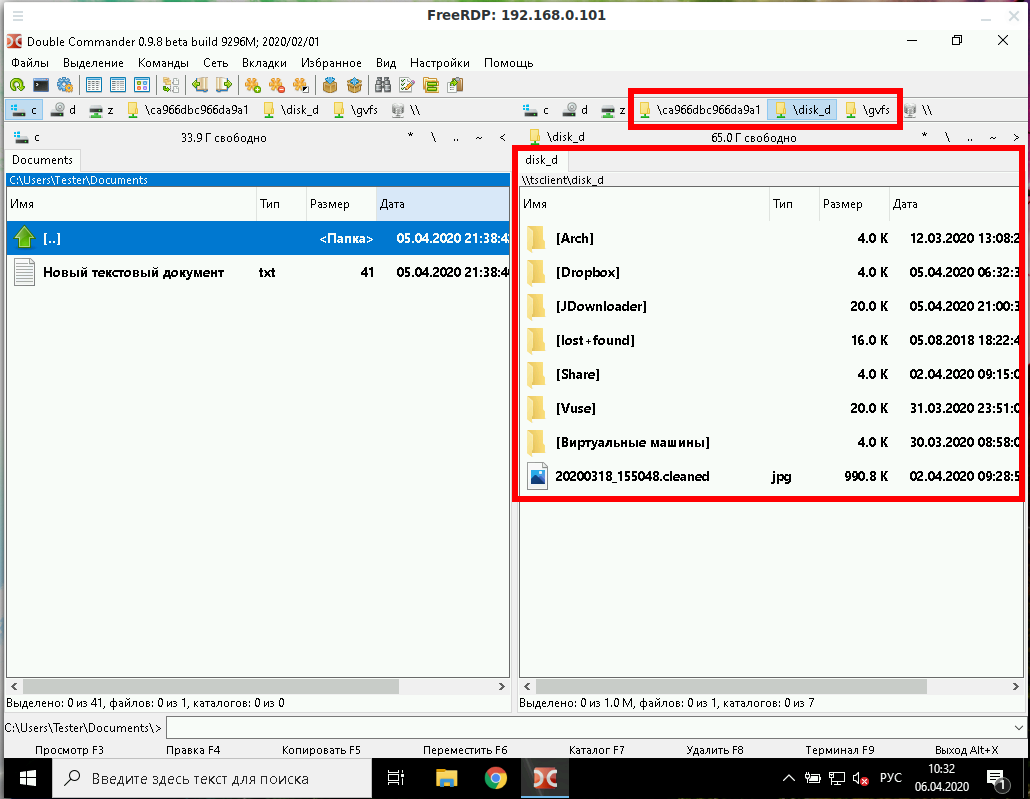
How to create shared folders in freerdp
With remote desktop connected via RDP, you can have shared folders. Let’s look at a few examples.
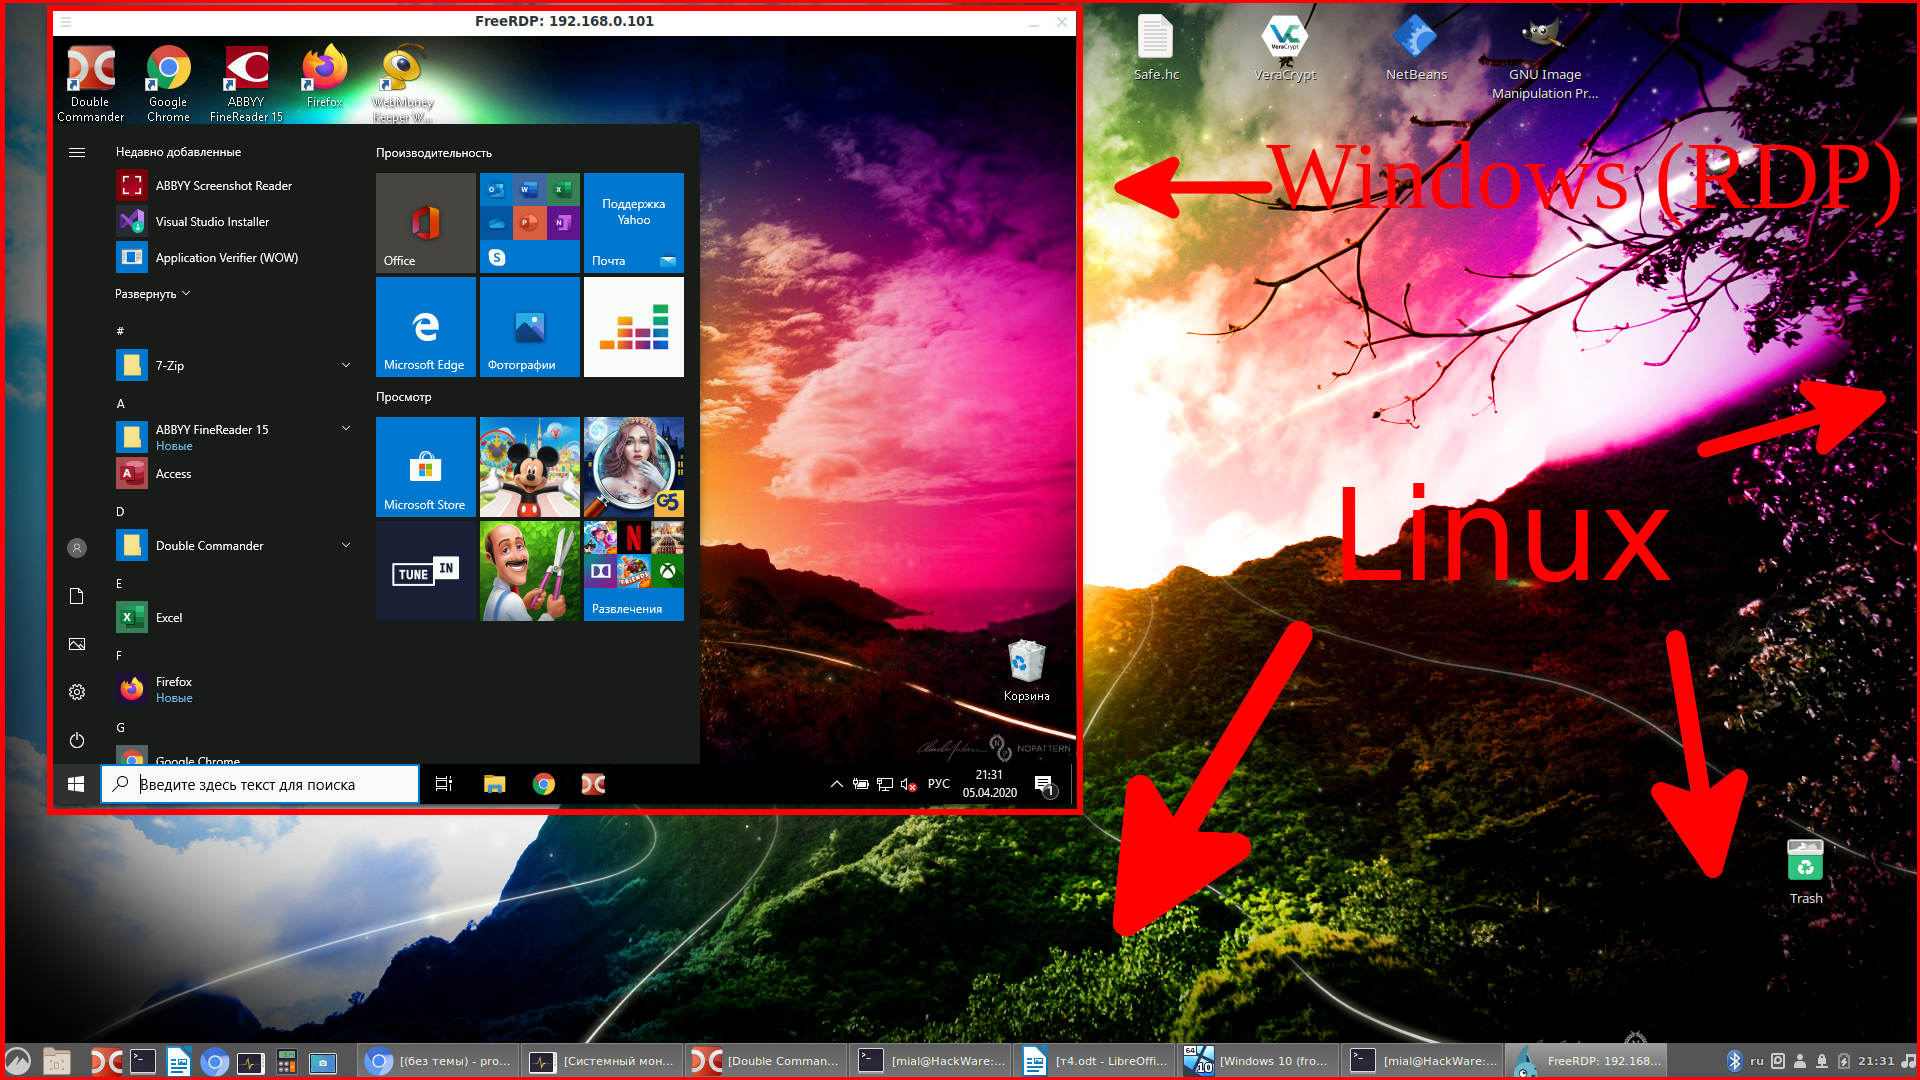
To connect all mount points in the current system as shared folders on the remote desktop, use the +drives option, for example:
The screenshot shows the remote Windows desktop, in which the Linux system folders are accessible:
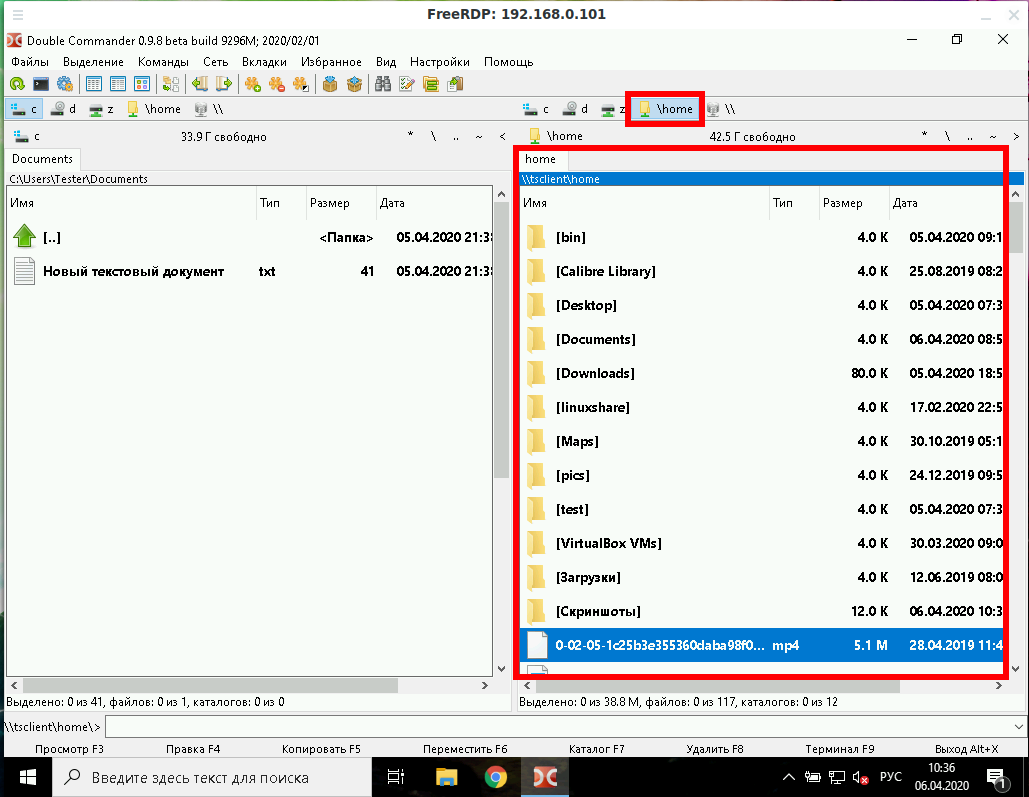
To connect only the home folder of the current Linux user as a network folder to the computer via RDP, specify the +home-drive option:
In this case, the home folder is mounted on a system connected via the remote desktop protocol:
With the option /drive:NAME,/PATH/IN/LINUX, you can connect any folder with any name. The path in the current system must be specified as /PATH/IN/LINUX, and NAME is the name that will have the share in the remote system. For example, to connect the root folder of the current system (/) to the remote folder with the root name:
How to bring remote desktop to another monitor
If you have several monitors, then you can choose which one to use for the remote system. To list the monitors, run the command:
Select the monitor (or multiple monitors) identifier using the /monitors: [,[,…]] option.
How to set the size of the remote desktop window
The following example connects to the rdp.contoso.com host with the name USER and is 50 percent of the height.
If width (w) is set instead of height (h), something like /size:50%w, then 50 percent of the width will be used.
How to use rdesktop
To install rdesktop on Debian, Kali Linux, Linux Mint, Ubuntu and derivatives, run the command:
To install rdesktop on Arch Linux and derivatives, run the command:
How to connect to remote desktop with rdesktop
To connect to RDP with rdesktop, use a command of the form:
As usual, at the very beginning there will be a problem with the certificate:
We type yes.
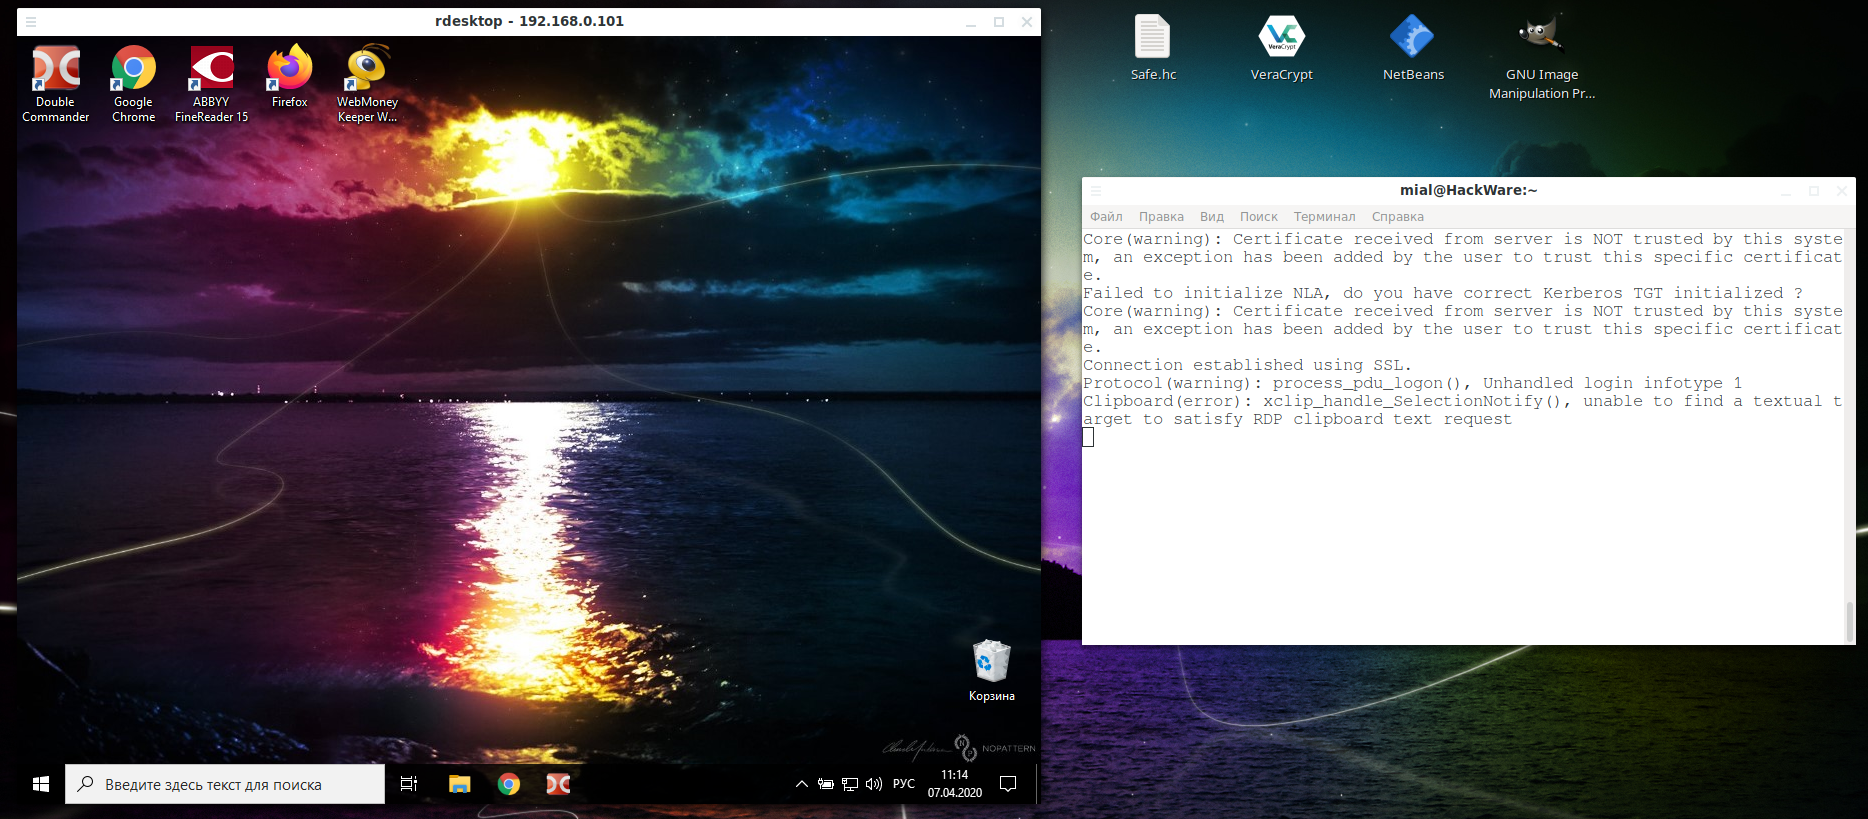
Then an error will occur:
This is because network-level authentication (Kerberos TGT) is not configured. Setup instructions at: https://github.com/rdesktop/rdesktop/wiki/Network-Level-Authentication-(NLA)
Another option that allows you to connect to Windows via RDP using rdesktop without setting up Network Level Authentication (NLA) is to disable network-level authentication in Windows. It is clear that this will weaken the security of RDP, therefore it is not recommended. But as a “quick dirty fix” this can be done as follows: Start menu → Settings → System → Remote Desktop → Advanced settings → Uncheck “Require computers to use Network Level Authentication at the to connect (recommended)”:

After that, rdesktop connection passes without errors:
In the Windows settings, you could see the link “Why allow connections with Network Level Authentication?”, It says the following:
If you want to restrict who can access your PC, choose to allow access only with Network Level Authentication (NLA). When you enable this option, users have to authenticate themselves to the network before they can connect to your PC. Allowing connections only from computers running Remote Desktop with NLA is a more secure authentication method that can help protect your computer from malicious users and software. To learn more about NLA and Remote Desktop, check out Configure NLA for RDS Connections. If you’re remotely connecting to a PC on your home network from outside of that network, don’t select this option.
How to connect from Linux to another Linux via RDP
There are no special features when connecting using the xfreerdp program, it is enough to start the RDP server, and if you use freerdp-shadow, then the /sam-file:SAM /sec:nla options are also needed:
Or run xrdp-sesman and xrdp as an RDP server.
And then the connection to Linux via RDP is the same as to Windows:
As for rdesktop, it could not be forced to work with any of the RDP servers under consideration under Linux – if you know how to do this, then write in the comments.
Источник
Kali linux rdp to windows
Kali Linux is supported on many different devices and systems. On some of those systems, you may only get a bare-bones install and occasionally may not have direct access to a GUI such as with WSL or Docker. One simple way to get access to a GUI for Kali is by installing Xfce and setting up RDP. This can be done either manually or with the script provided here, and can be seen below.
Before we can start the process of setting up Xfce and RDP, we must first acknowledge some differences with certain systems Kali is on. The first is Docker. To use this setup with Docker, we must supply a launch command like the following:
docker run -p 3390:3390 —expose=3390 —tty —interactive kalilinux/kali-rolling /bin/bash
For additional usage on Docker, such as how to resume an exited container, please read using Kali Docker images.
For AWS, we must be sure to allow our IP to access the proper ports when we set up the machine.
To use the script we do the following:
Setting this up manually will provide more control over what configuration is done, but also will take a bit longer.
If you are using WSL, dbus-x11 needs to be installed next for xrdp and xfce to connect.
After you set up Xfce and RDP, you need to start the service:
In the case of AWS, you will need to change the password to the default ‘kali’ account before connecting. This can be done with the following command:
If you are using Docker, you will need to create a new user. You can do this with adduser
You can then connect with a RDP client to that system. Keep in mind the port that is being used. If you used the script, the port would be 3390. In the case of WSL and Docker, the IP would be 127.0.0.1:3390 that you would wish to connect to from your windows system (or the host systems IP from a separate computer). In the case of AWS, the IP would be the same as you use to connect via SSH.
You may encounter the error Authentication Required to Create Managed Color Device when trying to connect. Do the following to fix this issue.
Updated on: 2022-Sep-16
Author: gamb1t
Источник
Remotely Access Kali Linux system is a useful task that allows you to access the system wherever you go. There are multiple ways to access a system remotely, but the simplest method to access a system is using the Remote Desktop Protocol (RDP). It is one of the secure network connection protocols designed by the Microsoft developers that allows you to access the system remotely and control it from another computer. You can manage your system desktop right from another system, removing the need to purchase a separate mouse or keyboard for the system.
In this guide, you will learn:
- How to Remotely Access Kali Linux Using Remote Desktop Protocol (RDP)
- How to Remotely Access Kali Linux Using RDP on Windows
- How to Remotely Access Kali Linux Using RDP with Microsoft Remote Desktop
- How to Remotely Access Kali Linux Using RDP on Linux
- Bonus Method: How to Remotely Access Kali Linux Using RDP on Virtual Box
- Conclusion
To access Kali Linux remotely using RDP, follow the below-given steps:
Step 1: Install Kali Linux XFCE Desktop and RDP Server
Before you begin setting up Kali Linux remotely, you are required to install XFCE desktop and RDP server (xrdp) on your system. XFCE is optional if you are already using the Kali Linux desktop. However, it is mandatory if you are using the Kali Linux terminal version, because remote desktop connection will only work in desktop mode.
To install XFCE and RDP server on Kali Linux, you can use the following command:
sudo apt install kali-desktop-xfce xrdp -y

Note: Remove kali-desktop-xfce from the above command to only install RDP server if you are using Kali Linux desktop.
Step 2: Enable RDP Server on Kali Linux
After installing the RDP server, you have to enable it on your system so that it will start automatically whenever you boot the system. You can enable RDP server on Kali Linux from the following command:
sudo systemctl enable xrdp —now

Step 3: Install D-Bus Package on Kali Linux
You should also require installing the D-Bus (Desktop Bus) package on your Kali Linux system for a smooth RDP experience with XFCE. This package will allow both RDP and XFCE to connect on your system. You can install D-Bus package from the official Kali Linux repository using the following command:
sudo apt install dbus-x11 -y

During the installation of the above package, a prompt window will appear that will ask for your approval to restart some services on your system. You can go with the default one or choose manually and restart them by pressing the Enter button:

Note: The system may restart after completing the installation of the above package.
Step 4: Start RDP Server on Kali Linux
Now at the Kali Linux terminal, start your RDP server by running the below-given command:

Step 5: Check RDP Server Status
To ensure RDP server is running on Kali Linux system, you can run the below-given command:

Step 6: Install Firewall on Kali Linux
It is also recommended to install a Firewall on your Kali Linux system to add extra security to your remote desktop connection. You can install Firewall on Kali Linux from the following command:

Step 7: Allow Communication with the Default RDP Port
By default, RDP server operates at port 3389 and if you have installed Firewall on your Kali Linux system, you can allow communication with this port using the following command:

Step 8: Enable Firewall on Kali Linux
You are required to enable the Firewall service on your system from the following command:

Step 9: Reload Firewall on Kali Linux
Then reload the Firewall on Kali Linux so that the changes are successfully applied, you can do this from the below-given command:

Step 10: Logout of the Current User on Kali Linux
To ensure the connection to the remote desktop is successfully made, you should log out of the current user that you want to access.
How to Remotely Access Kali Linux Using RDP on Windows
For Windows users, there is a built-in application called Remote Desktop Connection that uses the RDP protocol and allows you to access the system. If you have set up the RDP connection on Kali Linux from the above steps, you can use the Remote Desktop Connection using the following steps to access Kali Linux desktop on Windows:
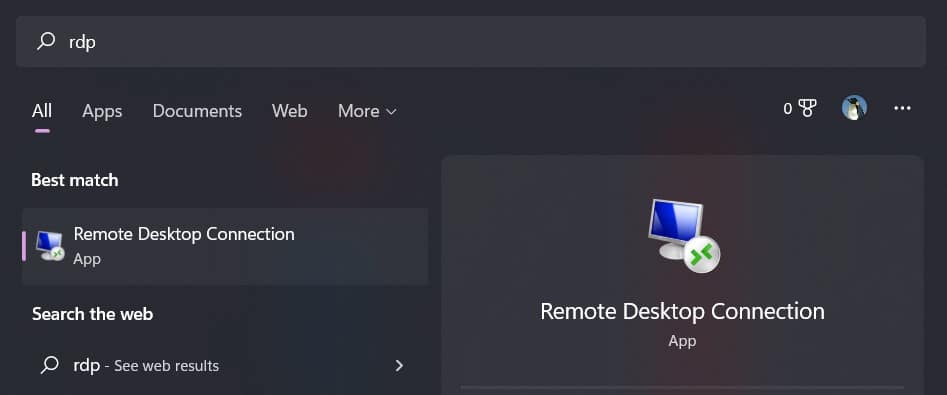
Step 1: First, open Remote Desktop Connection on Windows from the Start Menu:

Step 2: Enter the IP address of your server, and click on the Connect button:

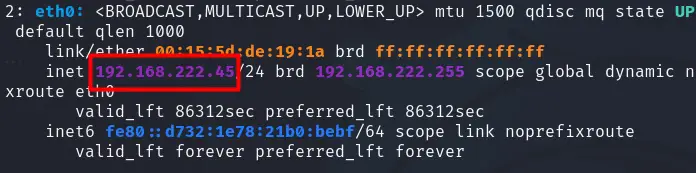
Note: You can find the IP address of your Kali Linux system using the hostname -I command.
Step 3: Allow the connection to remote server using the Yes button:

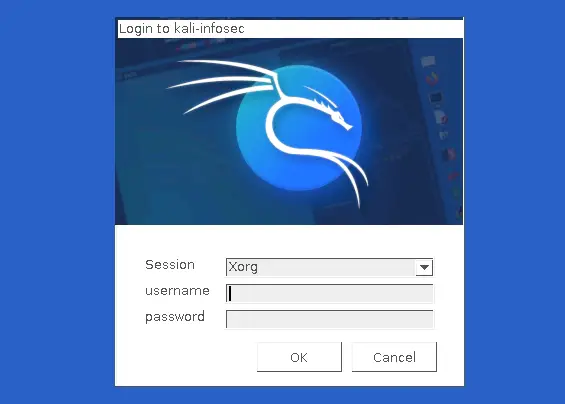
Step 4: Enter the Kali Linux credentials like username and password by leaving the session as Xorg, then click on the OK button to log in to the system:

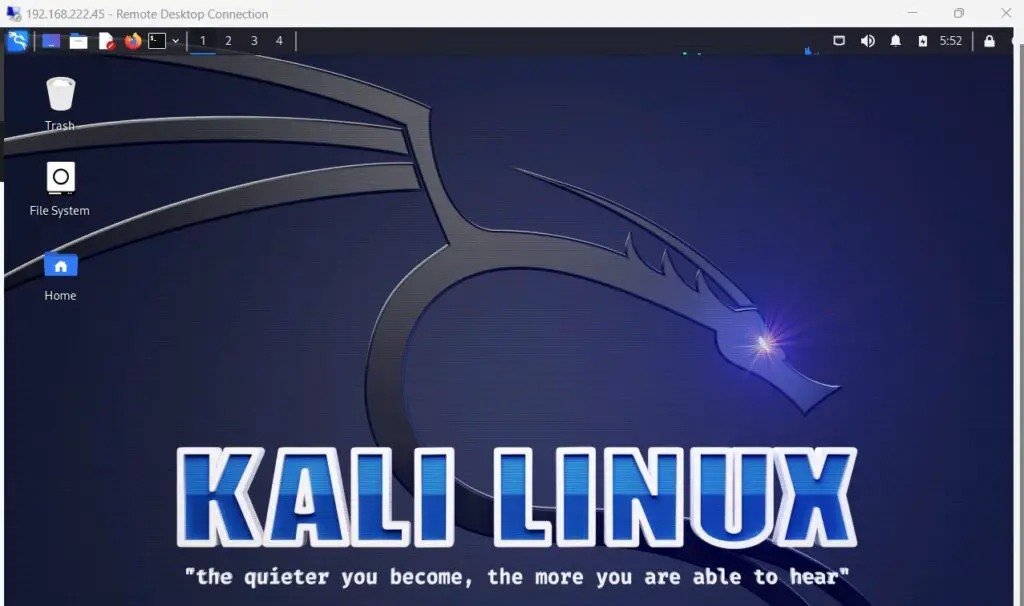
Once done, you will be able to see your Kali Linux desktop on Remote Desktop Connection application:

Note: If you are unable to access Kali Linux desktop on Remote Desktop Connection, ensure that it is enabled on your system. You can search for Remote Desktop settings from the Start menu and enable the Remote Desktop connection on Windows:

How to Remotely Access Kali Linux Using RDP with Microsoft Remote Desktop
If you are a Windows or Mac user, you can install Microsoft Remote Desktop from the App Store and Apple Store, respectively and use the following steps to access Kali Linux using RDP:
Note: Here, we are performing steps by installing Microsoft Remote Desktop on Windows, but the same steps can be followed on Mac.
Step 1: Open Microsoft Remote Desktop on Windows or Mac, and click on the Add button:

Step 2: Select the PCs option:

Step 3: Add the IP address of RDP server (Kali Linux), give a connection name according to your choice and click the Save button to add this to the PC list:

Step 4: Now, double-click on the added PC:

Step 5: Click on the Connect anyway button:

This will open the remote desktop login session:

You can use the same credentials you use in the Step 4 of the first method to remotely access Kali Linux desktop on Windows or Mac.

How to Remotely Access Kali Linux Using RDP on Linux
If you are using a Linux system and want to access Kali Linux using RDP, then you have to use the Remmina desktop app. Remmina is a desktop client for Linux systems that uses the RDP and allows you to remotely access the system. You can use the following steps to remotely access Kali Linux using RDP with Remmina on Linux:
Step 1: First, you must install Remmina desktop application on your Linux system from the apt repository using the below-given command:
Step 2: Then run the Remmina desktop application on Linux using the remmina command, enter the IP address of your Linux system, then press Enter:

Step 3: Enter the Kali Linux credentials like username and password:

After this, you will be able to access the Kali Linux system on Linux with Remmina:

Bonus Method: How to Remotely Access Kali Linux Using RDP on Virtual Box
By default, the VirtualBox uses NAT as a networking mode, which means that it provides Kali Linux its own private network adapter and IP address. Thus, accessing the device remotely with that mode is challenging for the users. To overcome this issue, you can change the networking mode to Bridged Adapter to connect your Kali Linux system to a physical network with its own IP address. It will allow you to easily perform remote desktop activities. You can switch from NAT to Bridged Adapter on VirtualBox using the following steps:
Step 1: First, right-click on the Kali Linux Virtual Machine and click on the Settings:

Step 2: Then navigate to Network section, change the network mode to Bridged Adapter from NAT and click on the OK button to make the changes:

Step 3: Check for the IP address using the hostname -I command, if it is changed to 192.168…, you have completed the process. Else, you have to reboot the Virtual Machine to apply the changes.
Conclusion
RDP is a secure network communication protocol used to remotely access and control a desktop system. You can easily access your Kali Linux system remotely by installing XFCE and RDP server (xrdp) from the default system repository. Then enable the RDP server, install Firewall and allow the traffic to the default RDP port 3389 on Kali Linux. You have to reload the Firewall and start the RDP server to make changes to the system. Then you can use Remote Desktop Connection on Windows to access the Kali Linux system using the IP address, username and password. You can also install Microsoft Remote Desktop app to access the system on Windows or Mac. Linux users can install and use Remmina to access the Kali Linux system using RDP.
By day, I am an engineer and researcher, building bridges and figuring out how the universe works. But when the clock strikes five, I turn into a wordsmith!
I write about my adventures on my blog, sharing tips and tricks to help others join the tech fun. I have worked on Raspberry Pi, Ubuntu, Debian, and Laptops. Right now, I have accepted the challenge of working on the Kali Linux system, and with my vast expertise in Linux systems, I will help users overcome the challenges through my blogs.
There are several ways to remotely access a computer running Kali Linux from another device. While VNC is a popular choice, RDP stands out as an alternative I really appreciate. In this article, I will introduce XRDP and demonstrate how you can quickly start using it on Kali Linux.
RDP, or Remote Desktop Protocol, allows access to the full desktop environment from another computer. The RDP server (xrdp) can be installed on Kali Linux using APT. On the client side, most systems already have an RDP app pre-installed.
I’ll start with a brief overview of the Remote Desktop Protocol (RDP) for those unfamiliar with it, followed by a guide to installing the RDP server on Kali. Finally, I’ll explain how to connect to it from any computer.
Master Linux Commands
Your essential Linux handbook
Want to level up your Linux skills? Here is the perfect solution to become efficient on Linux. 20% off today!
Download now
Introducing RDP
Let’s start with a bit of theory before going into the installation steps. Already familiar with this protocol? Feel free to skip this part.
What is RDP?
RDP, developed by Microsoft, is a protocol designed to allow users to access a computer’s graphical interface remotely. It stands for “Remote Desktop Protocol” and was initially known as “Terminal Server.”
Its usage was widespread in large companies when I started my career in system administration. Often, there was a central server hosting all the applications, and users connected to it using thin clients — basic, low-power devices meant solely for accessing the server via RDP.
This setup meant no local files for users; everything was stored on the server. This approach potentially saved time for administrators and, despite Microsoft’s significant licensing fees, possibly money for the companies.
As a system administrator, I also used RDP daily to manage servers. But given its Microsoft origins, how does RDP fit into the world of Kali Linux?
What is XRDP?
XRDP is the Linux-friendly, free, and open-source counterpart to Microsoft’s RDP protocol. It’s compatible with most Linux distributions and comes without any licensing fees.
In this guide, we’ll be using XRDP. It’s included in the default repository on Kali Linux.
XRDP functions just like RDP. You can use the same clients for it, meaning if you’re on a Windows computer, you already have the client installed, and it works the same as it would with a Windows server.
How to install XRDP on Kali Linux
Enabling access to a Kali Linux computer via RDP is pretty straightforward, here are the main steps:
- Use APT to install the RDP server on Kali Linux (xrdp)
- Find the IP address of the server
- Use it to access the system remotely
Don’t worry, I’ll explain each step in details now
Installing the XRDP package
As mentioned earlier, XRDP is available in the package manager on Kali Linux, so you can install it with APT:
- Open a terminal (or access your system via SSH).
- Make sure APT is up-to-date with:
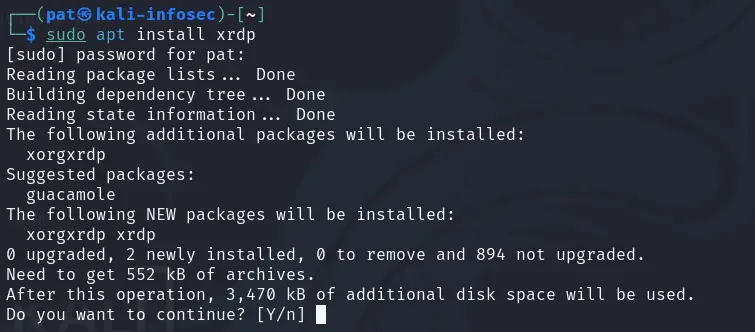
sudo apt update - Install the XRDP package with:
sudo apt install xrdp
Press “Y” and “Enter” to confirm the installation.
Start the XRDP service
While I was testing this, I noticed that the service wasn’t set to start automatically. You might need to start it manually with:sudo systemctl start xrdp
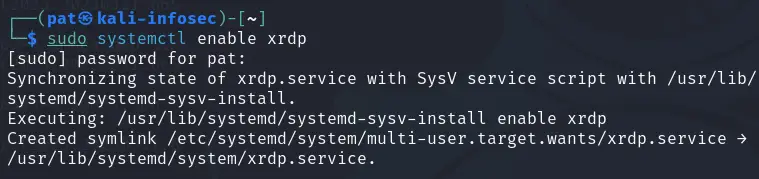
And enable it to make it start automatically on boot:sudo systemctl enable xrdp
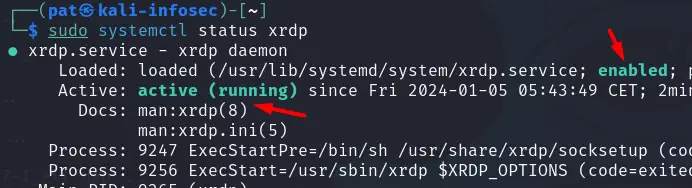
You can also use the “status” command, to make sure the service is running:sudo systemctl status xrdp
Find the server IP address
Now that XRDP is installed and the service is running, all we need to do is get the IP address of the system to access it remotely.
Since you have a desktop environment installed, the easiest way is to right-click on the network icon (top-right corner) and select “Connection Information”. This will open a window that looks like this; with the network information:
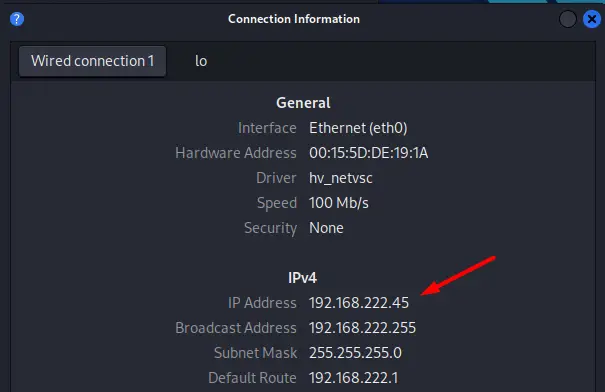
Another option is to use the following command line:ip aAnd find the IP address for your main connection (likely eth0 or wlan0).
Either way, you’re now ready to try RDP from your computer to access Kali Linux remotely.
How to use RDP from your computer
For most users, an RDP client is readily accessible or easy to install on their computers, and it varies based on the operating system.
Windows users have the advantage of a built-in RDP client. Linux’s users can opt for Remmina, a popular choice for RDP. Meanwhile, Mac users can find Microsoft’s RDP client available in the App Store.
Let’s do a quick overview for each system.
Use RDP from a Windows computer
On Windows, the process is straightforward as the Remote Desktop Connection app comes pre-installed, regardless of the Windows version you’re using.
Simply search for “rdp” in the start menu. In older versions of Windows, you might find it in the “Accessories” subfolder.
Hide your IP address and location with a free VPN:
Try it for free now, with advanced security features.
2900+ servers in 65 countries. It’s free. Forever.
When you start the app, you’ll be prompted to enter the remote computer IP address. That’s where you put the Kali Linux IP we just got in the previous step. Click on “Connect”, and you should get a login prompt to access the desktop interface:
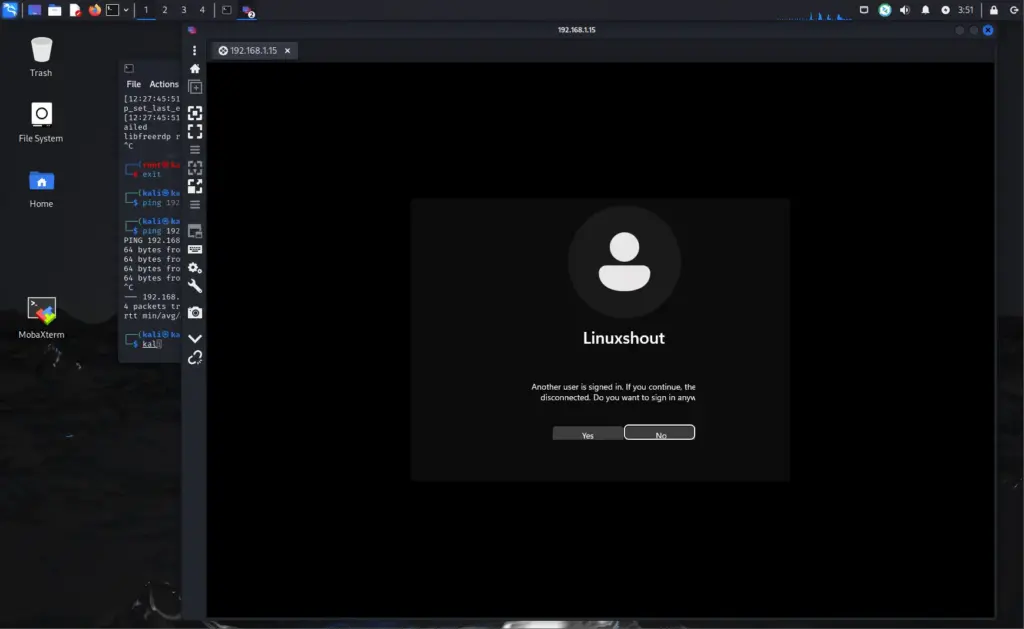
Important: You can’t be logged in on the same account simultaneously. If your session is already opened on Kali, you must log out first, or use a different account.
Once logged in via RDP, you should get access to the full interface, as if you were on the remote computer directly:
Connecting from a Linux computer
On Linux, the choice of RDP client depends on the distribution you’re using. One tool I recommend is “Remmina.” It’s compatible with XRDP and also supports VNC and other protocols, making it an all-in-one application for various remote desktop needs.
I think it’s pre-installed on Ubuntu and many other distributions, but if it’s not the case, you can easily add it with your package manager. For example, on Debian systems:sudo apt install remmina
Once installed, it’s the same idea as on Windows. Just type the Raspberry Pi IP address and log in.
Accessing RDP server from macOS
I didn’t test this one as I don’t have a Mac, but you can find RDP clients in the app store. As the Microsoft client is one of them, and it’s free, I would try this one first.
Once installed, follow the same procedure as on Windows.
Hi, my name is Patrick, I’m a web developer and network administrator. I have always been interested in security, and I created this website to share my findings with you.
Enabling Remote Desktop Protocol (RDP) on Kali Linux allows you to access the system remotely with a graphical interface. Below is a step-by-step guide to setting up and enabling RDP on Kali Linux, ensuring you understand each step fully and avoid potential pitfalls.
Step 1: Update Your System
Before making any changes, ensure your system is up to date to avoid compatibility or dependency issues:
sudo apt-get update -y && sudo apt-get upgrade -y
This command updates the package lists and upgrades all installed packages to their latest versions.
Step 2: Install a GUI Desktop Environment
If you are running Kali Linux in a non-GUI environment (e.g., on a cloud provider like AWS, Digital Ocean, or Linode), you need to install a desktop environment. If you already have a graphical interface, you can skip this step.
Install the GNOME desktop environment (or choose an alternative such as XFCE):
sudo apt install kali-desktop-gnome -y
Alternatively, for XFCE (lighter and preferred for remote access setups):
sudo apt install kali-desktop-xfce -y
Step 3: Install XRDP Server
To enable RDP functionality, you need to install XRDP, an open-source implementation of Microsoft’s RDP:
sudo apt-get install -y xrdp xorgxrdp
These packages install the XRDP service and its dependencies.
Step 4: Enable and Start XRDP Service
Enable the XRDP service to start on boot and start it immediately:
sudo systemctl enable xrdp --now
You can verify that XRDP is running using:
sudo systemctl status xrdp
Ensure the status shows «active (running).«
Step 5: Configure User Accounts for RDP
Only one user can be logged in via RDP at a time. If multiple users need access, create separate user accounts for each individual.
-
Create a New User:
sudo useradd -m -s /bin/bash username
Replace username with the desired username.
-
Add the User to the Sudo Group:
If the user needs administrative privileges:
sudo usermod -aG sudo username
-
Set the User’s Password:
Assign a password to the user:
sudo passwd username
Step 6: Configure Firewall (if Applicable). Note: This isn’t needed for many Kali installations. However, I did find that many cloud providers, such as Linode, was required.
If you have a firewall enabled, ensure that port 3389 (the default RDP port) is open:
If you’re using a cloud provider, check its security group or firewall settings to allow RDP traffic.
Step 7: Test the RDP Connection
On your local machine, open an RDP client (e.g., Remote Desktop Connection on Windows or remmina on Linux) and connect to your Kali Linux system using the IP address of the machine and the credentials of the user you created.
-
Address: IP address of the Kali system
-
Username: username
-
Password: user password
In the screenshots below, I am using Microsoft’s Windows App for RDP on MacOS. You can download it from the MacOS app store.
If everything is configured correctly, you should be able to log in to the graphical desktop environment of your Kali Linux machine.
Troubleshooting Tips
-
XRDP Not Starting:
-
Check the logs for XRDP issues:
sudo journalctl -u xrdp
-
-
Black Screen After Login:
-
Ensure the correct desktop environment is selected in the RDP client.
-
Try installing and switching to a lighter desktop environment like XFCE.
-
-
Connection Refused:
-
Verify that the firewall or cloud provider security settings allow RDP traffic on port 3389.
-
Check the XRDP status to ensure it’s running.
-