
В этой статье будет описано как узнать пароль от Windows (любых версий), НЕ сбросить, НЕ изменить, а именно УЗНАТЬ.
Сначала отступление
Сбросить пароль или изменить его в системе Windows легко — школьники уже наснимали свои стопятьсот видео как это сделать.
Продвинутые школьники используют ПРО версию программы ElcomSoft System Recovery, которая «за пол минуты взламывает пароль» (на самом деле, ищет по словарю наиболее популярные пароли, сравнивает их с ранее рассчитанными хэшами и, если школьник задалпароль что-нибудь вроде «1», «1111», «123», «admin», «password», то программа его отображает).
Продвинутые пользователи снимают видео как сбросить пароль с помощью Kali Linux. Причём, Kali Linux используется для 1) монтирования диска с ОС Windows, 2) переименование одного файла для запуска командной строки… Я думаю, в свободное время эти люди колют орехи айфонами.
На самом деле, я шучу. В 99.99% случаев именно это и нужно — сбросить пароль школьника или бухгалтера, которые зачем-то его поставили и благополучно забыли.
Если вам именно это и нужно, то загрузитесь с любого Live-диска (это может быть и Linux – что угодно). В каталоге C:WindowsSystem32 переименуйте файл cmd.exe в sethc.exe или в osk.exe. Понятно, что нужно сделать бэкап файла sethc.exe (или osk.exe), а файл cmd.exe копировать с присвоением нового имени.
Если вы переименовали файл в sethc.exe, то при следующей загрузке Windows, когда у вас спросят пароль, нажмите пять раз кнопку SHIFT, а если в osk.exe, то вызовите экранную клавиатуру. И в том и в другом случае у вас откроется командная строка (cmd.exe) в которой нужно набрать:
Код:
net user имя_пользователя *Т.е. если имя пользователя admin, то нужно набрать:
А теперь я буду снимать своё видео.
Опять шучу.
Узнаём пароль Windows с помощью Kali Linux
Теория: где Windows хранит свои пароли?
Windows размещает пароли в файле реестра SAM (System Account Management) (система управления аккаунтами). За исключением тех случаев, когда используется Active Directoryis. Active Directoryis — это отдельная система аутентификации, которая размещает пароли в базе данных LDAP. Файл SAM лежит в C:<systemroot>System32\config (C:<systemroot>\sys32\config).
Файл SAM хранит пароли в виде хэшей, используя хэши LM и NTLM, чтобы добавить безопасности защищаемому файлу.
Oтсюда важное замечание: получение пароля носит вероятностный характре. Если удасться расшифровать хэш — то пароль наш, а если нет — то нет…
Файл SAM не может быть перемещён или скопирован когда Windows запущена. Файл SAM может быть сдамплен (получен дамп), полученные из него хэши паролей могут быть подвержены брут-форсингу для взлома оффлайн. Хакер также может получить файл SAM загрузившись с другой ОС и смонтировав C:. Загрузиться можно с дистрибутива Linux, например Kali, или загрузиться с Live-диска.
Одно общее место для поиска файла SAM это C:<systemroot>\repair. По умолчанию создаётся бэкап файла SAM и обычно он не удаляется системным администратором. Бэкап этого файла не защищён, но сжат, это означает, что вам нужно его разархивировать, чтобы получить файл с хэшами. Для этого можно использовать утилиту expand. Команда имеет вид Expand [FILE] [DESTINATION]. Здесь пример раскрытия файла SAM в файл с именем uncompressedSAM.
Код:
C:> expand SAM uncompressedSAMЧтобы улучшить защиту от оффлайн хакинга, Microsoft Windows 2000 и более поздние версии включают утилиту SYSKEY. Утилита SYSKEY зашифровывает хэшированные пароли в файле SAM используя 128-битный ключ шифрования, который разный для каждой установленной Windows.
Атакующий с физическим доступом к системе Windows может получить SYSKEY (также называймый загрузочный ключ) используя следующие шаги:
- Загрузиться с другой ОС (например, с Kali).
- Украсть SAM и хайвы SYSTEM (C:<systemroot>\System32\config (C:<systemroot>\sys32\config)).
- Восстановить загрузочный ключ из хайвов SYSTEM используя bkreg или bkhive.
- Сделать дамп хэшей паролей.
- Взломать их оффлайн используя инструмент, например такой как John the Ripper.
Ещё одно важное замечание. При каждом доступе к файлам в Windows изменяется MAC(модификация, доступ и изменение), который залогирует ваше присутствие. Чтобы избежать оставления криминалистических доказательств, рекомендуется скопировать целевую систему (сделать образ диска) до запуска атак.
Монтирование Windows
Есть доступные инструменты для захвата Windows-файлов SAM и файла ключей SYSKEY. Один из методов захвата этих файлов — это монтирование целевой Windows системы так, чтобы другие инструменты имели доступ к этим файлам в то время, пока Microsoft Windows не запущена.
Первый шаг — это использование команды fdisk -l для идентификации ваших разделов. Вы должны идентифицировать Windows и тип раздела. Вывод fdisk показывает NTFS раздел, например так:
Код:
Device Boot Start End Blocks Id System
/dev/hdb1* 1 2432 19535008+ 86 NTFS
/dev/hdb2 2433 2554 979965 82 Linux swap/Solaris
/dev/hdb3 2555 6202 29302560 83 Linux
Создаёте точку монтирования используя следующую команду mkdir /mnt/windows.
Монтируете системный раздел Windows используя команду как показано в следующем примере:
Код:
mount -t <WindowsType> <Windows partition> /mnt/windows
Теперь, когда целевая система Windows смонтирована, вы можете скопировать файлы SAM и SYSTEM в вашу директорию для атаки следующей командой:
Код:
cp SAM SYSTEM /pentest/passwords/AttackDirectoryДоступны инструменты для дампа файла SAM. PwDumpand Cain, Abel и samdump — это только немногие примеры.
Обратите внимание, вам нужно восстановить оба файла — загрузочного ключа и SAM. Файл загрузочного ключа используется для доступа к файлу SAM. Инструменты, используемые для доступа к файлу SAM будут требовать файл загрузочного ключа.
bkreg и bkhiveare — популярные инструменты, которые помогут получить файл загрузчика ключа, как показано на следующем скриншоте:

Как защититься от кражи пароля для входа в Windows:
- Во-первых, не нужно надеяться на этот пароль. Этот пароль не спасёт вас даже от вашего сына-школьника. Этот пароль не поможет вам защитить данные, а также бесполезен при краже компьютера. (Ситуация с паролем на BIOS примерно такая же — не предоставляет никакой реальной защиты, время от времени портит жизнь бухгалтерам и людям с плохой памятью).
- Если вам важно ограничить доступ к данным или ко всей системе, используйте такие программы шифрования как VeraCrypt и TrueCrypt (но если уж вы в этом случае забудете пароль, то данные будут безвозвратно утеряны).
- Чтобы ваш пароль на вход в Windows не могли расшифровать школьники, придумывайте сложный, длинный пароль с разными регистрами, цифрами и буквами (в том числе русскими) и т. д. Но ещё раз повторю — этот пароль не защищает ничего.
🔐 Password Cracking on Windows Servers with Kali Linux Tools
In today’s ever-evolving world of cybersecurity, understanding password vulnerabilities is essential for both defenders and ethical hackers. In this blog, I’ll walk you through a project where my team and I explored the powerful tools in Kali Linux to crack passwords on Windows servers. This experience highlighted the need for robust security practices and exposed the common weaknesses in password protection.
📝 Project Overview
Our project set out with a few ambitious goals:
- Analyze Windows Hashing Mechanisms: We focused on the SAM (Security Account Manager) and NTLM (New Technology LAN Manager) hash systems.
- Explore Cracking Techniques: We applied brute force, dictionary, and rainbow table attacks.
- Utilize Advanced Tools: Our arsenal included Mimikatz and Hashcat.
- Establish Countermeasures: We studied effective ways to defend against common attack vectors.
-
Practice Ethical Hacking: The entire project was conducted with strict ethical standards and a focus on strengthening cybersecurity skills.
🔨 The Kali Linux Arsenal
For this project, we leveraged three powerful tools from Kali Linux, each known for its ability to crack passwords:
-
John the Ripper: A versatile password cracker that supports multiple encryption formats.
-
Hydra: Renowned for brute-force attacks across various protocols.
-
Hashcat: A high-speed, GPU-accelerated tool designed to handle complex hashes.
Each of these tools was crucial in revealing vulnerabilities and highlighting the risks associated with weak passwords.
🔍 The Process: From SAM Files to Cracked Passwords
Step 1: Understanding SAM and SYSTEM Files
Our journey began with the Windows SAM (Security Account Manager) and SYSTEM files, found in C:\Windows\System32\config. The SAM file holds password hashes, while the SYSTEM file is required to decrypt these hashes. Together, they form the backbone of Windows password security.
Step 2: Gaining Access to SAM Files
To access these files, we needed administrative permissions. This step involved adjusting permissions to gain full control and read access—an important reminder of the role that access controls play in system security.
Step 3: Extracting Hashes with Mimikatz
With the necessary permissions, we moved on to Mimikatz, a powerful tool for retrieving NTLM hashes. Using the following command, we extracted hashes from the SAM file:
(mimikatz # lsadump::sam /system:C:\Users\User\Desktop\SYSTEM /SAM:C:\Users\User\Desktop\SAM)
This command allowed us to extract NTLM hashes for various user accounts, demonstrating how attackers could access sensitive data if adequate protections are not in place.
Step 4: Cracking the Hashes with Hashcat
Armed with the hashes, we turned to Hashcat for the actual cracking. Using a wordlist, we attempted to match each hash to its corresponding password. Here’s the command we used:
(hashcat -m 1000 -a 3 /home/User/Downloads/hashfile /home/User/Downloads/password-list --force)
The -m 1000 option enables NTLM hash mode in Hashcat, and the -a 3 option specifies a mask attack. This approach proved effective in testing password strength.
🚨 Results and Implications
We successfully cracked a password—revealing it to be a simple “password.” This stark outcome serves as a sobering reminder of the risks posed by weak passwords. The experiment demonstrated how attackers can easily exploit systems lacking strong password policies.
💡 Key Takeaways
Our project underscored several important lessons in cybersecurity:
- Password Complexity is Crucial: Simple passwords are cracked easily. Organizations should enforce strong password policies with complexity requirements.
- Regular Security Audits: Periodic testing of password strength and system security can identify vulnerabilities before they’re exploited.
- Implement Multi-Factor Authentication (MFA): Adding an extra layer of security can greatly reduce the risk of unauthorized access.
- Ethical Use of Powerful Tools: Tools like Mimikatz and Hashcat are highly effective but should be used responsibly on systems you own or have explicit permission to test.
📌 Conclusion
This project serves as a reminder to both individuals and organizations: implementing robust password policies, conducting regular security audits, and utilizing additional security measures like MFA are critical for safeguarding digital assets. As we rely more heavily on technology, understanding these vulnerabilities and taking proactive steps to mitigate them is essential.
Remember, with great power comes great responsibility. Use this knowledge to strengthen your systems, not to exploit others. Stay secure, stay ethical! 🛡️
Hello and Welcome,
Here I am with another article on recover windows 10 administrator password. If you have laptop installed window 1o and Forgot password on laptop. then some questions will arise in your mind “how to recover windows 10 OS password on a laptop?” or “how to recover laptop password?” so you are searching for solution, and solution here I am resetting my password by Kali Linux.
Similar as previous version of Window’s Operating system like Window XP/7/8/8.1 password of Window 10 are saved in SAM (Security Account Manager) file located in C:/Windows/system32/config. These password are encrypted with NTLMv2. In this post I will show you to dump the hashes and crack it using John password cracker tool. User can do that by follow the given steps:
Step 1:Boot Window machine with Kali Linux Live DVD/Flash Drive
Step 2: Mount Windows System Drive
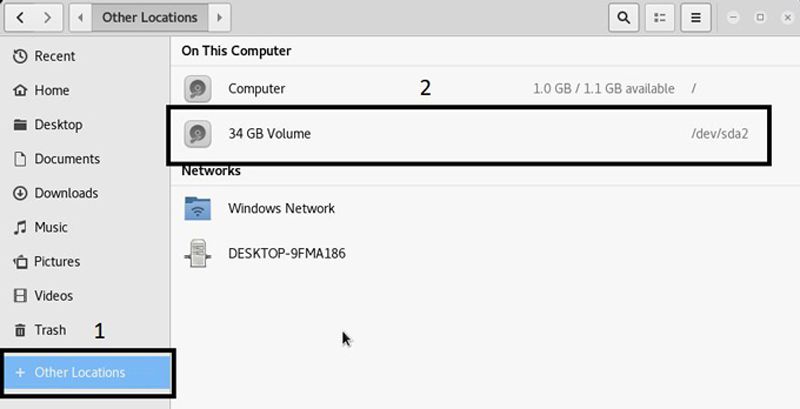
- Click on the Places and the menu bar will open click on Computer. The file manager will open.
- Click on other location, and again click on the Windows media. New windows will be open and looks like image.

Note: If you will not able to open this drive automatic use following command to fix error. This happen because Windows 10 does not shut down properly. By default it is going to sleep mode, So you will have to run following command.
#fdisk -l
this command is used to check the attached hardisk and its partition. its upto you how will you find the windows partition. if you will run following command with wrong partition, then no issue.
#ntfsfix /dev/sda2 (partition address)
- Try again to open Windows media, Once you will open go to next step.


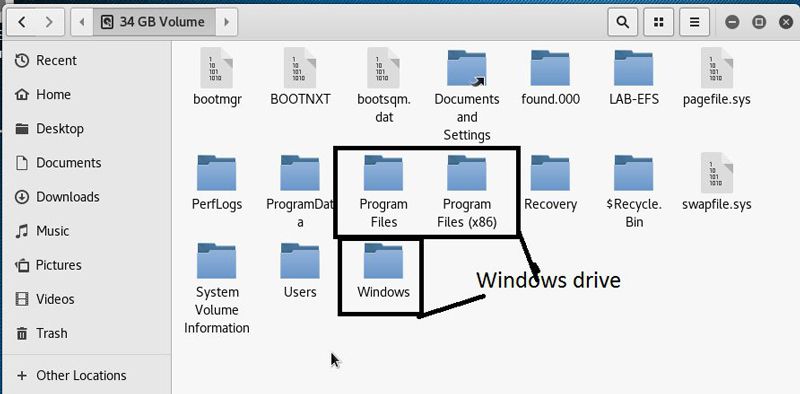
Step 3: Open terminal and Go into the SAM file location
#cd /Media/Media No./Windows/System32/config
Old method to get windows 10 password hashes
Step 4: Find the system bootkey using bkhive utility
#bkhive SYSTEM /root/Desktop/system
Step 5: Dump Password hashes using samdump2
#samdump2 SAM /root/Desktop/system > /root/Desktop/hashes.txt
New Method to get windows 10 password hashes – 2017
STEP 4+5: This is very important step, because in this step you are going to retrieve Windows 10 password hashes. So run the following command and dump the hashes.
#pwdump SYSTEM SAM > /root/Desktop/hashes.txt
You can provide any name instead of hashes.txt

Step 6: Change working directory as /root/Desktop
#cd /root/Desktop
Step 7: See available hashes in hashes.txt file
#cat hashes.txt
Step 8: Find the password from hashes using John the Ripper
#john –format=nt2 –users=UserName hashes.txt

Find the password Have a fun 🙂
Method 2. How to Recover Windows 10 administrator password If You Forgot.
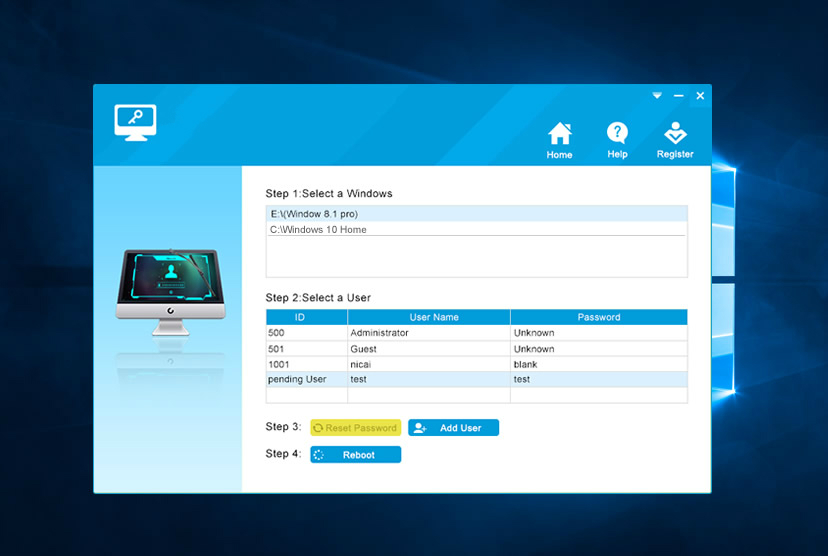
Another tool that can be used to recover windows 10 administrator password is the iSeePassword Windows Password Recovery Pro, this is a best PC Unlocker software. It is a professional password recovery tool that is meant to reset or unlock computer password. It is available for many other Windows operating systems including Windows Vista, 7, 8 and XP. You only need a USB flash drive. When compared to other methods mentioned above, this is the easiest way to recover a lost password and has no drawbacks. It works by listing all user accounts on your computer, you only need to select a user account on your computer and click the password reset button. You can login to your Windows account after restarting.
Let’s see how iSeePassword Windows Password Recovery Pro Works.
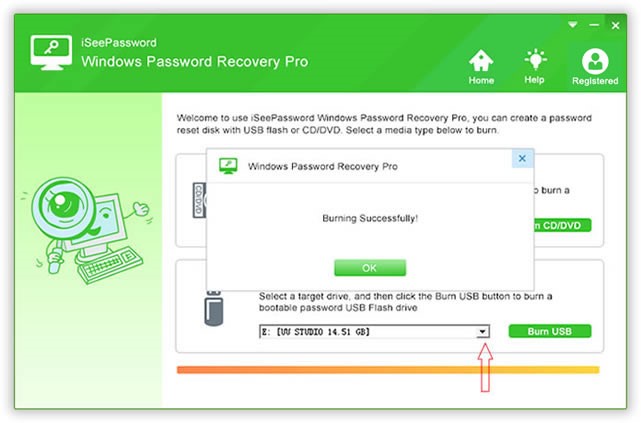
Step 1. Download iSeePassword Windows Password Recovery Pro and install and launch it on another available PC. There are 2 ways to burn a password reset disk, USB or DVD/CD, just inset a USB flash drive into it. Click “Burn”.

Step 2. When successful message pops up, click OK and exit removal device. Password recovery disk have been burned successfully.
Step 3: Insert the newly created USB drive to the locked Windows 10 computer. Set USB drive as the first boot device in BIOS setup. This computer will reboot. Then it will load the program, and detect all system and account on your computer, follow the interface to reset your Windows 10 password.

After you successfully reset the password, disconnect the boot disk and reboot your PC when password is reset to blank. Then your PC will restart normally and Windows 10 can login without password.
iSeePassword Windows Password Recovery Pro is easy to use and safe. With it,you can fast access to your windows if you forgot login password on Windows 10 without system re-installation.
You’re locked out of your Windows 10 computer because you forgot the password, and now you’re wondering whether you’ll have to reinstall the operating system to regain access.
Stop right there!
Before you go and do something as drastic and final as that (you’ll lose all your data and settings), consider other methods of unlocking a Windows 10 PC. This article shows you how to reset a Windows 10 password using Kali Linux, as well as another, easier option.
#1 Creating the Linux Live CD or Drive
The first step is to create what is called a bootable drive or disk for Kali Linux. Obviously, you can’t do it on your locked PC, so you’ll need a different Windows computer for this part of the process. Make sure you have admin access and that the system has an optical drive or a working USB port.
On your secondary computer, download the latest Kali Linux bootable ISO file (download file from here) and insert a storage device. USB is recommended since it’s more portable, but you can also use a physical disk.
For creating the bootable Kali Linux drive or disk, you can use a free ISO burner like Universal USB Installer or Free ISO Burner. If the other computer is also running Windows 10, you can use Command Prompt to create the bootable Kali Linux installer.
Remember, we’re not actually going to load Kali on your locked PC!
we’re merely using it as an OS pre-installation environment so the password can be reset, once again using Command Prompt.
#2 Booting to CMD with Admin Access
Once you have the Linux installer in hand, remove it and insert it into the computer that’s locked. Hit the boot key on start-up so it boots to the BIOS Utility Setup. Change the boot priority as your installer disk or drive, save the changes and exit to resume boot.

Choose Live System or Live (forensic mode) from the options you see in the Kali boot menu. You should now be able to navigate to /system32, where your Windows OS is loaded. When in that drive location, open Terminal in Kali Linux and execute this command:
cd /media/root/DCC056BBC0569B98/windows/system32
Next, we’re going to use the Accessibility feature in Windows 10 to bypass password security. Once we can access CMD, we’ll be running another command to change the password without having to know the old one. But first, run this command:
mv Magnify.exe magnify.old
mv cmd.exe Magnify.exe
#3 Resetting the Password
Now that we’ve switched the cmd executable with the magnify executable, this is what will happen: when you exit Linux and reboot to Windows 10, click the Accessibility icon and then on where it says Magnifier.
Since we swapped the two .exe files in the last step, you will see CMD open with admin access privileges. You can now change the password by executing this next command:
net user
Change the parameters within the angle brackets as appropriate. Your password has now been reset, but don’t forget to switch back the magnify.exe and cmd.exe files.
Once that’s done, you can reboot normally and log in with the new password.
A Better Alternative to Reset Windows 10 Password
If you feel that’s too complex for you to mess around with, don’t worry. There are other tools like WinPWD Windows Password Recovery that can help you create a bootable password reset disk and simply blank your current password even if you don’t remember it.
This one is a particularly intuitive tool that uses a built-in ISO burning tool and WinPE environment along with the code for the actual password reset process. And it’s designed for first-time users who have forgotten their Windows login password.
It works by allowing you to create a password reset disk on any other Windows computer (again, with admin access and a working USB port or DVD drive) and then use that to almost instantly unlock your password. Just download the utility on the other PC and click a couple of buttons to create your reset disk.
This can then be used to boot your locked Windows 10 machine. The interface lets you select the right ISO file and unlock any local or network user account password with just one click.
If the Kali Linux method of resetting your Windows 10 password looks a little daunting, PassMoz LabWin can get you out of the jam in just a few minutes.
Even there are other methods to reset windows 10 password like the one we have mentioned here- Reset Windows Password Without Disk.
Do you forget your password to Windows 10 local account and can’t pass the lock / login page at all? The problem is, that locked account is the only account on that computer and it’s a local administrator account.
I experienced that nightmare the other day.
I searched some free solutions online for that matter. Many tutorials suggest to use Offline NT Password & Registry Editor from Pogostick, but I didn’t have any luck using it to reset Windows 10 login password. Some of the errors I got were «Kernel panic — not syncing: Attempted to kill init! exitcode=0x0000000b» and stuck on «Booting the kernel.»
After tried several solutions, tools, and faced some troubles along the way, I was finally able to remove my Windows 10 local account’s login password.
Below I put together what I did to remove Windows 10 local administrator account login password in easy step-by-step.
What you need to remove Windows 10 login password
- Kali Linux ISO. Download it from Kali Linux Downloads page. For this tutorial, I used version 2019.2 of Kali Linux 64-Bit. [Update on 26 May 2022: If you want to use this specific Kali Linux’s old version, you can download it here: kali-linux-2019.2-amd64.iso]
- Universal USB Installer (UUI). Download it from Pendrivelinux UUI. I used version 1.9.8.7. [Update on 26 May 2022: this older version (UniversalUSBInstaller1.9.8.7) can be downloaded from archive.org]
- USB Flashdrive. Kali Linux used about 3.1 – 3.4 GB.
- Computer. You need access to a computer to install Kali Linux on USB flashdrive.
Steps to remove Windows 10 login password
- Download Kali Linux ISO and Universal USB Installer from above links.
- Plug in a USB flashdrive that you want to use as a bootable USB drive to a computer that you have access to.
- Run Universal USB Installer (UUI) .exe file on the same computer as the USB’s. Setup UUI:
- On Step 1, select «Debian Live».
- On Step 2, check the «Show All ISOs?». Browse and select the Kali Linux .iso file that you downloaded.
- On Step 3, select the USB drive
- Click «Create»

- Now let’s move to the computer whose password you forgot. Plug in the Kali Linux bootable USB.
- Go to the computer’s BIOS settings. How to enter the BIOS settings will vary depend on your computer’s manufacturer — please check the manual book. Some ways that you can try are:
- Press the turn on button, and immediately press F12. The screen will go dark for a moment, then open the BIOS settings.
- OR, you can try to boot up until you reach the login screen. Hold Shift button while you select the Restart option. You will enter Advanced Boot Options blue screen with big title «Choose an option». Select «Troubleshoot» > «Advanced options» > «UEFI Firmware Settings». Click «Restart».
- Change the boot order so that the computer will boot from the USB drive first. If you don’t find the option to boot from USB drive, try to check and make sure (however, again, it depends on your computer’s manufacturer BIOS settings):
- The «USB Boot» is enabled
- Boot mode support Legacy and boot priority is Legacy First.
- Save changes and restart the computer
- You will boot to Kali Linux Live screen. Choose «Live (forensic mode)»

- Go to System32 folder. Navigate from «+Other Locations» > «Windows» > «Windows» > «System32». Select «Open in Terminal» option from the dropdown menu.
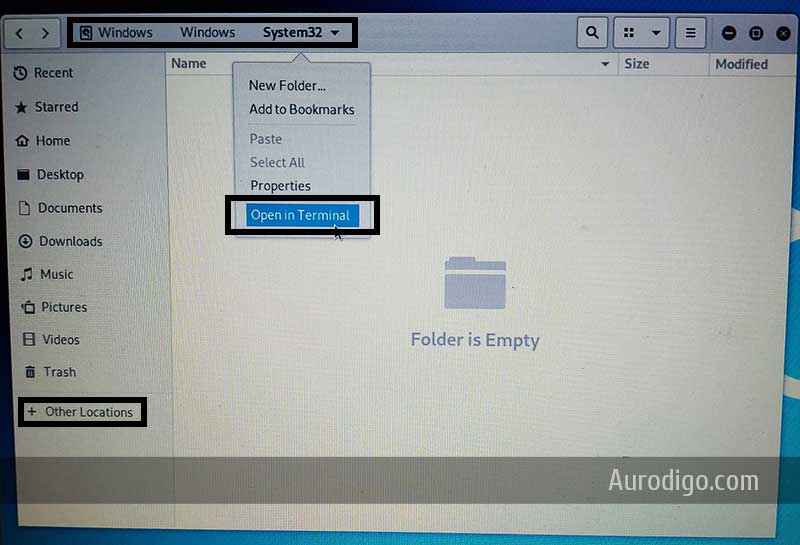
- Go to config folder by typing:
cd config - In the config folder, type
chntpw -l SAMto list user(s). Note the username.- If you get error in this step that read as follow:
read error: : Read-only file system, turn off the computer and remove the bootable USB. - Turn on the computer again until it reaches the Windows login screen. Plug in the bootable USB. Choose the Restart option from Windows login screen. Let it boot from the USB.
- Do the steps 8-11.
- If you get error in this step that read as follow:
- Type
chntpw -u USERNAME SAMto open details of the specific username. Change the ‘USERNAME’ with your username, e.gchntpw -u John SAM - Type
1to choose option number 1 — Clear (blank) user password. - Type
qto quit editing user - Type
y - Turn off the computer. Remove the bootable USB. Turn on the computer.
- Enter the BIOS settings to change boot order to Windows again.
- You should now be able to enter Windows 10 with your administrator account without any password. You can set password to your account again from the Windows user settings.
First published by on 31 May 2019. Last Modified on 26 May 2022.