
Последнее обновление: 31.10.2015
Для работы с датами в Windows Forms имеются элементы DateTimePicker и MonthCalendar.
DateTimePicker
DateTimePicker представляет раскрывающийся по нажатию календарь, в котором можно выбрать дату. собой элемент, который с помощью перемещения ползунка позволяет вводить числовые значения.
Наиболее важные свойства DateTimePicker:
-
Format: определяет формат отображения даты в элементе управления. Может принимать следующие значения:
Custom: формат задается разработчикомLong: полная датаShort: дата в сокращенном форматеTime: формат для работы с временем -
CustomFormat: задает формат отображения даты, если для свойства
Formatустановлено
значениеCustom -
MinDate: минимальная дата, которую можно выбрать
-
MaxDate: наибольшая дата, которую можно выбрать
-
Value: определеяте текущее выбранное значение в DateTimePicker
-
Text: представляет тот текст, который отображается в элементе
При выборе даты элемент генерирует событие ValueChanged. Например, обработаем данное собатие и присвоим выбранное значение
тексту метки:
public partial class Form1 : Form
{
    public Form1()
    {
        InitializeComponent();
		dateTimePicker1.Format = DateTimePickerFormat.Time;
        dateTimePicker1.ValueChanged+=dateTimePicker1_ValueChanged;
    }

    private void dateTimePicker1_ValueChanged(object sender, EventArgs e)
    {
        label1.Text = String.Format("Вы выбрали: {0}", dateTimePicker1.Value.ToLongTimeString());
    }
}
Свойство Value хранит объект DateTime, поэтому с ним можно работать как и с любой другой датой. В данном случае выбранная дата
преобразуется в строку времени.
В вышеприведенном случае значение dateTimePicker1.Value.ToLongTimeString() аналогично тому тексту, который отображается в элементе.
И мы могли бы написать так:
label1.Text = String.Format("Вы выбрали: {0}", dateTimePicker1.Text);
MonthCalendar
С помощью MonthCalendar также можно выбрать дату, только в данном случае этот элемент представляет сам календарь, который не надо раскрывать:
Рассмотрим некоторые основные свойства элемента.
Свойства выделения дат:
-
AnnuallyBoldedDates: содержит набор дат, которые будут отмечены жирным в календаре для каждого года
-
BoldedDates: содержит набор дат, которые будут отмечены жирным (только для текущего года)
-
MonthlyBoldedDates: содержит набор дат, которые будут отмечены жирным для каждого месяца
Добавление выделенных дат делается с помощью определенных методов (как и удаление):
monthCalendar1.AddBoldedDate(new DateTime(2015, 05, 21));
monthCalendar1.AddBoldedDate(new DateTime(2015, 05, 22));
monthCalendar1.AddAnnuallyBoldedDate(new DateTime(2015, 05, 9));
monthCalendar1.AddMonthlyBoldedDate(new DateTime(2015, 05, 1));
Для снятия выделения можно использовать аналоги этих методов:
monthCalendar1.RemoveBoldedDate(new DateTime(2015, 05, 21));
monthCalendar1.RemoveBoldedDate(new DateTime(2015, 05, 22));
monthCalendar1.RemoveAnnuallyBoldedDate(new DateTime(2015, 05, 9));
monthCalendar1.RemoveMonthlyBoldedDate(new DateTime(2015, 05, 1));
Свойства для определения дат в календаре:
-
MinDate: определяет минимальную дату для выбора в календаре
-
MaxDate: задает наибольшую дату для выбора в календаре
-
FirstDayOfWeek: определяет день недели, с которого должна начинаться неделя в календаре
-
SelectionRange: определяет диапазон выделенных дат
-
SelectionEnd: задает конечную дату выделения
-
SelectionStart: определяет начальную дату выделения
-
ShowToday: при значении true отображает внизу календаря текущую дату
-
ShowTodayCircle: при значении true текущая дата будет обведена кружочком
-
TodayDate: определяет текущую дату. По умолчанию используется системная дата на компьютере, но с помощью данного
свойства мы можем ее изменить
Например, при установке свойств:
monthCalendar1.TodayDate= new DateTime(2015, 05, 22);
monthCalendar1.ShowTodayCircle = true;
monthCalendar1.ShowToday = false;
monthCalendar1.SelectionStart = new DateTime(2015, 05, 1);
monthCalendar1.SelectionEnd = new DateTime(2015, 05, 11);
будет следующее отображение календаря:
Наиболее интересными событиями элемента являются события DateChanged и DateSelected, которые возникают
при изменении выбранной в элементе даты. Однако надо учитывать, что выбранная дата будет представлять первую дату из диапазона выделенных дат:
public partial class Form1 : Form
{
    public Form1()
    {
        InitializeComponent();
		monthCalendar1.DateChanged += monthCalendar1_DateChanged;
    }

    void monthCalendar1_DateChanged(object sender, DateRangeEventArgs e)
    {
        label1.Text = String.Format("Вы выбрали: {0}", e.Start.ToLongDateString());
		// или так - аналогичный код
        //label1.Text = String.Format("Вы выбрали: {0}", monthCalendar1.SelectionStart.ToLongDateString());
    }
}
Winforms-Calendar
A calendar UI control for WinForms that can handle appointments, all-day events, and multiple day view support.
History
This calendar interface for WinForms was originally published to CodeProject. It looks like it became a dead project in 2009.
It was then forked to SourceForge. From there it also appears to have become dead in 2016.
I have forked it here. This is intended to be, as much as possible, an active fork. I welcome any pull requests and suggested changes.
About this Control (README copied from CodeProject)

Introduction
As you can see in the screenshots, this is a fully capable calendar view for specifying appointments and all day events. It has several features so you can control what happens inside, like item blocking and item-oriented events.
It’s 100% managed code! No resources; as with most of my projects, you can just include all the source files into your project to make it work.
Background
I found a couple of controls like this, but as always, they don’t meet my needs, so here I come. It performs fairly well, but mostly will depend on your implementation — I’ll explain that in the next section.
Using the Code
To add a calendar to your form, just drag the Calendar control. It’s located under the System.Widows.Forms.Calendar namespace.
When to Use it
It can be used to display any information that is based on a date, not just appointments and meetings. Think about it, on what ugly control do you display your system log?
Controlling the View
The view of the Calendar is given by a date range provided by the ViewStart and ViewEnd properties. Depending on the number of days between these two dates, the calendar will draw them.
The Calendar can show days in two modes: Expanded and Short (see Calendar.DaysMode). Expanded is the style of the first screenshot: the days are shown in a column, and items are placed in the time they belong; while the Short mode (second screenshot) shows days on week rows, and items are shown in a more compact way.
An important property here is MaximumFullDays (by default, 8). This property indicates that when you specify a view of 8 days or less, the days will be shown in Expanded mode. Any more days will be displayed in Short mode.
Feeding Items to the Calendar
The calendar tells you when to add items to it with the LoadItems event. In that event, you should manage to bring information to display in the calendar, by adding items to the Items collection of the calendar. The event is raised every time the view changes. I strongly suggest that you use caching and not query the database every time this event is raised, because performance will be severely affected.
The demo project in the source loads items from a memory array, so it’s not the best example.
private void calendar1_LoadItems(object sender, CalendarLoadEventArgs e)
{
    //Load items whose date range intersects e.DateStart and e.DateEnd
    foreach(CalendarItem item in loadedItems)
    {
         calendar1.Items.Add(item);
    }

    //Or even better....
    calendar1.Items.AddRange(loadedItems);
}
I strongly suggest to add items that only intersect with the calendar’s view range. You can learn how to check date intersection by taking a look at the implementation of DateIntersects, in Calendar:
public static bool DateIntersects(DateTime startA, DateTime endA,
                                  DateTime startB, DateTime endB)
{
     //Don't forget to check dates this way in your database queries!
     return startB < endA && startA < endB;
}
Events
Since you can explore other members using IntelliSense I list events here; they are important because they let you control your application of the Calendar.
DayHeaderClick: Occurs when a day header is clicked.
ItemClick: Occurs when an item is clicked.
ItemCreated: Occurs when an item is successfully created.
ItemCreating: Occurs when the user is about to create an item. It can be cancelled.
ItemDatesChanged: Occurs when the date range of an item changes.
ItemDeleted: Occurs when an item is successfully deleted.
ItemDeleting: Occurs when the user is about to delete an item. It can be cancelled.
ItemDoubleClick: Occurs when an item is double clicked.
ItemMouseHover: Occurs when the mouse is placed over an item.
ItemSelected: Occurs when an item is selected.
ItemTextEdited: Occurs when an item’s text is edited by the user.
ItemTextEditing: Occurs when the user is trying to edit an item’s text. It can be cancelled.
LoadItems: Occurs when the Calendar view is changed.
Some Nice Features
Items Overlapping
When items intersect in their date ranges, there’s a nice algorithm that performs a layout to accommodate them. Give it a try.
Item Coloring
Although a Renderer takes charge of drawing items, you can specify the background colors and borders to items individually.
Even better, you can use the ApplyColor method (in CalendarItem) to an item, and the code will take charge of shading colors for the background, border, and text.
In the demo application, use the calendar’s contextual menu to apply coloring to items.
TimeScale
You can choose between options of time scaling, though, the default is 30 minutes like Outlook’s calendar. Here is a sample of a 15 minutes timescale.
In the demo application, use the calendar’s contextual menu to choose different timescale options.
MonthViewControl
Don’t you absolutely hate the way the MonthCalendar control behaves on your UI? Well, here is the solution. Now, the project contains a control called MonthView, which looks like the Outlook calendar’s view, fully customizable, and it does not force the size of the control; the visualization of months will depend on the size of the container.
Some interesting properties of the control are:
FirstDayOfWeek: To change what day your weeks start with.
ItemPadding: To set the padding of the internal items, so you can make a compact or not so much view.
SelectionMode: Manual, Day, Week, WorkWeek, and Month.
WorkWeekStart: To specify what day the work-weeks start with.
WorkWeekEnd: To specify what day the work-weeks end with.
This C# article describes the MonthCalendar control in Windows Forms.
MonthCalendar is a selectable calendar widget.
On the MonthCalendar, a user can select a day, or a range of days. The user can also scroll through the months. This control provides many useful options. It is ideal for instant calendars.
Start. To get started, you can double-click on the MonthCalendar icon in the Toolbox pane in Visual Studio. A MonthCalendar with all its defaults is inserted into your form. Next, you can adjust the properties of the MonthCalendar.
Usually: You can begin referencing the MonthControl in your program’s C# code through the identifier monthControl1.
MaxDate, MinDate. The MonthControl provides two important properties of the calendar called MaxDate and MinDate. These indicate the maximum and minimum selectable dates. These dates give you a lot of range to select dates.
Date properties:

MinDate:   1/1/1753
MaxDate: 12/31/9998

Color properties. Another set of properties you can edit on the MonthCalendar are the color properties. These allow you to set your control to be in garish, ugly shades of puce, magenta and lavender. You can even dynamically change the colors.
Properties:

BackColor
ForeColor
TitleBackColor
TitleForeColor
TrailingForeColor

BoldedDates. MonthCalendar has several properties related to bolded dates. In the MonthCalendar, some dates can be bolded to indicate an important event. These properties include AnnuallyBoldedDates, MonthlyBoldedDates and BoldedDates.
Next: We look at a code example that demonstrates setting the BoldedDates property.
C# program that uses MonthCalendar and BoldedDates

using System;
using System.Windows.Forms;

namespace WindowsFormsApplication3
{
    public partial class Form1 : Form
    {
	public Form1()
	{
	    InitializeComponent();

	    // Set the BoldedDates property to a DateTime array.
	    // ... Use array initializer syntax to add tomorrow and two days after.
	    monthCalendar1.BoldedDates = new DateTime[]
	    {
		DateTime.Today.AddDays(1),
		DateTime.Today.AddDays(2),
		DateTime.Today.AddDays(4)
	    };
	}
    }
}

Please note that you can use any array initialization syntax you choose to set the BoldedDates property. You could populate a List collection and then convert it to a DateTime array using the ToArray extension method.
ListToArray
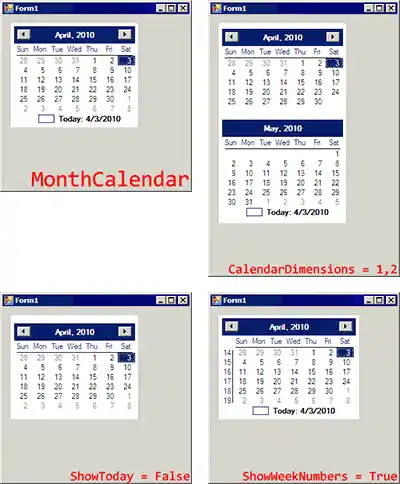
CalendarDimensions. It is also possible to change the MonthCalendar so that it displays more than one month at a time in the visual area. You could, for example, display four months together, or just two. I adjusted the CalendarDimensions to 1, 2.
SelectionRange. The SelectionRange property, as well as the SelectionStart and SelectionEnd properties, allow you to get the dates that are selected in the form of two DateTime values. These are the start and end dates.
Also: You can assign to all of these properties. This will change the currently selected square on the MonthCalendar.
C# program that uses SelectionRange

using System;
using System.Windows.Forms;

namespace WindowsFormsApplication3
{
    public partial class Form1 : Form
    {
	public Form1()
	{
	    InitializeComponent();

	    // You can acquire the range using this property accessor.
	    SelectionRange range = monthCalendar1.SelectionRange;
	    DateTime start = range.Start;
	    DateTime end = range.End;

	    // Alternatively, you can use the SelectionStart and End properties.
	    DateTime startB = monthCalendar1.SelectionStart;
	    DateTime endB = monthCalendar1.SelectionEnd;
	}
    }
}

ShowToday. There are two properties that allow you to change whether and how the «Today» text at the bottom of the calendar appears. ShowToday is by default set to true. If you set it to false, it will not be present at the bottom of the calendar.
ShowTodayCircle: The ShowTodayCircle property adjusts the visibility of the box on the left of the «Today» display.
ShowWeekNumbers. In some applications, you may want users to be able to know what the number of the week is in the year they are looking at. For example, some offices might index years based on an integer.
Here: The ShowWeekNumbers property was set to true. The numbers 14, 15, 16, 17, 18, and 19 are the numbers of the weeks in the year.
DateChanged. The MonthCalendar provides an event-driven user interface and you can provide and hook up event handlers to execute code on user actions. The DateChanged event allows you to detect whenever the user changes the date to something else.
Note: When this event handler executes, you can detect the SelectionRange. You can also access the properties on the DateRangeEventArgs.
C# program that uses DateChanged

using System;
using System.Windows.Forms;

namespace WindowsFormsApplication3
{
    public partial class Form1 : Form
    {
	public Form1()
	{
	    InitializeComponent();
	}

	private void monthCalendar1_DateChanged(object sender, DateRangeEventArgs e)
	{
	    // The user changed the current selection.
	    // ... Bug him or her with an obnoxious message box.
	    // ... It will really help the world be a better place.
	    MessageBox.Show("DateChanged: " +
		monthCalendar1.SelectionRange.ToString());
	}
    }
}

Summary. You could implement a custom calendar widget in the C# language. But this would require a lot of time and effort. As a solution, the MonthCalendar control in Windows Forms provides a fast and easy-to-use calendar.
And: For programs where the calendar is important or key, this may not be sufficient. But in most cases this control is ideal.
Related Links
Adjectives
Ado
Ai
Android
Angular
Antonyms
Apache
Articles
Asp
Autocad
Automata
Aws
Azure
Basic
Binary
Bitcoin
Blockchain
C
Cassandra
Change
Coa
Computer
Control
Cpp
Create
Creating
C-Sharp
Cyber
Daa
Data
Dbms
Deletion
Devops
Difference
Discrete
Es6
Ethical
Examples
Features
Firebase
Flutter
Fs
Git
Go
Hbase
History
Hive
Hiveql
How
Html
Idioms
Insertion
Installing
Ios
Java
Joomla
Js
Kafka
Kali
Laravel
Logical
Machine
Matlab
Matrix
Mongodb
Mysql
One
Opencv
Oracle
Ordering
Os
Pandas
Php
Pig
Pl
Postgresql
Powershell
Prepositions
Program
Python
React
Ruby
Scala
Selecting
Selenium
Sentence
Seo
Sharepoint
Software
Spellings
Spotting
Spring
Sql
Sqlite
Sqoop
Svn
Swift
Synonyms
Talend
Testng
Types
Uml
Unity
Vbnet
Verbal
Webdriver
What
Wpf
You currently have JavaScript disabled on your web browser.
This website uses JavaScript, and This web page needs JavaScript activated to work correctly.
Please active JavaScript on your web browser and then refresh this web page.
By Tim-Bo Tolbert, posted on Jan 09, 2022
The MonthCalendar control is found in the System.Windows.Forms namespace within the System.Windows.Forms.dll. In this blog post I am referring to the MonthCalendar control that is available in C# .NET-Core (.NET 6.0) with Visual Studio 2022 (although this code example might still work OK with older .NET versions).
The purpose and function of the MonthCalendar control is to represent a visual monthly calendar display which the user can view and select dates from, in a standard Gregorian style calendar.
The visual appearance of the MonthCalendar control object can be modified to some extent by adjusting the ForeColor, Font, TitleBackColor, TitleForeColor, TrailingForeColor, and BackColor properties. Since the Paint event is never raised for this control, if you need to provide a more customized look then you should override the OnPrint method and perform custom painting.
Example Source Code
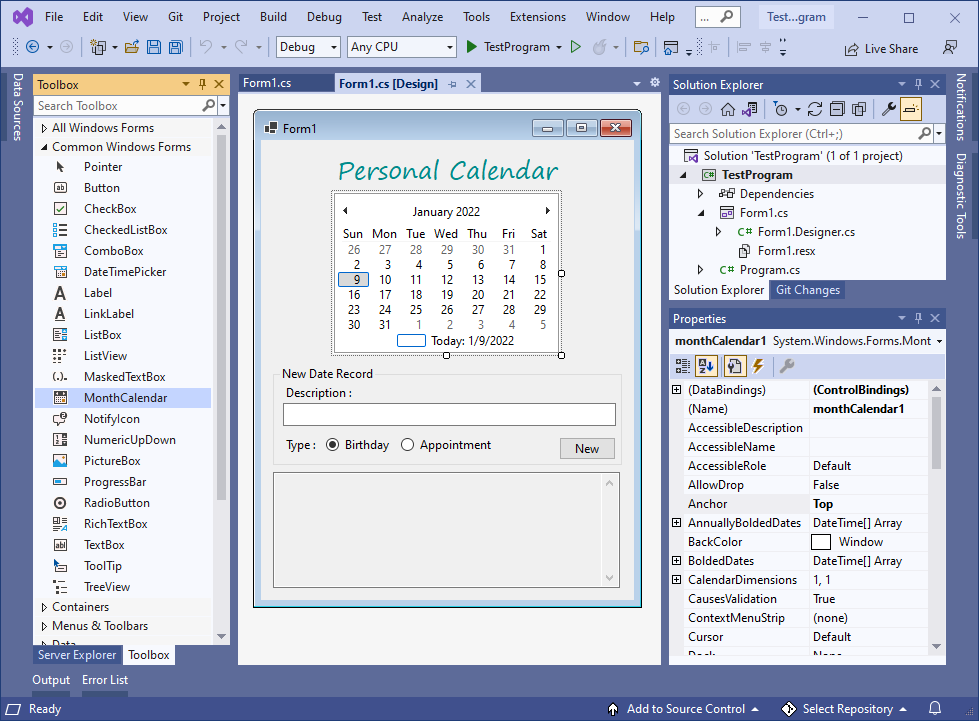
This example uses a MonthCalendar control, along with a GroupBox control, two Label controls, two TextBox controls, two RadioButton controls, one Button control, and a MessageBox object.
To add the MonthCalendar control to your form, you can double click on its name (i.e. MonthCalendar) as listed in the Toolbox window panel within the Form editor window. Alternatively, you can single click on it and then drag and drop it onto your form, to position it more closer to where you want it to be positioned at. Once it is added to the form then it will appear on the forms surface area having default control values.
After you have added the MonthCalendar control to your form, then once you select it then you can view and edit that objects property values in the Properties window within the Forms editor window, where you can then change the controls Name, Text, and other properties as you desire.
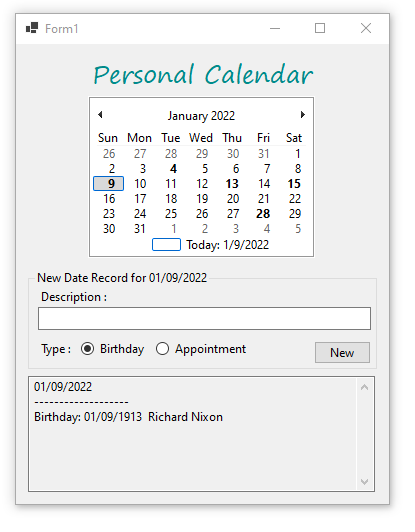
The following example shows how a MonthCalendar control can be added to a Form and allow a user to view and add both recurring Birthday and fixed Appointment date’s to the calendar, which will display on the calendar as Bold date values.
In the following example, I added a MonthCalendar control to my Form, positioning it so that it is centered horizontally and near the top of the form, as shown below. After selecting it I altered its Anchor property to only be anchored at the Top, so that the object will auto-center itself horizontally on the form whenever the form is resized by the user. I then double clicked onto the MonthCalendar control object so that Visual Studio will automatically create and link a callback method to the controls DateChanged event into the Forms source code.
I then added a Label control, and changed its Text property to «Personal Calendar» and altered its Font and ForeColor property values, to increase its size and make it look pleasing. I positioned it to be at the very top of the form and centered above the MonthCalendar control object, and then set its Anchor property to only be anchored at the Top also, so that it too will auto-center itself horizontally on the form whenever the form is resized by the user.
Then I added a GroupBox control, and added a TextBox, two Radio buttons, and one Button control into it, along with some Label controls to help visually identify them to the user. I then altered their Text properties to display the string values as is shown on the Form below. I set the GroupBox and TextBox controls Anchor property to Left, Right, and Top, so that they will stretch with the Form if the user resizes the Form, and then I set the Button controls Anchor property to Right and Top so that its position floats at a fixed distance from the Top and Right edges of the Form if the user resizes the Form.
I then double clicked on the Button control object so that Visual Studio will automatically create and link a callback method to that button’s Click event into the Forms source code.
I then added a TextBox control to the bottom of the Form, and set its MultiLine property to True. I then resized it to be the width of the Form, and anchored it Left, Right and Bottom so that it too will stretch with the Form if the user ever resizes the Form. I set the TextBox’s ScrollBar property value to Both, and ReadOnly property value to True.
I then altered and expanded upon the Forms source code as shown below:
// Copyright 2025 T&J Divisions, LLC
// Designed and developed by Tim Tolbert
// All Rights Reserved
namespace TestProgram
{
    public partial class Form1 : Form
    {
        public Form1()
        {
            InitializeComponent();
        }

        private void Form1_Load(object sender, EventArgs e)
        {
            // initialize MonthCalendar control
            monthCalendar1.TodayDate = DateTime.Today;

            // load birthdates
            loadBirthDates();

            // load appointments
            loadAppointments();

            // populate calendar with known birthdates
            reloadCalendar();

            // display the records for this date, if any
            displaySelectedDatesRecords();
        }

        private void displaySelectedDatesRecords()
        {
            // get the selected date value
            DateTime thisDate = monthCalendar1.SelectionStart;
            string thisDateText = thisDate.ToString("MM/dd/yyyy");
            string shortDate = thisDate.ToString("MM/dd/");

            // see if this is a birth date
            string thisValue = "-------------------" + Environment.NewLine;
            foreach (KeyValuePair<string, string> thisBirthDay in birthDates)
            {
                if (thisBirthDay.Key.StartsWith(shortDate) == true)
                {
                    thisValue += "Birthday: " + thisBirthDay.Key + "  " + thisBirthDay.Value + Environment.NewLine;
                }
            }

            // see if this is an appointment
            foreach (KeyValuePair<string, string> thisAppointmentDay in appointmentDates)
            {
                if (thisAppointmentDay.Key.StartsWith(shortDate) == true)
                {
                    thisValue += "Appointment: " + thisAppointmentDay.Key + "  " + thisAppointmentDay.Value + Environment.NewLine;
                }
            }

            // give feedback
            textBox2.Text = thisDateText + Environment.NewLine + thisValue;

            // update the new date records group box text
            groupBox1.Text = "New Date Record for " + thisDateText;
        }

        private void button1_Click(object sender, EventArgs e)
        {
            // precheck
            if(textBox1.Text.Trim() == "")
            {
                MessageBox.Show("Missing value for persons name", "Error");
                textBox1.Focus();
                return;
            }

            // get the selected date value
            DateTime thisDate = monthCalendar1.SelectionStart;

            // Append current Time to allow for multiple dictionary key entries for this example
            string thisDateText = thisDate.ToString("MM/dd/yyyy " + DateTime.Now.ToString("hh:mm:ss"));

            // try and add the new date record
            try
            {
                if (radioButton1.Checked == true)
                {
                    // add this date to the birthDates dictionary
                    birthDates.Add(thisDateText, textBox1.Text.Trim());
                }
                else if(radioButton2.Checked == true)
                {
                    // add this date to the appointmentDates dictionary
                    appointmentDates.Add(thisDateText, textBox1.Text.Trim());
                }
            }
            catch (Exception ex)
            {
                // if error then display error message
                MessageBox.Show(ex.Message, "Error");
            }

            // reload the calendar to show this new date
            reloadCalendar();

            // display the records for this selected date
            displaySelectedDatesRecords();
        }

        private void loadAppointments()
        {
            // load non-repeating appointment dates from some data source
            // (to keep this example simple I am just adding them manually)
            appointmentDates.Add("01/15/2022", "Sales Tax Report");
            appointmentDates.Add("01/28/2022", "Dentist Appointment");
            appointmentDates.Add("02/26/2022", "Business Trip To Thailand");

        }

        private void loadBirthDates()
        {
            // load repeating birthdates from some data source
            // (to keep this example simple I am just adding them manually)
            birthDates.Add("01/04/1936", "Mom's Birthday");
            birthDates.Add("01/09/1913", "Richard Nixon");
            birthDates.Add("01/13/1985 04:24:45", "First Twins Birthday");
            birthDates.Add("01/13/1985 04:26:05", "Second Twins Birthday");
            birthDates.Add("02/06/1911", "Ronald Reagan");
            birthDates.Add("02/19/1934", "Dad's Birthday");
            birthDates.Add("05/29/1917", "John Kennedy");
            birthDates.Add("06/12/1924", "George H.W. Bush");
            birthDates.Add("06/14/1946", "Donald Trump");
            birthDates.Add("07/06/1946", "George W. Bush");
            birthDates.Add("07/14/1913", "Gerald Ford");
            birthDates.Add("08/04/1961", "Barack Obama");
            birthDates.Add("08/19/1946", "William Clinton");
            birthDates.Add("08/27/1908", "Lyndon Johnson");
            birthDates.Add("10/1/1924", "Jimmy Carter");
            birthDates.Add("11/20/1942", "Joe Biden");

        }

        private void monthCalendar1_DateChanged(object sender, DateRangeEventArgs e)
        {
            // display the records for this selected date
            displaySelectedDatesRecords();
        }

        private void reloadCalendar()
        {
            // suspend drawing the layout
            monthCalendar1.SuspendLayout();

            // remove all previously added birthdates
            monthCalendar1.RemoveAllAnnuallyBoldedDates();

            // add known birthdays
            foreach(KeyValuePair<string, string> thisBirthDay in birthDates)
            {
                monthCalendar1.AddAnnuallyBoldedDate(Convert.ToDateTime(thisBirthDay.Key));
            }

            // add known appointments
            foreach (KeyValuePair<string, string> thisAppointment in appointmentDates)
            {
                monthCalendar1.AddBoldedDate(Convert.ToDateTime(thisAppointment.Key));
            }

            // resume drawing the layout
            monthCalendar1.ResumeLayout();

            // update to ensure bolded dates are bold
            monthCalendar1.UpdateBoldedDates();
        }

    }
}
When you run the above example and interact with the MonthCalendar control object, and/or click on the New Button control object, then you should see something similar to the following:
Initial Screen:
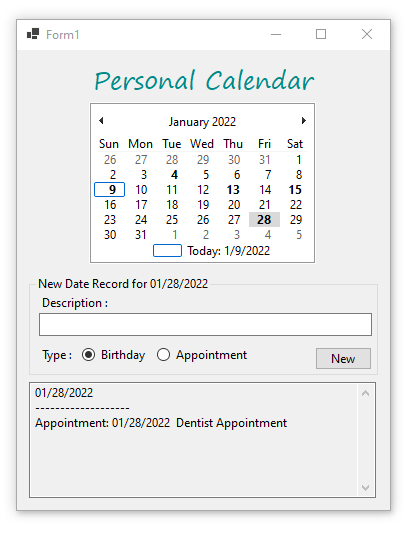
Clicked on the calendar for 01/28/2022:
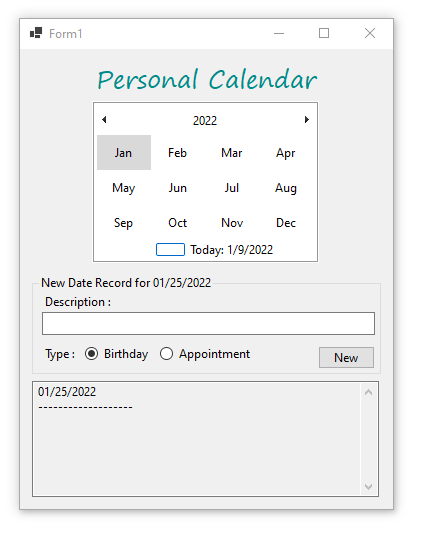
Clicked on the calendar title to show the Months for the year (not required to do, just showing you that it can be done):
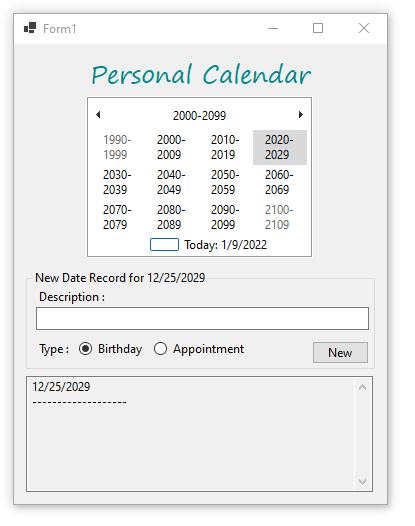
Clicked on the calendar title again to show the Year for the decade (still not required to do, just doing it to show what it can do for allowing you to rapidly select a different date):

Clicked on the calendar title again to show the Decades for the century (again not required to do, I am just doing it here to show you the extent of it):
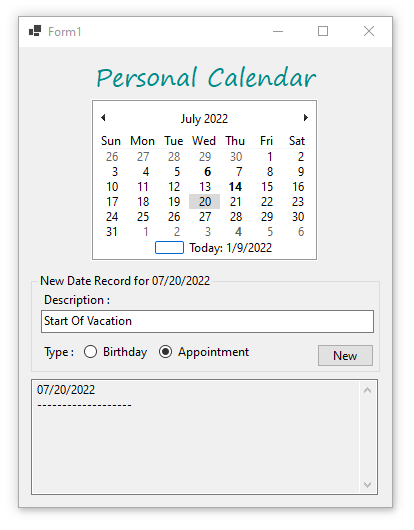
Clicked on the 2020-2030 decade, 2022 year, July month, and 20 day to select 07/20/2022. I then entered in «Start Of Vacation» into new date records description TextBox, and selected Appointment in the Type options:
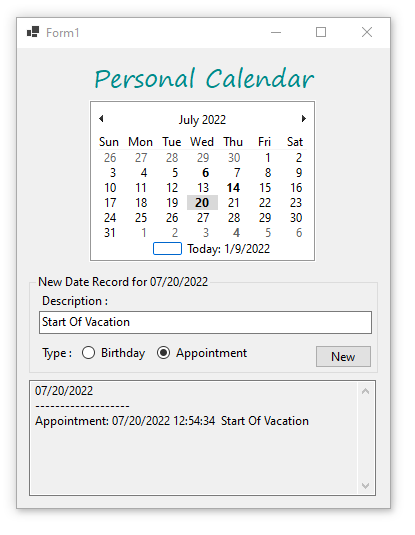
Clicked the New button to add the new appointment date and display it as bold on the calendar:
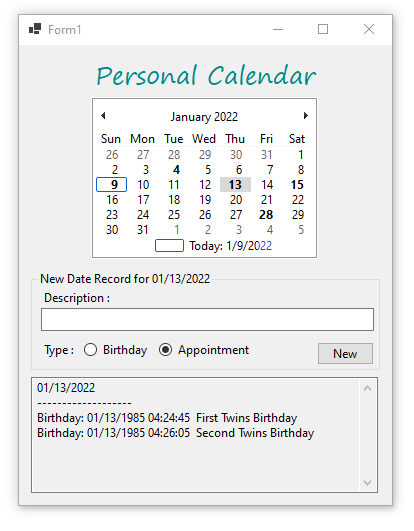
Clicked on Today at the bottom of the calendar and then selected 01/13/2022 to view its value:
Final Thoughts
Thank you for reading, I hope you found this blog post (tutorial) educational and helpful.
MonthCalendar. This is a selectable calendar widget. On the MonthCalendar, a user can select a day, or a range of days. The user can also scroll through the months.
To get started, you can double-click on the MonthCalendar icon in the Toolbox pane in Visual Studio. This control provides many useful options.
BoldedDates. MonthCalendar has several properties related to bolded dates. In the MonthCalendar, some dates can be bolded to indicate an important event.
Next We look at a code example that demonstrates setting the BoldedDates property.
using System;
using System.Windows.Forms;
namespace WindowsFormsApplication3
{
public partial class Form1 : Form
{
public Form1()
{
InitializeComponent();
// Set the BoldedDates property to a DateTime array.
// … Use array initializer syntax to add tomorrow and two days after.
monthCalendar1.BoldedDates = new DateTime[]
{
DateTime.Today.AddDays(1),
DateTime.Today.AddDays(2),
DateTime.Today.AddDays(4)
};
}
}
}
MaxDate, MinDate. The MonthControl has properties called MaxDate and MinDate—these indicate the maximum and minimum selectable dates. These dates give you a lot of range to select dates.
MinDate: 1/1/1753
MaxDate: 12/31/9998
Color properties. Another set of properties you can edit on the MonthCalendar are the color properties. These allow you to set your control to be in various colors.
BackColor
ForeColor
TitleBackColor
TitleForeColor
TrailingForeColor
SelectionRange, as well as SelectionStart and SelectionEnd, allow you to get the dates that are selected in the form of two DateTime values. These are the start and end dates.
Also You can assign to all of these properties. This will change the currently selected square on the MonthCalendar.
using System;
using System.Windows.Forms;
namespace WindowsFormsApplication3
{
public partial class Form1 : Form
{
public Form1()
{
InitializeComponent();
// You can acquire the range using this property accessor.
SelectionRange range = monthCalendar1.SelectionRange;
DateTime start = range.Start;
DateTime end = range.End;
// Alternatively, you can use the SelectionStart and End properties.
DateTime startB = monthCalendar1.SelectionStart;
DateTime endB = monthCalendar1.SelectionEnd;
}
}
}
DateChanged. The MonthCalendar provides an event-driven user interface and you can provide and hook up event handlers to execute code on user actions.
And The DateChanged event allows you to detect whenever the user changes the date to something else.
Note When this event handler executes, you can detect the SelectionRange. You can also access the properties on the DateRangeEventArgs.
using System;
using System.Windows.Forms;
namespace WindowsFormsApplication3
{
public partial class Form1 : Form
{
public Form1()
{
InitializeComponent();
}
private void monthCalendar1_DateChanged(object sender, DateRangeEventArgs e)
{
// The user changed the current selection.
MessageBox.Show(«DateChanged: « + monthCalendar1.SelectionRange.ToString());
}
}
}
ShowToday. There are 2 properties that allow you to change whether and how the «Today» text at the bottom of the calendar appears—ShowToday, and ShowTodayCircle.
Detail This is by default set to true. If you set it to false, it will not be present at the bottom of the calendar.
Detail The ShowTodayCircle property adjusts the visibility of the box on the left of the «Today» display.
A summary. The MonthCalendar control in Windows Forms provides a fast and easy-to-use calendar. It is used to allow a user to indicate a date.
Dot Net Perls is a collection of pages with code examples, which are updated to stay current. Programming is an art, and it can be learned from examples.
Donate to this site to help offset the costs of running the server. Sites like this will cease to exist if there is no financial support for them.
Sam Allen is passionate about computer languages, and he maintains 100% of the material available on this website. He hopes it makes the world a nicer place.
This page was last updated on Sep 28, 2022 (edit).