
Автор: Келли Последнее изменение: 2025 июля 04 г.
При запуске Microsoft Outlook двойным щелчком по значку Outlook на рабочем столе или в меню «Пуск» обычно открывается папка «Входящие» учетной записи электронной почты по умолчанию. Но в некоторых случаях вам может потребоваться напрямую открыть определенную папку, например Календарь. И эта статья покажет вам, как этого добиться:
Создайте новый ярлык на рабочем столе для календаря Outlook / конкретной папки
Этот метод поможет добавить новый ярлык на рабочий стол для конкретной папки Outlook, такой как Календарь, Задача и т. Д.
1. Откройте папку, содержащую программу Microsoft Outlook, открыв проводник, вставив путь к папке C:\Program Files\Microsoft Office\Office15 в поле «Адрес» и нажав клавишу «Enter».

Примечание:
(1) Измените путь к папке Office15 в приведенном выше списке на Office16 для Outlook 2016 или Office14 на Office 2010.
(2) Если вы устанавливаете Microsoft Office (или Outlook) в пользовательскую папку, откройте пользовательскую папку, содержащую программу Microsoft Outlook.
2. Теперь открывается папка, содержащая программу Outlook. Щелкните правой кнопкой мыши программу Outlook (EXE-файл) и выберите «Отправить» > «Рабочий стол (создать ярлык)» из контекстного меню. Смотрите скриншот:

3. Теперь ярлык Outlook на рабочем столе создан. Перейдите на рабочий стол, щелкните правой кнопкой мыши ярлык на рабочем столе и выберите «Свойства» в контекстном меню. Смотрите скриншот:
4. Теперь появится диалоговое окно «Свойства». Щелкните вкладку «Ярлык», добавьте пробел и /select outlook:calendar в конце поля «Объект», затем щелкните кнопку «ОК». Смотрите скриншот:
Заметки:
(1) После изменения текст изменится на «C:\Program Files\Microsoft Office\root\Office16\OUTLOOK.EXE» /выберите outlook:calendar в поле «Объект». (16 можно заменить на 15, 14 или другие в зависимости от вашей версии Microsoft Outlook)
(2) Если имя целевой папки содержит пробелы, заключите имя папки в кавычки, например «C: \ Program Files \ Microsoft Office \ root \ Office16 \ OUTLOOK.EXE» / выберите «outlook: Отправленные».
(3) Если целевая папка является подпапкой, добавьте имя основной папки и косую черту перед именем подпапки, например «C: \ Program Files \ Microsoft Office \ root \ Office16 \ OUTLOOK.EXE» / выберите outlook: Контакты / B.
5. Продолжайте выбирать ярлык на рабочем столе, щелкните правой кнопкой мыши и выберите «Переименовать» в контекстном меню, а затем переименуйте ярлык на рабочем столе по своему усмотрению.
В моем случае я коротко переименовываю рабочий стол в Outlook_Calendar. Смотрите скриншот:
С этого момента при двойном щелчке по ярлыку на рабочем столе по умолчанию в Outlook открывается папка «Календарь».
Автоматический ответ с учетной записью электронной почты по умолчанию в Outlook
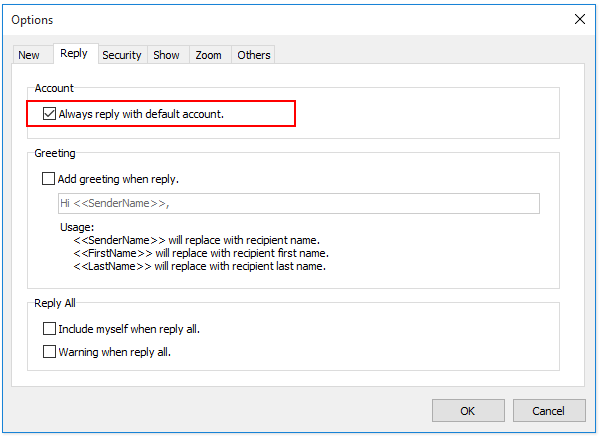
В общем, Outlook может определить учетную запись электронной почты, к которой принадлежит активное письмо, а затем автоматически ответить с этой учетной записи. Однако с опцией Kutools for Outlook «Всегда отвечать с учетной записью по умолчанию», независимо от того, к какой учетной записи электронной почты принадлежит активное письмо, на него будет отправлен ответ с учетной записи электронной почты по умолчанию в вашем Outlook.
Изменить исходный ярлык на рабочем столе для календаря Outlook / конкретной папки
Фактически, вы также можете настроить параметры Outlook и изменить начальную папку по умолчанию в Outlook. Пожалуйста, сделайте следующее:
1. Нажмите «Файл» > «Параметры».
2. В открывшемся диалоговом окне «Параметры Outlook» нажмите «Дополнительно» на левой панели, а затем нажмите кнопку «Обзор» в разделе «Запуск и выход из Outlook». Смотрите снимок экрана:

3. Теперь появится диалоговое окно выбора папки. Щелкните, чтобы выбрать новую начальную папку, как вам нужно, и нажмите кнопку «ОК». Смотрите скриншот:
4. Нажмите кнопку «ОК» в диалоговом окне «Параметры Outlook».
В дальнейшем при запуске Outlook по умолчанию открывается указанная начальная папка.
Статьи по теме
Лучшие инструменты для офисной работы
Срочные новости: Kutools для Outlook запускает бесплатную версию!
Испытайте совершенно новую БЕСПЛАТНУЮ версию Kutools for Outlook с более чем 70 невероятными функциями, которые можно использовать НАВСЕГДА! Нажмите, чтобы скачать сейчас!
🤖 Кутулс ИИ : Использует передовые технологии искусственного интеллекта для легкой обработки электронной почты, включая ответы, обобщение, оптимизацию, расширение, перевод и составление электронных писем.
???? Автоматизация электронной почты: Автоответ (доступно для POP и IMAP) / Расписание отправки писем / Автоматическое копирование/скрытая копия по правилам при отправке электронной почты / Автопересылка (расширенные правила) / Автоматическое добавление приветствия / Автоматически разделять электронные письма от нескольких получателей на отдельные сообщения …
📨 Управление электронной почтой: Отозвать электронные письма / Блокировка мошеннических писем от субъектов и других лиц / Удалить повторяющиеся электронные письма / Advanced Search / Объединение папок …
📁 Вложения Pro: Пакетное сохранение / Пакетное отсоединение / Пакетное сжатие / Автосохранение / Авто отсоединение / Автоматическое сжатие …
???? Магия интерфейса: 😊Больше красивых и крутых смайлов / Напоминать, когда приходят важные письма / Свернуть Outlook вместо закрытия …
???? Чудеса в один клик: Ответить всем с вложениями / Антифишинговые письма / 🕘Показать часовой пояс отправителя …
👩🏼🤝👩🏻 Контакты и календарь: Пакетное добавление контактов из выбранных писем / Разделить группу контактов на отдельные группы / Удалить напоминания о днях рождения …
Используйте Kutools на предпочитаемом вами языке — поддерживаются английский, испанский, немецкий, французский, китайский и более 40 других языков!
Мгновенно разблокируйте Kutools для Outlook одним щелчком. Не ждите, скачайте сейчас и повысьте свою эффективность!
Apart from being the email client of choice for millions of people, Outlook is much more than that. Calendar and Tasks are two other main features which are used extensively by everyone. There is however no way to display the calendar and tasks without Outlook 2010 being open and displaying them on the desktop is out of the question.
DeskTask fills this void. It is a neat little app that syncs with Outlook and displays both Calendar and Tasks on the desktop. It can also display the To-do list (Folder Tasks). By default, it is positioned on the left side of the window but can be dragged and placed anywhere on the screen.

The default refresh interval is 1 hour and can be changed from General tab in Options. Other noteworthy settings include, align items, refresh hotkey, snap to desktop, open outlook items(when clicked), and more.

Calendar and Tasks can both be customized from their respective tabs. You can also adjust the way you want them to be displayed from the Display tab.


To open Outlook, Calendar, or Tasks, right-click the system tray icon and choose the desired option. Apart from Options, there are four other useful items in the context menu; Refresh, Restore Position, Hide Desktop Window, and Lock Window.
Download DeskTask
The updated version of this app works seamlessly with both Windows 7 and Outlook 2010. It works on all versions of Windows and Outlook till 2000.


With a few keystrokes, you can display your Outlook calendar on your desktop.
You can display your Microsoft Outlook calendar right on your computer’s desktop, along with a full week’s worth of tasks. As long as you have Microsoft Outlook 2000 or a more recent version, and an Active Desktop Calendar version 5.6 or later, you won’t have to download any additional programs. You will have to start Microsoft Outlook whenever you power on your computer in order to keep your desktop calendar display updated.
Step 1
Turn on your computer. Open Microsoft Outlook.
Step 2
Locate the date on the right-hand side of your task bar, next to the clock. Right-click on it and select «Layers.»
Step 3
Select «Add Outlook Layer.»
Step 4
Click on the desktop icon on the bottom left-hand side of your taskbar to see your new desktop calendar.
Если для организации повседневных дел вы используете календарь Microsoft Outlook то вам может пригодиться бесплатная утилита Outlook on the Desktop. Удобство данной программы заключается в том, что вам теперь не нужно выполнять множество кликов, открывая необходимые окна. Утилита перемещает календарную систему прямо на рабочий стол операционной системы Windows, и все дела будут постоянно перед глазами. При этом календарь полностью функционален, вы можете редактировать, перетаскивать файлы и так далее. Скачать бесплатную утилиту Outlook on the Desktop можно
отсюда
.

Управление осуществляется через значок с отображением текущей даты в системном трее. Нажав на нем правую клавишу, открывается меню с параметрами конфигурации.

Вы можете переключаться между календарем, контактами, записями, задачами. С помощью пункта Select Folder осуществляется выбор папки для работы. Пункт Start With Windows означает запуск утилиты при старте системы. Lock Position блокирует перемещение окна календаря на рабочем столе. Hide скрывает окно утилиты, для возобновления отображения нажмите Show. Пункт Disable Editing запрещает изменения, то есть редактирование записей. Для выхода используется пункт Exit.
Интерфейс утилиты Outlook on the Desktop достаточно прост и удобен. Можно отрегулировать прозрачность окна ползунком в левом верхнем углу окна.

Для изменения размера окна воспользуйтесь методом перемещения границ, подведя курсор к краю до появления двойной стрелки. Изменение позиции осуществляется перетаскиванием, так же как и других окон в Windows.
Системные требования:
OS Windows XP и выше.
Microsoft Outlook 2003 или выше. В Office 2010 при работе замечены ошибки. Советуют установить SP1 для него.
Microsoft .NET Framework 3.5.
———————————————————————————————
Making Outlook Calendar a Widget

Outlook Calendar is a great tool for keeping track of our busy schedules. We all have so many meetings, appointments, and tasks that it can feel overwhelming at times. So what’s the easiest way to keep tabs on everything? Adding the Outlook Calendar as a widget on our devices can make it much easier to stay organized.
It might sound complicated, but trust me, it’s not. With a few simple steps, we can have our Outlook Calendar right on our home screen, giving us an at-a-glance view of what’s coming up. Besides being super handy, it also saves us a lot of time. Instead of constantly opening the app, we can see our schedule with just a quick glance.
Adding a widget is as easy as tapping a few options. On an Android device, we can long-press the home screen, select Widgets, find Outlook, and drag the Calendar widget to our desired spot. This quick setup will transform the way we manage our day, keeping us one step ahead without any fuss. Isn’t it time we made our lives a bit simpler?
Contents
- 1 Introduction
- 2 Setting Up Outlook
- 2.1 Step-by-Step Guide
- 2.2 Adding Widgets
- 3 Creating The Widget
- 3.1 Necessary Tools
- 3.2 Step-By-Step Guide
- 4 Customization Options
- 4.1 Color and Layout
- 4.2 Notification Settings
- 5 Troubleshooting
Introduction
Let’s face it, life can get pretty hectic. Between work, personal life, and everything in between, keeping track of our schedules can be a real challenge. That’s where the Outlook calendar widget comes in handy.
Adding the Outlook calendar as a widget to our Android device can make a world of difference. It’s like having a personal assistant right on our home screen. We can quickly see our upcoming meetings or appointments without needing to open the full app.
The process to set it up is surprisingly simple. With just a few taps and swipes, we can get our calendar up and running. Trust us, it’s worth the small investment of time.
Want to know the best part? We can customize the widget to display different calendars from various accounts. So, if we’re juggling multiple schedules, we’ve got options.
In this article, we’ll walk through how to make Outlook calendar a widget step-by-step. From finding the widget to customizing it to suit our needs, we’ll cover everything.
Ready to make our lives a bit easier? Let’s get started! 🌟
Setting Up Outlook
First, we need to make sure we have the Outlook app installed. If you’re using a smartphone, head to the App Store or Google Play Store. If you’re on a computer, download it from the official Microsoft website. Once it’s installed, let’s start to set things up.
Step-by-Step Guide
-
Open the Outlook App
We start by launching the app. If prompted, we log in using our Microsoft account. Don’t have one? No worries! We can create a new account quickly. -
Add Our Email Accounts
Inside the app, tap the menu (three lines) in the upper-left corner. Tap on “Settings,” then “Add Account.” We enter our email credentials. This will sync our emails, calendars, and tasks. -
Enable Calendar
To access our calendar, click on the calendar icon at the bottom. This brings up our appointments, meetings, and tasks. We can add new events by tapping the “+” button. -
Customize Sync Settings
We want our calendar and emails to sync perfectly. Go back to “Settings” and then “Account Info.” Here, we can adjust the sync frequency to stay updated.
Adding Widgets
To make life simpler, add a Calendar Widget:
-
Android:
Long hold the home screen, tap “Widgets,” then drag the Outlook Calendar widget to the desired location. Customize it by selecting which calendars to display. -
Windows 11:
Open the Widgets pane, and add the calendar widget. A pop-up window will allow us to configure our display preferences.
Note: We can pin different views like Mail, Calendar, and Tasks directly on the Windows desktop.
Lastly, let’s enable notifications to ensure we never miss an email or meeting reminder.
With these steps, our Outlook is set up and ready for both work and personal use. 🌟
Creating The Widget
Making the Outlook Calendar a widget lets us quickly see our schedule. Whether on a phone or desktop, it’s a handy tool for staying organized.
Necessary Tools
To start, we need a few things ready. If we’re using Android, we should have the Outlook app installed from the Google Play Store. For iOS, we need it from the App Store. Also, let’s use a device with the latest software updates to avoid any hiccups.
On a Windows 10 or Windows 11 desktop, we use the Calendar app or download the Outlook app from the Microsoft Store. Having a stable internet connection ensures the widget syncs all our events in real-time.
Step-By-Step Guide
-
Open the Widgets Menu
- On Android, long-press on the home screen and select “Widgets.”
- For iOS, swipe right on the home screen and tap “Edit.”
-
Select Outlook Calendar
- Scroll through the list of widgets until we find “Outlook.”
- Tap and hold the Calendar widget.
-
Drag and Place
- Drag the widget to our preferred spot on the home screen.
- Release it to place.
-
Configure the Widget
- After placing, a configuration screen pops up.
- Choose which calendars to display, such as work or personal.
-
Finalize Setup
- Tap “Add Widget” to complete the setup.
- On Windows 10 or 11, open the Calendar app, go to settings, and pin the calendar to Start.
| Step | Action | Device |
| 1 | Open Widgets Menu | Android, iOS |
| 2 | Select Outlook Calendar | All Devices |
| 3 | Drag and Place | All Devices |
| 4 | Configure the Widget | All Devices |
| 5 | Finalize Setup | All Devices |
And voila! Let’s enjoy a more organized day with our new Outlook Calendar widget.
Customization Options
Let’s dive into how we can make our Outlook calendar widget more personal and functional by tweaking its color, layout, and notification settings.
Color and Layout
When customizing the Outlook calendar widget, the first thing we often want to do is adjust its color and layout. This helps make the widget more visually appealing and easier to read. We can start with choosing the colors that best suit our preferences.
Color Options:
- Default Themes: Look for the default themes provided by Outlook.
- Custom Colors: Some devices may allow you to select custom colors for better personalization.
Layout Adjustments:
- Size Adjustment: Resize the widget to fit our home screen without clutter.
- Calendar View: Choose between day view, week view, or month view.
- Font Size: Adjust the font size for better readability.
These settings ensure that our calendar widget isn’t just functional but also matches our overall aesthetic sense.
Notification Settings
Staying on top of our schedule is crucial, and notification settings play a big role in that. Outlook offers several options to fine-tune notifications, making sure we never miss an important event or reminder.
Notification Features:
- Event Reminders: Set up reminders for events. Options usually include 5 minutes, 10 minutes, or up to a day before.
- To-Do List Alerts: If we integrate our to-do list with the calendar, we can receive notifications for due tasks.
- Email Notifications: Enable or disable email notifications to control what shows up on the widget.
Snooze Options:
Some of us like to snooze our reminders. Customize the snooze duration to match our workflow, whether it’s 5 minutes or an hour.
By adjusting these settings, we can make sure our Outlook calendar widget is perfectly aligned with how we manage our time and tasks.
Troubleshooting
Getting the Outlook calendar widget to work smoothly on your Android device can be a bit tricky. Here’s how we can tackle common issues.
Widget Not Showing Up
If the widget doesn’t appear in the list, let’s start simple. Restart your phone. Sometimes, that’s all it takes. If it’s still missing, make sure you’re running the latest version of both Android and Outlook.
Widget Not Updating
Sometimes the widget might not refresh properly. First, ensure you’re connected to the internet. If it’s still stuck, remove the widget and add it again. Long hold the widget, drag it to the trash icon, and then re-add it. This often solves sync issues.
Can’t Select Calendar
When you can’t select the desired calendar, check your Outlook settings. Ensure the calendar is enabled and synced. Go to Settings > Accounts > Select account > Sync Calendar.
Widget Is Too Small
If your widget feels cramped, most devices allow resizing. Long press the widget until a border appears, then drag to resize. Make sure it’s placed somewhere with enough screen space.
Tip: Remember, not all devices support widget resizing. If yours doesn’t, you may be out of luck.
Feedback and Help
If these steps don’t work, it’s time to reach out. Use the “Give Feedback” option in your Outlook app. Go to Settings > Help & Feedback > Contact Support. They can offer more tailored solutions.
By following these tips, most issues should be resolved, letting us enjoy a smooth experience with our Outlook calendar widget!