
Первоначально для работы необходимо установить роли File Server, File Server Resource Manager и средства управления (Tools). Отмечаем эти компоненты в мастере установки в Server Manager и нажимаем Install.

Их можно установить гораздо быстрее, используя PowerShell. Запускаем PowerShell и вводим команду, которая установит сразу все необходимое:
Install-WindowsFeature -Name FS-FileServer, FS-Resource-Manager, RSAT-FSRM-Mgmt

Вначале нужно определиться с типами файлов, которые будут блокироваться. Минус в том, что правила используют расширения файлов, и если пользователь изменит расширение файла, то ограничение уже не отработает.
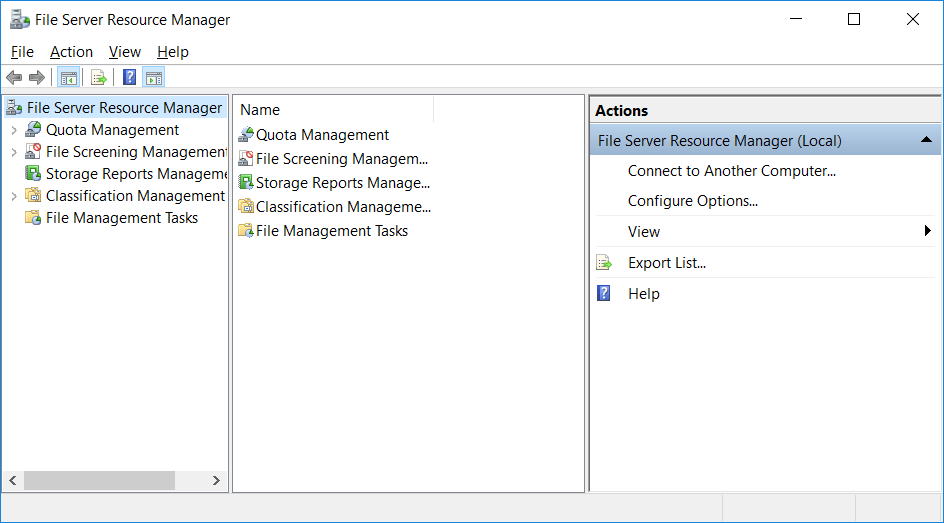
Нажимаем Win+R (Выполнить) вводим fsrm.msc и нажимаем Enter. Откроется оснастка File Server Resource Manager. Также ее можно запустить из Server Manager.

Преднастроенные (по-умолчанию) типы файлов находятся в группе File Screening Management — File Group.

В свойствах имеется возможность добавлять свои расширения файлов.
Знак * перед расширением — это знак, означающий, что любое имя файла с этими расширениями может быть заблокировано. Также могут быть разрешены или запрещены сами файлы, на основе содержимого самого имени, а не только расширения.
В группе File Screen Templates находятся готовые шаблоны, которые можно использовать или изменять.

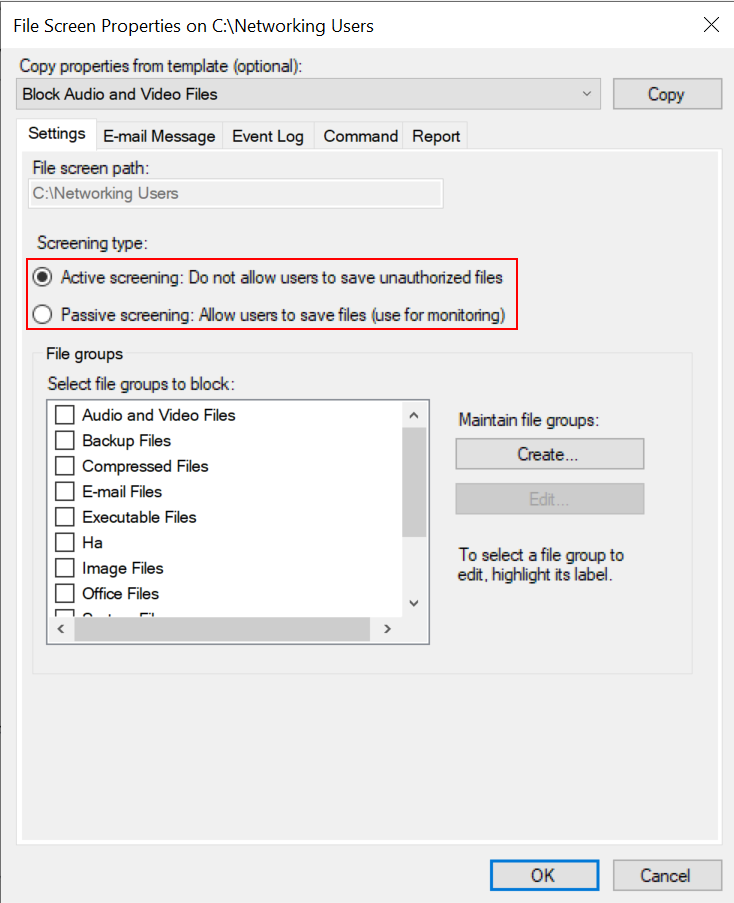
В шаблоне Block Audio and Video Files включен (Active screening) активный мониторинг, т.е. он не позволит пользователю сохранить файлы, в то время как пассивный мониторинг (Passive screening) будет только мониторить и позволять сохранять файлы.
В Свойствах шаблонов имеются дополнительные вкладки для настройки уведомлений на электронную почту, которое получит пользователь, попытавшийся сохранить заблокированный файл. Это весьма полезная функция, если сотрудник не ознакомлен с правилами работы с сетевыми ресурсами. Сразу же можно отправить письмо в службу технической поддержки. При включении этой опции вы увидите предупреждение, т.к. у вас должен быть настроен SMTP-сервер.
В теме письма можно написать, почему нельзя сохранять тот или иной тип файлов.

На вкладке Event Log можно настроить регистрацию и запись события при попытке сохранить файл. Можно использовать переменные, которые будут автоматически подставляться в сообщение.

Вкладка Command позволяет указать программу или скрипт, который запустится при попытке сохранить неразрешенный файл. Можно указать уровень привилегий, с которыми будет запускаться программа или скрипт, т.к. у разных учетных данных могут быть различные права.

Последняя вкладка Reports. Отчет может быть автоматически сгенерирован и отправлен по электронной почте администраторам или пользователю, пытающемуся сохранить неавторизованный файл.

Создадим блокировку файлов мультимедиа. Шаблон по-умолчанию для этих файлов уже имеется.
Перейдем в File Screening Management — File Screens и выберем Create File Screen.

Сначала нужно указать каталог, к которому будет применяться блокировка. Выбрать шаблон (Block Audio and Video Files). Нажать Create.
Настройка будет применяться ко всему содержимому указанного каталога.
Так как в шаблоне блокировки установлено расширение *.mp3 создать или изменить файл в указанной директории не получится. Система покажет сообщение «File Access Denied«.

В группе Quotas Management Quota Templates существуют преднастроенные шаблоны квот. Эти шаблоны обладают такими же свойствами, как и шаблоны блокировки. Отправка предупреждения на почту, запись в лог, выполнение команды и отчет.
Создадим жесткую квоту в 100 MB, т.е. запись в папку будет ограничена при достижении объема в 100 MB.

При сохранении больше 100 MB получим сообщение, что нет свободного места.

When you create a file server, the File Server Resource Manager (FSRM) is a must-have tool. You can use the FSRM to set limits for storage, classify files and folders, and control the types of file(s) you want to store on the file server. Moreover, the FSRM feature is not installed by default on Windows Server 2022 and the previous versions. You can install this feature manually using PowerShell or Server Manager. You will learn how to install the FSRM on Windows Server 2022. Additionally, you will learn how to restrict a folder by storage size and data type.
Install File Server Resource Manager on Windows Server 2022
There are two ways to install this feature on Windows Server 2022:
1. Install Using PowerShell
An easy and quick way to install the FSRM on Windows Server 2022 is using PowerShell.
- Search the PowerShell in the Search box or open it from the Start Menu on Windows Server.
- In the PowerShell window, write:
Install-WindowsFeature FS-Resource-Managerand enter.

It may take a few seconds to install. After the FSRM is installed, you can write the: Get-WindowsFeature |More to check whether it is installed successfully or not. If the installation was completed, you see the X sign in front of its name.
2. Install the FSRM through Server Manager
Another way to install the File Server Resource Manager on Windows Server is via the Server Manager.
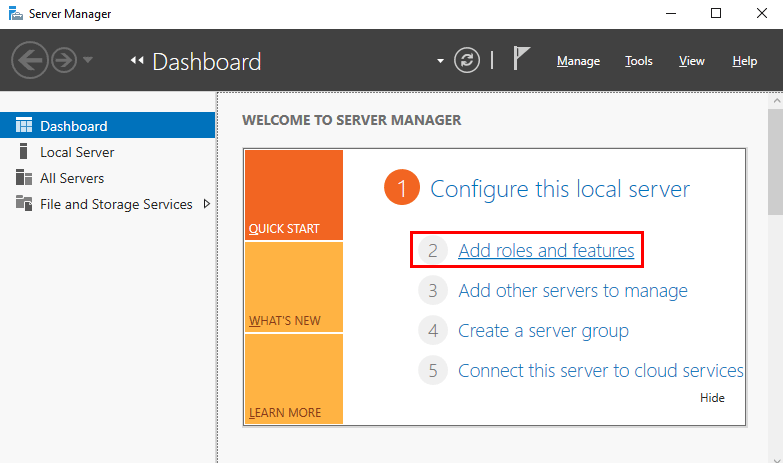
- Open the Server Manager in your Windows Server. Click on Manage and Add Roles and Features on the top right-hand side.
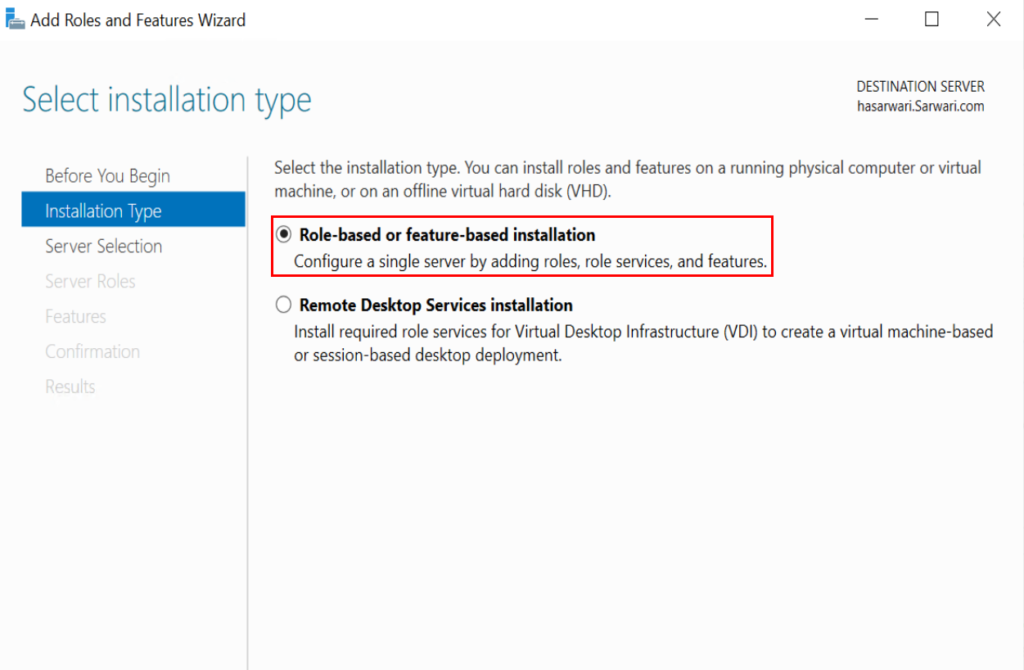
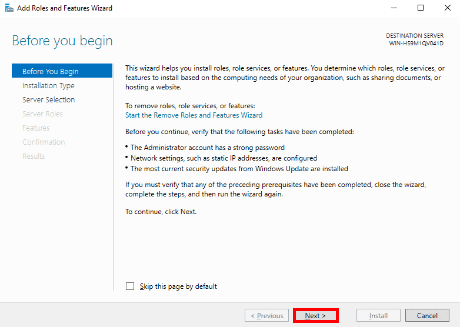
- Click on Next in Add Roles and Features Wizard.
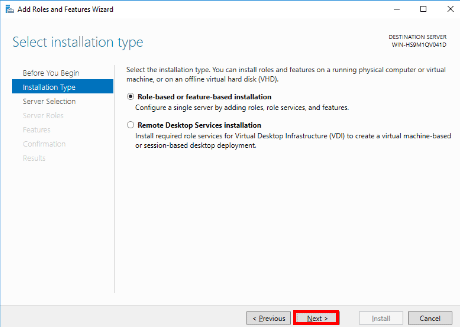
- Select the installation type: Role-based or Feature-based installation, and click Next.
4. Choose the destination server and click next.
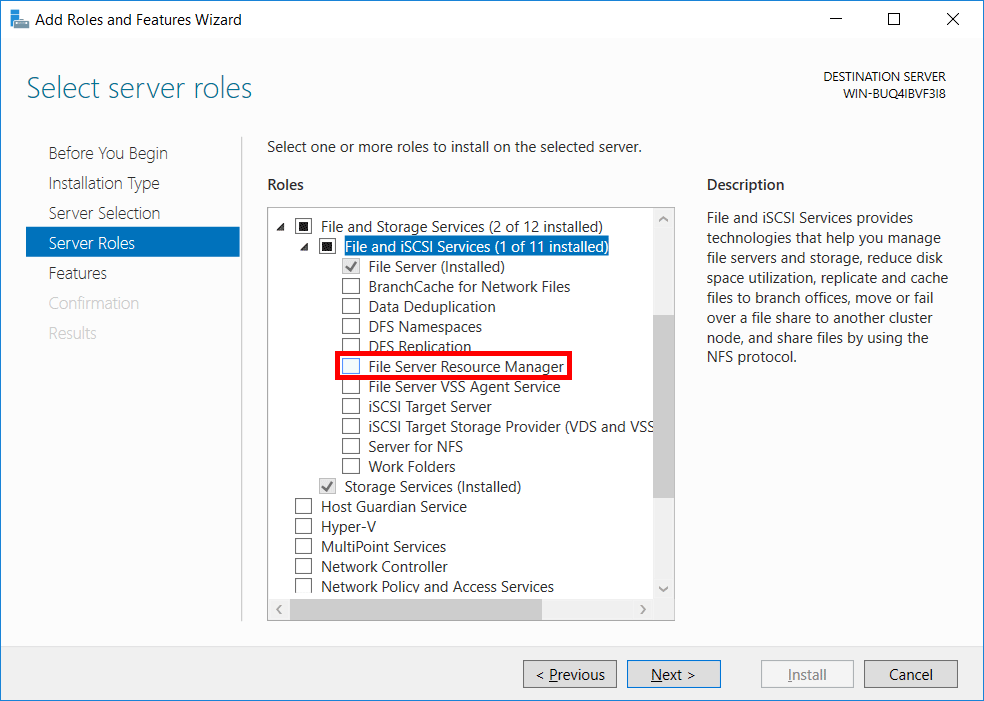
5. Find the File and Storage Services feature in the Select Server Roles window and expand it. Under the File and Storage Services, there are two more options. You expand the File and ISCSI Services.
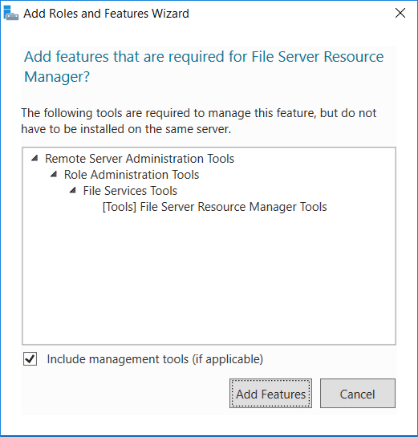
6. Find the File Server Resource Manager feature and select (Check) it, and a new window pop up; click on Add Features, and click next.
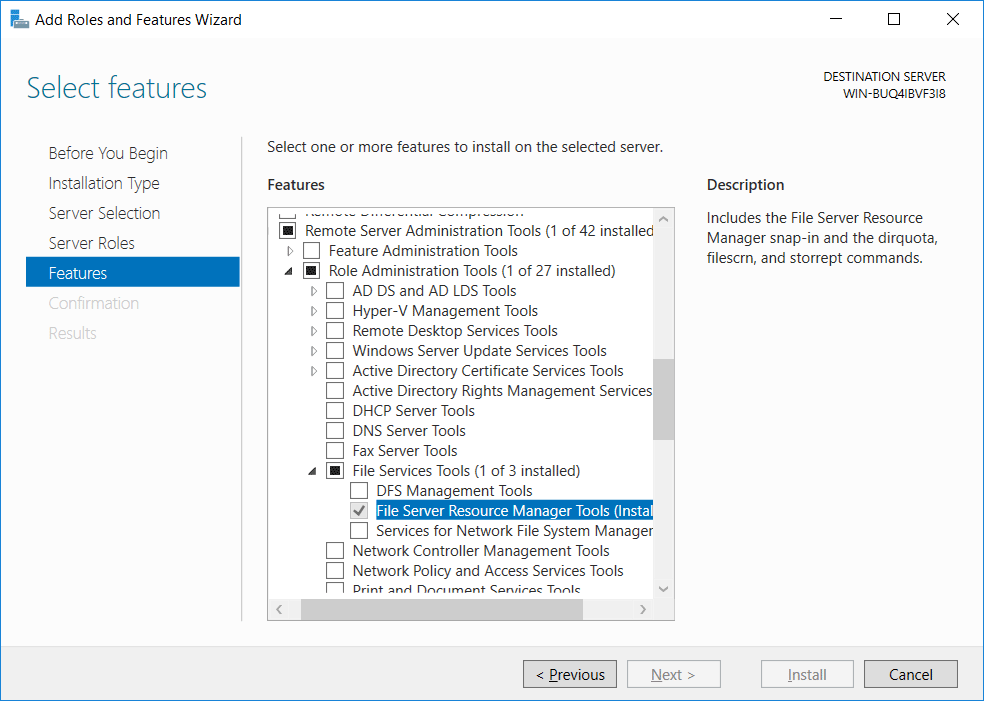
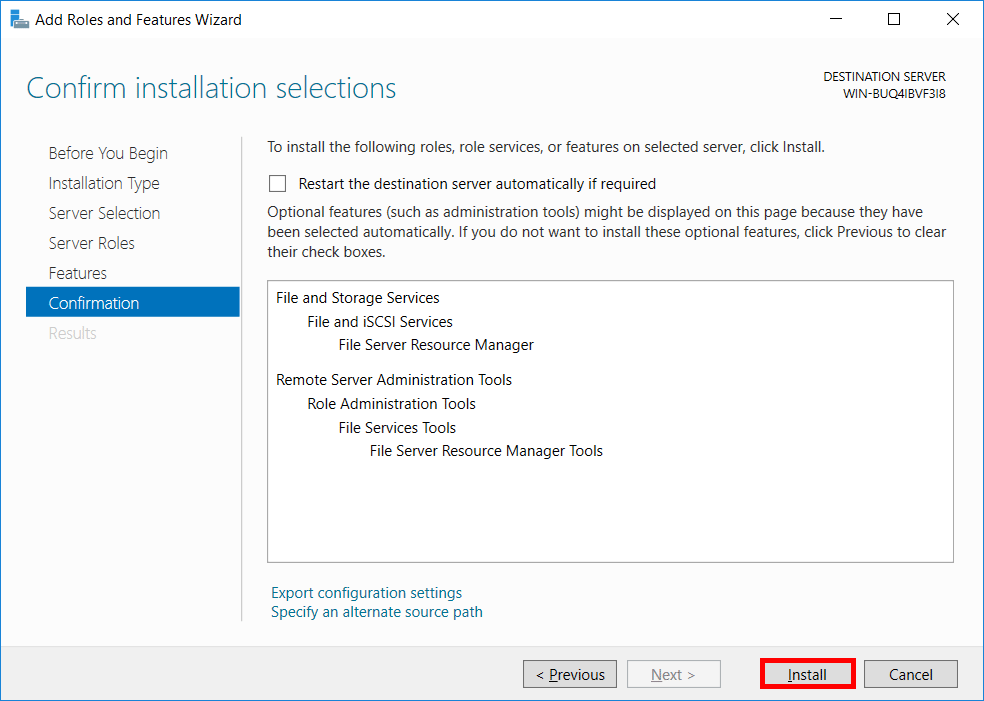
7. In the Select Feature window, click Next, and in the Confirm the Installation Selections window, click on the Install button.
After the installation, open the Server Manager. Click on the Tools menu, and see the File Server Resource Manager added there.
Configure File Server Resource Manager
When you open the File Server Resource Manager feature, there are five sub-features under it. You can use those sub-features according to the requirement. In this article, we discuss the most important of them: Quota Management and File Screening Management.
Quota Management
People use Quota Management to limit the space allowed for the volumes or folders and notify the admin or the user via email or other notifications. When you open the Quota Management, there are two other sub-container:
- Quota: This container contains all the existing and upcoming quotas with details.
- Quota template: it carries all the existing and ready templates.
How do create quotas?
- Right-click on the Quota container and click on Create Quota.
- In the Create Quota window, specify the folder path that you want to restrict. You can do it by browsing or writing the path of that folder.
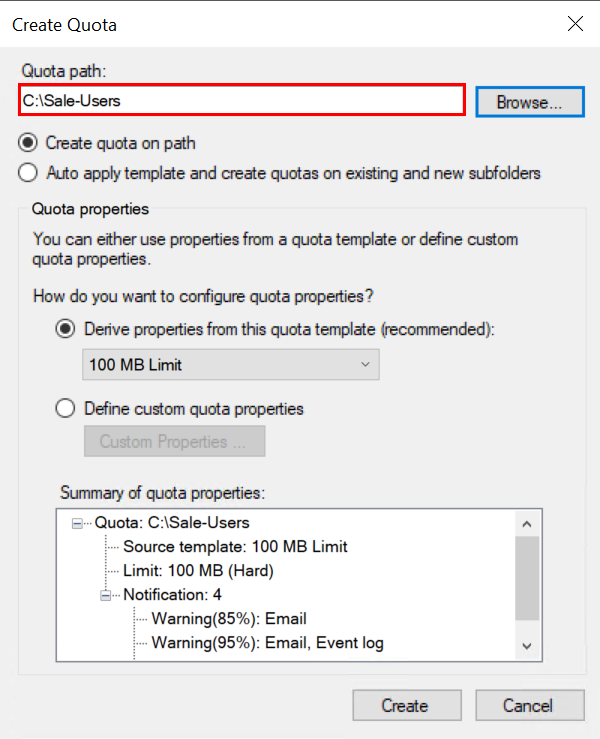
3. In the same window, a question asking how do you want to configure quota properties? Beneath that question, there are two options.
- If you check the “Drives properties from this quota template”, then open the drop-down menu. And select the limited space amount from the existing templates, and click Create.
- Alternatively, if you check the second answer (Define custom quota properties), click on the Custom Properties button. The Custom Properties button lets you specify the quota properties yourself.
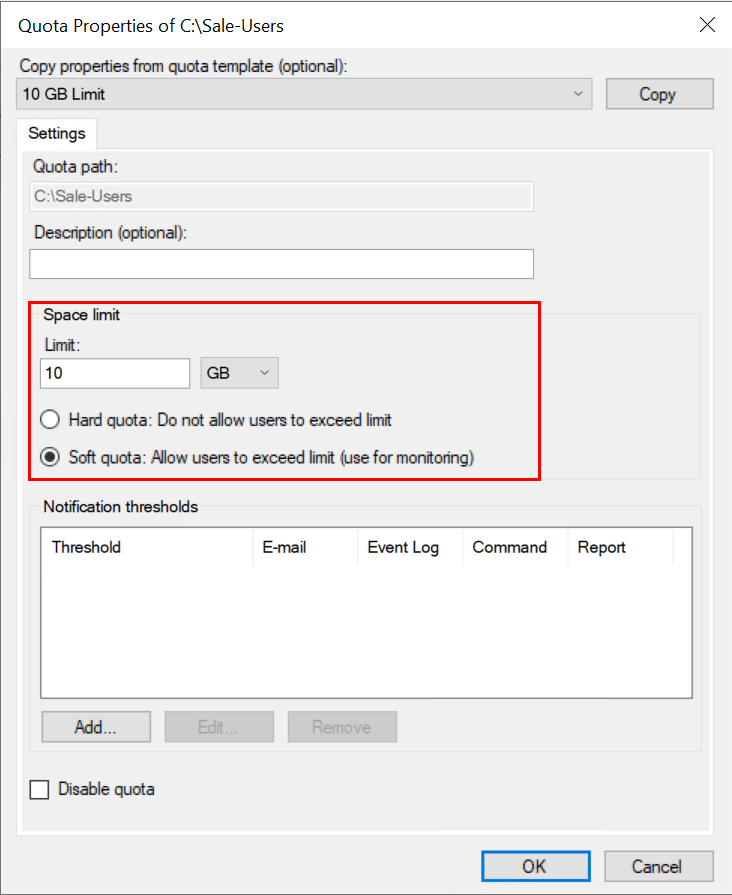
4. If you want a custom quota, specify the space limit and types of quotas in the custom properties windows. There are two types of Quotas:
- Hard quota specifies not to exceed the defined amount.
- Soft quota is just for monitoring.
5. Now click on Add button for the notification thresholds.
6. In the threshold window, specify when and how notification should notify the admin or user. And what type of notifications (Email, Event log, Command, or Report) should notify the admin or the user.
7. After defining the type of notification, click Ok to close the threshold windows. Then click again Ok to close the quota properties window. Finally, click on Create button in the Create Quota, and a new window asks you to save the newly created template. If you want to save the template, give it a name and click on Ok. Else, check the Save custom quota without saving the template and click the Ok.
File Screening Management
You can use file screening management to control the types of files users can store in the folder or volumes. If you expand the file screening management, you will see three options:
- File Screen: you can see and create new file screens.
- File Screen templates: it keeps many pre-made templates that you can use.
- The third option is file Group: it consists of files in one group.
How to Create New File Screen
- Right-click on File Screen and click on Create File Screen.
- Specify the path of the folder or volumes you want to implement the restriction.
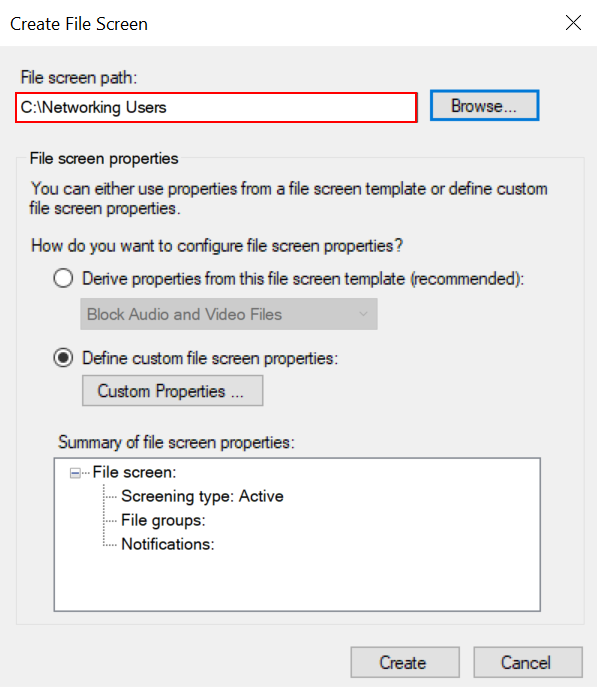
3. Question asking how do you want to configure file screen properties? If you check the Drive properties from this file screen template, open the drop-down menu beneath that and select the type of file you want to ban. Click create. You are done!
4. On the other hand, if you create a custom file screen, check the Define custom file screen properties. And click on the Custom Properties button.
5. In file screen custom properties, define the type of file screens you want. There are two types of file screens:
- Active screening: this type does not allow users to save unauthorized files.
- Passive screening: allow users to save files (It is for monitoring)
6. Additionally, in the File Screen Custom properties window, click on the Create button if you want to create a new file screen. Or, select one option from the file groups column and click on the Edit button to bring changes to the existing file groups.
7. Define the type of notification (Email message, event, comment, or report) from the top menu and click Ok to close the window.
8. After you customize and select the file screen, click on the Create button. A new window shows up asking do you want to save the newly created template. If yes, give the name and click Ok. Else, check the Save custom file screening without saving the template and click Ok.
The Conclusion
To conclude, File Server Resource Manager is a feature in Windows Server that enables users to have extra monitoring of their files. In the article, you learned how to install the FSRM feature in Windows Server 2022 and limit folder size, and prevent unauthorized files. Write down your questions in the comment section.
You may find the below article useful!
Windows Server 2022 Backup Installation and Configuration
How to Create and Configure Storage Pool on Windows Server 2022
How to Configure NTFS Permissions on Windows Server 2022
Posted by
on March 10, 2017
This guide will cover how to install the File Server Resource Manager (FSRM) role service in Windows Server 2016 with both PowerShell and GUI methods.
FSRM is used to configure quotas, file screens, and storage reports on the file system in Windows.
This post is part of our Microsoft 70-744 Securing Windows Server 2016 exam study guide series. For more related posts and information check out our full 70-744 study guide.
Install with PowerShell
First we’ll start with PowerShell, as this is faster and easier than installing through the GUI.
Install-WindowsFeature -Name FS-Resource-Manager, RSAT-FSRM-Mgmt

A restart should not be required once this has completed. FS-Resource-Manager installs the FSRM role itself, while RSAT-FSRM-Mgmt installs the feature that you get prompted for during the GUI installation (covered below). Without RSAT-FSRM-Mgmt, you will not be able to access the GUI component to manage FSRM, which may be what you want on a server without a GUI. You would install the RSAT feature on a remote system and access the FSRM system remotely.
If you forget either of these feature names, you can run ‘Get-WindowsFeature’ instead, and scroll to the File and Storage Services section and see that it’s listed for File Server Resource Manager.
Install with GUI
Alternatively if you want to use the graphical user interface (GUI) to install this role you can use Server Manager instead, however there’s a bit more mouse clicking work involved here compared to simply running the PowerShell cmdlet above.
- From within Server Manager, select “Add roles and features”.

- The Add Roles and Features Wizard window will appear, click the Next button.

- On the Select installation type screen, leave Role-based or feature-based installation selected and click Next.
- On the Select destination server window leave everything as is as we’re installing to this server itself, so click Next to continue.
- From the select server roles window, scroll down and expand file and storage services, and then go into file and iSCSI services. From here select File Server Resource Manager. This is equivalent to using PowerShell to install FS-Resource-Manager as shown above.

This will also ask if you want to add the File Server Resource Manager RSAT Tools, click to add the features.

Click the Next button to proceed.
- On the select features screen simply click next without selecting anything, by default in the last step we chose to automatically add the suggested features already. We can see here that this is already selected for us. This feature is equivalent to using PowerShell to install RSAT-FSRM-Mgmt.
- On the confirm installation selections screen, review that you’re installing the File Server Resource Manager and File Server Resource Manager Tools and click install to continue.

At this point we can open the FSRM window from Server Manager > Tools > File Server Resource Manager to configure and manage it through the GUI.
Summary
We can install the File Server Resource Manager (FSRM) role service in Windows Server 2016 using either PowerShell or the graphical user interface. Personally I prefer using PowerShell, as it’s a lot quicker to complete the task, however you can use either method to get the job done.
This post is part of our Microsoft 70-744 Securing Windows Server 2016 exam study guide series. For more related posts and information check out our full 70-744 study guide.
File servers have always been a curious paradox for the IT professional in charge of managing them. On one hand, you’re the person responsible for the file server, and so it’s your mission to make sure that it works. It’s your mission to make sure that the unnecessary stuff isn’t on there, perhaps clogging up things or taking up space that could be better used for corporate projects and actually useful things. On the other side are the users who see a vast openness of available space with which to store, in many cases, anything they want. Adding to this complexity is the fact that the users aren’t typically tasked with managing their own space. And so, your job is to manage the space, but you have no idea what the content is or whether it’s useful or not. They are not in charge of managing the space but they know what’s important to them and important to the company. It’s because of this paradox that solutions like FSRM exist. The File Services Resource Manager is a tool for solving this problem about what kinds of content should and should not be on a machine. What’s particularly great about FSRM is that it’s a really easy solution to use. And when you start to poke around into the things that you can do on a file by file basis, I think you’ll appreciate that just simply installing the FSRM role service, the very first task that we have to do here, is something you’ll probably going to want to do.
What this part cover
- Install the FSRM role
- Configure Quotas
- Configure file screens
- Access-Denied Assistance
Let’s get started.
Install the FSRM role
We can install it through Server Manager or with Powershell. Let’s install it through server manager first. Start the Server Manager and go to Manage, then Add Roles and Features.
Before you begin page will pop-up. Click through the Before you begin dialog, installation type and select destination server pages accepting the defaults.
When you get to the Select server roles screen, scroll down to the File And Storage Services area expand File and iSCSI services and check File Server Resource Manager. When you do this, you’ll be prompted to add additional features. Click Add Features and click Next to move on.

On the Select features screen, click next accepting the defaults. On the Confirmation installation selections screen, you can click Install. Now you can sit back and wait for FSRM to install.

Once done, click Close

Install FSRM with powershell. Open powershell as admin and type in
Install-WindowsFeature –Name FS-Resource-Manager –IncludeManagementTools

To access FSRM –> Open Server Manager -> Tools -> Select File Server Resource Manager
We can take a look at FSRM console and then the different things that it can accomplish.

Configure Quotas (Quota Management)
First in the list is Quota Management. Often, you end up in a situation where you’ve got users that they really just abuse the amount of storage space that you have. Well, in a world these days where a terabyte can be really drilled down into something you can hold in the palm of your hand, the whole idea of storage space is something that has evolved quite a bit over time. There are still certain circumstances where setting quotas on particular files and folders can become useful to prevent that file or folder from becoming too large. Now, in the real word, the location where quota management is used the most is typically with roaming profiles. And this has less to do with the idea that you’re consuming a bunch of space and space is expensive. It has more to do with the fact that roaming profiles require those profiles to be copied in their entirety every time the user logs in. Here, under quota management, we have two different items to look at
Quotas and Quota Templates
Let’s take a look at Quota Templates first and these are just a series of templates that define characteristics for what you want to control through the quotas that you later create.

Let’s open one. I will double-click on 100 MB Limit. That will open quota template properties.
To start with settings of an existing template, expand the list from the copy properties from quota template (Optional), select the template you would like to use and then click copy.

This 100 MB limit here defines the limit on a specific folder, that says when that folder hits a 100 MB, no matter what the content is, no matter how it got there, when that folder hits a 100 MB, well then set up these notifications. So as you approach it, send emails, write events into the event log etc.

Hard Quota -> Forbid users from adding additional content after that 100 MB quota is exceeded.
Now, it’s here we have to be kind of cautious about the setting of a hard quota versus a soft quota. If you end up in a situation where a hard quota actually prevents a person from adding files and folders, that could actually impact the use of roaming profiles. So here, you can choose whether or not you want to prevent users from exceeding the limit or if you want to allow them to exceed the limit but just notify you that indeed, they have exceeded that limit. In most real-world circumstances, it’s best to set a soft quota first, and then use that as your monitoring tool to perhaps proactively help users to get themselves underneath a certain limit. In the case of hard quotas, sometimes there could be fallout effects that end up causing users more pain than the amount of space that they’re consuming.
Let’s click on ADD under the notification thresholds and for each of these, we can set additional notification thresholds that we want here

Email Treshold – we can send a specific email message to that user who exceeded the threshold.

Event Log – We can configure an event log error, so a warning that gets popped up into the event log. One assumes that in setting these event log errors, that you would have some solution monitoring the event log for exactly the error message that you’re creating.

Command – You can also run a command, so if you’ve got a PowerShell command or a script or a VBScript or even a batch script, you can run that script here using one of the following command security contexts, so local service, network service, or local system.

Report – you can pop up a report any time this threshold gets exceeded, well, then, go ahead and generate a report and send that report to one of the following administrators, that they’re aware of the problem, and then have all the information, all the data they need in order to help that person then resolve the problem.

These are the default quota templates that, in the best practices approach, when you’re using these and applying these, Microsoft highly recommends that you use the templates as the mechanisms to define the quotas. So that’s why we’re starting here with the templates as opposed to the quotas themselves. If you would like to create your own templates you can do it by right-clicking on Quota templates and selecting Create Quota Template
Let’s see how we can create our own quota.
Right-Click on Quotas and select Create Quota
Create Quota Wizard will pop-up.

Quota Path – > Click on Browse and browse to the folder where you want to apply this quota.
Create Quota on path vs Auto apply template and create quota on existing and new subfolders -> Now, one of the big things about choosing to create a quota on the specific path is that it doesn’t do much if there are additional quotas that need to be configured sub to that location of the path. When you choose first option it will limit entire main folder or volume. The second option allows you to create what is called an auto-apply quota, where the auto-apply quota will automatically apply the template that you create or assign, and then create the quotas on any existing and new subfolders to the path that we’re identifying here, so the second option will limit the subfolders. It will not limit the main folder itself, but subfolders within that folder.
If you are using roaming profiles, typically those profiles are subfolders of some folder that exists on a file server somewhere. So if quota path were our company roaming profiles location, then the subfolders of which would usually correspond to the username of the person that’s associated with that roaming profile. It’s here where the auto-apply template can be used relatively easily for the creation of that quota every time, automatically, whenever a new user attempts to use and then create that roaming profile.
Quota Properties
Here we can define where the properties are coming from, whether it be from one of the templates
Or we can click on Define custom properties and create our own template.

Once done, click on create. OBS!! I created my own template 10 MB Limit. Need to point this out, in case you are wondering why you don’t have it in the list.

Here it is.

Now if I try to copy/move some file into that folder larger then 10 MB I will run into this.

Configure file screens
Now, one of the biggest notions of file servers is that they provide a place for people to put their stuff onto. And without any kind of control of that, a lot of times, users will end up just storing whatever they want onto those file servers without really considering the types of reasons for why that file server exists.
File screening management here provides a way, through file groups, also through templates, and then through the file screens themselves, of identifying the files that you don’t want by file extension, by determining what you want to do when they appear, and then applying those to the locations that you want to ensure are screened out so that those files don’t appear.
A common example of those are, down here, under File Groups, where we have a list of just different kinds of files that are commonly thought of as perhaps not great files to exist on a file server. More often than not, the file server contains office documents or other artifacts, projects that need to be constrained in one location that people can access. But these other kinds of things, like audio and video files and backup files and executable files and image files, can sometimes be the extraneous kinds of data that you don’t want on that machine.

Let’s double-click on example Audio and Video File Group to open it and check how it looks like. Here we can see which extensions are included in this group which means that every extension in this list will be blocked when or if we apply this to the location via File Screen Templates. If we would like to exclude some of them we can do that as well by adding them to exclude.

If you would like to create a new File Group you can do it by right-clicking on File Groups and selecting Create File Group, or clicking on Create File Groups link in the action pane
Once you create the file group, then you go backwards through the file screen templates, which provides more of the logic associated with the type of file group that you don’t want on that machine.

Let’s double-click on Block Audio and Video Files Template
So here, the template block audio and video files, which is active, says that when there is an audio and video file, the file group that we’ve configured under the File Groups, go ahead and actually perform some activity. This is active screening, which is turned on. Do not allow users to save those unauthorized files in the location that we’d later tag this template to. Or, alternatively, just like before, we could use passive screening, where would allow the users to upload those files, but then send an alert in one or more forms to an administrator, to let them know what’s going on.

These same alerts can occur in just the same ways that we did before.
We can send an email message to the administrator or to the user who attempted to save the unauthorized file. We can configure an event log error, so that our warning message appears in the event log. We can also configure a command, PowerShell, VBSCript, or batch file that can execute whenever that person attempts to upload the file. And then also configure the report to generate the report, what’s going on in the machine, and perhaps email that to an administrator. So all of these, again, very similar to how things worked over in quota management, provide that mechanism to define the rules of what should happen when that file attempts to be uploaded onto to this machine.
Now, none of this actually does anything until up here at the top, where we actually apply the file screen using the template that we’ve created.

So let’s create a file screen. Right-Click on File Screens and select create file screen

Create File Screen windows will pop-up. Identify the path where you would like to apply this rule and just like before we can define where the properties are coming from, whether it be from one of the templates that we created, or we can click on Define custom file screen. One done click on create.

Here it is.

Now if I try to copy/move some mp3 file into that folder I will run into this.

It will also generate event in Event Viewer.

As we can see here this rule will apply to all users. If you would like to make an exception and let for example admins or some other user to save mp3 files you would need to create File Screen Exception.
A file screen exception is a special type of file screen that overrides any file screening that would otherwise apply to a folder and all its subfolders in a designated exception path. That is, it creates an exception to any rules derived from a parent folder.
OBS!!! You cannot create a file screen exception on a parent folder where a file screen is already defined. You must assign the exception to a subfolder or make changes to the existing file screen. What this means is if you exclude mp3 from template that is already applied to a folder you will remove block for every user and every user will be able to save mp3 files to that folder. What you need to do is to create a new sub-folder/our use an existing one, configure permissions so that you choose who will be able to see that folder and access it and create new File Group
Example:
I created sub-folder Admins. Then I right-clicked on File Screens and selected Create File Screen Exception. When you add the path you will need to click on Create. There I created new File Group and included *.mp3 so that admins can save mp3 into that folder which is within Screens folder.

The main gist of what I’m trying to show you here is that in all of these cases, it’s best to start really at the bottom and work your way up. Doing so allows you to create all the policies that then, like the layers of an onion, fold into each other to ultimately create the file screen you applied at that location.
Access-Denied Assistance
Right-Click on FSRM Server and select Configure Options –> Access-Denied Assistance Tab


This Access-Denied Assistance tab allows me to turn on access-denied assistance and then to provide the user with the following message if they’ve been denied access to folder for one reason or another. I could add any information I want in here, too, I can customize this or any other information that is important so that when the user gets denied access to the file, they know what to do. When that user gets denied access to the file, there is also the ability to configure what are called email requests.
Click on Configure email requests

Now this email request assistance allows the user to send an email to a specific recipient list here, a little button appears in the dialog box that shows up when the user is denied that includes information about the Folder owner and the Administrator and then this text at the end of the email. It could also generate an event log entry for each email sent. Essentially what this means is that when the user gets that access denied message and they see that there is a problem, they have the ability to request further assistance by generating an email message.

Obviously in order for this to work, you’ll have to have your email settings configured under Email Notifications with an appropriate SMTP server and where the default email settings should go, but this gives those users just a little bit of extra information about why they got denied and the ability to request further assistance.

You can also click on Preview Button to see how the Error Message will look like

That’s it. In the next part we will take a look at
- Configure reports
- Classification Management
- Configure file management tasks
Thanks for reading!
Cheers,
Nedim
The Windows Server 2008 first carried FSRM or Fie Server Resources Manager, which allowed administrators to define the file types that users could save to file servers. Windows FSRM has been a part of all succeeding Windows Servers, and administrators can now block defined file types from being uploaded to a specific folder or to an entire volume on the server.
Before you can begin blocking file extensions, you may need to install and configure FSRM on your Windows Server 2012 R2. Installation of FSRM can be achieved through the Server Manager GUI or by using the PowerShell console.
This article will examine the installation of FSRM using both methods, Server Manager GUI and Windows Server PowerShell console, while providing all necessary information to ensure a successful deployment and configuration of FSRM services.
FREE Hyper-V & VMware Backup: Easy to use — Powerful features — Just works, no hassle: It’s FREE for Firewall.cx readers! Download Now!
Installing FSRM On Server 2012 Using The Server Manager GUI
Assuming you are logged in as the administrator, start with the Server Manager – click on the second icon from left on the bottom toolbar on the desktop as shown below:
Figure 1. Launching the Server Manager Dashboard
This brings up the Server Manager Dashboard. Proceed to the top right hand corner and click on Manage, then click on Add Roles and Features.
Figure 2. Opening Add Roles and Features console
This opens the Add Roles and Features Wizard, where you need to click on Server Selection. Depending on how many servers you are currently managing, the right hand side will show one or multiple servers in the pool. Select the file server on which you want to install FSRM, and click on Next to proceed.

Figure 3. Selecting a Server to add the FSRM role
The next screen shows the server roles that you can install on the selected server. On the right hand side, locate File and Storage Services and expand it. Locate the File and iSCSI services and expand it. Now, locate the File Server Resource Manager entry.

Figure 4. Selecting the File Server Resource Manager role for installation
Click on the check box in front of the entry File Server Resource Manager. This will open up the confirmation dialog box for the additional features that you must first install before installing FSRM.

Figure 5. Confirming the installation of additional role services required for FSRM
Click on Add Features and you are all set to install FSRM, as the check box for File Server Resource Manager now has a tick mark (shown below).

Figure 6. Back to the Server Role installation – Confirming FSRM Role Selection
Clicking on Next allows you to Select one or more features to install on the selected server. We don’t need to add anything here at this stage, so click Next to go to the next step.
This brings up a screen asking you to Confirm installation selections. This is the stage where you have the last chance to go back and make any changes, before the actual installation starts.

Figure 7. Confirm installation selections
Click on Install to allow the installation to commence and show the progress on the progress bar on the Results screen. Once completed, you can see the Installation successful on … under the progress bar.

Figure 8. Completion of FSRM role installation
Click on Close to exit the process.
To check if the FSRM has actually started running, go to the Server Manager Dashboard and click on File and Storage Services on the left hand side of the screen.

Figure 9. Server Manager Dashboard
The Dashboard now shows all the servers running under the File and Storage Services. Go down to Services and you will see FSRM running with an automatic start up.

Figure 10. File and Storage Services – Confirming FSRM Service
Installing FSRM On Server 2012 Using The PowerShell Console
This is a comparatively easier and faster process compared to the GUI method.
To invoke the PowerShell, click the third icon from left on the bottom toolbar on the desktop.
Figure 11. Launching Windows PowerShell
This will open up a console with an administrative level command prompt. At the command prompt, type:
C:\Users\Administrator> Add-WindowsFeature –Name FS-Resource-Manager –IncludeManagementTools

Figure 12. Executing PowerShell command to install FSRM
A successful installation will be indicated as True , under the Success column as shown above.
FREE Hyper-V & VMware Backup: Easy to use — Powerful features — Just works, no hassle: It’s FREE for Firewall.cx readers! Download Now!
Configuring File Screening
Invoke FSRM from the Tools menu on the top right hand corner of the Server Manager Dashboard.
Figure 13. Running the File Server Resource Manager component
The File Server Resource Manager screen opens up. On the left panel, expand the File Screening Management and go to File Groups. The central panel shows the File Groups, the Include Files and the Exclude Files in three columns.
Under the column File Groups, you will find file types conveniently grouped together. The column Include Files lists all file extensions that are included in the specific file group. For a new server, the column Exclude Files is typically empty.

Figure 14 – File Groups, Include File and Exclude Files
On the left panel, go to File Screen Templates and click on it. The central panel shows predefined rules that apply to folders or volumes.

Figure 15. File Server Resource Manager — File Screen Templates
For instance, double-click on Block Image Files in the central panel. This opens up the File Screen Template Properties for Block Image Files. Here you can define all the actions that the server will take when it encounters a situation where a user is trying to save a file belonging to the excluded group.

Figure 16. FSRM — File Screen Template Properties for Block Image Files
You can choose to screen the specified file type either actively or passively. Active screening disallows users from saving the specified file group. With passive screening, users are not prevented from saving the files while the administrator can monitor their actions.
The server can send from one to four basic alerts when it encounters an attempt to save a forbidden file. The server can send an Email message to the administrator, create an entry in the Event Log, run a specified Command or Script and or generate a Report. You can set up the details for each action on individual tabs. When completed, exit by clicking on OK or Cancel.
To edit the existing template or to create a new one based on the chosen template, go to the File Screen Templates and in the central panel, right-click on the predefined template you would like to edit. From the Actions menu on the right panel, you can either Create File Screen Template or Edit Template Properties.

Figure 17. FSRM – Creating or editing a File Screen Template
Clicking on Create File Screen Template opens up a dialog where you can click on Browse to select a folder or volume on which the new rule would be applied. Under How do you want to configure file screen properties? You can either Derive or Create the file screen properties. Click on Create to allow the new file screen rule to appear in the central panel.

Figure 18. FSRM — Creating a File Screen
Creating Exceptions
Exceptions are useful when you want to allow a blocked file type to be saved in a specific location. Go to the left panel of the FSRM screen and right-click on File Screens.

Figure 19. FSRM – Creating a File Screen Exception
From the menu on the right panel, click on Create File Screen Exception. On the menu that opens up, click on Browse to select a folder or volume on which the new rule would be applied and select the group you would like to exclude under the File groups. Click OK and complete the process.

Figure 20. FSRM – File Screen Exception settings and options
Summary
This article showed how to we can use Windows Server File Server Resources Manager (FSRM) to block file types and extensions from being uploaded or saved to a directory or volume on a Windows 2012 R2 server. We explained how to perform installation of FSRM via GUI interface and Powershell, and covered the creation or editing of File Screen Templates used to block or permit access for specific files.