
The Windows 10 operating system offers the login password feature, but the login or account password can be easily bypassed with or without the help of third-party tools. In short, the login or account password can’t actually protect your confidential data saved on your Windows 10 PC.
There are a couple of ways out there to protect your data (like encryption) on your Windows 10 PC, but setting a BIOS or UEFI password is one of the better ways out there to protect your data.
What’s a BIOS or UEFI password?
A BIOS or UEFI password stops your PC from booting without the right password. That is, one can use a bootable USB or CD or any other method to boot into your PC without entering the BIOS or UEFI password. The BIOS or UEFI password prompt appears right after you turn on the PC. Without entering the correct BIOS or UEFI password, a user can’t even access BIOS or UEFI settings.

For instance, when you have set a BIOS or UEFI password, one can’t use third-party login screen password unlocking tools to access your PC. In fact, when the BIOS or UEFI password is set, users can’t install another operating system as well.
Of course, if someone has access to your PC protected with BIOS/UEFI password, he/she might be able to access your data by removing the hard drive or SSD and then connecting the same to a different PC. Besides that, the BIOS or UEFI password can also be reset if someone has physical access to your PC, but the process is not definitely easy, especially on notebooks and tablets. This means that the BIOS/UEFI password adds an extra layer of security to your data and is not the ultimate solution to protect your data.
If you purchased a PC pre-loaded with Windows 8, Windows 8.1, or Windows 10, then your PC likely supports UEFI, and you need to set the UEFI password. And if your PC doesn’t support UEFI, then it will be BIOS for sure. You can go through our check if your PC supports UEFI for detailed directions.
The BIOS or UEFI password setting process is not precisely the same for all computers. The process varies from manufacturer to manufacture, but the process is more or less the same for most PCs.
Method 1 of 2
Setting BIOS password on a Windows 10 PC
To set the UEFI password, refer to instructions in Method 2 (scroll down).
Step 1: Turn on your PC and press Del, F2, Esc, F10, or F12 key to get into the BIOS. The keyboard key to get into BIOS varies from PC to PC, but the ones mentioned above are commonly used. So try one after another and if one of them works, please check your PC’s user manual or contact the manufacturer to know the right key.
Step 2: Once you are into the BIOS, navigate to the Security or Password section. You can use the arrow keys to navigate between these sections.
Step 3: Under the Security or Password section, look for any entry named Set supervisor password, User password, System password, or a similar option. Select the correct option and set a strong password.

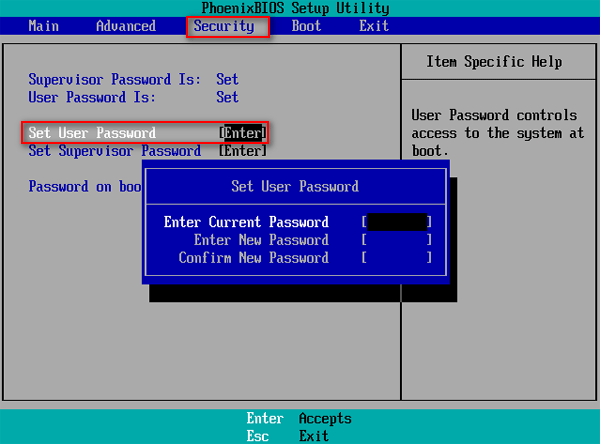
Important: If your BIOS has both supervisor password as well as user password option as seen in the picture below, it’s a good idea to set both supervisor password as well as user password.
On most PCs, the supervisor password protects users from accessing BIOS, whereas the user password restricts users from booting into your PC. That said, on some PCs, the user password acts as both supervisor and user password. So we suggest you set both passwords and make sure that you see the password prompt before accessing BIOS as well before booting into the operating system.
NOTE: Some manufacturers include additional security options, as you can see in the picture below. If additional options are available, make sure that they are configured correctly for the best security. For instance, on my Lenovo ThinkPad T450s, the system doesn’t prompt you for the BIOS password when you reboot with default settings. If there is a similar option, we advise you to enable the same for enhanced security.

Finally, don’t forget to save the changes made to your BIOS settings. On most PCs pressing the F10 key saves the settings. Check on the BIOS screen for directions or key to save the settings.
Reboot your PC to see the BIOS password prompt. Good luck!
Set UEFI password on a Windows 10 PC
Step 1: Open UEFI firmware settings. The process to access UEFI firmware settings is completely different from accessing BIOS. Go through our how to access UEFI firmware settings in Windows 10 guide for step-by-step directions.
Step 2: When you are at the UEFI firmware settings screen, look for the security or password section. On some PCs, you need to navigate to the settings section to see security options.
Step 3: Look for an option to set the password. Set the password and save the changes before exiting the UEFI settings.
How to recover Windows 10 product key from the BIOS guide might also be of interest to you.
Обезопасьте систему от нежелательного доступа к настройкам и вашим личным данным.
Пароль на вход в Windows мешает посторонним входить в учётную запись пользователя. Но он не препятствует доступу к настройкам BIOS, с помощью которых можно навредить компьютеру или просто разблокировать вход в Windows. Чтобы защитить устройство от этих проблем, установите дополнительный пароль на BIOS. Это займёт у вас несколько минут.
Прежде всего вам нужно попасть в меню BIOS. Для этого в первые секунды включения компьютера нажимайте, пока не появятся настройки, специальную клавишу. Это может быть F1, F2, F8 или Delete — в зависимости от производителя материнской платы. Обычно нужная клавиша отображается внизу экрана при запуске компьютера.
Затем найдите настройки со словом Password. Оформление и расположение разделов BIOS отличаются на разных компьютерах, поэтому нужные опции вам придётся отыскать самостоятельно. Чаще всего пароль можно менять в разделе Security. Возможно, на вашем ПК установлен не классический BIOS, а графическая оболочка UEFI. В таком случае алгоритм действий не будет отличаться.
Когда найдёте настройку c названием вроде BIOS Setting Password, воспользуйтесь ею, чтобы установить пароль. Система будет запрашивать его, если кто-то попытается войти в BIOS.
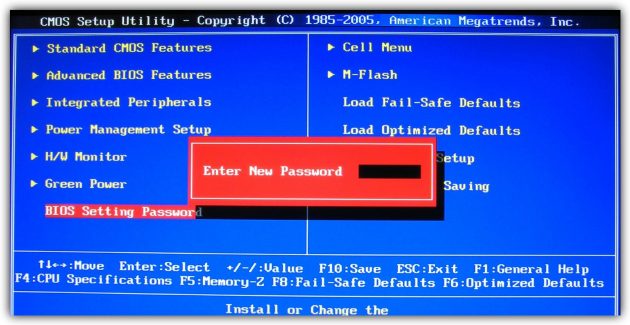
Запишите куда-нибудь новый пароль, чтобы не забыть, или хорошо запомните его.
Ваша версия BIOS может поддерживать не один, а два типа паролей. В таком случае вы увидите настройки со словами User Password (пароль пользователя) и Administrator Password (пароль администратора) и сможете задать любой из них.
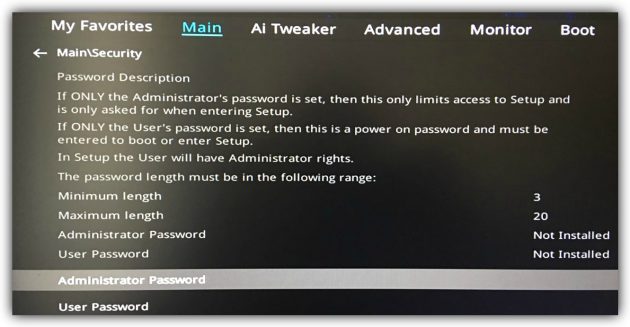
Если установите Administrator Password, то система будет запрашивать пароль только при входе в меню BIOS. Выберите этот вариант, если не желаете, чтобы посторонние могли менять настройки.
Если установите User Password, то запрос пароля будет появляться всегда при запуске компьютера (не путайте с паролем на вход в Windows). Этот вариант не только защищает настройки BIOS, но также не позволяет злоумышленникам использовать флешки для сброса пароля Windows и переустановки ОС. Используйте User Password, если опасаетесь таких вмешательств.
Когда настроите пароль, отыщите в меню BIOS пункт Save And Exit (обычно запускается клавишей F10), чтобы сохранить изменения и перезапустить компьютер. Если в будущем захотите отключить защиту, снова найдите настройки пароля и вместо новой комбинации оставьте пустую строку.
Пароль BIOS не гарантирует абсолютную безопасность, но заметно усложняет взлом. Чтобы обнулить такую защиту, недоброжелателю придётся вскрывать корпус и копаться внутри компьютера.
Download Windows Speedup Tool to fix errors and make PC run faster
Other than securing your local account with a password or a PIN, one can set and use BIOS or UEFI passwords on their Windows computer. In this post, we see how you can set up an Administrator or Supervisor password.
Settings up a password or PIN is very easy on Windows 11/10. Let’s assume that someone has a live disc of a Linux distribution. In this case, anyone can easily access your computer without your password and move data to an external drive. If you want to block that situation, you have two options. First, you cannot leave your computer alone physically (which is not possible) or, second, you can set and use a BIOS password.
If you use a BIOS password to protect your computer, no one can access even the computer’s start screen without the correct password. The good news is that almost all motherboard manufacturers include this facility for consumers. However, the steps or the location of the option might be different for your motherboard.
To set and use BIOS/UEFI password on Windows, follow these steps-
- Restart your computer.
- Go to the BIOS screen.
- Switch to the BIOS tab.
- Select the Administrator Password and press the Enter button.
- Enter a password twice to confirm.
- Save and exit from the BIOS screen.
At first, you will have to restart your computer. While restarting, press the Delete button to open the BIOS screen.
If you are using a Gigabyte motherboard, the Delete button does the job. However, it is recommended to contact the motherboard manufacturer to find out the correct key. Alternatively, your computer shows the required key while starting. You can note down the key from there as well.
After opening the BIOS screen, switch to the BIOS tab. Although most of the motherboards have this option in the BIOS section, there is no guarantee that you have the same tab or not.
In that case, you will have to find out the option that says Administrator Password.

Select it with the up/down arrow keys, and hit the Enter button. Now, you will find a prompt to enter the password. For confirmation, it asks you to enter the password twice. Once done, save the change and exit from the BIOS screen.
After that, whenever you start your computer, it will ask for the password like the following screen.

That’s all! Hope this security feature will help you a lot.
In case, you forget this password; you can always recover or reset BIOS or UEFI password.
How to set BIOS password in Windows 11?
To set the BIOS password in Windows 11, you first need to boot into BIOS. Once you are in the BIOS, look to change the Administrator Password. You can follow the guide mentioned earlier to do the same.
How to enter UEFI BIOS in Windows 11?
When starting your computer, press the correct key (F1, F2, F10, etc.) to enter the UEFI/BIOS. The key depends on your manufacturer and is usually shown on the bottom of your boot screen. There are various other methods as well that you can find in our guide on how to boot into BIOS.
Also Read: Add Security Questions to reset Windows Local Account password.
Anand Khanse is the Admin of TheWindowsClub.com, a 10-year Microsoft MVP (2006-16) & a Windows Insider MVP (2016-2022). Please read the entire post & the comments first, create a System Restore Point before making any changes to your system & be careful about any 3rd-party offers while installing freeware.
При установке Windows 10 с локальной учетной записью пользователя просят ввести пароль, который впоследствии используется для входа, но его можно оставить пустым — в этом случае запроса при входе в систему не будет. При создании учетной записи Майкрософт указание пароля обязательно, но некоторые пользователи отключают его запрос при входе: в такой ситуации его можно снова включить при необходимости.
В этой инструкции подробно о способах установить пароль для локальной учетной записи, а также дополнительные нюансы и информация на тему, которая может пригодиться, например, для тех, у кого используется учетная запись Майкрософт.
Установка пароля локальной учетной записи
Если у вас в системе используется локальная учетная запись Windows 10, но она не имеет пароля (например, вы не задали его при установке системы, либо его не было при обновлении с предыдущей версии ОС), вы можете поставить пароль для пользователя несколькими простыми способами.
Добавление пароля учетной записи в Параметрах
- Зайдите в Пуск — Параметры (иконка шестеренки в левой части меню пуск).
- Выберите пункт «Учетные записи», а затем — «Параметры входа».
- В разделе «Пароль», при его отсутствии, вы увидите сообщение о том, что «У вашей учетной записи нет пароля» (если же такое не указано, а предлагается изменить пароль — то вам подойдет следующий раздел этой инструкции).

- Нажмите «Добавить», укажите новый пароль, повторите его и введите понятную вам, но не способную помочь посторонним, подсказку пароля. И нажмите «Далее».


После этого, пароль будет установлен и будет запрошен в следующий раз при входе в Windows 10, выходе системы из сна или при блокировке компьютера, что можно сделать клавишами Win+L (где Win — клавиша с эмблемой ОС на клавиатуре), либо через меню Пуск — клик по значку пользователя в левой части — «Заблокировать».
Если у вас используется локальная учётная запись и на неё пока не установлен пароль, вы можете использовать следующий простой метод его установки в последних версиях Windows 10:
- Нажмите клавиши Ctrl+Alt+Delete на клавиатуре.
- В появившемся меню выберите пункт «Изменить пароль»

- В следующем окне поле «Старый пароль» не заполняйте (если его нет), а задайте новый пароль и подтвердите его.
- Нажмите по стрелке справа от поля ввода подтверждения пароля.

Готово, теперь пароль на вход для вашего пользователя будет установлен.
Командная строка
Есть еще один способ установить пароль на локальную учетную запись Windows 10 — использовать командную строку. Для этого
- Запустите командную строку от имени администратора (используйте правый клик по кнопке «Пуск» и выбор нужного пункта меню).
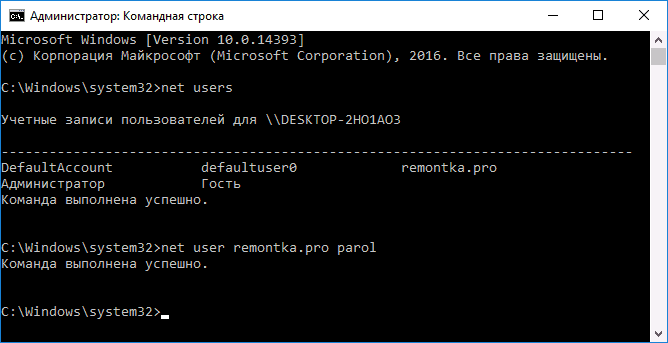
- В командной строке введите net users и нажмите Enter. Вы увидите список активных и неактивных пользователей. Обратите внимание на имя того пользователя, для которого будет устанавливаться пароль.
- Введите команду
net user имя_пользователя пароль
Где имя_пользователя — значение из п.2, а пароль — желаемый пароль на вход в Windows 10 и нажмите Enter.

Готово, так же, как и в предыдущем способе, достаточно заблокировать систему или выйти из Windows 10, чтобы у вас запросили пароль.
Локальные пользователи и группы
Ещё одна возможность установки пароля — использование оснастки «Локальные пользователи и группы», но способ не следует использовать без необходимости: в некоторых случаях он может привести к проблемам с учетной записью. Способ работает только в версиях Windows 10 Pro и Enterprise.
Шаги будут следующими:
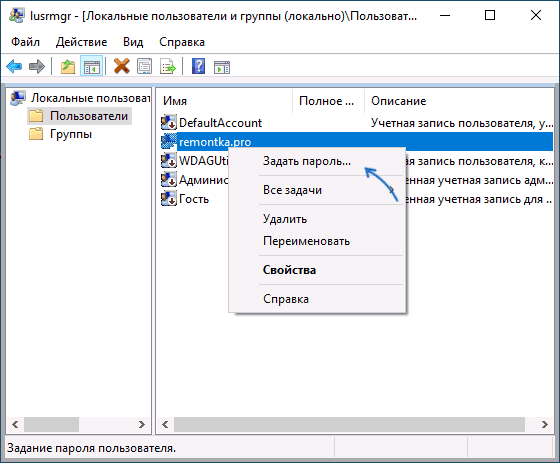
- Нажмите клавиши Win+R на клавиатуре, введите lusrmgr и нажмите Enter.
- Перейдите в раздел «Пользователи», нажмите правой кнопкой мыши по нужному пользователю и выберите пункт «Задать пароль».

- Прочтите предупреждение о возможных последствиях смены пароля и, если готовы, нажмите «Продолжить».
- Введите новый пароль и его подтверждение, нажмите «Ок».
Готово, пароль пользователя был установлен.
Как включить запрос пароля, если ранее он был отключен
В тех случаях, если вы используете учетную запись Майкрософт, или же при использовании локальной учетной записи на ней уже есть пароль, но он не запрашивается, можно предположить, что запрос пароля при входе в Windows 10 был отключен в настройках.
Чтобы снова включить его, выполните следующие шаги:
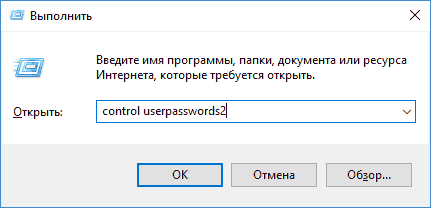
- Нажмите клавиши Win+R на клавиатуре, введите control userpasswords2 в диалоговое окно «Выполнить» и нажмите Enter.

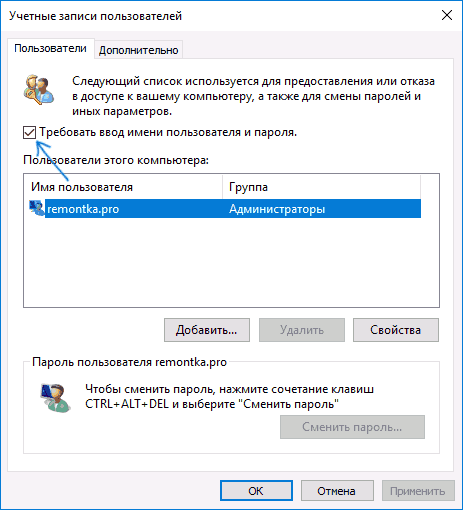
- В окне управления учетными записями пользователей выберите вашего пользователя и отметьте пункт «Требовать ввод имени пользователя и пароля» и нажмите «Ок». Для подтверждения придется также ввести текущий пароль. Внимание: отдельная инструкция о том, что делать, если нет пункта Требовать ввод имени пользователя и пароля.

- Дополнительно, если был отключен запрос пароля при выходе из сна и его требуется включить, зайдите в Параметры — Учетные записи — Параметры входа и справа, в разделе «Требуется вход», выберите «Время выхода компьютера из спящего режима».
Дополнительно обратите внимание на следующий нюанс: последние версии Windows 10 при установке и обновлении могут предлагать задать ПИН-код и использовать его для входа вместо пароля. Здесь может пригодиться инструкция Как удалить ПИН-код Windows 10
В завершение — некоторые дополнительные нюансы, которые могут быть полезными в контексте рассмотренной темы:
- Если у вас в Windows 10 используется учетная запись с именем «Администратор» (не только с правами администратора, а именно с таким именем), которая не имеет пароля (и иногда вы видите сообщение о том, что какое-то приложение не может быть запущено с использованием встроенной учетной записи администратора), то правильным вариантом действий в вашем случае будет: Создать нового пользователя Windows 10 и дать ему права администратора, перенести важные данные из системных папок (рабочий стол, документы и прочие) в папки нового пользователя, а затем отключить встроенную учетную запись, о чем писалось в материале Встроенная учетная запись администратора Windows 10.
- Как отключить запрос пароля при входе в Windows 10 (тем же способом можно его включить вновь, если ранее он был отключен).
- Как поставить пароль в БИОС или UEFI
- Как включить шифрование BitLocker в Windows (с запросом пароля)
- Как сбросить пароль Windows 10
На этом всё, при входе в Windows 10 в будущем вы должны будете авторизоваться. Если же что-то не получается или ваш случай отличается от приведенных выше, опишите его в комментариях, постараюсь помочь. Также может заинтересовать: Как изменить пароль Windows 10.
-
Home
-
News
- How To Recover/Reset/Set A BIOS Or UEFI Password On Windows
By Sarah |
Last Updated
A good way to secure your computer is to set a BIOS or UEFI password. This is able to help you prevent unauthorized access to your operating system. The password setting is needed especially when there’s confidential or private data on a computer. Today, I’m going to tell you how to set the BIOS or UEFI password on Windows step by step.
What Is BIOS or UEFI Password
As everyone knows, a password helps a lot to prevent people from accessing your device without your permission. This is a good way to control access and protect privacy. By setting a BIOS or UEFI password, you can:
- Prevent people from logging into the certain operating system.
- Prevent booting from any removable devices.
- Prevent others from changing BIOS or UEFI settings.
- Prevent others from installing another operating system.
- …
Yet, the access to other systems is still available.
FYI: what if you run into operating system not found error?
BIOS or UEFI Password vs. Login or Account Password
Some people may ask what the difference is between the BIOS or UEFI password and the login or account password since both of them are used to prevent malicious access and protect data.
- Indeed, though the login password or account password is built in the Windows to help ensure data security, it can be easily bypassed by using third-party tools. What’s worse, in some cases, even the third-party tool is not necessary.
- Well, the BIOS or UEFI password is lower-level password, which can’t be bypassed by people. So you can enjoy high data security through BIOS or UEFI password setting.
Tip: The biggest problem may be: unlike Microsoft account, there is no recovery option for BIOS or UEFI password. But don’t worry, you can recover or reset a BIOS or UEFI password for Windows computers.
>> Related articles:
- How to change your Microsoft account password?
- How to reset your Microsoft account password?
How to Set a BIOS or UEFI Password on Windows 10
If your PC is pre-loaded with Windows 8, Windows 8.1 or Windows 10, it is very likely that it supports UEFI. Otherwise, it will be BIOS for sure. The BIOS or UEFI password setting process varies a little from computer to computer, manufacturer to manufacturer, and system to system. Yet, the basic steps are the same. Here, I’ll show you how to set a BIOS or UEFI password on a Win10 computer.
Set a BIOS Password
1. Turn on your computer and press corresponding button (usually Del, F2, Esc, F10, or, F12) to enter BIOS. If you are not sure about the key, you can look at the screen carefully when computer boots or contact the manufacturer.
2. Search for Security or Password section in the BIOS setting. You can navigate between different sections by making use of the arrow keys.
3. Under the Security or Password section, you should look for any entry similar to:
- User password
- System password
- A general password
- Supervisor password
- Master password for the hard drive
4. Click on the correct password option to set a strong password.
If you find more than one password under the Security or Password section (for instance, you find both Set User Password and Set Supervisor Password), you may set a password for each to enhance security.
Set a UEFI Password
Step 1: Enter UEFI firmware settings. The process to enter UEFI firmware settings is totally different from accessing BIOS. You should do the following things to access UEFI firmware settings:
- Open Settings
- Select Update & Security.
- Shift to Recovery tab in the left-hand panel.
- Find Advanced startup and click on the Restart now button here.
- Click on the Troubleshoot option in the Choose an option window.
- Click on the Advanced options in the Troubleshoot window.
- Click on the UEFI Firmware Settings option in the Advanced options window.
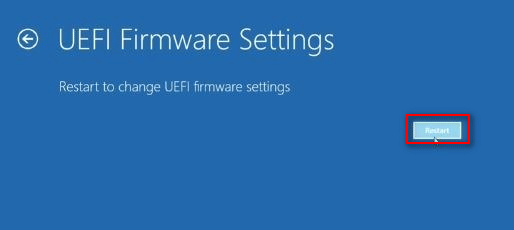
- Click on the Restart button in the UEFI Firmware Settings window.
- Wait for the restart and then you’ll enter UEFI firmware settings.
Step 2: Look for Security or Password section (sometimes, the Security option may be included in the Settings section).
Step 3: Look for the password entry.
Step 4: Click on the correct password option to set a strong password.
About The Author
Position: Columnist
Sarah has been working as an editor at MiniTool since she graduated from university. Sarah aims at helping users with their computer problems such as disk errors and data loss. She feels a sense of accomplishment to see that users get their issues fixed relying on her articles. Besides, she likes to make friends and listen to music after work.