
Windows 11, when it comes to background services, is still more or less the same as its previous version, Windows 10. One well known fact is that not all of these services are needed for gamers. In fact, for computers that aren’t very fast or have older parts, every little bit of performance counts.
In this guide, we’ll talk about the Windows 11 services you can turn off to improve your gaming and overall performance. We’ll also share some tips on some very widely used tools to further improve your PC’s performance on Windows 11.
What to do before disabling services in Windows 11
Before you turn off any services in Windows, make sure to do a few things first so you don’t accidentally break something important and mess up your computer. Here’s what you should do:
Create a system restore point
Creating a system restore point before you disable services is a must. This makes sure you can get your system back to how it was if something goes wrong after you turn services off. Just search for “Create a restore point” in the Windows search bar, then click on “Create” to set it up.
Research the service
Before you disable a service, make sure you understand what it does and if your system really needs it. You can look up the service name online to get more details about what it does and if it’s okay to turn it off.
Related service: .NET Runtime Optimization Service High CPU Usage in Windows 11/10
Disable services one at a time
It’s safer to turn off services one by one and check your system after each change. This way, if something goes wrong, you’ll know which service caused it and you can switch it back on easily.
Monitor your system
After turning off services, keep an eye on how your computer is doing. If there are any problems, you can go back to the last restore point you created and turn any services you stopped back on.
What could actually go wrong when disabling Windows services?
Although turning off unnecessary services can sometimes help give your computer a little boost in terms of performance, doing so recklessly and disabling the wrong services can have some consequences.
For example, there are some services that handle security stuff that features such as Windows Defender and Windows Firewall rely on. If you accidentally disable these services, your PC can be open to viruses and other threats.
Besides, some services are actually there to increase your computer performance. Disabling these would be counterproductive and can actually make your computer slower.
Also, if you disable a service that a program requires, that program will either not start or crash after starting.
Related issue: How to Fix Game Stuttering on Windows 11
30+ Windows 11 services you can safely disable
Disabling Windows 11 services that you don’t need to improve gaming performance is a standard practice for many gamers to squeeze as much speed as possible from their PC. However, it’s utterly important to know which services you can actually safely disable without hurting your system or stopping things you shouldn’t.
Some Windows 11 services are very important for Windows’ basic functions, which we won’t list here. In the following list, we’ll only focus on services that you can disable if you don’t need what it does.
Please know that even among the services we’ll list below, some may still be required in many cases. Please double-check or at least read their basic descriptions first to understand what they do and if you need them.
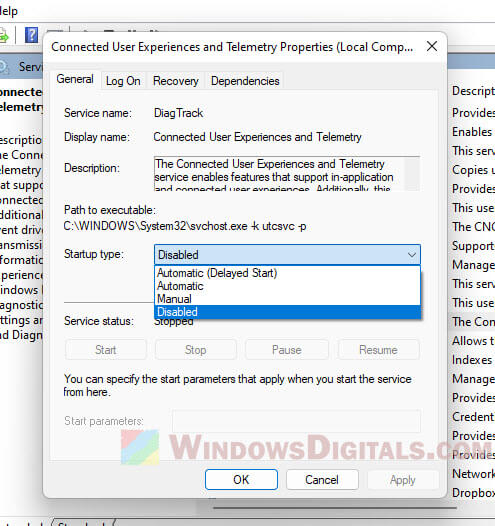
- Connected user experiences and telemetry: This service gathers your usage data and sends it to Microsoft for analysis. If you’re worried about your privacy, feel free to turn it off.
- Touch keyboard and handwriting panel service: This service lets you use the touch keyboard and handwriting features on touch-screen devices. If your screen doesn’t support touch, you can turn this off.
- Netlogon: This service helps set up secure links between your computer and the domain controller. If you aren’t connected to a domain or network, you can turn this off without any problem.
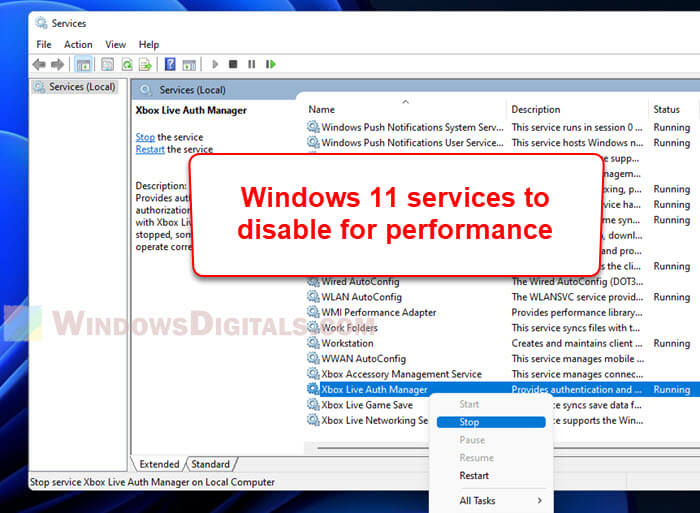
- Xbox live services: These services power Xbox app features like managing accessories, saving games, and networking. If you don’t use the Xbox app, you might want to disable them.
- Windows image acquisition: You need this service to use scanners and digital cameras. If you don’t have these devices, or don’t plan to use them, you can disable this service.
- Geolocation service: This service lets apps offer location-based services and notifications. If you prefer not to be tracked, you can turn it off.
- Program compatibility assistant service: This service finds problems with old games and software. If you don’t use older software, you can turn it off.
- Device management wireless application protocol (WAP) push message routing service: This service collects and sends your data to Microsoft. If privacy is important to you, you can disable it.
- Retail demo service: This is meant for vendors and retailers to show off Windows features to customers. If that’s not you, you can safely turn it off.
- Windows error reporting service: This lets you report problems and logs them when programs stop working. Usually, you can turn this off safely.
- Internet connection sharing: This service is for sharing your internet in small home or office networks. If that’s not your situation, you can turn it off.
- Print spooler: This service is needed for printing. If you don’t need to print, you can turn it off.
- Certificate propagation: Related to the Smart Card service, it detects when a Smart Card is connected and installs the necessary drivers. If you don’t use Smart Cards, feel free to disable it.
- Enterprise app management service: Needed for managing enterprise apps provided by companies. If you aren’t part of a company that uses these apps, you can disable it.
- Windows biometric service: This service is for devices with fingerprint sensors. If yours doesn’t have one, you can turn it off.
- Windows insider service: This is for Windows Insiders who test new features. If you’re not one, you can disable it.
- Network connection broker: Allows Microsoft Store apps to receive notifications from the internet. If you don’t use these apps, you can turn it off.
- Remote desktop configuration and remote desktop services: These let you connect to other PCs nearby. If you don’t need this, you can disable them.
- Portable device enumerator service: This service makes changes to group policy for removable drives and helps synchronize content for applications like Windows Media Player and Image Import Wizard.
- Parental control: This service lets parents limit what their kids can access online. If you don’t need to manage this, you can turn it off.
- Windows mobile hotspot service: Needed for sharing your mobile’s internet connection with your PC. If you don’t use this feature, you can disable the service.
- Windows connect now: This service helps desktops and laptops connect to wireless networks and devices. If you don’t have a wireless setup, you can disable it.
- Smart card and other related services: Enables the use of Smart Cards for security in big organizations. If you’re a regular home user or your workplace doesn’t need Smart Cards, you can turn them off.
- Windows event log: Generates logs about Windows events. You might not need this, but be careful if you decide to disable it—some users say it can mess up Windows Explorer. If you have issues with Explorer after turning it off, turning it back on should fix them.
- Windows event log: This service creates logs about Windows events. If you don’t need it, you can disable it. Note: Some users reported issues with Windows Explorer after disabling this service. If you encounter any problems, turning it back on should fix them.
- Remote registry: Allows anyone to access and change your Windows registry. For better security, it’s a good idea to turn this off. Your own access won’t be affected.
- Phone service: Needed for the Your Phone app and its features. If you don’t use the app, you can disable it.
- Downloaded maps manager: Only necessary for Bing Maps. If you don’t use Bing Maps, you can turn it off.
- AllJoyn router service: Lets you connect to the Internet of Things and communicate with smart devices. If you’re not using IoT devices, you can turn it off.
- FAX: Needed if you plan to send or receive faxes. If not, you can disable it.
- Secondary logon: Allows standard users to run specific applications as admins. If you’re the only user of your PC, you can turn this off.
Also see: GPU 100% Usage When Idle or Gaming (Good or Bad)
How to disable services in Windows 11
There are different ways to turn off services in Windows 11. Here are two popular methods you can use:
Using Services.msc
Services.msc is a built-in tool in Windows 11 that lets you see and change system services. Here’s how to use Services.msc to disable a service:
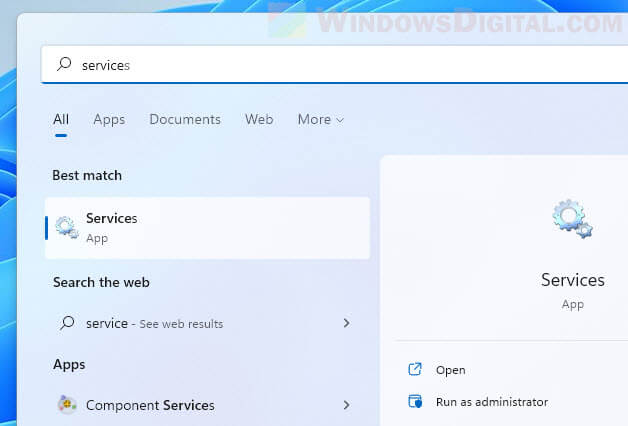
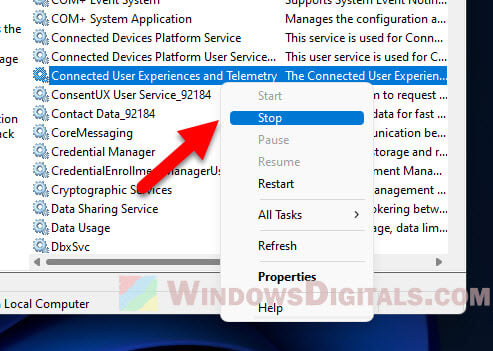
- Open the Start menu and search for “Services“.

- Click on the “Services” app to open it.
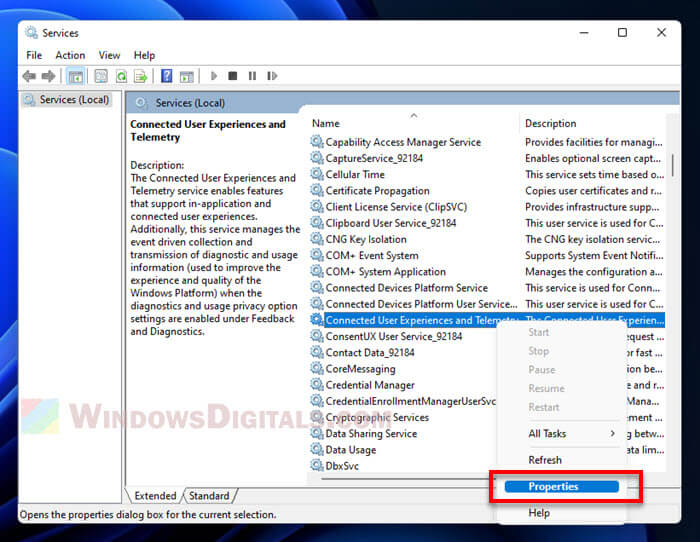
- Find the service you want to disable in the Services window.
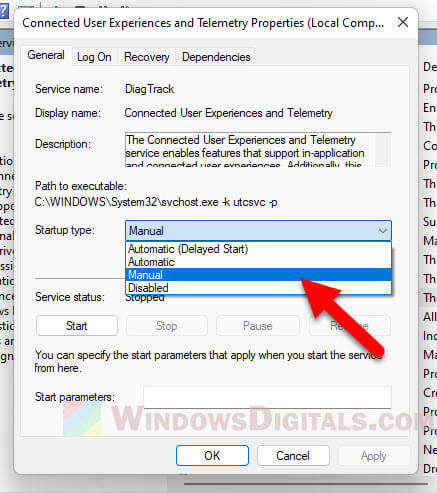
- Right-click on the service and choose “Properties“.

- In the Properties window, under the “General” tab, set the “Startup type” to “Disabled“.

- Click on the “Apply” button to save your settings.
- Restart your computer to apply the changes.
Suggested read: How to Disable Superfetch and Prefetch in Windows 11 or 10
Although you can just set the Startup type to “Disabled”, it might be better to stop the service and set it to manual. This way, the service won’t start automatically with Windows, but you can still start it manually if you need to. Here’s how to do it:
- Follow steps 1-3 from the instructions above.
- Right-click on the service and choose “Stop“.

- Right-click on the service again and choose “Properties“.
- In the Properties window, under the “General” tab, change the Startup type to “Manual“.

- Click on the “Apply” button to save the changes.
- Restart your computer to apply the changes.
Using MSConfig
MSConfig is another built-in tool in Windows 11 that you can use to modify system services.
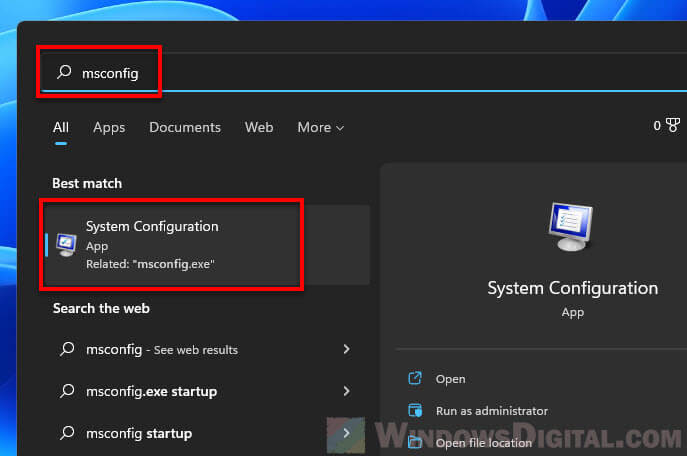
- Open the Start menu and search for “msconfig“.

- Click on the “System Configuration” app to open it.
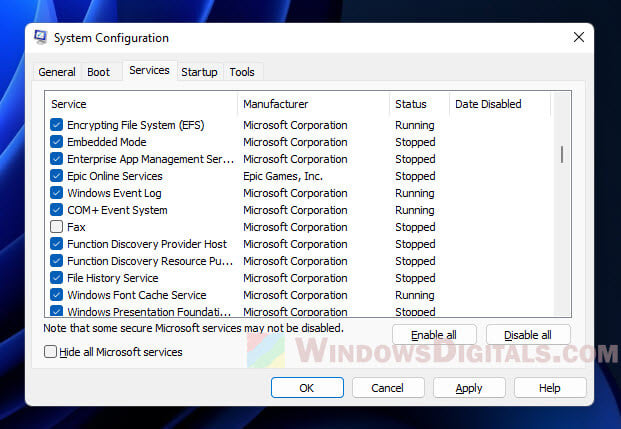
- Go to the “Services” tab in the System Configuration window.
- Find the service you want to disable.
- Uncheck the box next to the service.

- Click on the “Apply” button to save your settings.
- Restart your computer to apply the changes.
Please know that not all services can be safely turned off. Some are very important for your system to work properly. Always check the service’s function before disabling it.
Also, it’s best to turn off services one at a time and check your system after each change. This helps you spot any problems and easily undo changes if needed.
Some other tips to improve your PC’s gaming performance in Windows 11
Turning off unnecessary services is just one of many ways to slightly boost your computer’s performance for gaming. The below are some more tips you can try.
See also: Why is My Memory Usage So High When Nothing is Running?
Using O&O ShutUp10++
O&O ShutUp10++ is a free tool that lets you turn off privacy-related features and services in Windows 11 that you don’t need for gaming. Turning these off can make more system resources available and potentially improve your gaming performance.
Here’s how to use O&O ShutUp10++:
- Download and install O&O ShutUp10++ from the official website.
https://www.oo-software.com/en/shutup10
- Start the program.
- Look through the list of features and services that can be turned off and choose the ones you want to disable.
- To use recommended settings, click the “Actions” menu and select “Apply only recommended settings” (or another option that fits your needs). To undo changes, choose “Undo all changes“.

- Restart your computer to apply the changes.
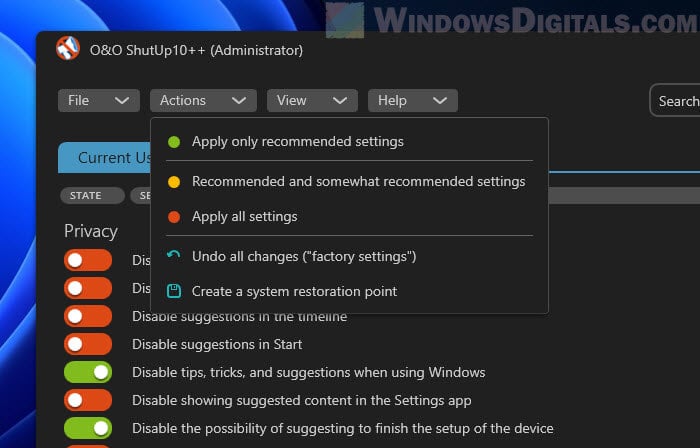
Be careful when turning off certain privacy-related features and services as it might affect other programs and services. Only turn off what you really don’t need.
Using Optimizer
Optimizer by hellzerg is another free tool that you can use to tweak your system’s settings to free up resources and improve performance.
- Download and install Optimizer from its GitHub releases page.
- Start the program and check out each tab.
- Go through the list of settings to be optimized and select the ones you want to apply.

- Restart your computer to apply the changes.
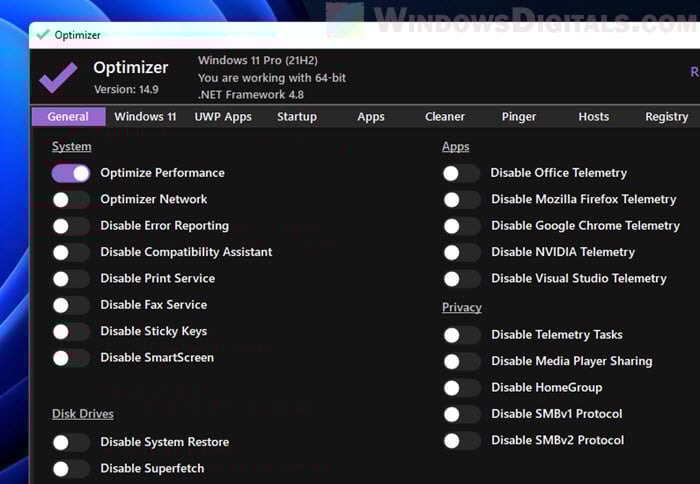
Be cautious when optimizing settings as it may affect other programs and services. Only optimize what is not needed for your system.

The new Microsoft Windows 11 operating system is the best among all the previous ones but at times for better performance and gaming experience, small changes are needed. If you have been asking yourself the question of what to disable to gain more resources then we have your answer and a solution too!
We have found out the unnecessary Windows 11 services to disable. These are not core or essential and can be disabled completely or on start-up. Stopping these will help free your resources including CPU, RAM and GPU for other tasks.
10 Windows 11 Services you need to disable for performance, gaming and privacy
Turn off Windows Hotspot Service
Your system or laptop can become a hotspot option for others to use. However, this is used quite rarely. If you do not know a lot about this feature then disable it.
- It would be best if you chose “Start menu”.
- Here, type “services” > “application”.
- Once done, find and click right on “Windows mobile hotspot”.
- If it is enabled, you need to choose “stop” or “properties”.
- If the process was not started already, it has been enabled manually.
- To not allow anyone to do this, you only need to select the “startup type” dropdown box and choose “disabled”.
Following these steps, your hotspot service shall be disabled, but you always have the choice to enable it again.
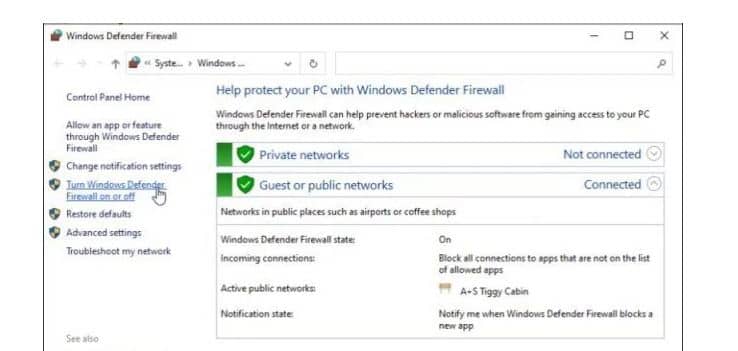
Disable Windows Defender Services (Only if you have another solution)
You might have an anti-virus installed on your system running the new Microsoft version 11. In such a case, having this run in the back seemed redundant.
- You need to select “start menu”.
- In here type “windows defender” > “windows defender firewall”.
- As the application opens you need to select “turn windows defender firewall either on or off there from the left menu.
- You shall now see customize settings on your screen.
- From here just select the “radio button” to turn this off under both “private and public network settings”.
Note: The downside of turning all security services off is that you may lose protection and passwords can be compromised.
Get rid of Fax Services
Well, to be honest, today rarely does someone use the fax now Why don’t you pause for one second and think when was the last time you faxed someone, Windows 11 still includes it and helps connect phone lines and fax modems. If you have the correct fax software, you can send and receive faxes.
Just search for this in the list and follow the same procedure explained above: click right > choose properties > set startup type to disabled. That’s all!

Who uses Fax now anyway? It’s 2024, come on! You should have a PDF app installed and that’s it!
Turn off Print Spooler – If you don’t have a printer
This queues up print jobs when we print something from the system. Again if you don’t print at home then you don’t need to keep an active printing service disable it.
The three steps are as follows:
- You need to go to the services windows and find out “print spooler”.
- After this click right and choose “properties”.
- Here choose the “stop” button.
As it always runs therefore you must see the option to stop it. You would need to disable it as it is set down to automatic startup type.
All you need to do is choose the startup type dropdown button and then choose “disables”.
Disable Windows Security App
When we read the word security then the first thing that pops in our head is that this is something important. Still, no it is only running in the background scanning the system for some problems like either any window updates are pending or you do not have an anti-virus installed on the system.
Chances are that you have your “windows 11 security” squared away and don’t need it to eat your system resources scanning your system for problems that shall never exit.
For this:
- You need to click right > properties > stop the service > change startup type to disabled.
This along with giving you more space shall also make your experience less annoying.
Delete Maps Manager
Do you know that the new window version has a native map application? Well, if you are not aware of this it is not a bigger deal. So, disable it at any time you want. For this, all you need to do is lookup for “downloaded maps manager”.
For services that are set up to the automatic type of the startup all you need to do is:
- Right-click > choose properties > stop the service if it is running > set startup type to disabled.
Disable Universal Telemetry Client (UTC) – Data collection
As you install Windows, you are asked whether Microsoft can collect information regarding the background system. If you answered yes to this, you have enabled the UTC software which runs unnecessary diagnostic services there in the background.
Once this is disabled a lot of space is freed and the best thing is it shall not have any impact on your Windows experience at all.
To find it you need to:
- Open up the services window.
- Once there, look for “connected experiences and telemetry”.
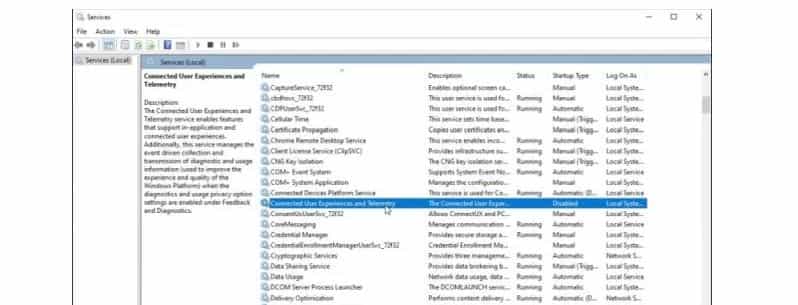
You need to click right on properties > stop services > change startup type to disables.
Keep in mind that this shall not stop Microsoft from gathering information but shall help your system run fast and free up your internet connection from all the unnecessary traffic.
RECOMMENDED: All the information Microsoft gathers in Windows 11.
Turn Off Certificate Propagation
It is used when we insert any smart card in the smart card reader slot on our laptop or system. It shall read and add the certificate to the system. Such services are being used in enterprise and corporate environments and are being controlled through Group policy through IT.
The service does not seem to be of use if you don’t use a smart card.
You need to click right > properties > be sure that the service is stopped > change startup type to disabled.
Biometrics and Scanning Service
Such a service is beneficial when you use applications that need facial or fingerprint scanning. If you have a system that lacks the hardware even to utilize such features then you don’t need to run these in the background.
In the list, you shall see “Windows biometric”.
If you don’t require biometrics then disable it.
Moreover, if you never want to stream or record your favorite games, permanently disable it.
ALSO CHECK: Windows 11 Skinpack with Themes and Icons for Windows 10.
Windows 11 OneSyncSvc

This is the last service on the list which shall sync Microsoft applications used by the user. It includes Windows mail, Microsoft account, calendar mail, contacts, mail, and other applications.
This service can be found in the settings and begins with OneSyncSvc.
You need to click right > choose properties > stop the services > setup startup type to be disabled.
Tip: Stop Windows Input Experience
The Windows Input Experience is a feature experience pack module. If you are seeing high RAM usage this can be due to the input experience running. If you have 8GB of RAM particularly then this should worry you.
Follow the 4 simple steps below:
- Navigate to the “Run” module.
- Go to”Services”.
- Now disable the start-up service for “Virtual Keyboard”.
- Reboot and it will be much better now.
RECOMMENDED: 13 Gorgeous and Free Rainmeter Skins To Download and Install on Windows 11.
FAQs
How do I know which service to disable?
You will have to do troubleshooting on running services and check their CPU and RAM usage over time. This way you can determine which one to turn off.
Is turning off a Windows service dangerous?
The answer completely depends on the service you switch off. You should avoid switching off any core process such as CryptSvc.
Conclusion: Which Windows 11 service have you disabled
The new release from Microsoft has a lot of added benefits and a fresh new look. However, with new features come newly added resource usage. This takes a hit on gaming and performance mainly. This is why we have curated a list of the top 10 Windows 11 services that we think you should completely disable if not needed. Let us know what you are disabling so we can add them above too, Good luck!
Windows 10 or 11 comprise a plethora of pre-installed essential services which are basically small programs. Most of the Microsoft applications coming along with the operating system carry specific services. Whereas with time, several third-party software also add services of their own and allow some tools to function better. But, some superfluous services make Windows 11 PC slow. Therefore, these are not such important to the operating system and can be turned off if you don’t need them. Here, in this article, we have mentioned 15 such types of Windows 11 or 10 Services to Disable for Performance to make PC fast.
Windows 10 or 11 has obviously highly advanced executable programs that run regularly in the background and run functions of their own. However, these services consume system resources just like third-party software. Typically, they don’t use as much RAM as third-party software. Still, lots of unnecessary Windows 11 or 10 services are available that ruin the system resources. When you put Windows services to disable, it free up extra RAM which would very helpful for gaming. Accordingly, it’s worth to disable some Windows 10 services prior to starting a game for performance. Here is the list of Windows 10 Services to Disable for Performance –
1] Phone Service
2] Print Spooler
3] Windows Insider Service
4] Bluetooth Support Service
5] WalletService
6] Fax
7] Remote Desktop Configuration and Remote Desktop Services
8] Diagnostic Policy Service
9] Security Center
10] Downloaded Maps Manager
11] Windows Mobile Hotspot Service
12] Windows Defender Firewall
13] Touch Keyboard and Handwriting Panel Service
14] DevicePicker_3e7b5d8
15] Turn Off Third-Party Services
Windows 11/10 Services To Disable for Performance improvement
Here are the Windows 11 or 10 Services to Disable for Performance –
1] Phone Service
Windows 10 is getting new features and Your Phone app is one of them. This app has its own service which can improve performance of PC and most of all most people don’t use it. So you can disable this from Services console.
- Press Win+S, type services and then hit Enter.
- Find out Phone Service and make a double click on it.
- Click on dropdown adjacent to Startup type and select Disabled.
- Select Stop to put this Service to an end at once.
- At last, click on Apply afterward OK to save the tweaks.
2] Print Spooler
The Printer Spooler is one of the Windows 11 or 10 Services to Disable for Performance. Accordingly, this is mainly useful for printing purposes and who don’t have printers can certainly turn it off. In addition, users having printer can also temporarily disable this application before playing a game and thereafter enable it. Microsoft recommends to disable it only if you are not having a printer.
Here is the tip to disable it –
- First of all, right-click on the Start button and select Computer Management.
- In the left panel of the following page, spread out Services and Applications and then select “Services”.
- Locate Print Spooler in the Name column and do a right-click on it.
- From the list, select the Properties option.
- When Print Spooler Properties window appears, click on the drop-down menu against “Startup type”.
- Select Disabled.
- Now, click on the Apply and then OK button.
Now your printer spooler service is disabled. If needed, you can re-enable this by following the same steps and click Enable.
3] Windows Insider Service
Window Insider Service allows you to get the preview versions of future Windows 10 builds before revealing to the general public. However, this is not a very essential service for everyone. So, the user who is not registered with the Windows Insider program can certainly turn off this one.
- Click on the Start button and type “Control” and hit Enter.
- On the following screen, click on the Administrative Tools.
- Locate Services and double click on it.
- Find Windows Insider Service in the Name column and do a right-click on it.
- From the context menu, select the Properties option.
- When the Windows Insider Service Properties window appears, click on the drop-down menu against Startup type.
- Select Disabled.
- Now, click on the Apply and then OK button to save the changes in the service startup type.
In this way, you can disable the Windows Insider Service.
4] Bluetooth Support Service
Bluetooth provides you the ability to pair devices such as mobile phone, speaker wirelessly with the desktops or laptops. This Service is essential for Bluetooth connectivity, but not mandatory for the Windows 11 or 10. Therefore, anybody who doesn’t need to pair with can certainly turn off this service.
- Press Win+S and let Taskbar search appear.
- Type Services and select it from the top of the list.
- Locate Bluetooth Support Service in the Name column and do a right-click on it.
- From the context menu list, select the Properties option.
- When the “Bluetooth Support Service” wizard appears, click on the drop-down menu adjacent to Startup type and choose Disabled.
- Now, click on the Apply and then OK button to save the changes in the service.
In this way, you can disable the Bluetooth Support Service.
5] WalletService
Clients of the wallet use host objects and these Services help them. If you don’t use Wallet on Windows 11 and 10 then you can disable this one to boost the performance.
6] Fax
In Windows 10 and 11, Fax is a third party service which has become obsolete and as a result, it slows down the system. This device was widely used in earlier times to send documents electronically over a telephone network. Therefore, those users who have long since chucked out fax machines can disable this service.
Through Control Panel
Step-1: First of all, press Win+R keyboard shortcuts and let Run dialog box appear.
Step-2: Type control panel in the empty text bar and hit the Enter key.
Step-3: Choose Programs and Features.
Step-4: Select Turn Windows Features on or off link from the left pane of the subsequent window.
Step-5: When Windows Features tiny window appears, locate Print and Document Services and then expand it by clicking on the plus (+) sign.
Step-6: Uncheck Windows Fax and Scan option.
Step-7: Click on the OK button to save the changes.
Through Windows Services
- Type Administrative Tools in the Windows search and press Enter.
- Locate Services and double click on it.
- Find Fax in the Name column and double click on it.
- When the Fax Properties window appears, click on the drop-down menu against Startup type.
- Select Disabled.
- Now, click on the Apply and then OK button.
7] Remote Desktop Configuration and Remote Desktop Services
Win 11/10 OS comprises a Remote Desktop utility which is mainly used for connecting another PC. Both the Remote Desktop Configuration and Remote Desktop Services are essential to enable for removing desktop connectivity. Moreover, RDP is a very crucial feature provides remote display over network connections. Although, users who don’t need this feature can disable it before starting the game.
Remote Desktop Configuration service
Step-1: Press Windows key+S, type Services and select it from the top of the list.
Step-3: Locate Remote Desktop Configuration in the Name column and perform a double-click on it.
Step-4: When the Properties wizard appears, click on the drop-down menu against Startup type.
Step-5: Select Disabled.
Step-6: Finally, click on the Apply afterward OK button.
Disable Remote Desktop Services
- Do a right-click on the Start menu icon and select Computer Management.
- In the left panel of the following page, expand Services and Applications and then select Services.
- Locate Disable Remote Desktop Services in the Name column and do a double-click on it.
- When Disable Remote Desktop Services window appears, click on the drop-down menu against Startup type.
- Select Disabled.
- Lastly, click on the Apply and thereupon OK button.
8] Diagnostic Policy Service
Diagnostic Policy Service also remains active in the background and performs some functions. Sometimes this also causes high CPU usage.
- Open Computer Management.
- In the left panel of the upcoming page, unfold Services and Applications and then select Services.
- Locate Diagnostic Policy Service in the Name column and double-click on it.
- When Diagnostic Policy Service Properties window appears, click on the drop-down menu against Startup type and select Disabled.
- In the end, click on Apply followed by OK button.
Now your Diagnostic Policy Service is disabled. If needed, you can re-enable this service by following the same steps and click Enable.
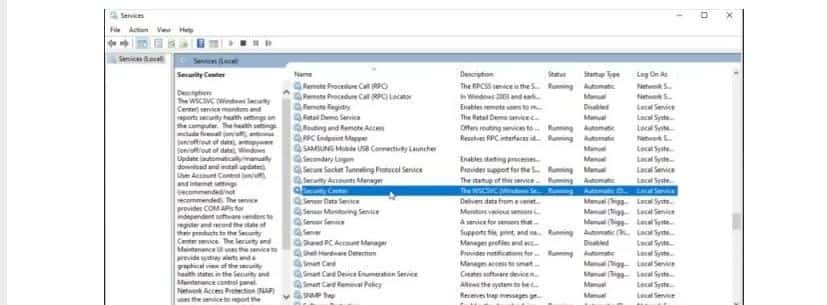
9] Security Center
The Security Center is one of the most necessary Windows OS components introduced by the Microsoft team. It periodically monitors the issues and informs users for various operations like – Windows updates pending. In spite of, this is not such a useful service and continuously runs in the background while booting up the device. Therefore, disabling it will not harm your PC and even make it run fast.
- Open Services as one of the methods given above.
- Find Security Center in the Name column and double-click on it.
- When the “Security Center Properties” window appears, click on the drop-down menu against “Startup type” and then choose Disabled.
- Ultimately, click on the Apply and consecutively OK button.
10] Downloaded Maps Manager
With a collection of services, Windows 11/10 comprises Download Maps Manager service which allows map apps to access downloaded maps. The included applications definitely need this service enabled. Although, users who don’t require any map apps can easily turn off this service to boost the gaming performance. Furthermore, you’re able to enable it if required in Windows 10/11. And if required in future you can enable it in Windows 11 or 10.
- Go to Services console, locate Downloaded Maps Manager in the Name column and do a double-click on it.
- When Downloaded Maps Manager window appears, click on the drop-down menu against Startup type.and then select Disabled.
- In the last, click on the Apply and afterward OK button.
11] Windows Mobile Hotspot Service
The Windows Hotspot Service empowers you to share the internet connection with a computer. Those who often utilize mobile hotspot will need to keep this on. However, when you have no need for this service, it would be better to disable it for enhancing the gaming performance.
- Get access to Services console, locate Windows Mobile Hotspot Service in the Name column and double-click on it.
- From the context menu, select the Properties option.
- When Windows Mobile Hotspot Service window appears, click on the drop-down menu against Startup type.
- Select Disabled.
- Finally, click on the Apply and subsequently OK button.
Now your Windows Mobile Hotspot Service is disabled. If needed, you can re-enable this service by following the same steps and click Enable.
12] Windows Defender Firewall
Microsoft team usually doesn’t recommend to disable Windows Defender Firewall. If you turn off this service, it can block software connections. However, that’s not really an essential system service and the firewall can also block multiplayer games. Therefore, it might be better if you disable this service before playing a game and re-enable when the game over. Some third-party antivirus software also incorporates firewalls. Therefore, you might not need the Windows Defender Firewall service on at all.
- Get at Services console, find Windows Defender Firewall in the Name column and do a double-click on it.
- From the context menu, select the Properties option.
- When the Windows Defender Firewall Properties window appears, click on the drop-down menu against Startup type.
- Select Disabled.
- Once done, click on the Apply after then OK button to store the modifications.
13] Touch Keyboard and Handwriting Panel Service
The Touch Keyboard and Handwriting Panel Service allows using the OSK in Windows 11 and 10. Although, several users ever require the same. Such users can disable on screen keyboard.
- Reach Service college, locate the Touch Keyboard and Handwriting Panel Service in the Name column and do a double-click on it.
- Choose Properties.
- When the “Touch Keyboard and Handwriting Panel Service wizard comes into view, click on the drop-down menu against Startup type and then select Disabled.
- As the ultimate step, click on the Apply and then OK button.
14] DevicePicker
This service is used for the management of the Miracast, DLNA, and DIAL UI. So when you are not using these features on your Windows 10 and 11 PC they will put an unnecessary load to the resources. So we suggest you Windows 11 or 10 Services to Disable for Performance.
15] Turn Off Third-Party Services
On Windows 11 and 10, several third-party application has its own services. Usually, these services provide automatic updates for programs, for instance – AllJoyn Router Service, Adobe Acrobat Update Service updates Adobe applications. They consume system resources a lot, but none are essential for the operating system. You are able to disable the running third-party applications through the Services window. Although, the System Configuration service incorporates a handy Disable all option.
Here is how you can turn off all third-party software services.
- Press Win+R hotkey and let appear the Run dialog box.
- In the void, type ‘msconfig’ and click on the OK button to open the System Configuration directly.
- Once the window appears, click on the Services tab.
- At the lowest part, tick the Hide all Microsoft services checkbox.
- Hit Disable all option.
- Click on the Apply and then OK button.
- Finally, a Restart button will appear on the dialog box. Click on it.
That’s all!!!
Have you ever checked which services are running on your Windows 11? I bet there must be several services that you rarely use, yet they are running in the background and consuming system resources. If you are not using a high-end laptop or system, you must be cautious of how system resources are being spent. In this post, we will discuss in length the services that are completely safe to disable on Windows 11.

Nine Services that are Safe to Disable on Windows 11
Certain services on your Windows 11 only waste system resources as they are not being used, yet they are running in the background. We will present a list of such services that you need not require running, and you may disable them on your Windows 11 PC. They are as follows –
1. Fax Service
If you don’t work in a corporate, or rarely send or receive Fax, you may choose to disable the Fax service running in the background. To disable the Fax service on Windows 11, do the following –
- Press Win + R to launch the Run dialog.
- Type “
services.msc” and hit OK. - When the Services window launches, scroll down to the Fax Service.
- Right-click on it and select Properties.
- Change its startup type to “Disabled” on its properties window and hit Apply > OK.

Note: If you ever receive a fax, you need to reverse the above steps i.e. change the startup type to “Enabled“.
2. Downloaded Maps Manager
Windows 11 has a native map application and for this to work accurately, there’s a service running in the background. If you don’t use this navigation feature by Windows, you must disable this service on your PC.
Open the Services window and search for Downloaded Maps Manager by scrolling down. When found, right-click on it and choose Properties. Change its startup type to “Disabled” and hit Apply > OK.

That’s it, downloaded maps manager will stop running in the background when you restart your PC.
3. Universal Telemetry Client (UTC)
The universal telemetry Client is a service that runs in the background and accumulates data on how well your device is operating or functioning. It runs different diagnostic services in the background and sends the full report to the Microsoft servers. Though it sends info for the betterment of Windows, it unnecessarily consumes system resources and makes your device slow.
If you do want to disable a service because your device is running slow, you must disable it. To do so, launch Services and look for a Universal Telemetry Client on it. When found, right-click on it and select Properties. Change its startup type to “Disabled” and hit Apply then OK.

Note: Disabling it will free up some system resources and unnecessary data waste when sending information from your computer to Microsoft Servers.
4. Windows Biometric Service
Windows biometric service is useful on laptops where you do have a fingerprint scanner. If you are using an old system, it must be lacking a fingerprint scanner. Well, in that case, one may opt to disable Windows biometric service on his/her device.
To disable Windows Biometric Service on Windows 11, do the following –
- Launch the Services window first.
- Look for the Windows Biometric Service on the Services window.
- When found, right-click on it and hit Stop.

By default, Windows Automatic Service is set to start automatically when you power On your PC. This is so because you need to unlock your computer using your fingerprint. Stopping this service one time will not resolve this problem as this can restart the moment you reboot your PC.
To permanently disable Windows Biometric Service, reach out to its Properties window and change its Startup type drop-down menu to “Disabled”. Don’t forget to click Apply and then OK to confirm this change.
5. Windows Mobile Hotspot Service
Windows Mobile Hotspot Service is a very useful service that can make your device a hotspot for nearby devices. This indeed is a great thing, however, what if you never make your device a hotspot? Well, then it is unnecessarily running and consuming system resources. It is completely safe to disable this service as you won’t be missing anything on your computer. To do so, follow these steps –
- Right-click on the Windows icon and select Run.
- Type “
services.msc” on it and hit OK to enter the Services window. - Scroll down to Windows Mobile Hotspot Service and right-click on it.
- Select Properties on the context menu.
- Change its startup type to “disabled” and hit Apply > OK.

- After successfully disabling the Mobile hotspot service, do reboot your PC.
Sign back into your device again and the Windows Mobile hotspot Service must not be running on your computer. If you ever wish to re-enable this service, re-open the Services and change its Startup type to “Enabled” on its Properties window.
6. OneSyncSvc
OneSyncSvc is a sync service by Microsoft and it keeps all Windows apps in sync when used on two or more devices. It could be your Microsoft account, Mail & Calendar, and several other apps. If you do use these apps on your laptop or personal computer only, there’s no need to keep these apps in sync.
So, it is quite safe to disable this OneSyncSvc on your Windows PC. Open Services and come down looking for this service. When you locate this service, right-click on it and select Properties. On its properties window, use the drop-down menu next to the Startup type and change it to “Disabled“.
7. Security Center
Security Center seems to be a service having something to do with system security. Well, it isn’t. All it does is keep running in the background and check if any new update is available for your operating system. This definitely sounds like a not-important service, isn’t it?
If you are not concerned about system resources being wasted, you may keep this service On and running. Else, follow the below steps to disable it permanently on your computer.
- Press Win + S, and type “Service” in the search bar.
- Click on the top result to launch the Services window.
- Scroll down to Security Center, and right-click on it.
- Click Properties and change its startup type to “Disabled”, followed by Apply > OK.

After you disable this service, restart your PC. You will find your computer running more efficiently from the next login.
8. Print Spooler
Print Spooler is an essential service when you use a printer attached to your computer. However, if you don’t print anything from your system, there’s no point in keeping this service On and running.
To disable this service, launch the Services window first. Scroll down and locate the Print Spooler service over here. When found, right-click on it and select the option – Stop.

To ensure this doesn’t start automatically when you restart your PC, double-click on the Print Spooler service. Change its startup type to “Disabled” and hit OK. Doing so will keep this service disabled even when you reboot your device.
How to Fix Print Spooler Service Issues on Windows 10
9. Disable Windows Defender Firewall
Windows Defender Firewall prevents your device from installing untrusted applications, software from malicious sites, etc. This is a good thing but it is non-relevant if you are already using a third-party antivirus on your computer.
Keeping a Windows Firewall running along with an external antivirus will only consume unnecessary system resources. So, you better disable Windows Defender Firewall by following the below steps –
- Launch Control Panel.
- Click Windows Defender Firewall.
- Select “Turn Windows Defender Firewall on or off” on the left pane.

- On the next screen, turn off Windows Firewall for both Private as well as Public networks. See the Snapshot below.

- Click OK to confirm disabling the Windows Defender Firewall.
Note: If you don’t use any other antivirus on your computer, restarting your computer will re-enable Firewall.
Can I disable the Windows Update Service?
Microsoft releases new security updates every second Tuesday of a month and one shouldn’t restrict such updates. This is because they include several bug fixes along with features to improve your device’s security. However, as they come too often, you may delay installing such updates.
Even in cases where you don’t want to delay Windows updates, you may wait to know about the features a new update holds. When a new update is available for your PC, you may visit Windows 11 Update history and read its changelog. If it does satisfy you, you may proceed ahead with its manual installation from the Microsoft Update Catalog.
Apart from security patches, Microsoft also releases non-security updates or optional updates which contain more bugs than any new feature. So, when you disable unnecessary scanning for new updates on your computer, it saves system resources and your device may last longer. Here’s how to put a stop to Windows updates automatically.
- Press Win + R to launch Run.
- Type “
services.msc” on it and hit OK. - Locate Windows Update on the Services window.
- When found, right-click on it and select Properties.
- On its properties window, change the Startup type drop-down menu to “Disabled“, and hit Stop.

If an update comes after disabling Windows Update and you do wish to install that, check for the same over Microsoft’s Update Catalog. Microsoft releases standalone packages for all new updates (security, non-security, out-of-band, or optional). Here’s a complete guide on how to install pending updates manually on your PC –
- Manually install updates on Windows 11
- Manually install updates on Windows 10
Apart from the above list, you may disable these services safely on your Windows 11. It is to be noted that these services will restart the next time you restart your computer. So, you must change their Startup types to “Disabled” on their properties window.
- Application Layer Gateway Service
- Alljoyn Router Service
- AVCTP Service
- Bitlocker
- Bluetooth Support Service
- Certificate Propagation
- Diagnostic Policy Service
- Diagnostic Service/System Host
- Distributed Link Tracking Client
- Enterprise App Management Service
- File History Service
- GameDVR and Broadcast
- Geolocation Service
- IP Helper
- Internet Connection Sharing
- Netlogon
- Offline Files
- Parental Control
- Payments and NFC/SE Manager
- Phone Service
- Program Compatibility Assistant Service
- Remote Registry
- Retail Demo Service
- Secondary Logon
- Smartcard
- TCP/IP NetBIOS Helper
- Windows Error Reporting Service
- Windows Insider Service
- Windows Image Acquisition
- Windows Camera Frame Server
- Windows Media Player Network Sharing Service
- Xbox Accessory Live Auth Manager
- Xbox Live Networking Services
That would be all. I hope by now, you get a fair idea of which services to disable on your Windows 11 PC.