
The Apple Magic Mouse isn’t the most ergonomic mouse on the planet, but you just can’t deny how well it works on the Mac. It connects flawlessly and is super convenient to configure. But what if you want to use it on a PC or Mac running Windows 10 via Boot Camp?
This tutorial covers everything you need to set up and use the Magic Mouse on a Windows PC or Mac computer.
Can Magic Mouse Be Used with Windows?
The Magic Mouse uses Bluetooth, so you can connect it to Windows and use it for basic navigation without issues. The mouse will also connect and work on any Bluetooth-enabled device that supports mouse input.
Although Magic Mouse works on Windows devices, not all features function as they do on Mac computers. For instance, you can’t scroll through pages using gestures unless you install the additional drivers. Also, you can only view your Magic Mouse battery status or customize scroll directions in Windows with third-party apps.
The steps in the next section will help set up Magic Mouse in Windows for a Mac-like experience.
You can connect a Magic Mouse over Bluetooth to a Windows or Mac computer like any Bluetooth device. If your computer doesn’t support Bluetooth, pair it with a Bluetooth adapter instead.
- Open the Start menu and select Settings. You can also open Windows Settings using the Windows key + I shortcut.
- Select Bluetooth & devices in the sidebar, turn on Bluetooth, and select the Add device button.
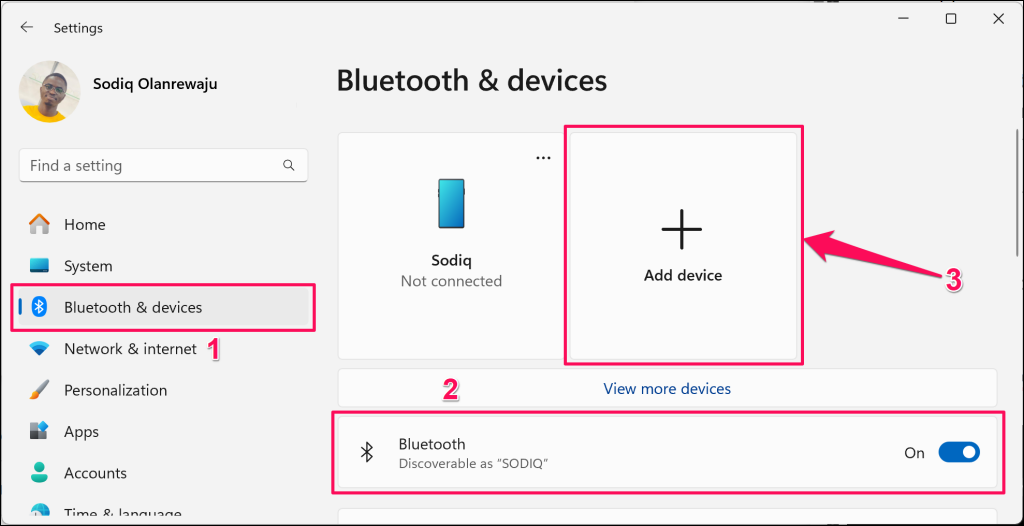
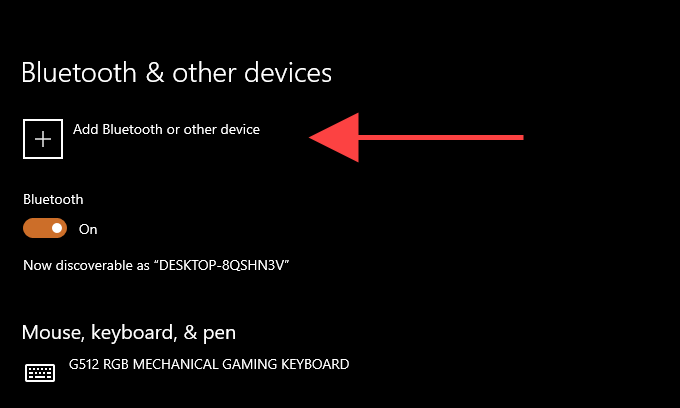
In Windows 10, go to Settings > Devices > Bluetooth & other devices, turn on Bluetooth (if disabled), and select Add Bluetooth or other device.
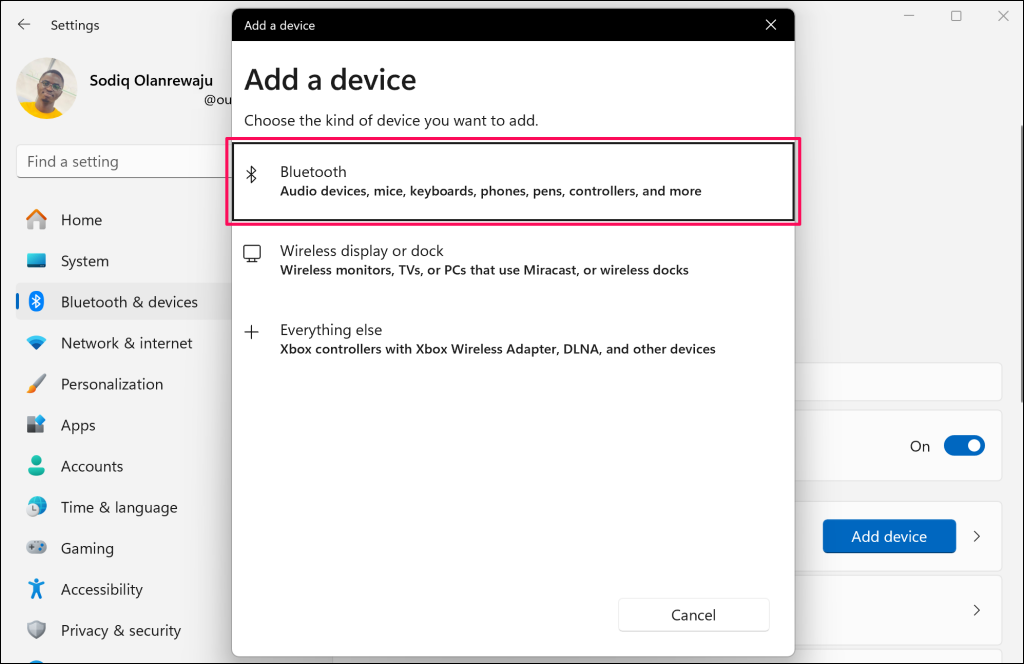
- Select Bluetooth on the “Add a device” pop-up window.
- Select your Magic Mouse from the list of available Bluetooth devices.
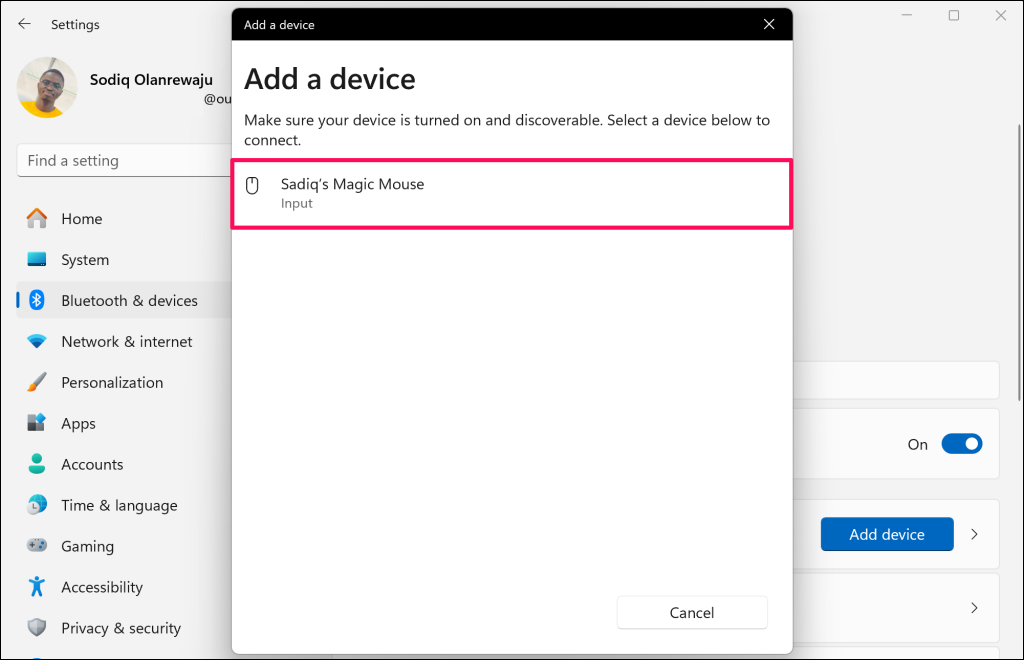
7. Select Done to finish the pairing process.
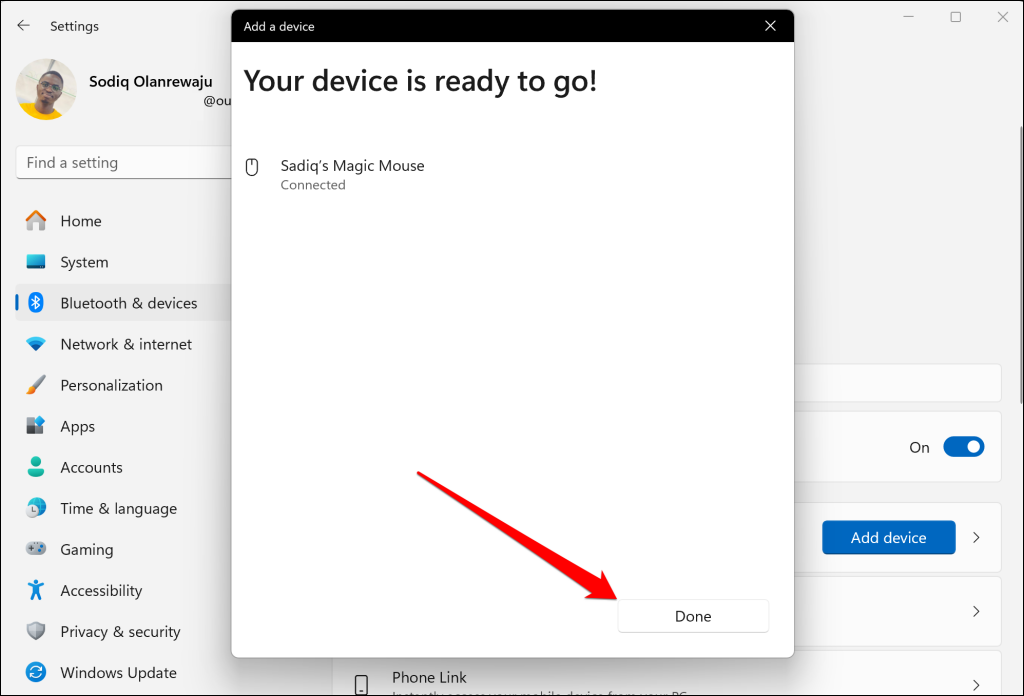
Note: Turn off your Magic Mouse and turn it back on if it doesn’t appear on the list of available Bluetooth devices. Charge or plug your Magic Mouse into a power source if Windows doesn’t detect it over Bluetooth.
You can now start using the Magic Mouse to navigate Windows. Click the left button to perform a regular click and the right button to execute a right click.
Go to Settings > Bluetooth & devices > Mouse to reconfigure your Magic Mouse buttons, adjust the cursor/scrolling speed, pointer size/color, etc.
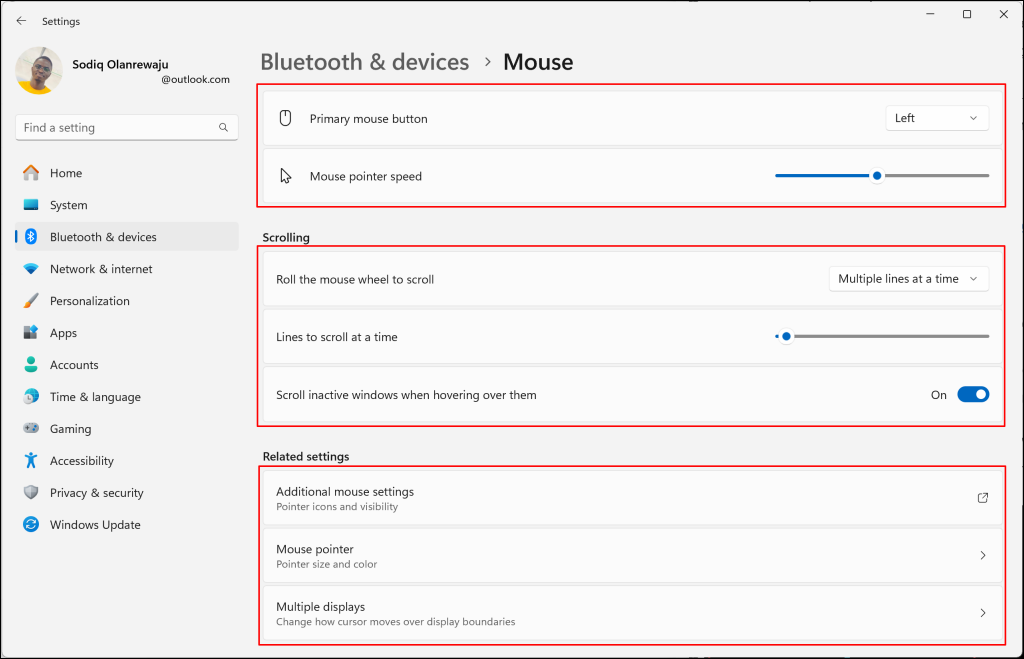
Select Additional mouse options in the “Related settings” section to configure the double-click speed, pointer precision, etc.
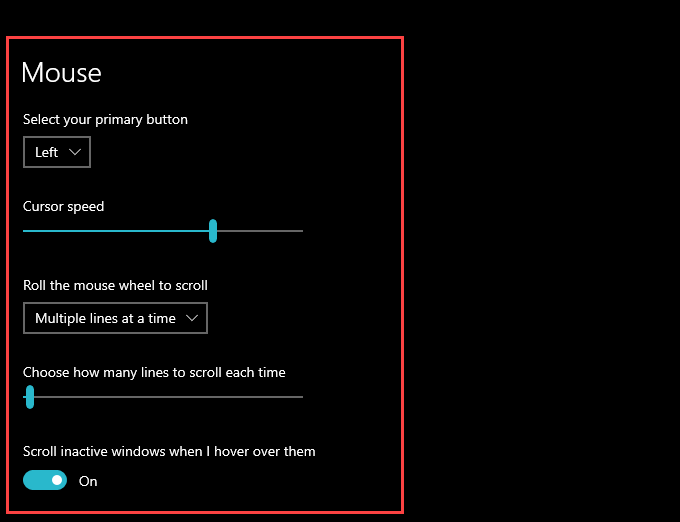
In Windows, head to Start > Settings > Devices > Mouse to configure your Magic Mouse buttons and pointer speed.
Note: You can’t scroll in Windows using your Magic Mouse until you install the Apple Wireless Mouse driver.
How to Install Magic Mouse Driver in Windows
As earlier mentioned, you need the Apple Wireless Mouse driver to scroll with the Magic Mouse in Windows. There are two methods to get the driver on your computer.
You can download it directly from Apple’s website or via third-party tools like Brigadier.
Download Driver Directly From Apple
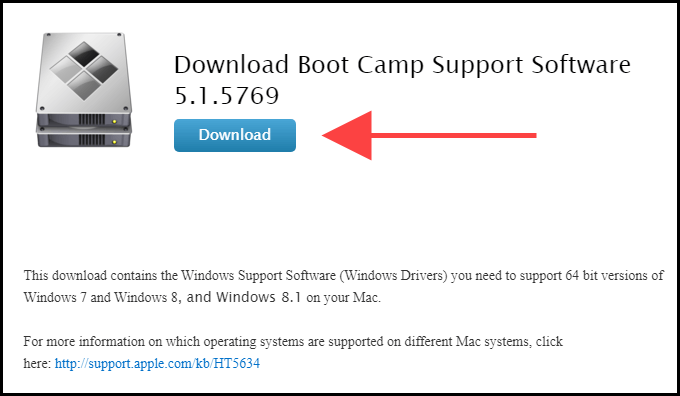
Apple provides a Boot Camp Support Software package that contains the Magic Mouse driver needed to enable scrolling on the PC. However, it’s pretty dated and may not allow scrolling in some Windows 10 and 11 versions.
1. Go to Apple’s Downloads page and search for boot camp support software. Then, download the most recent Boot Camp Support Software version to your PC.
2. Extract the downloaded ZIP file.
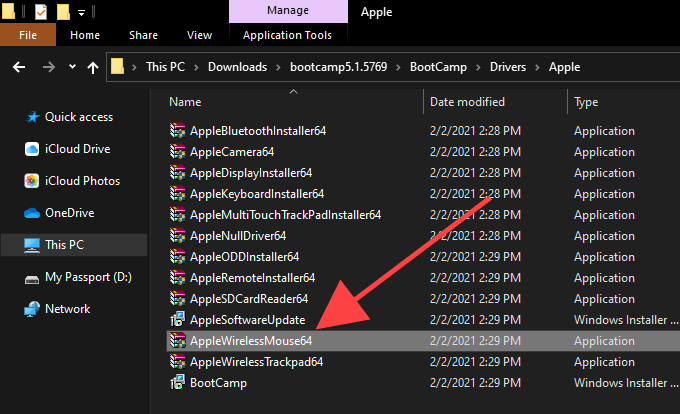
3. Open the extracted folder and go to BootCamp > Drivers > Apple.
4. Double-click the file labeled AppleWirelessMouse64 and follow all on-screen instructions to install the Apple Wireless Mouse Drivers.
5. Restart your PC and check if you can scroll vertically or horizontally in Windows using the Magic Mouse. If not, try out the following method.
Download Driver From Apple Using Brigadier
Brigadier is a Python script that can fetch the latest Boot Camp Support Software from Apple by identifying your PC as a Mac. The Apple Wireless Mouse driver in the package is compatible with almost all computers running Windows 10.
Connect your computer to the internet and follow the steps below.
- Download Brigadier from GitHub and copy the Brigadier.exe file to the desktop.
- Right-click the brigadier.exe setup file and select Properties in the context menu.
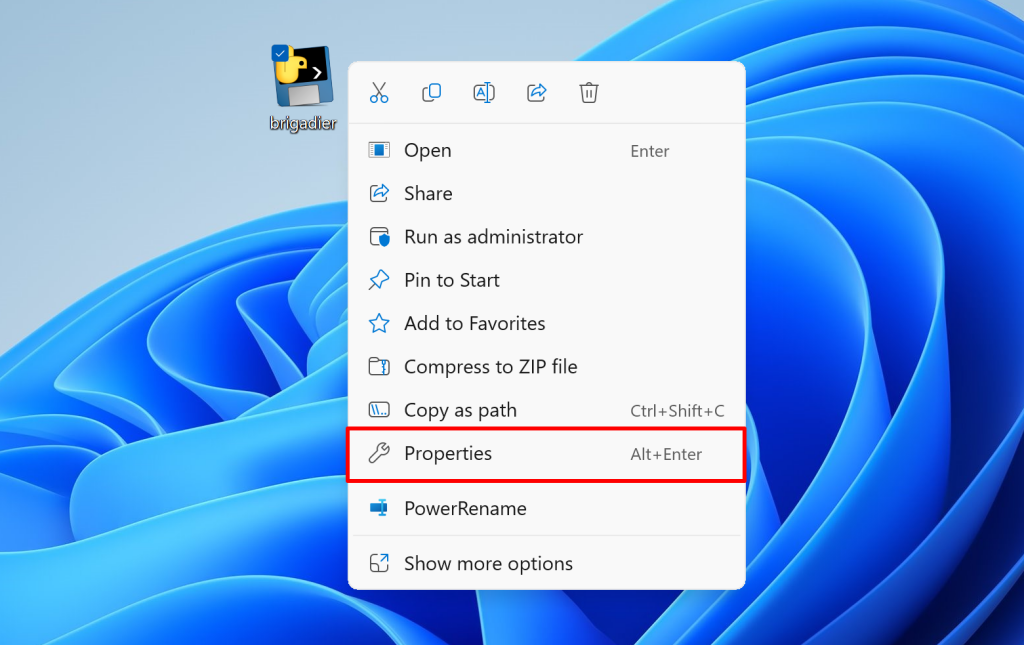
- Copy the file’s location or path to your computer’s clipboard.

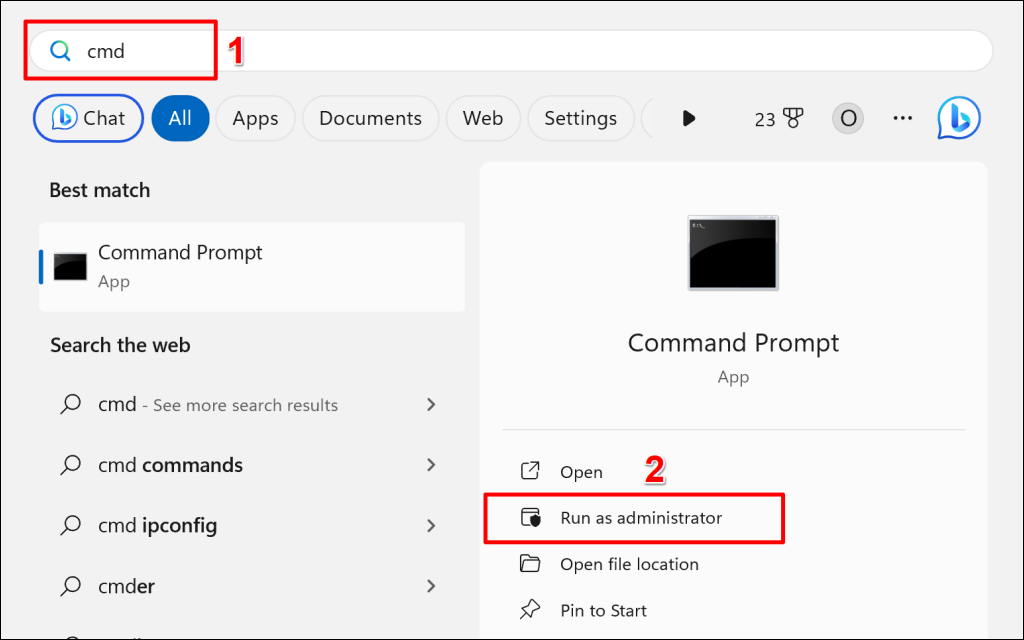
- Open the Start menu, type cmd in the search box, and select Run as administrator.
- Type the command below into the Command Prompt console and press Enter:
cd [brigadier_location]Replace [brigadier_location] with the location of the brigadier.exe file on your computer—see step #3. The command should look like this:
cd C:UsersolanrOneDriveDesktop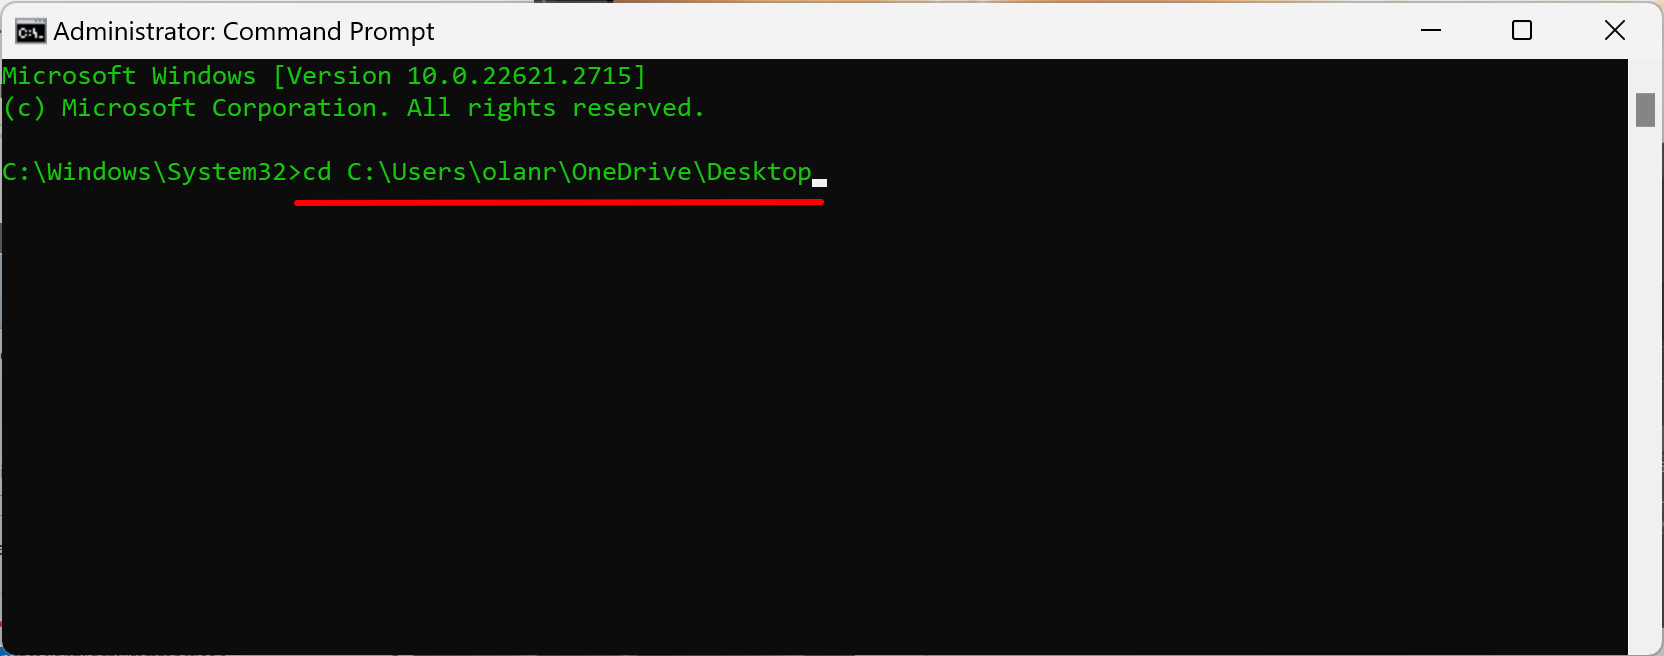
- Next, type the command below and press Enter:
brigadier.exe -m MacBookPro16,3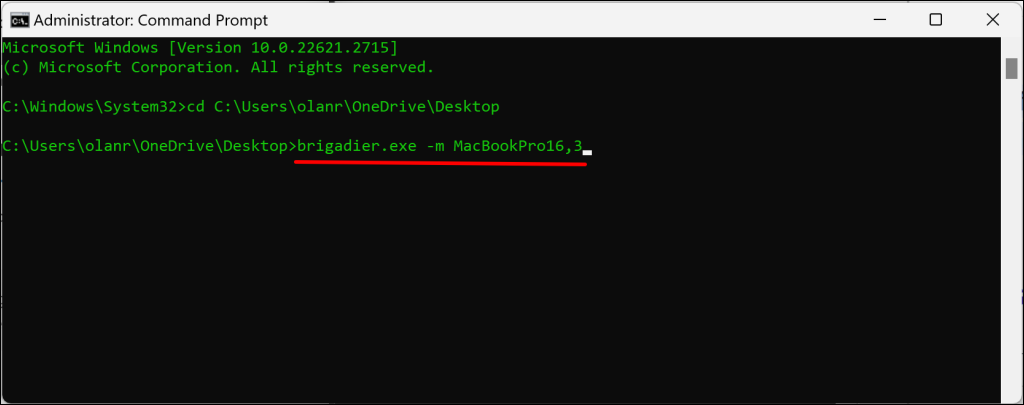
The command above includes a Mac model identifier—MacBookPro16,3—that identifies your PC as a 13-inch 2020 MacBook Pro. You can swap it with another identifier, but using a recent Mac model that supports Windows over Boot Camp is a good idea.
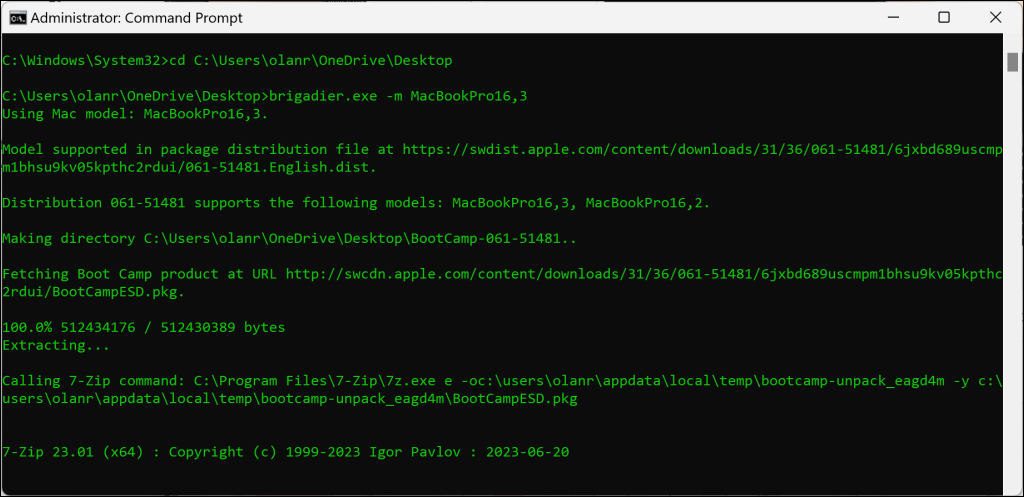
Wait until Brigadier downloads and saves the latest drivers from Apple to the desktop. You’ll find the files in a “BootCamp” folder in the same location as the brigadier.exe setup file.

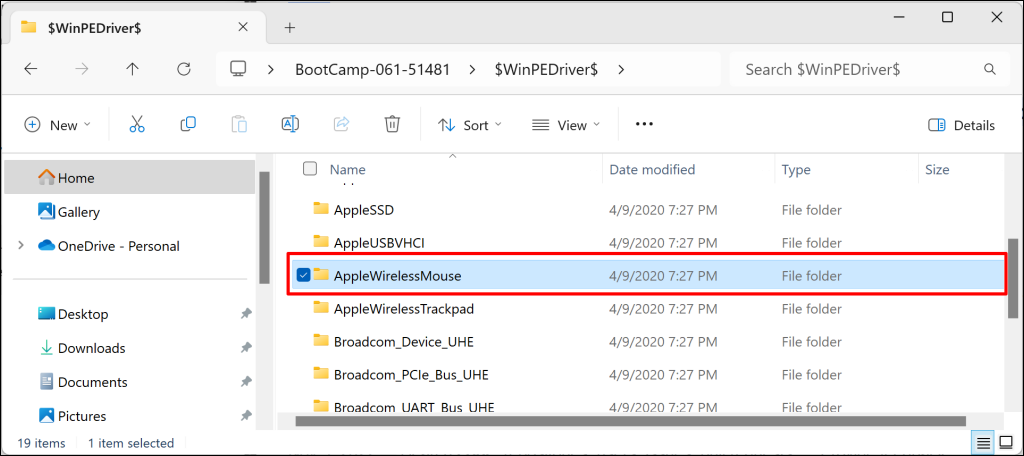
- Open the BootCamp folder on the desktop and go to $WinPEDriver$ > AppleWirelessMouse.
- Right-click the AppleWirelessMouse (or AppleWirelessMouse.inf) setup file, select Install, and wait a few seconds.
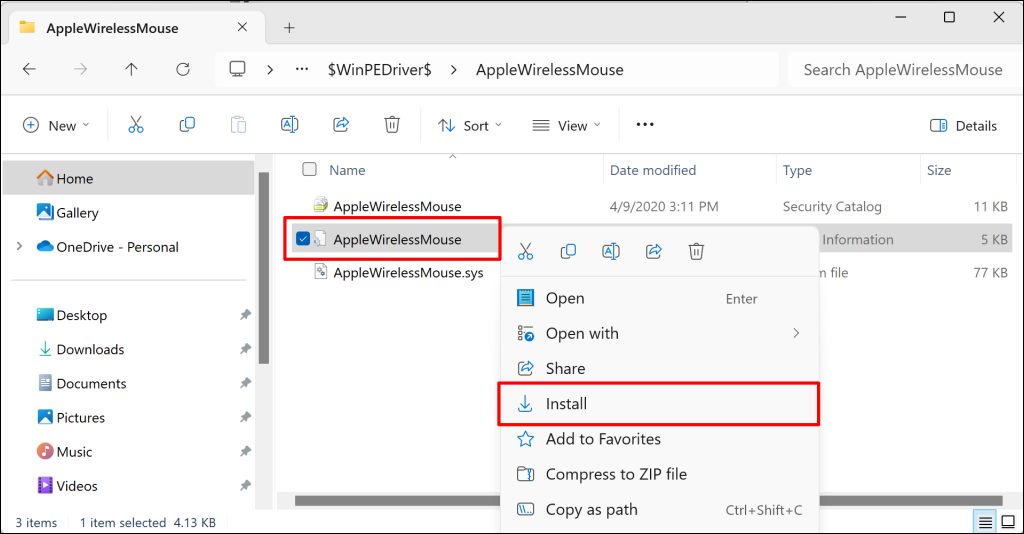
You should now be able to scroll horizontally and vertically with your Magic Mouse.
How to Install Magic Mouse Driver for Windows on Mac
Your Mac automatically installs the Boot Camp Support Software package when you set up Windows 10 using Boot Camp. The package contains drivers that allow Apple devices and accessories to function correctly in Windows. However, in most cases, the Magic Mouse won’t scroll until you install pending driver updates via Apple Software Update.
- Open the Start menu, type Apple Software Update, and select Open.
Note: Apple Software Update is pre-installed on Windows running via Boot Camp, so you don’t have to install it separately.
- Wait until Apple Software Update scans for available updates.
- Check the boxes next to Apple Input Device Update and Boot Camp Update. It’s also a good idea to select any other listed updates.
- Select Install N items to download and apply the updates.
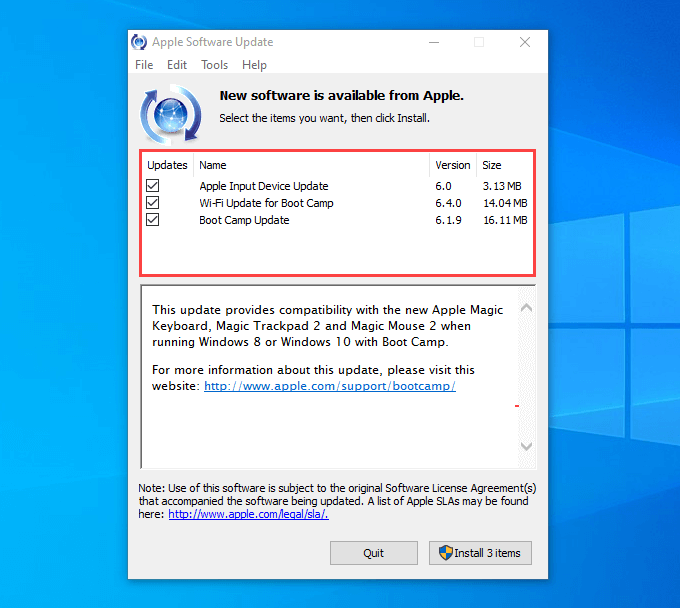
5. Restart your Mac computer. The Magic Mouse should work correctly when you run Windows on your Mac.
Configure Magic Mouse in Windows Using Third-Party Software
Even after correctly setting up your Magic Mouse in Windows, it doesn’t feel like using the device alongside macOS. That’s where third-party tools like Magic Mouse Utilities come into the picture.
Magic Mouse Utilities is a third-party program that optimizes the usage of Apple accessories on Windows devices. It introduces multiple gestures that allow you to move between pages, switch among desktops, invoke Task View, etc. It also allows you to customize scrolling, middle-click actions, swap buttons, etc.
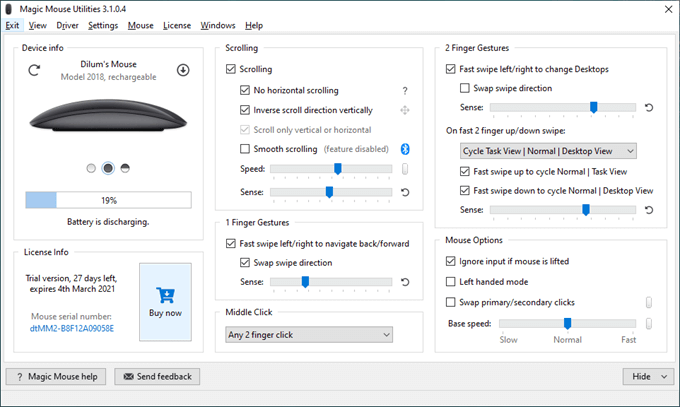
You can even see your Magic Mouse battery status in real time. The program is easy to install and use in Windows. Connect your Magic Mouse to Windows via Bluetooth, install and launch Magic Mouse Utilities, and it’ll automatically detect the mouse.
Magic Mouse Utilities isn’t free, but it’s pretty affordable. The app costs $14.90 for a one-year subscription, but you can get a 28-day free trial to test things out thoroughly. It’s as close as you can get to emulating a Mac-like Magic Mouse experience on Windows.
Related Posts
- How to Middle Click on macOS Using Trackpad or Magic Mouse
- Apple Mouse Not Working? 9 Ways to Fix
- Magic Mouse Won’t Connect or Not Scrolling?
- How to Use Your iPhone as a USB Drive on Mac and PC
- Apple’s Big Week: Design Debates, AI Ambitions, and Regulatory Roadblocks
Getting your Magic Mouse to work with Windows 10 can be smooth and simple. In this article, we’ll show you how to connect your Magic Mouse, install the right drivers, and fine-tune its settings to enhance your Windows experience without any fluff or sales pitch. Ready to master your Magic Mouse on Windows 10? Let’s dive in.
Key Takeaways
- The Apple Magic Mouse can be connected to a Windows 10 PC via Bluetooth without the need for additional software, and the correct driver must be installed to enable full functionality.
- Windows 10 allows for customization of the Magic Mouse settings, including click and scroll adjustments as well as fine-tuning gesture controls to improve user experience.
- Connectivity issues and driver errors are common hurdles that can typically be resolved by re-pairing the device or using tools like Driver Easy.
Unlocking the Magic: Connecting Your Magic Mouse to Windows 10

The first step toward integrating the elegance and precision of an Apple Magic Mouse with your Windows 10 PC is to establish a connection – a bridge between two worlds of technology. This seemingly simple task of connecting via Bluetooth is the cornerstone of your enhanced navigation experience. Ensuring a smooth pairing process is vital, as it sets the stage for the advanced features and capabilities that the Magic Mouse has to offer.
Finding Your Way Through Bluetooth Settings
Before the magic unfolds, one must navigate Windows settings to find the fabled Bluetooth options. Embark on your quest by clicking the Windows icon, then gear up by selecting Settings. It’s here, in the Devices section, that you’ll encounter the tools needed to manage your left button, mouse, keyboard, and other peripherals.
With a few more clicks, you unveil the Bluetooth & Other Devices tab, the gateway to all things wireless, including your bluetooth device.
Completing the Pairing Process
With Bluetooth now in your sights, it’s time to bring the Magic Mouse into the fold. Turning on Bluetooth is just the beginning; initiating the pairing process with a flourish of clicks leads you to select the Magic Mouse from a list of available devices. Should a PIN be requested, fear not, for ‘0000’ or simply a void may be the key to unlocking the connection.
With no additional software needed, the mouse is now at one with your PC, ready to obey its master’s gestures.
The Solumics Case: A Touch of Ergonomics for Your Magic Mouse

After successfully connecting your Magic Mouse to a Windows 10 PC, it’s time to consider user comfort. The sleek design of the Magic Mouse is aesthetically pleasing but may lead to discomfort over time. Enter the Solumics Case, an ergonomic solution designed to complement the Magic Mouse’s unique touch interface. It enhances comfort without sacrificing functionality, making it an ideal addition for your Magic Mouse setup.
The Solumics Case promises to alleviate the strain of long hours at the computer, transforming your Magic Mouse into a bastion of comfort while maintaining its functionality and promoting productivity.
Quick and Easy Attachment
The Solumics Case is a testament to convenience, designed for quick attachment and detachment that takes less than a heartbeat. This allows for effortless transitions between workstations or tasks, ensuring that your mouse is always ready for action, clad in its ergonomic armor.
Once affixed, the case provides a stable and protective fit, enhancing your Magic Mouse grip and control.
Benefits of Elevating Palm Support
The Solumics Case’s elevated palm support is a feature crafted to combat fatigue and strain, offering an oasis of comfort in a desert of discomfort. Its design encourages a more natural hand position, relieving fingertips from undue pressure and reducing the risk of repetitive strain injuries.
The side extensions broaden the grip, allowing for more precise mouse movements and an overall improvement in ergonomic health, making every click a delight rather than a chore.
Installing the Essential Magic Mouse Driver
Now that the Solumics Case is attached and the Magic Mouse is connected, it’s imperative to install the essential driver that will awaken its full capabilities on your Windows PC. Without the proper incantations – or in this case, the right driver – the mouse might as well be an ordinary rodent. To avoid this, a magic mouse driver needed to be installed.
This pivotal step ensures that the magic within the mouse is fully accessible and that every scroll and swipe is recognized by the digital realm of Windows 10.
Locating the Correct Driver File
To find the treasure that is the correct exe file, one must embark on a digital excavation. Deep within the Boot Camp Support Software, you’ll unearth the AppleWirelessMouse64.exe, the coveted artifact needed to bring your Magic Mouse to life on a Windows platform.
For those who prefer a guided expedition, Brigadier stands ready to fetch this software with ease, sparing you the toil of navigating Apple’s archives.
Smooth Installation Steps
Once the driver is found, it’s time to perform the installation ritual. Here are the steps to follow:
- Begin by banishing the Magic Mouse from the Bluetooth devices list to avoid any conflicts.
- Then, beckon the driver file to run and watch as the installation wizard conjures the necessary magic.
- Upon completion, reconnect your mouse to the Bluetooth settings and let it be reborn with newfound powers.
- A system restart might be the final step in ensuring a seamless integration.
Customizing Your Magic Mouse Windows 10 Experience

The Magic Mouse, now fully under your command, is ready to be molded to your preferences. This is where you can personalize your interactions, adjusting the device to meet your specific needs. Whether it’s about the speed of the cursor or the sensitivity of the scroll, Windows 10 offers a plethora of settings to tailor your experience.
With the right adjustments, your Magic Mouse becomes an extension of your will, responding to your every gesture with precision, just like a magic keyboard. These magic utilities truly enhance your user experience.
Adjusting Click and Scroll Settings
In the realm of customization, the Mouse & Touchpad settings panel is your canvas, and your preferences are the paint. Here you can enable scrolling and fine-tune your Magic Mouse’s scrolling behavior, making it as free-flowing or controlled as you desire. The ‘Scroll Speed’ and ‘Scroll Acceleration’ sliders are your tools, allowing you to craft the perfect scrolling experience.
With these adjustments and the help of Magic Mouse Utilities, the Magic Mouse becomes a more responsive and intuitive ally in your daily computing endeavors.
Fine-Tuning Gesture Controls
Gesture controls are the heart of the Magic Mouse experience, and Windows 10 provides the means to finetune these to your liking. Whether it’s a two-finger scroll or a multi-finger swipe, the control panel lets you set the stage for how you want to interact with your digital world.
Adjusting the sensitivity and the number of fingers required for gestures, such as two finger scrolling, can make your navigation feel more natural and aligned with your instincts.
Navigating Common Hurdles with Magic Mouse on Windows 10
Even in the most magical tales, our heroes face obstacles, and the journey with the Magic Mouse on Windows 10 is no different. Common hurdles such as connectivity issues or driver errors might arise, but fear not; these dragons can be slain with the right knowledge and tools.
With each challenge overcome, the bond between your Magic Mouse and mac computers or PC grows stronger, leading to a more harmonious computing experience.
Resolving Connectivity Issues
Connectivity is the invisible thread that binds your Magic Mouse to the PC; if broken, communication falters. To mend this link, a simple restart of both devices can often rekindle the connection. Ensuring that the mouse is within the Bluetooth range of the PC and that its batteries are fully charged are both crucial steps to maintaining a strong bond.
Should the thread fray, re-pairing the device is a spell worth casting to restore harmony between the mouse and your Windows 10 PC.
Addressing Driver Errors
When it comes to driver errors, having the correct version of the driver installed is akin to knowing the right magical incantation. For those who find themselves in a maze of technicalities, Driver Easy offers a guiding light, automatically helping you install Magic Mouse driver and ensuring seamless functionality.
This simplicity in the operating system can be a boon to users looking for a quick and effective resolution to their driver woes, often through the use of a third party program.
Summary
As we bring our journey to a close, it’s clear that the Magic Mouse, when paired with Windows 10, can transcend the boundaries of its Apple ecosystem to enhance your computing experience. By following the steps to connect, install drivers, customize settings, and troubleshoot common issues, you can unlock the full potential of this device. The addition of the Solumics Case elevates the experience even further, marrying functionality with ergonomic design for ultimate comfort and productivity.
Let this guide be your grimoire, your source of wisdom in the quest to harmonize the Magic Mouse with your Windows 10 PC. With these tools and knowledge, you’re now equipped to navigate your digital realm with grace and precision, ensuring that every interaction with your PC is as effortless and satisfying as possible.
Frequently Asked Questions
Can I use Apple Magic Mouse with Windows 10?
Yes, you can use an Apple Magic Mouse with Windows 10 by turning it on and pairing it via Settings > Devices > Bluetooth. Simply follow the steps to connect it to your Windows 10 device.
How do I right-click with Magic Mouse on Windows 10?
To right-click with a Magic Mouse on Windows 10, press and hold the Control key while clicking the mouse. This will simulate the right-click functionality on a Windows PC.
Where can I find the Magic Mouse driver for Windows 10?
You can find the Magic Mouse driver for Windows 10 by downloading Apple’s Boot Camp Support Software from their website or using the Brigadier script.
What should I do if my Magic Mouse isn’t scrolling properly on my Windows 10 PC?
Make sure you have the proper Magic Mouse driver installed and consider using third-party software like Magic Mouse Utilities if the problem continues. This should help resolve the scrolling issue on your Windows 10 PC.
How can I customize the gestures on my Magic Mouse in Windows 10?
To customize the gestures on your Magic Mouse in Windows 10, adjust the settings in the Mouse Properties panel within the Windows Control Panel. You can configure two-finger scrolling and other multi-touch actions there.
Apple’s hardware is expensive. But it works really well in most cases. If you’re looking for a wireless keyboard or a wireless mouse, Apple’s peripherals are worth their price.
Apple doesn’t block its hardware from working on other devices. You can use an Apple keyboard or Magic Mouse on a Windows 10 system as easily as you can a non-Apple mouse or keyboard. You may need to remap some keys on the Apple keyboard but the mouse will work as-is.
The Apple Magic Mouse connects via Bluetooth. To use it with a Windows 10 system, you need to pair it via Bluetooth. Pairing a Bluetooth device on Windows 10 is simple enough but the OS does often fail to detect Bluetooth devices. It may be a problem with Bluetooth services on Windows 10, the hardware on the system, or the device that is being paired.
If you’re unable to connect a Magic Mouse to a Windows 10 system, try the following basic checks and then the fixes listed further below.
What to do if Apple Magic Mouse won’t connect to Windows 10
Basic checks
Try the following before you try to fix the problem with a magic Mouse not connecting.
- Restart the system.
- Turn Bluetooth off, restart the system, and then turn it back on.
- Try pairing a different Bluetooth device to the computer.
- Remove all paired Bluetooth devices and try to connect just the Magic Mouse.
1. Change battery in Magic Mouse
Apple’s Magic Mouse is built to work with its own devices which is why it may enforce random rules when it tries to connect with a non-Apple system.
Change the battery in the Magic Mouse out for brand new ones. Try pairing the device fresh after the battery change.
2. Disconnect from other systems
If you’ve paired the Magic Mouse with a different system in the past, make sure that the device has been disconnected. For good measure, unpair it. It is possible the Magic Mouse is pairing with the first device and therefore unable to pair with a Windows 10 system.
3. Check for Bluetooth driver updates
Try to update Bluetooth drivers.
- Open Device Manager.
- Expand Bluetooth.
- Right-click the Bluetooth chip and select Update drivers.
- Search online for available drivers and install any updates that are available.
- Restart the system and try to connect the Magic Mouse.
4. Unpair and paid again
If you’ve been able to pair the Magic Mouse but cannot get it to connect, you should try to unpair and pair it again.
- Open the Settings app (Win+I keyboard shortcut).
- Go to Devices>Bluetooth.
- Select the Magic Mouse and click Remove Device.
- Restart the system.
- Open the Settings app again.
- Go to Devices>Bluetooth.
- Click Add a device.
- Pair and connect the Apple Magic Mouse.
5. Get drivers from Bootcamp
Intel-based Macs can run Windows 10 with Bootcamp. Bootcamp is distributed by Apple and contains necessary drivers needed to get its peripherals, such as a Magic Mouse, working on Windows 10.
- Visit this link and download Bootcamp. Get the 2015 version which is the latest.
- Extract the folder.
- Go to this folder in the extracted folder:
BootCamp4.1.4586\BootCamp\Drivers\Apple - Run the AppleMultiTouchTrackPadInstaller64.exe file to install drivers for the Magic Mouse.
- Restart the system.
- Pair the Magic mouse and it should start working.
Magic Mouse Windows 10 Conclusion
The Magic Mouse isn’t hard to set up. It is, at the end of the day, a simple peripheral that works via Bluetooth. In most cases, a simple system restart and/or unpairing and pairing the device again will get it working. If your Windows 10 system is old i.e., it predates the release of the Magic Mouse 2, you may need the Bootcamp drivers.

Fatima Wahab
Fatima has been writing for AddictiveTips for six years. She began as a junior writer and has been working as the Editor in Chief since 2014.
Fatima gets an adrenaline rush from figuring out how technology works, and how to manipulate it. A well-designed app, something that solves a common everyday problem and looks
You do not have to switch to macOS just to enjoy the quality feel, precision and capabilities of the Apple magic mouse, especially the current rechargeable version. I have a dedicated Windows 11 computer for client work and, I like my accessories to all be the same so I set about making the Apple Magic mouse work. In this guide, I will walk you through the process of setting up and using the Magic Mouse fully on your Windows 11 PC. So, buy yourself an Apple Magic mouse 2 in Black or white cheaper than Apple, brand new from Amazon UK, and let’s dive in!
TL:DR – I wasn’t a fan until I got one for my Mac, but I’ve slowly been won over by the feel and the cordless convenience and now I have that for Windows too.
Contents
- Use an Apple Magic Mouse on Windows 11 with working scrolling
- Getting Started
- Checking System Requirements
- Connecting the Magic Mouse
- Installing the Apple Magic Mouse driver for Windows in Windows 11
- Troubleshooting
I’ve preferred cheap corded mice since my first expensive Microsoft Mouse that came with an InPort expansion card for my IBM PC XT in 1985! But even dinosaurs like me need to move on and Apples Magic Mouse is great to use.

Use an Apple Magic Mouse on Windows 11 with working scrolling
Getting Started
You will need a Windows 11 based computer with Bluetooth Capability, and an Apple Magic Mouse. Look for the later model which has a rechargeable battery and lightning connector and more colour options. You can find a genuine Apple Magic Mouse at Amazon. The latest versions include an Apple USB-C to Lightning Cable in the box which you’ll need in order to recharge your mouse.
Checking System Requirements
Before embarking on your magical mouse journey, it’s essential to ensure that your system meets the requirements for using the Magic Mouse on Windows 11. Here are the steps to check your system compatibility:
- To see if your PC is eligible to upgrade, you can download and run the Microsoft PC Health Check app, which will scan your system and inform you if it meets the necessary specifications or you can check if Windows 11 is available for your device by going to Settings > Update & Security > Check for updates.
- Magic Mouse connects to your Windows 11 PC wirelessly via Bluetooth. Therefore, it’s crucial to verify that your computer has built-in Bluetooth capability. If your PC doesn’t have it, you would need to purchase a bluetooth adapter such as the TP-Link Nano USB Bluetooth 5.3 Adapter for Multiple Devices, Long Range Bluetooth Dongle/Receiver for Win 11/10/8.1/7, Plug and Play (UB5A) to make the mouse connect. Make sure you choose one that supports Windows 11, and that has the USB connector you have on your computer.
Connecting the Magic Mouse
Assuming your system is ready, it’s time to connect the Magic Mouse to your Windows 11 PC. Here’s how you can do it:
- Enable Bluetooth on Windows 11: To establish a connection between the Magic Mouse and your PC, you first need to enable Bluetooth on Windows 11. Navigate to the Settings menu, click on «Bluetooth & devices,» and ensure that Bluetooth is toggled on.
- Connect your Magic Magic Mouse, with your PC: In Bluetooth settings on your Windows 11 PC click on the «Add device» button. Windows will search for available devices, and when it detects the Magic Mouse, click on its name to initiate the pairing process. After a few moments, the connection will be established, you can click «Done» and you’ll be ready to experience the magic of the Magic Mouse on Windows 11. If you cant find it in available devices you may need to connect it first to a Mac via a USB to Lightning cable, or a USB-C cable if its the very latest model and then ‘Forget’ the connection and then turn it off and on again.
- Thats it. Sort of. Your mouse works with the basic mouse driver in Windows 11. However, this doesn’t allow you to scroll using the magic mouse. If you need to scroll you need to do more.
Installing the Apple Magic Mouse driver for Windows in Windows 11
Apple software engineers write Windows software. They have pretty much always done so. It must be fun being a Windows developer at Apple. I imagine they are a slightly unloved but passionate group of herberts. Anyway, there is a set of Windows drivers for Apple products and it is provided for BootCamp, which is a mechanism provided by Apple by which you can run Windows on an Intel based Mac computer. The BootCamp drivers provide support for scrolling with the Magic Mouse so it MUST be possible to get to work — but Apple only provide the drivers on installation of BootCamp on a supported Mac computer.
Fortunately, there is a utility called «Brigadier» which can fetch the BootCamp drivers for a given Mac computer and although venerable, it has had a recent (2022) release.
You can use it to get the drivers.
I have a last of the line Intel Mac Mini — the 2018 fourth generation Mac mini, which has Intel Coffee Lake processors, Bluetooth 5, four combination USB-C 3.1 ports that support Thunderbolt 3, two USB 3.0 Type-A ports, and HDMI 2. It supports BootCamp and Magic Mouse so that would seem a good latest BootCamp driver set to download from Apple.
- Download the Brigadier executable from GitHub to your Windows 11 PC. Run it with the model identifier for the Mac you wish to download the BootCamp drivers for. C:\>brigadier -m Macmini8,1 and watch as it does its work and downloads the BootCamp drivers to your PC.
- You’ll find the mouse driver in a directory inside the BootCamp driver set for the ‘Mac’ you chose at BootCamp\Drivers\Apple\AppleWirelessMouse and if you right click on the ‘inf’ file you can choose ‘Install’. You may need to restart Windows after that. Do so, and your Windows 11 PC will come back to life with proper Magic Mouse scrolling!
Troubleshooting
- If your Magic Mouse is not connecting to your Windows 11 PC, there are a few steps you can take to troubleshoot the issue. First, make sure that the mouse is turned on and in discovery mode. If it was paired already you might need to connect it to a Mac with a Lightning cable or a USB-C cable for the very latest model and ‘Forget’ the device before it becomes discoverable to Windows.
- If you’re experiencing an unresponsive cursor with your Magic Mouse, after a few days use you probably need to replace the batteries (first generation) or plug in to a charger via the lightning port to charge up.
- Third-Party Apps exist to give you even more control over the Apple Magic Mouse. I haven’t needed them but I am (as you can probably tell) a bit of a gesture luddite. Left Click, Right Click and scroll are pretty much all I want.
- If you have one Magic Mouse for Mac computers and another for Windows consider a White one for macOS and a Black one for the dark side of Windows 11. It quickly becomes automatic to reach for the right one on the same mousepad.
- Don’t connect your Magic Mouse with a Lightning cable to a Mac or it will forget your pairing and connect to the mac instead. If this happens ‘Forget it’ Turn it off, Restart Windows and go through the pairing process again.
In conclusion, setting up and using the Magic Mouse on Windows 11 is a straightforward experience that brings Apple’s Magic hardware to Windows. By following the steps outlined in this guide, you can connect your Magic Mouse on your Windows 11 PC and enable scrolling. So go ahead, unleash the magic, and enjoy a truly enchanting computing experience!
Magic Mouse is compatible with Windows 10/11, but you might face some issues like Magic Mouse not connecting or working properly on your PC. This can be due to various reasons that may or may not be associated with the device itself. In this guide, we will explain how to pair Magic Mouse to Windows 10 properly and fix the said issue.

Table of Contents
If you don’t know how to pair it on Windows laptop, scroll to the end of the guide.
There might be varying reasons why you are facing this issue, including an outdated Bluetooth driver or Operating System or connectivity via Bluetooth.
Method 1: Basic Troubleshooting Methods
Let’s first see the basic troubleshooting methods before getting into the complex solutions:
1A. Switch OFF and ON Magic Mouse
The first thing when facing this issue is switching off the Magic Mouse. Wait a few seconds and then switch it back on. It is a tried and tested method for solving major issues irrespective of the Operating System used.
1B. Turn OFF and ON Bluetooth Service
In a similar way, you can also try switching off and on Bluetooth service to fix Magic Mouse not connecting on Windows 10 issue. This can be done by following the below-given steps:
1. Type Bluetooth and other devices in the Windows search box and click on Open.

2. Turn off the toggle for the Bluetooth option.
3. Then, turn on the toggle for the Bluetooth option again. Now, wait a few seconds for Magic Mouse to connect.

1C. Re-Add Magic Mouse to Bluetooth Devices
Another basic troubleshooting method is to remove and then add again the Magic Mouse. Sometimes it so happens that a PC is not able to recognize a device the first time you try. Therefore, one should definitely try to re-add Magic mouse to your Windows 10 PC.

Also Read: How to Reset Magic Mouse
Method 2: Install & Use AppleWirelessMouse64 Driver Software
AppleWirelessMouse64 is the official driver for using the Magic Mouse on Windows 10/11 PC. Installing this driver will potentially fix how to pair Magic Mouse to Windows 10. It is available for 64-bit versions of Windows PC.

Method 3: Correlate Issue with Past Events
Going through the Events tab in device properties can help you decipher the potential cause. This can further help to fix Magic Mouse 2 not connecting on Windows 10 by researching the particular event after which the Magic Mouse stopped functioning.
1. Press Windows key to search for Device Manager and press the Enter key.

2. Double-click on Mice and other pointing devices.

3. Now, right-click on the mouse and choose Properties from the menu.

4. Finally, click on the Events tab at the top to understand the issue more clearly.

Also Read: How to Fix Mac Bluetooth Not Working
Method 4: Update Bluetooth Driver
An outdated or incompatible Bluetooth driver may compromise Magic Mouse connection with Bluetooth service of your PC or laptop. Accordingly, you will face Magic Mouse not connecting on Windows 10 error. Therefore, it is advised that you update your Bluetooth driver before going further with any method to fix Magic Mouse not working on Windows 10. Follow the below-given steps to do the same:
1. Press Windows + X keys at the same time to open Power menu. Click on Device Manager.
2. Click on Bluetooth to show all mice connected to the PC/laptop till now.
3. Right-click on the mouse that is causing trouble and then click on Update driver.

Method 5: Reinstall Bluetooth Driver
In case the Bluetooth driver of your PC is already the latest compatible version then you should try uninstalling and then reinstall compatible Bluetooth driver. Follow the below-given steps to do the same:
1. In Device Manager, double-click on the Bluetooth option.
2. Right-click on the mouse causing trouble and click on Uninstall device.

3. After installation, download and install the latest driver for Windows 10 and Windows 11. In case the aforementioned driver does not work for you then download the driver from the official website of the Bluetooth adapter.

Method 6: Run Antivirus Scan
Viruses are a fundamental cause of Magic Mouse not connecting on Windows 10. Therefore, you may save a lot of time by quickly checking for infections before using any additional methods. Third-party antivirus scanners make this task simple to do. Additionally, if one is not accessible, you can utilize the built-in virus scanner by following the instructions below:
1. Press Windows + X at the same time to open the Power menu and click on Settings.
2. Click on Update & Security.

3. Click on Windows Security from the left pane and choose the Virus & threat protection option.

4. Click on Quick scan.

Also Read: Fix Alps SetMouseMonitor Error in Windows 10
Method 7: Update Windows OS
Magic Mouse not connecting on Windows 10 may sometimes be fixed by updating your Windows 10 to the most recent version of the Operating System. Follow our guide on How to Download and Install Windows 10 Latest Update to do the same.

Method 8: Contact Apple Support
In case you are not able to solve this issue with the given methods then contacting Apple Support is the best option available. As Apple Support deals with these kinds of issues on daily basis, therefore they are able to suggest better solutions as per the exact model and manufacturing year of the product.

Also Read: How to Disable Mouse Acceleration in Windows 10
How to Pair Magic Mouse to Windows 10?
Wondering how to pair Magic Mouse to Windows 10? In order to pair Magic Mouse to Windows 10, you first have to make sure that Bluetooth on other devices is switched off so that you don’t have to waste time while your mouse is unintentionally trying to get paired with other devices.
1. Turn over Magic Mouse on the back and first switch off and then switch on it to see the green light blinking.
2. Type Bluetooth and other devices in the Windows search box. Click on Open.

2. Turn on the toggle for Bluetooth and click on Add Bluetooth or other device.

3. Select your Magic Mouse from the devices listed and follow the onscreen instructions to finish the process.
Note: In case a numeric code is required while pairing, enter four times zero (0000).
Recommended: Fix Logitech Wireless Mouse Not Working
We hope the above article on how to fix Magic Mouse not connecting on Windows 10 was helpful, and you were able to fix the issue. Let us know which one of the above methods worked for you in resolving this issue. Feel free to reach out to us with your queries and suggestions via the comments section below. Also, let us know what you want to learn about next.