
Способ 1: Элемент «Панели управления»
По умолчанию в Windows 11, как и во всех предыдущих версиях ОС Microsoft, начиная с 7-ой, при закрытии крышки портативного компьютера инициируется его перевод в «Спящий режим». Изменить такое положение вещей совершенно несложно, а выполняется это доступными в разделе «Электропитание» средствами «Панели управления».
- В действительности существует множество путей получения доступа к целевому в нашем случае средству конфигурирования параметров работы компьютера, далее описано два наиболее предпочтительных — полный и, пожалуй, самый короткий:
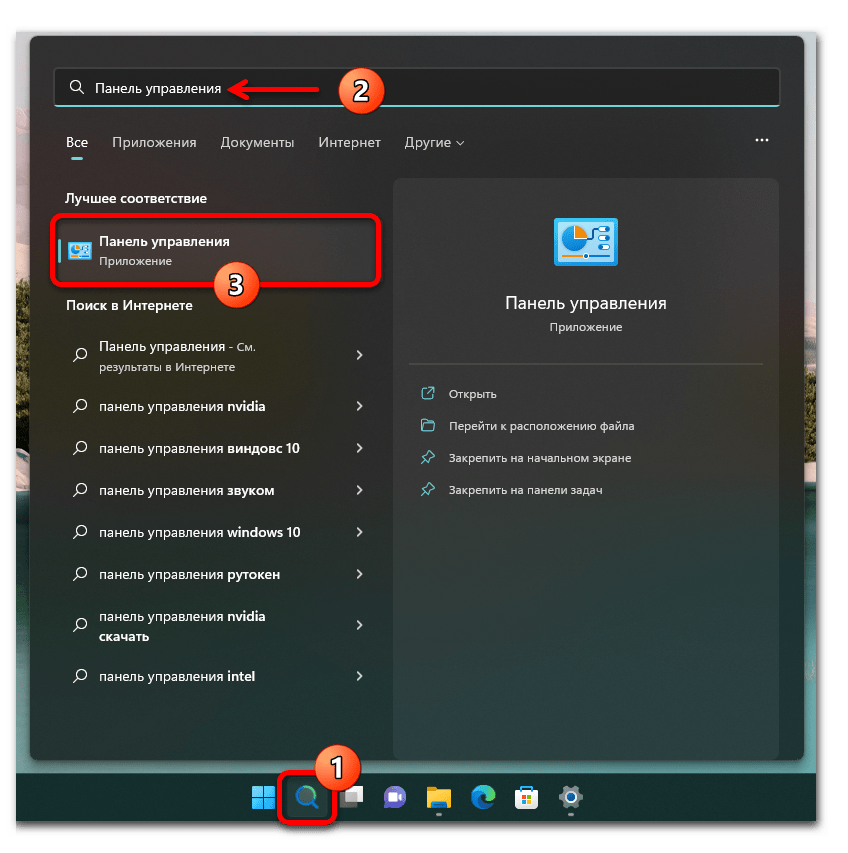
- Вызываем «Панель управления» Виндовс 11. С такой целью (к примеру, есть и другие методы) кликаем «Поиск» на Панели задач, вводим запрос
Панель управленияв поле вверху открывшейся области, после чего переходим по предоставленной системой как «Лучшее соответствие» ссылке на запуск приложения.
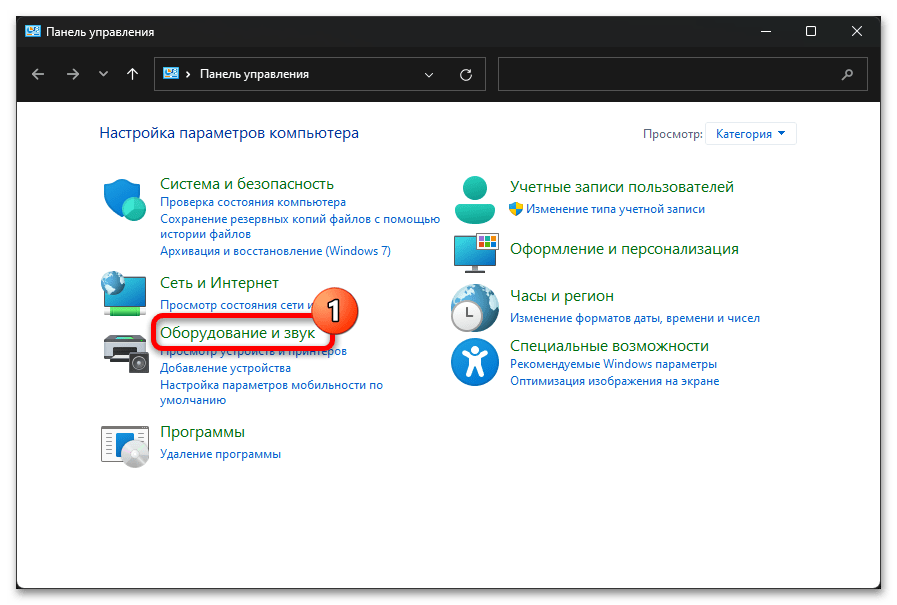
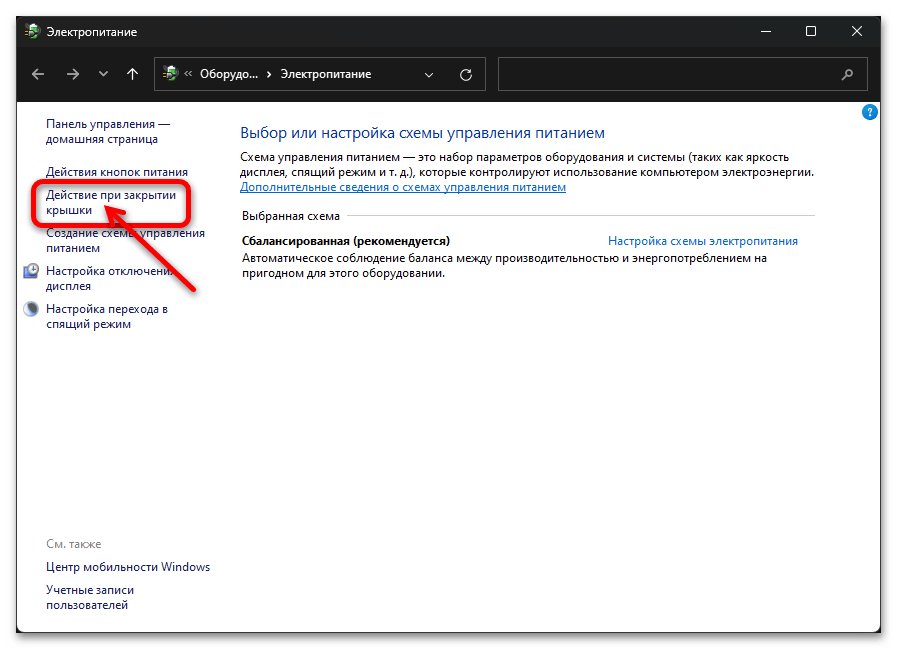
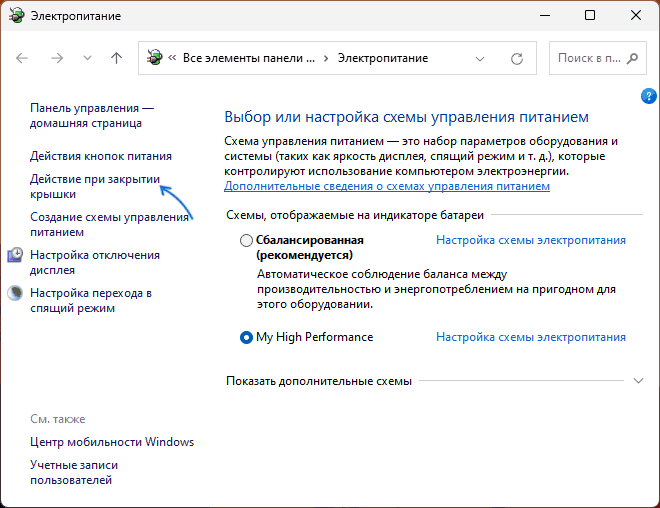
Далее по очереди открываем разделы «Панели управления»: «Оборудование и звук»,

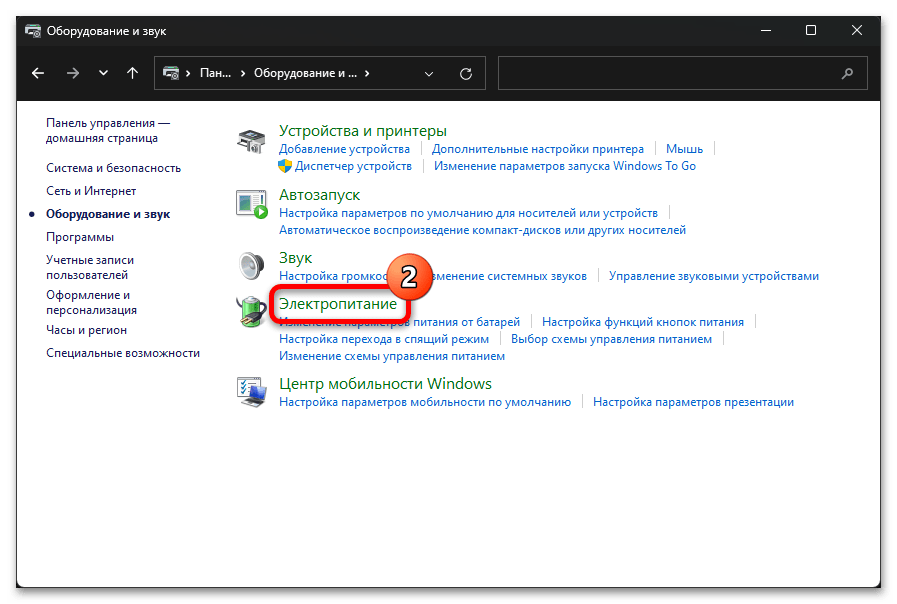
затем «Электропитание».

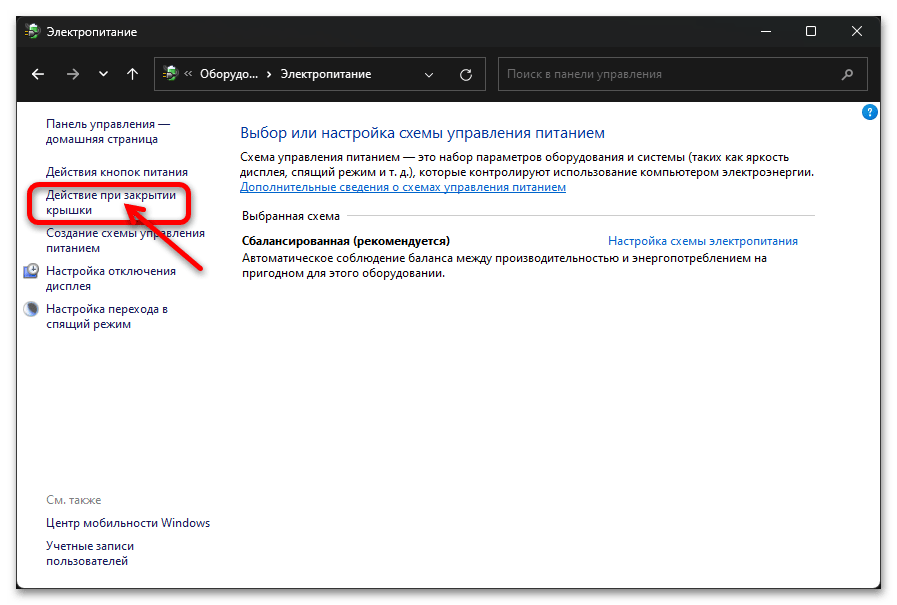
Щёлкаем мышкой по расположенной в списке слева окна ссылке «Действие при закрытии крышки».
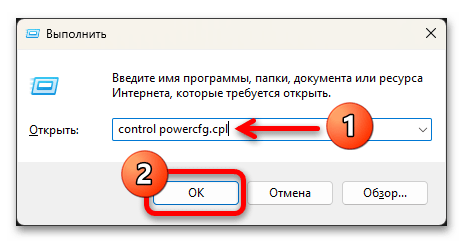
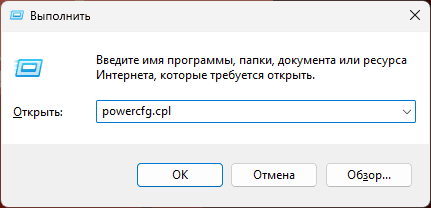
- Открываем системную оснастку Windows 11 под названием «Выполнить». Это осуществимо путём одновременного нажатия кнопок «Win»+«R» на клавиатуре, из контекстного меню элемента «Пуск» на Панели задач (кликаем «Пуск» правой кнопкой мышки или нажимаем «Win»+«X», выбираем пункт «Выполнить» в отобразившемся списке) и другими методами.

В поле «Открыть» окна «Выполнить» пишем следующую команду, после чего, кликнув «ОК» либо нажав «Ввод» на клавиатуре, отправляем её на выполнение:
control powercfg.cpl
В результате появится окно «Панели управления» с открытым в нём разделом «Электропитание», и нам останется лишь кликнуть по ссылке «Действие при закрытии крышки» в расположенном слева перечне.

- Вызываем «Панель управления» Виндовс 11. С такой целью (к примеру, есть и другие методы) кликаем «Поиск» на Панели задач, вводим запрос
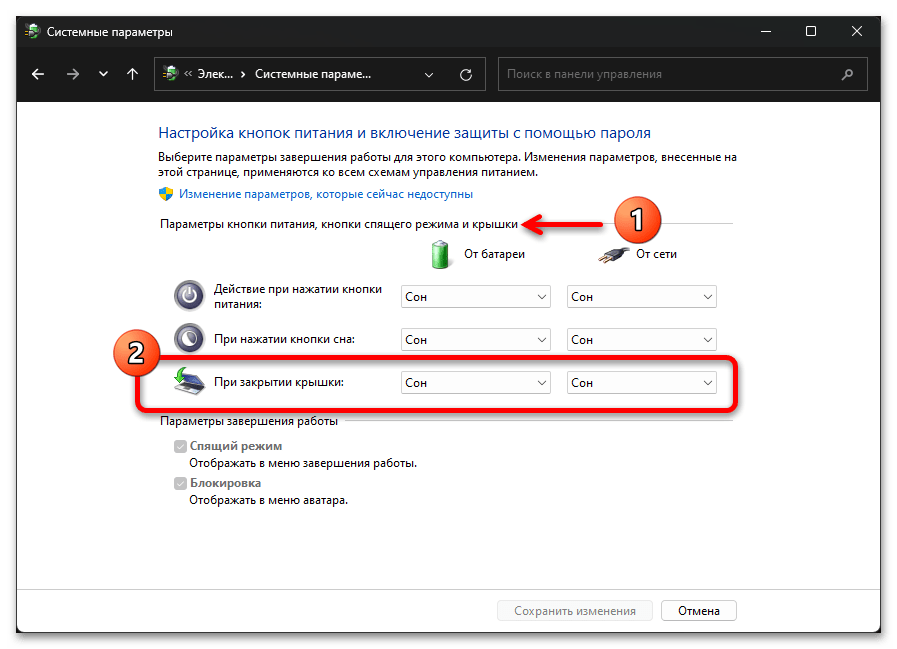
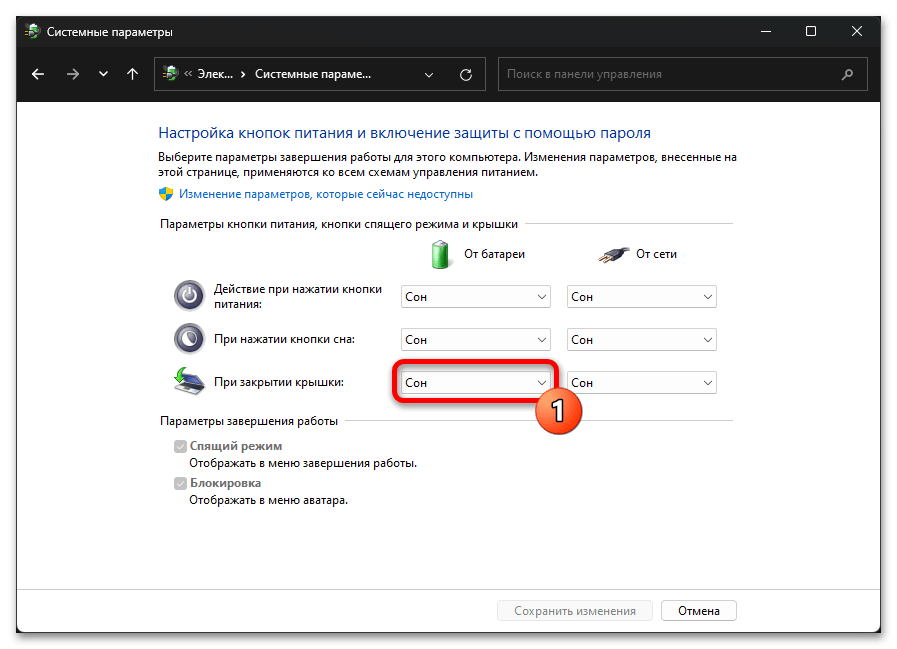
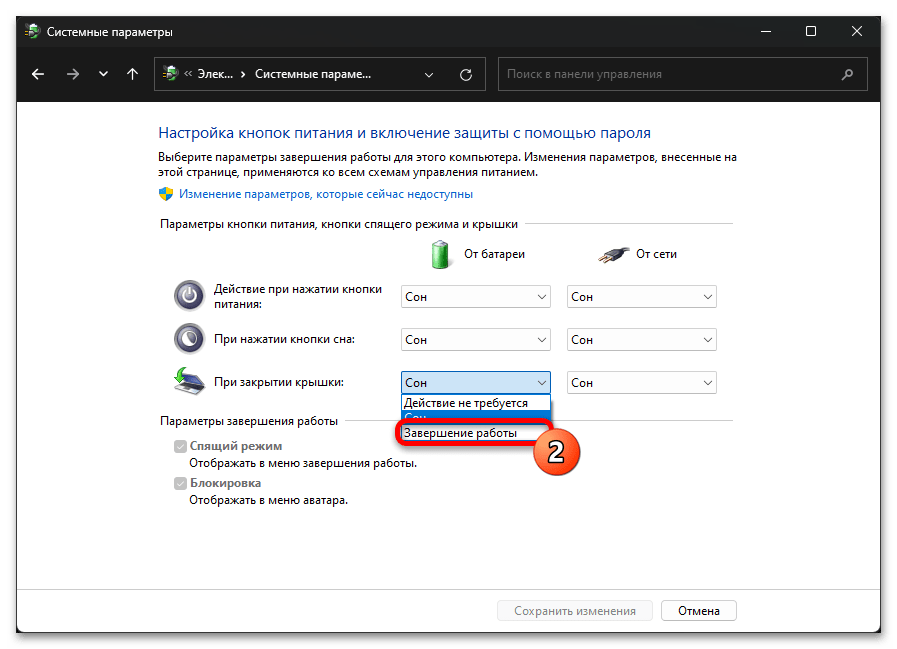
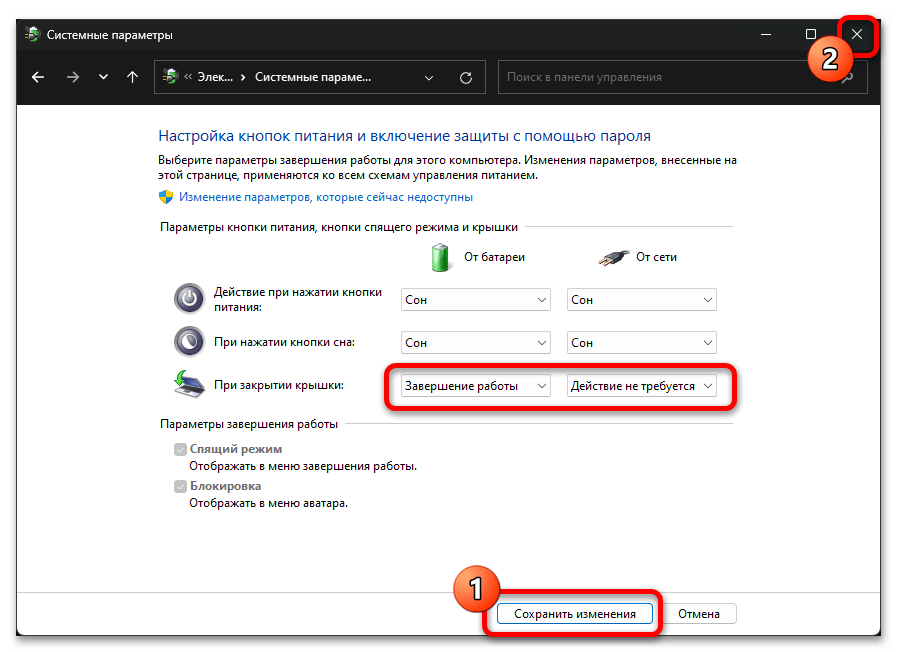
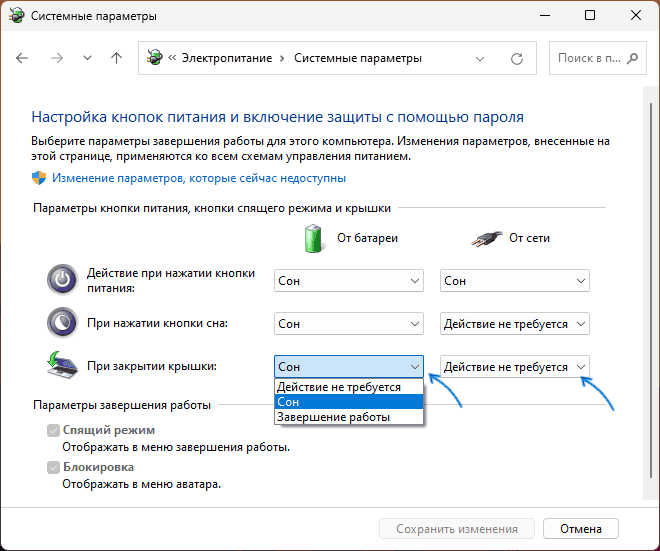
- Перемещаемся в секцию «Параметры кнопки питания, кнопки спящего режима и крышки» открывшегося окна, здесь нас интересует функция «При закрытии крышки».
Выбираем инициируемое в момент рассматриваемого действия событие в раскрывающемся списке из столбца «От батареи»,
и «От сети».
Кратко о последствиях закрытия крышки ноутбука под управлением Windows 11, когда в указанных выше списках выбраны различные события:
- «Действие не требуется» — компьютер продолжит функционировать фактически как обычно, но его дисплей отключится до момента открытия крышки.
- «Сон» — ноутбук будет переведён в характеризующийся отключением экрана и переходом к пониженному энергопотреблению «Спящий режим». Состояние ОС и запущенных в ней программ при этом сохраняется в оперативной памяти лэптопа, что позволяет практически мгновенно вернуться к работе, просто открыв его крышку.
- «Гибернация» — похожа на описанное выше состоянию «Сон», однако компьютер в результате перехода в режим выключится полностью. Вся информация о состоянии программной части ноутбука при переходе в этот режим сохраняется не в ОЗУ, а на диске (в специальном файле hiberfil.sys). Стоит отметить, что «Гибернация» по умолчанию отключена в установленных на SSD системах, поэтому данный пункт может отсутствовать в рассматриваемых перечнях событий.
Подробнее: Включение гибернации в Windows 11
- «Завершение работы» — в результате автоматической инициации данного действия ноутбук должен выключиться, предварительно корректно остановив выполнение всех открытых в Win 11 приложений. Стоит отметить, что данное событие не всегда отрабатывается «правильно» (к примеру, завершению работы системы могут помешать запросы запущенных в ней программ с несохраненными пользователем вручную данными).
- Завершив конфигурирование функции, кликаем «Сохранить изменения» внизу окна «Панели управления» и закрываем её — на этом выбор реакции операционной системы на закрытие крышки компьютера считается завершённым.

Способ 2: Консоль Windows 11
Ещё один метод назначения сопутствующего закрытию крышки ноутбука с Виндовс 11 действия предполагает эксплуатацию программы командной строки Powercfg из комплекта поставки ОС. Это решение можно задействовать из запущенных с правами администратора классического приложения «Командная строка», оболочки «PowerShell» и, как продемонстрировано в примере далее, — «Терминала».
Читайте также: Как в Windows 11 открыть «Командную строку» от имени Администратора
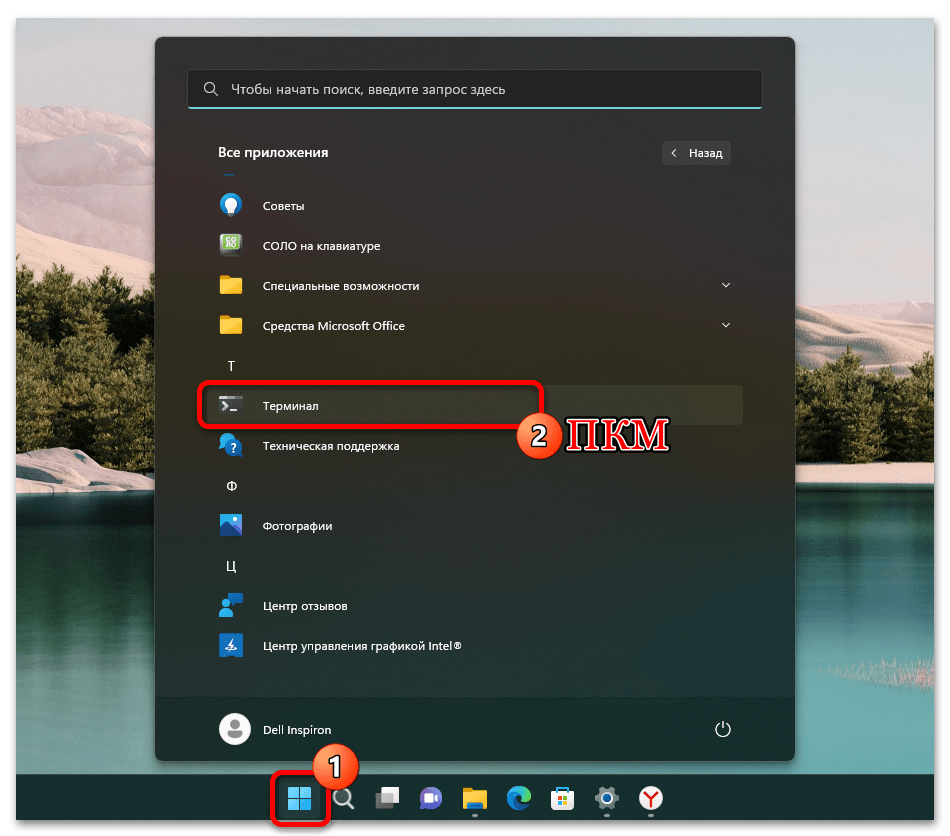
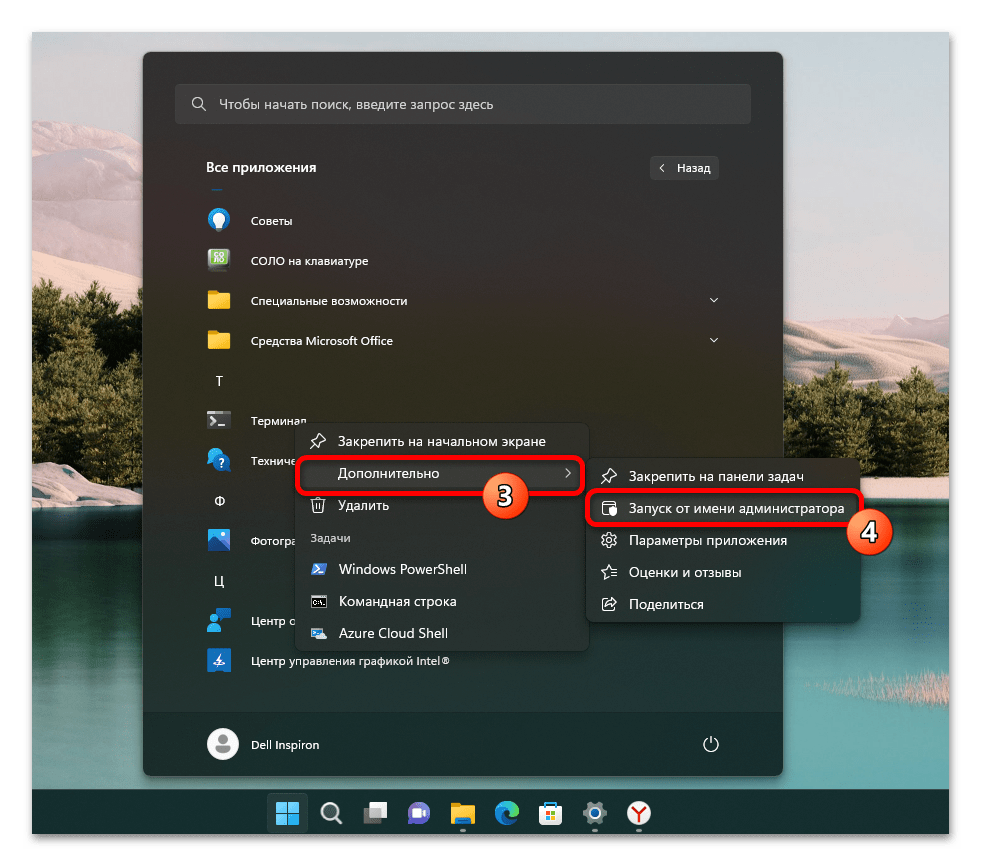
- Запускаем появившееся с выходом Win 11 средство работы в консоли – «Терминал», обязательно с повышенными правами доступа в систему. С такой целью можно, к примеру, щёлкнуть «Пуск» и затем «Все приложения», отыскать «Терминал» в перечне софта и, кликнув по наименованию средства правой кнопкой мыши,

выбрать «Дополнительно» — «Запуск от имени администратора» в контекстном меню.

Читайте также: Способы запуска «Терминала» в Windows 11
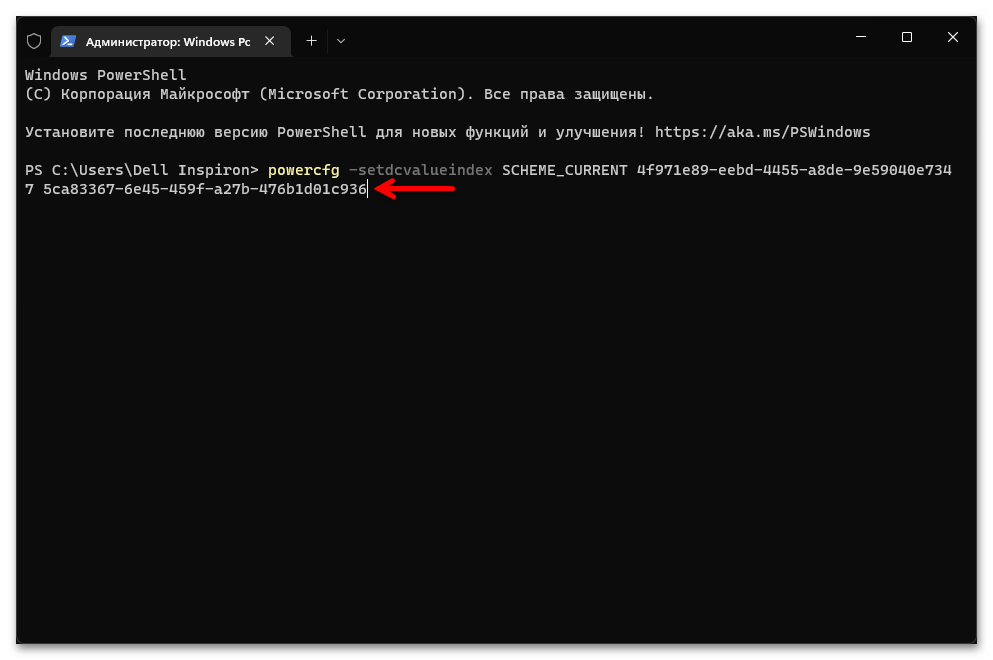
- Далее вводим в «Терминал» (копируем из этой статьи и вставляем в целевое окно) один из вариантов текста:
- Чтобы назначить событие на закрытие крышки компьютера, когда он работает от аккумулятора:
powercfg -setdcvalueindex SCHEME_CURRENT 4f971e89-eebd-4455-a8de-9e59040e7347 5ca83367-6e45-459f-a27b-476b1d01c936 - Для смены действия, сопутствующего закрытию крышки лэптопа при питании от сети:
powercfg -setacvalueindex SCHEME_CURRENT 4f971e89-eebd-4455-a8de-9e59040e7347 5ca83367-6e45-459f-a27b-476b1d01c936
- Чтобы назначить событие на закрытие крышки компьютера, когда он работает от аккумулятора:
- После последнего символа одного из предложенных выше указаний в «Терминале» ставим пробел, а затем вводим одну из перечисленных далее цифр-кодов назначаемого сопутствующим закрытию крышки ноутбука события:
Код Событие 3 «Завершение работы» 2 «Гибернация» 1 «Сон» 0 «Действие не требуется» 
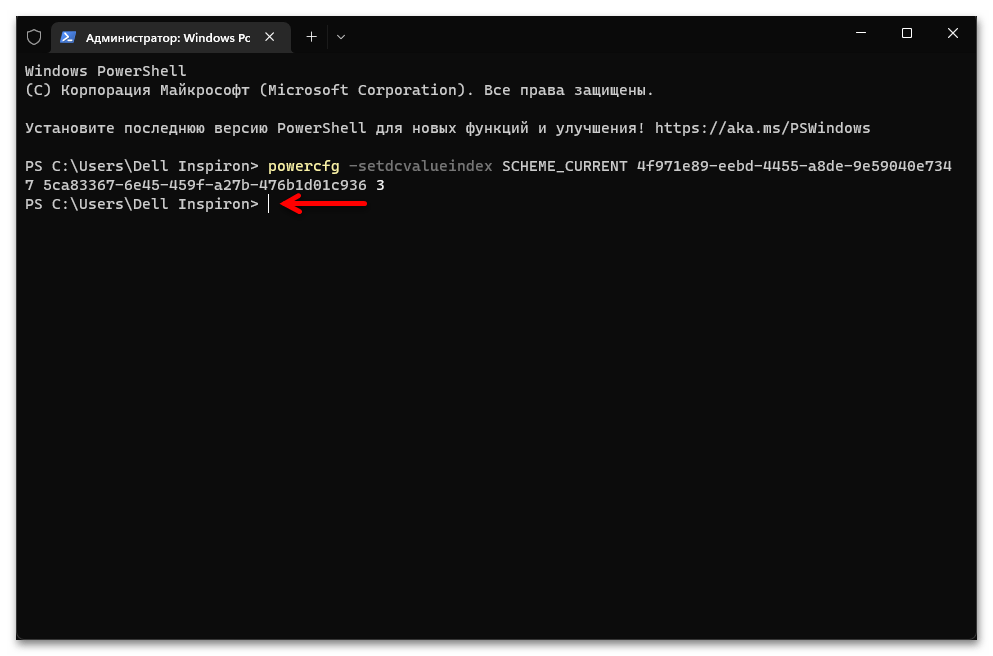
- Отправляем сформированную команду на выполнение нажатием кнопки «Enter» на клавиатуре. Каких-либо уведомлений об успешности операции «Терминал» не выдаёт, просто появляется строчка-приглашение к вводу следующих указаний.
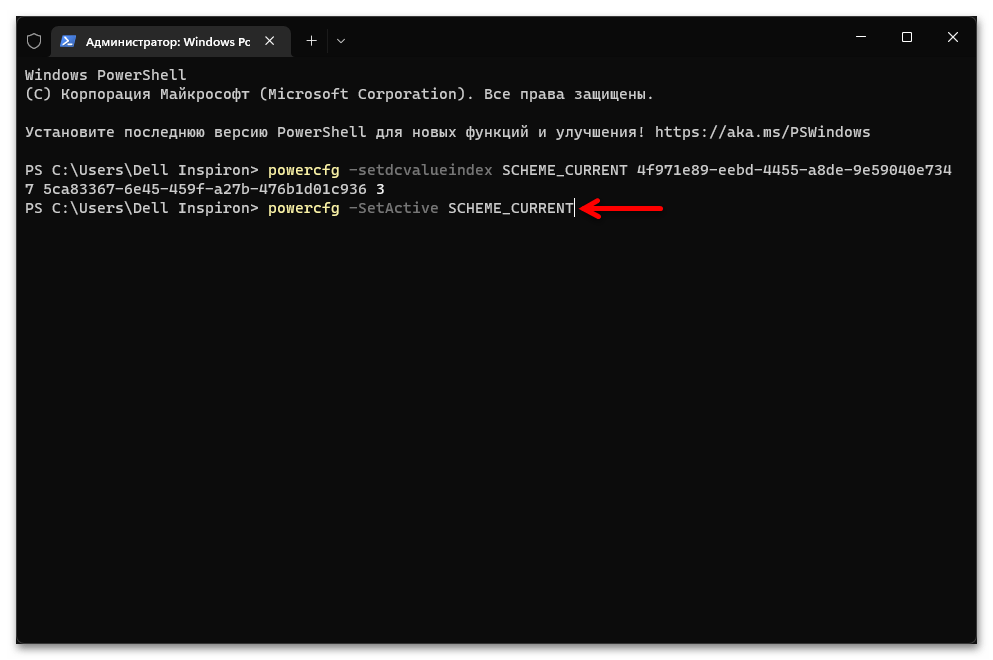
- Для фиксации внесённых утилитой Powercfg в настройки операционной системы изменений необходимо запустить ещё одну команду:
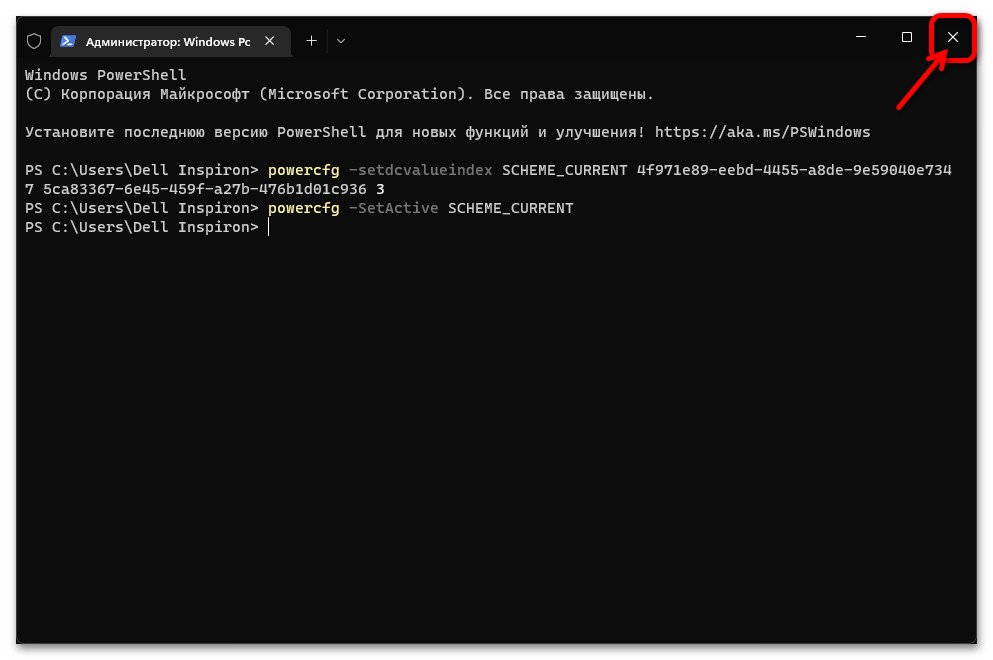
powercfg -SetActive SCHEME_CURRENT - На этом всё, можно закрывать «Терминал» и проверять действенность выполненной процедуры.

Наша группа в TelegramПолезные советы и помощь
Если вам требуется, чтобы ноутбук продолжал работать после того, как вы его закрыли: например, при использовании со вторым монитором или в качестве устройства воспроизведения, это реализуемо средствами системы.
В этой инструкции о том, как настроить Windows 11 таким образом, чтобы при закрытии крышки ноутбука он не выключался. На близкую тему: Как предотвратить переход Windows в сон, когда запущена определённая программа.
Настройка действия при закрытии крышки в параметрах электропитания
Необходимые настройки, позволяющие задать действие при закрытии крышки ноутбука в Windows 11, можно найти в оснастке панели управления «Электропитание». Достаточно выполнить следующие шаги:
- Нажмите клавиши Win+R на клавиатуре, либо нажмите правой кнопкой мыши по кнопке «Пуск» и выберите пункт «Выполнить», введите powercfg.cpl и нажмите Enter.

- В открывшемся окне в панели слева выберите «Действие при закрытии крышки».

- Установите нужные действия при питании от батареи и от сети в разделе «При закрытии крышки» — вас будет интересовать пункт «Действие не требуется».

- Нажмите кнопку «Сохранить изменения».
На этом всё: теперь при закрытии ноутбука он продолжит работать.
На некоторых ноутбуках в настройках схемы электропитания в разделе изменения дополнительных параметров вы можете найти раздел «Кнопки питания и крышка», где также будет доступно отключение действий при закрытии крышки ноутбука:
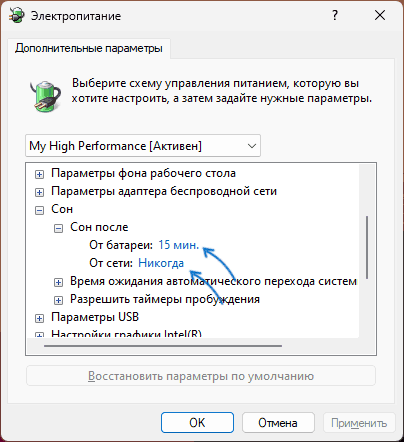
Учитывайте: если у вас настроен спящий режим через определенное время — ноутбук будет, как и прежде, засыпать. Для отключения спящего режима вы можете открыть настройки текущей схемы электропитания, открыть пункт «Изменить дополнительные параметры питания», а затем настроить параметры спящего режима в разделе «Сон»:
Более подробно об этом и других способах в статье: Спящий режим Windows 11 — как включить, отключить, решение возможных проблем.
На близкую тему могут быть полезными материалы:
- Как выключить экран ноутбука, не выключая сам ноутбук
- Как сделать, чтобы MacBook продолжал работать после закрытия
В завершение ещё один момент: если вы выберите опцию «Действие не требуется» при питании от батареи, это приведет, что после закрытия ноутбук продолжит разряжаться, а регулярный глубокий разряд батареи может ей навредить.
### Закрытие крышки ноутбука при использовании внешнего монитора: как повысить эффективность рабочего пространства
Закрытие крышки ноутбука при использовании внешнего монитора стало распространенной практикой, особенно в офисных условиях. Этот подход не только улучшает рабочее пространство, предоставляя дополнительное экранное пространство, но и помогает защитить экран ноутбука от возможных повреждений. Подключение к док-станции или использование внешнего монитора позволяет создать более организованное и эффективное рабочее место.
**Как изменить настройки для закрытия крышки ноутбука при использовании внешнего дисплея в Windows 11**
1. Перейдите в Панель управления. Вы можете получить доступ к ней, нажав клавишу Windows, введя «Панель управления» и выбрав первый вариант.
2. Выберите «Оборудование и звук».
3. Выберите «Электропитание».
4. Слева нажмите на «Действие при закрытии крышки».
5. Найдите опцию «При закрытии крышки:» и выберите «Ничего не делать» как для режима работы от батареи, так и для режима подключения к сети.
6. Не забудьте сохранить изменения.
Эта простая настройка позволяет пользователям держать ноутбук закрытым при работе с внешним дисплеем. Если вы решите открыть крышку ноутбука, экран активируется автоматически, что позволит использовать ноутбук в качестве второго монитора, значительно повышая продуктивность. Если вы захотите вернуть исходные настройки, просто следуйте тем же шагам и выберите опцию перевода ПК в спящий режим при закрытии крышки.
**Преимущества и соображения**
Существует несколько преимуществ закрытия крышки ноутбука при использовании внешнего дисплея. Основное преимущество — расширенное рабочее пространство, предлагаемое большими экранами или двойными мониторами. Эта практика также помогает освободить место на столе, так как ноутбук можно аккуратно убрать. Более того, это защищает экран ноутбука от пролитий и крошек, что может продлить его срок службы.
Однако есть и некоторые соображения. Если у вас нет отдельной мыши и клавиатуры, закрытие крышки ноутбука может быть непрактичным, так как это сделает встроенную клавиатуру и трекпад недоступными. Кроме того, если ваша работа связана с частыми перемещениями между встречами, держать крышку открытой может быть удобнее для быстрого перехода без необходимости постоянно открывать и закрывать ноутбук.
В конечном счете, решение о закрытии крышки ноутбука при использовании внешнего дисплея зависит от индивидуальных предпочтений и рабочих привычек. Настройка проста и может быть адаптирована под ваши конкретные потребности, делая ее гибким вариантом для повышения эффективности рабочего пространства.
Readers help support Windows Report. We may get a commission if you buy through our links.
Read our disclosure page to find out how can you help Windows Report sustain the editorial team. Read more
No other device can match the portability and convenience of a laptop computer. If you wish to buy and use a laptop for work purposes or if you like to consume some information on a screen larger than your laptop from time to time, you may wish to connect it to an external display.
This is where the issue arises since you will most likely want to keep the monitor on when the laptop is closed on Windows 11. By default, the Windows 11 lid close action is set to put your laptop to sleep when you close the lid.
As you might imagine, having an open laptop lid sitting on your desk while connected to a newly bought external monitor is not an ideal situation, nor is it a comfortable one to be exposed to. Thus we will show you how to customize the Windows 11 lid close action in order to fix this issue.
You don’t have to put up with this cruel condition, and you can close the lid of your laptop without putting it to sleep or interfering with its operation. Let’s see how you can achieve this, right after we understand what hibernate and sleep modes are.
How do I keep the monitor on when the laptop is closed on Windows 11?
-
1. Press the Windows key on your keyboard to open the Windows Search function.
-
2. Type Control Panel in the search box and click to open the topmost result.

-
3. Navigate to Power Options.

-
4. Next, select the Choose what closing the lid does option to edit the Windows 11 lid close action when opening your laptop.
-
5. Here, you can select the Do nothing option under the On battery section and Plugged in one, in order to keep your monitor on when the laptop lid is closed.
For more information on the other options, check out Microsoft’s page on those actions.


In order to do nothing when the laptop lid is closed in Windows 11, you need to tweak your PC’s Power Settings.
When your laptop is linked to an external monitor, you may now close the lid and continue working without having to worry about it going to sleep or hibernating.
Note that this mode of operation is called the clamshell mode and refers to a working laptop that has the lid shut off.
- FIX: Laptop not locking when the lid is closed
- 4 easy tips to change the lid close action on Windows 11
- Can I close my laptop lid while Windows is updating?
- Here’s how to get the best power efficiency in Windows 11
- 5 best hard drives for Windows 11 [Price & Capacity]
What can I do if lid customization settings are missing?
- Note that this solution also works for the lid close action missing in Windows 10 error. Open your Command Prompt app by typing cmd inside the Windows Search function.

- Next, type or copy-paste the following command and press Enter in order to fix the lid close action missing in Windows 11 / 10:
REG ADD HKLM\SYSTEM\CurrentControlSet\Control\Power\PowerSettings\4f971e89-eebd-4455-a8de-9e59040e7347\5ca83367-6e45-459f-a27b-476b1d01c936 /v Attributes /t REG_DWORD /d 2 /f
- If you wish to also add the missing Windows 11 lid open action type or paste the following command and press Enter:
REG ADD HKLM\SYSTEM\CurrentControlSet\Control\Power\PowerSettings\4f971e89-eebd-4455-a8de-9e59040e7347\99ff10e7-23b1-4c07-a9d1-5c3206d741b4 /v Attributes /t REG_DWORD /d 2 /f - In order to customize the lid open action, go to the Power Options section inside Control Panel and choose Change plan settings next to your current plan.

- Next, click on Change advanced power settings and expand the Power buttons and lid option in order to tweak the configuration.


Now you should be able to change the Windows 11 lid close action when starting settings as we have shown in the first solution, as well as tweak the lid open action configuration.
Are hibernate and sleep mode the same thing?
Two computer modes that must be distinguished are sleep and hibernate modes, which are frequently used interchangeably but are not the same thing in reality.
Sleep mode is a power-saving one that allows activities to restart once the device is ultimately charged again.
Hibernate mode, is intended to conserve power, but it differs from sleep mode in terms of what happens to your data. The documents and files that you are now working on are stored in the RAM, requiring only a minimal bit of power in the process.
The former effectively accomplishes the same thing as hibernate mode, except it stores the information on your hard disk, allowing you to power off your computer and saving all of the energy it would have consumed.
When you turn your computer back on, the hard drive allows you to pick up precisely where you left off with your work. Hibernate is primarily intended for laptops, and it is most effective when you are not planning to use your device for an extended time.
Moreover, if you encounter troubles when connecting a second monitor, check out our guide on what to do when your laptop doesn’t detect the second monitor.
Alternatively, take a look at our post on how to fix random external monitor behavior, such as turning off or disconnecting.
Don’t hesitate to tell us what you think in the comments section below as well as if you have more solutions in mind. Thanks for reading!
Loredana Harsana
Windows Software Expert
Loredana is a passionate writer with a keen interest in PC software and technology. She started off writing about mobile phones back when Samsung Galaxy S II was on top of the world and she fell in love with tech of all sorts.
Whenever she’s not at her work desk, you’ll find her enjoying refreshing tea flavors, spilling stories on paper, and listening to the radio.

This tutorial will show you how to change the default action to take when closing the lid of your laptop in Windows 10 and Windows 11.
The lid switch close action specifies the action to take when the system lid is closed.
Users can specify one of the following actions to take:
- Do Nothing = No action is taken when the system lid is closed.
- Sleep = The system enters sleep when the system lid is closed.
- Hibernate = The system enters hibernate when the system lid is closed.
- Shut Down = The system shuts down when the system lid is closed.
Contents
- Option One: Change Lid Close Action for Current Power Plan in Settings
- Option Two: Change Lid Close Action for Current Power Plan in Power Options
- Option Three: Change Lid Close Action for Specific Power Plan in Advanced Power Options
- Option Four: Change Lid Close Action for Current Power Plan in Windows Terminal
- Option Five: Change Lid Close Action for Specific Power Plan in Windows Terminal
- Option Six: Specify Lid Close Action for All Power Plans in Local Group Policy Editor
- Option Seven: Specify Lid Close Action for All Power Plans using REG file
Option One
Change Lid Close Action for Current Power Plan in Settings
This option is only available starting with Windows 11 version 24H2.
1 Open Settings (Win+I).
2 Click/tap on System on the left side, and click/tap on Power & battery on the right side. (see screenshot below)

3 Click/tap on Lid & power button controls to expand it open. (see screenshot below)
4 Select Do Nothing, Sleep (default), Hibernate, Shutdown, or Display Off for what you want in the «Plugged in» and «On battery» Closing the lid will make my PC drop menus.

5 You can now close Settings if you like.
Option Two
Change Lid Close Action for Current Power Plan in Power Options
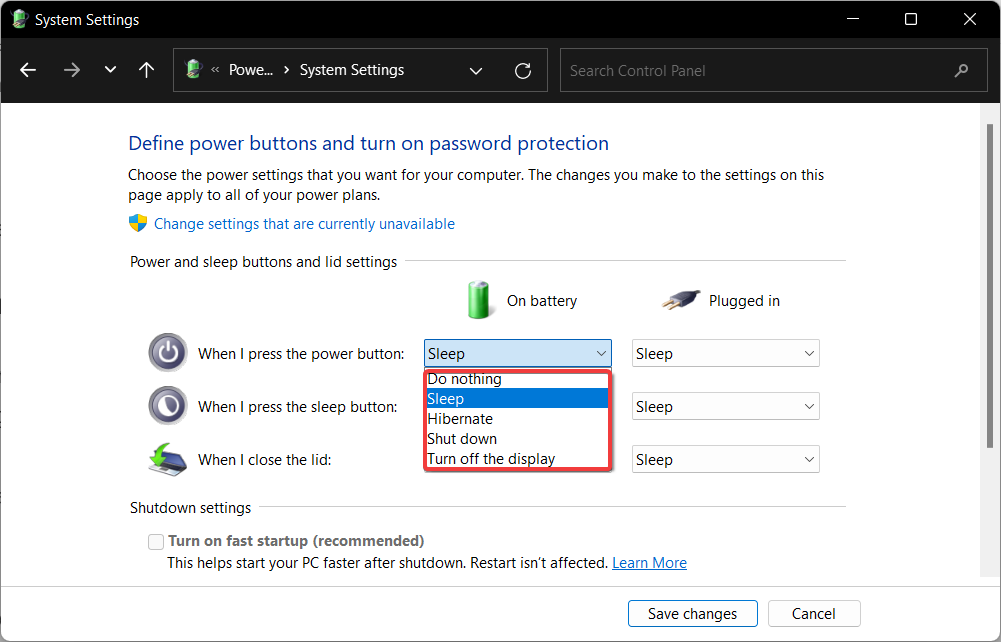
1 Open the Control Panel (icons view), and click/tap on the Power Options icon.
2 Click/tap on the Choose what the power button does link in the left pane. (see screenshot below)

3 In both the On battery and Plugged in drop menus for the When I close the lid setting, select Do nothing, Sleep (default), Hibernate, or Shut down for what you want, and click/tap on Save changes.
Desktop computers will not have separate On battery and Plugged in options available unless it has a data connection to a UPS.

Option Three
Change Lid Close Action for Specific Power Plan in Advanced Power Options
1 Open the Control Panel (icons view), and click/tap on the Power Options icon.
2 Click/tap on the Change plan settings link for the power plan (ex: «Balanced») you want to apply this to. (see screenshot below)

3 Click/tap on the Change advanced power settings link. (see screenshot below)

4 Expand open the Power buttons and lid and Lid close action settings. (see screenshot below step 5)
You can add Lid close action to Power Options if you do not have it available.
5 In both the On battery and Plugged in drop menus for the Lid close action setting, select Do nothing, Sleep (default), Hibernate, or Shut down for what you want, and click/tap on OK.
Desktop computers will not have separate On battery and Plugged in options available unless it has a data connection to a UPS.

Option Four
Change Lid Close Action for Current Power Plan in Windows Terminal
1 Open Windows Terminal, and select either Windows PowerShell or Command Prompt.
2 Copy and paste the command below you want to use for when on battery and/or plugged in into Windows Terminal, and press Enter.
(Do nothing)
powercfg -setdcvalueindex SCHEME_CURRENT 4f971e89-eebd-4455-a8de-9e59040e7347 5ca83367-6e45-459f-a27b-476b1d01c936 0
OR
(Sleep — default)
powercfg -setdcvalueindex SCHEME_CURRENT 4f971e89-eebd-4455-a8de-9e59040e7347 5ca83367-6e45-459f-a27b-476b1d01c936 1
OR
powercfg -setdcvalueindex SCHEME_CURRENT 4f971e89-eebd-4455-a8de-9e59040e7347 5ca83367-6e45-459f-a27b-476b1d01c936 2
OR
(Shut down)
powercfg -setdcvalueindex SCHEME_CURRENT 4f971e89-eebd-4455-a8de-9e59040e7347 5ca83367-6e45-459f-a27b-476b1d01c936 3
AND/OR
You would use this option for a desktop computer, since desktop computers will not have separate On battery and Plugged in options available unless it has a data connection to a UPS.
(Do nothing)
powercfg -setacvalueindex SCHEME_CURRENT 4f971e89-eebd-4455-a8de-9e59040e7347 5ca83367-6e45-459f-a27b-476b1d01c936 0
OR
(Sleep — default)
powercfg -setacvalueindex SCHEME_CURRENT 4f971e89-eebd-4455-a8de-9e59040e7347 5ca83367-6e45-459f-a27b-476b1d01c936 1
OR
powercfg -setacvalueindex SCHEME_CURRENT 4f971e89-eebd-4455-a8de-9e59040e7347 5ca83367-6e45-459f-a27b-476b1d01c936 2
OR
(Shut down)
powercfg -setacvalueindex SCHEME_CURRENT 4f971e89-eebd-4455-a8de-9e59040e7347 5ca83367-6e45-459f-a27b-476b1d01c936 3
3 You can now close Windows Terminal if you like.
Option Five
Change Lid Close Action for Specific Power Plan in Windows Terminal
1 Open Windows Terminal, and select either Windows PowerShell or Command Prompt.
2 Copy and paste the powercfg /L command into Windows Terminal, and press Enter. Make note of the GUID number (ex: 381b4222-f694-41f0-9685-ff5bb260df2e) of the power plan (ex: «Balanced») you want to apply this to. (see screenshot below)
The power plan (ex: Ultimate Performance) with an asterisk (*) to the right of it is your current active power plan scheme.

3 Type the command below you want to use for when on battery and/or plugged in into Windows Terminal, and press Enter.
(Do nothing)
powercfg -setdcvalueindex GUID 4f971e89-eebd-4455-a8de-9e59040e7347 5ca83367-6e45-459f-a27b-476b1d01c936 0
OR
(Sleep — default)
powercfg -setdcvalueindex GUID 4f971e89-eebd-4455-a8de-9e59040e7347 5ca83367-6e45-459f-a27b-476b1d01c936 1
OR
powercfg -setdcvalueindex GUID 4f971e89-eebd-4455-a8de-9e59040e7347 5ca83367-6e45-459f-a27b-476b1d01c936 2
OR
(Shut down)
powercfg -setdcvalueindex GUID 4f971e89-eebd-4455-a8de-9e59040e7347 5ca83367-6e45-459f-a27b-476b1d01c936 3
AND/OR
You would use this option for a desktop computer, since desktop computers will not have separate On battery and Plugged in options available unless it has a data connection to a UPS.
(Do nothing)
powercfg -setacvalueindex GUID 4f971e89-eebd-4455-a8de-9e59040e7347 5ca83367-6e45-459f-a27b-476b1d01c936 0
OR
(Sleep — default)
powercfg -setacvalueindex GUID 4f971e89-eebd-4455-a8de-9e59040e7347 5ca83367-6e45-459f-a27b-476b1d01c936 1
OR
powercfg -setacvalueindex GUID 4f971e89-eebd-4455-a8de-9e59040e7347 5ca83367-6e45-459f-a27b-476b1d01c936 2
OR
(Shut down)
powercfg -setacvalueindex GUID 4f971e89-eebd-4455-a8de-9e59040e7347 5ca83367-6e45-459f-a27b-476b1d01c936 3
Substitute GUID in the command above with the actual GUID from step 2 above for the power plan you want to apply this to.
For example: Set to «Shut down» while «Plugged in» for the Balanced power plan GUID (381b4222-f694-41f0-9685-ff5bb260df2e)
powercfg -setacvalueindex 381b4222-f694-41f0-9685-ff5bb260df2e 4f971e89-eebd-4455-a8de-9e59040e7347 5ca83367-6e45-459f-a27b-476b1d01c936 3
4 You can now close Windows Terminal if you like.
Option Six
Specify Lid Close Action for All Power Plans in Local Group Policy Editor
You must be signed in as an administrator to use this option.
The Local Group Policy Editor is only available in the Windows 11 Pro, Enterprise, and Education, editions.
All editions can use Option Seven below to configure the same policy.
1 Open the Local Group Policy Editor (gpedit.msc).
2 Navigate to the policy location below in the left pane of the Local Group Policy Editor. (see screenshot below)
Computer Configuration > Administrative Templates > System > Power Management > Button Settings.

3 In the right pane of Button Settings, double click/tap on the Select the lid switch action (plugged in) and/or Select the lid switch action (on battery) policy you want to edit. (see screenshot above)
4 Do step 5 (default), step 6 (hibernate), step 7 (shut down), step 8 (sleep), or step 9 (Take no action) below for which default action you want to specify.
5 Default User Choice for Lid Close Action
This will allow users to use Option One, Option Two, Option Three, and Option Four.
A) Select (dot) Not Configured, click/tap on OK, and go to step 10 below. (see screenshot below step 9)
6 To Specify «Hibernate» for Lid Close Action
This will override and gray out Option One, Option Two, Option Three, Option Four, and Option Five.
A) Select (dot) Enabled, select Hibernate in the Lid Switch Action drop menu under Options, click/tap on OK, and go to step 10 below. (see screenshots below step 9)
7 To Specify «Shut down» for Lid Close Action
This will override and gray out Option One, Option Two, Option Three, Option Four, and Option Five.
A) Select (dot) Enabled, select Shut down in the Lid Switch Action drop menu under Options, click/tap on OK, and go to step 10 below. (see screenshots below step 9)
8 To Specify «Sleep» for Lid Close Action
This will override and gray out Option One, Option Two, Option Three, Option Four, and Option Five.
A) Select (dot) Enabled, select Sleep in the Lid Switch Action drop menu under Options, click/tap on OK, and go to step 10 below. (see screenshots below step 9)
9 To Specify «Take no action» for Lid Close Action
This will override and gray out Option One, Option Two, Option Three, Option Four, and Option Five.
A) Select (dot) Enabled, select Take no action in the Lid Switch Action drop menu under Options, click/tap on OK, and go to step 10 below. (see screenshots below)


10 When finished, you can close the Local Group Policy Editor if you like.
Option Seven
Specify Lid Close Action for All Power Plans using REG file
You must be signed in as an administrator to use this option.
1 Do step 2 (default), step 3 (hibernate), step 4 (shut down), step 5 (sleep), or step 6 (Take no action) below for which default action you want to specify.
2. Default User Choice for Lid Close Action
This will allow users to use Option One, Option Two, Option Three, Option Four, and Option Five.
A) Click/tap on the Download button you want below to download the plugged in AND/OR on battery file below, and go to step 7 below.
Default_user_choice_for_lid_close_action-plugged-in.reg
(Contents of REG file for reference)
Code:
Windows Registry Editor Version 5.00

[HKEY_LOCAL_MACHINE\SOFTWARE\Policies\Microsoft\Power\PowerSettings\5CA83367-6E45-459F-A27B-476B1D01C936]
"ACSettingIndex"=-AND/OR
Default_user_choice_for_lid_close_action-on-battery.reg
(Contents of REG file for reference)
Code:
Windows Registry Editor Version 5.00

[HKEY_LOCAL_MACHINE\SOFTWARE\Policies\Microsoft\Power\PowerSettings\5CA83367-6E45-459F-A27B-476B1D01C936]
"DCSettingIndex"=-
3. To Specify «Hibernate» for Lid Close Action
This will override and gray out Option One, Option Two, Option Three, Option Four, and Option Five.
A) Click/tap on the Download button you want below to download the plugged in AND/OR on battery file below, and go to step 7 below.
Specify_hibernate_for_lid_close_action-plugged-in.reg
(Contents of REG file for reference)
Code:
Windows Registry Editor Version 5.00

[HKEY_LOCAL_MACHINE\SOFTWARE\Policies\Microsoft\Power\PowerSettings\5CA83367-6E45-459F-A27B-476B1D01C936]
"ACSettingIndex"=dword:00000002AND/OR
Specify_hibernate_for_lid_close_action-on-battery.reg
(Contents of REG file for reference)
Code:
Windows Registry Editor Version 5.00

[HKEY_LOCAL_MACHINE\SOFTWARE\Policies\Microsoft\Power\PowerSettings\5CA83367-6E45-459F-A27B-476B1D01C936]
"DCSettingIndex"=dword:00000002
4. To Specify «Shut down» for Lid Close Action
This will override and gray out Option One, Option Two, Option Three, Option Four, and Option Five.
A) Click/tap on the Download button you want below to download the plugged in AND/OR on battery file below, and go to step 7 below.
Specify_shut_down_for_lid_close_action-plugged-in.reg
(Contents of REG file for reference)
Code:
Windows Registry Editor Version 5.00

[HKEY_LOCAL_MACHINE\SOFTWARE\Policies\Microsoft\Power\PowerSettings\5CA83367-6E45-459F-A27B-476B1D01C936]
"ACSettingIndex"=dword:00000003AND/OR
Specify_shut_down_for_lid_close_action-on-battery.reg
(Contents of REG file for reference)
Code:
Windows Registry Editor Version 5.00

[HKEY_LOCAL_MACHINE\SOFTWARE\Policies\Microsoft\Power\PowerSettings\5CA83367-6E45-459F-A27B-476B1D01C936]
"DCSettingIndex"=dword:00000003
5. To Specify «Sleep» for Lid Close Action
This will override and gray out Option One, Option Two, Option Three, Option Four, and Option Five.
A) Click/tap on the Download button you want below to download the plugged in AND/OR on battery file below, and go to step 7 below.
Specify_sleep_for_lid_close_action-plugged-in.reg
(Contents of REG file for reference)
Code:
Windows Registry Editor Version 5.00

[HKEY_LOCAL_MACHINE\SOFTWARE\Policies\Microsoft\Power\PowerSettings\5CA83367-6E45-459F-A27B-476B1D01C936]
"ACSettingIndex"=dword:00000001AND/OR
Specify_sleep_for_lid_close_action-on-battery.reg
(Contents of REG file for reference)
Code:
Windows Registry Editor Version 5.00

[HKEY_LOCAL_MACHINE\SOFTWARE\Policies\Microsoft\Power\PowerSettings\5CA83367-6E45-459F-A27B-476B1D01C936]
"DCSettingIndex"=dword:00000001
6. To Specify «Take no action» for Lid Close Action
This will override and gray out Option One, Option Two, Option Three, Option Four, and Option Five.
A) Click/tap on the Download button you want below to download the plugged in AND/OR on battery file below, and go to step 7 below.
Specify_do_nothing_for_lid_close_action-plugged-in.reg
(Contents of REG file for reference)
Code:
Windows Registry Editor Version 5.00

[HKEY_LOCAL_MACHINE\SOFTWARE\Policies\Microsoft\Power\PowerSettings\5CA83367-6E45-459F-A27B-476B1D01C936]
"ACSettingIndex"=dword:00000000AND/OR
Specify_do_nothing_for_lid_close_action-on-battery.reg
(Contents of REG file for reference)
Code:
Windows Registry Editor Version 5.00

[HKEY_LOCAL_MACHINE\SOFTWARE\Policies\Microsoft\Power\PowerSettings\5CA83367-6E45-459F-A27B-476B1D01C936]
"DCSettingIndex"=dword:00000000
7 Save the .reg file to your desktop.
8 Double click/tap on the downloaded .reg file to merge it.
9 When prompted, click/tap on Run, Yes (UAC), Yes, and OK to approve the merge.
10 You can now delete the downloaded .reg file if you like.
That’s it,
Shawn Brink
Related Tutorials
- Change Lid Open Action in Windows 11
- Change Power Button Action in Windows 11
- Change Sleep Button Action in Windows 11
- Turn On or Off «Enable forced button/lid shutdown» in Windows 11