
Способ 1: Шифрование
С помощью специального файла-ключа с шифрованием можно поставить пароль на выбранную папку, а также на все каталоги, которые хранятся в ней. Пожалуй, это один из наиболее надежных способов, поскольку узнать пароль от зашифрованных директорий посторонние лица не смогут никаким образом, к тому же для этого не потребуется специальное программное обеспечение, которое может быть скачано из ненадежных источников.
Рекомендация сработает при условии, что у вас включено шифрование BitLocker в Windows 11. О том, как это сделать, мы писали в отдельном материале на сайте.
Подробнее: Активация шифрования дисков BitLocker в Windows 11
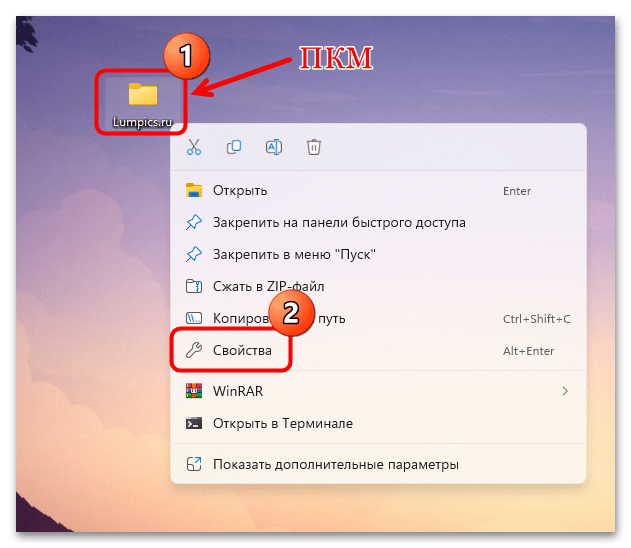
- Кликните правой кнопкой мыши по папке, на которую нужно поставить пароль, затем из контекстного меню выберите пункт «Свойства».
- На вкладке «Общие» кликните по кнопке «Другие».
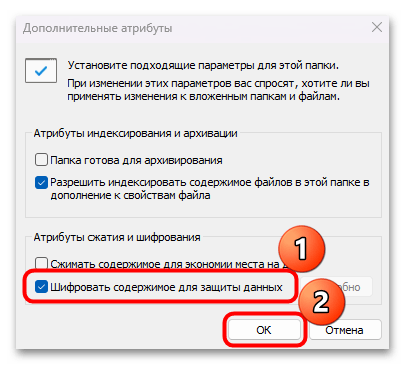
- Откроется новое окно, где в разделе «Атрибуты сжатия и шифрования» нужно отметить пункт «Шифровать содержимое для защиты данных» и подтвердить действие.
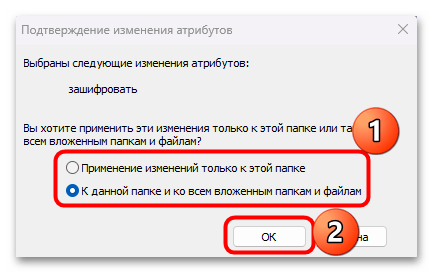
- Отметьте то, к чему нужно применить шифрование, – только к этой папке или же ко всем каталогам из нее, нажмите на кнопку «ОК».
Получить доступ к такой папке невозможно без введенного пароля и созданного в соответствии с инструкцией файла-ключа.
Способ 2: BAT-файл
Есть еще один способ установить пароль на папку – он наиболее простой, но содержит несколько нюансов. Во-первых, придется создавать специальный скрипт, который будет храниться в том же каталоге, где и запароленная директория, и более опытные пользователи смогут получить доступ к коду, просто открыв созданный BAT-файл через любой текстовой редактор. Кроме того, зашифрованная папка будет отображаться, но ее можно скрыть и, таким образом, усложнив процедуру поиска объекта тем, кто попытается ее найти.
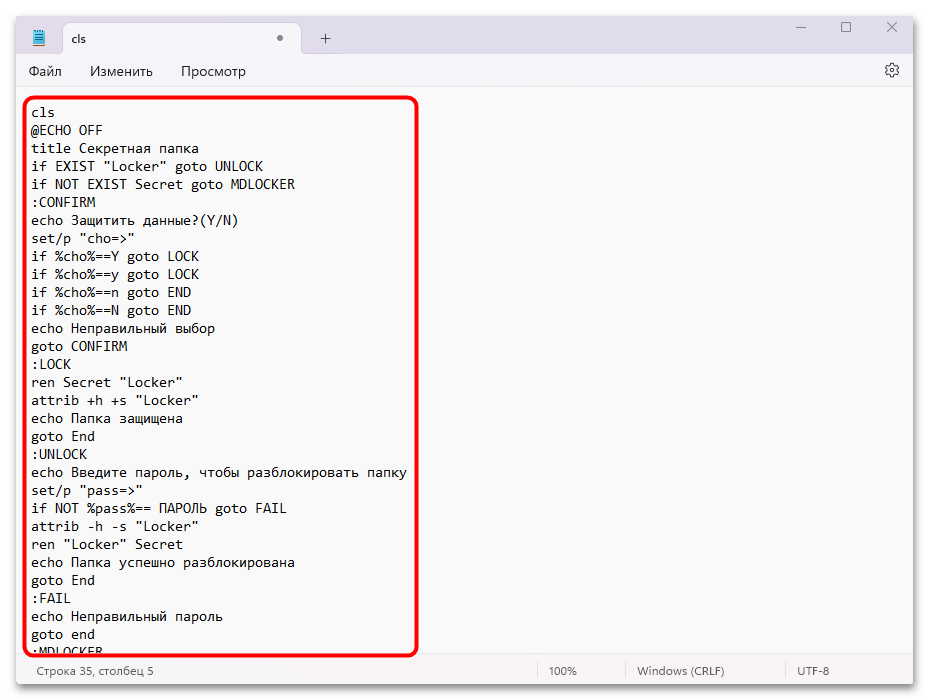
- Откройте предустановленный «Блокнот» и скопируйте туда следующий код:
cls

@ECHO OFF

title Секретная папка

if EXIST "Locker" goto UNLOCK

if NOT EXIST Secret goto MDLOCKER

:CONFIRM

echo Защитить данные?(Y/N)

set/p "cho=>"

if %cho%==Y goto LOCK

if %cho%==y goto LOCK

if %cho%==n goto END

if %cho%==N goto END

echo Неправильный выбор

goto CONFIRM

:LOCK

ren Secret "Locker"

attrib +h +s "Locker"

echo Папка защищена

goto End

:UNLOCK

echo Введите пароль, чтобы разблокировать папку

set/p "pass=>"

if NOT %pass%== ПАРОЛЬ goto FAIL

attrib -h -s "Locker"

ren "Locker" Secret

echo Папка успешно разблокирована

goto End

:FAIL

echo Неправильный пароль

goto end

:MDLOCKER

md Secret

echo Секретная папка создана

goto End

:End
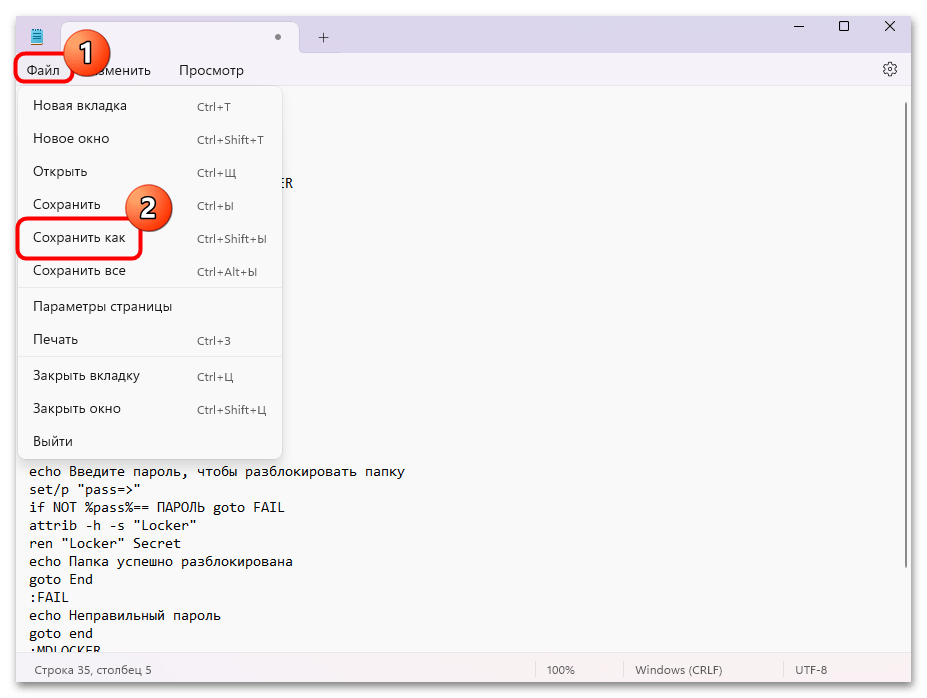
Вместо слова «ПАРОЛЬ» введите вашу секретную комбинацию. - Далее нужно сохранить файл в правильном формате. Нажмите на вкладку «Файл», затем выберите «Сохранить как».
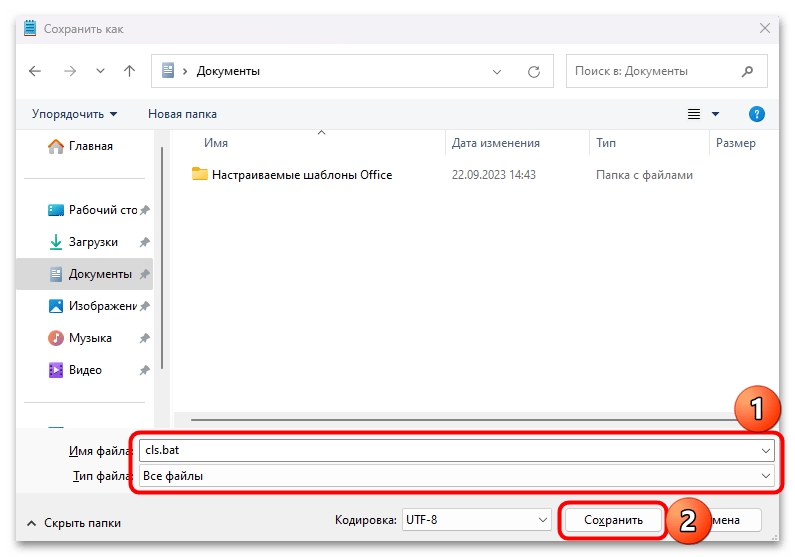
- В новом окне из меню «Тип файла» выберите «Все файлы», затем впишите имя, обязательно приписав в конце расширение
.bat, выберите расположение и нажмите на кнопку «Сохранить».
На этом создание BAT-файла завершено. Запустите его, после чего будет создана секретная папка там же, где находится этот файл. Поместите туда то, что хотите скрыть. Далее потребуется снова запустить BAT-файл – отобразится окно консоли, куда нужно ввести «Y» для подтверждения и выполнить команду, нажав на клавишу «Enter». После этого папка запароленная папка окажется скрыта.
Для повторного отображения директории снова запустите BAT-файл, введите пароль и подтвердите его клавишей «Enter».
Способ 3: Архиватор
Многие архиваторы предусматривают функцию защиты заархивированных файлов. Они позволяют установить пароль на папку с помощью встроенных средств. Как правило, одной из самых популярных программ является 7-Zip, но алгоритм действий у такого софта достаточно схож, поэтому нет смысла рассматривать все варианты.
Скачать 7-Zip
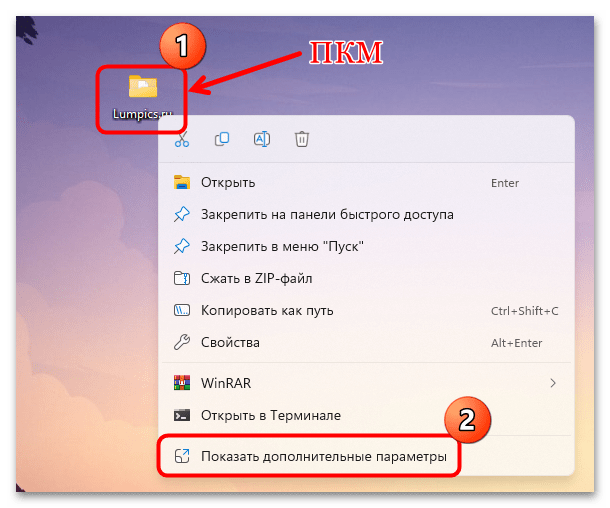
- Кликните по папке правой кнопкой мыши и выберите пункт «Показать дополнительные параметры».
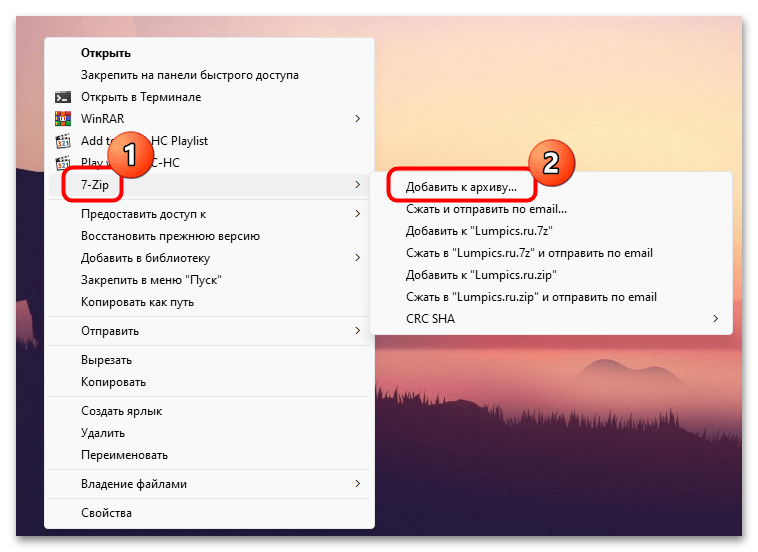
- В классическом меню наведите курсор на пункт «7-Zip», затем выберите опцию «Добавить к архиву».
- Перейдите к блоку «Шифрование» и в текстовых полях введите пароль, затем подтвердите его и нажмите на кнопку «ОК».
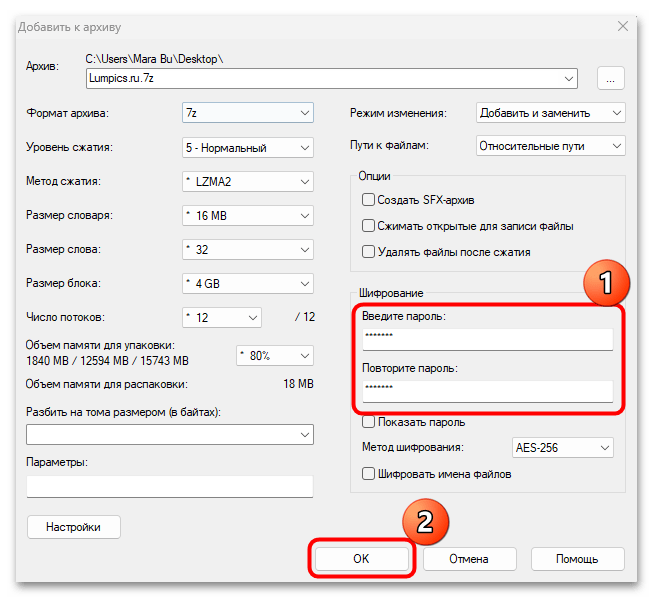
После этого папку, которая была помещена в архив и запаролена, открыть будет невозможно без ввода заданного кода.
Способ 4: Сторонние приложения
Также можно использовать специальное программное обеспечение от сторонних разработчиков, которое скачивается и устанавливается отдельно. Как правило, инструментарий такого софта более гибкий и часто наделен дополнительными функциями, например защищенным хранилищем с паролями или встроенной защитой от взлома. Ранее наш автор разбирал самые эффективные и популярные продукты в отдельном обзоре на сайте. Переходите по ссылке ниже, чтобы ознакомиться с ними и скачать понравившийся вариант.
Подробнее: Программы для шифрования папок и файлов
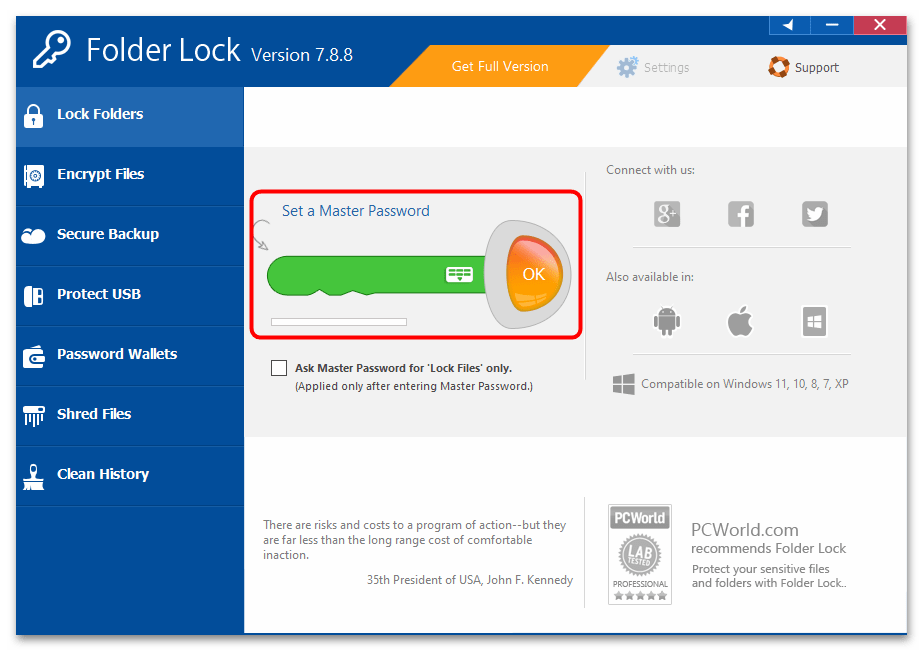
На примере одной из рассмотренных в материале выше программ — Folder Lock — рассмотрим, как можно запаролить папку с помощью функций софта:
- Установите и запустите программу. В текстовом поле «Set a Master Password» введите код, который будет использоваться для защиты папок, затем нажмите на кнопку «ОК».
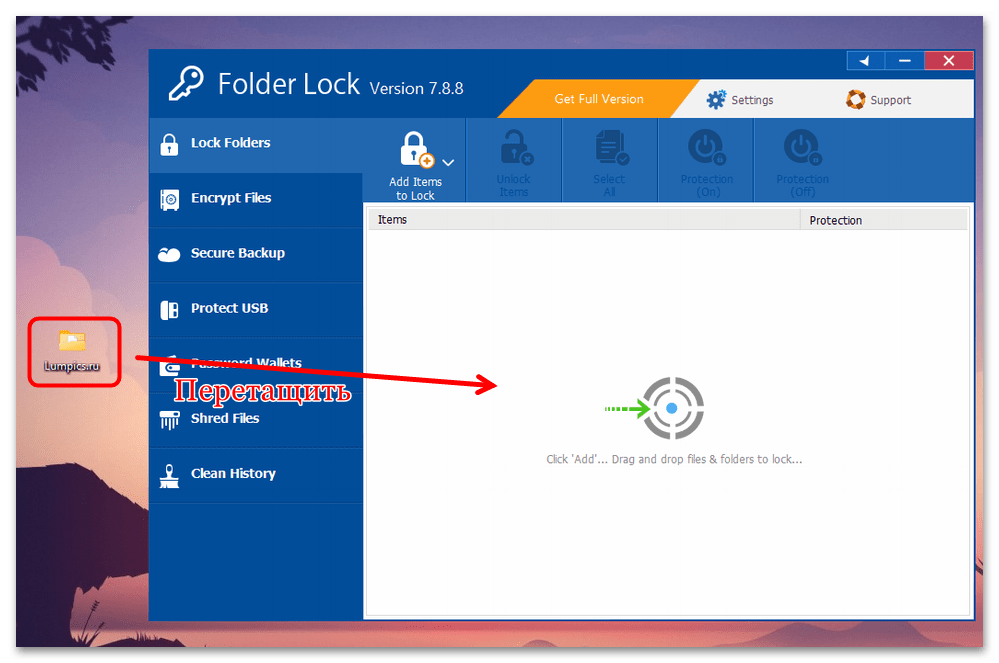
- Останется добавить директорию в интерфейс программы, после чего открыть ее на компьютере можно будет только после ввода заданного пароля, а сама директория станет скрытая — ее вы найдете лишь в интерфейсе приложения.
Программа Folder Lock платная, но при этому у нее есть ряд дополнительных преимуществ. Например, можно создавать специальные защищенные хранилища, получать отчеты о неправильно введенных паролях, а также безопасно удалять файлы и папки.
Наша группа в TelegramПолезные советы и помощь
Even though Windows 11 has you covered with comprehensive security features, you may want additional safeguards to keep your files private and secure. File encryption is another powerful tool for your protection. Learn more about encryption and how easy it is to encrypt your files and folders in Windows 11.
What is file encryption?
There are many ways to protect your files, including requiring a password to access your devices. Encryption takes that protection further. When you encrypt a file, its content is scrambled, making it undecipherable without a unique security certificate. As long as you’re signed into a Windows device, your file will open and operate normally because the security certificate is attached to your account. If someone tries to open this file without being logged in to your Windows account, it will be unreadable.
What are the benefits of encrypting a file?
This extra level of protection is especially useful to protect files that are shared online via email, chat, etc. These channels may be more prone to hacking or cyberattacks, but your encrypted files will be unreadable by any malicious actors. If you’re sending sensitive financial or personal data, encryption keeps that information more secure.
How do I encrypt files and folders in Windows 11?
Whether you want to learn how to encrypt an Excel spreadsheet, a Word document, or an entire folder, Windows 11 makes it easy. Follow these steps to encrypt a file or folder:
- Right-click on the icon for the file or folder you’d like to encrypt.
- Select Properties.
- Near the bottom of the Properties window, select Advanced.
- Check the box beside Encrypt contents to secure data.
- Select Apply.
- You’ll be given a choice of whether encryption should be applied to related folders and files. After you decide, select Okay.
- Select Apply again at the bottom of the Properties window.
- Your file or folder is now encrypted and accompanied by a lock icon.
- To unencrypt, follow these same steps and uncheck the box beside Encrypt contents to secure data.
If the option to Encrypt contents to secure data is unavailable (meaning it’s gray and you’re unable to check the box), encryption may not be enabled or available on your device. If that’s the case, read this guide to learn how to turn on encryption in Windows 11.
How do I back up security certificates for encrypted files?
Encryption is wonderfully secure, which is why you’ll want to have a backup of the security certificates that allow you to access encrypted files and folders. These backups come in handy if your device fails, is stolen, or is somehow wiped. Follow these steps to create a backup:
- Enter “certificate” into the Windows search box.
- Choose Manage computer certificates.
- Select Personal > Certificates. Your available certificates will appear in the right-side pane.
- At the top of the window, navigate to Action > All Tasks > Export.
- You now have the option to save these certificates on a USB, external device, or in the cloud for safekeeping.
- To use these certificates in the future on a new device, follow the above steps, but choose Import.
Encrypting files is one more way Windows 11 keeps your digital life secure. For tips, tricks, and insights to get the most out of Windows 11, head to the Windows Learning Center.
Microsoft Word
By Ли ЧжанОбновлено в декабре 17, 2022
Резюме
Вы не знаете, как заблокировать, защитить паролем или зашифровать папку в Windows 11/10/8/7? Вы обеспокоены утечкой конфиденциальной папки в Windows 10/8/7 без шифрования? Не волнуйтесь, вы пришли в нужное место. Здесь вы найдете несколько эффективных способов защитить паролем папку на компьютере с Windows.
Компьютер стал важным инструментом в нашей работе и жизни. Если вы не зашифровали свои файлы и папки на компьютере, ваши конфиденциальные данные могут легко утечь и попасть к кому-то с плохими намерениями. Поэтому нам нужно заблокировать, зашифровать или защита файлов паролем и папки, чтобы предотвратить их утечку, вам необходимо защитить паролем папки на вашем компьютере. Итак, как защитить паролем папку в Windows 10/8/7? Мы перечисляем некоторые эффективные методы блокировки и защиты паролем папок на компьютере. Считается, что вы можете найти подходящий способ шифрования папок на ПК с Windows, даже на Mac.
СОДЕРЖАНИЕ
Часть 1: Защита папки паролем с помощью UkeySoft File Lock
Ukeysoft File Lock это профессиональный инструмент шифрования для Windows и Mac, он имеет надежную функцию блокировки/скрытия ваших файлов и папок на локальном диске и внешнем диске (USB-накопитель), чтобы вы могли надежно защитить ваши файлы и папки. Кроме того, он может отслеживать ваши файлы и папки, когда они изменяются. Кроме того, он может навсегда удалить ваши конфиденциальные файлы и папки с помощью мощной функции «Уничтожитель файлов», даже некоторые профессиональные программы для восстановления данных не могут восстановить их обратно. После блокировки ваших папок ваши файлы и папки могут быть доступны с установленным вами паролем, зашифрованные папки Вы можете быть уверены, что никогда не беспокоитесь о своих важных папках в опасности.
Вы можете знать, почему UkeySoft File Lock имеет отличную функцию шифрования? Ответ заключается в том, что используются 256-битные алгоритмы шифрования AES военного уровня, которые позволяют надежно защитить паролем файл/папку/USB-накопитель. И благодаря UkeySoft File Lock, защитите свою папку в Windows 11/10/8/7 стать легче. Установите UkeySoft File Lock и посмотрите, как это работает.
Лучшие функции, которые вы хотели бы
- Заблокируйте файл, папку от хакерских и вредоносных атак.
- Скрыть файл или папку от посторонних глаз.
- заблокируйте флэш-накопитель, например USB-накопитель, для защиты конфиденциальной информации.
- Отслеживайте файл, папку, когда они меняются.
- Удалить файл, папку принудительно.
3 простых шага для защиты папок паролем на ПК с Windows
Шаг 1. Установите и запустите UkeySoft File Lock на своем компьютере.
Перейдите на официальный сайт Ukeysoft и установите UkeySoft File Lock. Затем запустите его и введите начальный пароль «123456», чтобы запустить его. Если вы приобрели лицензионный код для активации программы, вы можете установить другой пароль.
Шаг 2. Выберите функцию блокировки папки
После запуска вы можете увидеть опцию «Блокировка папки» в левой части экрана и щелкнуть ее.
Шаг 3. Добавьте папку для шифрования
В этом окне, если вы хотите заблокировать папку, нажмите добавить папку или несколько папок в интерфейс блокировки.
Есть два способа добавить папку или папки в список блокировки.
Способ 1: нажмите «Заблокировать папку», и локальная папка будет открыта.
Затем выберите папку, которую вы хотите защитить паролем, появится небольшое окно и нажмите кнопку «Подтвердить», чтобы подтвердить добавление папки в список блокировки.
Способ 2: Вы также можете перетащить папку в центр интерфейса, после перетаскивания папки в интерфейс блокировки и успешного добавления вы увидите, что папка заблокирована.
Отлично, все выбранные папки заблокированы паролем. Всего 3 простых шага, ваша папка может быть надежно защищена, и вы никогда не будете беспокоиться о посторонних глазах.
Советы: Пароль по умолчанию — ваш мастер-пароль программы.
Часть 2: Как получить доступ к заблокированной папке и разблокировать папку
Отличная работа. Всего несколько кликов, и вы можете легко защитить паролем папку, никто не сможет открыть зашифрованную папку без пароля. Если вы хотите открыть зашифрованную папку, вам необходимо ввести правильный пароль, который вы установили.
Если вы хотите разблокировать зашифрованные папки, просто выберите папку из списка блокировки, затем нажмите кнопку «Разблокировать», чтобы разблокировать шифрование папки.
После разблокировки вы можете получить прямой доступ к папке без пароля.
Часть 3. Защита паролем папки в Windows 10/8/7 с помощью BitLocker
Windows 10 предлагает встроенный инструмент шифрования — BitLocker, который позволяет шифровать ваши папки от несанкционированного доступа к вашей информации с помощью пароля. BitLocker может защитить не только файл, папку, но и внешний диск, такой как USB-накопитель. В Windows 10, если вы хотите защитить свою конфиденциальную папку, вы можете попробовать этот способ и выполнить следующие шаги.
Шаг 1. Проверьте ваш компьютер на наличие BitLocker. Перейдите в панель управления вашего компьютера из меню «Пуск» и выберите «Система и безопасность». В основном разделе прокрутите вниз, чтобы найти здесь опцию «Шифрование диска BitLocker». Если да, выполните следующие действия.
Шаг 2. Щелкните параметр «Шифрование диска BitLocker» и введите, чтобы открыть страницу настроек шифрования диска BitLocker, и нажмите «Включить диск BitLocker».
Шаг 3. Установите пароль. Вам нужно установить пароль, который никто не знает, кроме вас самих, и нажать «Далее».
Шаг 4. Выберите вариант сохранения. Выберите вариант шифрования — «сохранить на диск Microsoft» и нажмите «Далее».
Шаг 5. На этой странице вам нужно выбрать объем дискового пространства для шифрования, выбрать «Шифровать только используемое дисковое пространство (быстрее и лучше для новых ПК и дисков) и нажать «Далее».
Шаг 6. На этом шаге вам нужно выбрать два варианта. Для внутреннего диска выберите «Новый режим шифрования (лучше всего подходит для фиксированных дисков на этом устройстве)». Для внешнего выберите «Совместимый режим (лучше всего подходит для дисков, которые можно перемещать с этого устройства)».
Шаг 7. Нажмите «Запустить проверку системы BitLocker». И ваш компьютер будет перезагружен. Отлично, вы должны ввести правильный пароль, чтобы разблокировать диск.
Часть 4. Защита паролем папки в Windows 10/8/7 с помощью AES Crypt
AES Crypt — это многоплатформенное программное обеспечение для шифрования. Он предоставляет версию GUI и командную строку. Однако первоначальная настройка для нового пользователя непроста, поскольку установка сложна. С инсталляционным пакетом сложно разобраться. По сути, вам нужно установить программу и разархивировать установочный пакет. Затем вы найдете в нем файл msi. После этого мастер установки вступит в свои права. Вы можете выполнить следующие действия.
Шаг 1. Загрузите соответствующий графический интерфейс и запустите файл msi из разархивированного файла. Следуйте инструкциям по установке. Если при этом произойдет ошибка, вы можете запустить исполняемый файл. Если нет, просто выполните установку пакета.
Шаг 2. Вам нужно включить его и выполнить следующие несколько шагов.
Шаг 3. После установки его не нужно запускать. Перейдите в проводник и выберите папку, которую вы хотите защитить, и щелкните ее правой кнопкой мыши. Вы увидите AES Encrypt в контекстном меню. Нажмите на нее, чтобы открыть подсказки для пароля. введите пароль и подтвердите пароль.
Часть 5: Защита паролем папки в Windows 10/8/7 с помощью DiskCryptor
DiskCryptor также является надежным инструментом шифрования, который использует пароли для защиты дисков. Он не только включает алгоритмы шифрования, но также обеспечивает 256-битное шифрование AES для важных данных на жестком диске. DiskCryptor может защитить данные паролем и поместить их на CD/DVD, чтобы люди могли носить их с собой и использовать в любое время. Многие другие инструменты шифрования не имеют этой функции. Следуйте инструкциям ниже, и вы сможете защитить свою папку с помощью DiskCryptor.
Шаг 1. Установите DiskCryptor.
Шаг 2. Вы можете посмотреть на центральную панель, чтобы увидеть все доступные тома после запуска. Выберите папку, которую вы хотите зашифровать, и нажмите «Зашифровать» справа.
Шаг 3. В этой части вы увидите окна настроек, и вам нужно выбрать тип шифрования. Затем нажмите «Далее».
Шаг 4. После этого система предложит вам дважды ввести пароль. Вы даже можете увидеть рейтинг безопасности, чтобы помочь вам установить пароль, который трудно взломать.
Заключение
Выше мы представляем 6 способов, чтобы научить вас, как защитить паролем папку в Windows 10/8/7. С уважением, мы надеемся, что вы сможете найти правильный способ зашифровать свою папку в Windows 10/8/7 в этой позе. Мы рады помочь вам защитить вашу важную папку.
Защита папки паролем в Windows

Ли Чжан
Ли Чжан — опытный редактор UkeySoft по написанию технических блогов, а также эксперт по SEO и контент-маркетингу. Она пишет связанные статьи о преобразовании мультимедиа, потоковой передаче музыки и потокового видео с 2018 года. Кроме того, она начинает писать статьи о безопасности данных, включая статьи о блокировке файлов, шифровании USB, шифровании DVD и т. д. Каждое полезное руководство и решение основано на на ее практических испытаниях она всегда энергична и заслуживает доверия в этой области.
Комментарии
подскажите: тебе нужно авторизоваться прежде чем вы сможете комментировать.
Еще нет аккаунта. Пожалуйста, нажмите здесь, чтобы зарегистрироваться.
The built-in way starts with a right-click, but there are other ways with additional software
What to Know
- Use W11 password: Right-click the folder > Properties > Advanced > Encrypt contents to secure data.
- Compress & lock folder with any password with 7-Zip. Right-click it > See more options > 7-Zip > Add to archive.
- To hide the folder and lock it with a password, use Wise Folder Hider.
This article describes three ways to lock a folder in Windows 11. There’s one built-in method and two third-party methods, all completely free.
How to Encrypt Folders in Windows 11
The easiest way to lock a folder is to enable encryption. Doing this prevents other computer users from opening/viewing your files. You have to be logged in to your account in order to open the files in the folder that you lock.
This is built-in to Windows 11, and it’s really easy to turn on:
-
Locate the folder you want to lock, and then right-click it and choose Properties.
-
From the General tab, select Advanced toward the bottom.
-
Select Encrypt contents to secure data.
-
Choose OK to save, and then OK again on the folder’s properties window.
-
Choose Apply changes to this folder, subfolders and files > OK to ensure that any folders in this one are also locked.
-
You’re done now! Windows 11 places a lock icon on the folder to show it’s encrypted behind your user password. Now, if anyone wants to open the files in that folder, they must be logged in under your user account.
Continue these steps to back up your file encryption key, and avoid permanently losing access to your locked files. To start, search windows for certmgr.msc.
-
Navigate to Personal > Certificates using the left pane.
-
Select the items that say Encrypting File System, right-click the selection and choose All Tasks > Export.
-
Walk through the Certificate Export Wizard by going to Next > Yes, export the private key > Next > Next (accept the defaults).
-
Choose Password, enter a password for the private key, and then press Next.
-
Select Browse, give the PFX file a name, and save it somewhere you’ll remember.
-
Press Next > Finish which completesthe wizard. If you need to use this certificate in the future, open it from wherever you saved it.
How to Password Protect a Folder on Windows 11
There isn’t a built-in function in Windows 11 which assigns a unique password to each folder you want to lock. There are, however, plenty of third-party software programs that can do the job.
Here are two examples:
7-Zip: Make Compressed Locked Folders
7-Zip is an archive tool. That means it can compress the folder while applying a password to it. You can share the locked folder with anyone, even if they don’t have 7-Zip installed, but the files within the folder can’t be opened until the right password is provided.
-
Download 7-Zip and then install it.
-
Right-click the folder you want to lock, and go to See more options > 7-Zip > Add to archive.
-
Make the following adjustments:
- Change Archive format to 7z
- Select Create SFX archive
- Provide a password
- Select Encrypt file names
Feel free to also edit the other settings on that screen, like the new file’s name and location or the compression level.
-
Select OK to save and create the locked folder.
Now, you can open the newly made EXE file to see a password prompt. Enter the password you made earlier to unlock the folder. This file can be shared with anyone, and they’ll get the same password prompt.
The options we enabled above for the self-extracting, password-protected archive didn’t include the option to remove the original folder. To ensure nobody can access the original files, delete the folder or move it somewhere private.
Wise Folder Hider: Make Hidden Locked Folders
Wise Folder Hider can hide a folder so it’s not visible on your computer like regular folders are. It can also put a password on the folder so that if someone did find it, they can’t open it without supplying that password. This program can secure your hidden folder behind two passwords.
-
Download and install Wise Folder Hider.
-
At the first launch, you’re asked to make a login password. This is the first layer of security this program offers. You must first enter this password to even use the software to unlock a locked folder later.
-
From the Hide File tab, select Hide Folder at the bottom, select the folder you want to hide and press OK to add it to the queue. We highlighted the folder ‘Secrets’ so you can see the steps. You’ll obviously pick your own folder(s).
-
Select the arrow and choose Set password.
-
Enter a password into the prompt, select OK to save it, and then OK again on the confirmation box.
-
You can now close the program. When you want to view/use this folder, open Wise Folder Hider, supply the login password from Step 2, and then select Open next to the folder to enter that password.
«Locked folder» also refers to a folder whose files are being used by another process, making them unable to be edited or deleted. See How to Move, Delete, and Rename Locked Files for more on how those files work. This differs from a folder that’s intentionally locked behind a password.
Choosing a Folder Lock Method
Of the three methods covered above, how do you know which one to choose? Here are some things to think about:
- The first technique is useful for multi-user computers. If you share your computer with someone with their own user account, encrypting the folder will stop them from opening its files. They can still delete the folder and even view the filenames, but they can’t open the files in that folder. Use this method if you don’t want to remember a new password.
- Use 7-Zip to lock the folder if you want to choose a different password from your Windows user account password. This method is also useful when sharing the locked folder, copying it elsewhere, and retaining its password protection.
- Wise Folder Hider is great if you want to protect the folder behind two different passwords and/or if you want the folder to appear invisible to others using the computer.
FAQ
-
If you’re the administrator, you can change the names of user profiles. Search for Computer Management, from the desktop, and then select it and go to Local Users and Groups > Users and right-click Administrator and choose Rename. Changing the account name will update the user folder for that account.
-
You can quickly open the startup folder in Windows 11 with the Run command. Press Windows + R, and then type shell:startup. When you select OK, the startup folder will open.
Thanks for letting us know!
Get the Latest Tech News Delivered Every Day
Subscribe
Microsoft’s Windows is a popular operating system, and with the latest release of Windows 11, it has become even more feature-rich and powerful. It also comes with improved security features, giving you more peace of mind as you work. You can even lock down your files or folders in Windows 11 with a password, just as you can in previous versions of the operating system.
Locking the windows account can be a great way to keep your sensitive data safe from prying eyes and identity thieves, or simply keep personal files away from house guests who may use your computer. In case you would forget the password, we here also write the ultimate solution – UnlockGo – Windows Password Recovery that you can be done once for all with UnlockGo for windows by your side.
How to Lock Folder on Windows 11 Home
Increased convenience and accessibility make today’s digital world better than ever for communication and information access, but also means you should take some extra security measures to protect your privacy. Knowing how to password protect a folder in Windows 11 is a great approach to ensure that no one can access your private data, especially if you share your computer with others.
Securing your folder with a password can be very helpful in the following ways:
- Prevent other people from accidentally or intentionally opening/modifying/removing crucial data.
- Help you share files only with those authorized people.
- Allow you to keep your important data safe from prying eyes.
So, after all this, the question is how to lock a folder on windows 11?
Well, though there are many tools available in the market just for locking and unlocking files and folders, it doesn’t make sense to buy a software to do it: you can simply set a password on a folder by using Windows built-in security system.
Here is a simple, easy-to-follow guide to doing it.
Step 1: First, you need to go to the folder that you want to protect, and then right-click on it and select “Properties” from the drop down menu.
Step 2: In the Properties window, go to the “General” tab and click on the “Advanced” button.
Step 3: Now check the box next to “Encrypt contents to secure data” and click on “OK” and “Apply”.
Step 4: A new pop-up window will appear asking if you want to encrypt only the current folder or all the subfolders and files inside it. Choose accordingly and click on “OK” again in the Properties window and you’re done.
Once you’ve set it up, this folder and its contents will be protected, and any new files you add to this folder will also be protected. To access the encrypted folder, you need to log in with the same Windows user account that you logged in when setting up encryption.
How to Unlock Password-Protected Folder on Windows 11 Home
Above, we explained the easy procedure of windows 11 password protect folder. But after setting it up, you may also want to know how to unlock a password-protected folder when you need access again. Well, It depends on how you have set up your password protection. For example, whether you’re using the built-in tool to lock a folder, a third-party software, or any other method.
Either way below we have mentioned two methods that will help you to unlock a password-protected folder without any hassle.
1. Unlock with Known Password from Folder Properties
If you had previously used the Windows built-in security system to password protect your folder through Folder Properties, then you can follow the steps below to unlock it without any software.
Step 1: First of all, go to the folder location where you encrypted folder is located.
Step 2: Right-click on the folder, select ‘File Ownership’ from the menu and choose ‘Personal’ to remove the lock. You may also uncheck the box next to Encrypt contents to secure data in the ‘Properties’ setting and click on ‘OK.’
2. Unlock without a Password with CMD
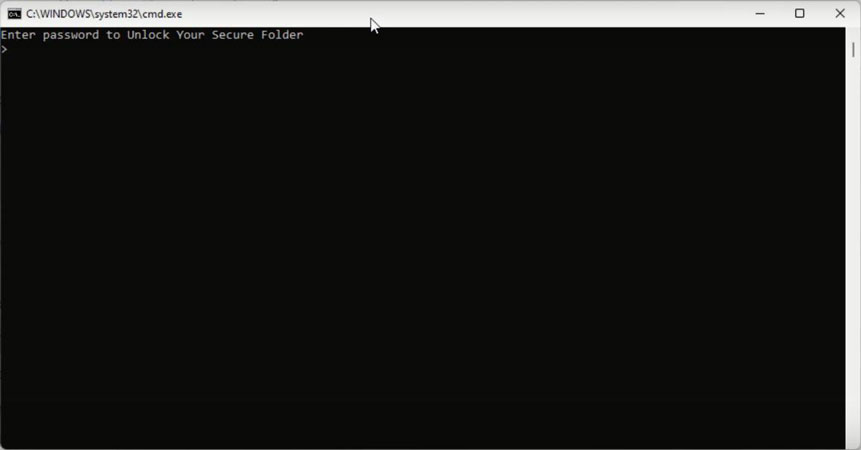
If you have locked a folder by creating a batch file and need to access the folder again without having a password, you can use the CMD method on Windows 11. Although this is a bit of a complicated process, it works perfectly if you follow the steps correctly.
Step 1: First, go to the location where you have locked your file. Then right-click on the batch file and select ‘Edit’.
Step 2: After you have opened the script file, search for the section labeled ‘:UNLOCK’ and you will see the password you chose there.
Step 3: Copy the password, then run the batch file again. When you are asked for a password, enter the copied password.
Extra Tips about Unlock Windows Password on Windows 11
So, that is all about how to lock and unlock a folder in Windows 11 with or without a password. If you have not already set up a login screen password and created a new user account for other people to use your computer, do so. This will add an extra layer of security and help prevent others from accessing your important data.
However, if you forget your password and none of the above methods work for you to unlock the Windows 11 password-protected folder, then you may feel helpless because of not being able to access its contents. In such a scenario, you can take the assistance of iToolab UnlockGo for windows – a reliable windows password recovery tool to help you reset or remove your forgotten password for both local and administrator accounts in Windows 10/8.1/8/7 and other earlier versions.
With the help of UnlockGo – Windows Password Recovery you don’t even need to reinstall the operating system, and all your data, files, and settings will remain intact. You can also use it to delete a user account entirely, as well as create new ones – all within a few clicks.
Let’s see how to use this tool to solve our windows 11 password issues.
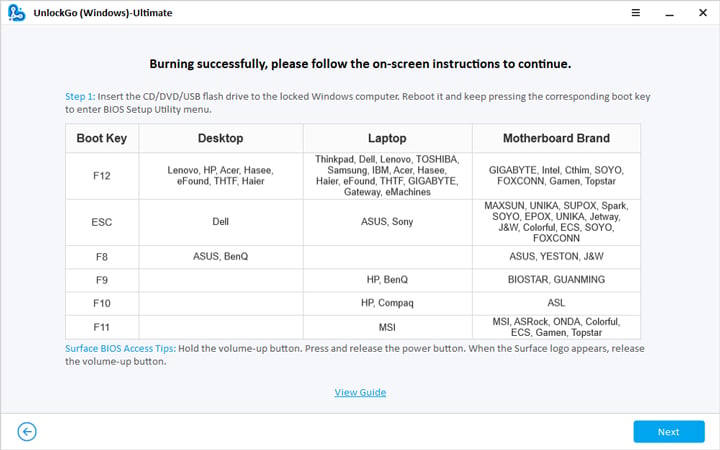
Step 1. Download and install UnlockGo for windows on another accessible computer, then insert your bootable USB/CS/DVD to burn.

Step 2. After burning, insert it into your locked PC, then press F12 or ESC to enter the boot menu for most PC, you can follow the on-screen instructions to enter it. Then choose the boot tab to select the boot device priority. Last, click F10 to save and exit.
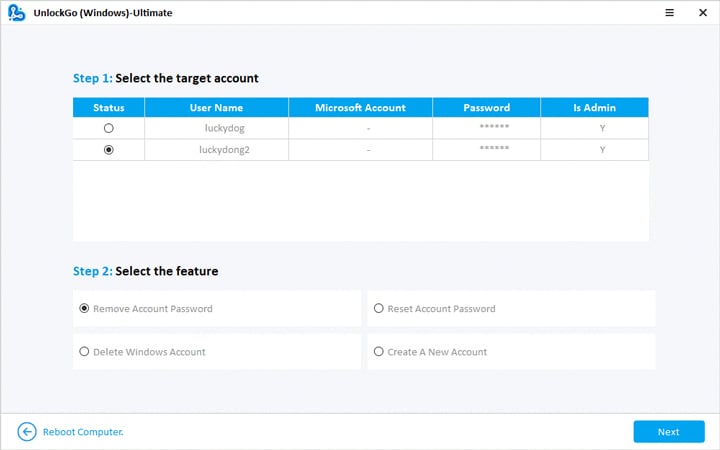
Step 3. After that, your locked PC will reboot, then it will show up a window asking for choosing windows system, then choose the target account to reset/remove account password. You can choose the features according to your requirement.
You can check this blog to see more windows 11 password recovery tools that can help you unlock windows 11 when locked out.
Conclusion
In conclusion, it is important to take measures to protect your data – whether it’s personal or professional. And the best way to do that is to password-protect your folders and lock your windows account.
By doing these things, you’ll be able to protect your data while also being able to access it whenever you need to. And if you choose to use UnlockGo – Windows Password Recovery to reset your password, then you can be sure of a secure and convenient experience. We hope this article was helpful to you in case of lock/unlock folder on windows 11. Do let us know your thoughts in the comments section below.
UnlockGo (Windows)
Reset/Remove Password on Windows 11
- Reset or Remove Windows Local, Admin, Microsoft, Domain account passwords.
- Create or Delete Windows Local Admin, Domain Admin, Guest accounts.
- Support All Windows system versions.