
Эта инструкция должна помочь, если при установке какой-либо программы в Windows 7, Windows 10 или 8.1 вы видите одно из следующих сообщений об ошибке:
- Служба установщика Windows 7 недоступна
- Не удалось получить доступ к службе установщика Windows. Это может произойти, если неверно установлен установщик Windows
- Не удалось получить доступ к службе установщика Windows Installer
- Возможно, не установлен Windows Installer
По порядку разберем все шаги, которые помогут исправить эту ошибку в Windows. См. также: какие службы можно отключить для оптимизации работы.
1. Проверить, запущена ли служба установщика Windows и есть ли она вообще

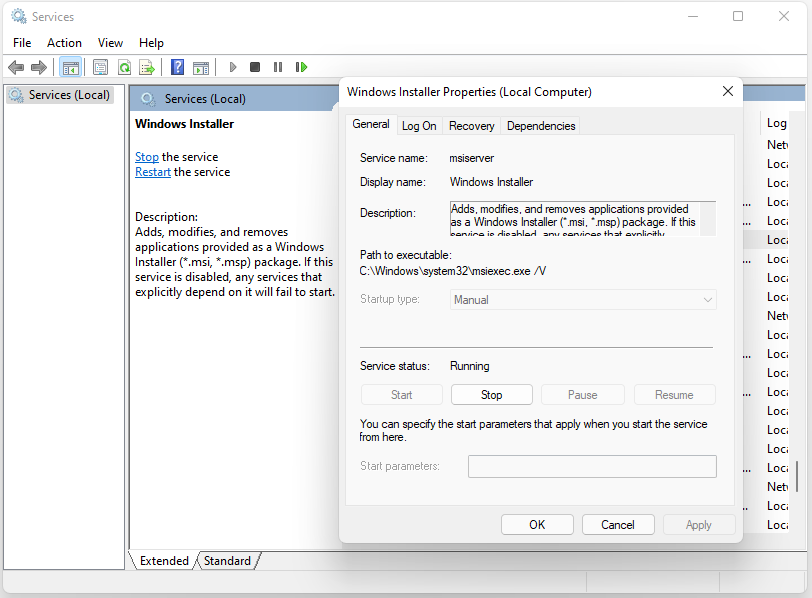
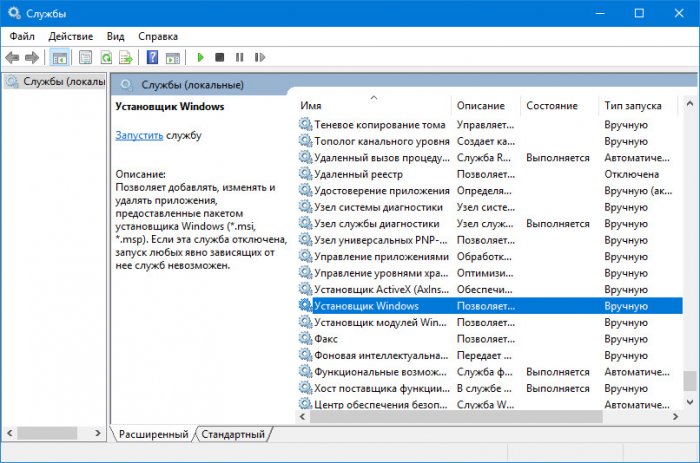
Откройте список служб Windows 7, 8.1 или Windows 10, для этого, нажмите клавиши Win + R и в появившемся окне «Выполнить» введите команду services.msc

Найдите в списке службу Установщик Windows (Windows Installer), дважды кликните по ней. По умолчанию, параметры запуска службы должны выглядеть как на скриншотах ниже.


Обратите внимание, что в Windows 7 можно изменить тип запуска для установщика Windows — поставить «Автоматически», а в Windows 10 и 8.1 данное изменение заблокировано (решение — далее). Таким образом, если у вас Windows 7, попробуйте включить автоматический запуск службы установщика, перезагрузить компьютер и попробовать установить программу снова.
Важно: если у вас нет службы Установщик Windows или Windows Installer в services.msc, или если она есть, но вы не можете поменять тип запуска этой службы в Windows 10 и 8.1, решение для этих двух случаев описано в инструкции Не удалось получить доступ к службе установщика Windows Installer. Там же описаны пара дополнительных методов исправить рассматриваемую ошибку.
2. Исправление ошибки вручную
Еще один способ исправить ошибку, связанную с тем, что служба установщика Windows недоступна — заново зарегистрировать службу Windows Installer в системе.

Для этого запустите командную строку от имени администратора (в Windows 8 нажать Win + X и выбрать соответствующий пункт, в Windows 7 — найти командную строку в стандартных программах, кликнуть по ней правой кнопкой мыши, выбрать «Запуск от имени Администратора).
Если у вас 32-битная версия Windows, то введите по порядку следующие команды:
msiexec /unregister
msiexec /register
Это перерегистрирует службу установщика в системе, после выполнения команд, перезагрузите компьютер.
Если у вас 64-битная версия Windows, то выполните по порядку следующие команды:
%windir%\system32\msiexec.exe /unregister
%windir%\system32\msiexec.exe /regserver
%windir%\syswow64\msiexec.exe /unregister
%windir%\syswow64\msiexec.exe /regserver
И также перезагрузите компьютер. Ошибка должна исчезнуть. Если проблема сохраняется, попробуйте вручную запустить службу: откройте командную строку от имени администратора, а затем введите команду net start MSIServer и нажмите Enter.
3. Сброс параметров службы установщика Windows в реестре
Как правило, второго способа оказывается достаточно для исправления рассматриваемой ошибки установщика Windows. Однако, если проблему так и не удалось решить, рекомендую ознакомиться со способом сброса параметров службы в реестре, описанный на сайте Microsoft: http://support.microsoft.com/kb/2642495/ru
Обратите внимание, что способ с реестром может не подходить для Windows 8 (точной информации на этот счет дать, не могу.
Удачи!
-
Home
-
News
- How to Enable/Disable Windows Installer Service on Windows 11
By Daisy | Follow |
Last Updated
If you want to enable or disable Windows Installer Service on Windows 11 but don’t know how to do that, then, you come to the right place. Besides, this post from MiniTool introduces other information about the Windows Installer Service. Now, keep on your reading.
What Is Windows Installer Service
Windows Installer Service is also called msiserver. The installation processes of the Windows operating system are managed by this service. Windows Installer Service is used to store application settings and installation information. In addition, it helps to track the locations of file groups, registry keys, and shortcuts that have been installed in the system. What’s more, it can add, modify, and delete applications, functions, and much other content.
Also see:
- 2 Ways to Enable Windows Installer in Safe Mode Windows 10
- Top 4 Ways to Windows Installer Service Could Not Be Accessed
How to Enable/Disable Windows Installer Service on Windows 11
Now, let’s see how to enable or disable Windows Installer Service on Windows 11. There are 3 ways available.
Way 1: Via Services
How to enable Windows Installer Service on Windows 11? The first method is to use Services. Here are steps:
Step 1: Press the Windows + R keys together to open the Run dialogue box, type services.msc and press the Enter key.
Step 2: The list of services will be displayed. Right-click the Windows Installer Service and select Properties.
Step 3: Under Startup type, select Automatic and click the Start button to enable it.
How to disable Windows Installer Service on Windows 11? You can follow the steps below:
Step 1: Open the Services application again. Find the Windows Installer Service and select it.
Step 2: Choose Properties and select Disabled from the Startup type box.
Step 3: Restart the computer.
Way 2: Via Registry Editor
The second method to enable or disable Windows Installer Service on Windows 11 is via Registry Editor. Follow the guide below:
Step 1: Press the Windows logo key and the R key at the same time to open the Run dialog.
Step 2: Type regedit and then press Enter to open Registry Editor. You’ll be prompted for permission and please click Yes to open it.
Step 3: Follow the path to locate the correct system files:
HKEY_LOCAL_MACHINE\SYSTEM\CurrentControlSet\Services\msiserver
Step 4: Right-click the Start item in the right panel to choose the Modify… option.
Step 5: Set the Value data to the following based on your needs:
Automatic: 2
Manual: 3
Disabled: 4
Automatic (Delayed Start): 2
Step 6: You need to click OK to save the changes.
Way 3: Via Command Prompt
You can also try to enable or disable Windows Installer Service via Command Prompt. Here is how to do that:
Step 1: Press Windows + R, type cmd in Run box, and press Ctrl + Shift + Enter. Click Yes in the pop-up User Account Control window to run Command Prompt as administrator.
Step 2: Type the following command and press Enter to enable the Windows Installer service.
net start MSIServer
Step 3: You can change the startup type of Windows Installer Service with the following command.
Automatic: REG add “HKLM\SYSTEM\CurrentControlSet\services\MSIServer” /v Start /t REG_DWORD /d 2 /f
Manual: REG add “HKLM\SYSTEM\CurrentControlSet\services\MSIServer” /v Start /t REG_DWORD /d 3 /f
Disabled: REG add “HKLM\SYSTEM\CurrentControlSet\services\MSIServer” /v Start /t REG_DWORD /d 4 /f
Automatic (Delayed Start): REG add “HKLM\SYSTEM\CurrentControlSet\services\MSIServer” /v Start /t REG_DWORD /d 2 /f
Final Words
This post has introduced information about Windows Installer Service. You can know how to enable Windows Installer Service and how to disable Windows Installer Service.
About The Author
Position: Columnist
Having been an editor at MiniTool since graduating college as an English major, Daisy specializes in writing about data backups, disk cloning, and file syncing as well as general computer knowledge and issues. In her free time, Daisy enjoys running and going with friends to the amusement park.
Иметь дело с распространяемыми в виде MSI-установщиков приложениями приходится нечасто, но почему-то именно они вызывают у пользователей больше всего проблем. Самая распространенная из них проявляется ошибкой «Не удалось получить доступ к службе установщика Windows Installer», причем столкнуться с ней вы можете в любой версии Windows. В большинстве случаев появление ошибки связано с некорректной работой соответствующей службы — установщика Windows или msiserver. Чаще всего при проверке она оказывается отключена. Убедиться, что со службой всё в порядке можно следующим образом.
Не удалось получить доступ к службе установщика Windows Installer
Откройте командой services.msc оснастку управления службами и отыщите в списке элемент «Установщик Windows».
По умолчанию эта служба находится в неактивном состоянии, а тип её запуска выбран «Вручную».
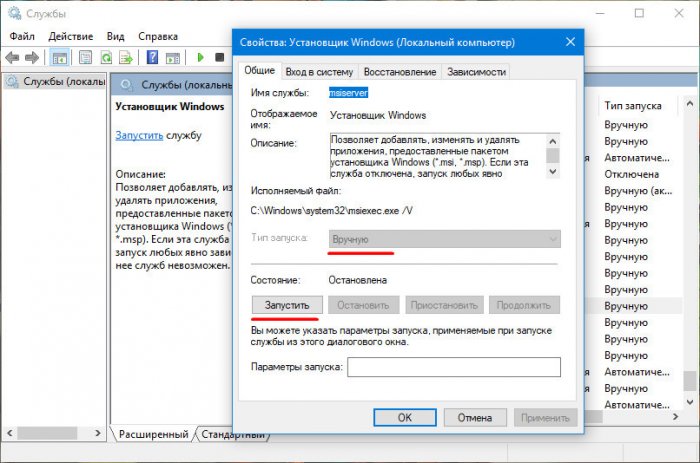
По идее, при запуске исполняемого MSI-файла она должна автоматически активироваться, но этого не произойдёт, если по какой-то причине тип запуска будет установлен «Отключена». Нужно изменить настройки, выбрав в выпадающем списке опцию «Вручную», но скорее всего настройки окажутся недоступными, что характерно для Windows 10. Придётся действовать в обход.
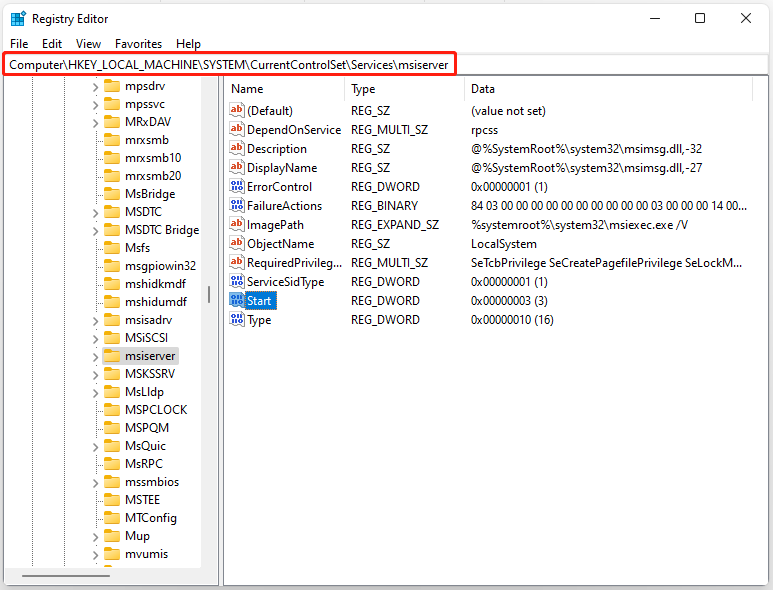
Откройте в редакторе реестра ключ HKEY_LOCAL_MACHINE/System/CurrentControlSet/Services/msiserver и измените значение параметра Start с 4 на 3, а затем перезагрузитесь.
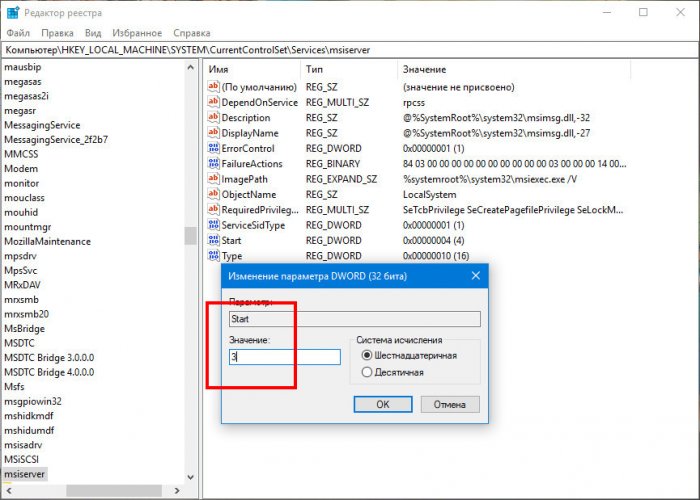
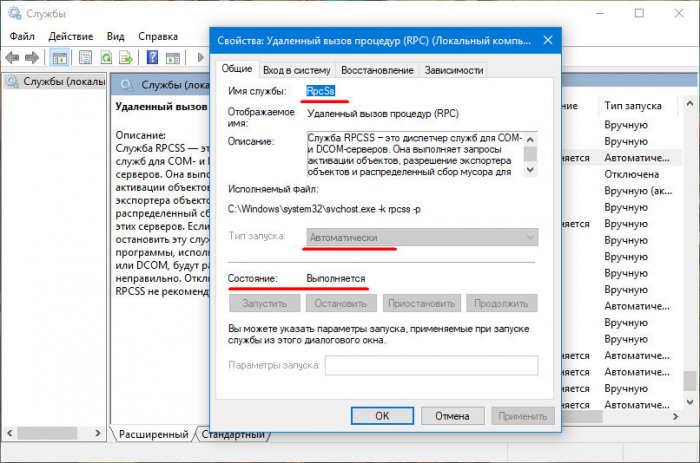
Тип запуска изменится на «Вручную», а кнопка запуска станет активной. Чтобы установить тип запуска «Автоматически», значение Start необходимо заменить на 2. Поскольку служба msiserver является зависимой, рекомендуем также проверить состояние службы «Удалённый вызов процедур RPC». Она должна быть запущенной и тип запуска иметь «Автоматически».
Может статься, что службы «Установщик Windows» вообще не окажется в списке. Наиболее вероятная тому причина — повреждение отвечающих за неё данных в реестре. В этом случае попробуйте её восстановить, выполнив слияние файла Windows_Installer.reg, доступного по ссылке
https://cloud.mail.ru/public/2eVp/mWmQUP8FG
. После применения твика нужно будет перезагрузить компьютер. Можно также выполнить обновление операционной системы до последней актуальной сборки, если такой вариант для вас приемлем.
Неплохо также будет проверить настройки политики установщика Windows. Командой gpedit.msc вызовите редактор локальных политик и перейдите по цепочке Конфигурация компьютера — Административные шаблоны — Компоненты Windows — Установщик Windows. Все политики должны иметь состояние «Не задано».

Аналогичным образом проверьте настройки в разделе «Конфигурация пользователя».
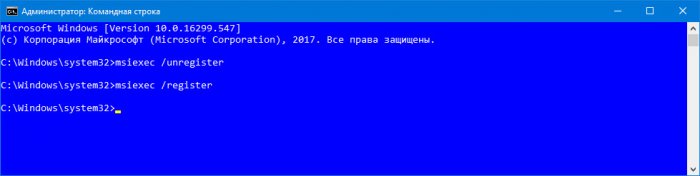
Наконец, восстановить нормальную работу службы установщика Windows можно путём её ручной перерегистрации. Для этого открываем от имени администратора командную строку и последовательно выполняем команды, указанные в этом текстовом файле —
https://cloud.mail.ru/public/9bBp/bYNiRVB82
. После повторной регистрации службы компьютер следует перезагрузить, а затем запустить службу установщика командой net start MSIServer, если вдруг по какой-то причине она не стартует сама.
In this article, we will explore what happens during a Windows
Installer registration and what are the repercussions that appear if you
don’t register your MSI during installation.
Also, we will see how to disable Windows Installer registration
altogether (which is not a recommended practice) — and the difference
between hiding your MSI from the Add/Remove Programs and not registering
it with Windows Installer.
Let’s start by going through what happens when you register
your MSI.
What happens when you register your MSI with Windows Installer and
how to find it?
When an MSI is installed on a machine, it is automatically
registered with Windows Installer — and you can find it in the
Add/Remove Programs. It includes all the options that you configured for
it (e.g. uninstall, repair, upgrade, etc.), and it can be easily
identified by the OS, allowing for quicker access.
Although the access to the MSI through the Add/Remove Programs
is helpful for users, it does not always reflect how many products are
installed within the MSI on the machine.
For developers or IT Pros, it’s best to access the MSI with a
PowerShell command instead of going through the Add/Remove Programs to
run specific scripts or make more advanced modifications to it.
One way to quickly find your registered MSI is by using the
Win32_Product WMI class.
Enter a PowerShell command line to retrieve all the MSI
products that are installed (and registered) on your
machine:
get-wmiobject Win32_Product | Sort-Object -Property Name |Format-Table IdentifyingNumber, Name, LocalPackage -AutoSize

The Differences Between Hiding Your MSI and Windows Installer
Registration
If you don’t want users to tamper with an MSI, you can hide it
from the Add/Remove Programs.
Do not mistake hiding the MSI from Add/Remove Programs with the
non-registration of the product. The product is still registered on the
machine; it just doesn’t appear in the Add/Remove Programs.
You can hide your MSI entry in the Add/Remove Programs using
Advanced Installer.
You can try Advanced Installer for free through the 30-day, Full-Featured Trial.
Go to the Product Details
Page and check the “Do not show in list”
option.

Even if you hide your MSI from the Add/Remove Programs, it is still
registered.
The RegisterProduct action
stores the Windows Installer database package on the local computer (but
not completely).
When you register an MSI, a small cached version of it is
stored in the C:\Windows\Installer folder. This cached MSI
contains important information for the repair and uninstall
actions.
For example, a cached MSI can contain the binaries of the
custom actions used for uninstalling the product, the registry, the INI
files stored in the INIFile Table, etc.
However, it will not contain the actual files that are placed
during the installation. So, if you have a 700MB MSI, the cached version
will have only 1 or 2 MB of data.
As a last point, during the registration of an MSI, a specific
ProductID is placed in the following registry location:
HKEY_LOCAL_MACHINE\SOFTWARE\Classes\Installer\Products\
In that registry location is where information such as the
source list (where the MSI was installed from), transforms, language,
etc. is stored. This is useful in some instances, such as recaching an MST.
If you want to find out how that ProductID is created, check out
this article: How does the MSI
Registration ProductID look like and where to find it?
How to Disable Windows Installer Registration?
Now that we know what it means to register your MSI with
Windows Installer, and how to hide it from the Add/Remove Programs —
let’s see how to disable that action.
Remember: We don’t really recommend disabling
Windows Installer registration for your MSI, but here’s how you can do
it if you absolutely need to.
In Advanced Installer, this can be easily done by navigating to
the Product Details Page and
unchecking the “Register product with Windows Installer”
option.

This action deletes the RegisterProduct Action from
the InstallExecuteSequence
table. It registers the product information with the installer and with
the Add/Remove Programs while storing the Windows Installer database
package on the local computer.
What are the repercussions of disabling MSI registration?
The repercussions are quite big, if you leave this option
unchecked (therefore not registering your MSI), you will not be able to
remove, repair or reinstall the application by using the Control Panel,
the Windows Installer command-line options or the Windows Installer
application programming interface (API).
This means that once you install your MSI package, you will
never be able to remove it from the system in any way(not even
programmatically).
Also, since the OS will not recognize that the MSI is present
on the machine, no patches for the
MSI can be installed.
The WMI class that we talked about earlier will not see the
MSI, and the ProductID created in the registry will be gone.
In short, the system will never know that an MSI was installed
on it.
Conclusion
To wrap this up, we recommend to always register your MSI with
Windows Installer. The whole point of an MSI is to easily keep track of
the installed applications so that you can manipulate them when needed.
And, if you don’t want it to show in the Add/Remove Programs,
you can just hide it.
Not registering your MSI only works for very specific
situations and should only be done by experienced developers. It could
be useful in some scenarios, for example, when you want to make certain
OS changes that you never want to be reverted by the users in any way,
or when you want to create a suite
installation.
Let us know if you found this information useful.
Subscribe to Our Newsletter
Sign up for free and be the first to receive the latest news, videos, exclusive How-Tos, and guides from Advanced Installer.