
Applies ToWindows 11 Windows 10
A tablet pen can enhance your interaction with your device, making tasks more intuitive and efficient. Imagine sketching your ideas directly onto the screen with the fluidity of a traditional pen, but with the added benefits of digital tools. The tablet pen allows for precise control, making it perfect for drawing, note-taking, and even navigating through your device. A pen isn’t intended to replace the mouse or keyboard but enhance the way you work and create.
When you use a pen with Windows, it provides a natural feel. The pressure sensitivity and tilt recognition mimic the experience of using a real pen, making it an ideal tool for artists and designers. For students, it means taking notes in a more organized and interactive way, with the ability to highlight, annotate, and even convert handwriting to text.
A pen can also help you be more productive. You can quickly jot down ideas, mark-up documents, and easily navigate through presentations. The integration with Windows Ink Workspace further enhances its utility, offering a suite of tools designed to make your pen experience even more powerful.
This article describes some of the common actions and settings in Windows to make the most of your pen.
A tablet pen uses Bluetooth to connect to your PC, so first must be paired in Windows. To pair your pen with your PC, use the following steps:
-
Select Start and then select Settings > Bluetooth & devices .
Or
Select the following Bluetooth & devices shortcut:
Open Bluetooth & devices
-
Make sure your pen is in pairing mode. This action varies among pen types. For example, with the Surface Pen, press and hold the top button of your pen for 5-7 seconds until the LED flashes white to turn on Bluetooth pairing mode.
-
Select Add device.
-
In the Add a device window, select Bluetooth.
-
Select the name of your pen. For example, «Surface Pen.»
-
After it connects, select Done to close the window.
-
For more information, see Pair a Bluetooth device in Windows.
The pen menu in Windows 11 makes it easy for you to access your favorite apps.
By default, the pen menu includes shortcuts to OneNote, Whiteboard, Snipping Tool, and Journal.
Show pen menu on taskbar
You may need to enable the pen menu to show on the taskbar.
-
Right-click on the taskbar and select Taskbar settings , or use the following shortcut:
Taskbar
-
Under System tray icons, enable Pen Menu.
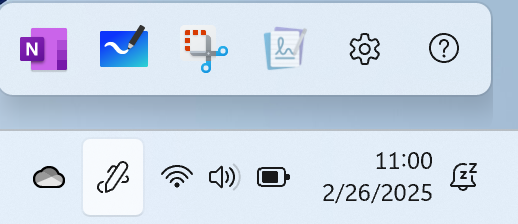
You’ll then see the Pen icon in the taskbar system tray.
To open the pen menu, tap the Pen icon.
Tip: If your pen has a shortcut button, you may be able to customize its function to open the pen menu. For example, see How to use your Surface Pen.
Add or remove shortcuts
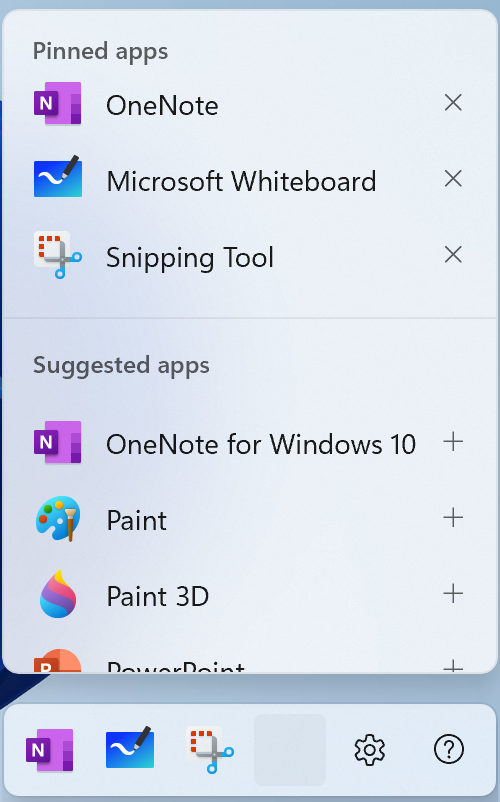
You can add up to four apps as shortcuts to your pen menu.
-
Select the pen menu in the corner of the taskbar.
-
When the pen menu appears, select Settings then Edit pen menu .
-
To remove an app from your pen menu, select the remove icon next to the app in the list of pinned apps.
Tip: You can only pin four apps to the pen menu. You can’t add an app if four apps are already pinned.
-
To add an app to an available slot on your pen menu, scroll to find the app in the list of suggested apps or all apps. Then select the add icon next to the app.
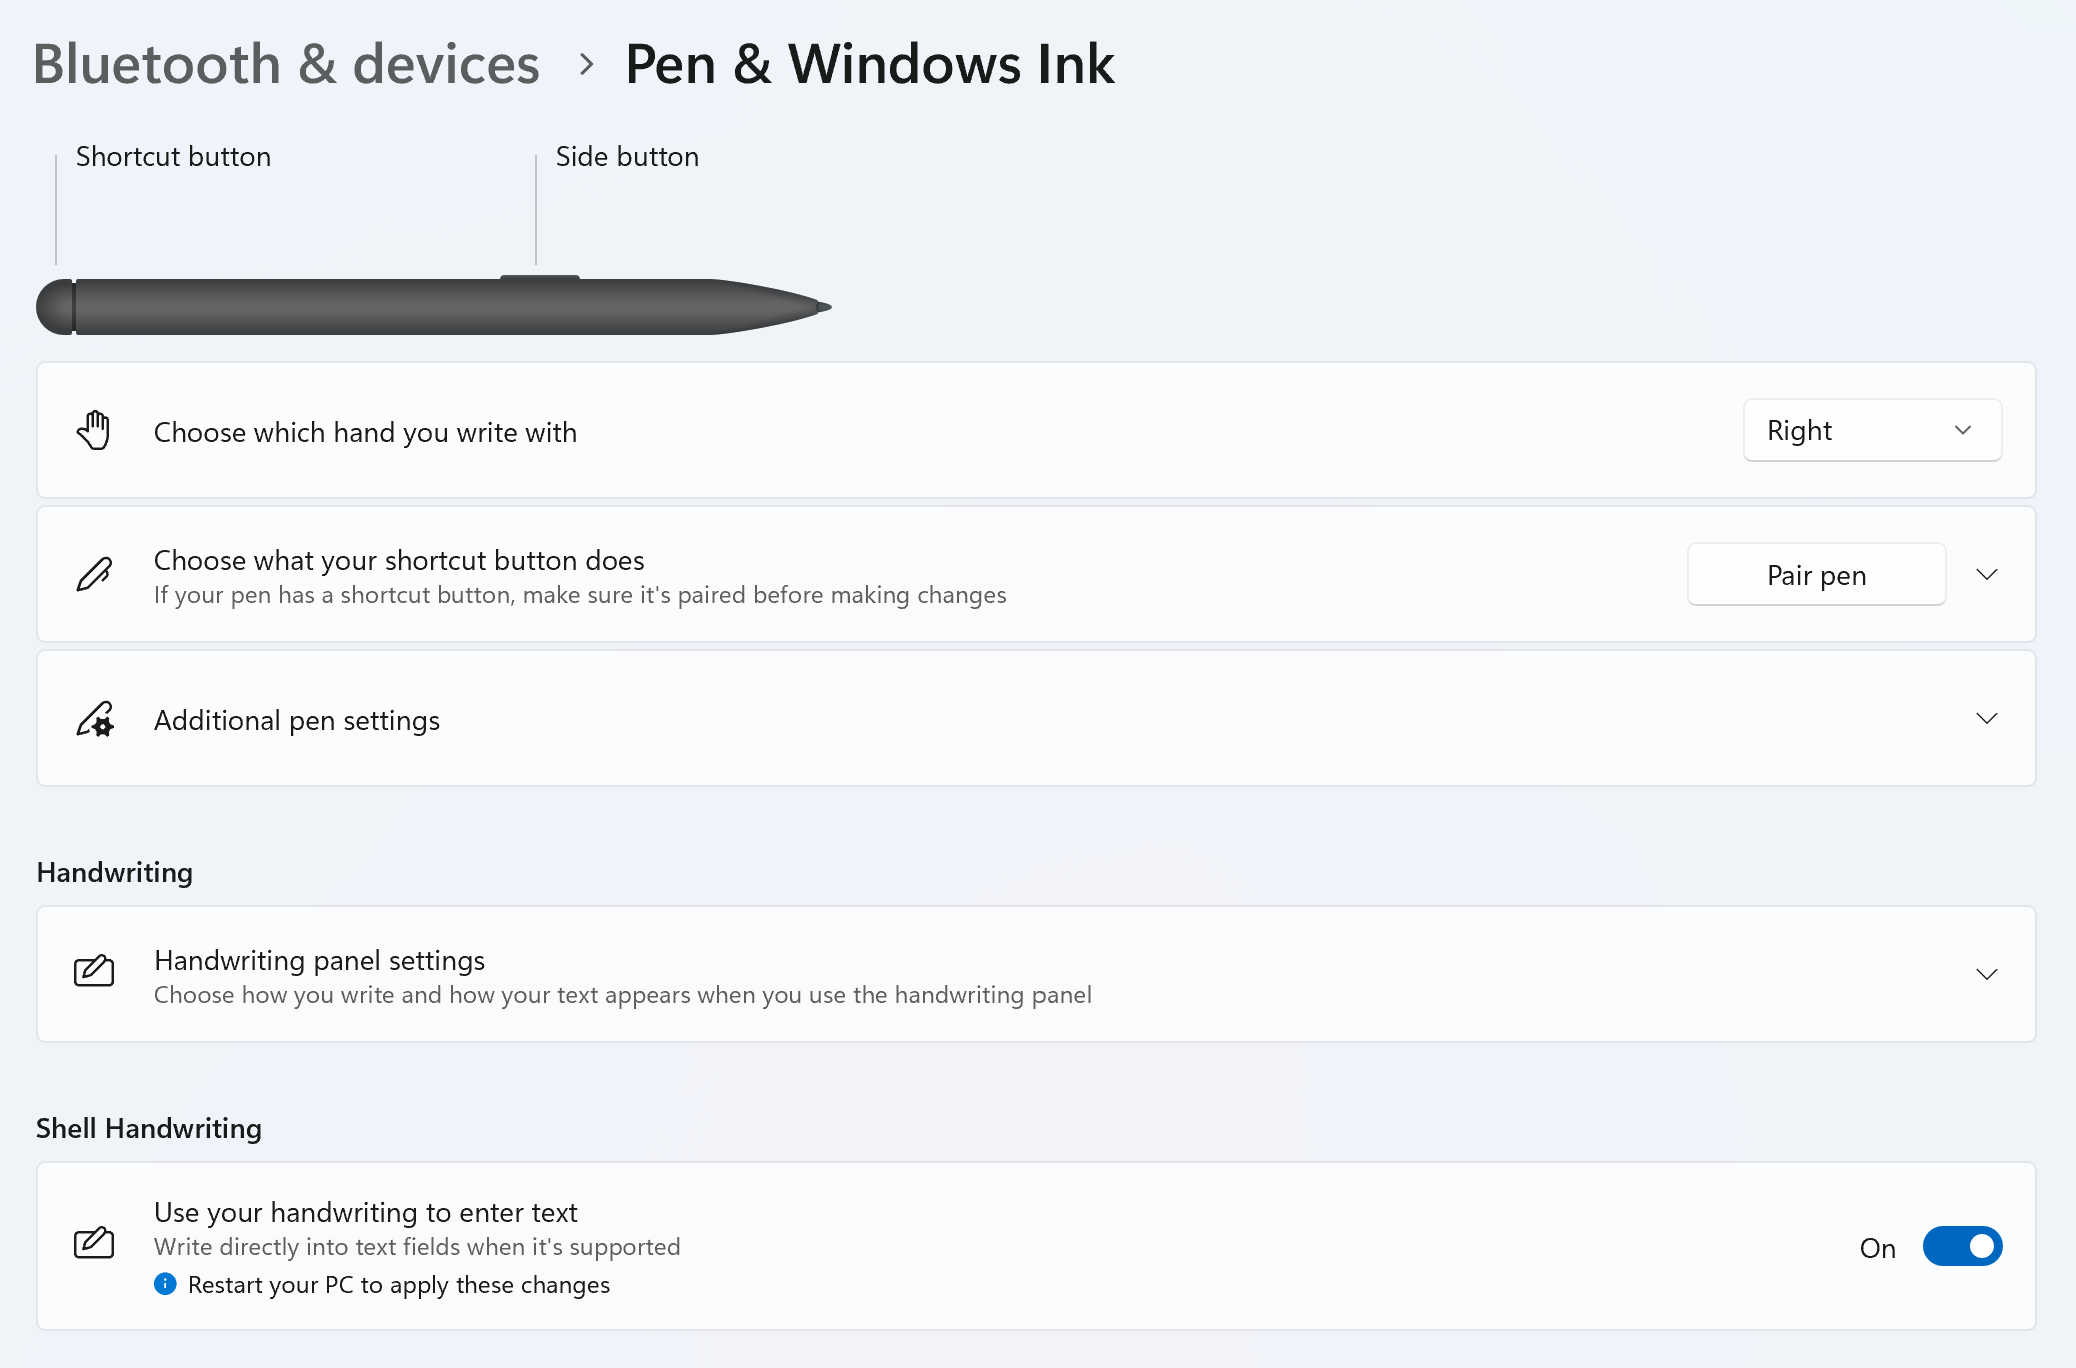
Customize what your pen does and how it works with your PC. Choose which hand you write with or what your PC does when you tap, double-tap, or hold down the pen’s shortcut button.
To change your settings, select Start > Settings > Bluetooth & devices > Pen & Windows Ink .
Or use the following shortcut:
Open Settings
Most digital pens for Windows are rechargeable or have a replaceable AAAA battery. Before you begin, check the instruction manual that came with your pen.
For most pens, you can replace the battery by unscrewing the end of the pen. If you need more specific instructions, check with your pen manufacturer.
For example, to replace the battery in a Surface Pen with no clip, pull the top end straight out from the bottom. For more information on other Surface Pen models, see Change Surface Pen batteries.
Related articles
-
Ink experience
-
Draw and sketch notes in OneNote
-
Whiteboard help & learning
-
Use Snipping Tool to capture screenshots
-
Microsoft Journal Help and Learning
-
Surface Pen help & learning
-
Identify your Surface Pen and features
-
Surface app in the Microsoft Store
Need more help?
Want more options?
Explore subscription benefits, browse training courses, learn how to secure your device, and more.
Written By
published
October 10, 2016
Today, we’re talking about how to get started with Windows Ink* in four easy steps. Windows Ink is part of the Windows 10 Anniversary Update and lets you capture ideas quickly and naturally with a pen or touch-enabled device.
Get started with the Windows Ink Workspace

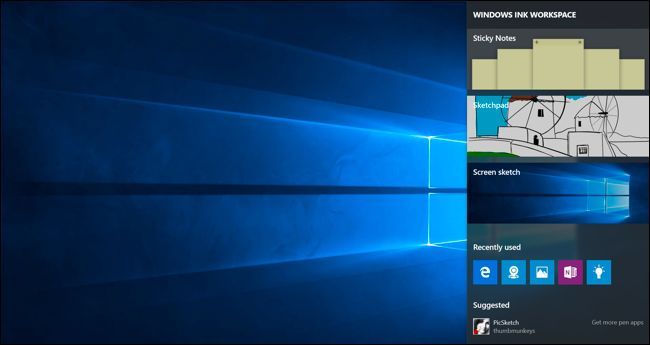
First, find the Windows Ink Workspace, your canvas for all the ink-powered features and apps on your PC. The Workspace has built-in experiences like sketchpad, screen sketch and Sticky Notes, as well as apps optimized for pen use.
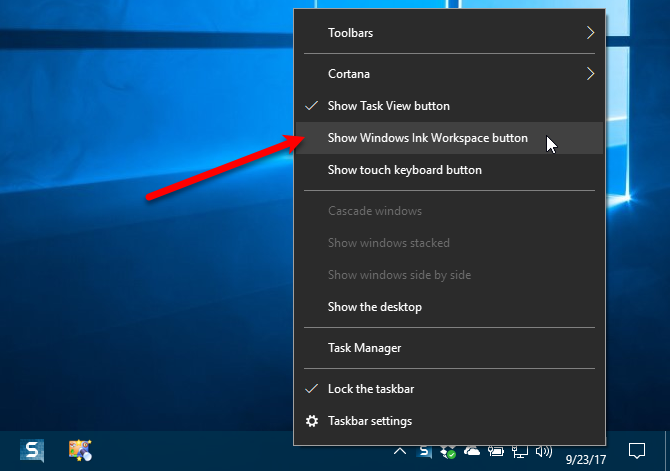
Press the Windows Ink Workspace button in your system tray at the bottom right of your screen or click the back of your pen**! If you don’t see the icon, right-click anywhere in the system tray and click on “Show Windows Ink Workspace Button.”
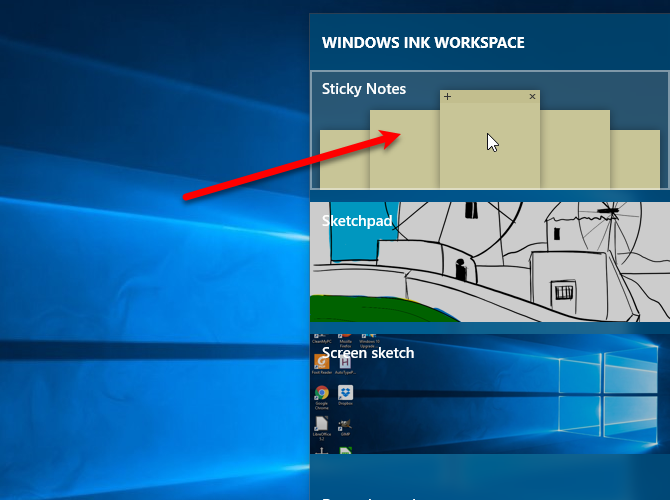
Take notes that become smart and active with Sticky Notes
You can find Sticky Notes in the Start menu or at the top of your Windows Ink Workspace. Write an address and Maps readies it for finding a route; jot down a few items and they become an easy-to-manage checklist; scribble down an email address and it tees up in your Mail app.*** And, with Cortana, you can simply jot down a time or date with your note and it will be highlighted. You can then tap on it to create a Cortana reminder, available across all the devices you have Cortana installed on. 1
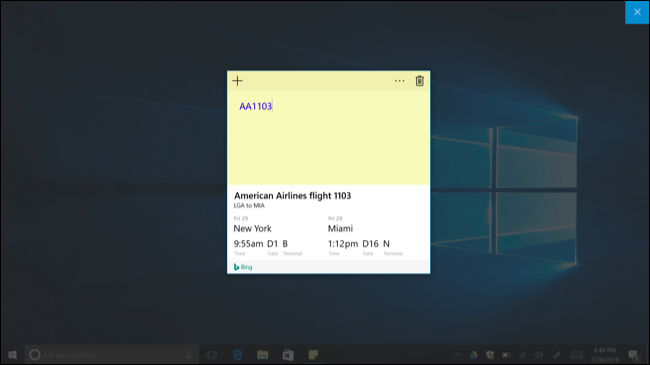
You can even write down a flight number and click on the text when it turns blue to track the flight right in the Sticky Note***.
Create in the sketchpad and trace with the digital ruler
The sketchpad in the Windows Ink Workspace is a simple blank canvas where you can quickly and easily draw an idea, doodle, create, and solve problems.
You can also use the digital ruler with Windows Ink to measure distance or trace along a straight edge, just like on paper! Head to the sketchpad or screen sketch within the Windows Ink Workspace and click on the ruler icon in the upper right-hand corner of the toolbar. Then, adjust the digital ruler and with your pen (or finger, if you click on the “touch writing” icon) to draw sharp lines along the edge.
Draw, crop and markup your desktop with screen sketch
Screen sketch lets you draw on a screen capture of your entire desktop – allowing you to collaborate on documents as though you would with pen and paper or add your personal touch to an awesome picture you saw in the Photos app, then easily share this with the rest of your world. Screen sketch is designed to be the most natural way to freely express emotions and personalize content, so you can draw, crop and mark up the entire image. Similar to the sketchpad, it’s easy for you to save and share these creations with your friends and colleagues.
If you aren’t running the Windows 10 Anniversary Update yet, learn how to get it here.
Have a great week!
*Touch-capable tablet or PC required. Pen accessory may be sold separately.
**User must enable in settings and have a Bluetooth button on pen.
1Available in select markets; experience may vary by region and device.
***US only
In Windows 10, Microsoft added a new feature for fans of digital pens called the Windows Ink Workspace. With this new feature, you get a centralized spot built into Windows 10 for your system’s pen-friendly apps.
Many users will never see the Ink Workspace if they aren’t using a digital pen with their PC. Nevertheless, Microsoft makes it possible for non-pen users to turn on the Ink Workspace in Windows 10 and check it out.
Ian Paul Activate the Ink Workspace with a right-click.
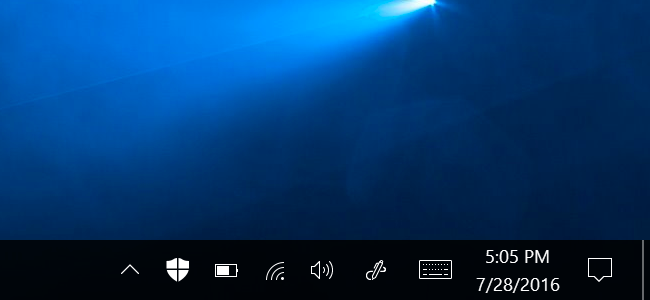
Right-click anywhere on the taskbar and from the context menu select Show Windows Ink Workspace button. An icon of a pen writing in an “S” shape will appear in the notifications area to the far right.
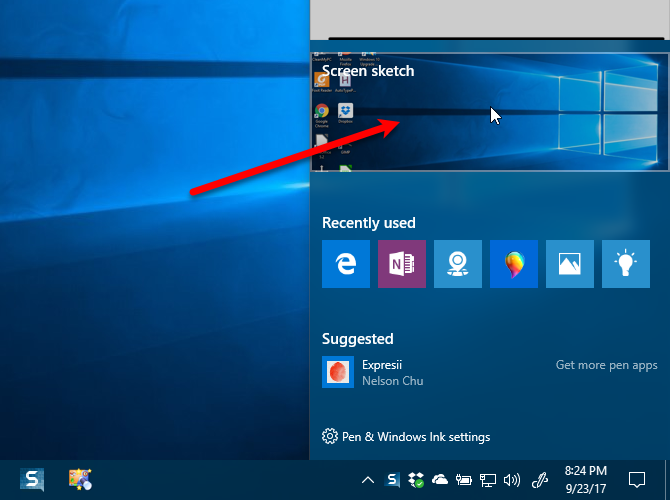
Click on that and the Ink Workspace appears. By default it includes Sticky Notes—an app that’s accessible outside of Workspace—as well as some apps you may not be familiar with, such as Sketchpad and Screen Sketch.
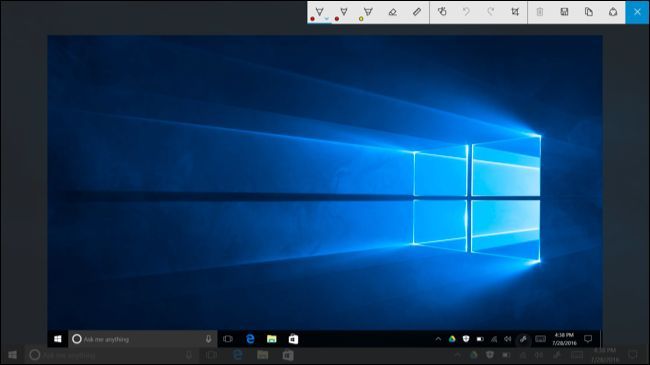
Sketchpad is a drawing app that can be fun to play with even if you don’t have a digital pen. Tapping on Screen Sketch, meanwhile, takes a quick screenshot of your desktop—a handy tool in any event—and from there you can draw directly on the screenshot using the pen tools provided inside the app.
Ian Paul Screen Sketch for Windows 10.
If you just wanted to use Screen Sketch to take a screenshot without drawing on it, click the save icon to archive it on your hard drive. Screen Sketch includes some quick sharing options for your screenshots based on your installed apps such as Twitter, Facebook, Mail, and OneNote.
The Ink Workspace also has a section for suggested pen-enabled apps from the Windows Store, as well as your recently used apps that have pen-friendly features.
That’s about all there is to the Ink Workspace. It’s not something you necessarily need to turn on, but for those who are curious to see it in action, the Ink Workspace is only a few clicks away.
Quick Links
-
How to Open the Windows Ink Workspace
-
How to Launch and Find Pen-Enabled Apps
-
How to Use Sticky Notes, Sketchpad, and Screen Sketch
-
How to Configure Your Pen and Customize the Workspace
-
How to Disable the Windows Ink Workspace Icon
Windows 10’s Anniversary Update improves on Windows 10’s stylus support with a new «Windows Ink Workspace» feature. It’s designed to make using a digital pen faster and easier with a Windows 10 tablet or convertible device.
Aside from being a dedicated launcher for pen-enabled apps, the Windows Ink Workspace includes new Sticky Notes, Sketchpad, and Screen Sketch applications. You’ll also find more options for controlling how your pen functions in the Settings app.
How to Open the Windows Ink Workspace
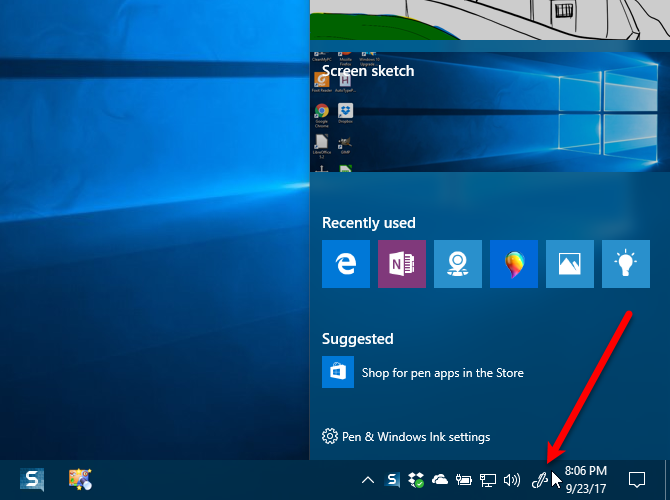
To launch the workspace, click or tap the pen-shaped Windows Ink Workspace icon that appears in your notification area.
If you have a stylus or digital pen with a shortcut button, you can also quickly launch the Windows Ink Workspace by pressing the button on the pen. For example, if you have a Surface Pen, you can press the button on the pen to launch the workspace. That’s the default setting, at least—you can customize what the button does from the Settings app.
How to Launch and Find Pen-Enabled Apps
The Windows Ink Workspace is like a Start menu for getting stuff done with a pen. Rather than hunting down individual apps, you just grab your pen, press the button, and then tap the app you want to use with the pen.
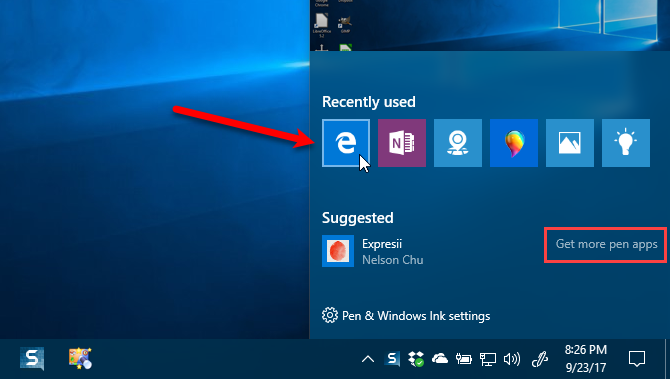
It opens as a sidebar on the right side of your screen and provides quick access to apps like the new Sticky Notes, Sketchpad, and Screen Sketch tools, along with quick shortcut tiles to launch pen-enabled apps you recently used. These shortcut tiles are just another way to find and launch pen-enabled apps without your other installed applications getting in the way.
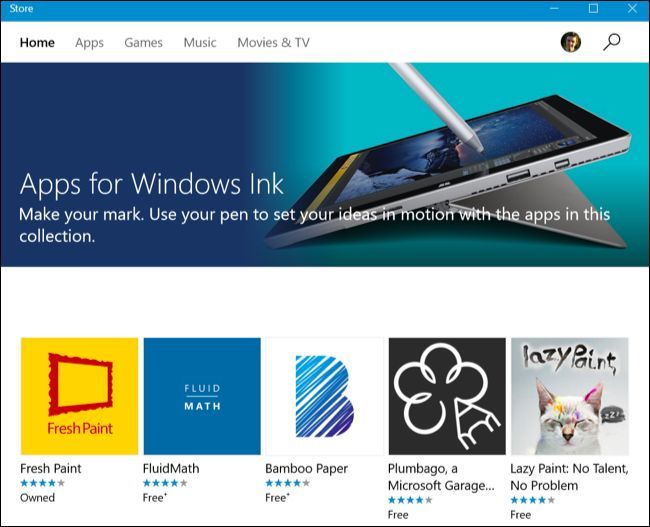
You’ll also see «Suggested» apps from the Windows Store here, and you can click or tap «Get more pen apps» to view a special page on the Windows Store that lists only pen-enabled apps. This gives you a faster way to find pen-enabled apps, like Microsoft’s own Fresh Paint application for digital art.
How to Use Sticky Notes, Sketchpad, and Screen Sketch
The three main Windows Ink Workspace apps are provided by Windows and designed to make using your pen easier and faster.
Use Sticky Notes to jot down notes with a pen (or just type them out with your keyboard) and refer to them later. Sticky Notes is a more lightweight app that’s ideal for quick notes. For more detailed, extensive note-taking, you’re probably better off with Microsoft’s OneNote.
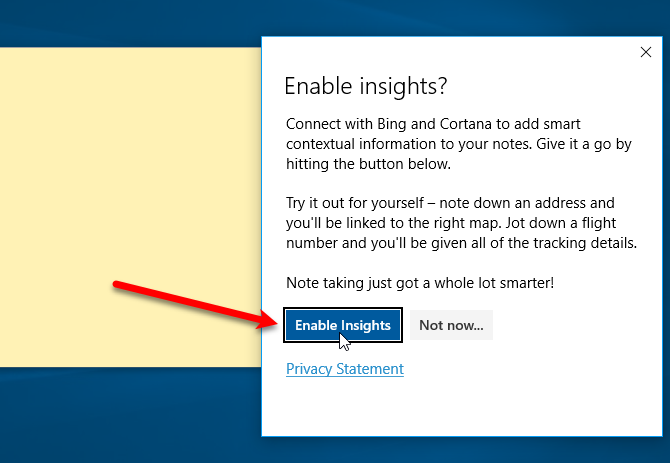
When you open Sticky Notes, you’ll be asked if you want to «Enable insights», which will make Windows use character recognition read your sticky notes and use Bing and Cortana to provide more detailed information. For example, if you jot down a flight number, Sticky Notes will perform character recognition, recognize the flight number, and turn it into a link. Click or tap the link to view up-to-date details about that flight number. This is entirely optional, and the main purpose of the Sticky Notes app is just for writing notes with a pen or your keyboard.
Sketchpad is basically just a digital whiteboard. You’ll find options for choosing different styles of writing, from thin pencil to colored pens and thicker highlighters of different colors. There’s also a virtual ruler you can enable that will allow you to draw a completely straight line. Place the ruler, draw, and your line will stay snapped to the edge of the ruler. You can save an image of your whiteboard to an image file or use the share button to send it to someone through another app.

Screen Sketch is a fairly simple tool that allows you to mark up your screen. When you launch Screen Sketch, it will take a screenshot and give you drawing tools you can use to annotate it. Draw or write whatever you want over your screen, and then you can save the sketch to an image file and send it to someone or use the share button to share it with another app.
If you just want to save a screenshot without annotating it, use the Windows+PrintScreen keyboard shortcut instead.
How to Configure Your Pen and Customize the Workspace
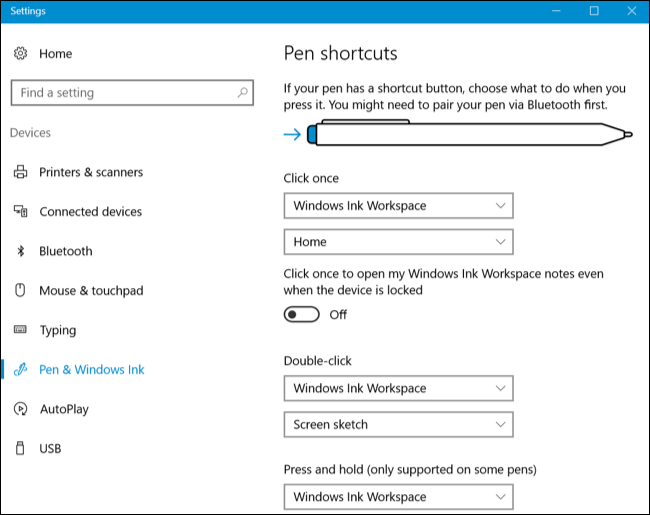
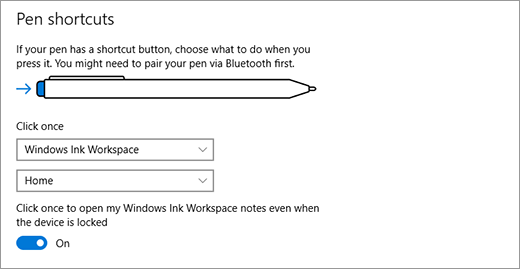
To customize the Windows Ink Workspace, head to Settings > Devices > Pen & Windows Ink. You’ll find a variety of options for controlling your pen and the Windows Ink Workspace here. For example, you can tell Windows whether you write with your right or left hand and choose what the button on the pen does when you click, double-click, or long-press it.
How to Disable the Windows Ink Workspace Icon
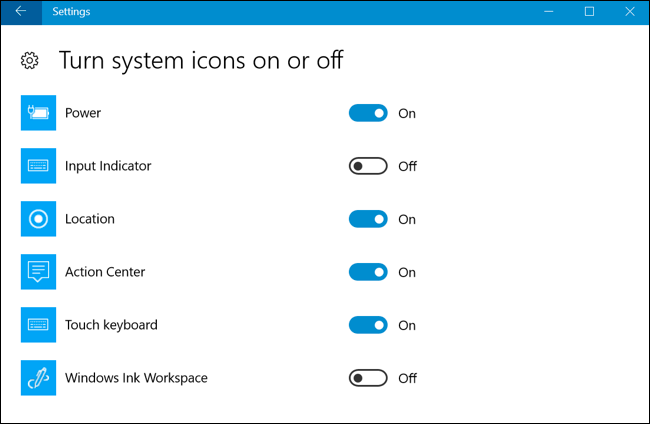
If you don’t plan on using a pen with Windows 10 and you want to get the Windows Ink Workspace off your taskbar, you can turn it off just like you’d turn off other system icons.
To do this, head to Settings > Personalization > Taskbar > Turn System Icons On or Off. Locate the Windows Ink Workspace icon here and set it to «Off».
Windows Ink has been a part of Windows 10 since late 2016. The Windows Ink Workspace is a set of apps designed for touch-enabled devices. Combined with an active stylus, or pen, you can quickly jot down notes in the Sticky Notes app, sketch ideas in the Sketchpad app, or makes notes on screenshots in the Screen Sketch app.
You don’t need to have a device with a pen, like a Surface Pro 4. You can use Windows Ink Workspace on any Windows 10 PC, with or without a touchscreen. Having a touchscreen allows you to write on the screen with your finger in the Sketchpad or Screen Sketch apps.
Here is our hands-on guide to using Windows Ink Workspace on your Windows 10 PC or device. We didn’t have a pen to test on our Windows 10 touchscreen laptop.
Open the Windows Ink Workspace
If you have a Surface Pro device, press the button on the pen to open the Windows Ink Workspace. If you’re using a Windows 10 PC with or without a touchscreen, but no pen, you may need to add the Windows Ink Workspace button to the Taskbar.
The button looks like script capital «I» and would be on the right side of the Taskbar next to the time and date. If you don’t see the button, right-click on an empty area on the Taskbar and select Show Windows Workspace button from the popup menu.
To open the Windows Ink Workspace, click the button that now appears on your Taskbar.
Jot Down Notes and Create Reminders With Sticky Notes
Sticky Notes has been part of Windows for a while, but the Windows Ink Workspace links your sticky notes to Cortana. When you enter a reference to a day or time, like «tomorrow,» you can let Cortana remind you of the event you write on the note. If you enter a flight number, Cortana will fetch the flight status from Bing. If you’re using multiple Windows devices, your Sticky Notes will be synced across them.
Click the Windows Ink Workspace button on the Taskbar and then click Sticky Notes at the top.
To be able to use the integrations with Bing and Cortana, you must enable insights. When the dialog box pictured below displays, click Enable Insights.
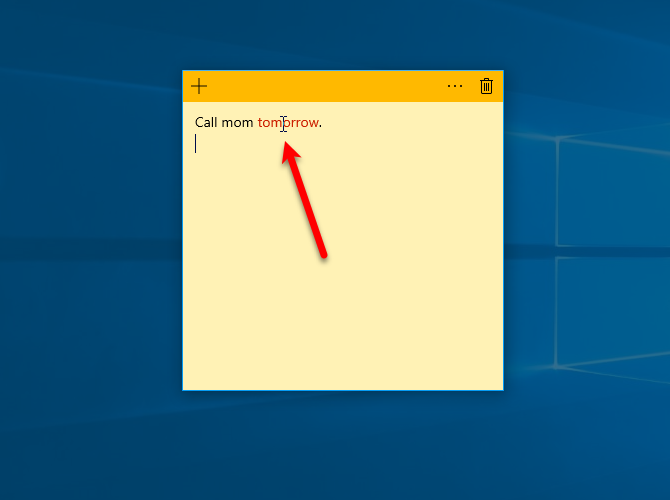
If you have a pen for your device, write a message on the sticky note. Or type the note if you don’t have a pen. You’ll notice that any day or time you put on the note turns red. To create a reminder from your note, click the red text.
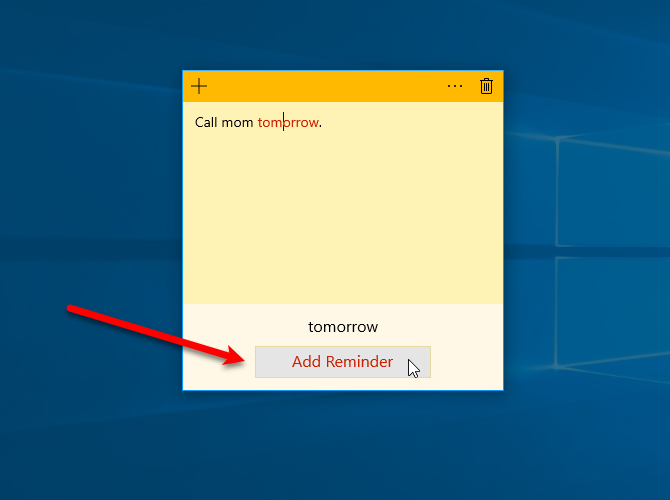
Next, click the Add Reminder button that displays at the bottom of the note.
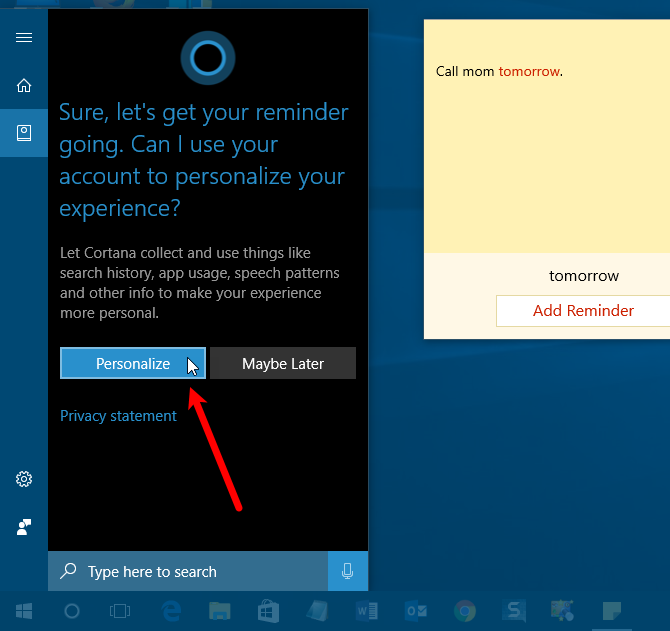
Cortana pops up asking to use your Microsoft account to personalize your experience. Click Personalize.
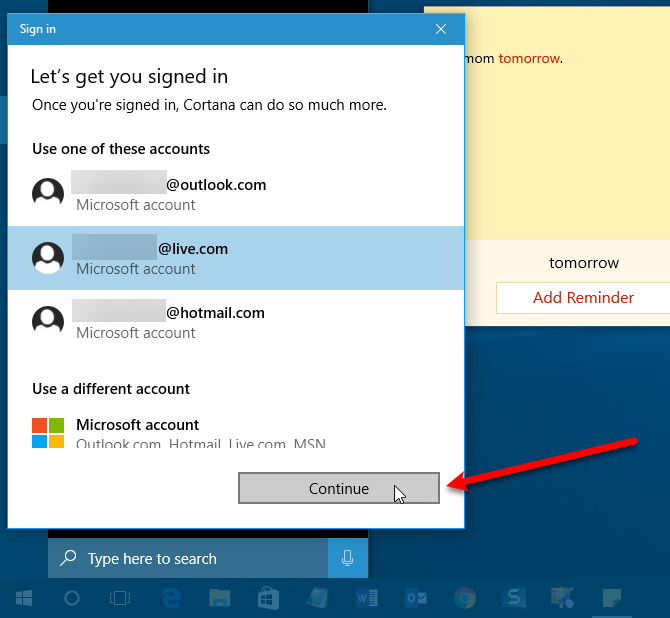
Select the account you want to use and click Continue. You can use a live.com, outlook.com, or hotmail.com account.
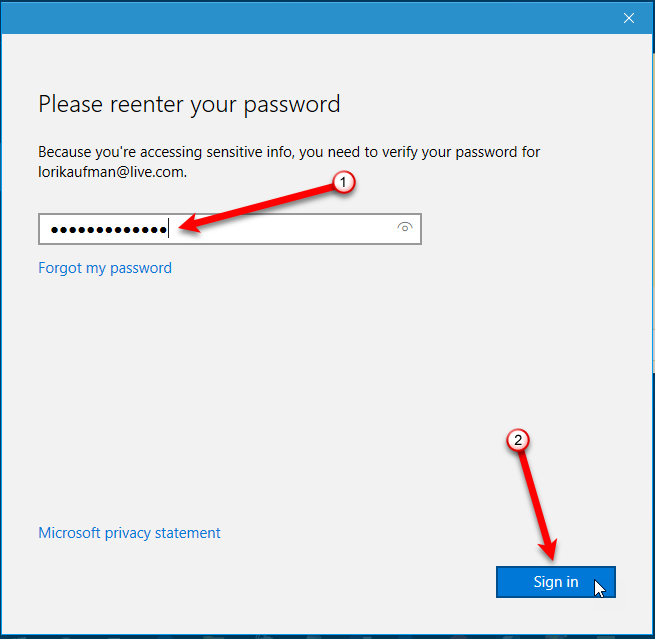
Even though you’re already signed into Cortana, you must re-enter your password again because you’re accessing sensitive information. Then, click Sign in.
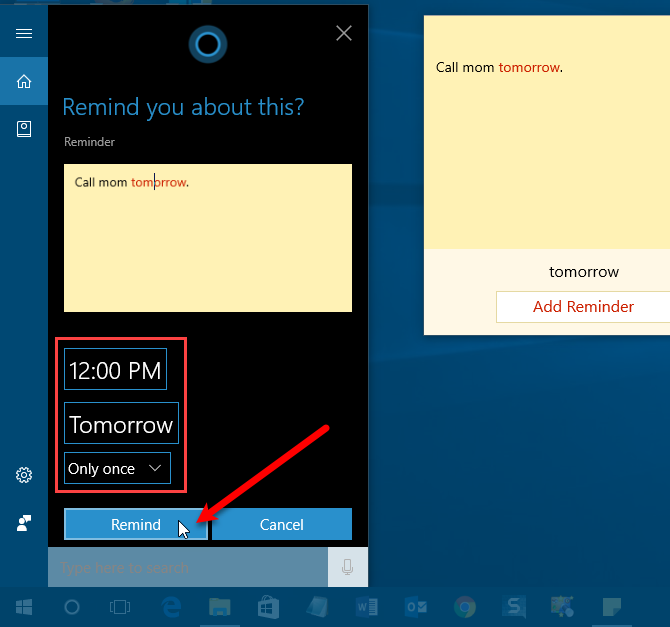
Set the time and date and select the frequency and then click Remind.
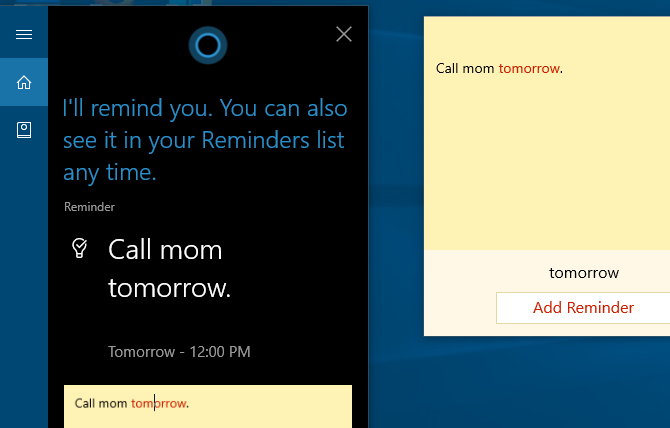
Cortana says she will remind you and shows you the reminder she set up.
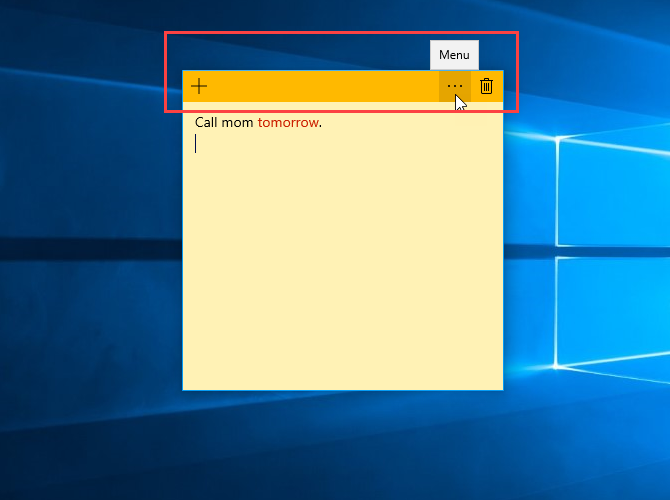
Use the plus icon to add a new note. To change the color of the current note, click the Menu button and select a color. Each note can be a different color. To delete the note, click the trash can icon.
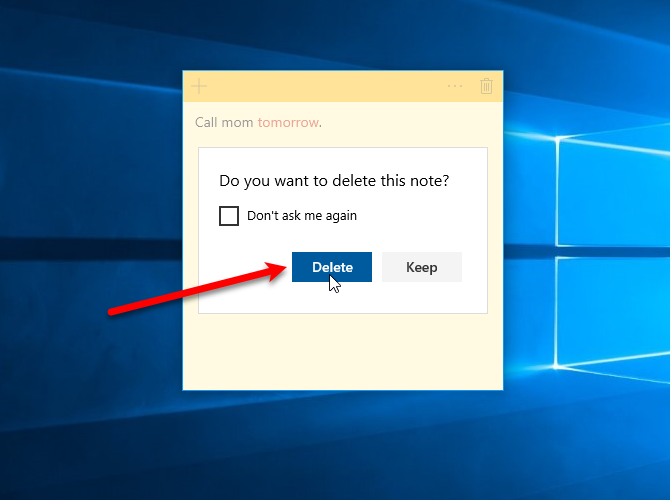
When you delete a note, a confirmation dialog box displays to make sure you want to delete it. If you don’t want to see this dialog box every time, check the Don’t ask me again box before clicking Delete.
Sketch Your Ideas With Sketchpad
Sketchpad is a very simple app that displays a blank one-page sketchpad where you can write or draw anything you want on it. This is handy if you come up with an idea and you need to draw something to get it down. Instead of grabbing a piece of paper, use Sketchpad.
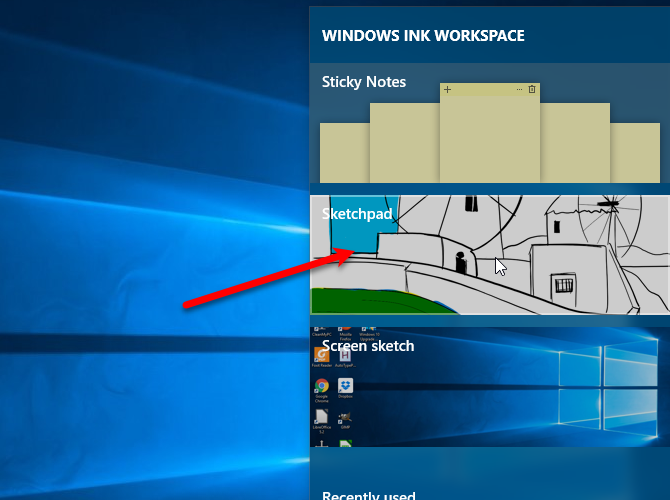
To start sketching, click the Windows Ink Workspace button on the Taskbar and then click Sketchpad.
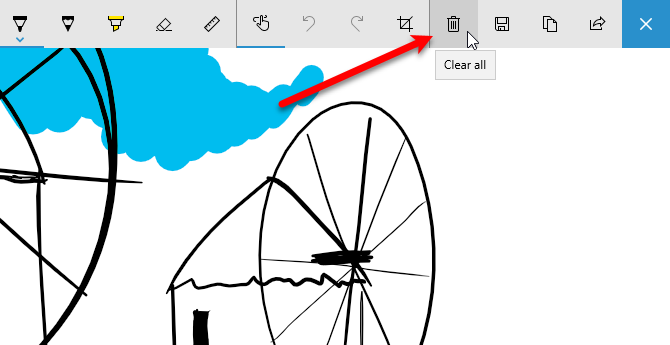
Microsoft provided a default drawing in Sketchpad to start with. To clear the sketchpad completely and start fresh, click Clear all on the toolbar.
In the left section of the toolbar, you’ll find the Ballpoint Pen, Pencil, Highlighter, Eraser, and Ruler tools. Click on a tool to use it on the sketchpad, then use your pen, finger, or mouse to draw or erase on the sketchpad.
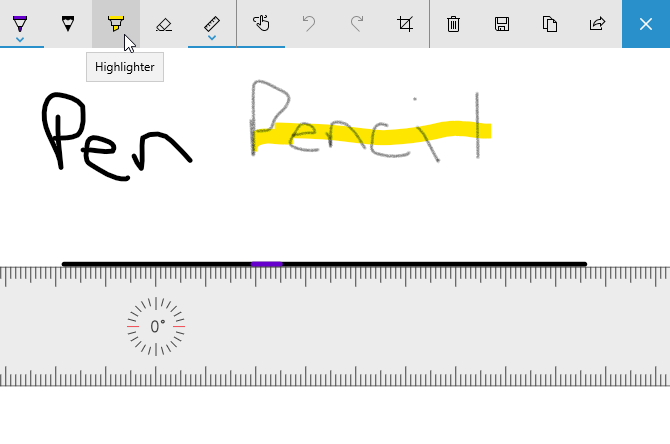
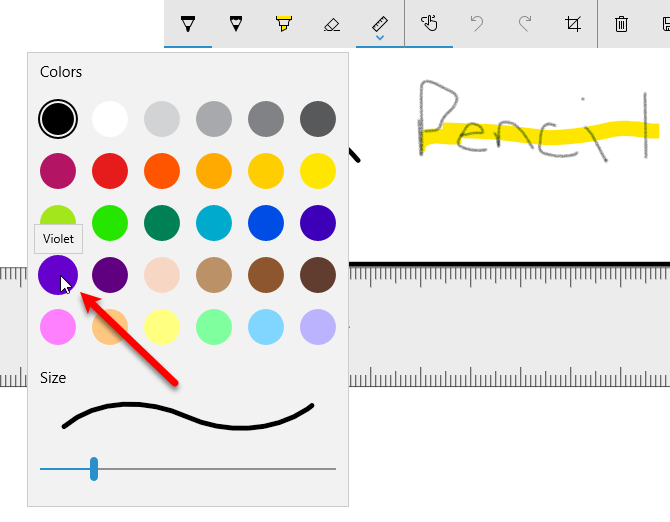
The ballpoint pen and pencil each have thirty colors you can use to draw and the highlighter has six different colors. To change the color for a tool, click the arrow on the button and then click the color you want to use. You can also change the Size of the tool.
Ever tried to draw a straight line on a screen? It’s hard enough on paper without a ruler. The Sketchpad app includes a ruler you can use at any angle, even without a pen.
Click the Ruler tool on the toolbar. You’ll see a ruler display on the sketchpad at a 45-degree angle. If you have a touchscreen, you can move the ruler around with one finger and change the angle by twisting two fingers around on the ruler.
If you don’t have a touchscreen, use the mouse to click and drag the ruler around. To change the angle without a touchscreen, move the mouse cursor over the ruler and use the scroll wheel.
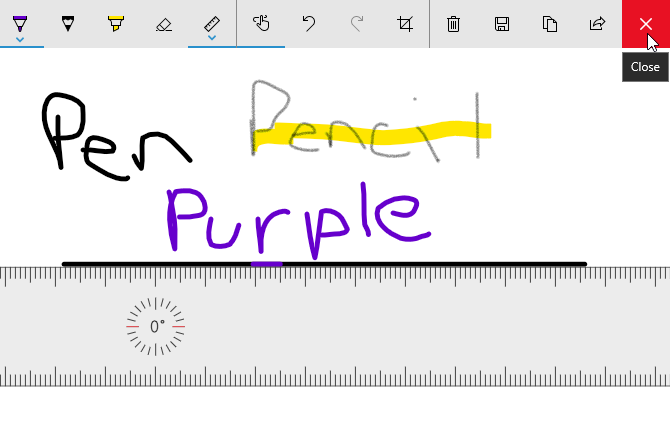
Once you’ve positioned the ruler, draw along the edge of the ruler with any of the drawing tools. You’ll find even if you stray away from the edge of the ruler, the line you’re drawing will stay straight.
The middle section on the toolbar allows you to turn Touch Writing on or off, undo and redo actions, and crop your sketch.
The buttons in the right section of the toolbar allow you to clear the entire sketchpad, save the sketch as a PNG file, copy the sketch to the clipboard, or share your sketch through Windows 10’s sharing center.
Close the Sketchpad using the red X button on the right side of the toolbar. Your sketch remains in the Sketchpad app until you clear it.
Annotate Screenshots With Screen Sketch
The Screen Sketch app allows you to take a screenshot of whatever’s currently on your screen and then draw on it using the same tools available in the Sketchpad app. It’s like Edge’s Ink feature, but you can draw on the entire screen, not just on a web page.
To use Screen Sketch, make sure what you want to capture is active on the screen. Then, click the Windows Ink Workspace button and click Screen Sketch.
The app captures the screen and presents it for you to write on. Use the drawing tools and the ruler to draw or write what you want using a pen, your finger, or a mouse.
You can save, copy, or share your screenshot just like you can do with sketches in the Sketchpad app.
Open a Pen-Enabled App
Recently used pen-enabled apps are listed towards the bottom of the Windows Ink Workspace, whether or not you have a pen.
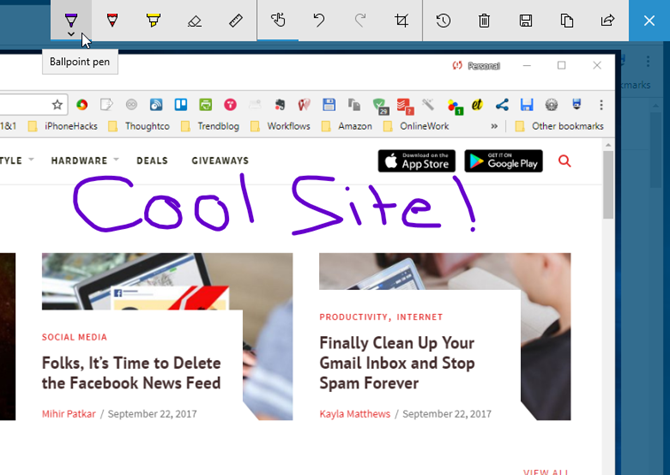
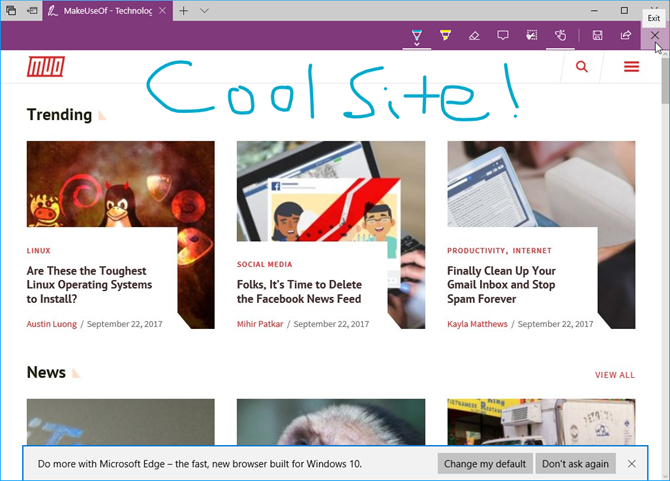
For example, you can click the Edge icon.
Then use Edge’s Ink feature to write on a web page. Some of the same tools you’ll recognize from the Sketchpad and Screen Sketch app are also available in Edge’s Ink feature. You can also save and share your annotated web page.
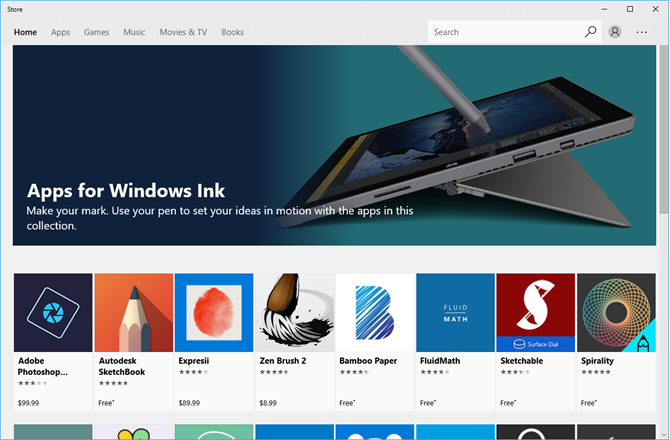
Get More Pen-Enabled Apps
The Get more pen apps link on the Windows Ink Workspace opens the Windows Store and shows you all the apps in which you can use your pen.
Customize the Pen Settings
If you’re using a pen, you can customize it in the Windows 10 Settings app by clicking Pen & Windows Ink settings at the bottom of the Windows Ink Workspace. As we mentioned, we don’t have a pen to test, but you can learn about the Pen settings on Microsoft’s support site.
Organize Your Ideas and Life With Windows Ink
Try out the Windows Ink Workspace to take notes and create reminders for yourself, sketch your ideas, or annotate a screenshot. You can also share your sketches and screenshots with others.
If the Windows Ink Workspace doesn’t quite meet your note-taking needs, give OneNote a try.
Have you used the Windows Ink Workspace? On a Surface device or a Windows 10 PC with a touchscreen? What do you use the Windows Ink apps for? Let us know your thoughts and experiences in the comments below.