
Installing Microsoft Windows 95 in DOSBox-X
Table of Contents
- Installing Microsoft Windows 95 in DOSBox-X
- Overview
- Windows CD-ROM editions this guide applies to
- External links
- DOSBox-X config file
- General installation Notes
- Dynamic vs Normal core
- Turbo mode
- Creating a Harddisk image
-
Installation Method
- Requirements
- Starting the installation
- Copying the contents of the CD-ROM
- Running SETUP.EXE
- Booting Windows 95 after installation
- Steps to take after installation
- Mounting CD or Diskette images
-
Enabling networking
- Enabling NE2000 in your DOSBox-X config file
- Setting up NE2000 networking in Windows 95
-
Emulated video adapter and video mode
- VESA driver
- Emulated sound card
- Enabling General MIDI
-
Enabling printing
- Print to PostScript
- Epson emulation
-
3dfx Voodoo
- Glide pass-through
- Hard Disk Read-ahead optimization
- Host Folder mounts
- Known limitations
- Outstanding issues
Overview
This guide will give a general description of installing Windows 95 in DOSBox-X, in addition to addressing some common issues.
Windows CD-ROM editions this guide applies to
-
Windows 95 (RTM; Original release) — Retail Full
-
Windows 95 (RTM; Original release) — OEM Full
-
Windows 95 OSR1 (aka 95A) — OEM Full
-
Windows 95 OSR2 (aka 95B) — OEM Full
-
Windows 95 OSR2.1 (aka 95B) — OEM Full
-
Windows 95 OSR2.5 (aka 95C) — OEM Full
|
Note |
This guide is meant for the Windows 95 CD-ROM editions. The Windows 95 diskette edition can also be used, but requires a lot of tedious disk swapping and is therefore not recommended. |
|
Note |
Windows 95 Upgrade editions have additional requirements and are not covered by this guide. |
If you don’t know which Windows 9x version to install, we recommend that you install Windows 98SE.
If you want to stick with Windows 95, we recommend to use Windows 95 OSR2 or later.
External links
DOSBox-X config file
You first need to create a DOSBox-X config file.
[sdl]
autolock=true

[dosbox]
title=Windows 95
memsize=64


vmemsize=8
vesa modelist width limit=0
vesa modelist height limit=0

[dos]
# Set 'ver=7.1' if using Win95 OSR2 (95B) or later
ver=7.0
hard drive data rate limit=0
floppy drive data rate limit=0

[cpu]
cputype=pentium_mmx
core=normal

[sblaster]
sbtype=sb16vibra

[fdc, primary]
int13fakev86io=true

[ide, primary]
int13fakeio=true
int13fakev86io=true

[ide, secondary]
int13fakeio=true
int13fakev86io=true
cd-rom insertion delay=4000

[render]
scaler=none

[autoexec]
Copy the above config and save it as win95.conf
|
Note |
If using Windows 95 OSR2 (or later) with FAT32 volumes, be sure to change the DOS version to 7.1 (ver=7.1 or from the DOSBox-X prompt: ver set 7.1) or else you will get errors mounting the FAT32 volume.
|
|
Note |
You can increase the allocated RAM up to the Windows 95 maximum of 480MB by setting memsize=480.Larger values may be possible with tweaks but are not covered here. |
General installation Notes
-
If you get a prompt stating that C:\WINDOWS already exists, ignore it, and continue the installation.
-
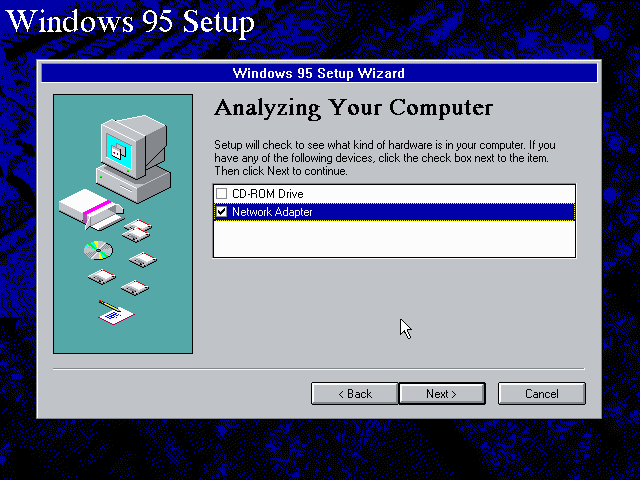
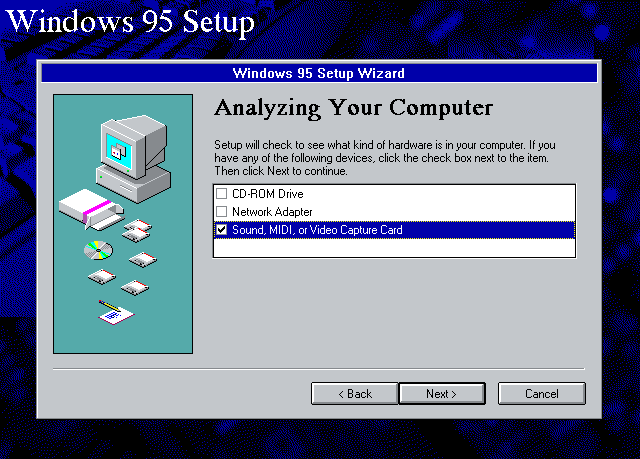
During the installation you may be asked if you have a CD-ROM, Network card or sound card that you want it to scan for. If you have NE2000 enabled in your DOSBox-X config file, you may want to check the Network adapter check box. Your DOSBox-X CD-ROM and Sound Card will be detected regardless if you check its box or not.
-
In case you installed Windows 95 OSR2.5 you may have noticed that you did not get IE4 and the Active Desktop features. This is because this is an optional installation. On the CD, simply run \WIN95\IE4SETUP.EXE to install it. While there is no real advantage to either feature, installing it does bring some new and updated libraries such as MSVCRT.DLL and COMCTL32.DLL that some programs need.
Dynamic vs Normal core
The dynamic_x86 core, which should perform much better, has been sufficiently enhanced that it can now be used for most use-cases with Windows 95.
However, for now we still recommend that you do the installation of Windows 95 using core=normal until issue #2215 is resolved.
But after the installation is finished you should be able to change to core=dynamic_x86.
Should you run into problems such as application crashes or a Windows 95 blue-screen that cannot be reproduced with core=normal, please report the problem on the DOSBox-X Git issues page.
One known issue is that opening a DOS window in Windows 95 will cause a crash when not using core=normal.
Turbo mode
Some parts of the installation, but also starting Windows 95 can take a considerable amount of time.
You may be able to speed this up considerably (depending on the host CPU) by using the DOSBox-X Turbo mode, which can be enabled from the drop-down menu bar by selecting «CPU» followed by «Turbo (Fast Forward)».
This turbo mode is not like the old Turbo button on retro PCs, but functions more like a fast-forward, and therefore should not be used when interacting with the guest OS.
By default, the moment you press a key on the keyboard, turbo mode will disengage.
|
Warning |
Using the mouse not disengage turbo mode, and double-clicks will be almost impossible to achieve as long as turbo mode is active. |
You may also want to enable turbo mode by default to allow Windows 95 to startup quicker by merging the following settings into your DOSBox-X config file.
|
Note |
This will cause some audio distortion on Windows 95 startup, if you have the Windows startup sound enabled. |
Creating a Harddisk image
|
Note |
In addition to the below DOSBox-X command line utility, it is possible to create harddisk images from the DOSBox-X menu. Go to the «DOS» menu and select «Create blank disk image…». This option allows for various common harddisk types to be created, for less common types you need to use the command line utility. |
|
Note |
When creating your HDD image with IMGMAKE, instead of specifying a custom size, you can choose a pre-defined template. The pre-defined HDD templates can be seen by running IMGMAKE without arguments.
|
-
Diskette (floppy) images are always created as FAT12.
-
If your reported DOS version is 7.0 or lower, then harddisk images up to 2GB will use FAT16 by default.
-
If your reported DOS version is 7.1 or higher, then harddisk images up to 512MB will use FAT16 by default.
-
Larger size harddisk images will use FAT32 by default (larger than 2GB can only be created as FAT32).
Alternatively, you can use the -fat option to instruct IMGMAKE to create a certain FAT type (assuming that is possible for the harddisk size).
|
Note |
Only Windows 95 OSR2 or later supports FAT32, for older Windows 95 releases you can only use FAT16 up to 2GB. |
First you need to start DOSBox-X from the command-line, using your newly created win95.conf.
This assumes that dosbox-x is in your path and win95.conf is in your current directory.
dosbox-x -conf win95.conf
Then in DOSBox-X you need to create a new harddisk image file with IMGMAKE.
This example uses an 2GB hard disk image with a single FAT16 formatted partition.
This is the maximum size for FAT16 and supported by all Windows 95 releases.
IMGMAKE hdd.img -t hd_2gig -fat 16
Or if you’re using Windows 95 OSR2 or later, you can create a FAT32 volume.
Technically the FAT32 filesystem is capable of supporting partitions up to 2TB, but the generic IDE driver in Windows 95 cannot handle volumes greater than 32GB.
Larger partition sizes may be possible with 3rd party drivers but are not covered here.
In later Windows versions, starting with Windows 2000, Microsoft won’t let you format a volume bigger than 32GB with FAT32 using its built-in formatting tool, this was presumably to push migrations to NTFS and later exFAT.
IMGMAKE hdd.img -t hd_8gig
Or if you want to create a larger disk, you can create a custom type.
This is an example of a 16GB (16*1024=16384 MB) disk, which due to its size, will be formatted as FAT32.
IMGMAKE hdd.img -t hd -size 16384
Installation Method
Other installation methods are possible than the one described below.
This method is however considered to be the quickest one with the least number of steps.
Requirements
-
DOSBox-X 0.83.10 or later, these instructions will NOT work with other DOSBox forks.
-
Windows 95 CD-ROM image (named «Win95.iso» in the example below).
Getting this image file is outside the scope of this guide.
Starting the installation
This assumes you have already started DOSBox-X with the win95.conf config file and created your harddisk image.
First mount the harddisk image you created earlier:
|
Note |
If you get an error saying that «This operation requires DOS version 7.10 or higher», than you’re trying to mount a FAT32 volume, and have not set your reported DOS version in your DOSBox-X config to 7.1. FAT32 volumes are only supported if your installing Windows 95 OSR2 or later. |
You will also need to mount the Windows 95 CD-ROM. There are a few ways of doing so, but this guide assumes you have a ISO image.
If you have a copy of the Windows 95 CD-ROM as an ISO (or a cue/bin pair), you can mount it as follows:
Copying the contents of the CD-ROM
While not strictly necessary, as it is possible to run SETUP.EXE directly from the CD-ROM (if you have the CD-ROM automatically mounted in your [autoexec] section of the config file).
It is recommended to copy the installation files (contents of the WIN95 directory on the CD-ROM) to your HDD image, as it will prevent Windows 95 from asking for the CD-ROM when it needs additional files later.
XCOPY D:\WIN95 C:\WIN95 /I /E
The files in the above example are copied to the C:\WIN95 directory.
|
Note |
You may want to use «C:\WINDOWS\OPTIONS\CABS» instead, as that is the directory that OEM installs normally use. But if you do, be aware that the installer will complain that C:\WINDOWS already exists. When you get the warning below, select «Other directory» and click «Next >» to continue. On the screen afterwards, change the directory to «C:\WINDOWS» and continue the installation. |

Running SETUP.EXE
You can now run SETUP.EXE.
Now run through the installation process.
The actual steps will not be covered in this guide but are pretty self-explanatory and detailed guides on the Windows 95 install process can be found online such as YouTube.
When the installer reboots DOSBox-X, and you’re back at the DOSBox-X Z:\ prompt, type EXIT.
Now edit your win98.conf config file.
At the end of the file, in the [autoexec] section, add the following lines:
IMGMOUNT 0 empty -fs none -t floppy
IMGMOUNT 1 empty -fs none -t floppy -size 512,15,2,80
IMGMOUNT C hdd.img -ide 1m
IMGMOUNT D empty -t iso -ide 2m
BOOT C:
|
Note |
The current DOSBox-X release seems to have a bug where Win95 will only see the first floppy drive. |
Save the config file, and at the command-prompt of your host PC you can type the below command to continue with the next phase of the installation process.
This is also the command you use, after the installation is finished, to start Windows 95 in DOSBox-X.
dosbox-x -conf win95.conf
Booting Windows 95 after installation
After the installation is finished, you can start Windows 95 from the command-prompt of your host PC, with the following command:
dosbox-x -conf win95.conf
You can optionally create a shortcut on your desktop to start Windows 95 directly.
Steps to take after installation
Once Windows 95 is installed, here is some additional software you may want to install or update:
-
Install Microsoft .NET framework version 1.0 and 1.1 (includes Visual C++ 2003 runtime)
-
Install Unofficial Windows 95 OSR2 Service Pack 1.05
-
Install/Update to Microsoft Internet Explorer 5.5SP2 (rarely needed)
-
Install Microsoft WinG API 1.0 (needed by just a few games, and those games typically include it)
-
Install Microsoft DCOM 4.71.1015.0 (DCOM95.EXE)
-
Install/Update to Microsoft DirectX 8.0a
-
Install/Update to Microsoft Windows Media Player 6.4
-
Install Adobe Acrobat Reader 5.05
-
Install/Update to Adobe Flash Player 8.0.24.0
-
Install Adobe PostScript driver 4.2.6
-
Install Apple QuickTime 5.0.5
-
Install the 3dfx Voodoo 3.01.00 reference drivers
Mounting CD or Diskette images
DOSBox-X supports mounting CD and diskette (floppy) images, and making those available to an OS booted in DOSBox-X.
To do so, an empty diskette or CD drive needs to be attached before booting a guest OS such as Windows 95, or diskette or CD images need to be attached (which will automatically cause an appropriate drive type to be emulated).
-
Disks can be changed after booting a guest OS from the drop-down menus under «DOS» → «Change current floppy image…»
-
CDs can be changed after booting a guest OS from the drop-down menus under «DOS» → «Change current CD image…»
For example, to specifying multiple image files with the IMGMOUNT command:
IMGMOUNT A disk1.img disk2.img disk3.img
IMGMOUNT D cd1.iso cd2.iso cd3.iso
You can then swap between disk images with the «DOS» → «Swap floppy drive» or «Swap CD drive» option from the drop-down menus, or using the hot-key.
Enabling networking
To enable networking, you first need to enable NE2000 adapter emulation in your win95.conf config file and select an appropriate back-end for the NE2000 emulation.
Enabling NE2000 in your DOSBox-X config file
There are two different back-ends to the NE2000 adapter emulation.
The default is backend=auto, which implies backend=slirp if SLIRP support is available, otherwise backend=pcap is implied if PCAP support is available.
backend=pcap
The PCAP back-end uses something called «Promiscuous mode».
This has the advantage that DOSBox-X can support various legacy network protocols, such as IPX and NetBIOS Frames (aka NetBEUI) in addition to TCP/IP.
This mode not only allows communication between DOSBox-X instances on the same network, but also with legacy PCs on the same network.
However, for this to work DOSBox-X needs to have very low-level access to your real network adapter.
In some cases, this is not possible, such as:
-
Network Adapter or Driver not supporting Promiscuous mode (most wireless adapters fall into this category).
-
Your Ethernet switch not allowing multiple MAC addresses on a single port or doing any kind of MAC address whitelisting.
-
Sandboxed versions of DOSBox-X (e.g., Flatpak) not allowing the required low-level access.
To enable NE2000 emulation with the pcap back-end, add the following to your win95.conf config file:
[ne2000]
ne2000=true
nicirq=10
backend=pcap

[ethernet, pcap]
realnic=list
The list value for realnic= will need to be replaced by a value representing your actual network adapter.
See Guide: Setting up networking in DOSBox-X for more information.
backend=slirp
Unlike the PCAP back-end, the SLIRP back-end does not require Promiscuous mode.
As such it will work with wireless adapters, and it will work in most sandboxed environments.
But obviously, it has its own limitations.
-
It is not supported in all platforms, such as Windows Visual Studio builds.
-
It only supports the TCP/IP protocol (other protocols must be TCP/IP encapsulated).
-
It is effectively behind a NAT (Network Address Translation) gateway, meaning that you can communicate outbound, but no systems on the LAN can instantiate a new connection to it. Which means that two DOSBox-X instances on the same LAN using
backend=slirpcannot communicate with each other.
To enable NE2000 emulation with the SLIRP back-end, add the following to your win95.conf config file:
[ne2000]
ne2000=true
nicirq=10
backend=slirp
Setting up NE2000 networking in Windows 95
Detection during installation
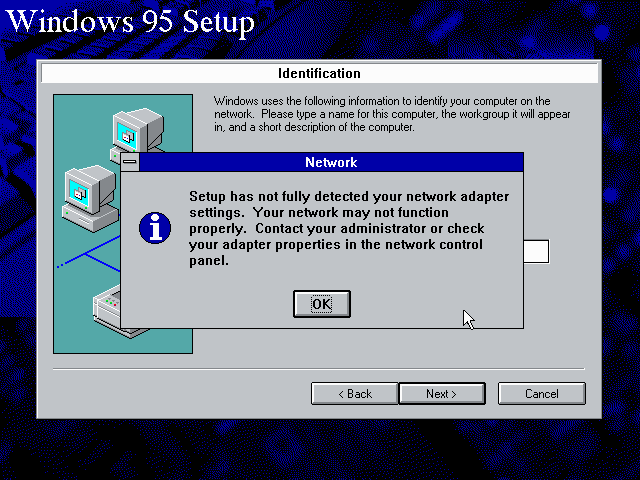
Windows 95 setup wizard will ask if you want to detect additional hardware during installation.
The exact options presented may vary depending on the Windows 95 edition.
You can tick the «Network adapter» checkbox, and it should continue and find the emulated NE2000 adapter.
It will however, not give you the possibility to set the resources at this point, and you will need to do so in device manager afterwards.
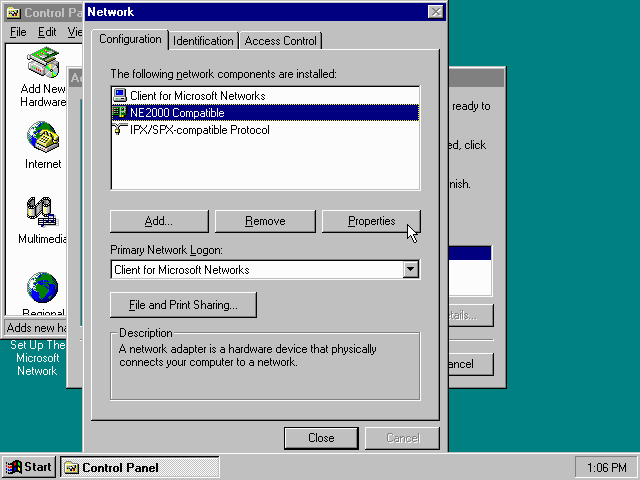
Once the Windows 95 installation is finished, right-click on «My Computer» on the desktop and select «Properties».
Now in the «System Properties» dialogue, select the «Device Manager» tab.
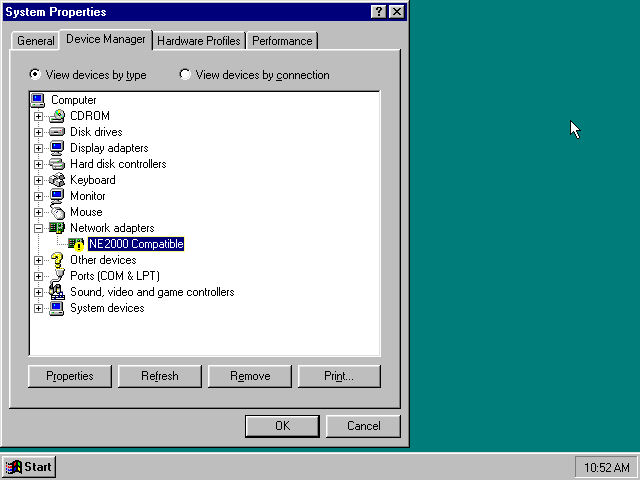
Highlight the «NE2000 Compatible» entry and click on the «Properties» tab and then click the «Set Configuration Manually» button.

Now you need to highlight the «Interrupt Request» entry and click the «Change Setting…» button. You can now change the IRQ to 10 to match the nicirq= value in your DOSBox-X config file.
Next, highlight the «Input/Output Range» entry, and again click the «Change Setting…» button. Now change the value to «0300 — 031F».
Once you’re finished adjusting the resources, click the «OK» button, and Windows 95 will prompt you to shut down to apply the settings, after which you need to restart Windows 95 in DOSBox-X.
|
Note |
By default, Windows 95 only enables Novell’s IPX/SPX protocol. Most Windows 95 applications expect TCP/IP which you will need to manually enable in the Network settings. |
NE2000 Detection after installation
If you enabled NE2000 support in your DOSBox-X config file after Windows 95 installation, go to «Start», «Settings» and «Control Panel» and double-click on «Add New Hardware».
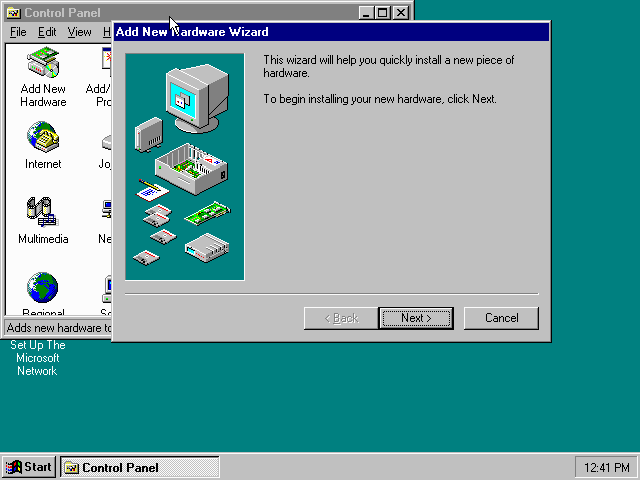
In the «Add New Hardware Wizard» dialogue, click the «Next >» button to continue.

Now select «Yes (Recommended)» and click the «Next >» button to continue.
It will ask for another confirmation.
Again, simply click the «Next >» button.
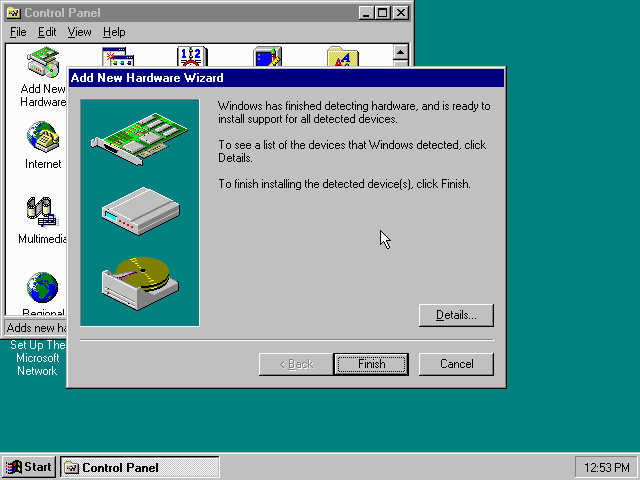
If it detected new hardware, you should get this dialogue.
You can click the «Details…» button to see what it found, after which you can click on «Finish».
It will now want you to provide some details, click on «OK».
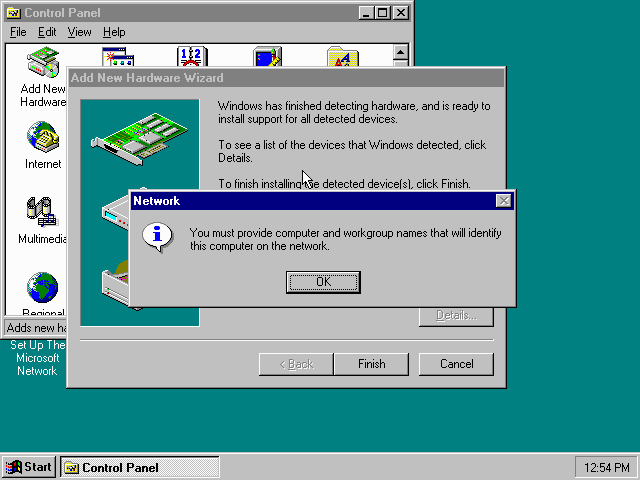
You must at a minimum enter a value in the «Workgroup» field.
If you don’t know what to type, just type «WORKGROUP».
You may also want to provide a more descriptive «Computer Name».
Don’t close the dialogue just yet though, click on the «Configuration» tab instead.
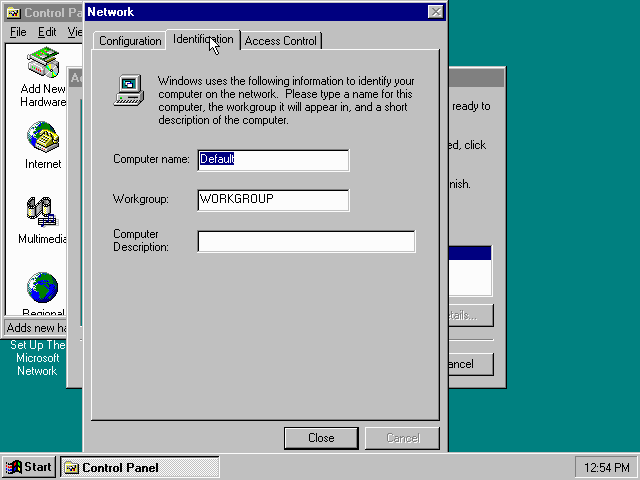
Highlight the «NE2000 Compatible» entry and click the «Properties» button.
On the «NE2000 Compatible Properties» dialogue, select the «Resources» tab, and adjust the IRQ to 10 to match the nicirq= value in your DOSBox-X config file.
Then click «OK» to finish.

Lastly, while you’re in the Network settings dialogue, you may also want to add the TCP/IP protocol, which is not enabled by default on Windows 95.
On the Configuration tab, click on «Add», then select «Protocol» and click again «Add…»
You will now be presented with the «Select Network Protocol» dialogue.
Select manufacturer: «Microsoft», and for Network Protocols: «TCP/IP», and click the «OK» button.
|
Note |
In the Network settings, you can optionally remove the «IPX/SPX-compatible Protocol» that was automatically installed, as few Windows programs need it. |
|
Note |
By default, TCP/IP will try to get its network configuration over DHCP, which should work in most cases. If you need to manually specify the settings, highlight «TCP/IP», and click the «Properties» button. |
Once you’re finished, Click OK to close the Network settings window, and the TCP/IP driver will be installed, and Windows will prompt you to restart your computer.
Confirm, and Windows 95 will reboot.
After the reboot you should have working TCP/IP networking.
Emulated video adapter and video mode
The default video adapter that DOSBox-X emulates is the S3 Trio64, which is the best emulated video adapter that DOSBox-X offers, with the widest range of resolutions and colour depths.
There is a newer S3 video driver for Win95, version 2.11.03, dated June 12, 1996.
This update adds some additional video modes. But it does not add support for 8MB video RAM, or wide-screen video modes.
The available video modes with the updated S3 Trio64 driver are:
-
4-bit colour (16): 640×480
-
8-bit colour (256): 640×480, 800×600, 1024×768, 1152×864, 1280×1024 and 1600×1200
-
16-bit colour (65536): 640×480, 800×600, 1024×768 and 1280×1024
-
24-bit colour (16.7M): 640×480
-
32-bit colour (16.7M + alpha): 640×480, 800×600 and 1024×768
A few enhancements have been made to the emulated S3 Trio64, compared to a real S3 Trio64:
-
No real S3 Trio64 was ever produced with more than 4MB video memory, under DOSBox-X you can optionally configure 8MB.
-
The real cards never supported wide-screen resolutions, wide-screen VESA modes can optionally be enabled in DOSBox-X.
However, these enhancements cannot be used in Windows 95 with the S3 video driver due to driver limitations.
As such you will be limited to the above video modes with this driver.
|
Note |
If you use an older S3 driver you may experience graphical problems (green tint) in 32-bit colour mode. These problems may not be completely solved by upgrading to the latest driver. The only known solution for now if you used an older driver is to re-install Win95 and use the 2.11.03 driver instead. |
VESA driver
First add the following lines to your DOSBox-X config file in the section:
allow high definition vesa modes=true
allow unusual vesa modes=true
allow low resolution vesa modes=false
Download and extract the latest VBEMP driver package and install the driver from the 032MB directory.
With these settings modes up to 1920×1080 in 32bit colour, or 1920×1440 in 16bit colour are possible.
|
Note |
Using the VBEMP driver does have a negative graphics performance impact, which when measured in WinBench96 Graphics WinMark, can be a reduction of up to 59%. |
Emulated sound card
The emulated sound card used in this guide is the SB16 Vibra, instead of the default SB16.
This is simply because the SB16 Vibra is an ISA PnP card, and therefore automatically detected by Windows.
There is no other real advantage of using the emulated SB16 Vibra over the SB16.
|
Note |
One often heard complaint of the real SB16 Vibra is its CQM synthesis, which was used as a low-cost replacement of the OPL3 chip found on earlier cards. However, DOSBox-X does not really emulate the CQM, instead it uses the same OPL3 emulation as for the regular SB16 model. Therefore, the CQM sound quality issues with the real SB16 Vibra do not apply to DOSBox-X. |
An optional driver update to 4.38.14 is available on the VOGONS Vintage Driver Library (ignore that the download claims it is for Windows 98, the update is for both Windows 95 and 98).
|
Warning |
There have been reports from some users that with sound enabled, that Windows 9x games crash. If you encounter similar issues, try to set sbtype=none and see if the game works.
|
Enabling General MIDI
If you have a working DOSBox-X General MIDI setup, either emulated or real, you can use that in Windows 95.
Go to «Start», «Settings» and open «Control Panel», and then double-click on «Multimedia».
Now on the «MIDI» tab, change the «Single instrument» option to «MPU-401 Compatible», and click OK to close the window.

Enabling printing
Print to PostScript
For the best print quality, you will want to print to a PostScript printer in Windows 95.
First, set up your DOSBox-X config to print to a file as such:
[dosbox]
captures=capture

[parallel]
parallel1=file timeout=2000
You can either use the PostScript driver bundled with Windows 95, or alternatively install the newer Adobe PostScript 4.2.6 driver.
If using the bundled driver, select any PostScript printer such as the «QMS ColorScript 100 Model 30», during printer setup connected to LPT1.
Once the printer is installed, open the printers properties, and on the «Details» tab click on the «Spool Settings…» button.
In the «Spool Settings», you must select «Print directly to the printer» and click OK.
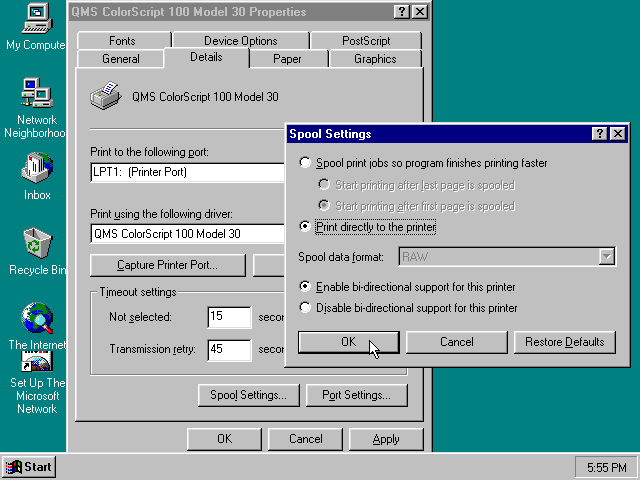
|
Warning |
Failing to change the spool setting, when printing to a file, will result in corrupted PostScript files! |
|
Note |
If two files end up being generated instead of just one for a printjob, you will want to revert the above spool setting. And perhaps try changing the spool setting to «Start printing after last page is spooled». |
When you print, a .prt file in your captures= directory will be created, which despite the extension, is actually a PostScript file.
On Linux and macOS, PostScript files are natively supported and can be viewed and printed.
On a Windows host, it is necessary to install a separate PostScript viewer such as GSview.
Epson emulation
As an alternative, you can use the integrated Epson printer emulation, but the output quality will be significantly less compared to PostScript.
First, set up your DOSBox-X config to emulate an Epson printer as such:
[parallel]
parallel1=printer

[printer]
printer=true
printoutput=ps
multipage=true
timeout=2000
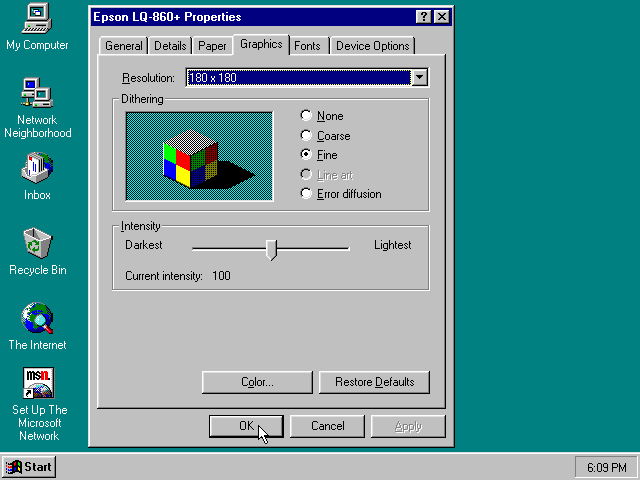
Next in Windows 95, select any Epson dot-matrix printer, such as the «Epson LQ-860+» option during printer setup connected to LPT1
|
Warning |
Make sure that you do not configure the Epson printer driver for a graphics resolution other than 180×180, or the output will be corrupted. |
When you print, a PostScript file with the .ps extension will be created in your current working directory.
The emulated Epson printer settings can be adjusted as documented on the above linked wiki printing guide.
3dfx Voodoo
The emulated 3dfx Voodoo PCI device is enabled by default in DOSBox-X, but Windows 95 lacks drivers for it by default.
As such a «PCI Multimedia Video Device» will show in Device Manager with a yellow exclamation mark.
A driver package is available here (v3.01.00) to enable support.
If for some reason you do not want 3dfx Voodoo emulation, it can be disabled by adding the following lines to your DOSBox-X config:
[voodoo]
voodoo_card=false
Glide pass-through
Glide pass-through is an optional DOSBox-X feature, and not required to use a 3dfx Voodoo game with Windows 95.
It can provide better performance, but can also be rather tricky to get working properly. As such it is not recommended for most users.
If you decide to try this method, first ensure the game works without glide pass-through using the standard 3dfx Voodoo emulation.
There are a few points you need to be aware of.
-
The DOSBox-X and glide-wrapper installed on the host need to be the same architecture.
So, if you’re using a 64bit DOSBox-X, you need to use a matching 64-bit glide-wrapper. -
The Linux SDL2 DOSBox-X does not work with OpenGlide, this is a limitation of OpenGlide (see OpenGlide issue #20).
The work-around is to use the SDL1 DOSBox-X instead.
You need to set the following DOSBox-X config option:
You will also need a specially patched GLIDE2X.DLL file which you can place in either the C:\Windows\System directory of Windows 95, or in the game directory.
But be aware that some games come with their own GLIDE2X.DLL, which typically gets installed in the game directory.
If so, you will have to remove this DLL file for glide pass-through to work.
Hard Disk Read-ahead optimization
In «System Properties», select the «Performance» tab, and click the «File System…» button.
A separate «File System Properties» window will open.
On the «Hard Disk» tab you can specify the Read-ahead optimization.
Based on benchmark results (WinBench 96), it seems that setting this to «None» gives the best performance in combination with DOSBox-X, although the difference is marginal.
This is no doubt because the host system is better at caching then the Windows 98 cache function.
Host Folder mounts
Starting with DOSBox-X 2022.08.0, there is optional support to dynamically convert a host folder mount to an emulated FAT harddisk for use when you need to boot a guest OS, such as Windows 95.
This can be accomplished in one of two ways. Either when you issue the boot command, you add the option -convertfat. e.g. boot c: -convertfat.
Or by setting the following option in your DOSBox-X config file:
[sdl]
convertdrivefat = true
When you now boot from a real image file, it will attempt to convert ALL folder mounts at the time of booting to emulated FAT Harddisks.
|
Note |
You cannot boot from such an emulated FAT harddisk. You will still need some other bootable image file to actually boot a guest OS. |
|
Note |
This conversion is dynamic, effectively creating an emulated FAT harddisk out of a folder mount. This converted FAT harddisk is not automatically stored permanently. You can however, store it as a permanent image file that you can later mount with IMGMOUNT, using the «Drive» > «drive letter» > «Save to disk image» option from the menus.Please see the «Creating harddisk images from folder mounts» section in the Guide: Managing image files in DOSBox-X for more information. |
|
Note |
There is currently no support for creating emulated CD-ROM or Floppy drives out of folder mounts with this method. Any CD-ROM or Floppy folder mounts will also be converted to harddisk folder mounts, and may not actually work for the intended purpose. |
One thing to note, is that there is no way to specify the FAT type to use for the conversion.
The FAT type will be automatically selected based on the aggregate size of files in the folder, plus 250MiB (this can be adjusted with the convert fat free space option in the DOSBox-X config file).
If the total space of files + 250MiB does not exceed 2GiB, it will convert it into a FAT16 disk. Otherwise, it will become a FAT32, which in turn will require a guest OS with FAT32 support.
Alternatively, you can also make the emulated FAT drive read-only by using the -convertfatro option with the boot command. Or by setting convert fat free space=0 option in the DOSBox-X config file.
Known limitations
-
If you intend at any point to use a Floppy or CD during your usage of Windows 95, you must attach either a floppy and/or CD image before starting Windows 95, or an empty floppy or CD-ROM drive.
If a floppy or CD drive is not present when starting Windows 95 the drive is simply missing, and you cannot add it without rebooting the guest OS. -
When mounting a CD-ROM image using
imgmount, before booting Windows 95, you may have to specify the IDE device to attach it to for it to work properly in Windows 95. e.g.imgmount d game_cd.iso -ide 2mto make the CD-ROM drive appear as the master device on the secondary IDE controller.
Outstanding issues
-
Resolve «Drive A is using MS-DOS compatibility mode file system»
Настройка эмуляции Gravis Ultrasound
Для начала необходимо скачать все файлы, которые потребуются нам для настройки Gravis Ultrasound под DOSBox:
Подготовка
- Скачиваем официальный драйвер: GUS Driver v4.10 и обновление v4.11[1].
- Скачиваем альтернативный набор сэмплов для драйвера: Pro Patches Lite v1.60
- Скачиваем обновление для патча: Update Pro Patches Lite v1.61
- Скачиваем фикс для обновления: FIX Pro Patches Lite v1.61
- Скачиваем утилиту для инициализации и загрузки инструментов в память:loadpats.exe и patches.ini
Установка драйвера GUS для DOS
- В конфиге DOSBoxа включаем эмуляцию Gravis Ultrasound (GUS). См. Dosbox.conf#.5Bgus.5D.
- Распаковываем в папку на жёсткий диск официальный драйвер и устанавливаем его в C:\ULTRASND, запустив «INSTALL.EXE». [2]
- Распаковываем обновление для драйвера и так же устанавливаем.
- В конфиге DOSBoxa, в секции [autoexec], добавляем: SET PATH=%PATH%;C:\ULTRASND\
- Распаковываем loadpats.zip и patches.zip’ в папку C:\ULTRASND.
- В разделе [autoexec] прописываем запуск loadpats.exe.
Установка «Pro Patches Lite»
- Распаковываем куда-нибудь патч, переименовываем эту папку в «PATCHES» и помещаем её в корень смонтированного диска «C».
- Распаковываем обновление для патча и кидаем файлы в папку «PATCHES» с заменой.
- Распаковываем фикс и тоже кидаем все файлы в папку «PATCHES» с заменой.
- Создаём в корне смонтированного диска «C» пустой файл «autoexec.bat».
- Добавляем в секцию [autoexec] конфига DOSBoxa строку: SET PROPATS=C:\PATCHES
- Заходим в папку «PATCHES», запускаем «INSTALL.EXE», жмём «Y» и инсталлируем.
- По окончании установки жмём «CTRL+F9» и перезапускаем DOSBox.
- Для более тонкой настройки звучания запускаем «PATMENU.EXE» и настраиваем. [3]
Примечание: Использование неоригинальных драйверов и патчей может ухудшать совместимость с играми.
Установка Windows 95/98 в DOSBox
В качестве примера работы с DOSBox и, в частности, работы с образами дисков в нем приведем руководство по установке Windows 9x в DOSBox.
Инструкция по установке windows 9x в DOSBox 0.73 (официальная сборка)
Для этого понадобится: дистрибутив Windows95/98, образ загрузочной дискеты с FDISK.EXE и FORMAT.EXE, утилиты bximage и WinImage.
- Утилитой bximage создать фиксированный образ жесткого диска на 504mb. [4][5][6]
- В dosbox.conf:
в разделе [cpu] сменить cputype=auto на cputype=pentium_slow; [7]
в разделе [autoexec] прописать команды монтирования созданного образа жесткого диска и загрузки с образа загрузочной дискеты. [8] - Запустить DOSBox. После загрузки с образа загрузочной дискеты создать раздел на образе жесткого диска (FDISK.EXE) и отформатировать его под fat [4] (FORMAT.EXE. Команда FORMAT C:). Закрыть DOSBox.
- На только что отформатированный образ жесткого диска перенести с помощью WinImage дистрибутив Windows. [9]
- Смонтировать отформатированный образ жесткого диска как C. [10]
- Запустить DOSBox. После загрузки с образа загрузочной дискеты запустить инсталлятор Windows (setup.exe) и начать установку ОС. [11]
- После того как на стадии «перезагрузка компьютера» DOSBox закроется, прописать загрузку DOSBox с диска C. [12]
Инструкция по установке windows 9x в DOSBox SVN Daum
Вам понадобится: сама сборка DOSBox SVN Daum (версия не младше 5.21.2012), образ CD с дистрибутивом win 9x, образ загрузочной дискеты с драйвером сд-рома.
- Запустите DOSBox, и в командной строке наберите imgmake с:\image.img -t hd_2gig. [13] Закройте DOSBox.
- В dosbox.conf:
в разделе [dosbox] установите machine=svga_s3, vmemsize=4, memsize=128;
в разделе [cpu] установите core=dynamic, cputype=pentium, cycles=max, isapnpbios=false;
в разделах [ide, primary], [ide, secondary], [ide, tertiary], [ide, quaternary] установите enable=true;
в разделе [autoexec] пропишите команды монтирования образа загрузочной дискеты, только что созданного образа жесткого диска и образа CD с дистрибутивом win 9x с ключами подключающими их к ide слотам, и загрузки с образа дискеты. [14] - Запустите DOSBox. После того как он загрузится с загрузочной дискеты, перейдите на виртуальный сд-ром и запустите инсталятор windows начав установку ОС.
- После того как по завершению установке DOSBox перезапустится — закройте DOSBox, и в dosbox.conf, в разделе [autoexec] измените команду загрузки с диска a на загрузку с диска c.
Примечания
- ↑ Так как gus_411up на официальном сайте пока битый, то может быть полезной тема на vogons
- ↑ Если GUS Driver v4.11 отказывается устанавливаться из-за конфликта порта, временно отключите в конфиге DOSBoxa эмуляцию Sound Blaster, включая FM-синтез.
- ↑ Если в некоторых играх хрипит музыка, запустите «PATMENU.EXE» и поиграйтесь с настройками. Для устранения хрипов в игре «Z» помогает настройка 4,5,6,B,C секций.
- ↑ 4,0 4,1 DOSBox не поддерживает динамические образы и более 1024 цилиндров (что в bximage = 504mb), а также работает только с fat.
- ↑
bximage v1.32 — Утилита для создания виртуальных жестких дисков и дискет, формата «.img», входит в состав эмулятора Bochs (Также в архиве пустой образ на 504mb, отформатированный под fat).Работа с утилитой:
- Выбрать создание образа жесткого диска «hd» (по умолчанию) или дискеты «fd».
- Выбрать тип образа жесткого диска, фиксированный «flat» (по умолчанию) или динамический «growing».
- Ввести размер жесткого диска в мегабайтах.
- Ввести имя файла образа («c.img» по умолчанию).
- Ввести подтверждение на создание образа «yes» («no» по умолчанию).
- Запомнить количество цилиндров «cylinders».
- ↑
Также, образ жесткого диска для DOSBox размером в 2гб можно создать при помощи сборки HAL9000’s. Для этого в окне запущенного HAL9000’s наберите команду imgmake c:\harddisk_2gb.img -t hd_2gig (образ будет создан на реальном диске C). Структура этого образа будет выглядеть так 512,63,64,1023. - ↑ С «auto» глючит драйвер «S3 Trio32/64 PCI», не устанавливается DirectX, после загрузки Win98SE завершается с ошибкой explorer.exe и ещё несколько компонентов
- ↑
imgmount 2 "путь к директории\образ жесткого диска.img" -size 512,63,16,ХХХ -t hdd -fs none
BOOT "путь к директории\образ загрузочной дискеты.IMG"
(2 = master, 3 = slave. В место ХХХ вписать количество цилиндров)
- ↑
При загрузке сторонней ОС под DOSBox 0.73 будут доступны только образы жестких дисков и дискет. К примеру, если вы используете следующие команды:imgmount c "c.img" -size 512,63,16,1024 -t hdd -fs fat imgmount f "d.img" -size 512,63,16,1024 -t hdd -fs fat imgmount d "Gold Soft 7.iso" -t iso -fs iso mount e "l:\" -t cdrom -usecd 0 mount y "DOS-Games" BOOT "DOS622_1.IMG" "DOS622_2.IMG" "DOS622_3.IMG" -l c
Смонтируются 2 образа жестких дисков, образ CD, CD-ROM, директория, 3 образа дискет (которые можно переключать с помощью CTRL+F4) и произойдет загрузка с диска «C». Но, после загрузки ОС будут доступны только образы жестких дисков (как «C» и «D») и дискет (как «a»).
Поэтому для переноса файлов на образ жесткого диска используем WinImage. - ↑ В настройке DOSBox`а после [autoexec] заменить команду:
imgmount 2 "путь к директории\образ жесткого диска.img" -size 512,63,16,ХХХ -t hdd -fs none
на:
imgmount c "путь к директории\образ жесткого диска.img" -size 512,63,16,ХХХ -t hdd -fs fat
(Вместо ХХХ вписать количество цилиндров).
- ↑ Если запустить setup во встроенном ДОСе, повиснет скандиск, а если его пропустить (setup.exe /is), установочные файлы будут копироваться с ошибками.
- ↑ Для этого в настройке DOSBox’а (пункт [autoexec]) заменить команду:
BOOT "путь к директории\образ загрузочной дискеты.IMG"
на:
BOOT -l c
- ↑ На диске c: вашего компьютера будет создан пустой образ жёсткого диска размером в 2Гб с файловой системой fat.
- ↑ Пример команд:
imgmount a "c:\Boot.ima"
imgmount c "c:\image.img" -t hdd -fs fat -ide 1m
imgmount d "c:\win98se.iso" -fs iso -ide 2m
boot -l a
См. также
- Тестирование игр, работающих в Windows 98, запущенной в DOSBox
I needed Windows to run SimTower, so I decided to try getting Win95 to run on DOSBox. The walkthroughs online had some skippable steps and I ran into some problems, and then I got distracted optimizing it.. Anyway, here are my terse, working steps for getting very nice Win95 DOSBox images.
In addition to a Win95 CD ISO and key, you’ll need:
- Empty FAT-16 HDD images
- S3 Video Driver
- DOS 6.22 Boot Disk
I’ve also packed up all of my DOSBox scripting, if you don’t want to copy and paste it from here.
Recommendations
Use Win95C (OSR 2.5)
I saw the fewest unhandled exceptions and other problems with the last Win95 release.
Trim the Win95 install CD
You can delete all of the files on the Win95C CD which aren’t on the Win95A CD to get the latest Win95 fixes, but without all of the optional software (IE, AOL, …). This also eliminated a few exceptions during the first boot. My scripting in Step 1 below copies the correct file list.
Make a Win95 install CD hard drive
I couldn’t mount the Win95 ISO so a DOS boot disk would see it. The walkthroughs copy the install directory to the target hard drive, but that means the target drive must be larger. Instead, I copied my (trimmed) Win95 setup folder to an empty hard drive image and then mount it along with the DOS Boot Disk and target drive to start setup.
Mount a second hard drive for each game
You have to boot from an “img” file in DOSBox to run Win95, but IMG files take up the whole drive size, not just the used space. I didn’t want to installing all of my games in the same Win95 image, which I could break easily, and I didn’t want a huge Win95 starting image to install each game. Instead, you can leave the Win95 image small and mount a second empty drive for each game that’s the right size to install the game to.
DOSBox.conf Template
This is the DOSBox.conf template I used for each step below. Rather than replacing the [autoexec] steps in the same file, making a separate file for each different kind of boot makes it easy to go back and forth again later.
# DOSBox configuration file for Win95 on DOSBox

[sdl]
# output=ddraw seemed to provide the lowest GPU use with the ability to scale the output
# windowresolution=1600x1200 (if double the Win95 resolution, scaling this way looks fine)
output=ddraw

[dosbox]
# 64MB is the maximum for normal DOSBox builds. The S3 Trio 64 is the most modern GPU you can emulate,
# and can run at 1600x1200 or lower resolutions in high color modes.
machine=svga_s3
memsize=63

[render]
aspect=true

[cpu]
# You need to set cputype=pentium_slow or Win95 thinks it's running on a 486 and won't install DirectX 8.
# cycles=max 80% is very fast but keeps my laptop fan from spinning wildly.
core=auto
cputype=pentium_slow
cycles=max 80%
cycleup=1000
cycledown=2000

[midi]
mpu401=intelligent
mididevice=default

[sblaster]
sbtype=sb16
sbbase=220
irq=7
dma=1
hdma=5

[autoexec]
@ECHO OFF

# Drive Geometries - DOSBOX must know the drive geometry to properly install Win95 and boot it
# <Drive Geometries> below
SET Size96MB=512,63,4,780
SET Size192MB=512,63,8,780
SET Size384MB=512,63,16,780
SET Size768MB=512,63,32,780
SET Size1536MB=512,63,64,780

SET Size64MB=512,63,4,520
SET Size128MB=512,63,8,520
SET Size256MB=512,63,16,520
SET Size512MB=512,63,32,520
SET Size1024MB=512,63,64,520
SET Size2048MB=512,63,128,520

# TODO: You must specify your Win95 and Game drive names and geometries.
SET NAME=Win95.img
SET SIZE=%Size256MB%
Step 1: Make the Win95 Install CD Hard Drive image
<DOSBOX.conf template>
...

[autoexec]
# Copy an empty 64 MB FAT-16 HDD image to 'Win95CD.img'

# Mount the image copy and a location with a Win95C (OSR 2.5) CD
imgmount c Win95CD.img -size 512,63,4,520 -t hdd
mount D ..\Sources

# Copy only Win95A setup file names for a small, patched setup.
MD C:\Win95
C:
CD Win95
COPY D:\Win95C\mini.cab .
COPY D:\Win95C\precopy*.cab .
COPY D:\Win95C\win95*.cab .
COPY D:\Win95C\extract.exe .
COPY D:\Win95C\oemsetup.exe .
COPY D:\Win95C\scandisk.exe .
COPY D:\Win95C\scanprog.exe .
COPY D:\Win95C\setup.exe .
COPY D:\Win95C\smartdrv.exe .
COPY D:\Win95C\wb15off.exe .
COPY D:\Win95C\xmsmmgr.exe .
COPY D:\Win95C\*.com .
COPY D:\Win95C\*.bin .
COPY D:\Win95C\readme.txt .

# Copy Drivers
MD C:\Drivers
COPY D:\Drivers\*.* C:\Drivers

ECHO.
ECHO Done. 'Win95CD.img' is now a trimmed Win95 CD image on a hard drive.

EXIT
Step 2: Run Win95 Setup
- Copy a 128 MB+ empty FAT-16 HDD image as ‘Win95.img’ to install the OS to.
- Get a DOS 6.22 Boot Disk to boot from to start setup.
<DOSBox.conf template>
...

[autoexec]
...
<Drive Geometries>

# TODO: Set the right img file name and size here
SET NAME=Win95.img
SET SIZE=%Size128MB%

ECHO.
ECHO 2. Boot DOS 6.22 disk and run Win95 setup from HDD
ECHO ==================================================
ECHO.

ECHO.
ECHO Inject latest INF into Win95 CD

imgmount d ..\Sources\Win95CD.img -size %Size64MB% -t hdd
mount e ..\Sources
COPY /Y E:\*.INF D:\Win95\
MOUNT -u E:
MOUNT -u D:


ECHO.
ECHO Inject setup command into boot disk

imgmount a ..\Sources\622c_Scratch.img -t floppy
ECHO D:\Win95\SETUP.EXE /im /is /IW > A:\autoexec.bat
MOUNT /u A:


ECHO.
ECHO Mount boot disk, hard drive, and Win95 install HDD

imgmount 0 ..\Sources\622c_Scratch.img -t floppy -fs none
imgmount 2  %NAME% -size %SIZE% -t hdd -fs none
imgmount 3 ..\Sources\Win95CD.img -size %Size64MB% -t hdd -fs none


ECHO.
ECHO Boot from boot disk; autoexec.bat will run Windows setup

ECHO [D:\Win95\setup.exe /im /is /IW]
boot -l a
During setup, make sure to pick ‘Yes’ if asked whether to detect hardware and check ‘Sound …’ to find the sound devices. Setup is otherwise very straightforward.
3. First Win95 Boot
<DOSBox.conf template>
...

[autoexec]
...
<Drive Geometries>

# TODO: Set the right img file name and size here
SET NAME=Win95.img
SET SIZE=%Size128MB%

# Mount new hard drive
imgmount 2  %NAME% -size %SIZE% -t hdd -fs none

# Mount source drive (for driver install)
imgmount 3 ..\Sources\Win95CD.img -size %Size64MB% -t hdd -fs none

# Boot from Windows (first boot)
boot -l C
During First Boot:
- You’ll see one unhandled exception during Control Panel setup
- Set your Time Zone
- Cancel Printer setup
- Clean up desktop icons
- Install Graphics Driver
- Right-click Desktop, click Properties
- In the ‘Settings’ tab, click ‘Advanced Properties’
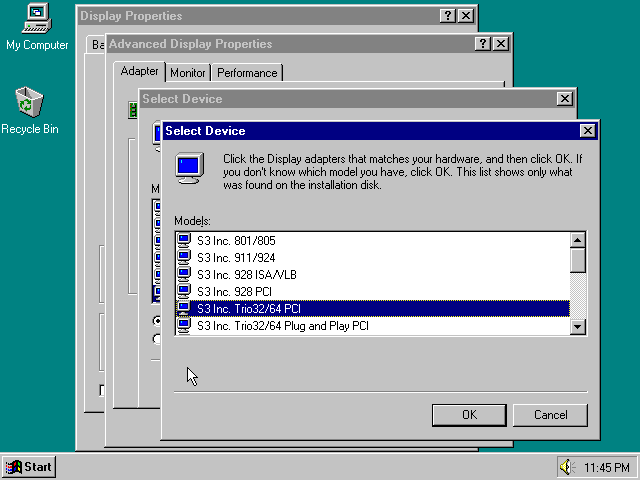
- In ‘Adapter’, click ‘Change’
- ‘Have Disk’ -> ‘Browse’ -> D:\Drivers -> OK
- Select ‘S3 Inc. Trio32/64 PCI’ and click OK
- Shut Down
- Reboot again
- Confirm sound works
- Uncheck the checkbox for hints on startup
- Shut Down
- Make a ZIP of your (tiny!) blank Win95 image!
Step 4: Copy a Game
- Copy an empty FAT-16 HDD image for each game, with enough space to hold the setup files and the installed result.
<DOSBOX.conf template>
...

[autoexec]
...
<Drive Geometries>

# TODO: You must specify your Win95 and Game drive names and geometries.
SET NAME=Win95.img
SET SIZE=%Size256MB%
SET GAME=Game.img
SET GAMESIZE=%Size64MB%

# Mount the (scratch) Boot Disk, Hard Drive, Game Drive, and Host Folder
imgmount a ..\Sources\622C_Scratch.IMG -t floppy
imgmount c %NAME% -size %SIZE% -t hdd
imgmount d %GAME% -size %Size64MB% -t hdd
mount e .
- Install the game on D:\
Note: If the game adds to the registry or C:\Windows, you’ll have to boot the matching Win95.img for it to work later. You can save the Win95.img you installed the game with and go back to the fresh one to see if the game works.
- ZIP the Game image (and the Win95.img, if altered) to store the game compactly.
Step 4: Play a Game
<DOSBOX.conf template>
...

[autoexec]
@ECHO OFF

<Drive Geometries>

# TODO: You must specify your Win95 and Game drive names and geometries.
SET NAME=Win95.img
SET SIZE=%Size256MB%
SET GAME=Game.img
SET GAMESIZE=%Size64MB%

# Mount hard drive and game drive to boot
imgmount 2  %NAME% -size %SIZE% -t hdd -fs none
imgmount 3 %GAME% -size %GAMESIZE% -t hdd -fs none

# Boot from Windows hard drive
boot -l C
…and you’re done!
Troubleshooting
Win95 is showing a messed up screen on boot or running ScanDisk forever
This happens to me when I haven’t shut down Win95 properly. You can get your original Win95.img from your ZIP to go back to a working install.
Windows Setup Error “SU 0013”
This error blocked me in my previous walkthrough. It happens when you mount the hard drive image to write files to rather than to boot to, or you don’t specify the hard drive geometry. If you copy the Win95 setup files to the hard drive you’ll install to, you need to close DOSBox, and start again mounting the drive “boot style” before you run setup.exe.
# Mount 'copy files style'
imgmount c Win95.img -size %Size256MB% -t hdd

# Mount 'boot style'
imgmount 2 Win95.img -size %Size256MB% -t hdd -fs none
Note that to boot, you must mount to an IDE position number instead of drive letter (2 is ‘Primary Master’), you must provide the geometry (-size), and you must not let DOSBox try to read the file system (-fs none).
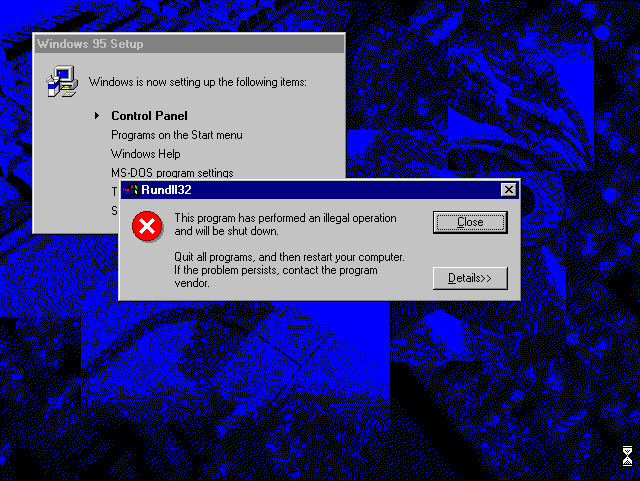
Opening Control Panel crashes
I saw this, but only for the first three or so boots of Win95. I know, weird. Anyway, try another reboot and it may work after that.
Bonus: Automating Win95 Setup
You really only need to install Win95 a few times (maybe once on a 256 MB, 512 MB, and 1024 MB hard drive) so you have template to use for various games. As long as you get the installs right and make backups of the images, you’re done.
However, in a past life I automated more modern Win95 setups, so I couldn’t help but look into how Win95 installs are automated.
There’s a tool on the Win95C CD in admin\nettools\bsetup called batch which will ask you for the answers to most questions setup.exe asks, and then write out a BSETUP.INF file you can use to automate. Pass this as an argument to setup.exe, and you’ve got an automated install:
D:\Win95\setup.exe /im /is /IW D:\Win95\BSETUP.INF
Here is the one I ended up with. I figured out everything except how to get it to look for a sound card, so I wasn’t able to leave it fully automated (and, it got stuck on the exception setting up the Control Panel also). [If anyone reading this knows how to do that, I’d love to know!]
Some settings in the INF and what they do (found by changing UI in the batch tool and re-exporting):
| Key Under [SETUP] | Purpose |
|---|---|
| Express=1 | Unattended [0 = Stop at every screen] |
| InstallDir=“C:\WINDOWS” | Install Directory |
| EBD=0 | Prompt to create (emergency) boot disk |
| ChangeDir=0 | ? |
| OptionalComponents=1 | Install any Optional Components |
| Network=1 | Configure Networking per below section |
| System=0 | ? |
| CCP=0 | ? |
| CleanBoot=0 | ? |
| Display=0 | ? |
| PenWinWarning=0 | “Enable PenWindows warning” [?] |
| InstallType=3 | Whether install is Disk or CD, upgrade or clean |
| DevicePath=0 | “Search source folder for devices” |
| TimeZone=“Pacific” | Time Zone to set on first boot |
| Uninstall=0 | Whether to save uninstall information |
| VRC=0 | “Auto-answer ‘No to all’ to version conflict dialogs” |
| NoPrompt2Boot=1 | “Automatically reboot PCI and PnP machines during setup” |
| ProductKey=XXX | Product Key to pre-fill in UX |
| ProductType=1 | OEM version indicator; only needed in separate MSBATCH.INF |
| [Printers]\r\n | (Separate from [SETUP]) Don’t prompt to install a printer |
I installed Windows 95 in DosBox-X by following a guide: http://dosbox95.darktraveler.com/guide%20select.html
NOTE: THIS IS NOT A VIABLE SUBSTITUTE FOR VIRTUAL MACHINES.
It’s pretty cool going back in time once in a while.
To transfer files to Win95 you’ll need WinImage (DL Page) Installed or Portable, DosBox-x has to be closed for it to work.
Open WinImage;
Inside WinBox 95 OSR 2.5 folder drag Win95.img into the WinImage window;
Pick a directory where you want to drop the files and drag them into the WinImage window.
- Addeddate
- 2021-08-16 17:11:20
- Identifier
- windows-95-dosbox-x
- Scanner
- Internet Archive HTML5 Uploader 1.6.4
comment
Reviews
(10)
There are 10 reviews for this item. .
15,936
Views
36
Favorites
10
Reviews
DOWNLOAD OPTIONS
Uploaded by
LividBunny
on