
Creating a virtual machine has become an essential skill for tech enthusiasts. Also, this method is ideal for software testing and running multiple systems. Moreover, it offers a powerful solution for developing applications in isolated environments. VMware Workstation 17 Pro is a software that simplifies this process considerably.
In addition, it allows you to use your Windows 10 64-bit & 11 systems effectively. Obviously, with our guide, you will learn how to optimize your installation for performance and efficiency. Even if you are starting, you can manage to create a virtual machine that suits your needs.
How to Install and Configure a New Virtual Machine on Windows 10 using VMware Workstation 17 Pro
Before installing an operating system such as Windows or Linux on VMware Workstation Pro, you need to create a new machine. Preparing a new VM with this software is more accessible than other software and offers you more professional options.
After checking the features of your computer’s processor hardware from the manufacturer’s website and learning about the virtualization support, you must first install the Workstation software on the system to create a new VM on your desktop or laptop computer. But first, you can enable VTx support by enabling the virtualization feature of your PC.
If you are using a Linux-based Ubuntu / Linux Mint / Debian operating system, you can access the related articles from the links below.
- Installing VMware on Ubuntu
- Installing VMware on Debian
- Installing VMware on Linux Mint
How to Create a Virtual Machine for Windows 10
After installing VMware on your Windows computer, you can create a new VM by following the steps below and then configure VMware Tools to exchange files between the host and the guest machine. Now, you can start the virtual machine creation process with Workstation by following the steps below.
Step 1
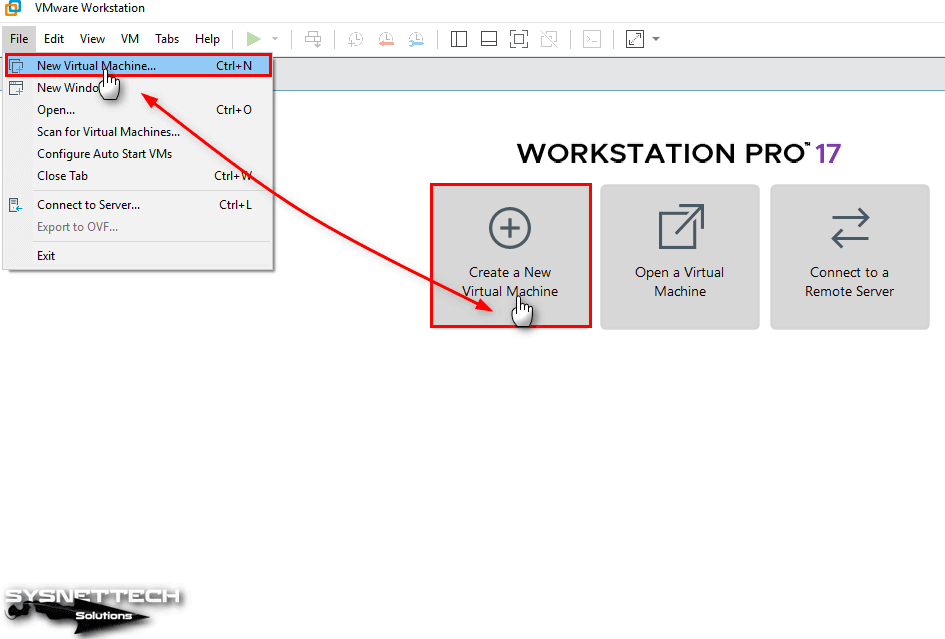
Open VMware Workstation Pro, click File, and then New VM from the tool menu to start the wizard. Or, click on the Create a New Virtual Machine option that you see directly on the main screen and start the wizard to install or create a VM.
Step 2
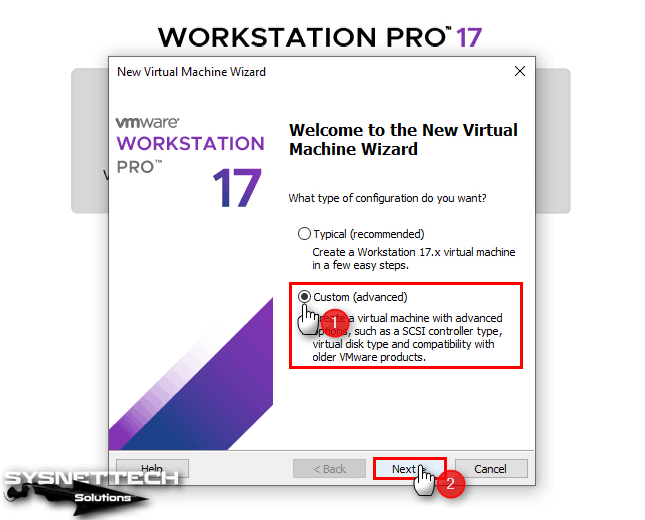
In the VM wizard, you are asked which configuration type you want to continue. Here, check the Custom (Advanced) option to review the more advanced settings, and then click the Next button.
Step 3
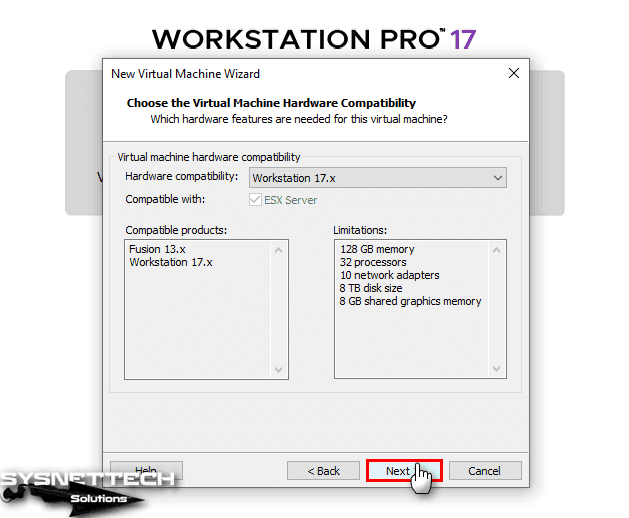
In the Choose the Virtual Machine Hardware Compatibility window, the Workstation 17.0 version is selected by default because VMware Workstation 17 Pro is installed. If you update when the new version of the program is released, you have to choose the latest version in this window.
After configuring the VMware hardware compatibility, continue by clicking the Next button.
Step 4
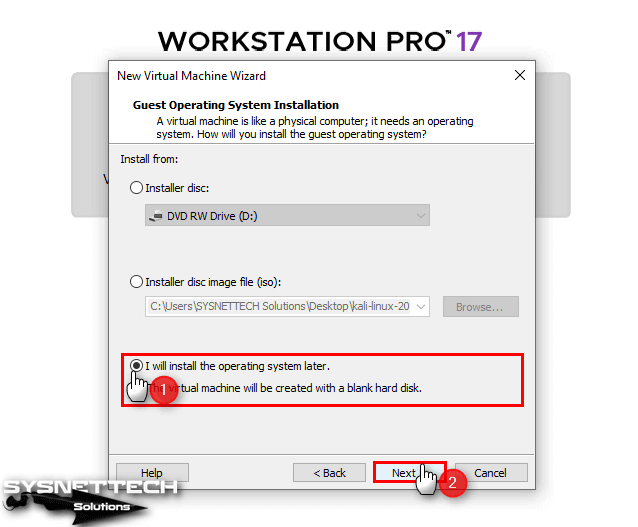
There are three options in the Guest Operating System Installation window.
- Installer Disc: If you want to use the CD/DVD installation platform of the operating system on the VM you will create, you must select the Installer Disc option.
- Installer disc image file (iso): When you add an ISO file with this option in the first step of creating a virtual machine, the VMware program will automatically configure some settings according to the operating system type you choose.
- I will install the operating system later: If you choose to add the operating system installation media to the VM later, you must manually configure all settings. This option is mainly preferred by professional users who know all the settings well.
Step 5
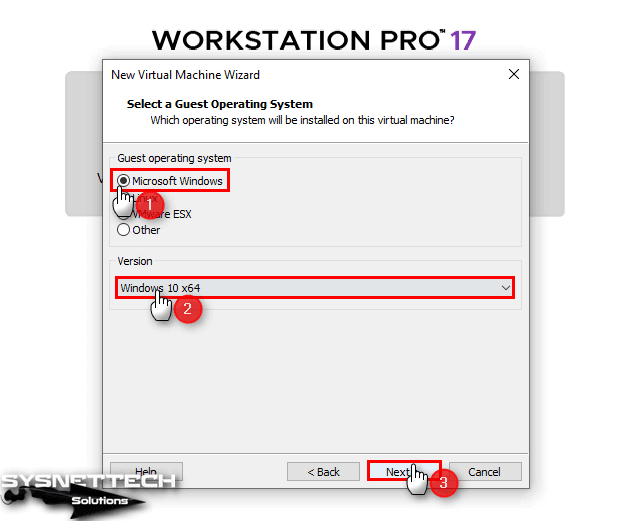
In the Select a Guest Operating System window, you must first check the type of operating system you will install and then select the version you want to install.
If you have a 64-bit ISO file of the Windows 10 operating system, you need to select “Windows 10 x64” in the Version section of this window.
Step 6
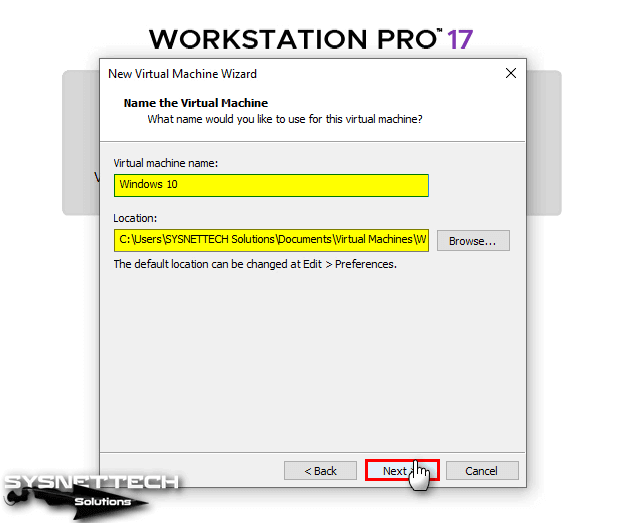
It would be more logical and catchy to write the name and version of the operating system you will install in the Name the VM window.
Also, if your computer’s storage device is large, you can continue with the location configured by default. However, installing and storing virtual machines on your computer’s physical SSD or NVMe disk will be more organized and more efficient.
Step 7
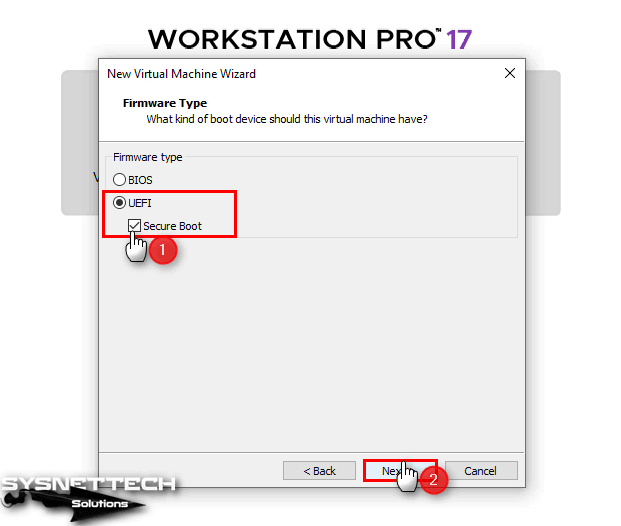
In the Firmware Type window, you can adjust the operating system boot settings. Here, the BIOS option was selected by default in older build versions of Windows 10. Since UEFI is more common for new build versions of Windows, VMware Workstation has automatically chosen this option.
Additionally, check the Secure Boot option to make your virtual system more secure and continue.
Step 8
In the Processor Configuration window, configure the number of processors and cores according to your computer’s hardware specifications and click the Next button. Here, you can configure one processor and four core counts as an average value.

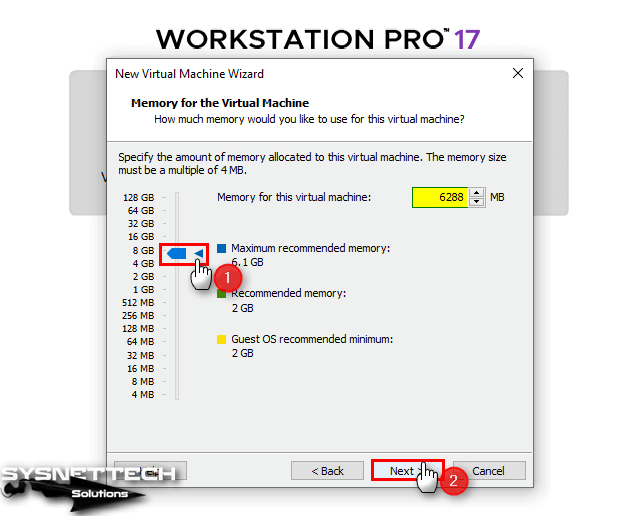
Step 9
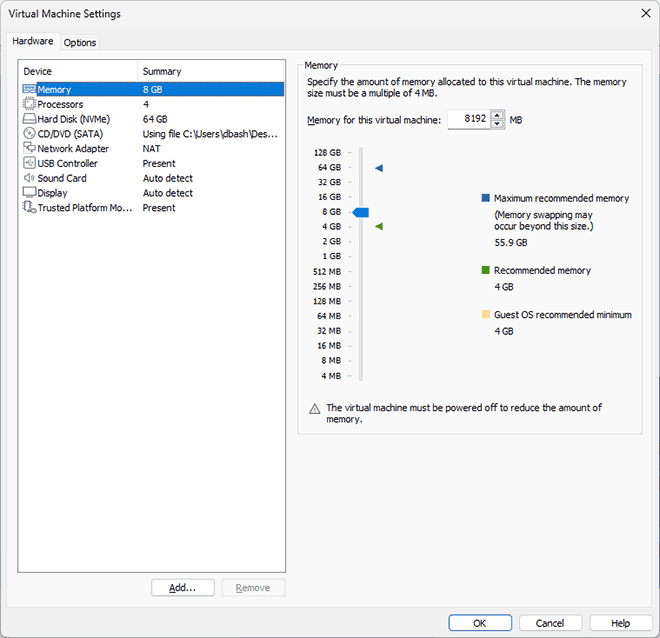
In the Memory for the Virtual Machine window, select the RAM size to assign to the VM and click the Next button. If your computer has 16GB of RAM and you will use only one virtual PC, you can specify 8GB of RAM here.
Step 10
You can configure the network settings of the virtual machine in the Network Type window. The changes you make in VMware’s Virtual Network Editor interface will affect the network settings of the virtual computers you set up. For more detailed VMware network settings, you can check out our articles below.
- VMware Bridge Configuration
- VMware NAT Configuration
- VMware Host-Only Configuration
Usually, the use of network address translation (NAT) is selected by default because it is suitable for its primary purpose. If you are going to use VMs for different network projects, the Host-Only type will help you a lot here. You can change your changes here again later.

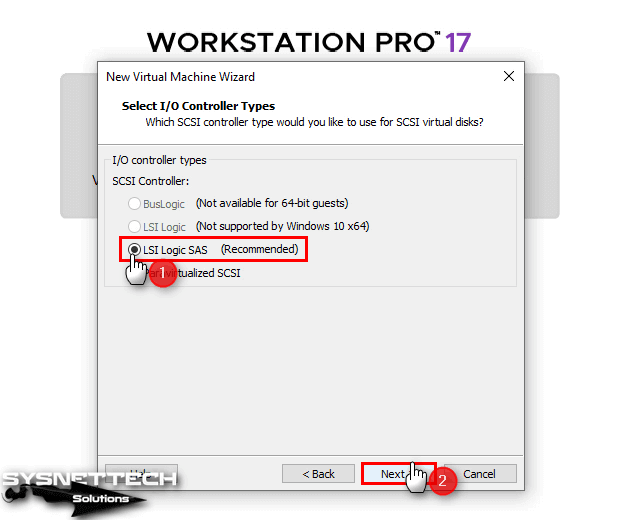
Step 11
In the Select I/O Controller Types window, select the LSI Logic SAS option selected by default and click Next.
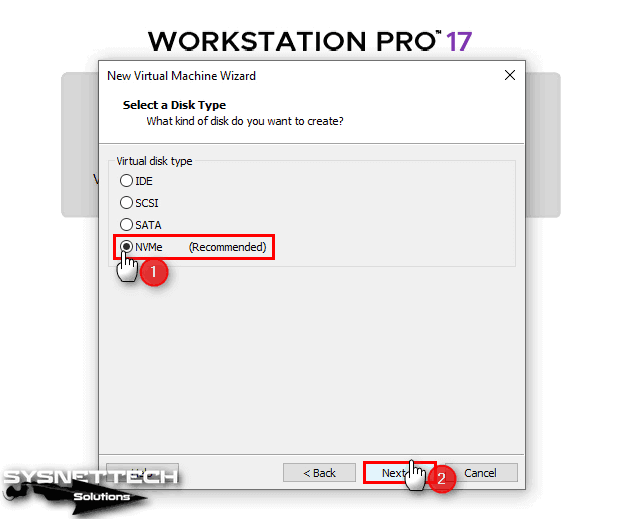
Step 12
In the Select a Disk Type window, NVMe is selected for the virtual disk type for Windows 10. In the latest versions of the VMware program, the NVMe option has been added, resulting in a significant performance increase in virtual machines.
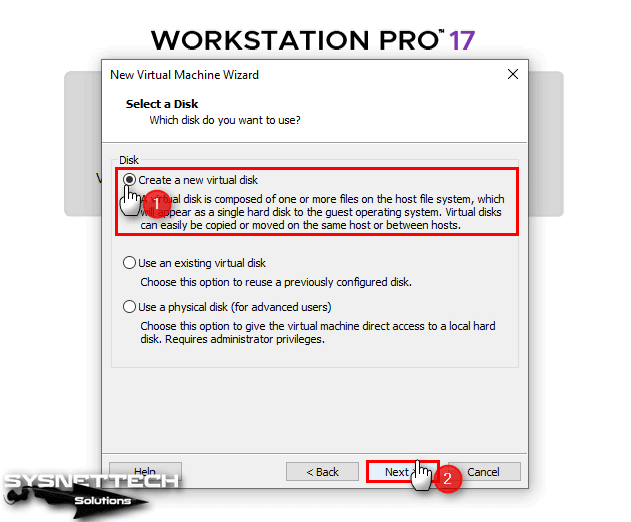
Step 13
There are three options in the Select a Disk window, as you can see from the image below. The disc options here have been developed for very different purposes.
- Create a New Virtual Disk: This option allows you to create a clean new disk for the system you are going to install.
- Use an Existing Virtual Disk: This option allows you to add the disk of a virtual machine you have previously set up.
- Use a Physical Disk: This option is recommended for advanced users. You can improve your performance by adding a physical disk to the VM. With this option, it will be more efficient to install ESXi and create VMs.
Step 14
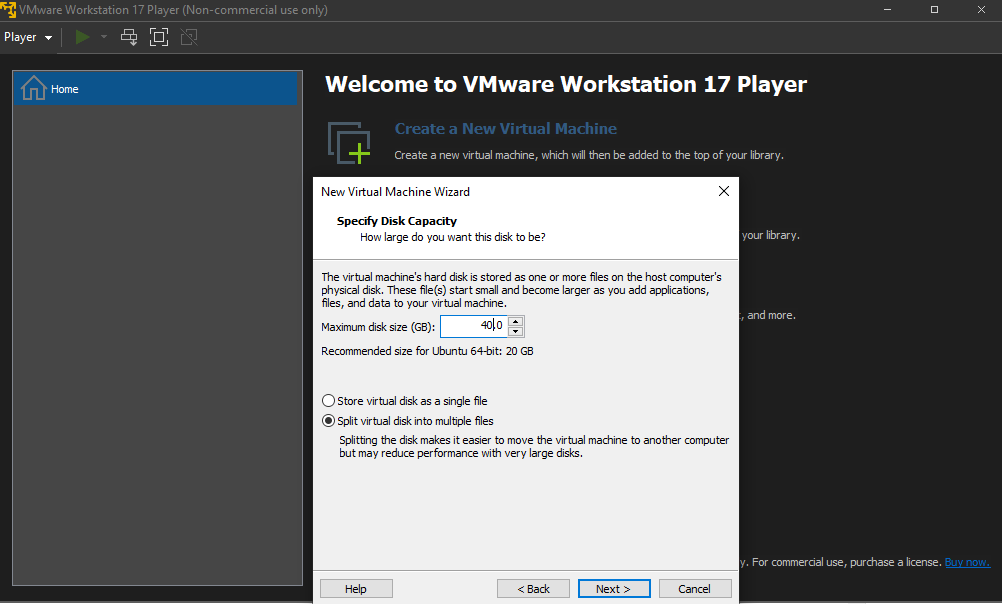
After choosing the Create a New Virtual Disk option in the previous step, you will be greeted by the disk capacity window as below. In this step, there are configuration settings of the disk you will create for the VM.
- Allocate all disk space now: With this option, the disk space specified for the VM will be reserved from the host’s disk space. Thus, when the additional disk is needed due to the operations performed on the VM, the virtualization software will not tire your computer to create additional disk space for the VM.
- Store virtual disk as a single file: This option allows the VM’s disk file to be stored as a single file.
- Split virtual disk into multiple files: This option splits the VM’s disk file into various parts but is confusing as it will create more than one file in the installation location. If you have an ancient computer, you can get some performance boost by enabling this option, but this is not necessary for today’s new technology computers.
Although it is essential for performance, we do not recommend that you select the “Allocate all disk space now” option for test installations only.
In this window, configure the size of the virtual disk in the Maximum Disk Size (GB) part only and select the “Store virtual disk as a single file” option.

Step 15
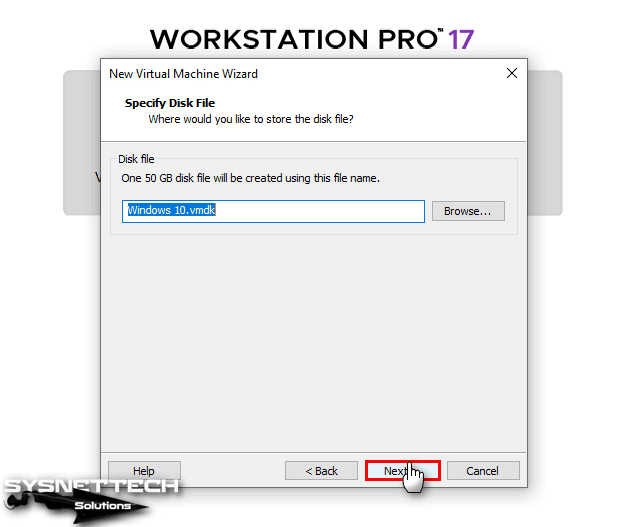
In the Specify Disk File window, you can specify how the virtual disk will be named in the location where it will be stored, but leave the name of the virtual disk file as default and click Next.
Step 16
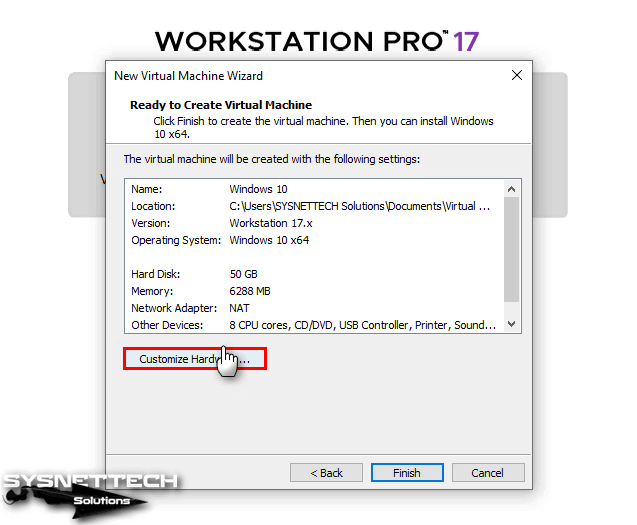
At the final stage of the setup steps, click on the Customize Hardware button to configure processes such as the processor virtualization feature, adding an ISO image, or adding or removing new hardware.
Step 17
In the Processor window, there are essential options for virtual machine performance.
- Virtualize Intel VT-x/EPT or AMD-V/RVI: It enables the virtualization feature for guest machines on Intel and AMD-based host machines. If your host does not support virtualization, these options will not work for guests.
- Virtualize CPU Performance Counters: This option is often used by software developers running on a virtual machine. As VMware has stated in this document, if you enable this setting, you can only move the VM to a host computer with compatible performance counters. Also, if the Fault Tolerance feature is enabled in the BIOS software of the ESXi host machine and the Performance Counter is used, some virtual counters may not work correctly on the VM.
- Virtualize IOMMU (IO Memory Management Unit): This option interacts with the host machine’s I/O devices directly with the VM. That is, hardware with high processing power, such as a graphics card, uses the DMA structure when directly accessing Memory. DMA in virtual machines is remapped by software, but DMA devices may fail in a virtual environment. Therefore, the IOMMU feature allows the host devices to be used on guest machines by remapping management.
Here, you can check all options to enable virtualization and memory management features, as in the image below.

Step 18
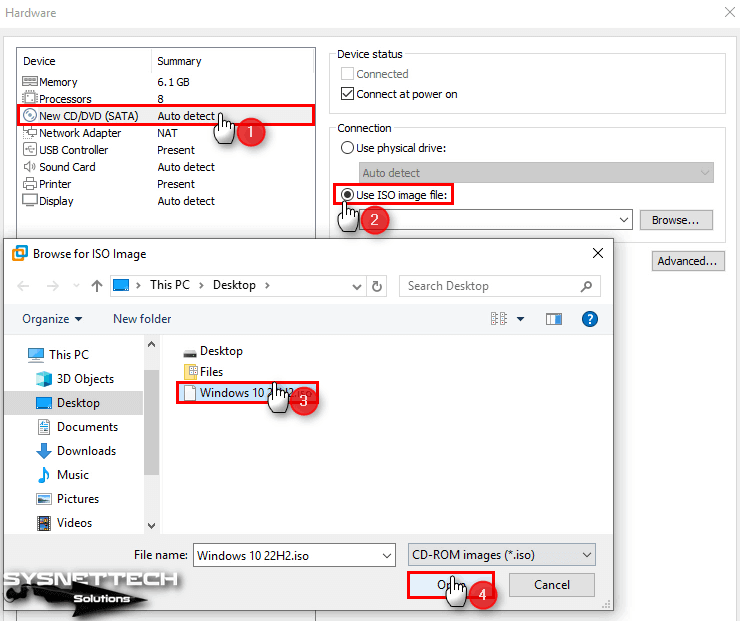
In the Hardware window, if there is a device you do not want to use on the VM, you can delete it. For example, you can remove printer and sound card devices.
Now, to add a Windows 10 ISO file to the virtual machine you have prepared, click the New CD/DVD (SATA) device and then click the Browse button in the Use ISO Image File option.
Select the ISO file you downloaded or have on your computer and add it to the program by clicking the Open button.
Step 19
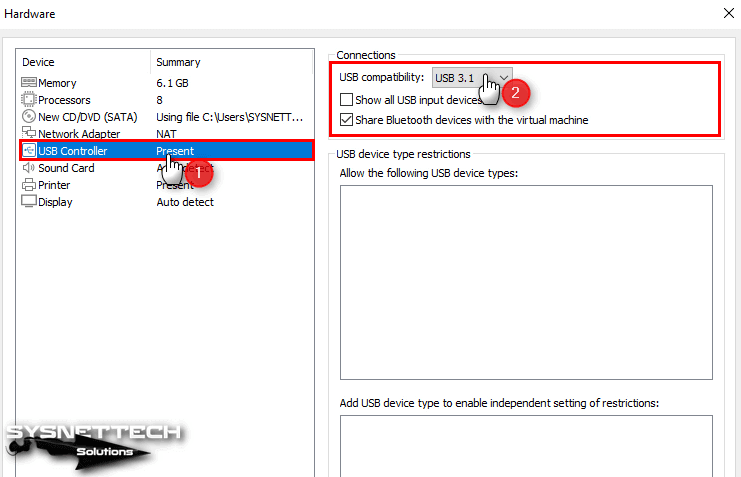
Change the compatibility mode to 3.1 in the USB device settings to facilitate faster file transfer between the host and your VM.
Step 20
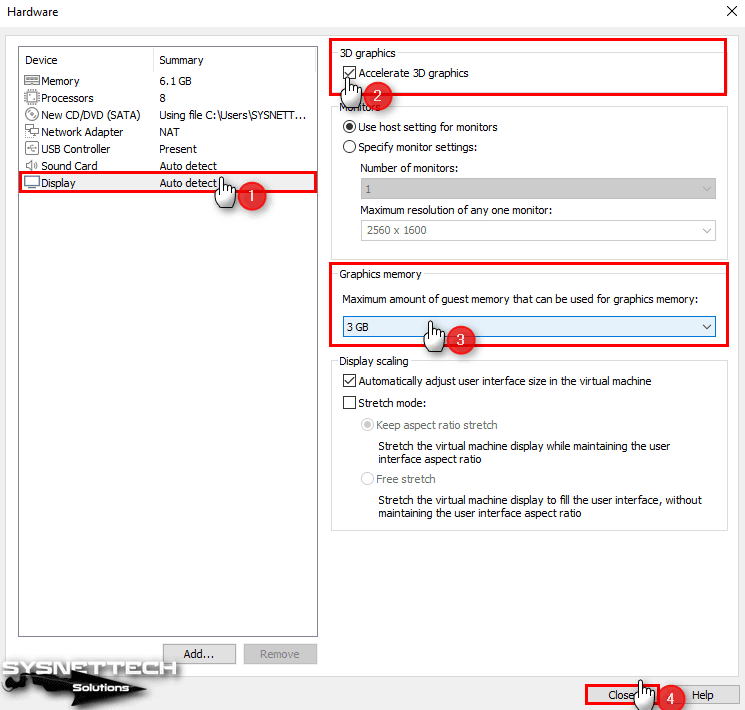
Check that the “Accelerate 3D Graphics” option under 3D Graphics in the Display tab is enabled. This feature allows you to use the power of your video card to use the VM with more performance. It also allows you to run the software with high processing power inside the VM.
In the Graphics Memory section, you can see the default value of 8 GB. In order to use the value here fully, you need to make the RAM value of the virtual machine 16 GB. Otherwise, this feature will not be activated. If your host machine’s RAM capacity is 32 GB, you can get a lot of efficiency in terms of virtualization.
Step 21
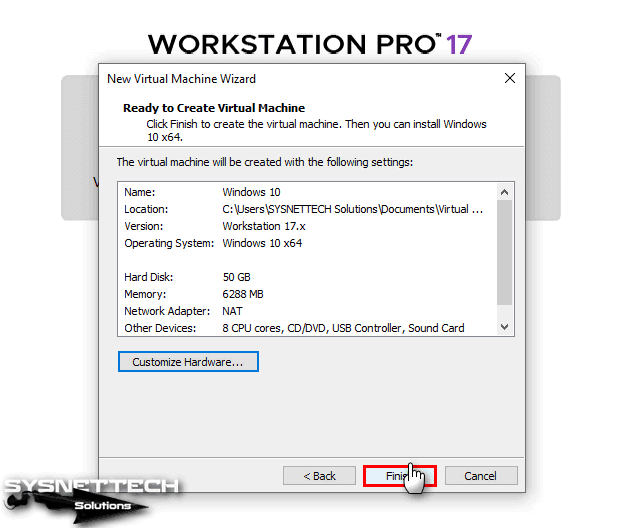
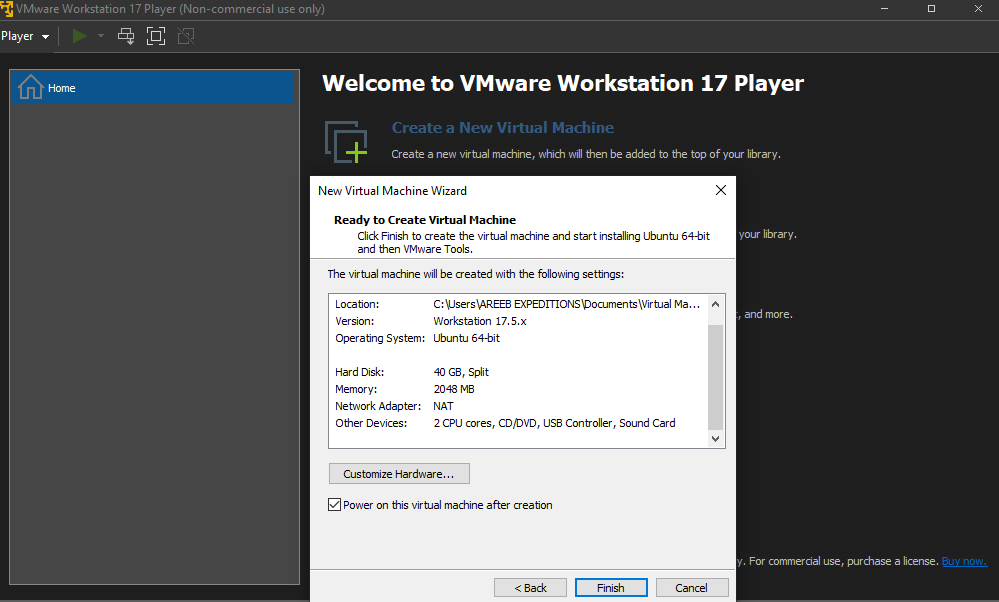
Information such as the hardware properties of the virtual machine and the installation location is included in the summary window. Click the Finish button and then proceed to the Windows installation.
Step 22
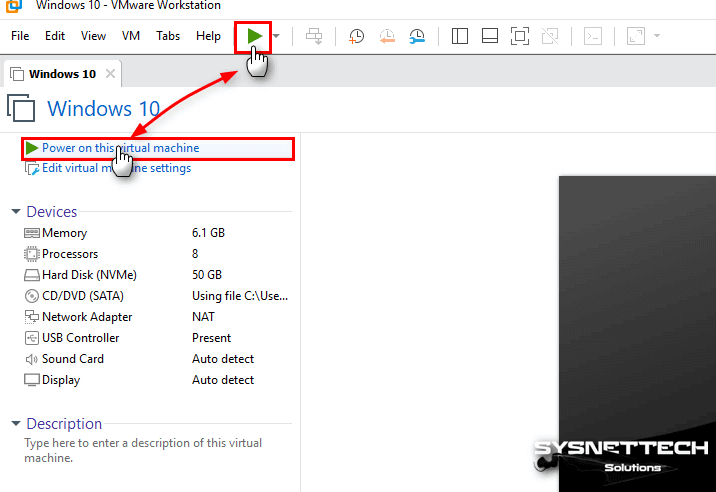
As in the image below, you can run the VM using both the “Power on this virtual machine” option and directly clicking the green start button.
Step 23
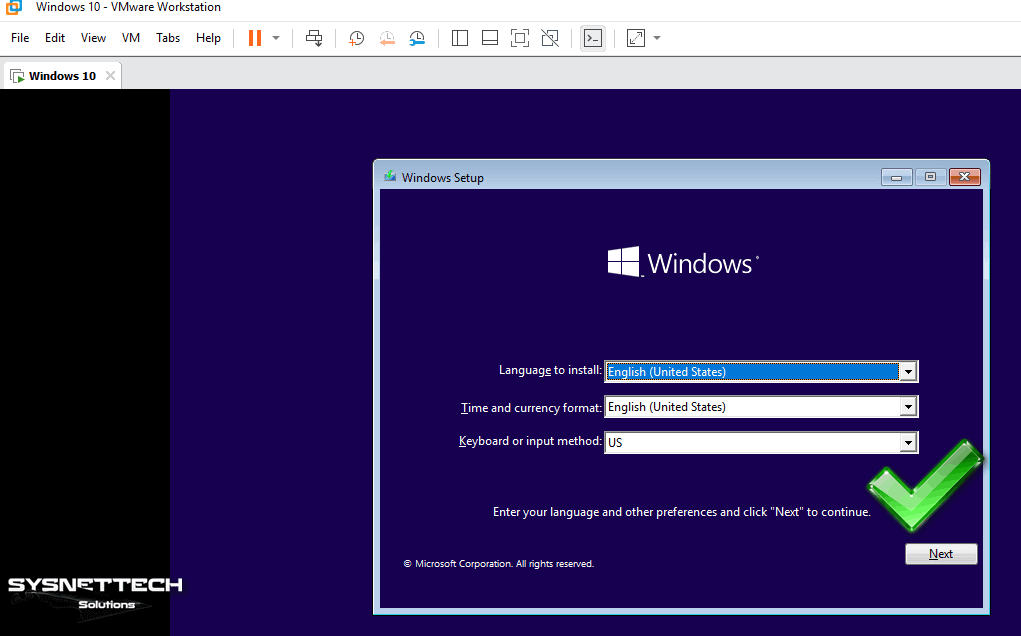
After clicking the Start button, you can see that the virtual operating system boots with the ISO file you added.
How to Install VMware Tools
After creating and configuring a new virtual machine and then installing a Windows 10 system, you need to install VMware Tools to improve the guest machine’s performance.
Suppose you use the guest operating system without installing VMware Tools. In that case, you will experience significant performance loss, and the screen resolution of the virtual machine will not fit the whole screen. Or you will not be able to transfer files between the host computer and the guest computer using the drag and drop method.
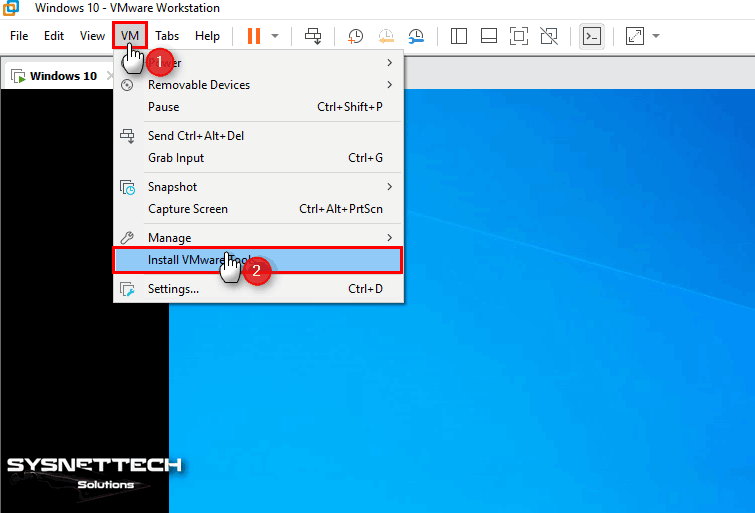
Step 1
To install VMware Tools on a Windows 10 virtual machine, first, click on the VM from the tool menu and then click on “Install VMware Tools.”
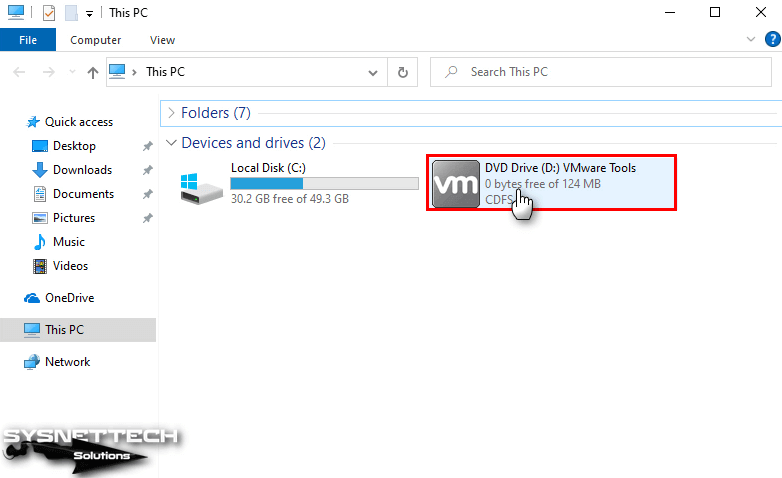
Step 2
If the installation wizard does not open in the lower right corner of the operating system, open This PC and double-click the DVD drive as in the image below.
In the User Account Control window, click the Yes button to allow the VMware Tools tool to make changes to your system.
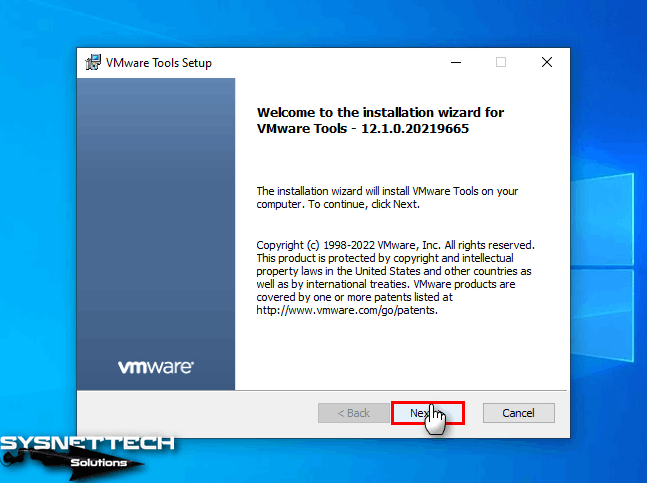
Step 3
When the VMware Tools Wizard window opens, click the Next button to continue.
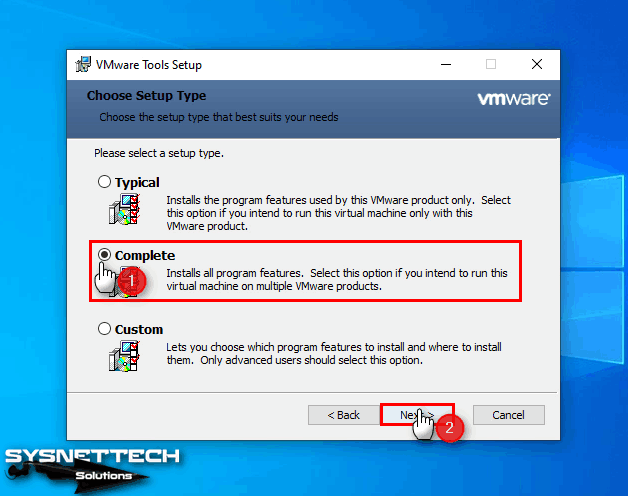
Step 4
To use the VM you created in the Choose Setup Type window in other VMware products, select the Complete option and click Next.
Step 5
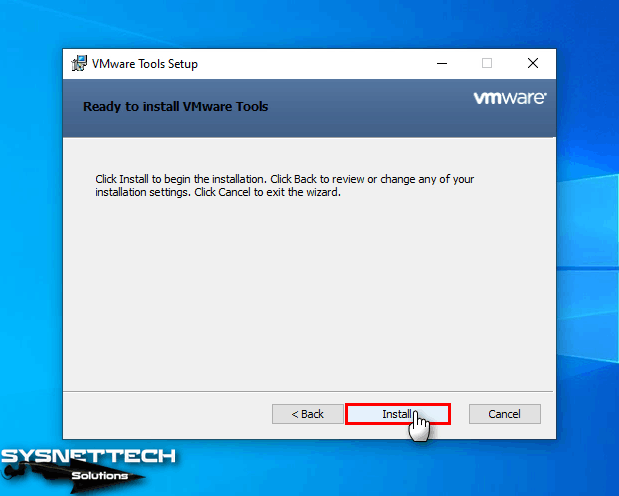
If you want to make changes to the installation settings, click the Back button. In this window, click the Install button to start the installation.
Step 6
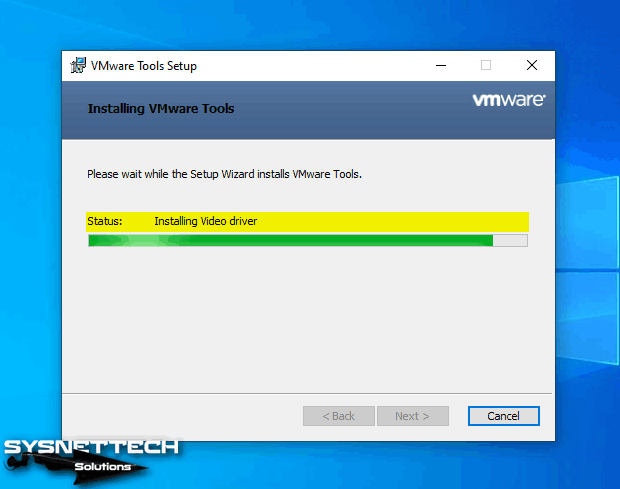
In the status section, you can see the necessary drivers for the devices you use on the host machine while installing.
Step 7
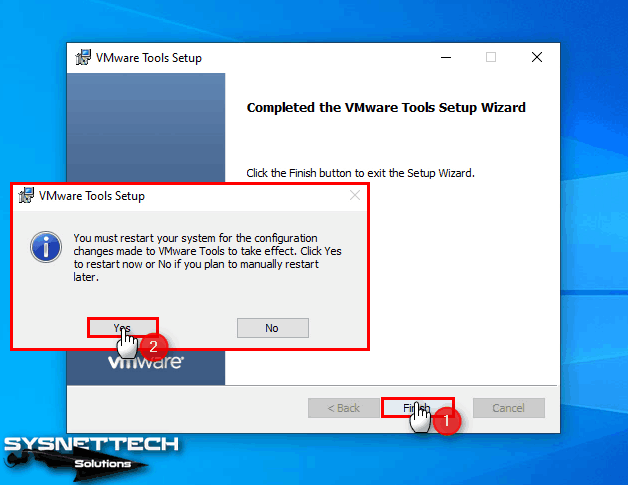
After installing the virtual computer tools, click Finish. Restart the system so the changes you made on your virtual computer take effect.
Step 8
When you view the VM menu again after installation, you can now see that the relevant software has been successfully installed. You can also check that the screen expands when you click View / Full Screen to run the Windows 10 guest machine in full-screen mode.

Step 9
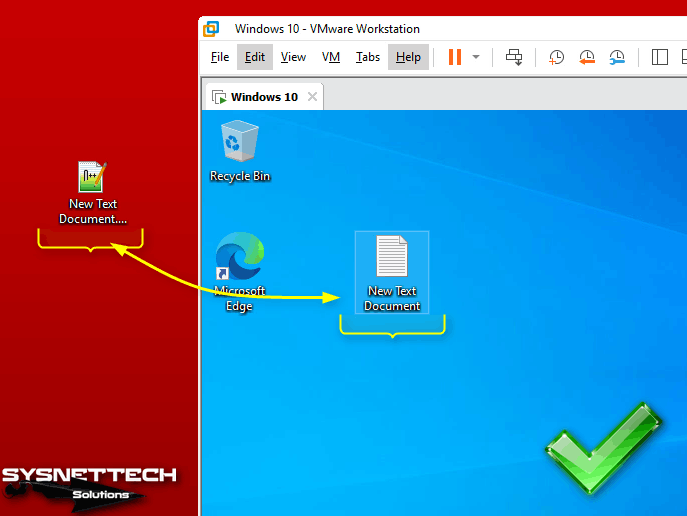
Drag and drop a text file from the host to the guest machine to verify if the VMware Tools software is running. If the “+” sign appears next to the mouse cursor, as in the image below, it means that the file can be copied to the virtual machine.
How to Delete a Virtual Machine on VMware
After all the operations you have done, if you decide to delete the virtual machine you have installed with VMware virtualization software or if you do not want your computer to take up space on the storage device, you must delete it entirely from your system.
The installation files of the virtual machine you installed on an external host disk by following the above steps are in the C:\ drive. In the Virtual Machine Details section, you can see the location where the VM is installed in the Configuration File label.
On VMware Workstation, you can see the list of VMs you have installed in the Library area on the left. Now, if you right-click on the Windows 10 x64 you have installed and select the Remove option, you will only delete the VM you have installed from the Library. However, if you want to add the VM back to the Workstation from the installation location, double-click it.VMX file.
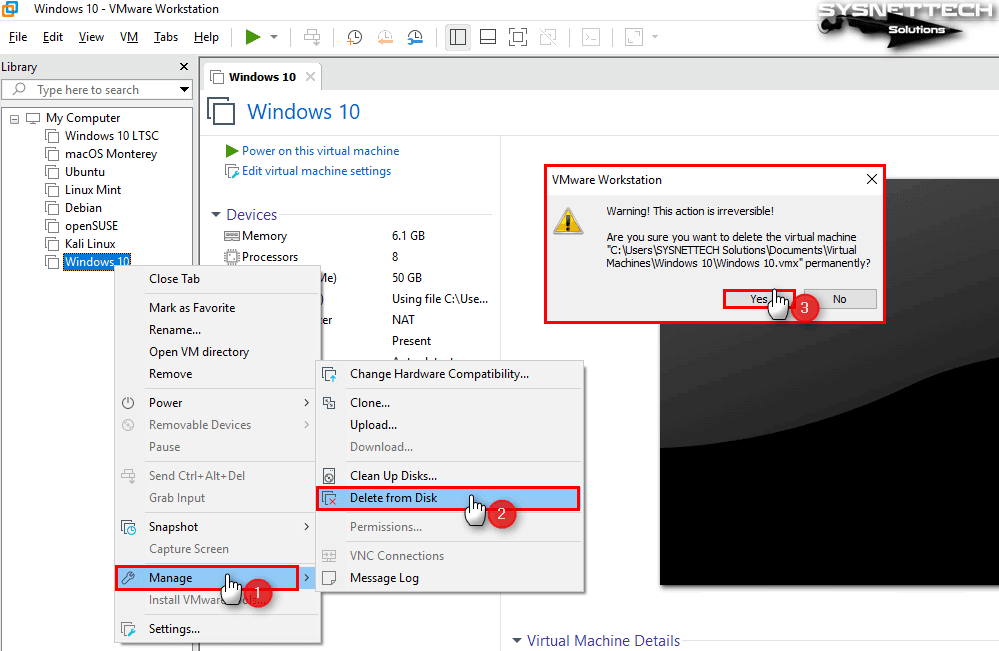
Now, to remove the VM altogether from your host computer, right-click on Windows 10 x64 and click Manage from the pop-up options. Then click “Delete From Disk” to delete all files from the host machine’s disk.
You will get a message in the warning window below that this action is essential. Click the Yes button in the warning window that states that the virtual machine deletion cannot be undone. This time, when you check the location where the virtual computer is installed, you can see that all files have been deleted this time.
Video
Creating Virtual Computers in Old Versions
Creating a new virtual pc using the old or new versions of VMware Pro software is almost the same. Only new versions have certain features. If you have an old VMware Pro license, you can prepare a new VM by following the steps in this article.
Frequently Asked Questions (FAQ)
- What are the basic requirements for creating a virtual machine in VMware?
First, we have some basic requirements for a virtual PC. First, you need to have a computer running a supported version of VMware software (like VMware Workstation or VMware Player). Then, you need to make sure you have enough hardware resources, including CPU, RAM, and disk space. Finally, you need to get an installation media (CD/DVD, ISO file, etc.) for the operating system you plan to install on your VM.
- How do I get started creating a virtual machine in VMware?
If you have your basic requirements, there are some basic steps to creating a virtual machine. First of all, open VMware Workstation or Player. Then, click “Create New Virtual Machine”. For a standard configuration, select “Typical” and click “Next.” Then, choose the installation method for your operating system (use ISO file or physical media).
After these steps, specify the OS version and VM name & location. Plus, configure hardware resources (change RAM, CPU, and disk allocation as needed). Finally, click “Finish” to create your VM.
- Can I customize the VM’s hardware settings?
Yes, you can customize your VM even after you’ve set up its hardware. For example, you might want to upgrade the RAM or add additional hard drives. To do this, right-click on the VM in the VMware interface and select “Settings.” From there, adjust specific hardware configurations to suit your needs.
- How do I install an operating system on my new virtual PC?
To install an OS on your VM, first make sure your VM is powered on. Then, connect your installation media or select your ISO file. As soon as your device boots up, you will see the installation wizard. You can install it just like you would on a physical machine, following the on-screen instructions to complete the system installation.
- What should I do if the VM does not start?
If your VM doesn’t start, make sure you have connected your installation media correctly. Plus, make sure it meets the hardware requirements. And finally, verify that virtualization is enabled in your BIOS/UEFI settings. Also, review any error messages that appear for additional troubleshooting steps. I recommend researching official sources if necessary.
- Where can I find more help or resources?
There may be times when you need more help. In such cases, refer to the official VMware documentation on their website. You may also consider seeking technical support on sites such as community forums.
Conclusion
In short, you can easily create a virtual machine with VMware Workstation 17 on your Windows 11 & 10 computer. In this way, you can benefit from virtualization by gaining flexibility in your system.
Moreover, you can create a virtual environment for yourself with the steps in our guide. Thus, you can take a step toward software testing, development, or learning in your environment.
Moreover, the advanced settings and customization options of VMware Workstation software are suitable for users of all levels. However, I can say that it is a complete virtualization solution for both novices and professionals.
As a result, I recommend that you install VMware Tools when you prepare your virtual machine. That is, this tool provides seamless interaction between your primary and guest systems.
С недавнего времени ПО для виртуализации VMware Workstation Pro (Windows и Linux) и VMware Fusion (MacOS) стало бесплатным для личного использования. И, если виртуальные машины VirtualBox или Hyper-V вам по какой-то причине не подходят, можно опробовать этот вариант.
В этой инструкции для начинающих о том, как скачать и установить VMware Workstation Pro, создать и выполнить первоначальную настройку виртуальной машины с Windows. Действия в VMware Fusion на MacOS по большей части аналогичны и не должны вызвать каких-либо проблем даже у начинающих пользователей.
Установка
Для загрузки VMware Workstation Pro с официальной страницы на сайте требуется регистрация, а для пользователей из РФ — ещё и использование VPN.
Однако, если зайти на эту страницу, затем выбрать последнюю доступную версию, перейти далее во вложенную папку «Windows\core», вы сможете загрузить архив с установщиком VMware Workstation Pro без всего перечисленного.
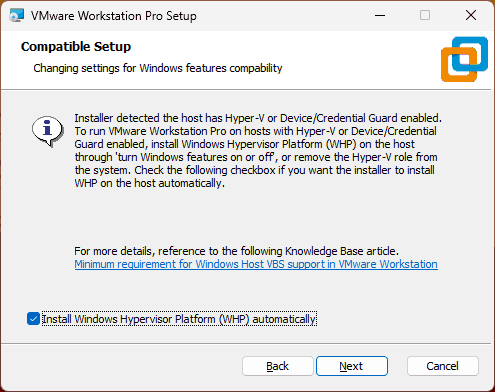
Сам процесс установки можно выполнять с параметрами по умолчанию, а какие-то нюансы отсутствуют, за исключением случая, когда в Windows включен Hyper-V. В этом случае вы увидите следующее окно:
Возможные действия:
- Установить отметку «Install Windows Hypervisor Platform», в случае если дальнейшее использование Hyper-V требуется.
- Не устанавливать отметку, но в дальнейшем отключить Hyper-V в Windows.
После установки VMware Workstation Pro выполните перезагрузку компьютера и запустите VMware Workstation Pro. При первом запуске вам будет предложено ввести ключ продукта:
Выберите опцию «Use VMware Workstation for Personal Use, чтобы использовать программное обеспечение бесплатно в некоммерческих целях.
Создание виртуальной машины в VMware Workstation Pro
С учетом того, что статья «для начинающих», сначала о том, что такое виртуальная машина. Виртуальная машина, если упрощённо — это виртуальный компьютер, запущенный как обычная программа на вашем основном компьютере (хост), на котором вы можете устанавливать операционные системы (гостевая ОС), программы, работать с ним как с обычным компьютером.
Этот виртуальный компьютер может быть в разной степени изолирован от основной операционной системы, что, например, упрощает и делает более безопасным тестирование сомнительных программ, а создание снимков состояния виртуальной машины позволяет почти моментально возвращаться к её нужному рабочему состоянию.
Процесс создания виртуальной машины будет состоять из следующих шагов (предварительно имеет смысл проверить, что в БИОС включена аппаратная виртуализация, подробнее — в этой статье):
- Нажмите «Create a New Virtual Machine» (создать новую виртуальную машину).

- Выберите вариант конфигурации — Typical (стандартный, многие параметры задаются автоматически) или Custom (пользовательский, все параметры задаются вручную). Далее будет рассмотрен второй вариант. Если вы не знаете, какие значения параметров установить на каком-то из шагов, достаточно оставить значения по умолчанию: с большой вероятностью всё будет работать исправно.

- Укажите, с какой версией VMware Workstation должна быть совместима виртуальная машина. В нашем случае что-либо менять не требуется.
- Выберите, откуда будет устанавливаться операционная система в виртуальной машине: это может быть подключенный накопитель с ОС или ISO образ (Пример загрузки: как скачать ISO Windows 11).
- Укажите имя виртуальной машины (любое удобное вам) и путь к папке, где будут храниться её файлы.
- Для Windows 11 потребуется указать пароль и подтверждение пароля для виртуального модуля TPM — можно просто сгенерировать его кнопкой Generate, по умолчанию данные автоматически сохраняются в диспетчере учетных данных.
- Выберите тип загрузки — UEFI или BIOS (Legacy), при необходимости включите Secure Boot (безопасную загрузку).
- Укажите число виртуальных процессоров и ядер на процессор. Учитывайте, что ядра и потоки выделяются из вашего центрального процессора и не следует «отдавать» их все виртуальной машине.
- Укажите объем оперативной памяти для виртуальной машины. Аналогично предыдущему пункту, она будет выделена из оперативной памяти хоста.
- Выберите тип сетевого подключения. Для начинающего пользователя лучше оставить вариант NAT (виртуальная машина будет иметь доступ в Интернет, но будет использоваться IP хоста), однако для каких-то задач может потребоваться отключить доступ к сети, включить мост (у виртуальной машины будет собственный IP-адрес в вашей локальной сети), либо создать виртуальную частную сеть между хостом и гостевой системой.
- Выберите тип контроллера виртуального диска. Здесь лучше оставить значение по умолчанию.
- Выберите тип виртуального диска: IDE, SCSI, SATA или NVMe
- Укажите, следует ли создать новый виртуальный диск, использовать уже имеющийся или же подключить физический диск в качестве диска виртуальной машины. Здесь будем использовать первый вариант.
- Укажите размер диска и тип хранения: в нескольких файлах или в единственном (Single) файле.
- Укажите место сохранения файла виртуального диска.
- Посмотрите список параметров виртуальной машины и нажмите «Finish».
- Виртуальная машина будет создана и автоматически запущена с накопителя, указанного на 4-м шаге. Далее потребуется установить операционную систему так же, как это делается на реальном компьютере (пример: Установка Windows 11).


Несмотря на то, что после последнего шага виртуальная машина создана, а гостевая система установлена, часть функциональности работать не будет.
Для того, чтобы это исправить следует установить набор средств интеграции и необходимых драйверов VMware Tools:
- Это можно сделать через меню виртуальной машины (VM — Install VMware Tools), однако при этом вы можете получить сообщение об ошибке скачивания необходимых файлов.

- Второй вариант: зайдите на страницу загрузки VMware Workstation Pro, но не в папку Core, а в папку Packages, скачайте архив tools для вашей ОС (здесь имеется в виду гостевая ОС), и распакуйте его.

Загруженный файл ISO с VMware Tools потребуется подключить в виртуальной машине: нажмите по заголовку вкладки с виртуальной машиной правой кнопкой мыши, перейдите в Removable Devices — CD\DVD — Settings и укажите путь к ISO образу.
Файл ISO будет подключен в виртуальной машине в гостевой ОС как обычный компакт диск, а уже с него можно будет запустить установщик VMware Tools:
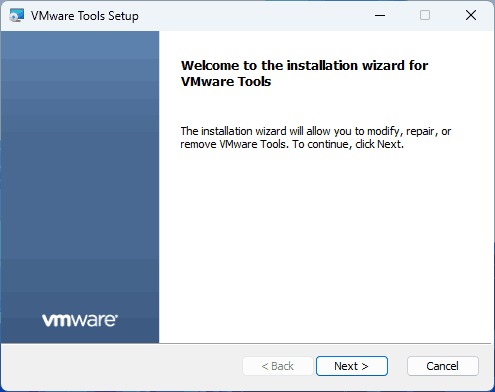
После установки VMware Tools и перезагрузки гостевой ОС виртуальной машиной можно полноценно пользоваться:
- Будут установлены необходимые драйверы в гостевой ОС, что сделает возможным использование перетаскивания и копирования-вставки файлов между хостом и гостевой ОС.
- Будет доступно использование USB-устройств с хоста: флешек, микрофонов, камер и других. Список доступных устройств хоста вы увидите в панели снизу, нажав по ним можно будет подключить их к гостевой ОС. При подключении накопителей будет появляться запрос о том, к какой системе вы хотите его подключить.
- Будет задействовано аппаратное ускорение графики (для ускорения 3D графики потребуется включить опцию в параметрах виртуальной машины в разделе Display).
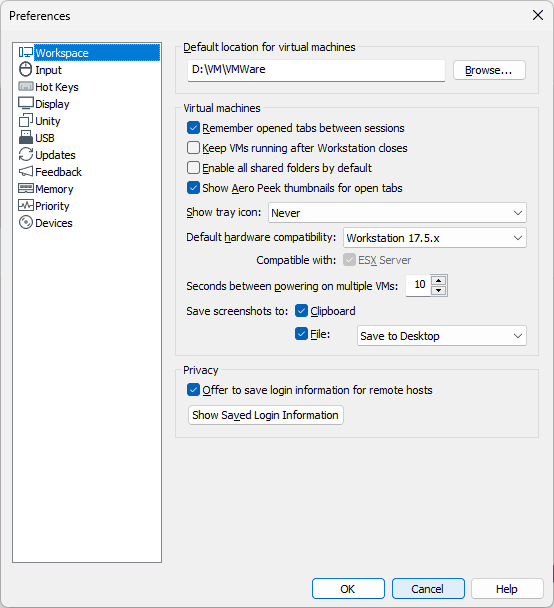
Дополнительно рекомендую изучить настройки как VMware Workstation в меню Edit — Preferences, влияющие на все виртуальные машины и на ПО в целом:
Так и самой виртуальной машины в меню VM — Settings (или в меню по правому клику на заголовке вкладки виртуальной машины), относящиеся к конкретной виртуальной машине:
Здесь на вкладке Hardware вы можете изменить аппаратные характеристики виртуальной машины, добавить новое оборудование (например, второй виртуальный диск), а на вкладке Options изменить параметры общих папок с хостом, создания снимков состояния (снэпшотов), изоляции виртуальной машины и другие. Учитывайте, что часть параметров можно изменить только при выключенной гостевой ОС.
Надеюсь, для начала использования этих сведений будет достаточно. Если же у вас есть вопросы, касающиеся VMware Workstation Pro, или я что-то упустил, вы можете оставить комментарий ниже.
VMware is a virtualization software that allows users to run multiple operating systems on a single physical machine. It creates a virtual environment where you can install and run different operating systems simultaneously without the need for separate hardware. If you want to perform experiments with different operating systems VMware is a good option.
In this post, we will discuss the knowledge and steps to install VMware Windows 10 system. Further will discuss two popular options offered by VMware the VMware Workstation Player free for non-commercial use and the VMware Workstation Pro paid with advanced features.
Understanding VMware
Before diving into the Virtual machine installation process it is important to identify the VMware version that best suits your requirements. Here’s a quick breakdown:
- VMware Workstation Player: This free-to-use option is ideal for basic virtualization needs. It allows you to run various guest operating systems within virtual environments on your Windows 10 machine. While it provides core functionalities it lacks some advanced features found in the Pro version.
- VMware Workstation Pro: This paid software provides power to users and professional environments. It offers a wider range of functionalities compared to Player including the ability to create and manage complex virtual networks develop secure environments for testing and take advantage of enhanced performance features.
Prerequisites
To process a smooth VMware installation Windows installation make sure your system meets the following minimum requirements:
- Operating System: Windows 10 a 64-bit recommended for optimal performance.
- Processor: 2 GHz or faster 64-bit processor.
- Memory: 2 GB of RAM minimum and 4 GB or more recommended.
- Hard Disk Space: 200 MB of free disk space for the installer and additional space required for each virtual machine.
- Internet Connection: An internet connection is necessary for downloading the installer and keeping the software updated which is optional for Player but required for Pro registration.
Installing VMware in Windows 10
First, we need to download the VMware installer by heading over to the official VMware website using your preferred web browser. Navigate to the “Products” section and locate the download page for either “VMware Workstation Player” or “VMware Workstation Pro” depending on your chosen version.

Ensure you select the installer compatible with your Windows 10 operating system. Click the “Download” button to save the installer file usually a .exe file to a location on your computer.
For VMware Workstation Player
Once the download is complete locate the installer file and right-click on it. Select “Run as administrator” to launch the installer with administrative privileges. This is important for granting the software necessary permissions during the installation process.

The VMware Workstation Player setup wizard will appear. Through the license agreement and click “I accept” to agree to the terms.
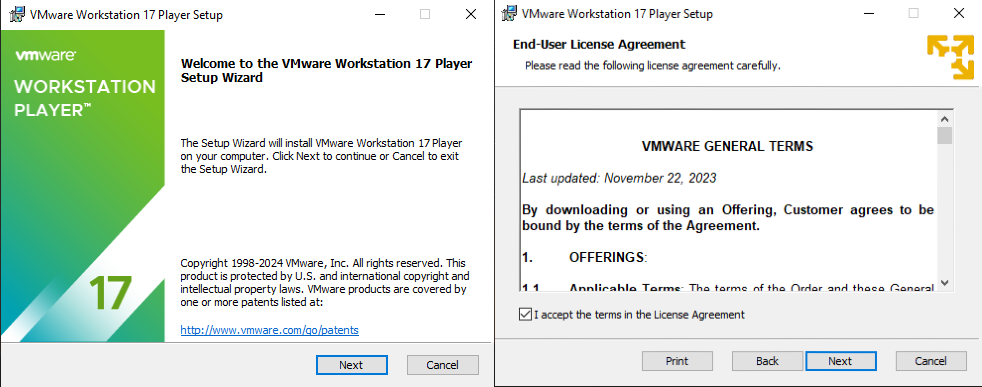
Next, the screen shows the choice of a default installer and a “Custom” installation. This option installs the software with default settings which is suitable for most users. However, if you are working with advanced configuration options you can choose “Custom” to personalize the installation directory and components.
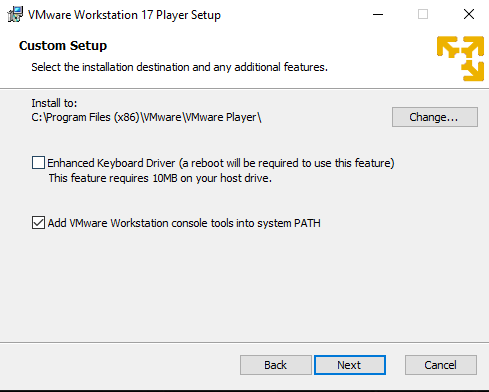
Click “Next” to proceed with the installation. The setup wizard will initiate the installation process. This might take a few minutes depending on your system’s speed.
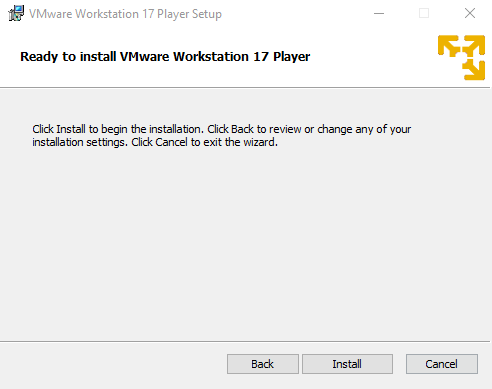
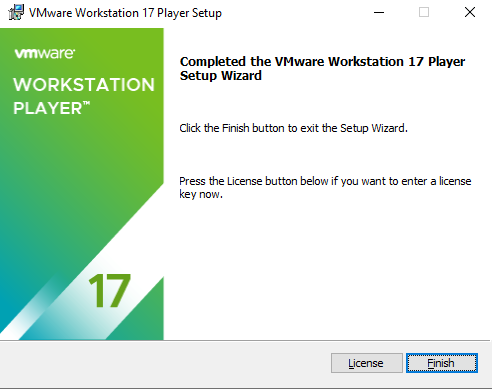
Once the installation is complete you will be prompted to choose whether to restart your computer now or later. A restart is recommended to ensure all necessary changes take effect. Click “Finish” to complete the installation process.
For VMware Workstation Pro
Follow the same steps as mentioned in the Player in installation. The difference is during the installation process you will encounter a registration screen for VMware Workstation Pro. You will need to enter your license key obtained during purchase to activate the full functionality of the software.
Proceed with the remaining installation steps as outlined in the Player installation guide.
Ready to Experience the Power of VM Hosting!
Take your virtualization journey to the next level with Ultahost’s VM hosting increasing the performance, flexibility, and security of Kernel-based Virtual Machine technology for your business.
How to Use VMware Workstation
Now that VMware is up and running, you can explore its functionalities to create and manage virtual machines. Here is an overview of the VMware workstation Windows 10 process:
Locate the VMware Workstation Player or Pro icon on your desktop or within the Start menu. Double-click the icon to launch the application.
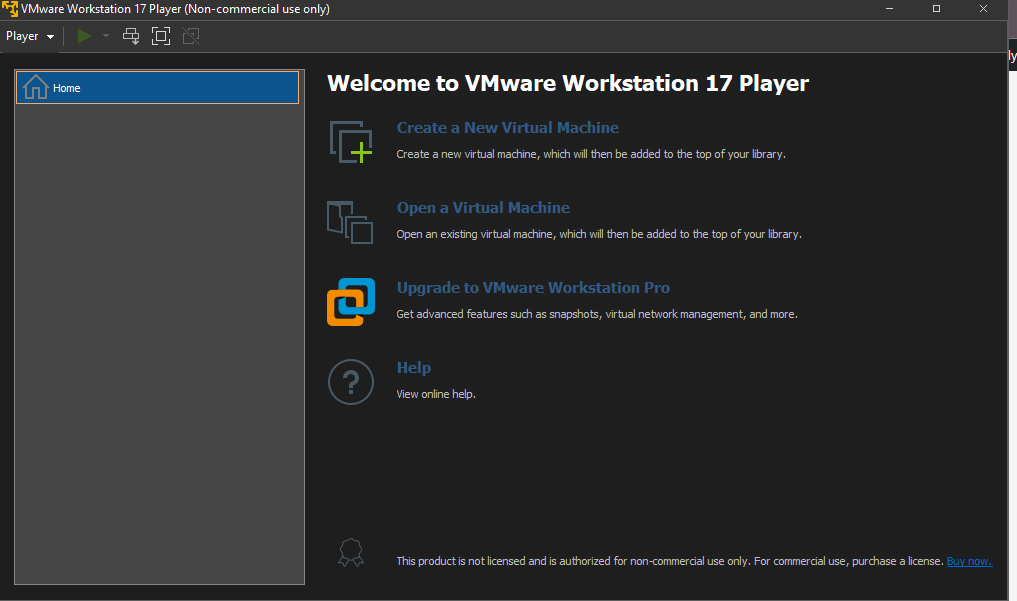
Click the “Create a New Virtual Machine” button within the VMware interface. This will initiate the virtual machine creation wizard. You will be presented with several options for creating a virtual machine.
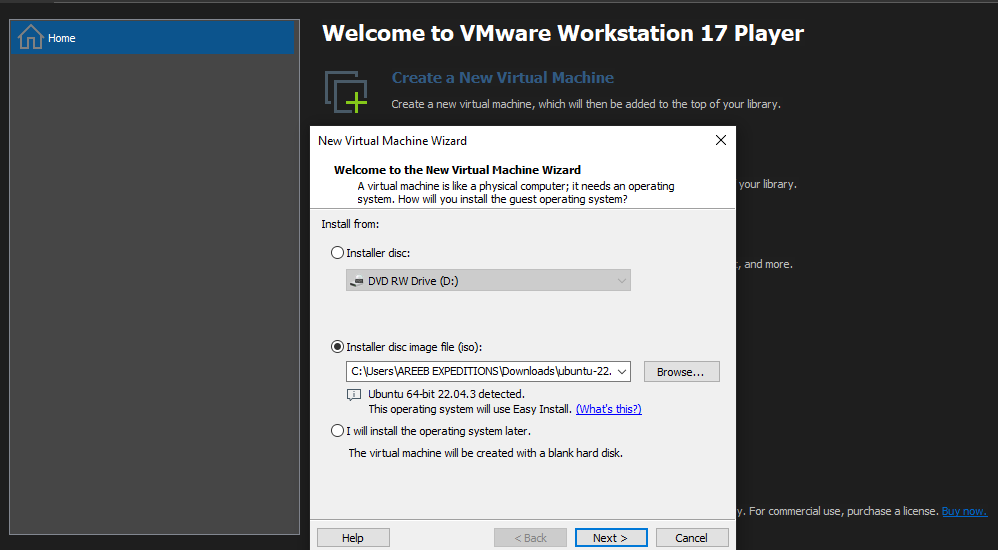
- Installer disc image ISO: If you have an installation disc image for the guest operating system you want to install Kali Linux or Ubuntu select this option and browse to the location of the ISO file on your computer.
- Other: For advanced users, there are additional options like creating a virtual machine from an existing virtual machine file or copying an existing virtual machine.
VMware will attempt to automatically detect the guest operating system you’re trying to install based on the chosen installation source. Assigning virtual machine hardware is an important step to allocate resources for your virtual machine including the amount of RAM the number of virtual processors CPUs, and the storage space for the virtual machine’s hard disk.
VMware offers various advanced settings for experienced users to configure aspects like network connectivity, shared folders between the host and guest machines, and USB device access. Once you have completed the configuration steps, click “Finish” to finalize the virtual machine creation.
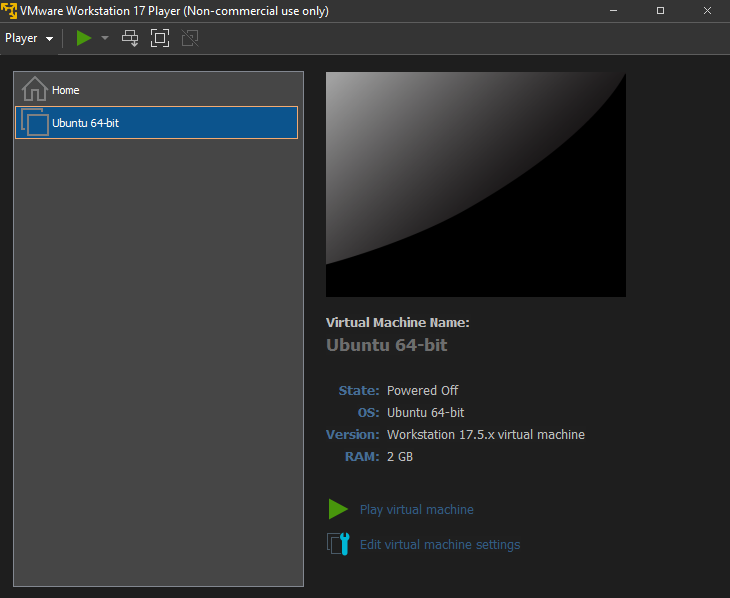
You can then power on the virtual machine by clicking the “Play virtual machine” button.
Now successfully you can run the Linux operating system through VMware. Remember to check the system requirements for the guest operating system you plan to install within the virtual machine.
Conclusion
VMware empowers you to utilize the potential of virtualization on your Windows 10 machine. VMware offers a versatile solution to run multiple operating systems, test software, and enhance your overall computing experience.
Ultahost’s Windows 10 servers offer superior processing power memory and storage compared to running VMs on your local machine. Focus on running demanding applications or managing complex virtual environments seamlessly, let Ultahost provide the power and resources you need to virtualize with confidence.
FAQ
Can I install VMware on any version of Windows 10?
Yes, VMware can be installed on all editions of Windows 10 including Home and Pro.
Do I need to pay to install VMware on Windows 10?
VMware offers both free and paid versions. You can choose based on your needs.
Will installing VMware affect my existing files on Windows 10?
No, installing VMware won’t impact your files. It creates a separate virtual environment.
Do I need advanced computer skills to install VMware on Windows 10?
No, VMware installation is straightforward and doesn’t require advanced technical knowledge.
Can I run multiple operating systems on VMware installed on Windows 10?
Yes, VMware allows you to run multiple operating systems simultaneously within Windows 10.

In this article I’ll walk you through creating a Windows 10 Virtual Machine using VMware Workstation.
Step 1) The first step is to open VMware Workstation, which can be purchased here:
Note: The free “Player” version is available here for non-commercial, personal and home use, and is limited to running a single virtual machine.

Step 2) Next, you’ll need your operating system installation DVD or ISO. In my case I purchased a new Windows 10 Pro 64 Bit OEM disk, which you’ll find on Amazon.com here:

Step 3) The next step is to click on “Create a New Virtual Machine”:

Step 4) Then choose Typical, and click on Next:
Step 5) On this screen is where you’ll select your OS DVD or ISO, and click on Next:
Step 6) If VMware is unable to identify your OS, be sure to choose the correct one from the list:
Step 7) Now name your virtual machine, and choose where you would like to store it:
Note: You’ll want to be sure the destination you choose has enough space to host your VM.
Step  On this screen we set the maximum disk size as well as a single or multiple file preference. Below I left both choices at their defaults:
 On this screen we set the maximum disk size as well as a single or multiple file preference. Below I left both choices at their defaults:
Step 9) If everything looks correct, click on Finish:
Step 10) Now power on your new VM to begin the installation process:
Step 11) At this point you may see a notice asking you to let VMware Workstation know when the installation is complete:
Step 12) In this example Windows 10 Pro 64 bit took just over 17 minutes to install.
Note: During the installation, Windows prompted me to activate the OS, but I chose not to as I want to customize Windows and take a clean snapshot prior to activating it.

Step 13) After the installation completed, I began customizing Windows. Well, with exception of the Taskbar, which can’t be personalized until after activation:

Step 14) The first thing I customize is what programs are pinned to the start menu and task bar. This allows me quick access to common utilities like the Command Prompt, Snipping tool, Calculator, etc.

Step 15) Another option I like to customize is “Windows Update,” including the disabling of the option for my VM’s OS to serve update files to other PCs.

Step 16) Under the advanced options for Windows Update you can even limit how much bandwidth is used for updates:

Step 17) Next, I like to manually run Windows Update to insure my VM’s OS is as up to date as possible before I clone it:

Step 18) Once I complete the above customization of Windows, I then take a snapshot as clone the VM in it’s pre-activated state just in case I need additional un-activated Win 10 VMs in the future:

Step 19) Next, I activate Windows, and then immediately take a snapshot and make multiple clones of the VM:
Step 20) Going forward, I only use clones of the original activated Windows 10 VM, saving the original for future cloning as needed:

If you’d like to watch a video demonstration of the above, check out Episode 21 of The Automation Minute Season 4 below:
I hope you’ve found the above information on how to create a Windows 10 VM helpful.
If you have any questions, or would like to comment on the above article, please feel free to click on the “post a comment or question” link below.
You can also become a Patron to support my work at TheAutomationBlog.com/join and in return receive free downloads of my sample, videos, and blog articles.
Until next time, Peace ✌️
If you enjoy this episode please give it a Like, and consider Sharing as this is the best way for us to find new guests to come on the show.
Shawn M Tierney
Technology Enthusiast & Content Creator
Eliminate commercials and gain access to my weekly full length hands-on, news, and Q&A sessions by becoming a member at The Automation Blog or on YouTube. You’ll also find all of my affordable PLC, HMI, and SCADA courses at TheAutomationSchool.com.
- Author
- Recent Posts
I’m a lifelong Technology Enthusiast who began programing in the early 80’s on the Apple II and VIC-20 personal computers. After earning a degree in Electronics, I worked as a Certified Controls and Information Automation Specialist for 25 years before leaving to become a full time Industrial Automation instructor and mentor at TheAutomationSchool, as well as publishing industry interviews, news, and product how-to’s at TheAutomationBlog.com. If you’re interested in my training, mentoring, or becoming a sponsor, please schedule a teams meeting with me via https://calendly.com/shawntierney/business-meeting
Discover more from The Automation Blog
Subscribe to get the latest posts sent to your email.