
Download Article
Download Article
- Using the Windows Command Prompt
- Using the Run Dialog
- Using Windows Explorer
|
|
This wikiHow teaches you how to run a Visual Basic script on a Windows PC. Visual Basic is a Windows-specific programming language, so you’ll only be able to run your script using Windows.
-

An easy way to do this is to press Windows key + S to open the search bar, type command into the bar, and then click Command prompt in the search results.
- You may also be able to open the command prompt by pressing Windows key + X and selecting Command prompt. If you don’t see this option there, you can select PowerShell –the command we’ll be using will work in both the standard command prompt and PowerShell.[1]
- You may also be able to open the command prompt by pressing Windows key + X and selecting Command prompt. If you don’t see this option there, you can select PowerShell –the command we’ll be using will work in both the standard command prompt and PowerShell.[1]
-
You can use the cd command to do this.
- For example, if the script is saved to C:\Windows\Scripts, type cd C:\Windows\Scripts and press Enter.
- The name of your script usually ends with the .VBS file extension.
Advertisement
-
Replace scriptname.vbs with the name of the script you want to run. This displays the output of the script in the window.[2]


Advertisement
-
Pressing Windows key + R’ opens the Run dialog, which allows you to select and run any script or program.
-
This opens the file browser.
-
If you don’t see your script, click the drop-down menu at the bottom-right corner and select All files instead.
- The script will usually end with the *.VBS file extension.
-
This runs the script.


Advertisement
-
This displays a list of files on your PC.
-
The script likely ends with the .VBS file extension.[3]
-
This runs the Visual Basic script.
- If the script is a console script, it will open a command prompt window and display the output.[4]
- If the script is a console script, it will open a command prompt window and display the output.[4]


Advertisement
Ask a Question
200 characters left
Include your email address to get a message when this question is answered.
Submit
Advertisement
Thanks for submitting a tip for review!
References
About This Article
Article SummaryX
1. To run a script from the command prompt, use «cscript scriptname.
2. To run a script from Windows Explorer, double-click the script.
3. To run the script from the Run dialog, open the Run dialog, browse for the script, and click OK.
Did this summary help you?
Thanks to all authors for creating a page that has been read 99,953 times.
Is this article up to date?
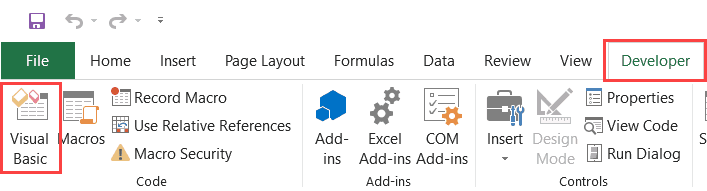
Unlock the power of Microsoft Visual Basic for Applications (VBA)! Get access to a world of possibilities for boosting productivity and efficiency. To open VBA, start with the Microsoft Office application you want to use. Then, go to the “Developer” tab in the ribbon. If it’s not visible, enable it in the settings. Click on the “Visual Basic” button in the “Code” group. This will launch the VBA editor.
The editor provides a user-friendly interface. Use it to write, edit, and run VBA code. Leverage VBA’s library of functions and objects to speed up processes and add interactive elements to documents and spreadsheets.
One pro tip: explore online resources and communities dedicated to VBA. Find helpful tips, solutions, and inspiration for creating projects. Engaging with these communities grows your skills and connects you with similar people.
By mastering VBA, you become a true power user who effortlessly automates tasks while customizing your work environment. Start exploring VBA today and witness the impact on your productivity!
Understanding Microsoft Visual Basic for Applications (VBA)
Microsoft Visual Basic for Applications (VBA) is a powerful tool. It lets users customize applications and automate repetitive tasks. Businesses and individuals can use it to improve productivity.
VBA is based on Visual Basic. This allows users to create macros. A macro is a set of instructions that do something when triggered. With VBA, users can modify Office applications to their needs.
VBA also integrates with Office apps like Excel, Word, and PowerPoint. This gives users direct access to underlying objects and properties. For example, in Excel, VBA can automate calculations or generate reports. In Word, VBA can manipulate document content or do advanced formatting.
Consider Sarah, a finance professional. She spent hours manually sorting and filtering data before calculations. She learned VBA and developed a macro. Now, with one click, she imports data, cleans it, calculates, and generates reports with visuals.
Thanks to VBA, Sarah saved time and became a valuable asset to her organization. She improved efficiency and accuracy.
System Requirements for Opening Microsoft VBA
Meeting system requirements is a must for using Microsoft VBA. Your computer should have the right specs. This includes having the correct version of Microsoft Office installed.
You must also have enough memory for VBA, or else it may crash or run slow.
Your OS should be up to date and patched. That way, you get security, bug-fixes and better performance.
Upgrade your computer if needed. Make sure to allocate memory for a smooth experience. Keep your OS and Microsoft Office up to date.
Do these things and you will unlock the potential of Microsoft VBA and enjoy its features.
Step-by-Step Guide on How to Open Microsoft VBA
Want to learn how to open Microsoft Visual Basic for Applications (VBA)? Follow this easy guide:
- Launch Office app.
- Go to “File” > “Options” or “Excel Options”.
- Click on “Customize Ribbon” or “Customize”.
- Look for “Main Tabs” and checkmark the box next to “Developer”.
- On the Developer tab, click on “Visual Basic” or the code editor icon.
Voila! You can now access VBA and explore its features.
Pro Tip: As you learn VBA, start with small tasks first. This helps you gain confidence in using this powerful programming language.
Common Issues and Troubleshooting
Using Microsoft Visual Basic for Applications can cause issues. But, there are ways to fix them.
Check the code for syntax errors. A wrong character or variable name can make the program not work. Inspecting the code line by line will show the problem and help fix it quickly.
Also, verify and update references and libraries. Missing or old ones can cause compatibility problems and errors.
Conflicts with other software applications can happen due to incompatible add-ins or plugins. Deactivate or update these if you can.
Finally, keep Microsoft Visual Basic for Applications up to date. Newer versions have bug fixes and performance improvements. This reduces the chance of issues.
Tips for Efficiently Using Microsoft VBA
Microsoft Visual Basic for Applications (VBA) – released in 1993 – is a popular tool for professionals to automate tasks in their programs like Excel and Word. Follow these tips to use it to its full potential:
- Leverage the power of Macros: Create macros to execute tasks quickly with just one click.
- Know the Object Model: Learn how objects like worksheets, charts and ranges interact with each other.
- Use Error Handling: Prevent crashing of programs by implementing error handling techniques.
- Optimize Your Code: Write efficient code by avoiding redundant operations & using variables appropriately.
Stay updated with the new features & improvements of VBA. Also, use online tutorials, forums & communities to get insights about best practices & advanced techniques. With these tips, you can maximize your productivity with Microsoft VBA and unleash your creativity!
Conclusion
Discover how to access Microsoft Visual Basic for Applications. This article outlines the steps to open the powerful tool. Developers can use it to create custom applications within Office products.
Here are the steps:
- Go to the Developer tab in the Office application.
- Select the “Visual Basic” option to launch the editor.
Gain access to coding tools and features to modify and enhance the Office application. Automate tasks, create custom commands, and boost productivity.
Exploring Microsoft Visual Basic for Applications unlocks creativity and possibilities. The user-friendly interface and online resources make it easy for any skill level.
Unlock opportunities with Visual Basic. Streamline everyday tasks or create innovative solutions. Take control of digital experiences.
Don’t miss the potential of Microsoft Visual Basic for Applications. Dive into this captivating world and unlock your programming potential!
VBA is an excellent tool in Microsoft Office suite, including MS Excel application. It can assist you to accomplish a lot of tasks not supported by the native features in Excel. Now, in this article, we will teach you to run VBA code in Excel step by step.
If you intend to write some VBA codes to achieve some of your requirements, you have to firstly figure out how to run VBA code in your Excel. Now, thereinafter, we will use MS Excel 2010 for an instance to show the detailed steps, including how to enable macro, trigger VBA editor and several means to run macro, etc.
Step 1: Show “Developer” Ribbon
- First off, launch Excel application.
- Then, go to “File” menu and click “Options”.

- In the popup “Excel Options” window, turn to “Customize Ribbon” tab.
- Next, in the right side, find and check the “Developer” option.

- Finally, click “OK” to enable the modifications.


Step 2: Change Macro Security Settings
Since Excel comes with macro auto disabled in security settings, you need to first change the settings by following the steps below:
- At first, in Excel main window, switch to “Developer” ribbon.
- Then, click “Macro Security” button in “Code” group.
- Next, in the new window, select “Disable all macros except digitally signed macros” or “Enable all macros” option to your liking.

- Lastly, click “OK” to save the changes.

Step 3: Trigger Excel VBA Editor
Excel VBA editor is the place where you put the code. You can get access to it by 2 means.
- On “Developer” tab, click the “Visual Basic” button in “Code” group.

- Directly press “Alt + F11” key shortcuts to bring up “Microsoft Visual Basic for Applications” window.

Step 4: Add VBA Code
After entering Excel VBA editor, you need to add your code into either a project or a module.
1. Put Code into Existing Project
As you can see, under expanded “Microsoft Excel Objects” folder, you can see the existing projects, including the projects for each worksheet and the one for the current workbook called “ThisWorkbook”.

- To begin with, double click on a project to open its window.
- Then, put the code into it.


2. Put Code into Module
Besides, you can add code to a module by the following steps.
- In the first place, click “Insert” button in toolbar.
- From the drop down list, select “Module”.

- Then, in the new module, you can put your code.

Step 5: Run VBA Code
1. Run Macro in VBA Editor
To run VBA in the “Microsoft Visual Basic for Applications” window, you can just press “F5” key button or click the “Run” icon in the toolbar.

2. Run Macro through Quick Access Toolbar (QAT)
Moreover, you can add macro to Quick Access Toolbar and run it through QAT by the steps below.
- At the outset, go to “File” > “Options”.
- In the popup window, access “Quick Access Toolbar” tab.
- Then, select “Macros” from the list of “Choose commands from”.

- Next, choose the macro in the left side.
- Later, click “Add” button in center.

- After that, click “OK” to save the changes to Quick Access Toolbar.
- Finally, in the main Excel window, to run this macro, you can click the macro button in Quick Access Toolbar, as shown in the following screenshot.


3. Run Macro through Ribbon
In addition, like Quick Access Toolbar, you can add and run macro in ribbon.
- For a start, access “File” menu and hit “Options”.
- In “Excel Options”, go to “Customize Ribbon”.
- Then, create a new group on “Home” tab by “New Group”.
- Optionally, you can rename this group by “Rename…” button.

- Subsequently, select “Macros” in the list of “Choose commands from”.
- After that, pitch on the desired macro in the left side.
- Next, click the “Add” button to add this macro to the new group.

- Eventually, click “OK” to save options.
- Since then, to run this macro, you can click the newly added macro button in ribbon.


Author Introduction:
Shirley Zhang is a data recovery expert in DataNumen, Inc., which is the world leader in data recovery technologies, including mdf recovery and outlook repair software products. For more information visit www.datanumen.com
Are you looking to unlock the full potential of Excel macros and automate repetitive tasks? Opening Microsoft Visual Basic for Applications is the key to unleashing a world of possibilities. With VBA, you can customize and enhance your Excel experience, saving time and improving efficiency. Whether you’re a seasoned developer or a beginner, learning how to open VBA is the first step towards a more streamlined workflow.
Microsoft Visual Basic for Applications, or VBA, is a programming language that allows users to create macros and automate tasks within Microsoft Office applications. By opening VBA, you gain access to a powerful set of tools that can help you simplify complex processes and increase productivity. With over 800 million Excel users worldwide, understanding how to open VBA is a valuable skill that can give you a competitive edge in today’s data-driven world. So, whether you’re looking to automate data analysis, create custom functions, or develop interactive dashboards, opening VBA is the gateway to unlocking the full potential of Microsoft Office.
To open Microsoft Visual Basic for Applications (VBA), follow these steps:
- Open any Microsoft Office application, such as Excel, Word, or PowerPoint.
- Click on the «Developer» tab in the ribbon.
- Click on the «Visual Basic» button in the «Code» group. This will open the VBA editor.
- Alternatively, you can use the keyboard shortcut «Alt + F11» to open the VBA editor.
Once the VBA editor is open, you can start writing, editing, and debugging your VBA code.

Understanding Microsoft Visual Basic for Applications
Microsoft Visual Basic for Applications (VBA) is a programming language that is integrated into Microsoft Office applications, such as Excel, Word, and PowerPoint. It allows users to automate repetitive tasks, create custom functions and procedures, and build interactive user interfaces.
Opening Visual Basic for Applications is essential for users who want to customize and extend the functionalities of Microsoft Office applications. Whether you are looking to automate tasks, create macros, or develop complex solutions, understanding how to open VBA is the first step in harnessing its power.
Opening Microsoft Visual Basic for Applications in Excel
To open Microsoft Visual Basic for Applications in Excel, you have two options:
- Press Alt+F11 on your keyboard
- Click on the «Developer» tab in the Excel ribbon, then click on the «Visual Basic» button
Once you have opened the Visual Basic Editor, you will see a window with various panes and options. The main window is where you write your VBA code, while the other panes provide access to project files, properties, and debugging tools.
Using the Project Explorer Pane
The Project Explorer pane in the Visual Basic Editor allows you to navigate and manage your VBA projects. It displays a hierarchical list of objects, such as workbooks and worksheets, that you can write code for.
To open the Project Explorer pane, go to the «View» menu and click on «Project Explorer» or press Ctrl+R. You can then expand or collapse the different nodes to access your desired object.
By double-clicking on an object in the Project Explorer pane, you can view and edit the code associated with that object. This is particularly useful when you want to modify the code for a specific worksheet or module.
Using the Code Window and Immediate Window
The Code Window is where you write and edit VBA code in the Visual Basic Editor. It displays the code associated with the selected object in the Project Explorer pane.
To open the Code Window, select an object in the Project Explorer pane and double-click on it. You can then start writing your VBA code in the blank space provided. The Code Window provides features like syntax highlighting and automatic code indentation to enhance your coding experience.
The Immediate Window is another useful feature in the Visual Basic Editor. It provides an interactive environment where you can execute immediate commands, test code snippets, and debug your VBA macros.
You can open the Immediate Window by going to the «View» menu and clicking on «Immediate Window» or by pressing Ctrl+G. Once opened, you can enter commands directly into the Immediate Window and see the results immediately.
Opening Microsoft Visual Basic for Applications in Word
To open Microsoft Visual Basic for Applications in Word, you can follow these steps:
- Press Alt+F11 on your keyboard
- Click on the «Developer» tab in the Word ribbon, then click on the «Visual Basic» button
Similar to Excel, you will be greeted with the Visual Basic Editor window, where you can start writing and editing VBA code.
Customizing the Word Interface
One unique aspect of opening Visual Basic for Applications in Word is the ability to customize the Word interface. This means you can create custom ribbon tabs, buttons, and dialog boxes that integrate seamlessly with Word.
To customize the Word interface using VBA, you can utilize the «CustomUI Editor,» which is a third-party add-in specifically designed for this purpose. It allows you to create XML-based customizations that can be easily applied to Word.
With the CustomUI Editor, you can add your own custom tabs, groups, buttons, and other controls to the Word ribbon. This enables you to create a tailored user experience and streamline your workflow by adding quick access to your frequently used macros and commands.
Opening Microsoft Visual Basic for Applications in PowerPoint
To open Microsoft Visual Basic for Applications in PowerPoint, you can follow these steps:
- Press Alt+F11 on your keyboard
- Click on the «Developer» tab in the PowerPoint ribbon, then click on the «Visual Basic» button
Once you have opened the Visual Basic Editor, you can start writing VBA code to automate and enhance your PowerPoint presentations. Whether you want to create dynamic slideshows, manipulate objects, or interact with external data, VBA allows you to extend the capabilities of PowerPoint.
Accessing Presentation Objects
In the Visual Basic Editor for PowerPoint, you can access various presentation objects, such as slides, shapes, and charts, to manipulate and customize them programmatically.
The Project Explorer pane in the Visual Basic Editor displays the various objects available in your PowerPoint presentation. By expanding the nodes, you can access specific objects and write code to modify their properties and behaviors.
For example, you can write VBA code to automatically create or delete slides, add animations and transitions, or even generate charts based on data from external sources.
Exploring the Power of Microsoft Visual Basic for Applications
Opening Microsoft Visual Basic for Applications is just the first step in harnessing its power. Once you are familiar with the basics of VBA, you can dive into its extensive features and capabilities to automate tasks, create sophisticated solutions, and enhance your overall productivity.
Automating Repetitive Tasks
One of the main benefits of VBA is its ability to automate repetitive tasks. By writing a VBA macro, you can automate a series of steps or actions, saving you time and effort in performing repetitive operations.
For example, if you frequently format data in a specific way in Excel, you can create a VBA macro that applies the desired formatting with just a click of a button. This eliminates the need for manual formatting and ensures consistency throughout your worksheets.
VBA also allows you to interact with external data sources, such as databases and web services, to import or export data automatically. This is particularly useful when you need to update your Excel spreadsheets with the latest information from a database or automate the generation of reports.
Creating Custom Functions and Procedures
VBA enables you to create custom functions and procedures that extend the built-in capabilities of Microsoft Office applications. These functions and procedures can be reused across different projects and provide additional functionalities that are not available out of the box.
For example, you can create a custom function in Excel that calculates the distance between two points based on their coordinates. This function can be used in any Excel workbook, allowing you to perform complex calculations without repeating the code.
Procedures, on the other hand, allow you to perform a set of actions or tasks in a specific order. You can create a procedure that automates a sequence of operations, such as pulling data from a database, performing calculations, and generating a report.
Building Interactive User Interfaces
If you want to enhance the user experience of your Microsoft Office applications, VBA allows you to create interactive user interfaces. You can add custom dialog boxes, input forms, and menus that provide a more intuitive and user-friendly interface.
For example, in Excel, you can create a custom menu or ribbon tab that contains buttons for executing macros or performing specific tasks. This allows users to access your custom functionality without the need to navigate through the built-in menus and options.
Similarly, in Word or PowerPoint, you can create dialog boxes that prompt users for input or display information based on their actions. This can greatly improve the usability of your applications and streamline workflows.
Debugging and Error Handling
Debugging is an essential part of programming, and VBA provides several tools and techniques to help you identify and fix issues in your code. The Visual Basic Editor includes a powerful debugging environment that allows you to set breakpoints, step through code line by line, and examine variables at runtime.
In addition to debugging, VBA also supports error handling, which allows you to gracefully handle errors that may occur during the execution of your macros. By using error handling techniques, you can anticipate potential errors, handle them appropriately, and provide useful feedback to the user.
Effective debugging and error handling practices can significantly improve the reliability and stability of your VBA projects, ensuring that your macros work as intended.

Getting Started with Microsoft Visual Basic for Applications
Microsoft Visual Basic for Applications (VBA) is a programming language developed by Microsoft that allows users to automate tasks and customize applications within the Microsoft Office suite. Here are the steps to open VBA:
Step 1: Launch the Microsoft Office application that you want to work with, such as Excel, Word, or PowerPoint.
Step 2: Go to the «Developer» tab in the application’s ribbon. If the «Developer» tab is not visible, you need to enable it. To do this, go to the application’s options or settings and check the box for «Show Developer tab.»
Step 3: In the «Developer» tab, click on the «Visual Basic» button. This will open the VBA editor, where you can write, modify, and run code.
Step 4: You can now start writing VBA code to automate tasks or customize the application’s functionalities. Remember to save your code and test it to ensure it works as intended.
Key Takeaways: How to Open Microsoft Visual Basic for Applications
- Microsoft Visual Basic for Applications (VBA) is a programming language that allows users to automate tasks and customize applications in Microsoft Office.
- To open Microsoft Visual Basic for Applications, you can use the developer tab in Microsoft Office applications or use the keyboard shortcut Alt+F11.
- In Microsoft Excel, you can open VBA by selecting «Developer» from the ribbon, clicking on «Visual Basic,» or using the Alt+F11 shortcut.
- In Microsoft Word, you can open VBA by clicking on «Developer» in the ribbon, selecting «Visual Basic,» or using the Alt+F11 shortcut.
- Once you’re in the VBA editor, you can write, edit, and debug VBA code to create custom macros and automate repetitive tasks in your Office applications.
Frequently Asked Questions
Here are some common questions about opening Microsoft Visual Basic for Applications:
1. How can I open Microsoft Visual Basic for Applications?
To open Microsoft Visual Basic for Applications, follow these steps:
1. Open the application you want to work with (e.g., Microsoft Excel, Word, or PowerPoint).
2. Click on the «Developer» tab on the application’s ribbon.
3. In the «Code» group, click on the «Visual Basic» button.
4. The Microsoft Visual Basic for Applications window will open, allowing you to write and modify VBA code.
2. Is Microsoft Visual Basic for Applications available in all Microsoft Office applications?
Yes, Microsoft Visual Basic for Applications is available in most Microsoft Office applications, including Excel, Word, PowerPoint, Outlook, and Access. It allows users to automate tasks, create macros, and customize the functionality of these applications by writing VBA code.
3. Can I access Microsoft Visual Basic for Applications in Microsoft Office 365?
Yes, you can access Microsoft Visual Basic for Applications in Microsoft Office 365. The process of opening it is the same as in previous versions of Microsoft Office. Simply follow the steps mentioned earlier to open the VBA editor in your Office 365 application.
4. Can I use Microsoft Visual Basic for Applications without any programming experience?
While having some programming experience can be helpful, it is not mandatory to use Microsoft Visual Basic for Applications. The VBA editor provides users with a user-friendly interface and various resources, such as built-in functions and code examples, to help them get started. With time and practice, even users without prior programming experience can learn to write and modify VBA code.
5. Are there any alternatives to Microsoft Visual Basic for Applications?
Yes, there are alternatives to Microsoft Visual Basic for Applications, such as Python, JavaScript, and PowerShell. These languages offer similar functionality and can be used to automate tasks and customize the behavior of various software applications. The choice of programming language depends on the specific requirements and preferences of the user.
In conclusion, opening Microsoft Visual Basic for Applications (VBA) is a simple process that can enhance your productivity in Microsoft Office applications. By following a few easy steps, you can access the VBA editor and start creating macros to automate repetitive tasks and customize your Office experience.
To open VBA, you first need to enable the Developer tab in the Office Ribbon. Then, in the Developer tab, click on the «Visual Basic» button or press ALT + F11 on your keyboard. This will open the VBA editor, where you can write and run your VBA code.
The first step to working with VBA in Excel is to get yourself familiarized with the Visual Basic Editor (also called the VBA Editor or VB Editor).
In this tutorial, I will cover all there is to know about the VBA Editor and some useful options that you should know when coding in Excel VBA.
What is Visual Basic Editor in Excel?
Visual Basic Editor is a separate application that is a part of Excel and opens whenever you open an Excel workbook. By default, it’s hidden and to access it, you need to activate it.
VB Editor is the place where you keep the VB code.
There are multiple ways you get the code in the VB Editor:
- When you record a macro, it automatically creates a new module in the VB Editor and inserts the code in that module.
- You can manually type VB code in the VB editor.
- You can copy a code from some other workbook or from the internet and paste it in the VB Editor.
Opening the VB Editor
There are various ways to open the Visual Basic Editor in Excel:
- Using a Keyboard Shortcut (easiest and fastest)
- Using the Developer Tab.
- Using the Worksheet Tabs.
Let’s go through each of these quickly.
Keyboard Shortcut to Open the Visual Basic Editor
The easiest way to open the Visual Basic editor is to use the keyboard shortcut – ALT + F11 (hold the ALT key and press the F11 key).
As soon as you do this, it will open a separate window for the Visual Basic editor.
This shortcut works as a toggle, so when you use it again, it will take you back to the Excel application (without closing the VB Editor).
The shortcut for the Mac version is Opt + F11 or Fn + Opt + F11
Using the Developer Tab
To open the Visual Basic Editor from the ribbon:
- Click the Developer tab (if you don’t see a developer tab, read this on how to get it).
- In the Code group, click on Visual Basic.
Using the Worksheet Tab
This is a less used method to open the Vb Editor.
Go to any of the worksheet tabs, right-click, and select ‘View Code’.
This method wouldn’t just open the VB Editor, it will also take you to the code window for that worksheet object.
This is useful when you want to write code that works only for a specific worksheet. This is usually the case with worksheet events.
Anatomy of the Visual Basic Editor in Excel
When you open the VB Editor for the first time, it may look a bit overwhelming.
There are different options and sections that may seem completely new at first.
Also, it still has an old Excel 97 days look. While Excel has improved tremendously in design and usability over the years, the VB Editor has not seen any change in the way it looks.
In this section, I will take you through the different parts of the Visual Basic Editor application.
Note: When I started using VBA years ago, I was quite overwhelmed with all these new options and windows. But as you get used to working with VBA, you would get comfortable with most of these. And most of the time, you’ll not be required to use all the options, only a hand full.
Below is an image of the different components of the VB Editor. These are then described in detail in the below sections of this tutorial.
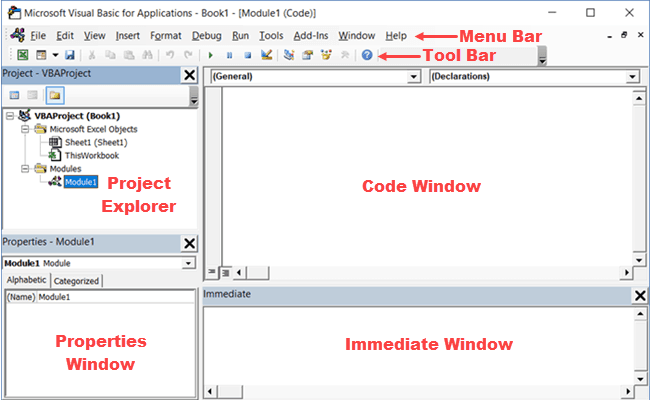
Now let’s quickly go through each of these components and understand what it does:
Menu Bar
This is where you have all the options that you can use in the VB Editor. It is similar to the Excel ribbon where you have tabs and options with each tab.
You can explore the available options by clicking on each of the menu element.
You will notice that most of the options in VB Editor have keyboard shortcuts mentioned next to it. Once you get used to a few keyboard shortcuts, working with the VB Editor becomes really easy.
Tool Bar
By default, there is a toolbar in the VB Editor which has some useful options that you’re likely to need most often. This is just like the Quick Access Toolbar in Excel. It gives you quick access to some of the useful options.
You can customize it a little by removing or adding options to it (by clicking on the small downward pointing arrow at the end of the toolbar).

In most cases, the default toolbar is all you need when working with the VB Editor.
You can move the toolbar above the menu bar by clicking on the three gray dots (at the beginning of the toolbar) and dragging it above the menu bar.
Note: There are four toolbars in the VB Editor – Standard, Debug, Edit, and User form. What you see in the image above (which is also the default) is the standard toolbar. You can access other toolbars by going to the View option and hovering the cursor on the Toolbars option. You can add one or more toolbars to the VB Editor if you want.
Project Explorer
Project Explorer is a window on the left that shows all the objects currently open in Excel.
When you’re working with Excel, every workbook or add-in that is open is a project. And each of these projects can have a collection of objects in it.
For example, in the below image, the Project Explorer shows the two workbooks that are open (Book1 and Book2) and the objects in each workbook (worksheets, ThisWorkbook, and Module in Book1).
There is a plus icon to the left of objects that you can use to collapse the list of objects or expand and see the complete list of objects.
The following objects can be a part of the Project Explorer:
- All open Workbooks – within each workbook (which is also called a project), you can have the following objects:
- Worksheet object for each worksheet in the workbook
- ThisWorkbook object which represents the workbook itself
- Chartsheet object for each chart sheet (these are not as common as worksheets)
- Modules – This is where the code that is generated with a macro recorder goes. You can also write or copy-paste VBA code here.
- All open Add-ins
Consider the Project Explorer as a place that outlines all the objects open in Excel at the given time.
The keyboard shortcut to open the Project Explorer is Control + R (hold the control key and then press R). To close it, simply click the close icon at the top right of the Project Explorer window.
Note: For every object in Project Explorer, there is a code window in which you can write the code (or copy and paste it from somewhere). The code window appears when you double click on the object.
Properties Window
Properties window is where you get to see the properties of the select object. If you don’t have the Properties window already, you can get it by using the keyboard shortcut F4 (or go to the View tab and click Properties window).
Properties window is a floating window which you can dock in the VB Editor. In the below example, I have docked it just below the Project Explorer.
Properties window allows us to change the properties of a selected object. For example, if I want to make a worksheet hidden (or very hidden), I can do that by changing the Visible Property of the selected worksheet object.
Related: Hiding a Worksheet in Excel (that can not be un-hidden easily)
Code Window
There is a code window for each object that is listed in the Project Explorer. You can open the code window for an object by double-clicking on it in the Project Explorer area.
Code window is where you’ll write your code or copy paste a code from somewhere else.
When you record a macro, the code for it goes into the code window of a module. Excel automatically inserts a module to place the code in it when recording a macro.
Related: How to Run a Macro (VBA Code) in Excel.
Immediate Window
The Immediate window is mostly used when debugging code. One way I use the Immediate window is by using a Print.Debug statement within the code and then run the code.
It helps me to debug the code and determine where my code gets stuck. If I get the result of Print.Debug in the immediate window, I know the code worked at least till that line.
If you’re new to VBA coding, it may take you some time to be able to use the immediate window for debugging.
By default, the immediate window is not visible in the VB Editor. You can get it by using the keyboard shortcut Control + G (or can go to the View tab and click on ‘Immediate Window’).
Where to Add Code in the VB Editor
I hope you now have a basic understanding of what VB Editor is and what all parts it has.
In this section of this tutorial, I will show you where to add a VBA code in the Visual Basic Editor.
There are two places where you can add the VBA code in Excel:
- The code window for an object. These objects can be a workbook, worksheet, User Form, etc.
- The code window of a module.
Module Code Window Vs Object Code Window
Let me first quickly clear the difference between adding a code in a module vs adding a code in an object code window.
When you add a code to any of the objects, it’s dependent on some action of that object that will trigger that code. For example, if you want to unhide all the worksheets in a workbook as soon as you open that workbook, then the code would go in the ThisWorkbook object (which represents the workbook).
The trigger, in this case, is opening the workbook.
Similarly, if you want to protect a worksheet as soon as some other worksheet is activated, the code for that would go in the worksheet code window.
These triggers are called events and you can associate a code to be executed when an event occurs.
Related: Learn more about Events in VBA.
On the contrary, the code in the module needs to be executed either manually (or it can be called from other subroutines as well).
When you record a macro, Excel automatically creates a module and inserts the recorded macro code in it. Now if you have to run this code, you need to manually execute the macro.
Adding VBA Code in Module
While recording a macro automatically creates a module and inserts the code in it, there are some limitations when using a macro recorder. For example, it can not use loops or If Then Else conditions.
In such cases, it’s better to either copy and paste the code manually or write the code yourself.
A module can be used to hold the following types of VBA codes:
- Declarations: You can declare variables in a module. Declaring variables allows you to specify what type of data a variable can hold. You can declare a variable for a sub-routine only or for all sub-routines in the module (or all modules)
- Subroutines (Procedures): This is the code that has the steps you want VBA to perform.
- Function Procedures: This is a code that returns a single value and you can use it to create custom functions (also called User Defined Functions or UDFs in VBA)
By default, a module is not a part of the workbook. You need to insert it first before using it.
Adding a Module in the VB Editor
Below are the steps to add a module:
- Right-click on any object of the workbook (in which you want the module).
- Hover the cursor on the Insert option.
- Click on Module.


This would instantly create a folder called Module and insert an object called Module 1. If you already have a module inserted, the above steps would insert another module.
Once the module is inserted, you can double click on the module object in the Project Explorer and it will open the code window for it.
Now you can copy-paste the code or write it yourself.
Removing the Module
Below are the steps to remove a module in Excel VBA:
- Right-click on the module that you want to remove.
- Click on Remove Module option.
- In the dialog box that opens, click on No.


Note: You can export a module before removing it. It gets saved as a .bas file and you can import it in some other project. To export a module, right-click on the module and click on ‘Export file’.
Adding Code to the Object Code Window
To open the code window for an object, simply double-click on it.
When it opens, you can enter the code manually or copy-paste the code from other modules or from the internet.
Note that some of the objects allow you to choose the event for which you want to write the code.
For example, if you want to write a code for something to happen when selection is changed in the worksheet, you need to first select worksheets from the drop-down at the top left of the code window and then select the change event from the drop-down on the right.
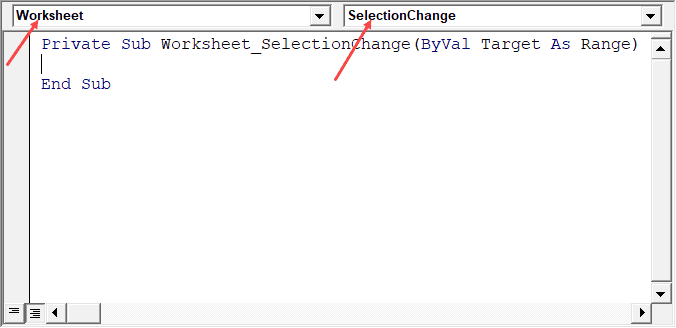
Note: These events are specific to the object. When you open the code window for a workbook, you will see the events related to the workbook object. When you open the code window for a worksheet, you will see the events related to the worksheet object.
Customizing the VB Editor
While the default settings of the Visual Basic Editor are good enough for most users, it does allow you to further customize the interface and a few functionalities.
In this section of the tutorial, I will show you all the options you have when customizing the VB Editor.
To customize the VB Editor environment, click Tools in the menu bar and then click on Options.
This would open the Options dialog box which will give you all the customization options in the VB Editor. The ‘Options’ dialog box has four tabs (as shown below) that have various customizations options for the Visual Basic Editor.
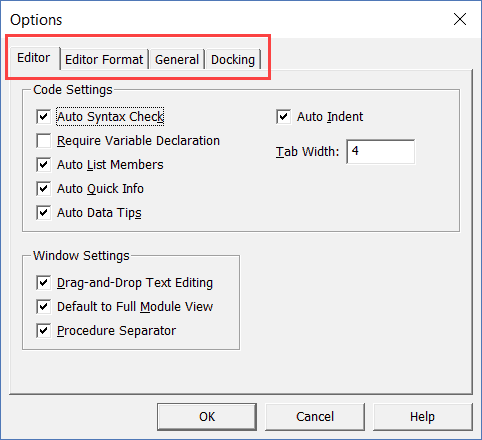
Let’s quickly go through each of these tabs and the important options in each.
Editor Tab
While the inbuilt settings work fine in most cases, let me still go through the options in this tab.
As you get more proficient working with VBA in Excel, you may want to customize the VB Editor using some of these options.
Auto Syntax Check
When working with VBA in Excel, as soon as you make a syntax error, you will be greeted by a pop-up dialog box (with some description about the error). Something as shown below:
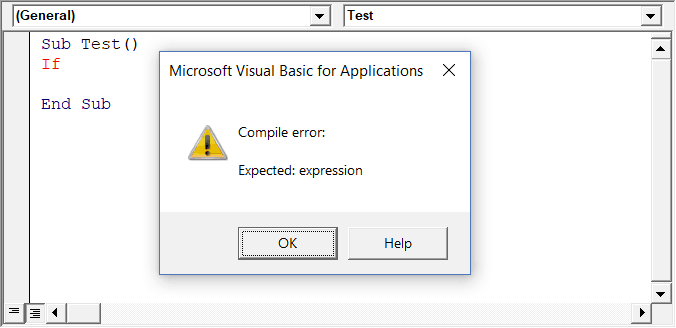
If you disable this option, this pop-up box will not appear even when you make a syntax error. However, there would be a change in color in the code text to indicate that there is an error.
If you’re a beginner, I recommend you keep this option enabled. As you get more experienced with coding, you may start finding these pop-up boxes irritating, and then you can disable this option.
Require Variable Declaration
This is one option I recommend enabling.
When you’re working with VBA, you would be using variables to hold different data types and objects.
When you enable this option, it automatically inserts the ‘Option Explicit’ statement at the top of the code window. This forces you to declare all the variables that you’re using in your code. If you don’t declare a variable and try to execute the code, it will show an error (as shown below).
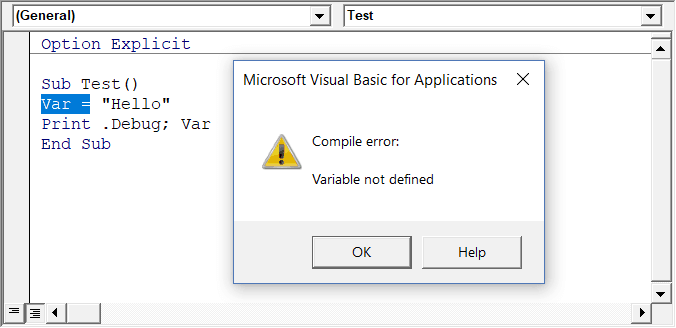
In the above case, I used the variable Var, but I didn’t declare it. So when I try to run the code, it shows an error.
This option is quite useful when you have a lot of variables. It often helps me find misspelled variables names as they are considered as undeclared and an error is shown.
Note: When you enable this option, it does not impact the existing modules.
Auto List Member
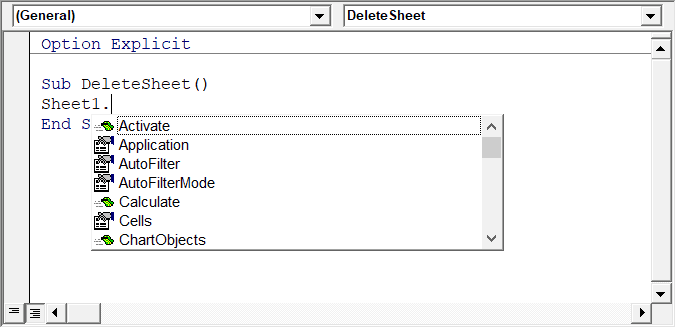
This option is quite useful as it helps you get a list of properties of methods for an object.
For example, if I want to delete a worksheet (Sheet1), I need to use the line Sheet1.Delete.
While I am typing the code, as soon as I type the dot, it will show me all the methods and properties associated with the Worksheet object (as shown below).
Auto list feature is great as it allows you to:
- Quickly select the property and method from the list and saves time
- Shows you all the properties and methods which you may not be aware of
- Avoid making spelling errors
This option is enabled by default and I recommend keeping it that way.
Auto Quick Info Options
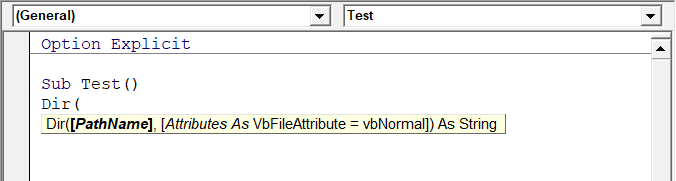
When you type a function in Excel worksheet, it shows you some information about the function – such as the arguments it takes.
Similarly, when you type a function in VBA, it shows you some information (as shown below). But for that to happen, you need to make sure the Auto Quick Info option is enabled (which it is by default).
Auto Data Tips Options
When you’re going through your code line by line and place your cursor above a variable name, it will show you the value of the variable.
I find it quite useful when debugging the code or going through the code line by line which has loops in it.
In the above example, as soon as I put the cursor over the variable (var), it shows the value it holds.
This option is enabled by default and I recommend you keep it that way.
Auto Indent
Since VBA codes can get long and messy, using indentation increases the readability of the code.
When writing code, you can indent using the tab key.
This option ensures that when you are done with the indented line and hit enter, the next line doesn’t start from the very beginning, but has the same indentation as the previous line.
In the above example, after I write the Debug.Print line and hit enter, it will start right below it (with the same indentation level).
I find this option useful and turning this off would mean manually indenting each line in a block of code that I want indented.
You can change the indentation value if you want. I keep it at the default value.
Drag and Drop Text Editing
When this option is enabled, it allows you to select a block of code and drag and drop it.
It saves time as you don’t have to first cut and then paste it. You can simply select and drag it.
This option is enabled by default and I recommend you keep it that way.
Default to Full Module View
When this option is enabled, you will be able to see all the procedures in a module in one single scrollable list.
If you disable this option, you will only be able to see one module at a time. You will have to make a selection of the module you want to see from the drop-down at the top right of the code window.
This option is enabled by default and I recommend keeping it that way.
One reason you may want to disable it when you have multiple procedures that are huge and scrolling across these is taking time, or when you have a lot of procedures and you want to quickly find it instead of wasting time in scrolling.
Procedure Separator
When this option is enabled, you will see a line (a kind of divider) between two procedures.
I find this useful as it visually shows when one procedure ends and the other one starts.
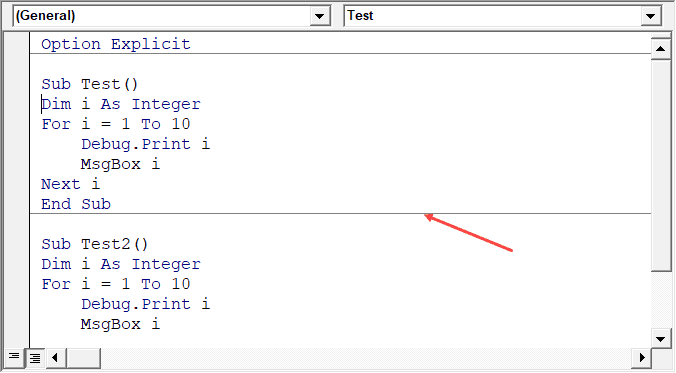
It’s enabled by default and I recommend keeping it that way.
Editor Format Tab
With the options in the Editor Format tab, you can customize the way your code looks in the code window.
Personally, I keep all the default options as I am fine with it. If you want, you can tweak this based on your preference.
To make a change, you need to first select an option in the Code Colors box. Once an option is selected, you can modify the foreground, background, and indicator color for it.
The font type and font size can also be set in this tab. It’s recommended to use a fixed-width font such as Courier New, as it makes the code more readable.
Note that the font type and size setting will remain the same for all code types (i.e., all the code types shown in the code color box).
Below is an image where I have selected Breakpoint, and I can change the formatting of it.
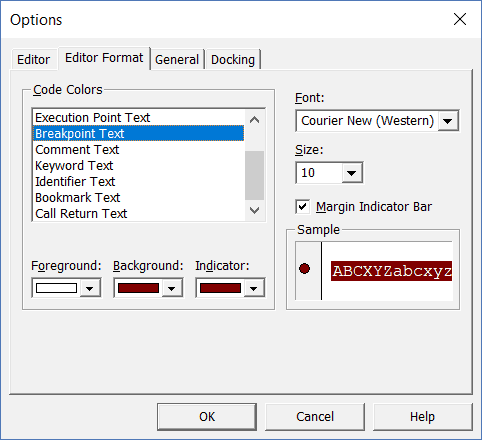
Note: The Margin Indicator Bar option when enabled shows a little margin bar to the left of the code. It’s helpful as it shows useful indicators when executing the code. In the above example, when you set a breakpoint, it will automatically show a red dot to the left of the line in the margin bar. Alternatively, to set a breakpoint, you can simply click on the margin bar on the left of the code line that you want as the breakpoint.
By default, Margin Indicator Bar is enabled and I recommend keeping it that way.
One of my VBA course students found this customization options useful and she was color blind. Using the options here, she was able to set the color and formats that made it easy for her to work with VBA.
General Tab
The General tab has many options but you don’t need to change any of it.
I recommend you keep all the options as is.
One important option to know about in this tab is Error Handling.
By default, ‘Break on Unhandled Errors’ is selected and I recommend keeping it that way.
This option means that if your code encounters an error, and you have not handled that error in your code already, then it will break and stop. But if you have addressed the error (such as by using On Error Resume Next or On Error Goto options), then it will not break (as the errors are not unhandled).
Docking Tab
In this tab, you can specify which windows you want to get docked.
Docking means that you can fix the position of a window (such as project explorer or the Properties window) so that it doesn’t float around and you can view all the different windows at the same time.
If you don’t dock, you will be able to view one window at a time in full-screen mode and will have to switch to the other one.
I recommend keeping the default settings.
Other Excel tutorials you may like:
- How to Remove Macros From an Excel Workbook
- Comments in Excel VBA (Add, Remove, Block Commenting)
- Using Active Cell in VBA in Excel (Examples)