

- To enable Remote Desktop on Windows 10, open Command Prompt (admin) and run the “reg add “HKEY_LOCAL_MACHINE\SYSTEM\CurrentControlSet\Control\Terminal Server” /v fDenyTSConnections /t REG_DWORD /d 0 /f” and “netsh advfirewall firewall set rule group=”remote desktop” new enable=Yes” commands.
On Windows 10, you can use the Remote Desktop feature to remotely access a computer or server to help other users or manage services without being physically present at the location.
Although you can manage the feature through the Settings app, you can also turn Remote Desktop on or off on Windows 10 using commands with Command Prompt or PowerShell. You may want to use this method to create a script to configure Remote Desktop on multiple computers more quickly. Or you can send the script to a user, allowing them to set up the feature without additional steps automatically.
This guide will teach you the steps to use Command Prompt to enable or disable Remote Desktop and open the required firewall ports for a successful connection on Windows 10.
- Enable Remote Desktop from Command Prompt
- Disable Remote Desktop from Command Prompt
Important: Remote Desktop is not a feature available on Windows 10 Home. It is only on Windows 10 Pro, Enterprise, and Education. It is also recommended you create a full backup of your computer before proceeding, as modifying the registry can cause irreversible damage to your system.
To enable the remote desktop protocol with Command Prompt, use these steps:
-
Open Start on Windows 10.
-
Search for Command Prompt, right-click the top result, and select the Run as administrator option.
-
Type the following command to enable the remote desktop protocol and press Enter:
reg add "HKEY_LOCAL_MACHINE\SYSTEM\CurrentControlSet\Control\Terminal Server" /v fDenyTSConnections /t REG_DWORD /d 0 /f

-
(Optional) Type the following command to enable remote desktop through the Windows Firewall and press Enter:
netsh advfirewall firewall set rule group="remote desktop" new enable=Yes

Once you complete the steps, the protocol will enable on Windows 10, and you will be able to access the device remotely.
Disable Remote Desktop from Command Prompt
To turn off the remote desktop protocol with Command Prompt, use these steps:
-
Open Start.
-
Search for Command Prompt, right-click the top result, and select the Run as administrator option.
-
Type the following command to disable the remote desktop protocol and press Enter:
reg add "HKEY_LOCAL_MACHINE\SYSTEM\CurrentControlSet\Control\Terminal Server" /v fDenyTSConnections /t REG_DWORD /d 1 /f
-
(Optional) Type the following command to disable Remote Desktop through the Windows Firewall and press Enter:
netsh advfirewall firewall set rule group="remote desktop" new enable=No

After you complete the steps, the Remote Desktop service will be turned off, and the Windows Firewall port will be closed.
This guide focuses on Command Prompt, but you can use the same commands to manage the remote desktop protocol using PowerShell.
Mauro Huculak is a
Windows How-To Expert and founder of
Pureinfotech
(est. 2010). With over 21 years as a technology writer and IT Specialist,
Mauro specializes in Windows, software, and cross-platform systems such as Linux, Android, and macOS.
Certifications:
Microsoft Certified Solutions Associate (MCSA),
Cisco Certified Network Professional (CCNP),
VMware Certified Professional (VCP),
and
CompTIA A+ and Network+.
Mauro is a recognized Microsoft MVP and has also been a long-time contributor to Windows Central.
You can follow him on
YouTube,
Threads,
BlueSky,
X (Twitter),
LinkedIn and
About.me.
Email him at [email protected].
The Remote Desktop Connection (RDC) tool, also known as Microsoft Terminal Services Client (MSTSC), allows a user to connect to another computer remotely over the network using the Remote Desktop Protocol (RDP). Most users use this tool via its Graphical User Interface (GUI) which is convenient to use, but this article focuses on using the Remote Desktop via the command line.
Connecting to other computers using RDC through the command line allows you to control different settings and preferences of the connection. Windows allows a user to use certain switches to predefine the settings before the connection is made. For example, you can define the name or IP address of the remote computer, or adjust the RDC window size even before running the tool.
Learn how to enable RDC in Windows 11.
Table of Contents
Let us help you become aware of the switch options and how you can use them to configure your RDC connections.
MSTSC commands and switches
The conventional way to open the RDC in Windows is by searching for “Remote Desktop Connection” or “RDC” in Run and open the tool.
 using Command Line 1")
This then opens the RDC tool where you can enter the name of IP address with port number (optional) of the remote computer that you want to connect to.
 using Command Line 2")
Most of you would already be aware of this method.
This section covers the possible commands and switches that you can use with RDC via the command line. We shall start with the most basic ones and then continue.
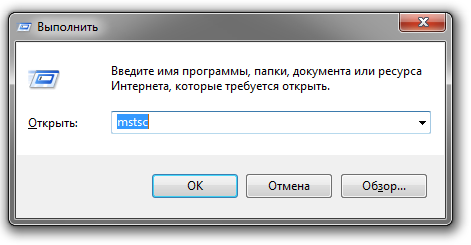
Launch RDC from Run
The very basic command to run Remote Desktop Connection from the command line is via Run. Simply type in the following in Run and hit Enter.
mstsc
Running this will open the RDC with a blank text field. However, with the addition of a few switches, you can change the settings and preferences of the RDC connection. Let us continue forward with a few examples.
Use RDC to connect via console
Although RDC fully supports GUI, you can also connect to remote machines through a console. This will help in case you wish to continue the session that you got disconnected from earlier. In contrast, a regular GUI-based RDC session creates a new session each time you connect to the same machine.
Use the following command to connect to a remote computer via console:
mstsc /console
 using Command Line 4")
Launch RDC with IP address
You can also launch RDC along with the IP address of the machine to connect it with. If the port on the machine is changed from the default value, you can also add the port number. Use the following commands to do so:
mstsc /v:IPAddress
mstsc /v:IPAddress:PortNumber
Replace IPAddress with the complete IP address of the remote computer that you want to connect with, and PortNumber with the port number if changed from its default value.
 using Command Line 5")
Launch RDC with computer name
You can also connect to the remote computer by its unique computer name. The switch used for this is the same one used with the IP address and port number in the steps above.
mstsc /v:ComputerName
Replace ComputerName with the unique name of the remote device that you can find in its settings or properties.
 using Command Line 6")
Launch RDC in full-screen mode
You can also launch the RDC connection in full-screen mode. Here is how:
mstsc /f
 using Command Line 7")
These switches can be combined into a single command to execute an RDC connection to your preferences. Here is an example:
mstsc /f /v:192.168.10.122:8002
 using Command Line 8")
MSTSC commands and switches
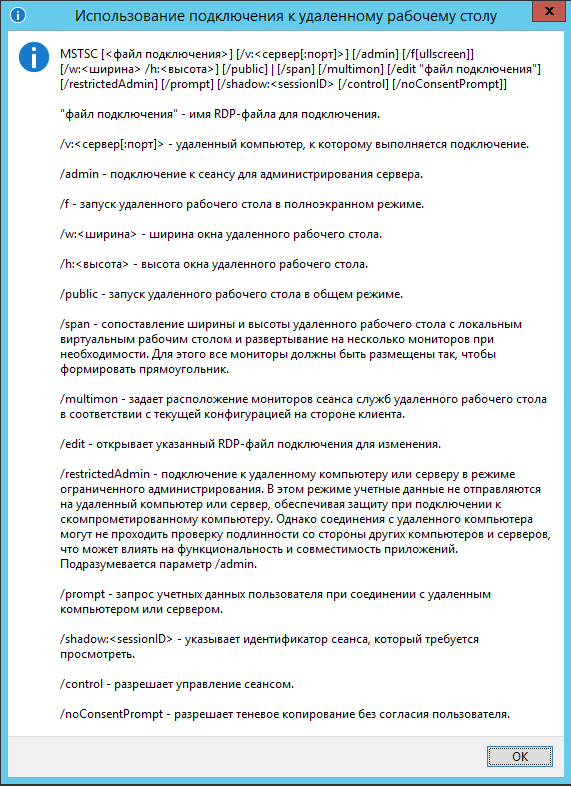
There are more commands and switches you can use with mstsc command-line to adjust your settings for the connection beforehand. Here is the complete list:
| <connectionfile> | For a .rdp file required to make a connection (if applicable). |
| /v: | IP Address or computer name of the remote computer. |
| /g: | IP Address or device name of a Remote Gateway Server (if applicable). |
| /admin | To establish a connection with administrative privileges. |
| /f | View the Remote Desktop Window in full-screen mode. |
| /w: | To specify the width of the Remote Desktop Window. |
| /h: | To specify the height of the Remote Desktop Window. |
| /public | Run the Remote Desktop Connection publicly (less secure). |
| /span | To match the width and height of the Remote Desktop with the local desktop. |
| /edit <connectionfile> | To edit a .rdp file. |
| /multimonTo make the monitor layout of the Remote Desktop Services session identical to the client-side configuration. | |
| /restrictedAdmin | Connect to the remote PC in Restricted Administration mode. The credentials are not sent to the remote PC in this mode, protecting you if you connect to a compromised PC. |
| /remoteGuard | Connect your device to a remote device using the Remote Guard, which prevents sending credentials to a remote PC. |
| /prompt | To prompt you to put in credentials to connect to the remote PC. |
| /shadow: | The ID of the session that you want to connect to. |
| /control | Give control of the session when shadowing. |
| /noConsentPrompt | To allow shadowing without user consent. |
| /migrate | Migrate legacy connection files created with Client Connection Manager to new .rdp connection files. |
| /? | To get help in the command prompt. |
These switches can have the following syntax in either Run or the Command Prompt:
mstsc [<connection file>] [/v:<server[:port]>] [/g:<gateway>]
[/admin] [/f] [/w:<width> /h:<height>] [/public] |
[/span] [/multimon] [/edit "connection file"] [/restrictedAdmin]
[/remoteGuard] [/prompt] [/shadow:<sessionID> [/control][/noConsentPrompt]]
The parameters in the alligator brackets (< and >) are variables that you can adjust according to your preferences.
Troubleshoot RDC via command line
You can also troubleshoot Remote Desktop services through the command line. For example, if you are unable to connect to a device using the GUI RDC but have access via console, you can check whether there are any configurations to be made that will connect you via GUI successfully.
Check if RDP is enabled from Command prompt
Learn how to enable RDP remotely.
You can run the following command to check the status of your device if RDP is enabled or disabled:
netstat /p tcp /a | findstr 3389
 using Command Line 9")
If the results come back as “Listening,” it means that RDP is enabled.
Check if RDP is enabled from PowerShell
Another method to check whether RDP is enabled is through Windows PowerShell. You can run the following commands in PowerShell and it will tell you whether the service is available or not.
if ((Get-ItemProperty "hklm:\System\CurrentControlSet\Control\Terminal Server").fDenyTSConnections -eq 0) { write-host "RDP is Enabled" } else { write-host "RDP is NOT enabled" }
 using Command Line 10")
If the script returns “RDP is enabled,” it means that it is.
Frequently Asked Questions
What is MSTSC?
Microsoft Terminal Services Client (MSTSC) is a tool that allows a user to remotely connect to another device over the network as if they were physically present on the remote device.
How to open Remote Desktop from the command line?
You can open the Remote Desktop Connection window from Run or Command Prompt using mstsc. You may also add switches like /v and /f to control the connection’s arguments.
How to add username and password to mstsc command line?
You cannot add a username or password directly to the mstsc command. However, you can store the credentials in a generic key against the machine you want to connect to using these 2 commands:cmdkey /generic:"<server>" /user:"<user>" /pass:"<password>"
mstsc /v:"<server>"
Is the RDP and RDC the same?
Remote Desktop Connection (RDC) is a tool used to establish a remote connection between devices. Remote Desktop Protocol (RDP) is the technology that RDC uses to create this remote connection.
Меня всегда напрягал момент поиска утилиты удаленного рабочего стола в меню Пуск. Никогда не помнил, в каком именно разделе она находится и всегда тратил много времени на поиск.
Так я долго мучился,пока один добрый человек (спасибо тебе, Паша) не показал мне:
Win + R, mstsc
mstsc.exe — такое имя файла имеет утилита удаленного рабочего стола. Просто запомнить, легко вводить.
| Параметр | Описание |
|---|---|
| <имя файла> | Задает имя файла .rdp для подключения. |
| /v:<Server[:<Port>] | Задает имя удаленного компьютера, к которому необходимо подключиться и, опционально, номер порта подключения |
| /console | Коннект к сеансу физической консоли (сеанс 0). |
| /admin | Подключает к сеансу для администратирования. |
| /f | Запуск удаленного рабочего стола в полноэкранном режиме. |
| /w:<ширина> | Указывает ширину экрана удаленного рабочего стола. |
| /h:<высота> | Указывает высоту экрана удаленного рабочего стола. |
| /public | Запускает удаленный рабочий стол в общедоступном режиме. |
| /span | Сопоставление ширины и высоты удаленного рабочего стола с локальным виртуальным рабочим столом и развертывание на несколько мониторов при необходимости. |
| /multimon | Задает расположение мониторов сеанса служб удаленного рабочего стола в соответствии с текущей конфигурацией на стороне клиента. |
| /edit <имя файла> | Открывает указанный файл .rdp для редактирования. |
| /migrate | Переносит устаревшие файлы подключений, созданные диспетчером клиентских подключений, в новые файлы .rdp |
| /control | разрешает управление сеансом |
| /? | Показывает помощь по параметрам командной строки. |
Ключ помощи показывает окно с командами, соответствующими текущей версии программы.
Следует заметить, что ключ /console применяется для подключения к сеансу физической консоли на сервере (также известный как сеанс 0). Этот режим использовался в Windows Server 2003. В Windows Server 2008 или Windows Server 2008 R2,а также более новых версий, данный режим является устаревшим, т.к. сеанс 0 стал неинтерактивной сессией, зарезервированной для службы.
Поэтому RDC 6.1 не поддерживает ключ /console. Тем не менее, для обеспечения обратной совместимости, можно использовать параметр /admin для подключения к сеансу физической консоли на сервере под управлением Windows Server 2003. Подробнее можно почитать в данной статье: Изменения для удаленного администрирования в Windows Server 2008
Кроме того, ключ /admin обладает еще и следующими особенностями:
- При использовании этого ключа с MSTSC соединения не требуется лицензии клиентского доступа (CAL) Terminal Services.
- Ключ /admin связан с повышением прав. Например, если на пользователя, имеющего полномочия применять ключ /admin, наложен запрет Deny Users Permissions To Log On To Terminal Server, он сможет подключиться через mstsc /admin.
- Даже если сервер терминала не принимает новых сеансов, все же можно создать сеанс /admin.
- Сеанс /admin не учитывается в счет предела, установленного на сервере терминала с целью ограничить число сеансов.
Как обычно, ссылки к дополнительной информации:
MSTSC /console is now MSTSC /admin
Microsoft TechNet — Опции командной строки mstsc
Подключение к удаленному столу (клиент служб терминалов версии 6.0)
Все статьи на тему RDP и устранения проблем в его работе на нашем сайте.
(Visited 70 778 times, 5 visits today)
Posted by Rewalon
The Windows Remote desktop can be enable with the command line such as CMD and Powershell. Here we enable remote desktop using command prompt in Windows 10. You can use this method on all Microsoft Windows server and Workstation systems.
In Microsoft Windows operating systems, you can connect to a computer running Windows from another computer running Windows that’s connected to the same network or the Internet. For example, you can use all of your work computer’s programs, files, and network resources from your home computer, and it’s just like you’re sitting in front of your computer at work.
To connect to a remote computer, that computer must be turned on; it must have a network connection, Remote Desktop must be enabled. You must have network access to the remote computer (this could be through the Internet), and you must have permission to connect. For permission to connect, you must be on the list of remote desktop users. Before you start a connection, it’s a good idea to look up the name of the computer you’re connecting to and to make sure Remote Desktop connections are allowed through its firewall.
Enable Remote Desktop using Command Line
To enable remote desktop using command line, you must have administrator permission in Windows. The command line interfaces, command prompt or Powershell, must run as administrator.
Enable remote desktop process:
- Run Windows Command Prompt.
- Execute registry command to enable remote desktop.
- Enable Remote Desktop on system Firewall.
- Test Remote Desktop Connectivity between two systems.
Let’s run the command prompt as administrator and follow the article to enable remote desktop with command line.
1. Type the below command to enable remote desktop.
reg add "HKEY_LOCAL_MACHINE\SYSTEM\CurrentControlSet\Control\Terminal Server" /v fDenyTSConnections /t REG_DWORD /d 0 /f
The result must be the same as above screenshot. If you face any issue while running command, check the command structure and try again.
2. To disable remote desktop, just type the below command and run it.
reg add "HKEY_LOCAL_MACHINE\SYSTEM\CurrentControlSet\Control\Terminal Server" /v fDenyTSConnections /t REG_DWORD /d 1 /f
3. Allow the Remote desktop on your Windows firewall system with netsh command.
netsh advfirewall firewall set rule group="remote desktop" new enable=yes
Related: Configure Windows IP Address with Netsh
4. Now, you need to add a user account to remote desktop users group. To do this using the “net localgroup” command.
net localgroup "remote desktop users" Shais /add
The username “Shais” has been added successfully to “Remote Desktop Users” group. You can test the remote desktop user members with below command.
net user Shais
That’s all you need to enable remote desktop using command line on any Windows operating systems.
If you want to do all with a graphical interface, follow the below Microsoft step by step guide to enable remote desktop.
Enable Remote Desktop Connection with GUI
If your user account doesn’t require a password to sign in, you’ll need to add a password before you’re allowed to start a connection with a remote computer.
To allow remote connections on the computer, you want to connect to:
- Open System by clicking the Start button, right-clicking Computer, and then click Properties.
- Click Remote settings.If you’re prompted for an administrator password or confirmation, type the password or provide confirmation. Under Remote Desktop, select one of the three options.
- Click Select Users.If you’re an administrator on the computer, your current user account will automatically be added to the list of remote users, and you can skip the next two steps.
- In the Remote Desktop Users dialog box, click Add.
- In the Select Users or Groups dialog box, do the following:
- To specify the search location, click Locations, and then select the location you want to search.
- In entering the object names to select, type the name of the user that you want to add, and then click OK.
- The name will be displayed in the list of users in the Remote Desktop Users dialog box. Click OK, and then click OK again.
Note: You can’t connect to a computer that’s asleep or hibernating, so make sure the settings for sleep and hibernation on the remote computer are set to Never. (Hibernation is not available on all computers.)
To look up the computer name of the remote computer:
- On the remote computer, open System by clicking the Start button, right-clicking Computer, and then click Properties.
- Under Computer name, domain, and workgroup settings, you can find your computer name, and it’s full computer name if your computer is on a domain.
To allow Remote Desktop connections through a Windows Firewall:
If you’re having trouble connecting, Remote Desktop connections might be getting blocked by the firewall. Here’s how to change that setting on a Windows PC. If you’re using another firewall, make sure the port for Remote Desktop (usually 3389) is open.
- On the remote computer, click Start and select Control Panel.
- Click System and Security.
- Then click Allow a program through Windows Firewall under Windows Firewall.
- And click Change settings and then check the box next to Remote Desktop.
- Click OK to save the changes.
To set a password for your user account
Your user account must have a password before you can use Remote Desktop to connect to another computer.
- Click Start and select Control Panel.
- Double-click User Accounts.
- Select Change your Windows Password under User Accounts.
- Click Create a password for your account and follow the instructions on the screen.
To start Remote Desktop on the computer, you want to work from:
- Open Remote Desktop Connection by clicking the Start button. In the search box, type Remote Desktop Connection, and then, in the list of results, click Remote Desktop Connection.
- In the Computer box, type the name of the computer that you want to connect to, and then click Connect. (You can also type the IP address instead of the computer name.)
Finally, hope you can enable remote desktop using command line in your network environment.
If you want to use the Remote Desktop feature without opening the Windows Settings panel, then you can enable Remote Desktop using Command Prompt or Windows PowerShell. If you have a remote desktop client on your mobile or another computer, you will be able to connect it and use your PC remotely.
Remote Desktop is a well-known facility for Windows 11/10 computers that lets you connect two computers or mobile so that an individual can access another computer remotely. You can fix some problems on the computer via mobile or do other jobs according to your requirements. You need a Remote Desktop client like Microsoft Remote Desktop or so on your mobile to connect two devices.
It is possible to enable to disable Remote Desktop via Windows Settings. You need to head to System > Remote Desktop to access the option. However, let’s assume that the Windows Settings panel is not opening due to some reasons, and you need to turn on the Remote Desktop feature. Then you can use this method to start the Remote Desktop using the command line.
To enable Remote Desktop using Command Prompt and Windows PowerShell, follow these steps-
- Open Command Prompt or PowerShell with administrator privilege
- Set value of fDenyTSConnections REG DWORD to 0
- Add a Firewall rule
- Restart your computer
- Start using Remote Desktop in Windows 10.
The commands are not the same for Command Prompt and Windows PowerShell.
1] Enable RDP firewall using Command Prompt

To get started, open the Command Prompt with administrator privilege. You can search for it in the Taskbar search box, and click the Run as administrator option that appears on your screen. After that, enter this following command and hit Enter:
reg add "HKLM\SYSTEM\CurrentControlSet\Control\Terminal Server" /v fDenyTSConnections /t REG_DWORD /d 0 /f
By default, the value of fDenyTSConnections is set to 1. This command will change the value to 0.
Next, execute the following command:
netsh advfirewall firewall set rule group="remote desktop" new enable=yes
This command will add and update three rules in the Firewall so that you can start using the Remote Desktop.
2] Enable RDP using Windows PowerShell
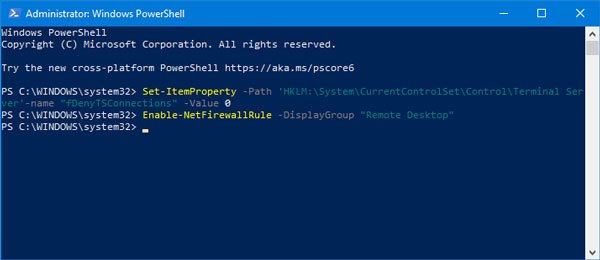
You need to open the Windows PowerShell with administrator privilege and enter the following command and hit Enter:
Set-ItemProperty -Path 'HKLM:\System\CurrentControlSet\Control\Terminal Server'-name "fDenyTSConnections" -Value 0
This command will change the fDenyTSConnections value to 0. Now, you need to execute the following command to add rules in the Firewall:
Enable-NetFirewallRule -DisplayGroup "Remote Desktop"
After that, you will be able to use Remote Desktop in Windows 10.
In case you want to disable Remote Desktop using Command Prompt and Windows PowerShell, you need to enter these steps.
Related: Remote Desktop option is greyed out.
Disable Remote Desktop using Command Prompt or PowerShell
To disable Remote Desktop using Command Prompt and Windows PowerShell, follow these steps-
- Open Command Prompt or PowerShell with administrator privilege
- Set value of fDenyTSConnections REG DWORD as 1
- Add a Firewall rule
- Restart computer.
To know more, you need to read on.
Disable Remote Desktop using Command Prompt
You need to set the default value of fDenyTSConnections as 1. For that, use this command-
reg add "HKLM\SYSTEM\CurrentControlSet\Control\Terminal Server" /v fDenyTSConnections /t REG_DWORD /d 1 /f
Now you need to remove rules from the Firewall. For that, use this command-
netsh advfirewall firewall set rule group="remote desktop" new enable=No
Disable Remote Desktop using PowerShell
You need to change the value of fDenyTSConnections as 1. You can do that by using this command-
Set-ItemProperty -Path 'HKLM:\System\CurrentControlSet\Control\Terminal Server'-name "fDenyTSConnections" -Value 1
The second command will let you remove the rules from the Firewall:
Disable-NetFirewallRule -DisplayGroup "Remote Desktop"
How do I know if RDP is enabled or not?
If you want to know the status of the RDP protocol on your Windows 11/10 system, then open the Registry Editor. After that, access the Terminal Services and Terminal Server Registry keys. There, look for the fDenyTSConnections DWORD (32-bit) Value. If the value data of this value is set to 0, then RDP is enabled. If it is set to 1, then RDP is disabled.
How to restart the RDP service using PowerShell?
If you want to restart the Remote Desktop Services using PowerShell, then first open the Windows PowerShell as administrator. After that, execute the command given below:
Restart-Service -Force -DisplayName "Remote Desktop Services"
You can also use the following command to restart the RDP service:
Restart-Service -Force -Name "TermService"
That’s all! I hope this simple tutorial will be helpful for you.