
#статьи
-
0
Популярные способы, работающие в Windows 7, 8, 10 и 11.
Иллюстрация: Оля Ежак для Skillbox Media
Филолог и технарь, пишет об IT так, что поймут даже новички. Коммерческий редактор, автор технических статей для vc.ru и «Хабра».
Это статья для тех, кто начинает изучать программирование и знакомится с командной строкой. Мы объясним, что такое командная строка и чем она отличается от консоли или терминала. Затем рассмотрим основные способы запуска командной строки во всех основных версиях Windows. А если вы используете Linux или macOS — загляните в последний раздел.
Содержание
- Что такое командная строка
- Как открыть командную строку в Windows 7, 8
- Через меню «Пуск»
- Через сочетание горячих клавиш
- Через диспетчер задач
- Через «Проводник» Windows
- Через создание ярлыка
- Как открыть командную строку в Windows 10 и 11
- Через Windows Terminal
- Через Microsoft Copilot
- Как открыть командную строку в Windows от имени администратора
- Как открыть командную строку при установке Windows
- Как запустить командную строку в других операционных системах
- Как открыть командную строку в Linux
- Как вызвать командную строку в macOS
Командная строка — это текстовый интерфейс для взаимодействия с операционной системой, который можно использовать вместо мыши и графических окон. Обычно командная строка представлена экраном с чёрным фоном и белыми символами. С её помощью можно управлять файлами, запускать программы, настраивать систему, автоматизировать задачи, администрировать сеть и выполнять множество других действий.
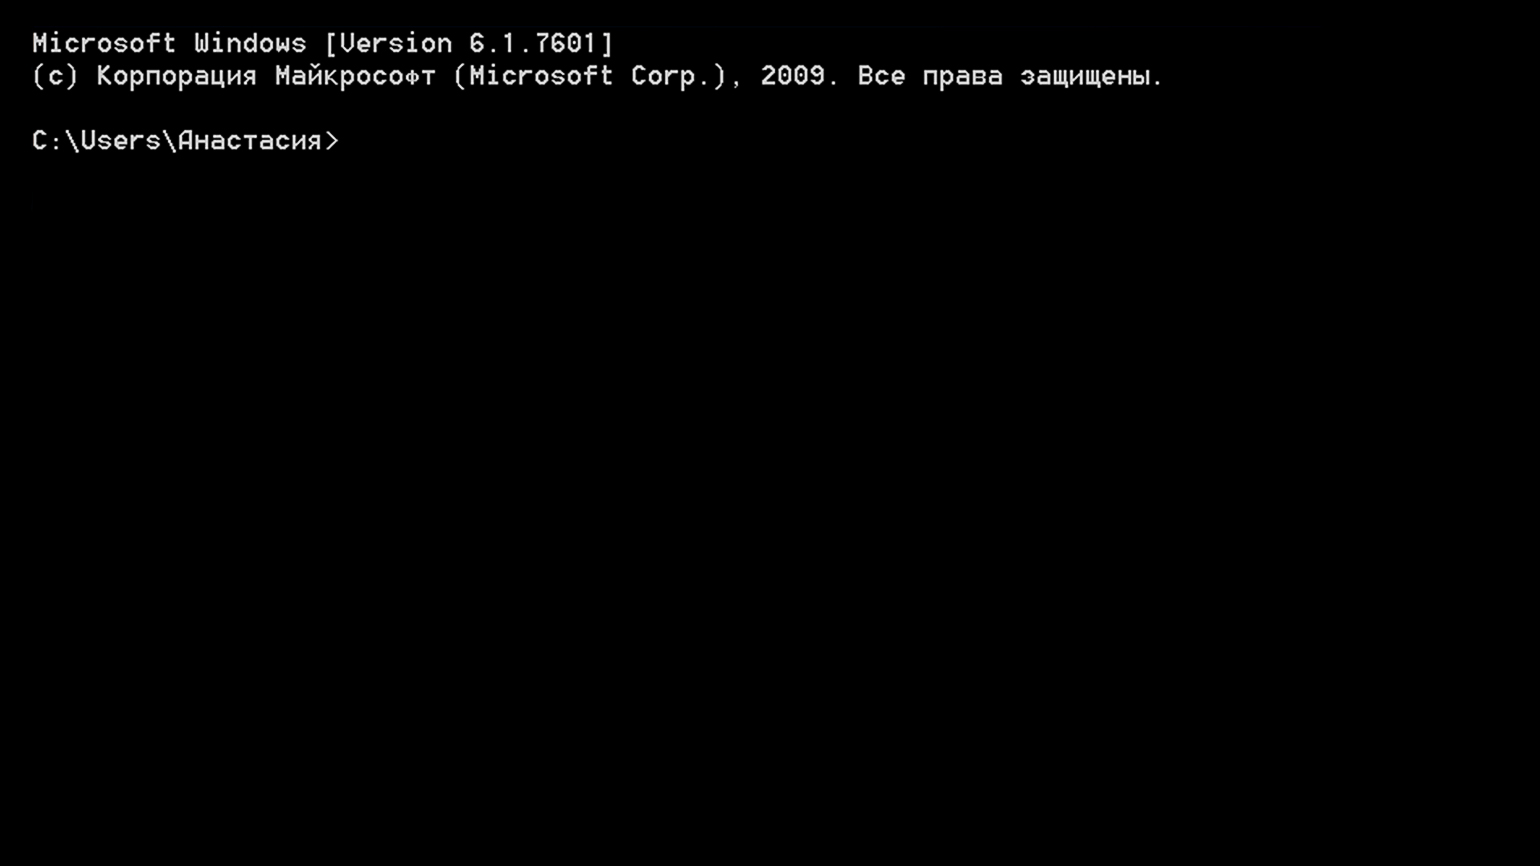
Скриншот: Skillbox Media
Командную строку часто называют терминалом или консолью. Хотя эти термины можно рассматривать как синонимы, между ними есть разница:
- Командная строка — это способ взаимодействия с операционной системой с помощью набора текстовых команд. В Windows такой интерфейс представлен приложением Command Prompt (cmd).
- Терминал — это общее название для всех программ или устройств, которые предоставляют доступ к командной строке. Например, это «Терминал» в macOS или Gnome Terminal в Linux. В Windows, помимо Command Prompt, терминалами можно назвать такие программы, как Windows Terminal и PowerShell.
- Консоль — это более общий термин, который может означать как физическое устройство, так и виртуальный экран, на который выводится текстовое содержимое программы. В контексте Windows консолью часто называют окно приложения Command Prompt, в котором пользователь может вводить команды и получать текстовые ответы.
Если не обращать внимания на нюансы терминологии, то командная строка, терминал и консоль служат одной цели — они обеспечивают пользователю доступ к выполнению команд в операционной системе.
Видео: Пётр Калинин
В Windows 7 и 8 можно запустить командную строку через меню «Пуск», комбинацию клавиш, диспетчер задач, программу «Проводник» или ярлыки.
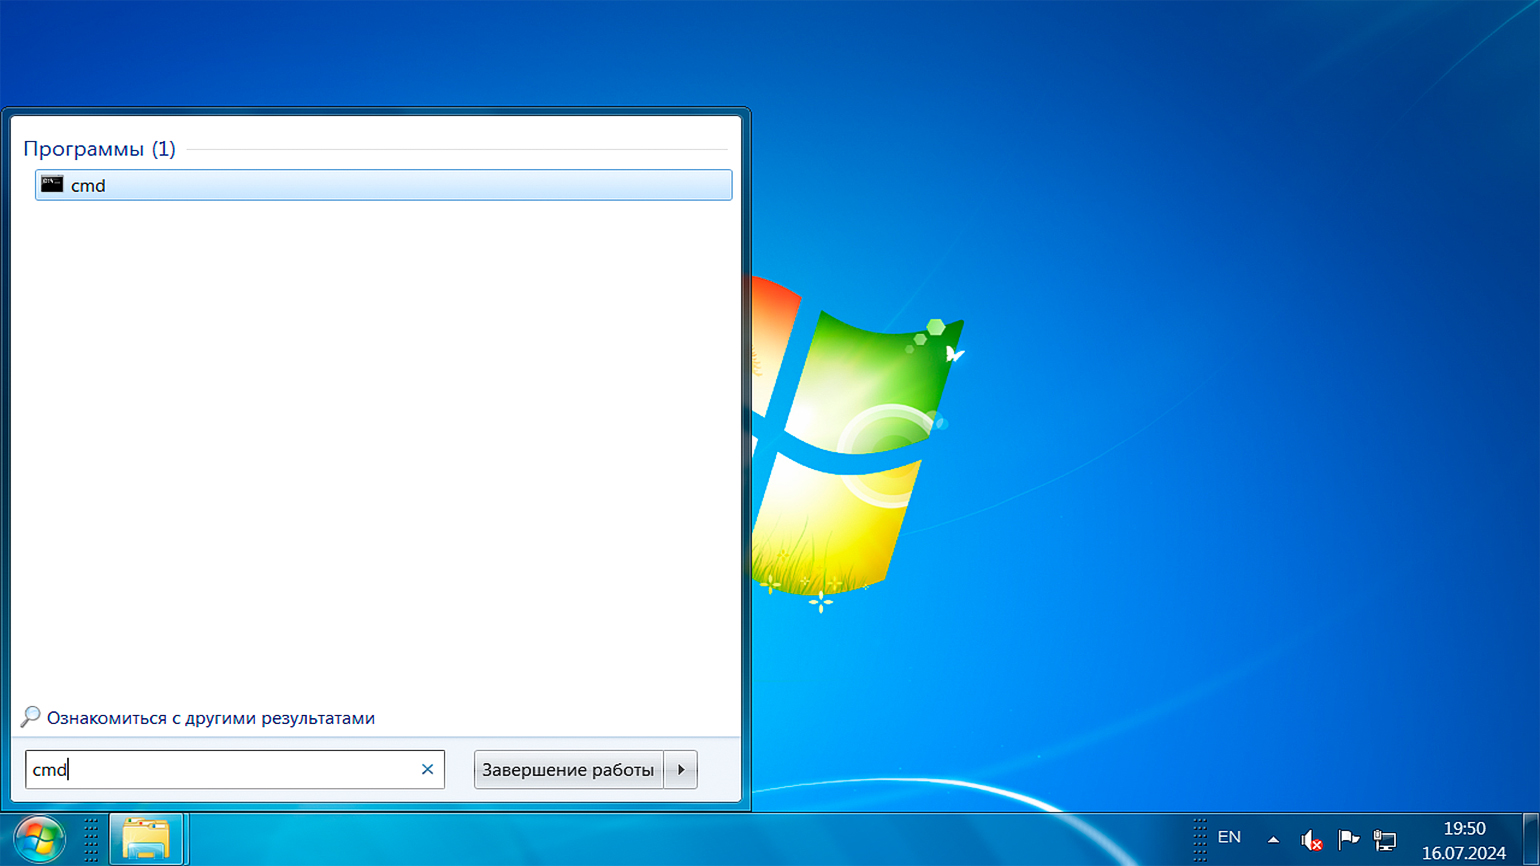
Нажмите кнопку «Пуск» в левой нижней части рабочего стола и в поле поиска введите cmd или командная строка. Если вы ввели cmd, выберите исполняемый файл cmd.exe для запуска командной строки. Если вы ввели командная строка, система сразу откроет соответствующее приложение.
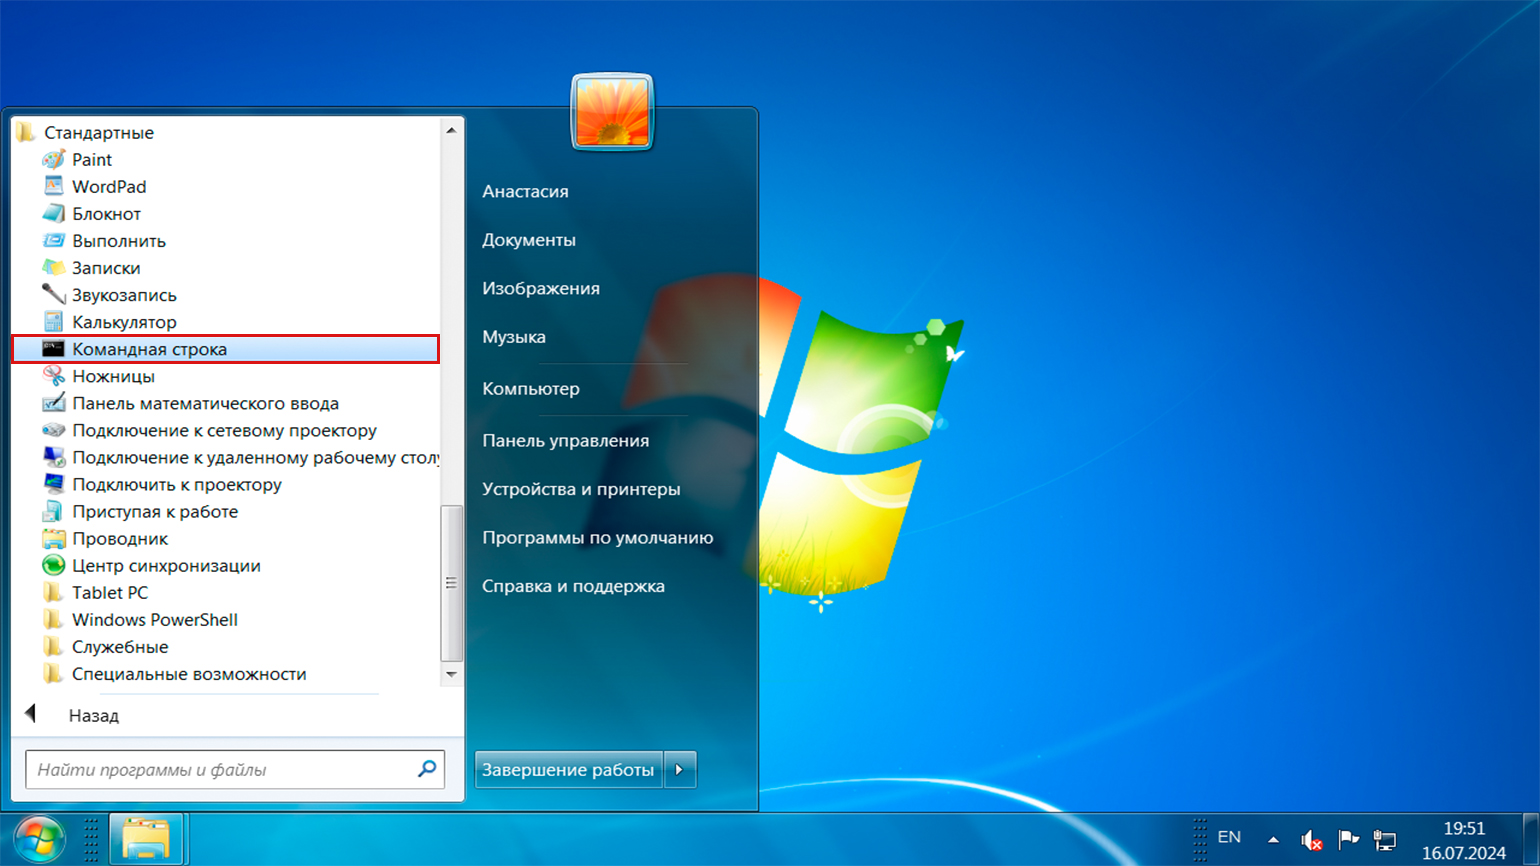
Командную строку можно вызвать и без поиска. Для этого откройте «Пуск», перейдите в раздел «Все программы», найдите папку «Стандартные» и выберите «Командная строка» в списке приложений.
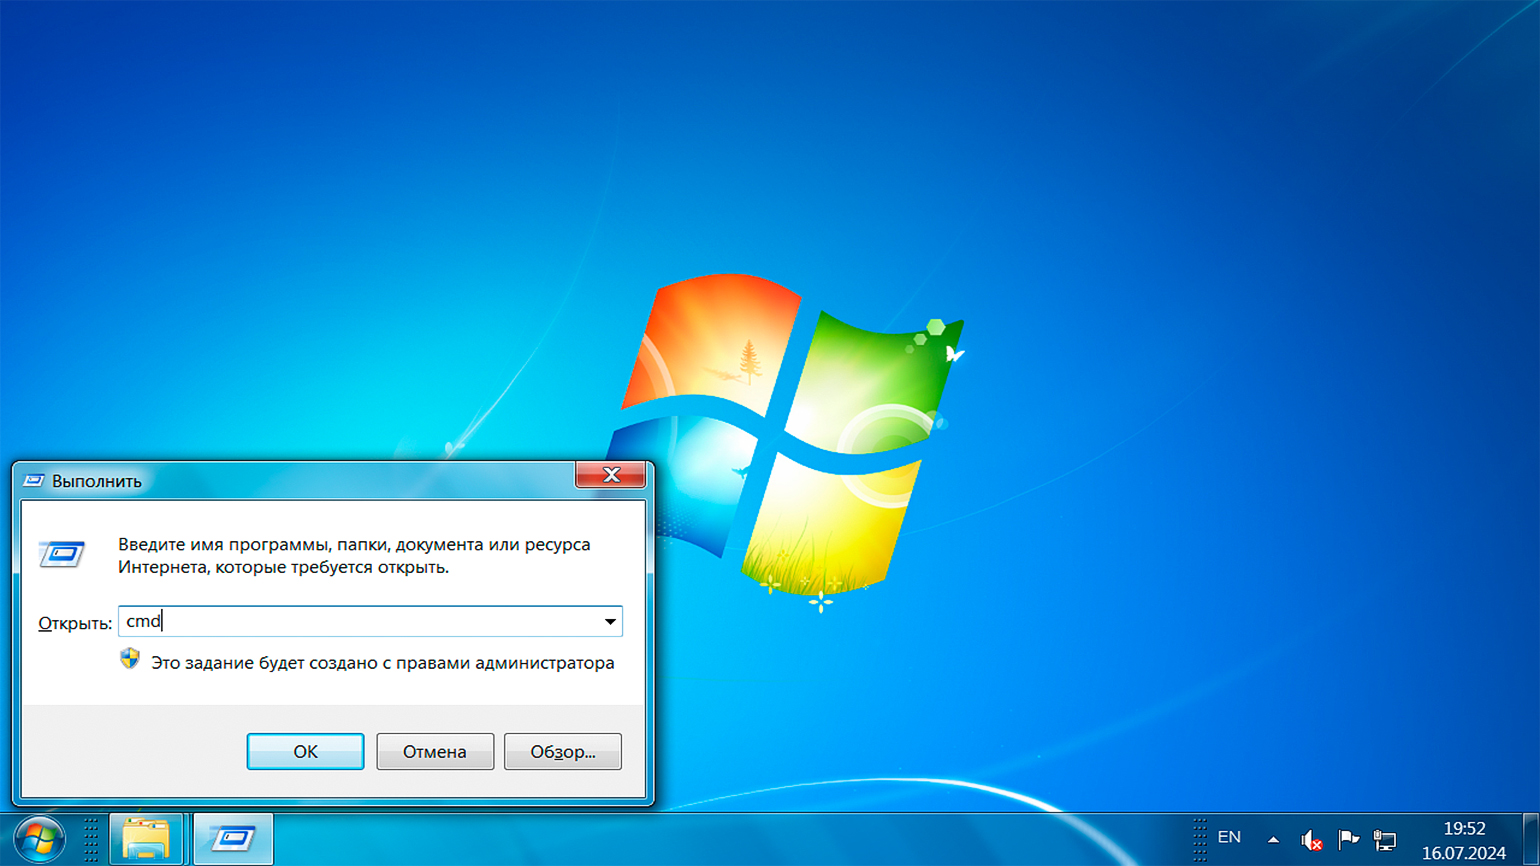
Нажмите комбинацию клавиш Win + R, чтобы открыть диалоговое окно «Выполнить». Введите cmd в поле «Открыть» и нажмите на кнопку «OK».
Начиная с Windows 8, в системе доступно специальное меню Power User, которое можно вызвать нажатием клавиш Win + X. Это меню предоставляет быстрый доступ к командной строке, диспетчеру задач, панели управления, сетевым подключениям и другим важным функциям. Это меню можно использовать вместо диалогового окна «Выполнить».
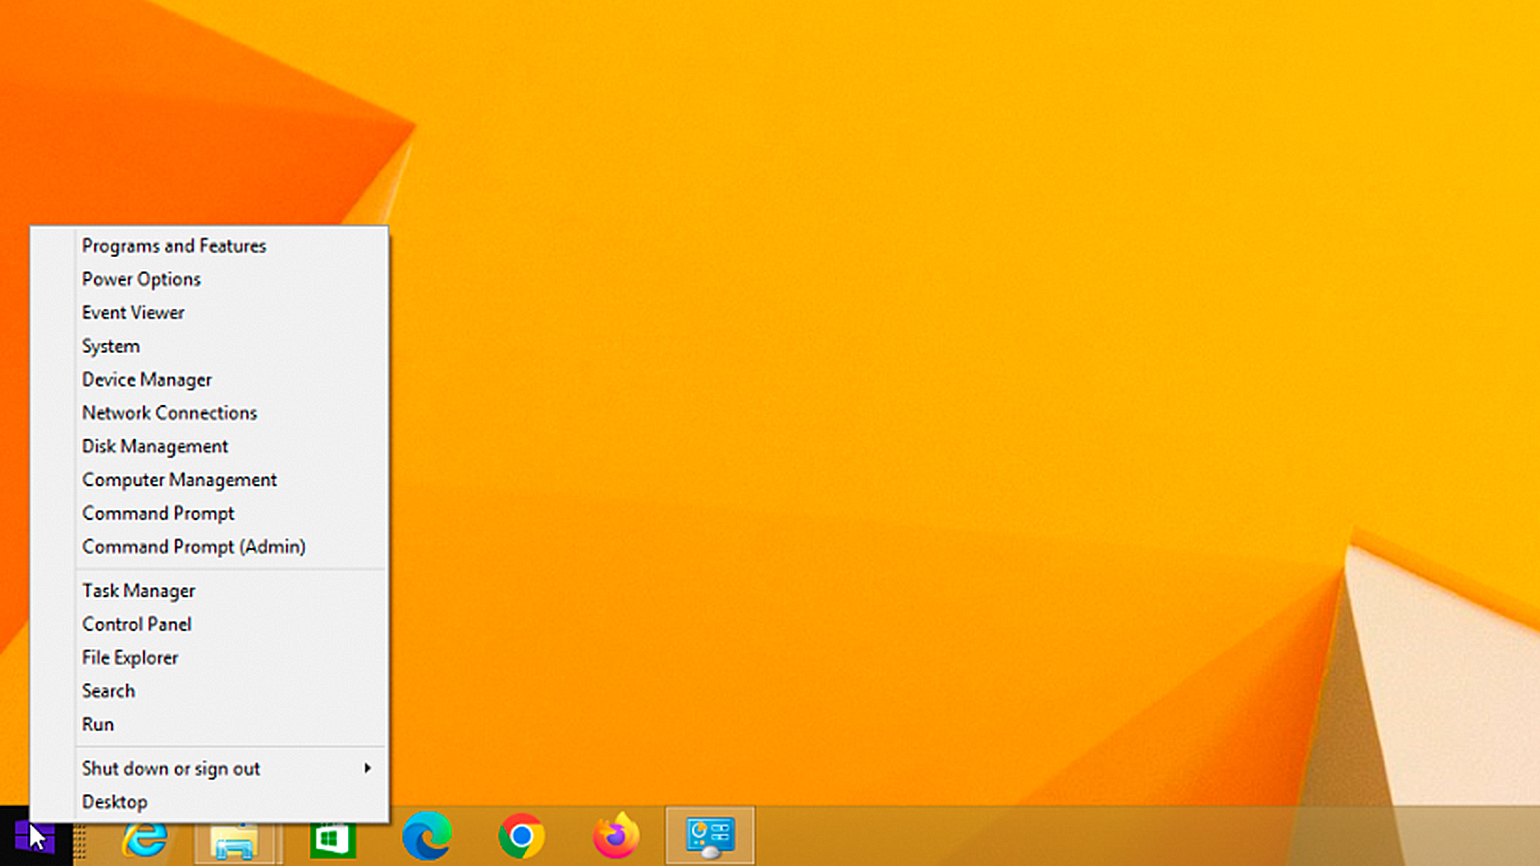
Скриншот: PCMag
Если у вас Windows 7, но вы хотите открывать Power User Menu с помощью сочетания клавиш Win + X, попробуйте программу WinPlusX:
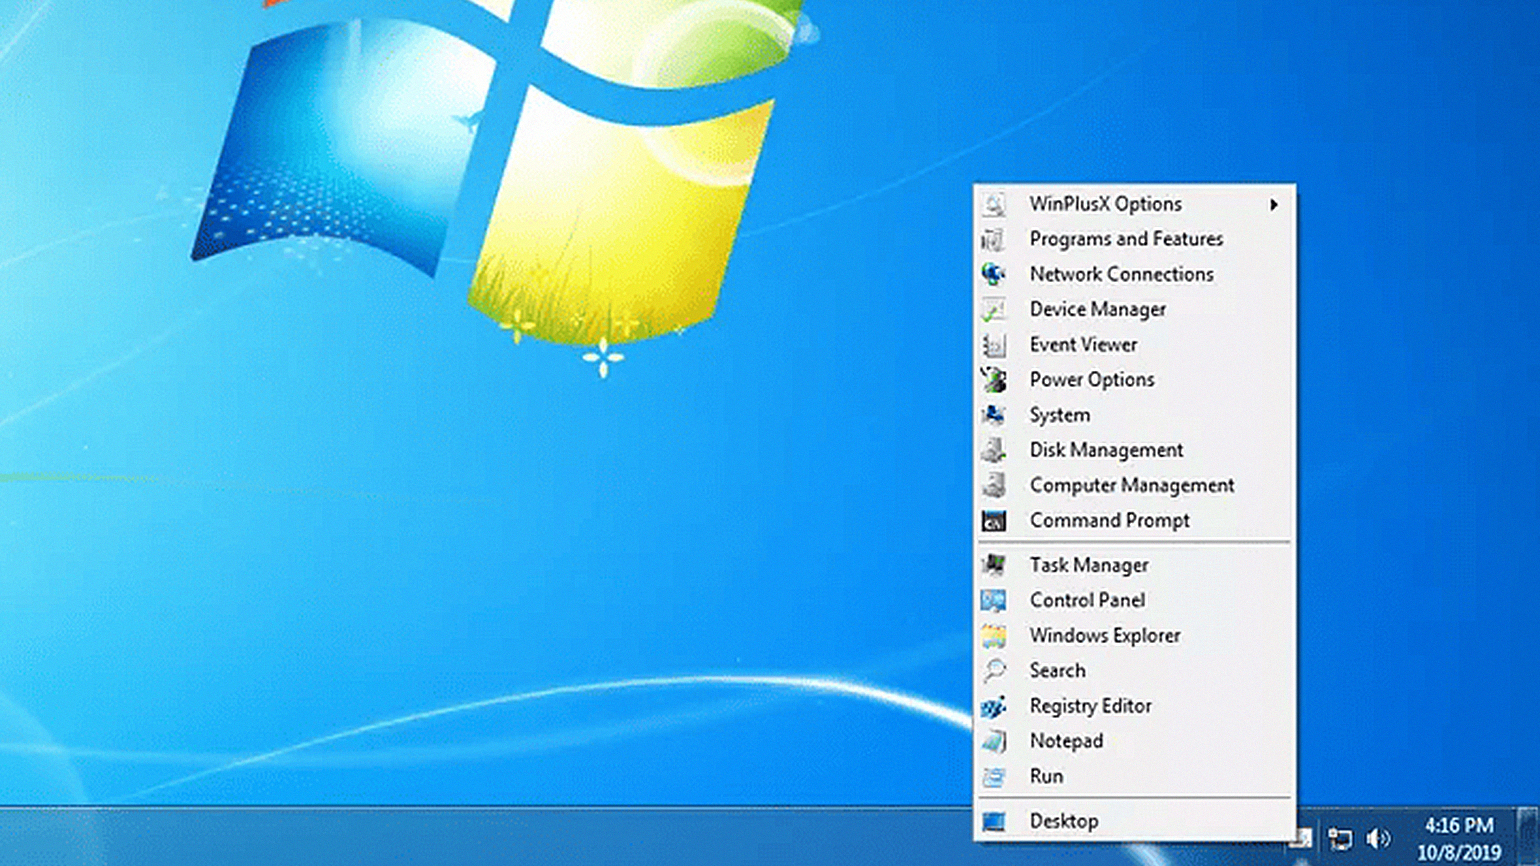
Скриншот: Lifewire
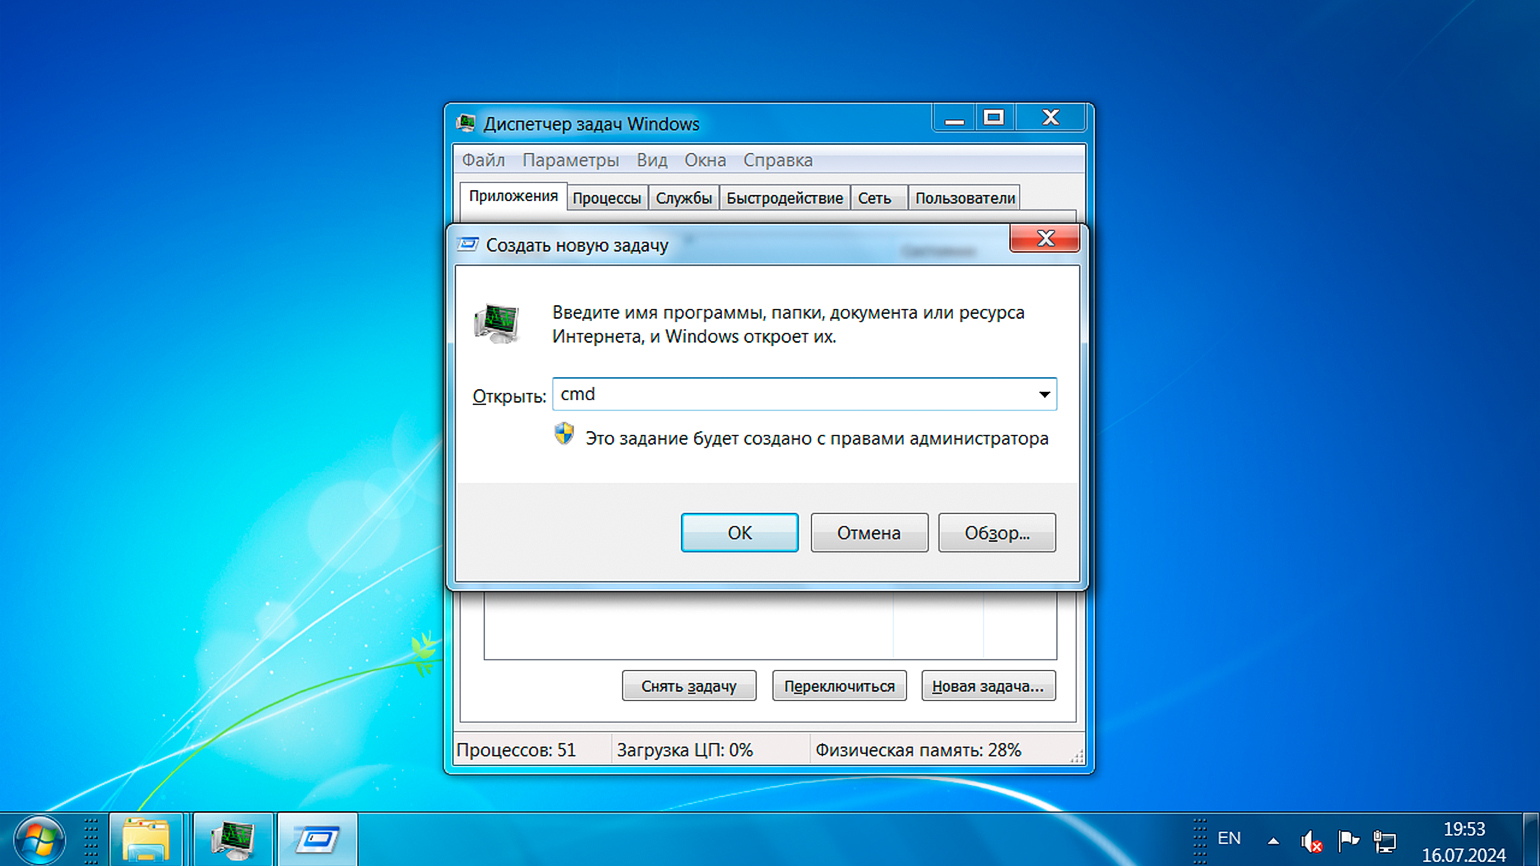
Нажмите комбинацию Ctrl + Shift + Esc или Ctrl + Alt + Del, чтобы вызвать диспетчер задач. Перейдите на вкладку «Файл», создайте новую задачу, введите cmd в поле «Открыть», а затем нажмите Enter или кнопку «OK».
Заходить в командную строку через диспетчер задач удобно в ситуациях, когда графический интерфейс завис или функционирует некорректно. Диспетчер задач всегда доступен и позволяет восстановить систему.
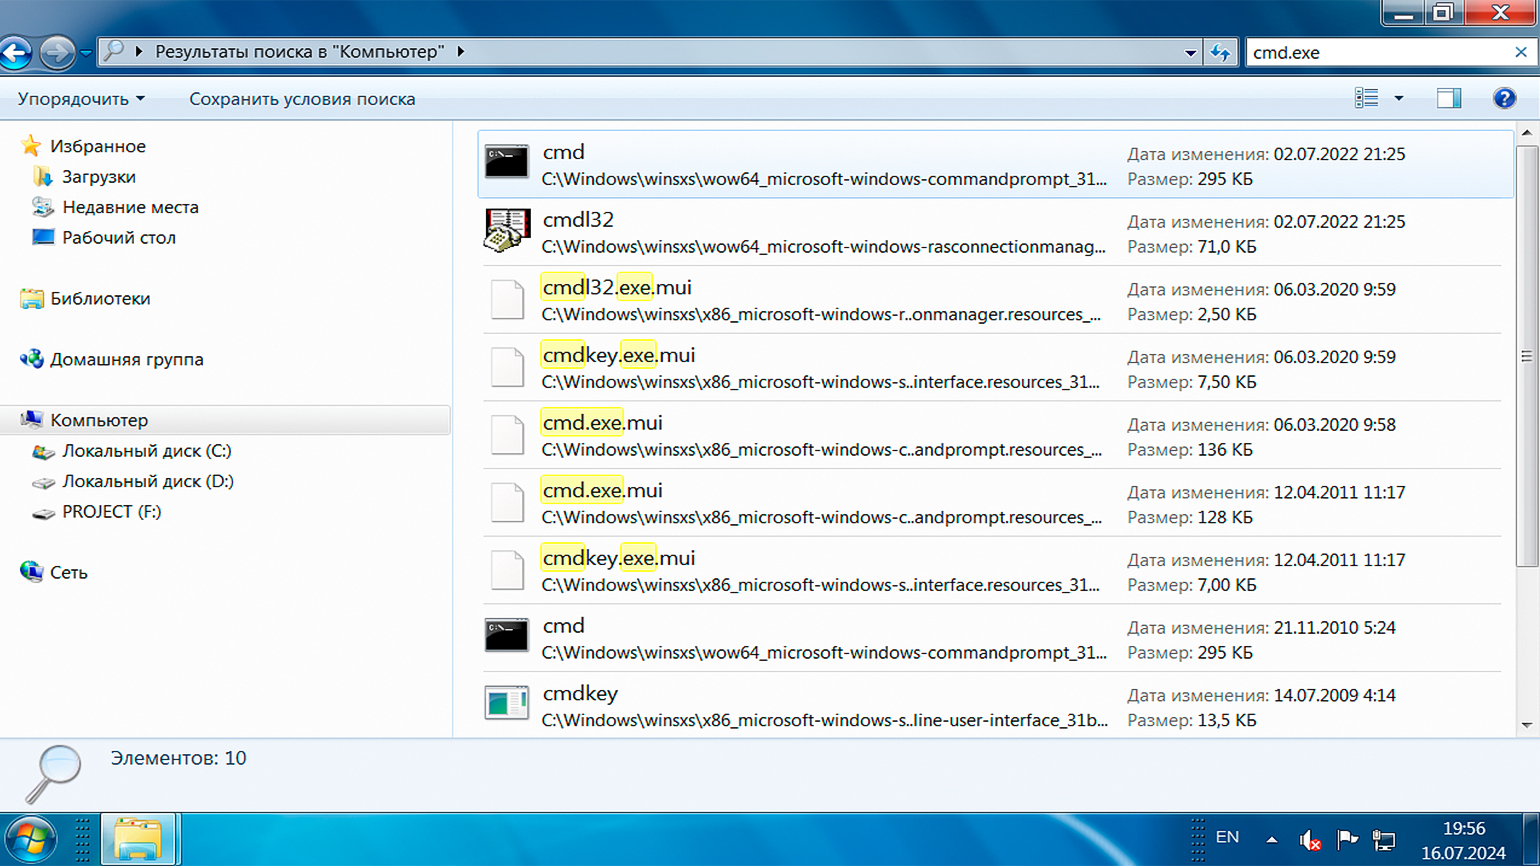
Откройте программу «Проводник», введите в строку поиска cmd.exe и нажмите Enter. В результатах найдите исполняемый файл, дважды кликните по нему левой кнопкой мыши и запустите командную строку.
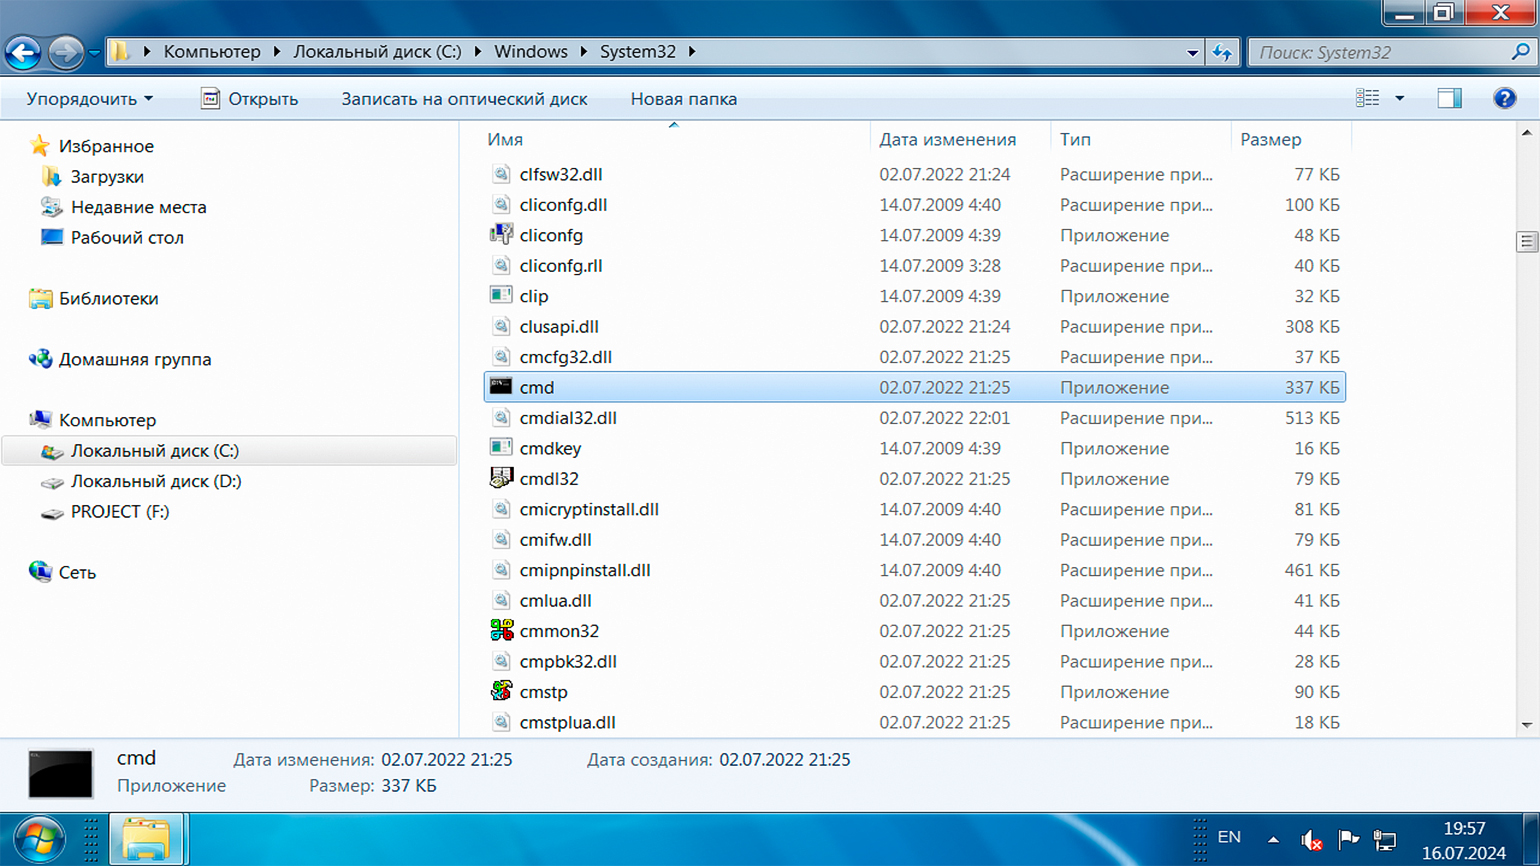
Если хотите, можете найти исполняемый файл вручную. Для этого откройте «Проводник» и перейдите по пути: «Компьютер» → диск C → Windows → System32. Затем запустите cmd.exe, кликнув на него мышью.
Щёлкните правой кнопкой мыши по пустому месту на рабочем столе или в любой папке, выберите пункт меню «Создать» → «Ярлык». В открывшемся окне в поле «Укажите расположение элемента» введите cmd.exe. Затем придумайте имя для ярлыка и нажмите «Готово». Теперь вы сможете использовать этот ярлык для быстрого запуска командной строки.

Ярлыки упрощают выполнение повседневных задач. Чтобы попробовать это на практике, выберите любую папку на своём компьютере, создайте ярлык и в поле «Укажите расположение элемента» введите команду:
cmd /k "dir"
После нажмите «Далее», дайте ярлыку имя — например, «Командная строка с dir» — и нажмите «Готово». Теперь при использовании этого ярлыка он откроет командную строку и сразу отобразит список доступных файлов.
Попробуем другой сценарий. Перейдите на рабочий стол, создайте ярлык и в поле «Укажите расположение элемента» введите другую команду:
cmd /k "cd Путь_к_папке && dir"
В этой команде Путь_к_папке вам нужно заменить на путь к той папке, в которую вы хотите перейти при открытии командной строки. После дайте ярлыку имя — например, «Командная строка в Папке» — и нажмите «Готово».
Теперь, когда вы запустите ярлык на рабочем столе, командная строка откроется в указанной папке и сразу отобразит её содержимое.
Многие способы запуска командной строки в Windows 10 и 11 напоминают те, что доступны в предыдущих версиях операционной системы. Речь идёт о запуске через поиск или меню «Пуск», диалоговое окно «Выполнить», диспетчер задач, программу «Проводник» и ярлыки. В этом разделе мы не будем их повторять и рассмотрим способы, о которых ещё не упоминали.
Windows Terminal — это многооконное приложение, которое поддерживает Command Prompt, PowerShell, Linux Bash и другие терминалы. Вы можете выбрать нужный или пользоваться сразу несколькими в разных вкладках.
В Windows 11 программа «Терминал» установлена по умолчанию, а для Windows 10 её нужно скачать из Microsoft Store. Для быстрого доступа к командной строке найдите «Терминал» через поиск в меню «Пуск» и закрепите его на панели задач или начальном экране списка приложений.
Скриншот: Microsoft Corporation
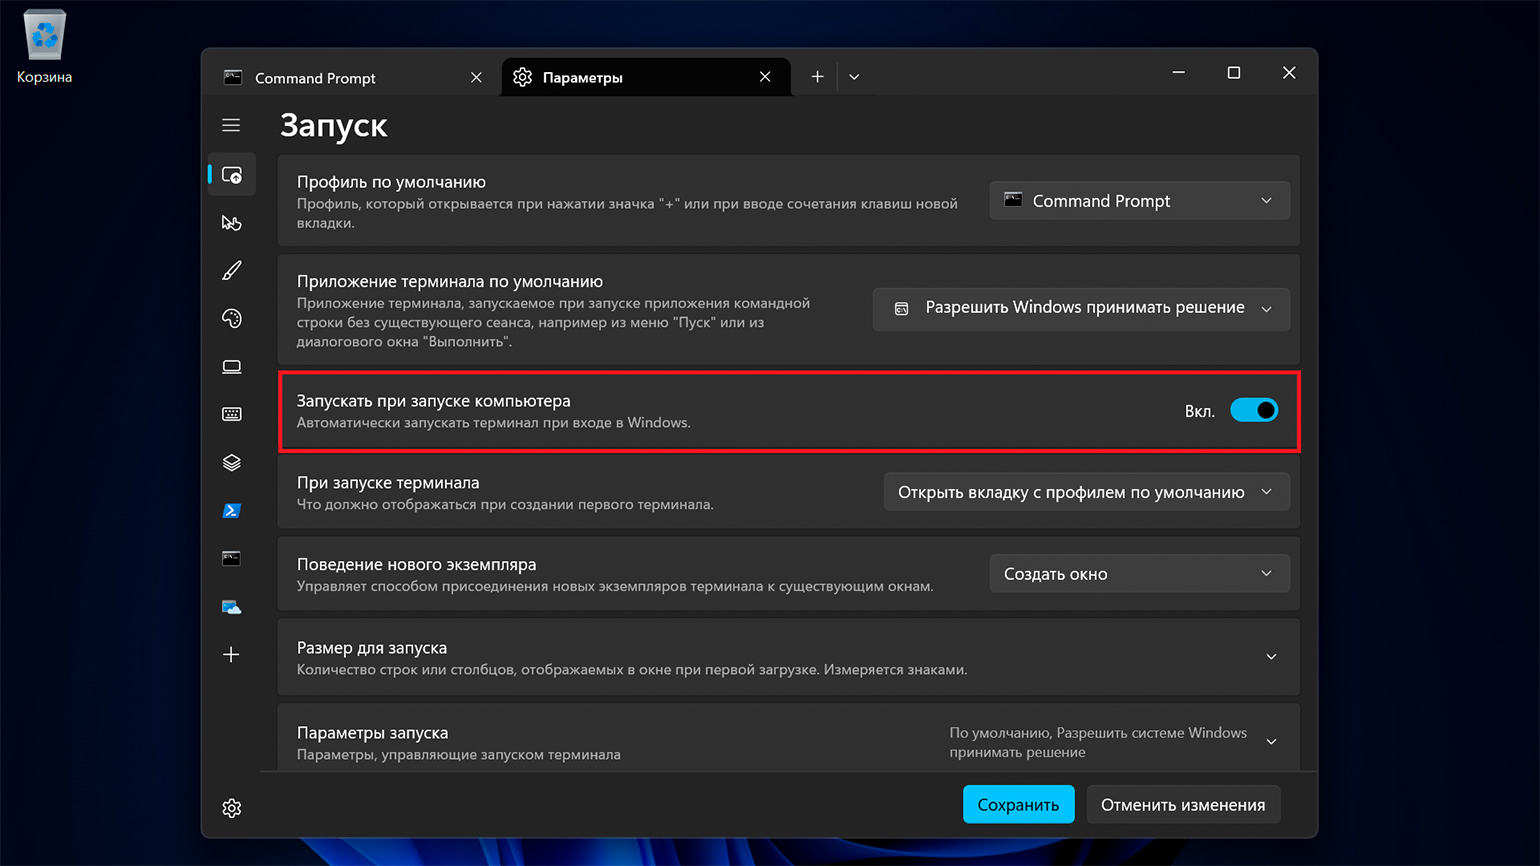
Удобство Windows Terminal в том, что вы можете перейти в «Параметры» и включить опцию «Запускать при запуске компьютера». Это позволит получить доступ к командной строке сразу после включения системы.
Если у вас нет Windows Terminal, вам придётся создать ярлык и поместить его в папку «Автозагрузки». Вот пошаговая инструкция:
- Нажмите Win + R, чтобы открыть диалоговое окно «Выполнить».
- Введите shell:startup и нажмите Enter.
- Перетащите созданный ярлык командной строки в открытую папку.
Ещё вы можете использовать «Планировщик задач» для автоматического запуска, но для этого нужно выполнить больше дополнительных шагов.
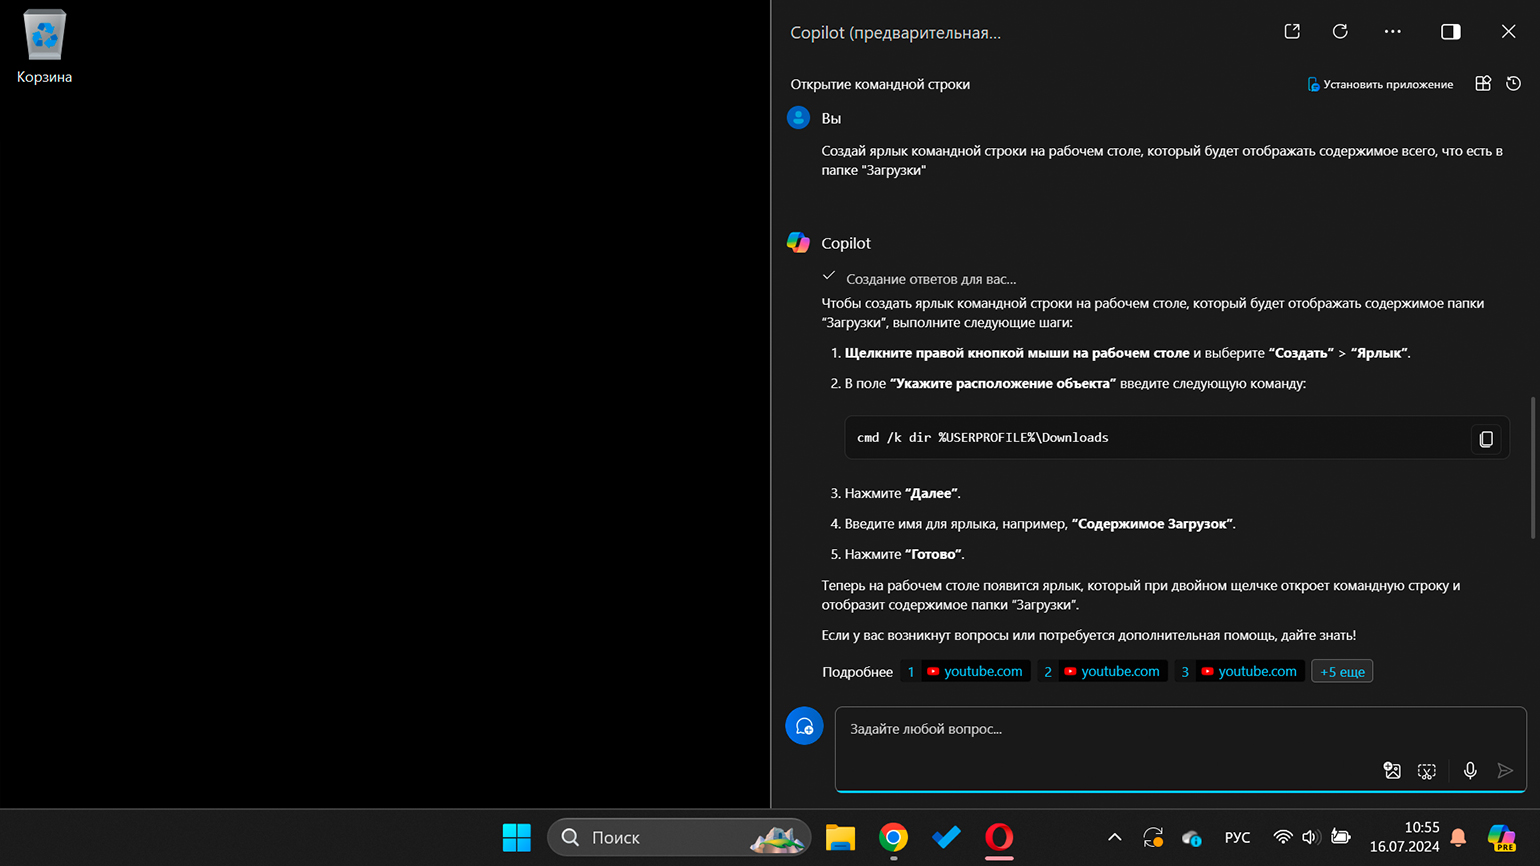
Microsoft Copilot — это интеллектуальный помощник, поставляемый вместе с Windows 11 и интегрированный с ней на уровне системы. Он позиционируется как инструмент для ответов на вопросы, предоставления полезной информации и выполнения различных повседневных задач.
Чтобы воспользоваться им, кликните на иконку приложения в правой нижней части экрана или найдите его через меню «Пуск». В диалоговом окне попросите его открыть командную строку и подтвердите выполнение.

Если попросить Microsoft Copilot создать ярлык или выполнить более сложную задачу, он пока не сможет это сделать. Вместо этого он предложит инструкцию и ссылки на интернет-ресурсы по вашему запросу.
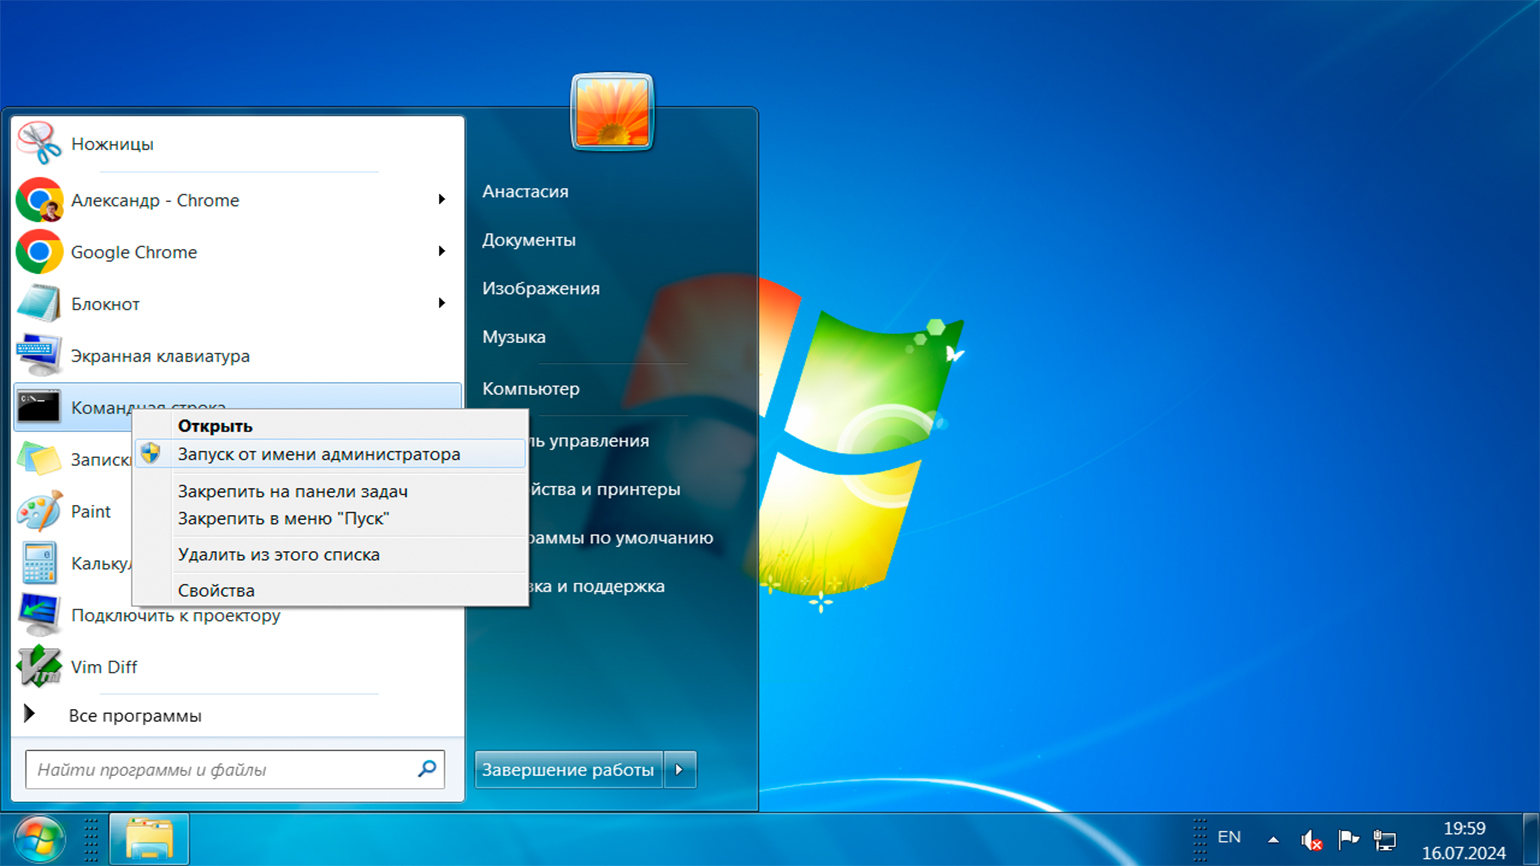
Чтобы открыть командную строку от имени администратора, вы можете использовать большинство из ранее описанных способов, но вместо обычного запуска выбирайте пункт «Запуск от имени администратора».
Вот пример для Windows 7: откройте меню «Пуск» → «Все программы» → «Стандартные» → «Командная строка». Затем кликните правой кнопкой мыши по приложению и в контекстном меню выберите способ запуска.
Запуск командной строки от имени администратора необходим для выполнения команд или запуска программ с повышенными привилегиями доступа к ресурсам системы. К таким действиям относятся, например, управление службами, настройка сети, установка обновлений, изменение конфигурации безопасности, доступ и изменение ключей реестра, диагностика и решение проблем, связанных с конфигурацией, и многое другое.
Операции от имени администратора могут повлиять на работу системы, поэтому будьте осторожны и не используйте эти права без необходимости.
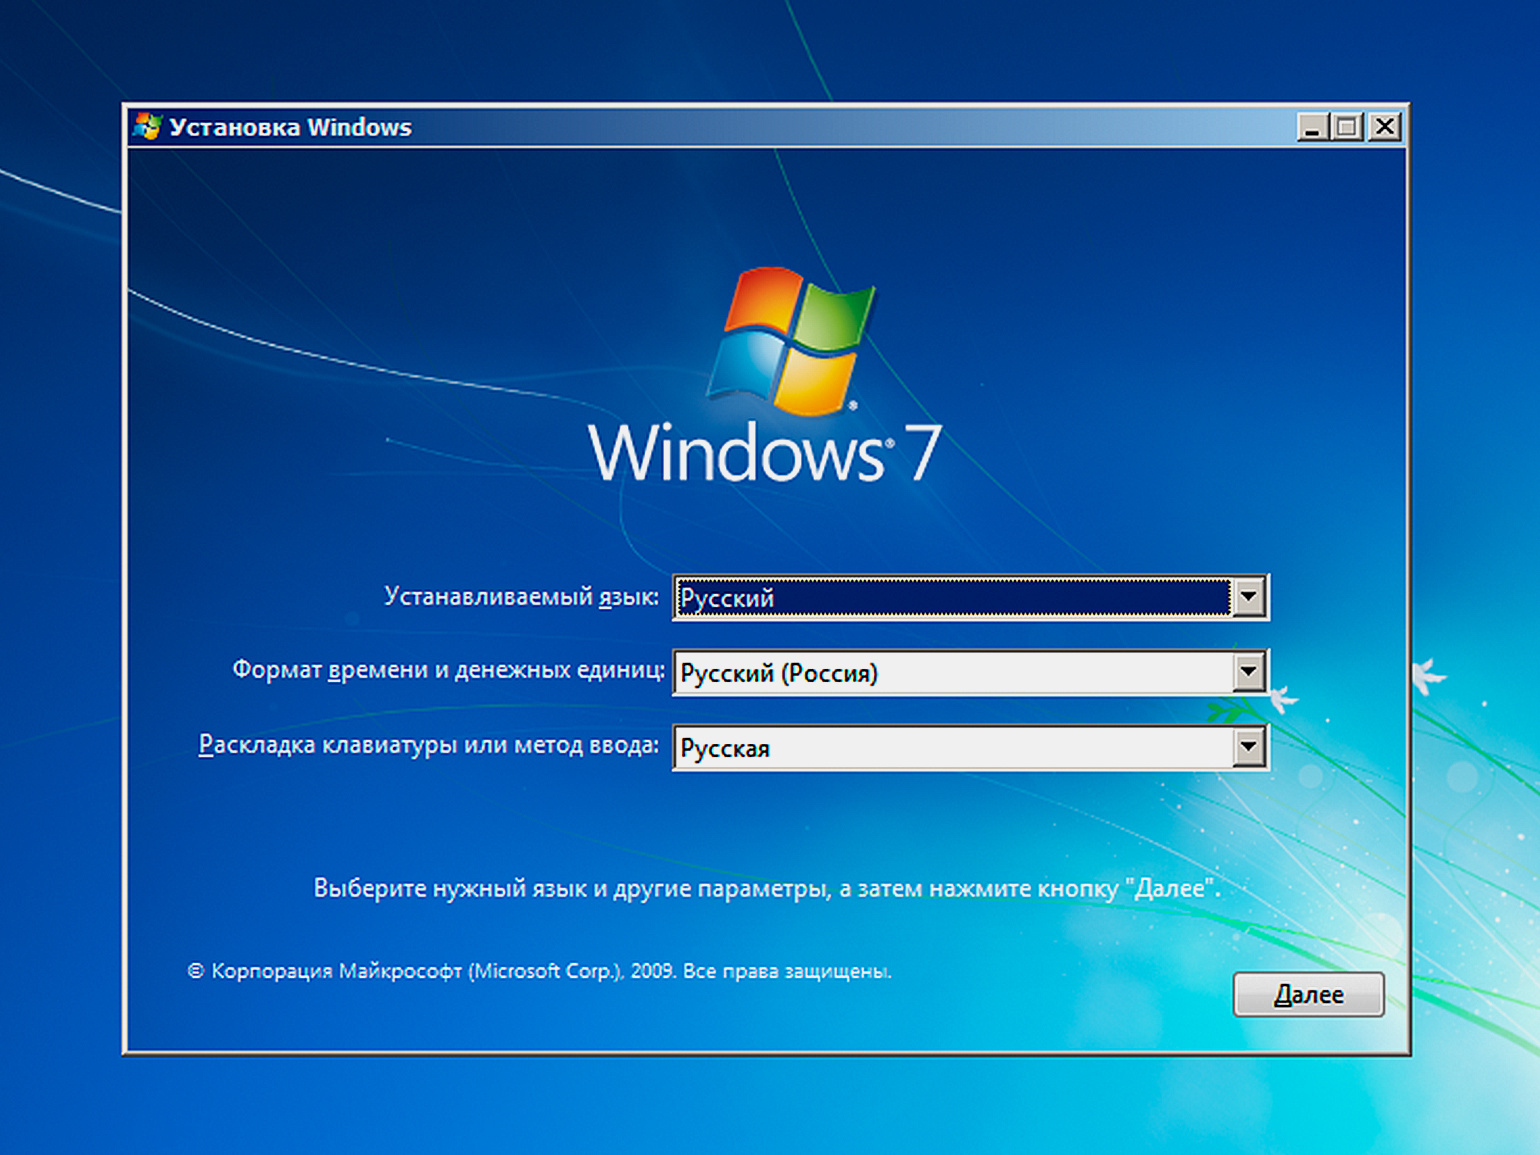
На первом шаге необходимо запустить процесс установки Windows и дождаться появления экрана, на котором можно выбрать язык и регион.
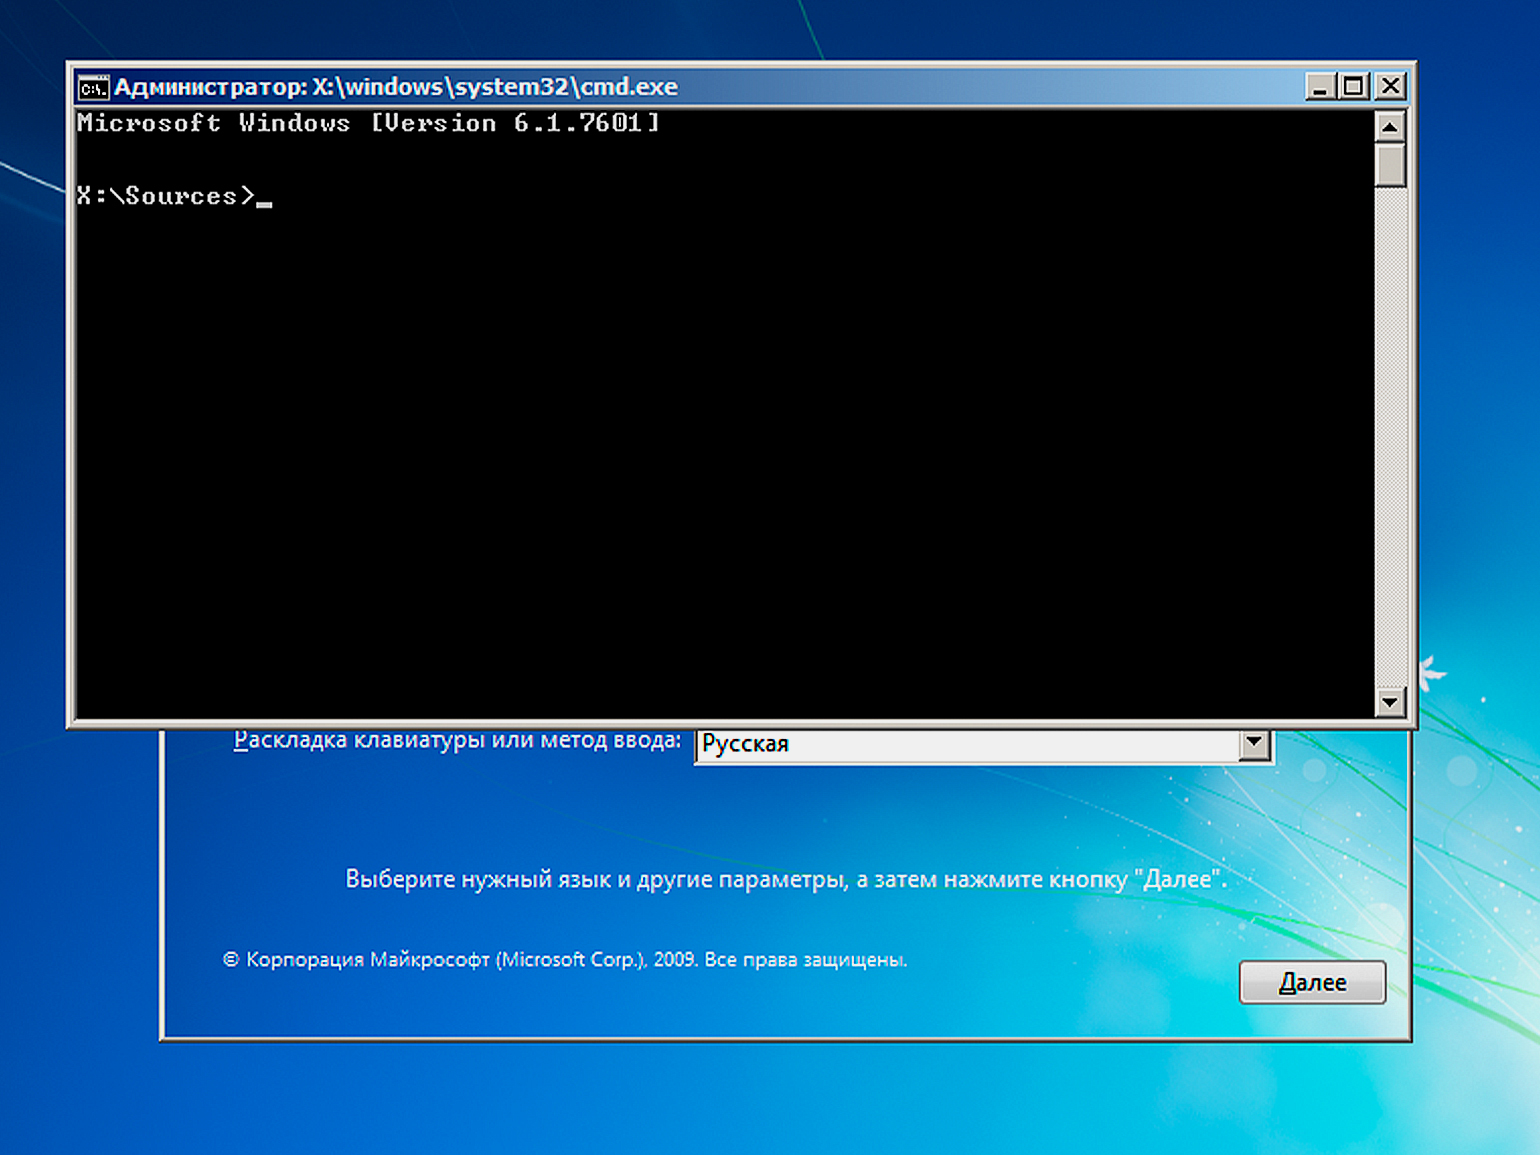
После этого нажмите сочетание клавиш Shift + F10, и вы получите доступ к командной строке. Это может быть полезно:
- для диагностики и исправления ошибок;
- создания, удаления и форматирования разделов на жёстком диске;
- копирования, перемещения или удаления файлов и папок;
- редактирования настроек загрузки;
- запуска скриптов или команд для автоматизации задач до или после установки системы;
- сброса пароля администратора, если вы забыли его и не можете войти в систему;
- решения множества других задач по настройке и оптимизации Windows.
Для Linux и macOS мы не будем разбирать способы вызова командной строки с учётом версии операционной системы, так как статья посвящена Windows. Но мы рассмотрим несколько популярных вариантов.
В большинстве Linux-дистрибутивов вы можете открыть новое окно терминала, нажав комбинацию клавиш Ctrl + Alt + T. Также его можно найти в меню приложений или через строку поиска по запросу terminal.
Если у вас уже открыт терминал и вам нужно дополнительное окно для работы, вы можете выполнить команду gnome-terminal для среды GNOME. Для других сред рабочего стола используются аналогичные команды: konsole для KDE или xfce4-terminal для XFCE.

В macOS доступ к командной строке открывает программа «Терминал». Быстрее всего её можно открыть через Spotlight: нажмите комбинацию Cmd + Пробел, введите в строке поиска терминал и нажмите Enter.
Также можно воспользоваться Launchpad — приложением с иконкой ракеты на панели Dock. Откройте Launchpad, найдите иконку «Терминал» и запустите её. Аналогично можно сделать с помощью файлового менеджера Finder: перейдите в раздел «Приложения» → «Утилиты» → «Терминал».
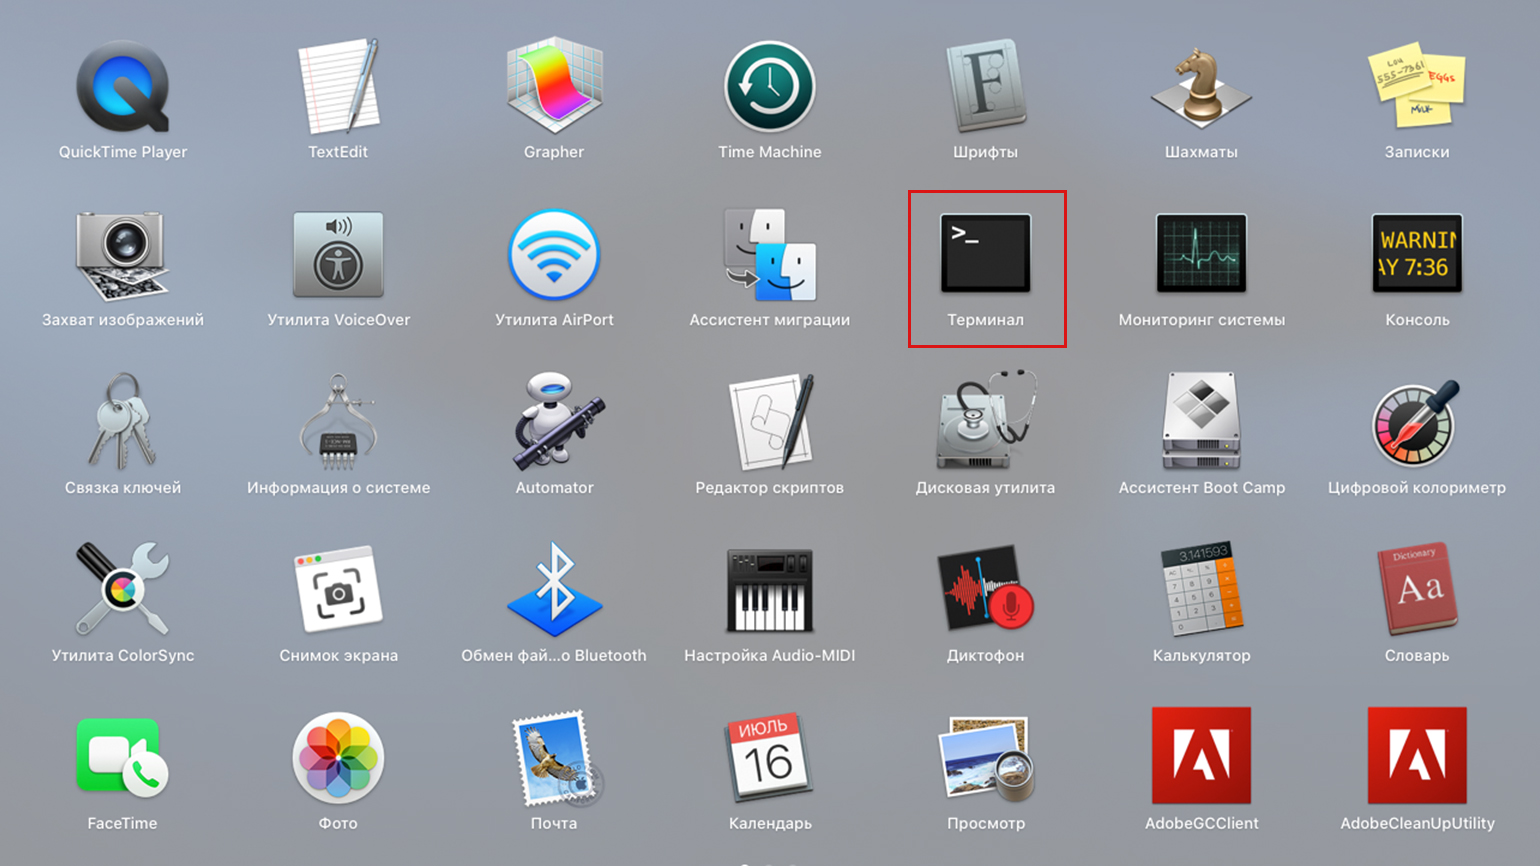
Скриншот: Skillbox Media
Как быстро заработать в IT в 2025 году
Попробуйте себя в разных направлениях IT и сделайте первый шаг к новой профессии на удалёнке!
Учиться бесплатно →
The Command Prompt is one of the most powerful tools on your Windows system, offering quick access to run commands, perform tasks, and manage system settings. But what happens when your mouse is not working or you are facing any issue with your laptop touchpad? So, in that time, knowing how to open a command prompt with keyboard shortcuts.
Now, to learn these shortcuts, explore this guide. Here we will show you 7 easy methods to open the command prompt on Windows 11, 10, and 8.
How to Open Command Prompt in Windows using Keyboard Shortcuts
In terms of productivity, keyboard shortcuts are often minimized. While navigating through menus and clicking icons can get the activity executed, learning keyboard shortcuts can turbocharge your computing revel. With just a few keystrokes, you can execute commands, release programs, and navigate your device with excellent speed and precision.
7 Methods to Open Command Prompt in Windows
The conventional way to open a command prompt entails many steps, like establishing the start menu, then searching the command activate, and so forth. But with the help of shortcuts, you can without difficulty visit the command prompt and begin operating on it.
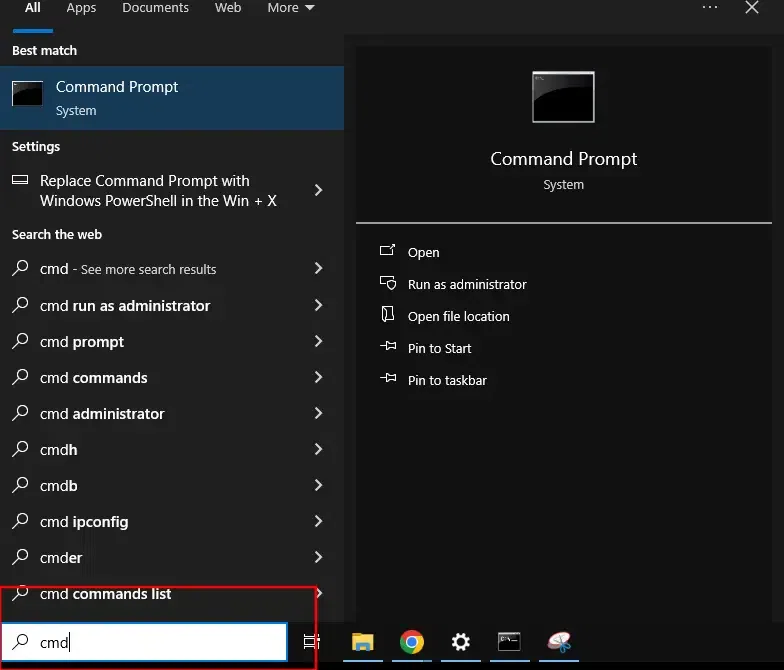
1. Using Windows Key (Windows 10 and 11)
Windows Search Bar allows user to find programs, including command prompt using few steps.
Step 1: Open the Windows icon and Type CMD.
- Press the Windows key from your keyboard
- Now type «CMD» or «Command Prompt»
- Hit ENTER to open Command Prompt
2. Using Run Dialog Box
You can also use the «run command» shortcut to launch cmd, below are the steps for the same:
Note: This method works across all versions of Windows, from Windows 7 to Windows 11.
Step 1: Press Windows + R to Open «Run Dialog»
- Press the Windows key + R on your keyboard to open the run command.
Step 2: Type «CMD» and hit «Enter»
A dialogue box will appear, type «cmd» or «Command Prompt» and press «Enter«.
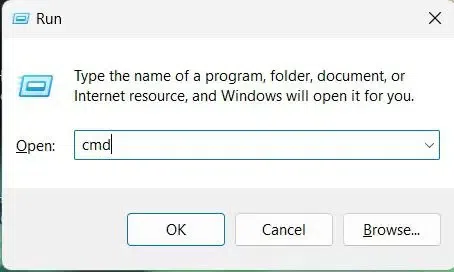
This will instantly open your system’s Command Prompt with keyboard only.
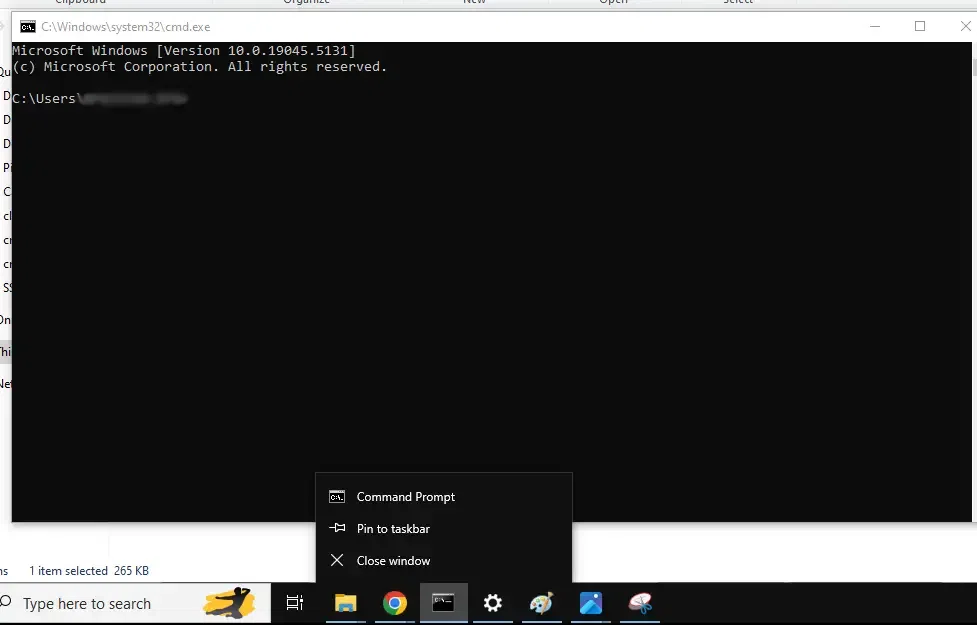
3. «Pin» to Taskbar
One of the most efficient method to open command prompt using keyboard shortcut in Windows is by pinning it to Taskbar. Let’s learn quick steps to do so:
Step 1: Open Command Prompt
First of all, open cmd with the help of any given method.
Step 2: Make a «Right-click» on the icon
Now, right-click on the CMD icon in the taskbar (in the bottom) and select Pin to Taskbar
Note: From now on, you can open Command Prompt by pressing Windows key + [number] (the number corresponds to the position of the CMD icon on the Taskbar).
4. How to open command prompt using the «Context Menu»
The ‘Context Menu» is suitable for Windows 10 and 11 and by using this method, you can directly open the command prompt from any folder in Windows 10 and 11.
Step 1: Open File Explorer
Click on the Windows button or go to Start Menu and type «File Explorer» and click to open it.
Hold down Shift and right-click anywhere in the File Explorer window (in the white space or within a folder) and go to Context Menu and select «Open Command Windows here»
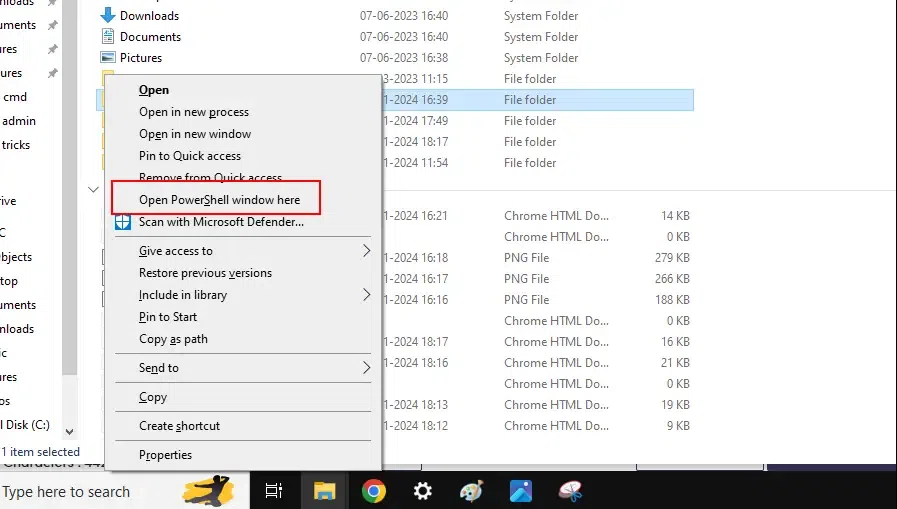
Note: In some versions, this option might show as Open PowerShell window here instead.
5. Custom Shortcut for all Versions
If you wish to create any specific keystroke toopen command prompt in your Windows PC, then you can create a custom shortcut using the following methods.
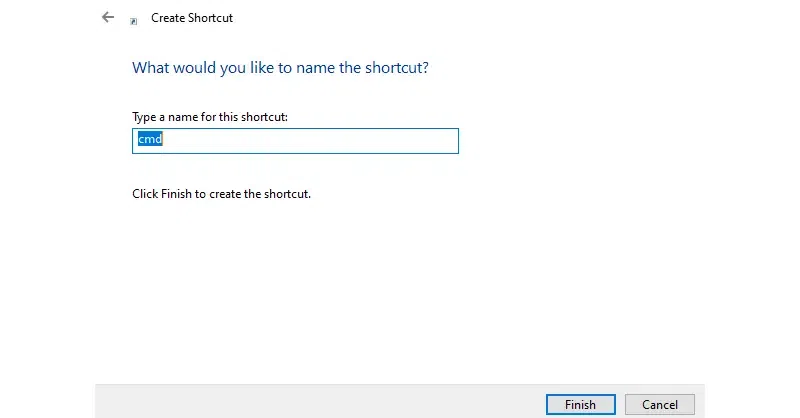
Step 1: Create a Shortcut
Go to «Desktop» and create a Shortcut first.
Step 2: Create Location Point for cmd.exe
Now, type cmd.exe as the location of the shortcut and name it as «CMD».
Step 3: Click on the «Shortcut key» field
Once you create the shortcut, make a right-click and choose Properties, and click on the «Shortcut Key» field and press your desired keystroke combination. Now, click «Apply > OK» to save it.
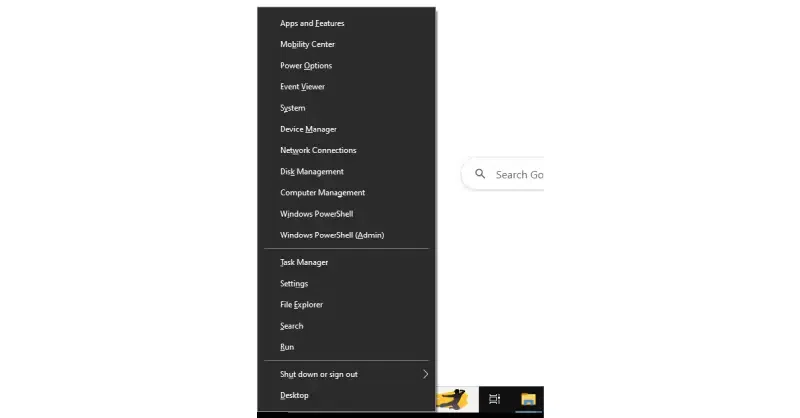
6. Use Windows + X to open CMD
The Windows + X menu provides quick access to system tools, including the Command Prompt in Administrator mode.
Press Windows key + X to open the Quick Access menu.
In Windows 8, 10, or 11, you will see options to open either Command Prompt or Command Prompt (Admin).
Step 2: Select CMD (Admin)
Select Command Prompt or Command Prompt (Admin) to open it immediately. Please keep this in mind that the newer versions of Windows will display PowerShell, but you can still switch it back to CMD through settings.
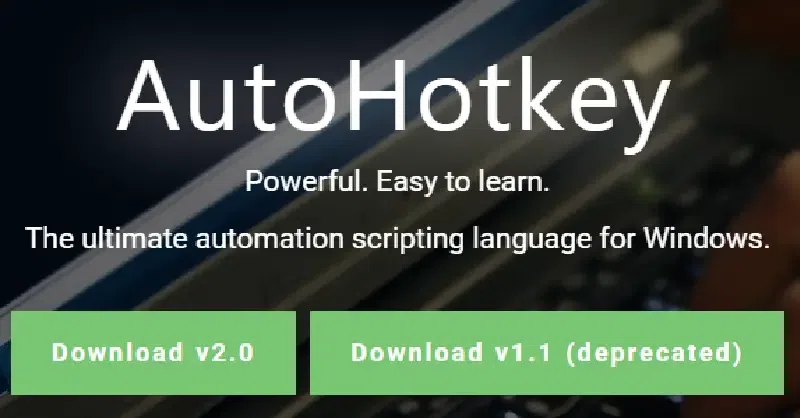
In older versions of Windows, such as Windows 7, you can use third-party tools like AutoHotkey to create custom keyboard shortcuts for opening the Command Prompt.
Step 1: Download and install AutoHotkey.
Open Chrome Browser in Windows and go to AutoHotkey Official website.
Step 2: Create and Run Script
Create a new script with the following command:
#C::Run, cmd.exeThis will allow you to open CMD by pressing Windows key + C.
Conclusion
The Command Prompt is an invaluable tool for Windows users, and knowing how to quickly open it can make a big difference in productivity. Whether you’re using Windows 7, 8, 10, or 11, there are several ways to access CMD through keyboard shortcuts. From the classic Windows + R to customizing your own shortcut, you have multiple methods to choose from.
Also Read
- Most Useful CMD Commands in Windows
- Create a New Maven Project From Command Prompt
- How to Create a File in CMD
Впервые новая оболочка для команд Windows 11 и Windows 10 была представлена в мае 2020, а уже осенью была выпущена первая стабильная версия. С тех пор Windows Terminal продолжает обновляться, но уже сейчас более чем пригоден к работе как с командной строкой или PowerShell, так и другими оболочками, например, Ubuntu, установленной в рамках WSL (Подсистема Windows для Linux).
В этом обзоре — базовые сведения о том, где скачать и как настроить Windows Terminal, о некоторых его возможностях и дополнительная информация, которая может оказаться полезной.
Где скачать Windows Terminal
Прежде чем приступить, два важных примечания: в Windows 11 Терминал Windows уже встроен (нажмите правой кнопкой мыши по кнопке Пуск и вы сможете его запустить), а для работы нового терминала в Windows 10 требуется версия 1903 или новее.
Бесплатно скачать Windows Terminal можно из двух официальных источников:
- Microsoft Store — достаточно ввести Windows Terminal в поиске магазина или перейти на страницу приложения https://www.microsoft.com/ru-ru/p/windows-terminal/9n0dx20hk701

- Загрузить последний релиз из GitHub, скачиваем файл .msixbundle из раздела Assets и устанавливаем его как обычное приложение — https://github.com/microsoft/terminal/releases/

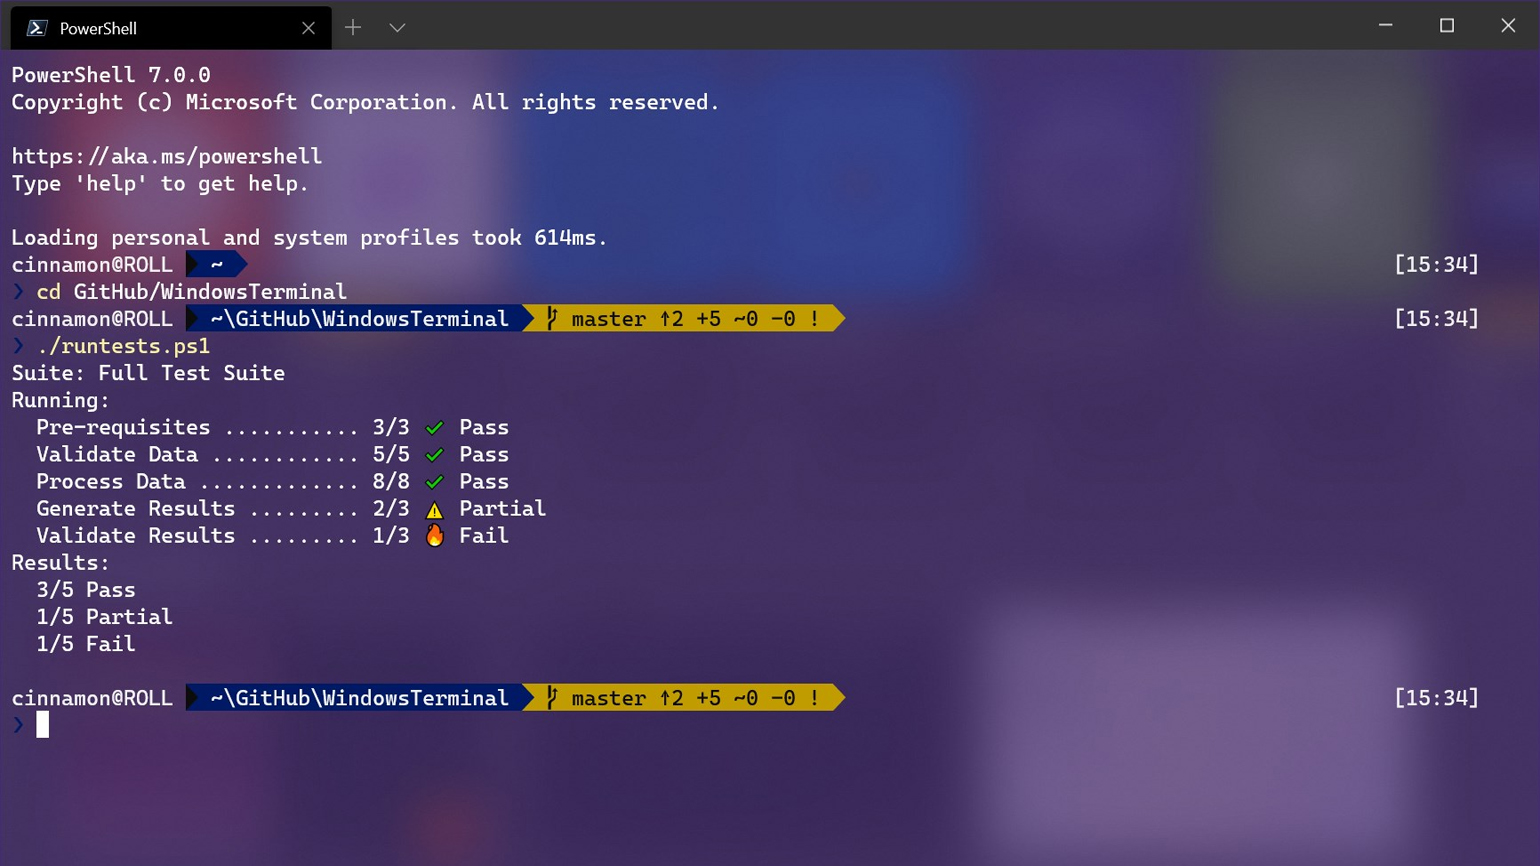
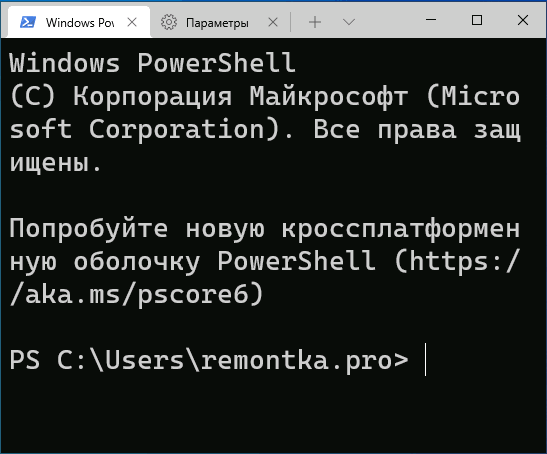
После установки Windows Terminal готов к работе — можно запускать. При первом старте по умолчанию будет открыта вкладка с PowerShell.

Использование Windows Terminal, возможности управления
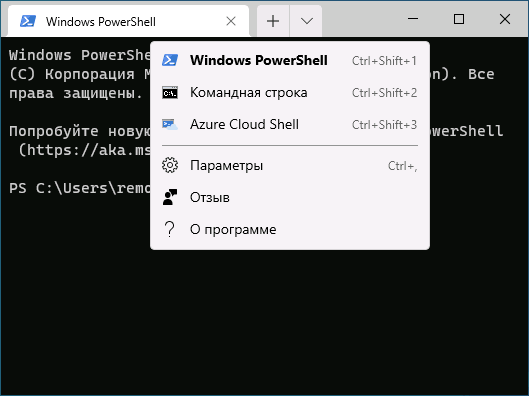
Скорее всего, с открытием новых вкладок с командной строкой, PowerShell и другими оболочками проблем не возникнет, достаточно нажать «+» если требуется открыть новую вкладку с консолью по умолчанию, либо по стрелке и выбрать нужную оболочку, там же можно увидеть и сочетания клавиш для быстрого открытия соответствующих новых вкладок.
Не будем торопиться с переходом к настройкам Windows Terminal, для начала некоторые вещи, которые вы можете сделать, не переходя к ним:
- Сочетания клавиш Ctrl + «+» и аналогичное сочетание с клавишей «минус» позволяет изменить размер текста в текущей вкладке.

- Нажмите клавиши Alt+Shift+D, чтобы разделить текущую вкладку на две панели. Действие можно повторять: выделенная панель будет разделяться при нажатии этих клавиш. Если вместо D использовать клавишу «минус» или «плюс», разделение будет происходить горизонтально и вертикально соответственно.

- Для панелей доступны и другие клавиши: Ctrl+Shift+W — закрыть текущую, Alt+Shift+стрелки — изменение размеров, Alt+стрелки — переключение между панелями.
- Если в Windows включены эффекты прозрачности, удержание клавиш Ctrl+Shift и вращение колеса мыши вниз позволяет сделать активное окно Windows Terminal более прозрачным.
- Windows Terminal добавляет пункт в контекстное меню Windows, позволяющий быстро запустить оболочку по умолчанию в текущей вкладке.

- «Стандартные» сочетания клавиш, такие как копирование и вставка, отмена (Ctrl+Z) и другие здесь также исправно работают.
- Если вам нужно запустить Windows Terminal от имени администратора, можно использовать правый клик по нему в меню «Пуск» и выбор нужного пункта в разделе «Дополнительно» или, поиск в панели задач, как на изображении ниже.


Настройки
Зайти в настройки Windows Terminal можно, нажав по кнопке со стрелкой или же с помощью сочетания клавиш Ctrl + «запятая». Параметры меняются от версии к версии и на момент написания этого обзора выглядят следующим образом:

Большинство вкладок вполне понятны и на русском языке:
- На вкладке «Запуск» можно выбрать оболочку по умолчанию, например, выбрать «Командная строка» вместо «Windows PowerShell», включить автозапуск, изменить режим запуска.
- Вкладки «Оформление» и «Цветовые схемы» позволяют изменить общие параметры оформления приложения, а также отредактировать цветовые схемы (их мы можем указать отдельно для каждой консоли в разделе «Профили»), при необходимости — создать собственную цветовую схему.
- В разделе «Действия» — базовые сочетания клавиш для работы в Windows Terminal. Эти сочетания подлежат редактированию в файле конфигурации.
- Если перейти в подраздел «Профили», мы можем настроить отдельные параметры оформления, запуска, значка, папки запуска, прозрачности и другие для каждой «командной строки». В оформлении можно не только выбрать цветовую схему и настроить прозрачность (акриловый эффект), но и задать обои для соответствующих вкладок.

- Настройки в достаточной мере гибкие и скриншот ниже — далеко не всё, чего можно добиться.

- При нажатии кнопки «Добавить», вы можете добавить собственную консоль в Windows Terminal (или использовать системную — тот же PowerShell или Командную строку, но с другим профилем настроек).
- Кнопка «Открытие файла JSON» позволяет открыть файл конфигурации для редактирования.


Если после проделанных экспериментов с настройками вам потребуется сбросить все параметры Windows Terminal на настройки по умолчанию, достаточно проделать следующие шаги:
- Запустите Windows Terminal и перейдите в его параметры.
- Нажмите «Открытие файла JSON» и откройте его в текстовом редакторе.
- Удалите всё содержимое файла и сохраните файл.
- Закройте и снова запустите Windows Terminal — он будет запущен с настройками по умолчанию.
I decided to try out the new Windows Terminal to see how it compared to ConEmu, which is my usual console.
The recommended way to get the Windows Terminal is to download it from the Microsoft Store so that it can automatically update itself as new versions are released.
While the Windows Terminal is not as mature and feature rich as ConEmu, I did enjoy it, and it’s being actively worked on with plenty of features coming down the road.
I’d also recommend following Scott Hanselman’s post about how to make it look nicer.
One feature I missed right away was ConEmu allows you to set a keyboard shortcut to put it in focus.
As a software developer, I’m constantly in and out of the terminal, and being able to get to it in a keystroke is very convenient.
Method 1: Pin Windows Terminal to the taskbar
The easiest way to get to the Windows Terminal using a keyboard shortcut is to pin it to the taskbar.
Not only does it make it easy to click on with the mouse, but you can also use the Windows Key + [number] keyboard shortcut to launch it or put it in focus.
For example, if on your taskbar from left to right you have: Edge, Chrome, Windows Terminal, then you could use Windows Key + 3 to launch the Windows Terminal, or put it in focus if it’s already open.
Similarly, Windows Key + 1 would launch Edge, and Windows Key + 2 would launch Chrome.
This is a simple solution and it works, but the reason I’m not a fan of it is:
- If I reorder the windows on the taskbar then the keyboard shortcut changes.
- This method only works for the first 10 items on the taskbar. i.e. you can’t do Windows Key + 11.
- I find it awkward to use the Windows Key with any numbers greater than 4.
So let’s continue exploring other options.
Method 2: Launch Windows Terminal from the command line
The Windows Terminal is installed as a Microsoft Store app, so the location of the executable isn’t very obvious, and it is likely to change every time the app is updated.
This can make launching it via other applications or scripts tough.
Luckily, I found this wonderful post describing how to launch Microsoft Store apps from the command line.
From there, I was able to track down that you can launch the Windows Terminal store app using:
explorer.exe shell:AppsFolder\Microsoft.WindowsTerminal_8wekyb3d8bbwe!App
Update: It turns out you can also simply run
wtfrom the command line to launch the Windows Terminal, aswt.exegets added to the Windows PATH when the Windows Terminal is installed.
Now that we know how to launch it from the command line, you can use this from any custom scripts or application launchers you might use.
This is in fact what I show how to do from AutoHotkey further below.
While this command allows us to launch Windows Terminal, it doesn’t allow us to put it in focus if it’s already open, so let’s continue.
Method 3: Launch Windows Terminal via a custom keyboard shortcut
The above post mentions that you can simply navigate to shell:AppsFolder, find the Windows Terminal app, right-click on it, and choose Create shortcut.
This will put a shortcut to the application on your desktop, and like any shortcut file in Windows, you can right-click on it, go to Properties, and assign it a Shortcut key that can be used to launch the application.
While this will allow you to launch the Windows Terminal with a custom keyboard shortcut, like the previous method, it opens a new instance of the Windows Terminal every time, which isn’t what I want, so let’s continue.
Method 4: Switch to Windows Terminal via keyboard shortcut and AutoHotkey
To use a custom keyboard shortcut to both launch the Windows Terminal, as well as simply switch to the Windows Terminal window if it’s already open, I use AutoHotkey.
I’ve blogged about AutoHotkey in the past, and if you’ve never used it you really should check it out.
In a new or existing AutoHotkey script, you can define this function and hotkey:
SwitchToWindowsTerminal()
{
  windowHandleId := WinExist("ahk_exe WindowsTerminal.exe")
  windowExistsAlready := windowHandleId > 0

  ; If the Windows Terminal is already open, determine if we should put it in focus or minimize it.
  if (windowExistsAlready = true)
  {
    activeWindowHandleId := WinExist("A")
    windowIsAlreadyActive := activeWindowHandleId == windowHandleId

    if (windowIsAlreadyActive)
    {
      ; Minimize the window.
      WinMinimize, "ahk_id %windowHandleId%"
    }
    else
    {
      ; Put the window in focus.
      WinActivate, "ahk_id %windowHandleId%"
      WinShow, "ahk_id %windowHandleId%"
    }
  }
  ; Else it's not already open, so launch it.
  else
  {
    Run, wt
  }
}

; Hotkey to use Ctrl+Shift+C to launch/restore the Windows Terminal.
^+c::SwitchToWindowsTerminal()
The last line in the script defines the keyboard shortcut and has it call the function.
Here I’m using Ctrl + Shift + C (^+c) for my keyboard shortcut, but you could use something else like Windows Key + C (#c) or Ctrl + Alt + C (^!c).
Check out the AutoHotkey key list for other non-obvious key symbols.
You may have also noticed in the code that if the window is already in focus, we minimize it.
This allows me to easily switch to and away from the Windows Terminal using the same shortcut keys.
Using Alt + Tab would also work to switch back to your previous application.
Finally, the line that actually launches the Windows Terminal is:
If you want the Windows Terminal launched as an elevated command prompt (i.e. as Admin), then you need to add *RunAs, like this:
Also, if you haven’t already, you’ll want to follow these steps to digitally sign your AutoHotkey executable to allow AutoHotkey scripts to be able to interact with applications running as Admin.
Without this, the AutoHotkey script will not be able to minimize the Windows Terminal.
Getting the AutoHotkey script running
If you’ve never used AutoHotkey before and want to get this working, all you need to do is:
- Install AutoHotkey
- Create a new text file with a
.ahkextension - Copy-paste the above script into the file
- Double click the file to run it.
Once that’s done, you should be able to use your keyboard shortcut to switch to Windows Terminal.
You’ll also likely want to have your script startup automatically with Windows so that you don’t have to manually run it all the time.
This is as easy as dropping the .ahk file (or a shortcut to it) in your shell:Startup directory.
Windows will automatically run all files in this directory every time you log in.
For more detailed instructions and information, see this post
Conclusion
As a software developer, I’m constantly in and out of the terminal for running Git and PowerShell commands.
If you’re ok simply pinning Windows Terminal to the taskbar in a dedicated position and don’t mind the preset keyboard shortcut, then roll with that.
For myself, using AutoHotkey I can now use Ctrl + Shift + C to switch to and away from the Windows Terminal at anytime, no matter what other application currently has focus, and not having to reach for the mouse.
Shameless Plug: You can also checkout my open source project AHK Command Picker that allows you to use a GUI picker instead of having to remember a ton of keyboard shortcuts.
I hope you’ve found this information helpful.
Happy command lining 
Command Prompt is a powerful tool for running commands, executing scripts, and performing advanced tasks in Windows. Whether you’re troubleshooting issues, automating processes, or simply prefer the command-line experience, it’s useful to know different methods for launching cmd. In this guide, you’ll discover fourteen ways to open Command Prompt, from classic options like the Run window and desktop shortcuts to more handy solutions involving cmd keyboard shortcuts. Read on and choose the methods that fit you best:
NOTE: This guide covers both Windows 10 and Windows 11. Where a procedure is identical, or things look almost identical, I use screenshots taken in Windows 11. Where things are different, I share screenshots for both operating systems.
How to open Command Prompt with a shortcut
If you’re reading this article, there’s a high chance you’re mainly looking for a way to open Command Prompt using either a keyboard shortcut or a clickable desktop shortcut. Here are a couple of methods to do that:
1. Create a Command Prompt shortcut on the desktop (point it to cmd)
If you like using shortcuts, then you should create a shortcut to the Command Prompt. Right-click or press and hold on an empty space on your desktop or any other folder, go to New in the contextual menu, and click or tap Shortcut.

Right-click on the desktop and choose New > Shortcut
Then, in the Create Shortcut wizard, copy and paste or type this command in the location field:
cmd
… and press Next.

Type cmd as the shortcut location
Give the CMD shortcut a name, like Command Prompt or Old-School Shell 🙂, and save it by pressing the Finish button.

Choose a name for the Command Prompt shortcut
You can now easily open CMD in Windows 10 and Windows 11 without using the keyboard: just double-click or double-tap the Command Prompt shortcut.

The Command Prompt shortcut
TIP: Alternatively, you can download our collection of shortcuts and use what we have created: Download the largest collection of Windows desktop shortcuts for free!. In this pack, there are also plenty of other useful shortcuts to download and use.
2. Use a keyboard shortcut to open Command Prompt
Once you have a desktop shortcut for Command Prompt (as shown in the previous method), you can edit its properties to set a custom keyboard shortcut for opening Command Prompt. Here’s how:
Right-click or press-and-hold your Command Prompt desktop shortcut, and choose Properties.

Open the Properties of the Command Prompt shortcut
In the Shortcut tab, click or tap inside the Shortcut key field and press the key combination you want (for example, Ctrl + Alt + C). Then, click or tap OK.

Set a keyboard combo for the Command Prompt shortcut
From now on, you can press that keyboard shortcut to launch Command Prompt anytime you want.
TIP: For more details on how to set custom keyboard shortcuts to desktop shortcuts, read this tutorial about creating and customizing desktop shortcuts in Windows.
3. Open Command Prompt using the Run window (keyboard shortcut: Win + R)
One of the quickest ways to go straight to Command Prompt in Windows 11 and Windows 10 is via the Run window. This is how it works:
Press the Win + R on your keyboard to bring up the Run window.

Use the Windows + R keyboard shortcut
In the Open field, type:
cmd
…and press Enter on your keyboard or click/tap OK.

Type cmd and press Enter or OK
The Command Prompt window will then immediately appear on your screen.
How to open Command Prompt from Start
Do you like opening apps from the Start Menu or the WinX menu? If you do, here’s how to get Command Prompt from there:
4.1. Open Command Prompt from the Start Menu in Windows 11
On a Windows 11 PC, you can also launch Command Prompt from the Start Menu. Open the Start Menu and click or tap the All button in the top-right corner.

Click or tap the All button in the Start Menu
Then, scroll down until you find the Windows Tools shortcut and click or tap it.

Click or tap Windows Tools
In the Windows Tools window, there’s a Command Prompt shortcut. Double-click or double-tap it, and your favorite command-line app opens.

Double-click the Command Prompt shortcut
Note that if you want to run Command Prompt as an administrator, you can right-click its shortcut and choose Run as administrator instead.

Running CMD as admin from Windows Tools
4.2. Open Command Prompt from the Start Menu in Windows 10
If you’re using a Windows 10 PC, open the Start Menu, scroll down the list of apps, and go to the Windows System shortcuts folder. You’ll find a Command Prompt shortcut there: click or tap it to open CMD.

The Command Prompt shortcut in Windows 10’s Start Menu
If you want to launch Command Prompt as an admin, right-click or press and hold the shortcut, then go to More, and finally, click or tap Run as administrator. Or just keep the Ctrl and Shift keys pressed and click or tap on the Command Prompt shortcut to launch CMD as admin.

Launch Command Prompt as administrator in Windows 10
5. Open Command Prompt using the WinX menu (Windows + X)
You can also right-click (or press and hold) the Start button to open the WinX menu (often called the “power user menu”). By default, Windows 11 shows the Terminal instead of Command Prompt, and you can’t change that. However, you can run Command Prompt from within Windows Terminal: see the 10th method in this guide.

The Terminal in the WinX menu of Windows 11
If you’re using Windows 10, it shows Powershell instead of Command Prompt by default.

The Windows PowerShell options in Windows 10’s WinX menu
There are two ways you can approach the situation in this operating system: customize the WinX menu to show cmd or run Command Prompt from within Windows Terminal. For the latter, check out the 10th method in this tutorial. For the former, follow the steps in this guide: How to show CMD, PowerShell & Control Panel in the Windows 10 WinX menu.
In short, open Settings (Win + I), go to Personalization > Taskbar, and turn off the switch of the setting that says “Replace Command Prompt with Windows PowerShell in the menu when I right-click the start button or press the Windows key+X.”

Make WinX show Command Prompt in Windows 10
You can then use any of the following keyboard shortcuts to launch Command Prompt:
Win + X, then C for Command Prompt
Win + X, then A for Command Prompt as Admin

The WinX Command Prompt shortcuts in Windows 10
You can also simply click or tap the Command Prompt option you prefer in the WinX menu.
How to open Command Prompt from the taskbar
The taskbar is also a good choice to launch Command Prompt. Here’s what to do:
6. How to open Command Prompt fast using search
Both in Windows 11 and Windows 10, one of the fastest ways to open Command Prompt is to search for it. In either operating system, click or tap the search field on the taskbar or use this keyboard shortcut if you prefer:
Windows + S
Then, type cmd and press Enter or click/tap the Command Prompt result.

Search cmd to open Command Prompt
If you want to launch Command Prompt as administrator, use the Run as administrator link from the right side of the search panel. Alternatively, you can right-click (or press and hold if you use a touchscreen) on the Command Prompt search result and then choose Run as administrator.

Run CMD as administrator from search
CMD will then launch in an instant.
7. Pin Command Prompt to your taskbar (or Start Menu)
If you prefer to have a clean desktop, pin the Command Prompt to the taskbar or the Start Menu. In either Windows 11 or Windows 10, search for CMD, and on the right of the search box, select Pin to taskbar. If you’d rather have it on the Pinned section of your Start Menu, click or tap Pin to Start.

Pin Command Prompt to the taskbar or to Start
From now on, use the shortcut that you have pinned to open Command Prompt. Furthermore, if you want to run Command Prompt as administrator, use the right-click menu of the shortcut pinned on your taskbar or Start Menu, and click/tap the Run as administrator option from it.

Run CMD as admin from the taskbar
How to open Command Prompt before Windows boots
Sometimes, you need to troubleshoot or repair issues that prevent Windows from loading correctly. In such cases, you can open Command Prompt before Windows fully boots or even when it’s not installed on your computer at all. Here’s how:
8. How to open Command Prompt while installing Windows 11 or Windows 10
This method of opening the Command Prompt works when Windows 11 or Windows 10 isn’t installed on your computer. It also works when your Windows is corrupted and can’t boot properly. Use a Windows 11 or Windows 10 installation media (like an USB stick with the Windows Setup) to boot your computer or device. When the setup wizard shows up, use this Command Prompt keyboard shortcut:
Shift + F10
…and Command Prompt pops up on your screen.

Press Shift + F10 to open Command Prompt when installing Windows
It’s as simple as that! 🙂
9. How to open Command Prompt when you boot Windows 11 or Windows 10 (using the Advanced Startup Options)
If you need to run advanced commands in Command Prompt, and Windows is installed on your PC but no longer works properly, you might need a way to open CMD at boot, before the operating system loads itself completely. To do that, there are a couple of alternative paths you can follow, and their steps are all detailed in this tutorial: How to open Command Prompt when Windows doesn’t boot (3 ways).

Open Command Prompt from the recovery environment
You can then use CMD to do anything you want, including advanced tasks such as boot repairs or partition management with diskpart, for instance.
Other ways of opening Command Prompt in Windows
Up until now, I talked about the most common ways to launch Command Prompt. There are more, though. Next, I’ll show some less popular and more “specialized” methods to run CMD in Windows. Keep in mind that they’re not ordered in any particular way:
10. How to open Command Prompt from the Windows Terminal
The Terminal app offers another easy way to open CMD in Windows. The Terminal is part of Windows 11, so you can simply launch it in this operating system. However, if you’re using Windows 10, you first have to download and install it, and only then can you open the Terminal. Either way, when you start the Windows Terminal, it loads a PowerShell tab. But you can also open CMD in the Terminal by clicking the Open a new tab button (shaped like a downward-pointing caret) and then selecting Command Prompt from the menu.

Open Command Prompt in Windows Terminal
TIP: Alternatively, you can open a Command Prompt tab in Windows Terminal using the Ctrl + Shift + 2 keyboard shortcut.
11. How to open Command Prompt from File Explorer’s address bar
You can also open Command Prompt using the address bar from File Explorer. All you have to do is type cmd in the address bar and press Enter. Then, a Command Prompt instance opens immediately, using the path of the current folder.

Type cmd to run Command Prompt from File Explorer
For more details, read this tutorial: How to run commands from Windows’ File Explorer. Unfortunately, you cannot open Command Prompt as an administrator using this method.
12. Open Command Prompt using its cmd.exe executable file
Another way to open Command Prompt using its cmd.exe file. Open File Explorer, navigate to the Windows partition, open the Windows folder, and then access System32. There, you’re going to find cmd.exe — the executable file used by Command Prompt. The full path, if you need it, is:
C:\Windows\System32\cmd.exe

The cmd.exe file in Windows
Furthermore, the easiest way to open CMD as an administrator is to right-click the file (or press and hold it if you have a touchscreen) and then click/tap on the Run as administrator option from the context menu.

Use the cmd.exe file to run Command Prompt as admin
13.1. Open Command Prompt from the Task Manager in Windows 11
You can also open Command Prompt using the Task Manager. If you’re using Windows 11, a quick way of accessing the Task Manager is to use this keyboard shortcut:
Ctrl + Shift + Esc
Then, click or tap Run new task in the top-right area of the Task Manager. It doesn’t matter what tab you’re on: the Run new task button is shown on all of them.

Run new task in Windows 11’s Task Manager
In the Open field from the Create new task window, input this command:
cmd
Next, mark the checkbox “Create this task with administrative privileges” if you want to run Command Prompt as administrator. Then, click OK or press Enter on your keyboard.

Type cmd and press OK or Enter
Windows 11 will then immediately start the Command Prompt.
13.2. Run Command Prompt from the Task Manager in Windows 10
In Windows 10, you can launch the Task Manager using the same keyboard shortcut:
Ctrl + Shift + Esc
If the Task Manager opens up in its compact view mode, click or tap More details. Then, open the File menu, and click or tap Run new task.

Choose Run new task in Windows 10’s Task Manager
In the Create new task window, type:
cmd
In case you’d rather open Command Prompt as admin, enable the “Create this task with administrative privileges” option. Then, click/tap OK or press Enter on your keyboard.

Input cmd and press Enter or OK
The Command Prompt will launch in an instant.
14. How to open the Command Prompt from Microsoft Edge
A cumbersome and unrecommended method to launch Command Prompt in Windows is to use the Microsoft Edge web browser. Launch Microsoft Edge and enter this command in the address bar:
file://C:/Windows/System32/cmd.exe
Then, press Enter.

Type this path in the browser’s address bar
In the download dialog that opens up, click or tap the Open button.

Click or tap Open
This method only opens Command Prompt windows with standard user rights, not administrative privileges. Furthermore, the starting path of CMD is the temporary internet files location assigned by Windows to your user account, which may not be something you want.

The Command Prompt launches
That was all!
How do you like to open the Command Prompt?
As you can see, there are plenty of ways to start Command Prompt in Windows 11 and Windows 10. Which ones you end up using most will depend on your habits, preferences, and the tasks you perform. Whether you prefer quick cmd keyboard shortcuts, desktop shortcuts, or something else, there’s a method here for you. If you know any other unique methods or shortcuts to launch Command Prompt, feel free to share them, and happy command-lining!