
Рассмотрим интегрированную в любую систему Windows утилиту chkdsk, позволяющую проверять жесткий диск, на наличие ошибок или поврежденных bad-секторов. К тому же утилита предпринимает шаги, направленные на устранение неисправностей, или же блокирует сектора с повреждениями, чтобы на них не смогла попасть новая информация.
Почему повреждается файловая система
Содержание
- Почему повреждается файловая система
- Запуск chkdsk
- Способ 1.
- Способ 2.
- Этапы проверки
- Параметры утилиты
Есть несколько ответов на этот вопрос:
- перебои с электроэнергией. Здесь лишь остается сказать, чтобы вы в обязательном порядке использовали стабилизаторы и источники бесперебойного питания;
- проблемы в «начинке» компьютера;
- наличие вредоносных программ, которые разрушают систему.
Запуск chkdsk
Для профилактики лучше пользоваться chkdsk время от времени, проверяя систему на наличие неисправностей.
Способ 1.
Зайти в «Компьютер», затем жмем с помощью правой кнопки мыши на диск, который будет проверяться, заходим в «Свойства». Затем следует вкладка «Сервис», где отмечаем «Проверка тома на наличие ошибок». Выбираем «Выполнить проверку».

Отмечаем 2 галочки и жмем «Выполнить».
Способ 2.
Для запуска программы chkdsk, нужна командная строка (Пуск – Все программы. Далее выбираем «Стандартные» и нажимаем «Командная строка»). Этот вариант подходит для Windows XP, Vista или 7.
Если у вас Windows 8 или 10, ищите через меню поиска.

Запускается командная строка.
После того, как откроется окно, набираем: chkdsk c: /f (либо другой параметр, об этом ниже). И жмем «Enter».
Поясним:
c: – буква диска, что надо проверить.
/f – параметр, позволяющий устранить ошибки в системе файлов и отыскать поврежденные сектора.
Если надо проверить раздел системы, к примеру, диск С, где находится операционка, появится предупреждение, которое укажет на то, что нельзя сейчас проверить данный том, потому что в данный момент на нем запущены системные файлы. Чтобы все-таки запустить проверку, надо перезагрузить систему и нажать «Y» в знак подтверждения.
Когда система будет перезагружена, утилита запустится в автоматическом режиме и проведет проверку тома.
Этапы проверки
Непосредственно проверка с помощью рассматриваемой утилиты идет поэтапно:
- проверяет файлы;
- проверяет индексы;
- проверяет дескрипторы безопасности;
- проверяет сектора;
- проверяет есть ли свободное место на диске.
После того, как проверка закончится, на экране появятся ее итоги.
Параметры утилиты
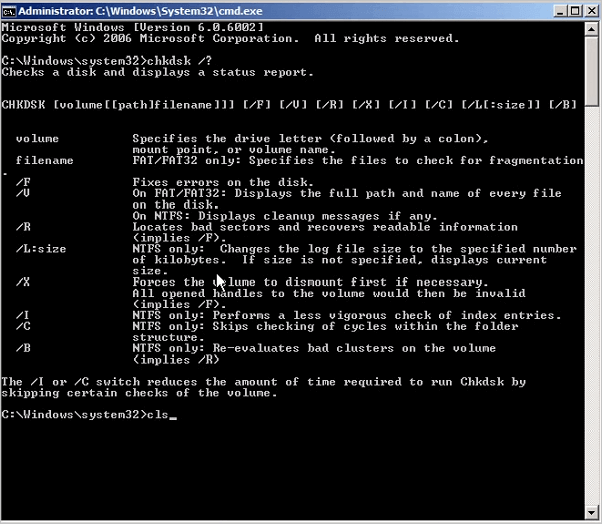
Рассмотрим все ключи запуска утилиты. Сhkdsk, кроме того, что может полностью проверить систему (/R), делает следующее:
- Ключ /F проверяет есть ли ошибки и их автоматически их устраняет;
- Ключ /V – во время проверки диска показывает полные пути и названия файлов, которые «лежит» на диске. Для дисков, что содержат разделы NTFS, утилита тоже выводит сообщения о том, что произведена очистка;
- Ключ /X – если надо, том отключится перед его проверкой. Вслед за этим все текущие дескрипторы для этого тома не будут работать. В данном случае обязательно к использованию ключ /F;
- Ключ /I применяется, если нет надобности строгой проверки индексных составляющих. Может применяться лишь в системе файлов NTFS. Это повышает скорость проверки, однако делает ее не такой доскональной;
- Ключ /C используют, если нет необходимости в проверке циклов в самой структуры папок. Работает в системе NTFS, что повышает скорость проверку, однако она становится не такая детальная;
- Ключ /L:размер – при проверке изменится объем файла журнала до прописанной величины (в килобайтах). Если размер не будет прописан, выводится текущая величина файла. Возможен к использованию лишь при файловой системе NTFS.
Однако, в большинстве случаев, достаточно применять ключ /F, потому что при использовании /R начинается полная проверка жесткого диска, на что уходит достаточно много времени (зависит от размера и объема данных, что хранятся на нем).
Это основные моменты использования утилиты chkdsk.
5
2
голоса
Рейтинг статьи
CHKDSK (often pronounced “Check Disk”) is a handy and vital tool for monitoring your HDD or SSD health. This tool uses multipass scan activity to verify that a drive’s health and functionality are intact. Using CHKDSK to ensure your HDDs and SSDs are running correctly is a great way to speed up Windows 10, and we suggest you use the tool every few months to keep your drives safe and healthy.
This article explains the details of CHKDSK, how it works, and how you can use it to repair your hard drive in Windows 10.
CHKDSK starts by scanning the file system on the HDD/SSD and analyzing the integrity of the files, file system, and file metadata on the drive.
When CHKDSK finds logical file system errors, it fixes them in place, saving the data that is on the disk so that nothing is lost. Logical file system errors include several things, such as corrupted entries in the drive’s master file table (MFT)—a table that tells the drive how files are connected in the murky labyrinths of the drive’s hardware.
CHKDSK also fixes misaligned time stamps, file size data, and security flags on HDD files. CHKDSK can conduct a complete disk drive scan, accessing and testing every hardware sector. Hard drives are divided into logical sectors, defined areas where a certain quantity of data will be stored.
Sectors can develop “soft errors,” in which data has been miswritten to the magnetic medium. They can also get “hard errors” when the drive has an actual physical defect in the area designated as a sector. CHKDSK fixes soft errors by rewriting the erroneous data and resolves hard errors by marking that disk section as being damaged and “out of bounds” for future use.
Because CHKDSK has been updated and upgraded repeatedly with each new generation of storage hardware, the program continues to work correctly to analyze and repair hard drives and SSDs. The exact process used to analyze a floppy disk holding 160K can today be executed to analyze an SSD holding 15 terabytes.
Running CHKDSK on Windows 10
Although there are several different ways that you can invoke CHKDSK on a Windows 10 machine, by far, the most common and ordinary place to run the utility is Windows PowerShell, the intended replacement for Windows Command Prompt.
However, because CHKDSK talks directly to drive hardware, it requires a certain level of operating system permission known as administrative privileges. This means that CHKDSK is allowed to run as though it was the account in charge of the computer.
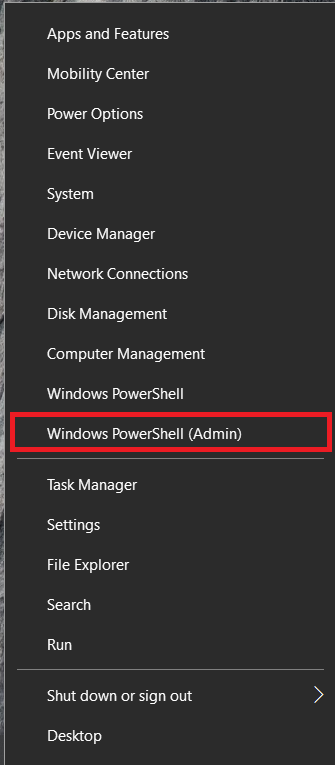
- Right-click the “Start menu” and select “Windows PowerShell (Admin).”

- In the User Account Control (UAC) window, select “Yes” to give it permission to launch the Windows Command Processor and make changes.
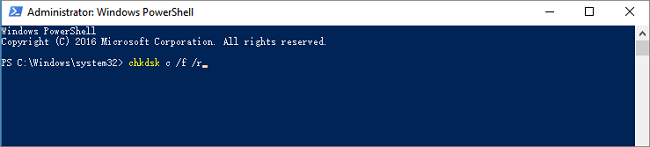
- Type “chkdsk c: /x /r” without the quotes to dismount the drive, scan it for errors, and repair it. You can also type “chkdsk /scan” to check the disk online and attempt to fix it.

- If you’re having issues running the above command because the drive is noted as “in use” by another process, you’re trying to scan your primary drive (boot drive) when the OS is using it. Reboot into recovery mode to perform the scan or create a Windows Recovery Tool to handle the process.

The basic invocation of CHKDSK, such as “chkdsk c:” will scan the disk and display status information, but it will not fix any encountered errors.
That’s why you need to add several parameters to run CHKDSK in a mode where it will fix problems that it encounters. In a Windows PowerShell program, parameters are additional commands added to the end of the program name, with “/” characters before each parameter. To get CHKDSK to do a full scan and repair pass, we typed “chkdsk c: /x /r” in the Powershell console.
The “/r” parameter performs the same tasks as “/f,” which fixes errors on the disk and tells CHKDSK to locate any bad sectors and recover any readable information.
The “/x” parameter tells CHKDSK to dismount the drive (take it offline from the operating system) before the process begins.
Additional CHKDSK Parameters
CHKDSK has an extensive library of optional parameters that you can use to modify the program’s behavior.
- <Volume> – The Volume parameter allows you to specify a drive letter (with a colon) or volume name. You do not need the < and > characters.
- [<Path>]<FileName> – The Path and FileName parameters can be used only on a drive using the FAT or FAT32 organizational models. With Path and FileName, you can specify the location and name of a file or set of files that you want CHKDSK to check for fragmentation. To specify multiple files, you can use the “?” and “*” wildcard characters.
- /f – The /f parameter instructs CHKDSK to fix errors on the disk. The disk must be locked, so if CHKSDK cannot do it, a message asks if you want to check the drive the next time you restart the computer.
- /v – The /v parameter displays the name of each file in every directory as the disk is checked.
- /r – The /r parameter locates bad sectors and recovers readable information. The disk must be locked. /r includes the functionality of /f, with the additional analysis of physical disk errors.
- /x – The /x parameter forces the volume to dismount first, if necessary. All open handles to the drive are invalidated. /x also includes the functionality of /f.
- /i – The /i parameter can only be used with a drive formatted with the NTFS model. This speeds up CHKDSK by performing a less vigorous check of index entries, reducing the time required to run CHKDSK.
- /c – The /c parameter is only usable on an NTFS disk. This tells CHKDSK not to check cycles within the folder structure, reducing the time required to run CHKDSK.
- /l[:<Size>] – The /l parameter can only be used with NTFS. It changes the size of the resulting log file to what you type. If you were to omit the size parameter, /l displays the current size instead.
- /b – The /b parameter is usable only with NTFS. It clears the list of bad clusters on the volume and rescans all allocated and free ones for errors. /b includes the functionality of /r. Use this parameter after imaging a volume to a new hard disk drive.
- /? – The /? parameter displays a help file containing this list of parameters and other instructions for using CHKDSK.
To summarize, the entire command that should be typed into the Command Prompt or PowerShell is:
chkdsk [Drive:] [parameters]
In our example, it’s:
chkdsk C: /x /r
Using CHKDSK on a Boot Drive
A boot drive is the partition of your hard drive that the computer starts up from. Boot partitions are particular in many ways, and one of those ways is that they require special handling for CHKDSK to be able to deal with them.
CHKDSK needs to be able to lock any boot drive it scans, meaning that it cannot examine the system’s boot drive if the computer is in use. If your target drive is an external or non-boot internal disk, the CHKDSK process will begin as soon as we enter the command above.
If the target drive is a boot disk, the system will ask you if you’d like to run the command before the next boot. Type “yes” (or “y”), restart the computer, and it will run before the operating system loads, allowing it to gain full access to the disk.
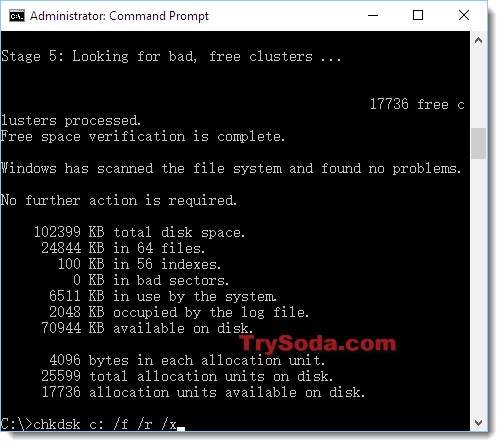
A CHKDSK command can take a long time to execute, primarily when performed on larger drives. Once done, it will present a summary of results, including total disk space, byte allocation, and, most importantly, any errors that were found and corrected.
CHKDSK In Previous Editions of Windows
The CHKDSK command is available in all versions of Windows, so users running on Windows 7, 8, or XP can also perform the steps above to initiate a scan of their hard drive.
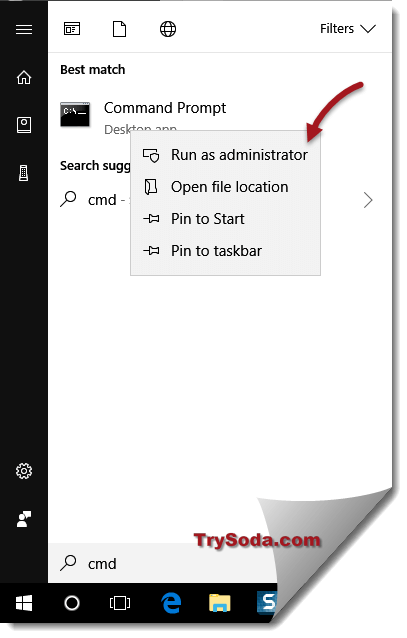
- In the case of older versions of Windows, users can get to the Command Prompt by going to Start > Run and typing “cmd.”
- Once the Command Prompt result is displayed, right-click on it and select Run as administrator to grant the program the necessary privileges to execute CHKDSK successfully.
One warning note: if you use CHKDSK on an older hard drive, you may find that your hard drive space was significantly reduced after running the command. This result is due to a failing hard drive, as one of the crucial functions CHKDSK performs is identifying and blocking bad sectors.
A few bad sectors on an old drive will typically go unnoticed by the user. Still, if the drive is failing or has serious problems, you could have vast numbers of bad sectors that, when mapped and blocked by CHKDSK, appear to “steal” significant portions of your hard drive’s capacity.
Other Ways to Launch CHKDSK
If you dislike using the command prompt, there are other ways to invoke CHKDSK on your system. Perhaps the easiest is directly through Windows Explorer.
- Open up “File Explorer,” right-click on the drive you want to check, and select “Properties.”

- Next, select the “Tools” tab and click on “Check” to launch CHKDSK with standard parameters.


CHKDSK is a very powerful tool for scanning and fixing hard drives on Windows 10 computers. Following the steps outlined in this article, you can use the CHKDSK function to optimize your PC’s performance and fix issues with your drive.
Windows CHKDSK FAQs
Does chkdsk work on an external drive?
You can use the “chkdsk” command on an external drive. All you need to do is indicate that drive in the command when executing.
Here’s an example:
1. Open up Windows Power Shell or Command Prompt as an Administrator, as shown above.
2. Then, type in “chkdsk d: /f”, and hit Enter.

For this example, the external drive is listed as the D drive; the/f command scans the disk and attempts to repair it.
How do you view the output logs of the chkdsk scan?
1. Type Windows key + R simultaneously to open the Run program, type in “eventvwr“, and hit Enter.

2. Now, click on Windows Logs.

3. Next, click on Application.

4. Now scroll through the logs and look for “Wininit” in the “Source” tab. You want the one that has chkdsk information in the “General” tab.
How do you scan a drive with CHKDSK that’s in use?
Sometimes, scanning a drive with chkdsk can cause a message that states the drive is still in use. If this happens to you, you’ll either need to unmount the drive or boot up a flash drive with Windows Recovery Tools on them.
Hard drive errors caused by power outages, hardware failure, system crash, or human error can lead to drive inaccessible, data loss or subpar performance. How to free check and fix hard drive error Windows 10? This article tells how to scan and resolve hard drive problems to its utmost by running CHKDSK Windows 10 in 4 methods.
Many Windows users check their hard drives regularly as disk error will slow down or damage a hard drive in an accumulated way. The best way to check and fix hard drive errors or bad sectors to keep it healthy is to use Windows built-in CHKDSK utility – a useful hard disk scanning and repair utility which helps to examine hard drives for errors and repair them.
What Is CHKDSK Utility
Some users may don’t know what CHKDSK is and how to run it. Actually, CHKDSK is the abbreviation of Check Disk, which is a system tool provided in Windows, OS/2 and DOS to check file system integrity of a partition and fix logical file errors.
CHKDSK can help you fix hard drive errors caused by bad sectors, improper or sudden shutdowns, corrupted software and meta data corruption. Whenever you have hard drive errors like you need to format the partition before you can use it caused by improper shutdown of the machine or abnormal removal of USB drives, you can use CHKDSK to find out errors and fix them.
Then how to repair hard drive windows 10 with CHKDSK utility? Here I will illustrate you 4 ways to run Windows 10 Check Disk utility and fix hard drive errors.
Method 1. Run Check Disk Windows 10 from Partition Property
You can run Windows 10 CHKDSK from Windows desktop and the detailed steps are as below.
Step 1. Right-click Windows Start Menu and select Disk Management to open it.
Step 2. When you get the main interface of Disk Management, you can select the drive that you want to check and fix, then right-click it and choose Property.

Step 3. On the Tools tab, click Check.
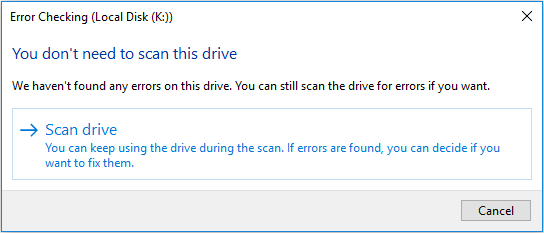
Step 4. If the system detects that there are errors, you will be asked to check the disk. If no errors are found, you will see a message as shown in the following picture. You can still choose to check the drive if you want to. Click on Scan drive.
Step 5. Windows will display a message as below after completion. If no errors are found, it will say no error found. Then click Close to exit it. If there are some errors found on the drive, Windows will ask for a restart to fix the errors.
Method 2. CHKDSK Windows 10 with Elevated Command Prompt.
CHKDSK Windows 10 with elevated Command Prompt performs a couple of functions. Although running it may take some time, it does prevent hard disk from being damaged and loss of data in the long term. It is recommended to run it whenever Windows has shut down abnormally or hard disk performs abnormally.
Step 1. Input cmd in the Windows 10 Cortana search box. Right-click the best match then select Run as administrator.
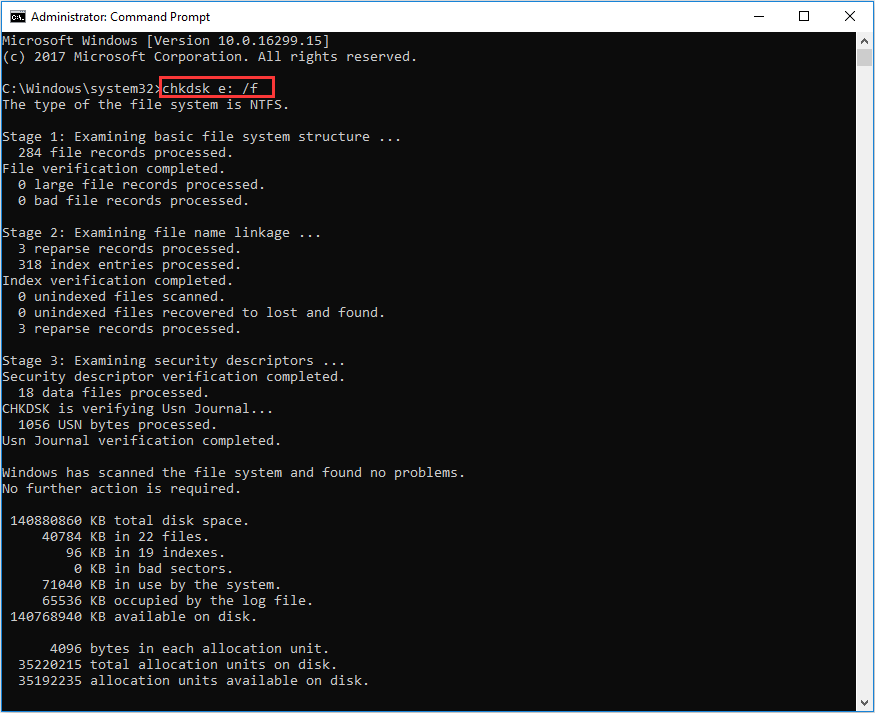
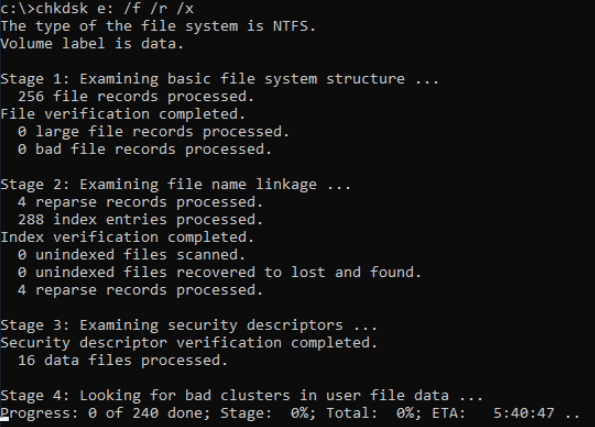
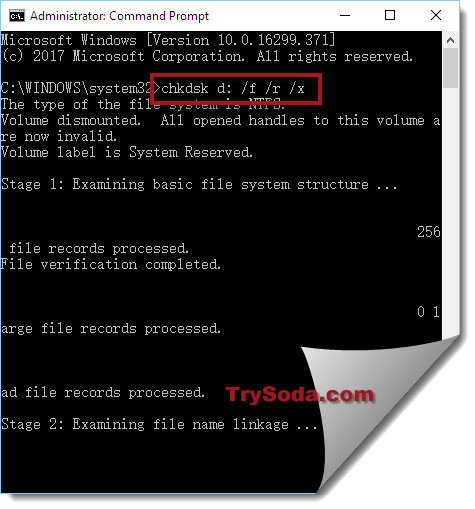
Step 2. In the elevated Command Prompt, type CHKDSK *: /f (* represents the drive letter of the specific drive that you want to scan and fix) and then press Enter. This CHKDSK Windows 10 command will scan your computer drive for errors and try to fix any that it finds.
Here I take CHKDSK e: /f as an example (e represent the drive letter that I want to scan). The bellowing picture shows there is no file system error with the partition. If there is any hard drive errors detected, CHKDSK will help you fix it automatically.
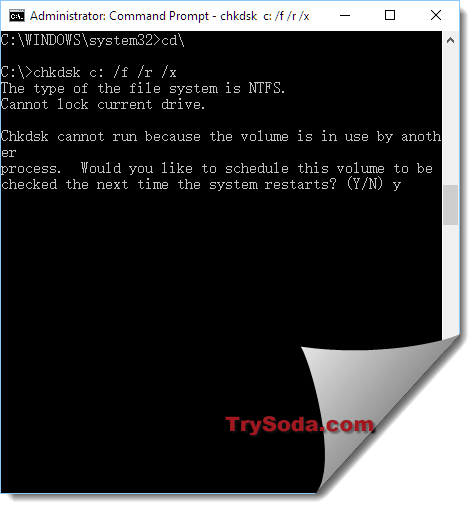
Tip: If you want to check and fix the partition that being used, you may see “CHKDSK cannot run because the volume is in use by another process. Would you like to schedule this volume to be checked the next time the system restarts?” in the Command Prompt Windows.
Type Y and press Enter to comfirm, and then restart your computer to continue with the CHKDSK repair. C drive and system partition will always ask for a reboot.
Step 3. Input exit to exit the Command Prompt Window after performing all operations.
Note: The command supports a number of hard disk operations, but we mainly focus on two of them: /f and /r.
/f – fix any errors it detected
/r – Locate bad sectors on the drive and try to recover any and all readable information from them
Apart from commonly used /f and /r, you can choose the following parameters valid for both FAT32 / NTFS partition when running the CHKDSK utility from an elevated Command Prompt.
- /v – Display list of every file in every directory on FAT32 partition. On NTFS, it displays the cleanup messages.
- /x – force the volume to dismount. Also invalidates all open file handles. This should be avoided in Desktop Editions of Windows, because it may cause data loss/corruption.
The following are valid for NTFS volumes only.
- /c – skip checking of cycles within the folder structure.
- /I – perform a less vigorous check of index entries.
- /L[:size] – change the size of the log file to specified number of kilobytes. If size is not specified, it will display current size.
- /b – re-evaluates bad clusters on the volume (implies /R)
Besides, CHKDSK cannot repair hard bad sectors, in which case, data can get lost and become unusable. If you have very important files and data stored on the drive, you’d better backup the hard drive as this occasion could happen sometimes.
If you cannot boot up your computer, you can run the tool from Command Prompt either by booting your computer into the Recovery Mode or by using the original installation disc to run Command Prompt (For detailed steps, please see Method 4). If you can, you may also run CHKDSK repair with third-party software, but be sure to choose a reliable one.
Method 3. Windows 10 CHKDSK Repair with Third-party Software
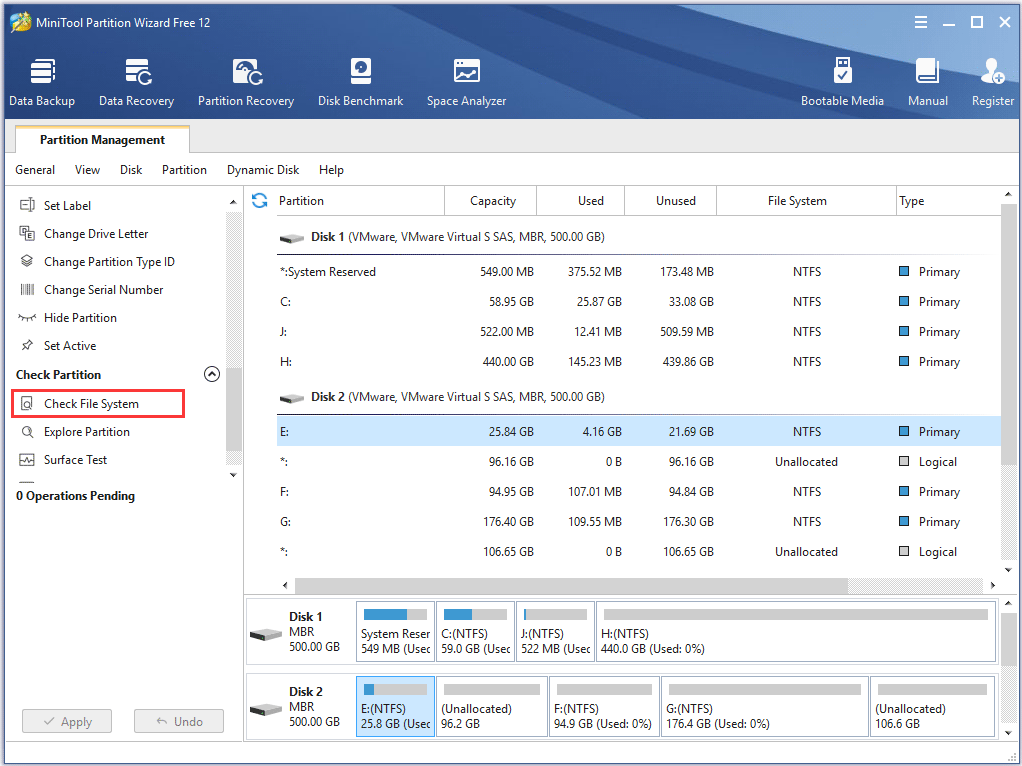
If you are not familiar with commands or find that using commands is error-prone as it requires you to input every command correctly, in this way, you can use a free CHKDSK repair alternative to repair hard drive Windows 10. It is recommended to use MiniTool Partition Wizard Free Edition, which makes CHKDSK Windows 10 as a breeze.
MiniTool Partition Wizard Free Edition is an easy-to-use partition manager. Its Check File System function can scan through your hard drive and fix all errors detected. It is not as complicated and time-consuming as running CHKDSK in Command Prompt. And it is simpler to operate with its intuitive interface.
Apart from Check file system function, it can also perform other operations like format partition, resize partition, extend partition, copy partition/disk, convert MBR to GPT without data loss, wipe disk, convert FAT to NTFS.
Note: This function can only be used when the selected partition has a drive letter. For the partition without drive letter, you should appoint it a drive letter and then use this function.
Next, let’s see detailed steps about how to run CHKDSK Windows 10 to fix hard drive error with third-party software.
Step 1. Download MiniTool Partition Wizard Free Edition by clicking the following button. Install it on your computer and launch it to get the main interface.
MiniTool Partition Wizard FreeClick to Download100%Clean & Safe
Then select the target partition, and choose “Check File System” from the Check Partition group or from Partition menu.
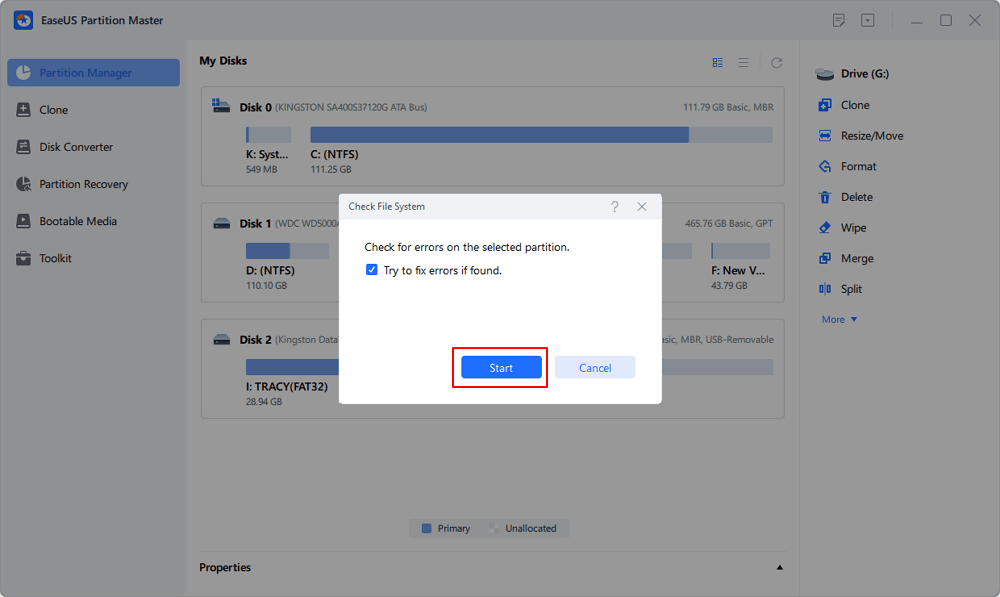
Step 2. You will see a new window with two options: Check only and Check & fix detected errors. If you only want to check, select Check only; if you want to recover mistakes during the checking process, select Check & fix detected errors. After that, click Start button. Once you click Start, MiniTool Partition Wizard will check/fix file system immediately.
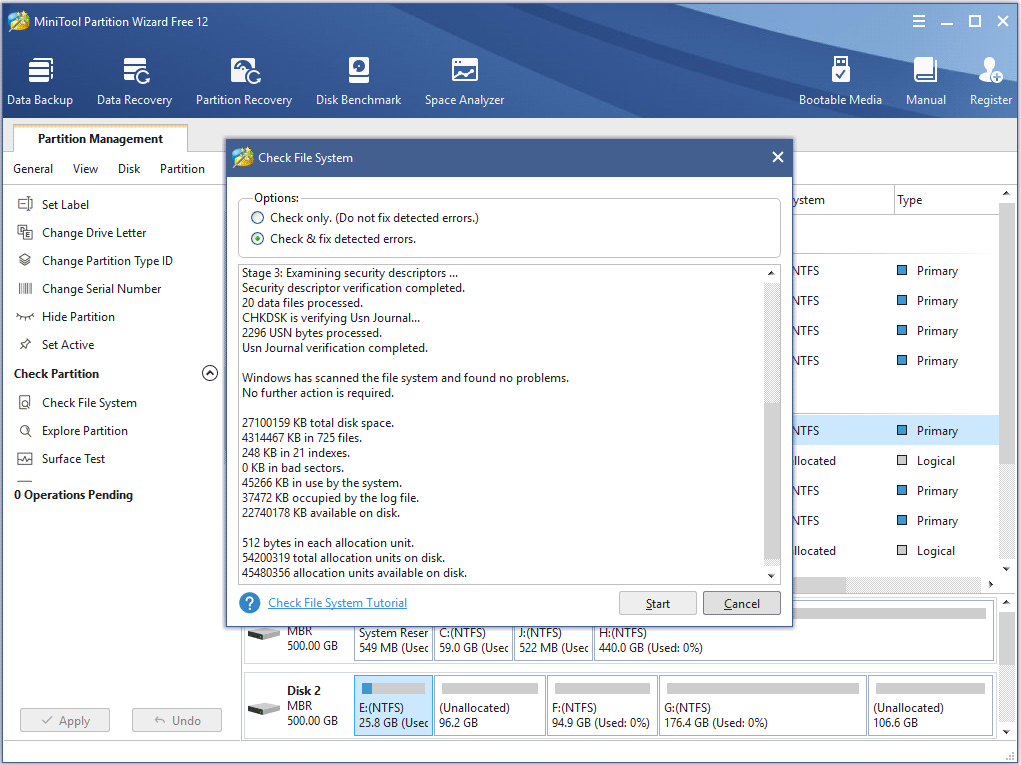
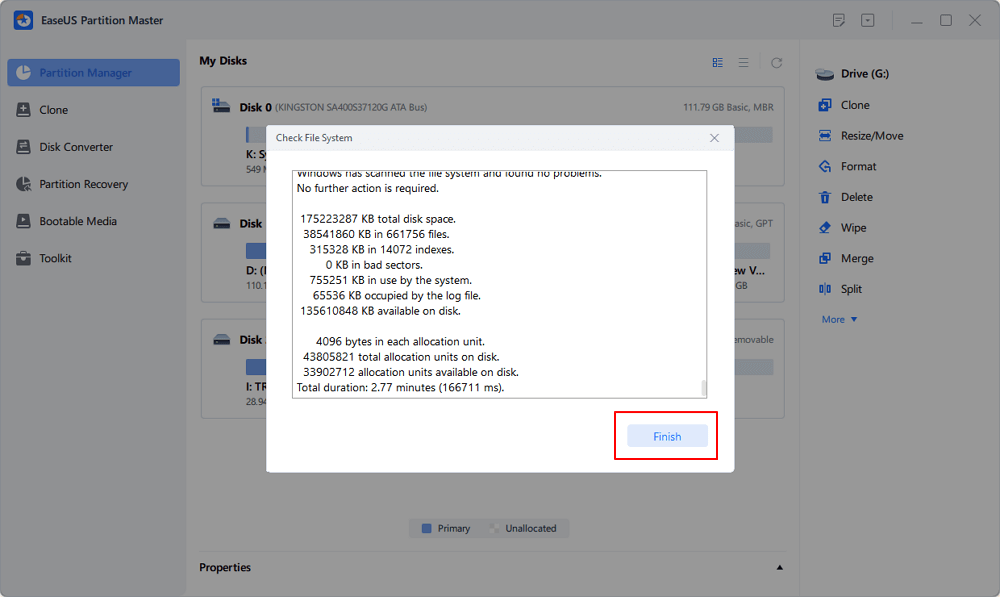
This page shows that MiniTool found no problems. If there is an error detected by MiniTool Partition Wizard, just let Partition Wizard fix it.
Method 4.Run Check Disk Windows 10 from Installation Disc/USB drive
The above three methods show you how to run CHKDSK when your computer can boot up successfully. However, if Windows won’t start, how can you check disk Windows 10?
Well, in this case, you can run CHKDSK on boot and check the hard drive for errors via Windows installation disc or USB drive. By following the steps as below, CHKDSK utility can be accessed easily.
Note: If you don’t have Windows 10 installation disc or USB flash drive to run CHKDSK, you can also run CHKDSK on MiniTool Partition Wizard Bootable Edition, which is very light and user-friendly.
Step 1. Insert Windows 10 installation disc or USB flash drive with Windows.
Step 2. Change the BIOS boot sequence to boot from the disc or USB drive.
Step 3. Select your language performance and click Next.
Step 4. Click Repair your computer.
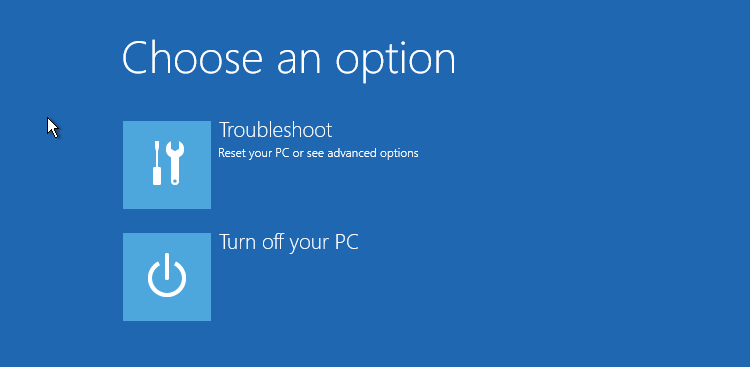
Step 5. Then choose Troubleshoot on this page.
Step 6. On the Advanced options page, click Command Prompt to open it.
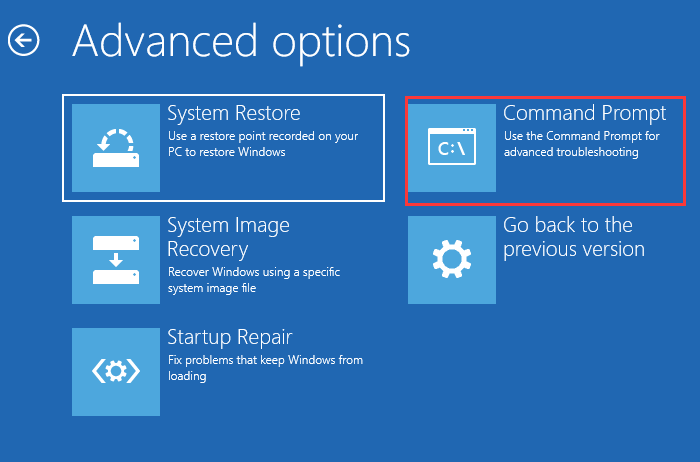
Step 6. When you successfully open the Command Prompt, you can follow the steps in Method 2 to execute CHKDSK commands.
After reading the 4 free methods in this post, I’m sure that you have learned how to use Windows 10 CHKDSK utility to repair hard drive errors. Now try one of them to complete hard drive repair by yourself.
“After reading this post, I learned how to repair hard drive Windows 10 with CHKDSK utility. People who don’t know how to run CHKDSK utility to fix hard drive error may check this post.”Click to Tweet
Wrapping Things Up
Have you fixed your hard drive with CHKDSK utility? Hope CHKDSK will help you fix all kinds of hard drive problems, and you can go back using your computer normally.
If you have any question about how to repair hard drive error with Window 10 Check Disk utility or if you have other better solutions, you can leave a message in the following comment zone and we will reply as soon as possible. If you need any help when using MiniTool software, you may contact us via [email protected].
CHKDSK Windows 10 FAQ
How do I run chkdsk in Windows 10?
To run chkdsk, please type cmd in the Windows 10 Cortana search box. Right-click the best match Command Prompt and select Run as administrator. In the command prompt window, type chkdsk e: /f (e represents the drive letter of the specific drive you want to scan and fix). Then CHKDSK will scan your drive and fix detected errors automatically.
Which is better chkdsk R or F?
Chkdsk /f will scan your drive and fix any errors it detected. Chkdsk /r will locate bad sectors on the drive and try to recover any and all readable information from them. Chkdsk /f will only check and fix disk errors, not bad sectors. So, chkdsk /r is better.
What is chkdsk f command?
Chkdsk /f is a Command Prompt command that is used to check a target drive on your computer and fix any hard drive errors it detects. Apart from chkdsk f, chkdsk /r is also commonly used to detect sectors on the hard drive and recovers any information still intact.
How do I repair my hard drive Windows 10?
Open Disk Management, select the drive that you want to check and fix, then right-click it and choose Property. On the Tools tab, click Check. Then it will scan your drive for hard drive errors and repair hard drive Windows 10 automatically.
What does CHKDSK /F /R do? How to use CHKDSK to repair the hard drive errors on Windows 10/8/7? Here is the full guide.
| Workable Solutions | Step-by-step Troubleshooting |
|---|---|
| What is CHKDSK command | CHKDSK (Check Disk Utility) can be used to check and fix any errors on the targeted disk. You can run it from the Command Prompt/PowerShell…Full steps |
| What does CHKDSK /F /R /X mean | CHKDSK /F can fix disk errors. CHKDSK /R does the same thing as CHKDSK /F only it also checks for bad sectors on the disk and recovers any readable information…Full steps |
| CHKDSK Alternative — Run a partition tool to fix disk error (1 Step) | Download EaseUS partition tool for free and use it to check and repair the corrupted file systems with clicks. No need to type commands manually…Full steps |
| Use CHKDSK manually | Run CHKDSK /F /R /X from the Command Prompt/Power shell or via the Properties window…Full steps |
What Is CHKDSK Command
In computing, CHKDSK (short for «check disk») is a system tool and command in DOS, Digital Research FlexOS, IBM/Toshiba 4690 OS, IBM OS/2, Microsoft Windows and related operating systems. It verifies the file system integrity of a volume and attempts to fix logical file system errors. — explained by Wikipedia
CHKDSK, also known as Microsoft Check Disk, is a utility that can be used in almost all Windows versions. The CHKDSK command is used to scan through your entire hard drive to find and fix any errors. For example, when your computer freezes, you cannot access a certain disk due to a corrupted file system, then you can use the CHKDSK commands to check and fix the drive errors.
💡💡💡It can be difficult to run CHKDSK /f /r /x commands for beginners. Hence, for beginners, you can use a professional alternative. Without giving any commands, you can check the disk for errors, check bad sectors, and check file system errors. Click the blue button to obtain the CHKDSK alternative — EaseUS Partition Master.
What Does CHKDSK /F /R /X Command Mean
What is CHKDSK /F /R /X? The primary function of CHKDSK /F /R /X is to scan the integrity of the file system and file system metadata on a disk volume and fix any logical file system errors that it finds. Besides, CHKDSK also can be used for detecting bad sectors on the target disk that occur because of physical damage. Then, it automatically fixes these errors as well.
CHKDSK /F VS CHKDSK /R VS CHKDSK /X, What’s The Difference
CHKDSK can fix two types of disk errors: logical errors and physical errors. Based on the disk error types, you can use the different CHKDSK commands and switches to fix hard drive errors. CHKDSK /F, CHKDSK /R, and CHKDSK /X are the most commonly used CHKDSK commands. What is the difference between CHKDSK /F /R and /X?
- CHKDSK /F: Check for disk errors, not bad sectors.
- CHKDSK /R: Locate the bad sectors on the target hard disk and try to recover the readable information from the bad sectors (implies /F).
- CHKDSK /X: Forces the volume to dismount first, if necessary. It also includes the functionality of /f.
When to use chkdsk /f, chkdsk /r, and chkdsk/x? You want to see existing errors, use CHKDSK /f command, you want recover readable information from back sectors, use CHKDSK /R, and dismount problematic disk, use CHKDSK /X.
If you feel like the provided information about CHKDSK, and it did help you have a better undersanding CHKDSK command lines, please share this guide to help more people around you!
What Does Each CHKDSK Parameter Means?
The syntax of the CHKDSK command is: chkdsk volume /f /v /r /x /i /c
- If used without parameters, CHKDSK displays only the volume’s status and does not fix any errors.
- If used with the /f, /r, /x, or /b parameters, it fixes errors on the volume.
What do the parameters ( /f /r /x… ) mean? Here are some common CHKDSK parameters and their meanings:
| Parameters | Details of the Parameters |
|---|---|
| /f | Fixes errors on the disk. The disk must be locked. If CHKDSK cannot lock the drive, a message appears that asks you if you want to check the drive the next time you restart the computer. |
| /r | Locates bad sectors and recovers readable information. The disk must be locked. It includes the functionality of /f, with the additional analysis of physical disk errors. |
| /x | Forces the volume to dismount first, if necessary. All open handles to the drive are invalidated. It also includes the functionality of /f. |
| /b | NTFS only. It clears the list of bad clusters on the volume and rescans all allocated and free clusters for errors. It includes the functionality of /r. Use this parameter after imaging a volume to a new hard disk drive. |
| /v | Displays the name of each file in every directory as the disk is checked. |
| /scan | NTFS only. It runs an online scan on the volume. |
| /i | NTFS only. It performs a less vigorous check of index entries, which reduces the amount of time required to run CHKDSK. |
| /c | NTFS only. It does not check cycles within the folder structure, which reduces the amount of time required to run CHKDSK. |
Run CHKDSK /F /R /X Alternative Tool to Fix and Repair Disk Errors
If you are not so tech-savvy and know little about computers, we highly recommend you try a professional CHKDSK /f /r /x alternative tool — EaseUS Partition Master to fix hard drive errors efficiently. It perfectly replaces CMD as reliable disk management tool and releases you from typing the commands manually.
EaseUS partition tool makes it effortless to repair disk errors. Follow the steps to check and repair your file system error:
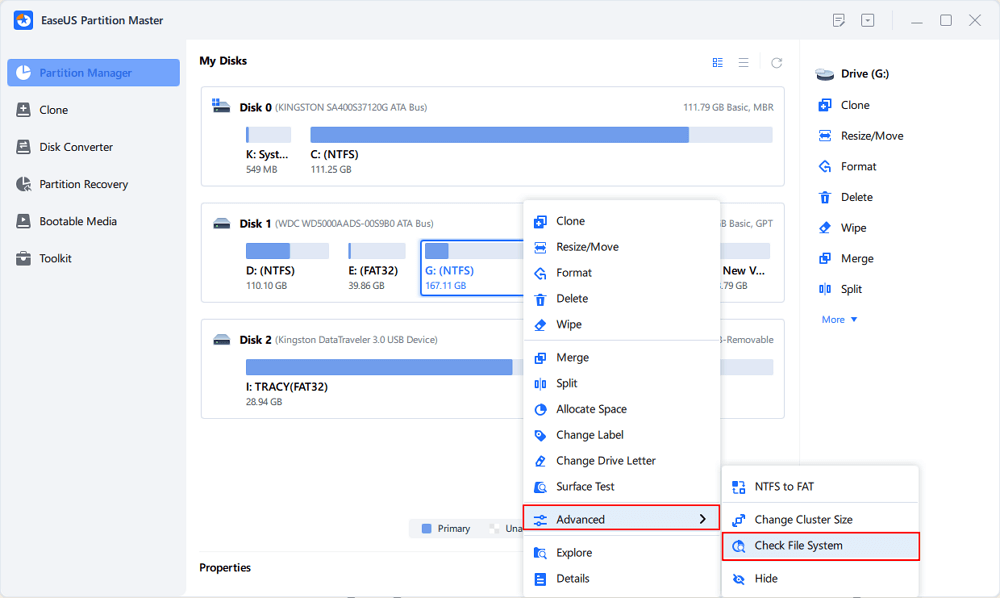
Step 1. Open EaseUS Partition Master on your computer. Then, locate the disk, right-click the partition you want to check, and choose «Advanced» > «Check File System».
Step 2. In the Check File System window, keep the «Try to fix errors if found» option selected and click «Start».
Step 3. The software will begin checking your partition file system on your disk. When it completes, click «Finish».
Fixing disk error and repair internal file system error with EaseUS Partitoin Master is so easy It is one of the best repair tool for hard drives, especially the best Toshiba External Hard Drive Repair Tool and Seagate Hard Drive Repair Tool. Share this tip to help more of your friends to rescue their problematic storage devices now:
How to Run CHKDSK /F /R /X Command to Fix Disk Errors on Windows 10/8/7
If you don’t like to use the simple third-party CHKDSK tool, you can run CHKDSK in a harder way via 3 methods: using Command prompt, Windows PowerShell, and disk check tool.
1. Run CHKDSK in Command Prompt
Whenever you find your hard drive performs poorly or Windows asks you to repair drive errors, you can try to run CHKDSK to do the job. Here’s how to run CHKDSK /f on Windows 10/8.1/8/7.
Use CHKDSK /F /R on Windows 10
Note: If you can’t boot into Windows 10 to run CHKDSK, fix the UEFI boot issue in Windows 10 with 5+ solutions.
Step 1. Press the Windows key and type cmd.
Step 2. Right-click «Command Prompt» and choose «Run as administrator».
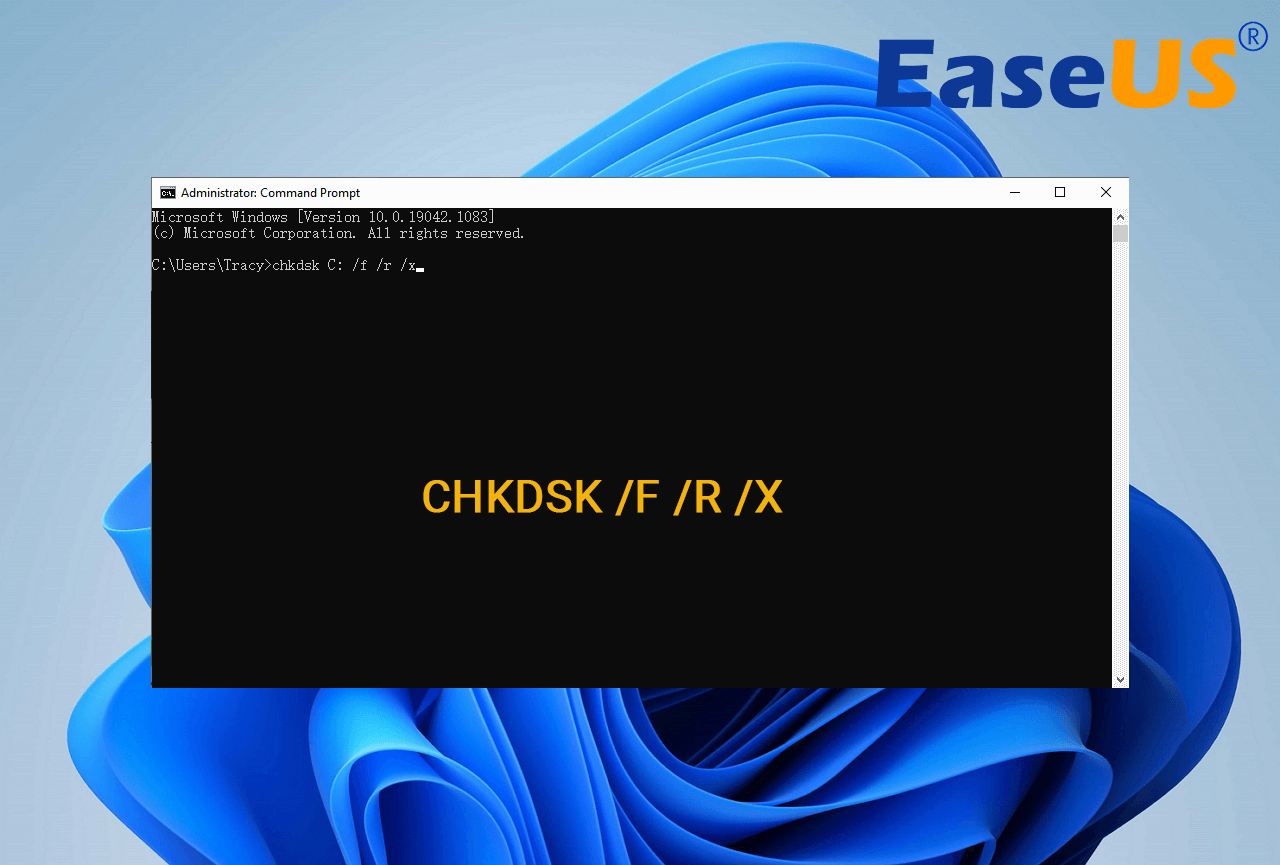
Step 3. Enter the following command and press Enter: chkdsk C: /f /r /x. Replace «C» with the drive letter of the partition you want to repair.

Do not interrupt CHKDSK and wait patiently for the process to end.
Aside from applying CHKDSK to fix disk errors, here are some tutorials that you may follow to learn more details about this command:
Run CHKDSK on Windows 8.1/8
To run the utility from Command Prompt for Windows 8.1/8 users, here are the instructions:
Step 1. Press the Windows and C key to open the Charm bar.
Step 2. Select «Search» and type cmd.
Step 3. Right-click on «Command Prompt» and click «Run as administrator.»
Step 4. When Command Prompt launches, type the command below and press «Enter»: chkdsk E: /f /r /x.
Run CHKDSK on Windows 7 CMD
If you are a Windows 7 user, you can run the CHKDSK command by the following steps:
Step 1. Click «Start». Type cmd at the search box.
Step 2. Right-click on cmd.exe and click «Run as Administrator». Enter your Administrator password if necessary.
Step 3. When cmd.exe opens, type the command below and press «Enter»: chkdsk c /f /r.
If you receive the «Chkdsk cannot run because the volume is in use by another process.» message, type Y to restart the computer and let the utility to run a scan at the next boot of your PC.
Extended Reading:
If you are looking for a guide to run CHKDSK to check and fix disk errors on Wnidows 11, try this recommended guide page and you’ll learn how to do so.
Check and Fix Disk Error in Windows 11
Are you looking to check disk errors in Windows 11? If yes, you might need a guide on checking and fixing disk errors in Windows 11. We have compiled the best methods for you.
2. Use CHKDSK/F/R in Windows PowerShell
If the Command Prompt not working in Windows 10, you can also run the CHKDSK /F or /R command in Windows PowerShell to fix hard drive errors.
Step 1. Click the Search button and type PowerShell.
Step 2. Right-click the PowerShell and choose Run as administrator.
Step 3. Type chkdsk c /f /r to start fixing disk error. Replace C with the drive letter of the target disk.
3. Run CHKDSK Alternative — CheckDisk in Properties Window
Running the Check Disk tool from the Windows desktop is easy. Follow the steps below to run CHKDSK in Windows 10. It works the same way on Windows 8 and Windows 7.
Step 1. Open This PC in File Explorer > right-click the HDD/SSD you want to scan > choose «Properties».
Step 2. Under the Tools tab > click the «Check» button under the Error-checking section.
Step 3. Next, you can choose to Scan drive if wanted or Repair drive if errors were found.
Step 4. When the scanning finishes, click on the Show Details link to see the CHKDSK log in Event Viewer.
Conclusion
Any time you have hard drive errors or corrupted files, the CHKDSK can be a lifesaver. You can use the disk error checker that comes with every Windows version with the full guide above.
Or you can use the ultimate disk management tool — EaseUS Partition Master to repair organize your hard drive to enhance system performance easily.
FAQs About CHKDSK /F /R That You May Be Interested In
You may encounter CHKDSK related problems; what to do then? Here are the common issues of CHKDSK errors; read on to figure out the solutions.
1. Is CHKDSK R safe?
It’s safe to run the CHKDSK /R command under normal circumstances as long as you’re using the syntax properly. There are different parameters with CHKDSK; you can check the CHKDSK parameters and choose the one that suits your problem to fix disk errors.
2. How long does chkdsk /f /r take?
It depends.
- chkdsk -f should take under an hour on that hard drive.
- chkdsk -r will take some time. It could take over an hour, maybe two, three, or more, depending on your partitioning.
You can interrupt the scan, but not recommended. Canceling or interrupting CHKDSK should not leave the volume any more corrupt than it was before CHKDSK was run. You can start it again, and it will check and repair any remaining corruption on the volume.
3. What to do when CHKDSK is stuck or frozen?
- Restart your computer.
- Press Esc or Enter to stop chkdsk from running.
- Run the Disk Cleanup utility to clear out junk files.
- Open an elevated CMD, type sfc /scannow, and press Enter to run the System File Checker.
- Restart and exit chkdsk again during the startup by pressing Esc or Enter.
- Open CMD as admin, type Dism /Online /Cleanup-Image /RestoreHealth, and press Enter to repair the Windows image.
- Run CHKDSK again.
The scan should be able to run to completion this time.
4. CHKDSK /F /R VS CHKDSK /R /F on Windows
What’s the difference between CHKDSK /F /R and CHKDSK /R /F commands on Windows computer?
This is no much difference between chkdsk /f /r and chkdsk /r /f. The only difference is the sequence of two parameters /f and /r. /f means to fix errors on target disk and /r means to locate bad sectors and recover readable information. Mostly, the correct form should be chkdsk /f /r. Basically, when we don’t know if the target drive contains bad sectors, we would suggest that you run the overall CHKDSK command: chkdsk /f /r /x together.
CHKDSK is a command used in Command Prompt to scan, check, and repair hard drives in our computers. In Windows 11 or Windows 10, using chkdsk is no different from using it in any previous version of Windows. However, you will need to give the Command Prompt (CMD) administrative privileges to use the chkdsk command.
Run CHKDSK in Windows 11/10 from Command Prompt
If your target hard drive is not a boot drive, meaning that the drive isn’t where your Windows is located, using CHKDSK in Command Prompt will scan and repair the target drive immediately.
- Go to Start Menu. Type CMD.
- From the search result, right click Command Prompt, then click Run as administrator.

- If “User Account Control” ask for permission, click Yes to proceed.
- In the command prompt, type:
chkdsk [driveletter] /f /r /x
- For example:
chkdsk C: /f /r /x

- Chkdsk will then run to scan the selected disk for errors and repair them automatically. It may take hours if you have a huge and messy drive.
Why do we need the parameters “/f /r /x” when doing chkdsk?
- If you enter CHKDSK without the parameters, the command itself will only scan the disk and show you the disk’s status. It won’t repair anything. To allow it to fix errors it finds, “/f” is needed.
- If you want it to also locate bad sectors on the drive and recover readable information, “/r” is needed.
- To force it to dismount the drive before checking the disk, “/x” is needed. This is recommended to make sure there is no running application in that particular drive that may interfere with the CHKDSK process.
- If you need more info on other parameters you can use, go to this chkdsk docs from microsoft.
Run CHKDSK in Windows 10/11 Before Boot
If you want to CHKDSK your primary drive where you store and boot your Windows, usually C: drive, CHKDSK will need to run before booting into Windows. This is because CHKDSK cannot be run if the drive is in use, especially if there are any system core files on the drive that Windows relies on to work.
Note: If you cannot even boot into Windows, skip this method and go to the next one.
Here’s how you can set CHKDSK to run before boot in Windows 11/10:
- Follow step 1-4 in the instruction above.
- In the command prompt, enter chkdsk commands with the parameters. For example:
chkdsk C: /f /r /x
- If chkdsk detects that the drive you want to scan is a boot drive, it will shows “Cannot lock current drive. Chkdsk cannot run because the volume is in used by another process“, and ask if you would like to schedule the drive to be checked the next time you reboot/restart your computer.
- Type and enter Y.
- Restart your computer.
- Chkdsk will run automatically during your next boot before booting into Windows.
If you cannot even boot into Windows
If you are facing a serious issue where you can’t even boot into Windows, you can force your PC to boot into recovery mode and open Command Prompt from the recovery mode.
For more info about how to launch CMD on boot, read: How to Startup Repair Windows 11/10 using Command Prompt.
When do you need to run chkdsk for your drives?
You can run CHKDSK gradually and as frequently as you like. Unlike defragmenting, CHKDSK won’t harm your drive in any way no matter how frequently you run it. If you have not run it for a while, it’s recommended that you run CHKDSK for each of your hard drives once a month.
If you encounter freezes, hangs, drives, or CPU running at 100% all the time in Windows, run CHKDSK. There may be errors on the disk that cause all the problems.
Why is chkdsk stuck at a certain percentage for a long time?
CHKDSK may take some time to finish. We are talking about several hours here depending on the size of the disk and how much space it was used. Try to wait it out. We usually let our system run CHKDSK overnight.
If CHKDSK is still stuck at a certain percentage even after 10 hours of running, try to restart the run. It may indicate that your drive is starting to fail. Backup immediately and replace the drive as soon as possible before it completely breaks down.