
Иногда вам может понадобится, взять управление службами Windows 10. Чтобы остановить некоторые службы, запустить, отключить службу, задержать запуск или возобновить или приостановить службу Windows. Необходимо использовать встроенный инструмент в операционной системе Windows -оснастку «Службы». Эта небольшая статья покажет вам, как запустить, остановить или перезагрузить любую службу в Windows 10, с помощью диспетчера Служб, а также Командной строки.
Службы Windows, обычно запускаются, при старте компьютера в фоновом режиме. Грубо говоря, они обрабатывают задачи низкого уровня, которые как правило не требуют взаимодействия с пользователем. В диспетчере управления службами вы сможете запускать, останавливать, отключать, отложить запуск Служб Windows 10. Давайте посмотрим, как сделать это более подробно.
4 способа как открыть «Службы» в Windows 10.
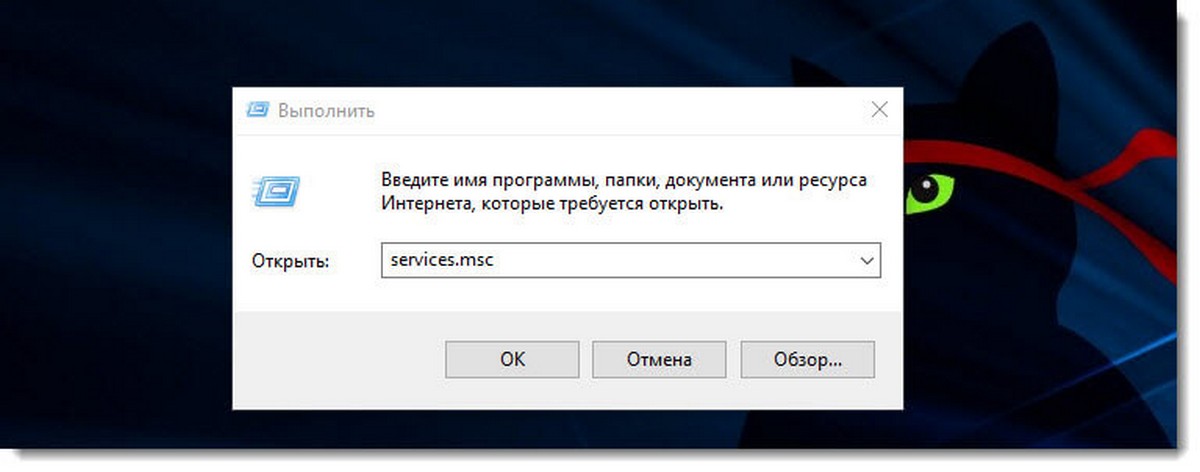
Способ 1. Открыть службы Windows можно с помощью диалогового окна «Выполнить».
Нажмите сочетание клавиш Win + R и введите или скопируйте и вставьте команду: services.msc в диалоговом окне «Выполнить» и нажмите Enter. Это откроет оснастку «Диспетчер служб».
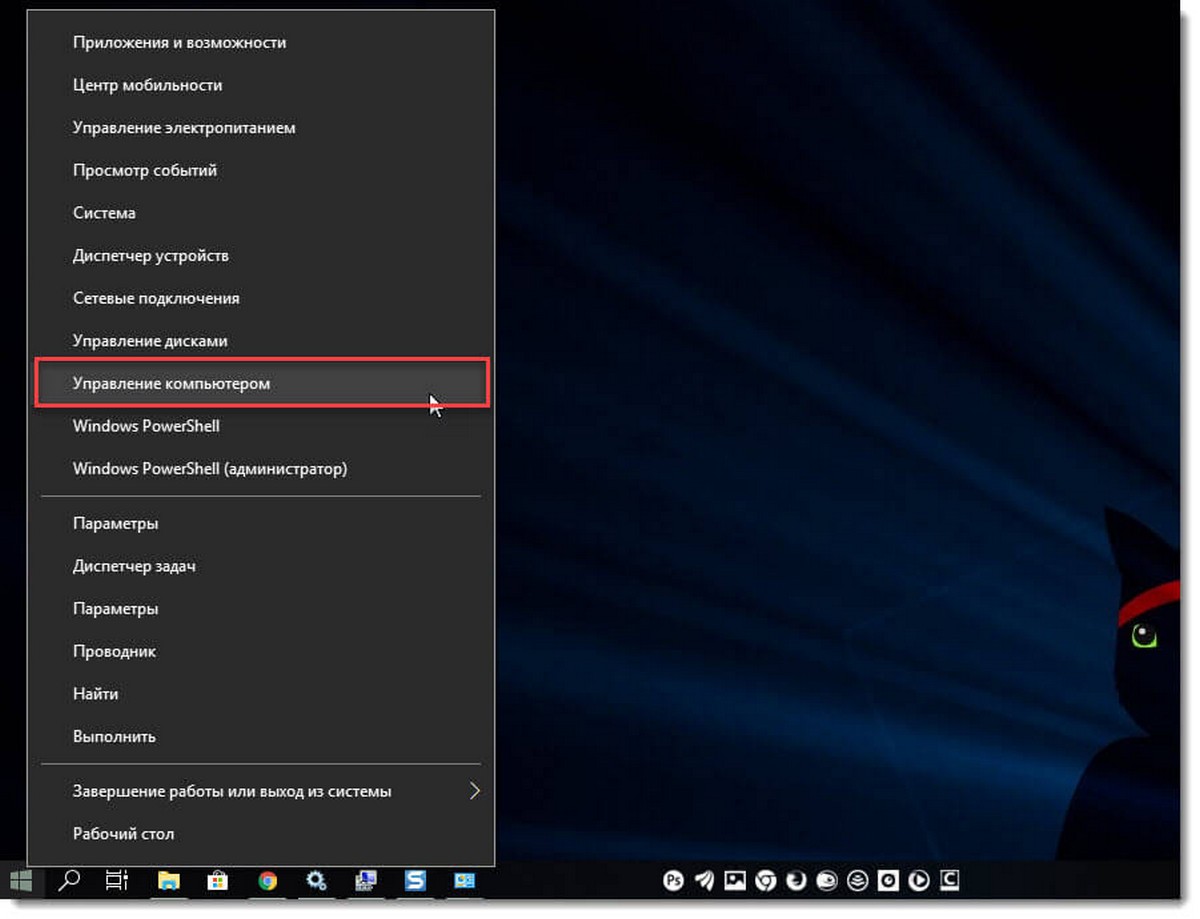
Способ 2. Открыть службы Windows можно с помощью меню WinX.
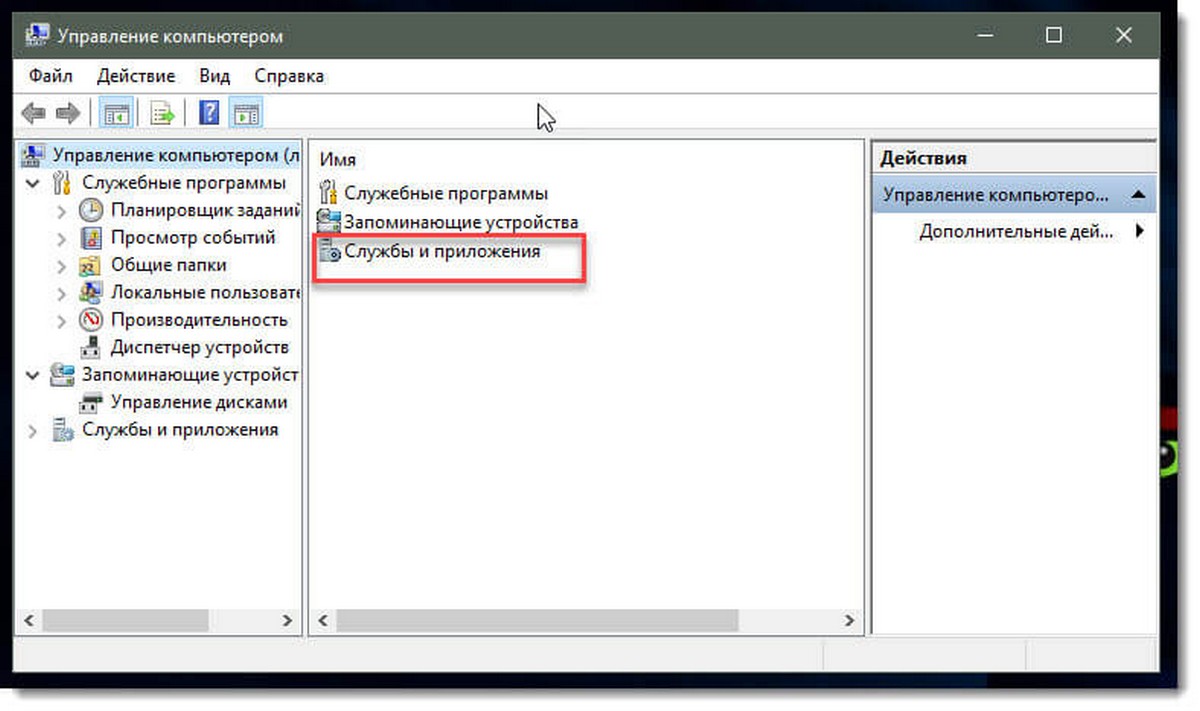
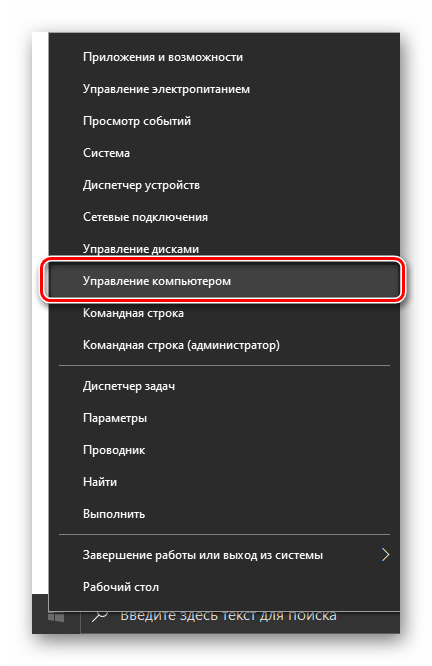
Кликните правой кнопкой мыши на кнопку «Пуск» или нажмите сочетание клавиш Win + X в открывшемся меню выберите «Управление компьютером», далее перейдите «Службы и приложения» → «Службы».

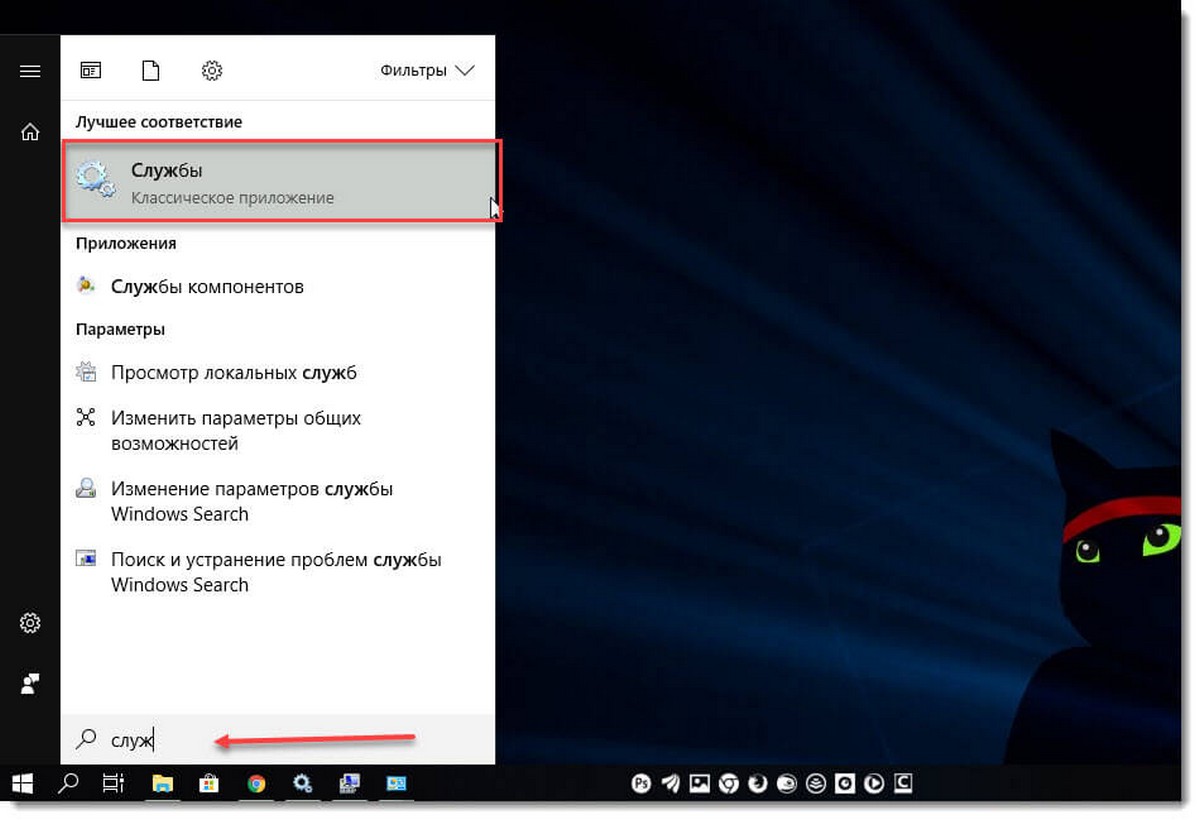
Способ 3. Открыть службы Windows с помощью Поиска Windows.
Откройте меню «Пуск» и начните набирать слово «Служб» на клавиатуре, в найденных результатах кликните мышкой «Службы», это откроет нужную нам оснастку.
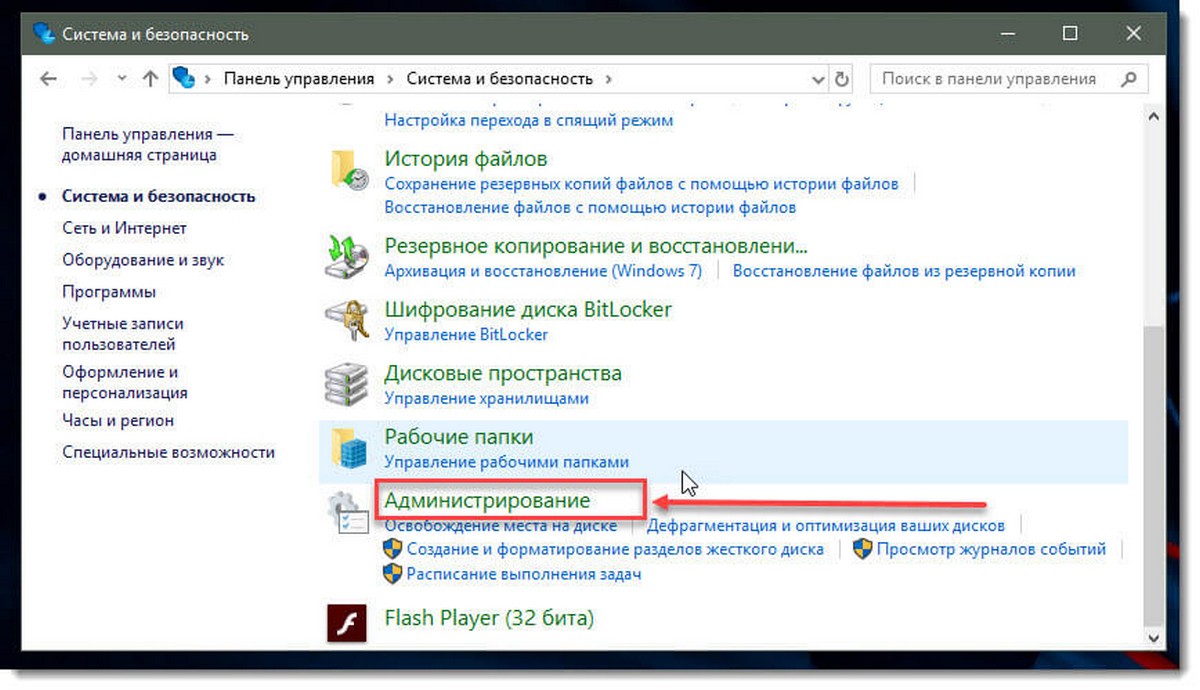
Способ 4. Открыть службы Windows с помощью Классической панели управления.
Откройте классическую панель управления. Перейдите Панель управления\Система и безопасность\Администрирование\Службы
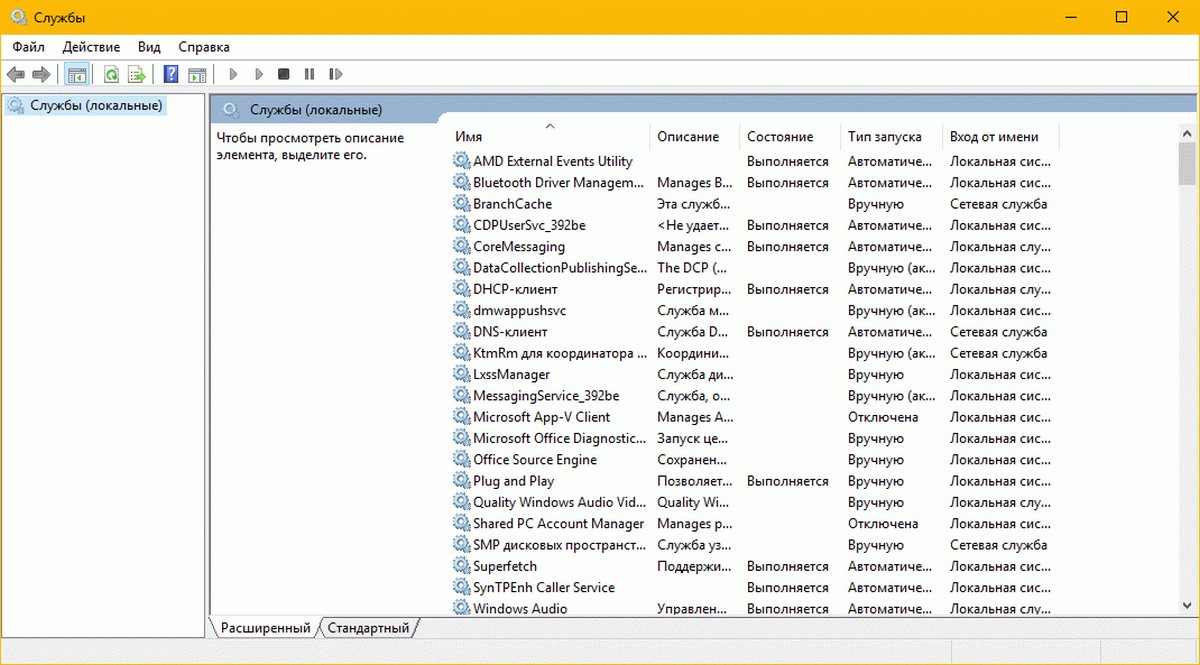
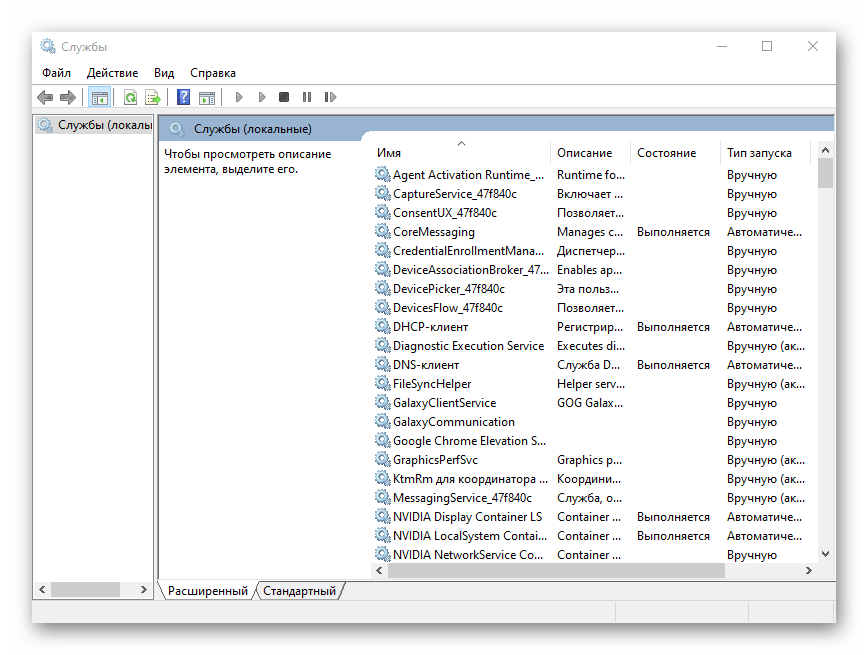
В диспетчере, вы увидите список служб, работающих в системе. Вы также будете иметь возможность посмотреть статус любой Службы — Имя, Описание, Состояние (работает или остановлена), Тип запуска и др..
Типы запуска служб Windows 10.
Windows 10 предлагает четыре типа запуска:
- Автоматический
- Автоматически (отложенный запуск)
- Вручную
- Отключена.
Запуск, остановка, отключение служб Windows 10.
Для запуска, остановки, приостановки, возобновления или перезагрузки любой службы Windows, выберите службу и кликните правой кнопкой мыши на ней. Вам будут предложены эти варианты. См скрин.
.jpg)
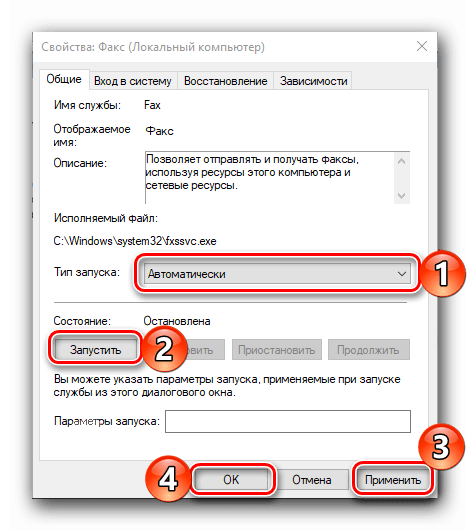
Если вы хотите управлять большим количеством опций, дважды кликните на службе, чтобы открыть окно «Свойства».
.jpg)
В раскрывающемся меню «Тип запуска», вы сможете выбрать как будет запускаться редактируемая вами служба.
В строке Состояние, вы увидите кнопки «Запустить», «Остановить», «Приостановить», «Продолжить» (Возобновить службу).
В окне Свойств, вы также увидите другие вкладки, которые предлагают дополнительные опции и информацию — «Вход в систему», «Восстановление» и «Зависимости».
После того, как вы внесете изменения, вы должны нажать на кнопку «Применить» и при необходимости перезагрузить компьютер, для того чтобы изменения вступили в силу.
Управление службами с помощью Командной строки Windows.
Вы также можете использовать командную строку для Запуска, Остановки, Приостановки, и Возобновления любой службы.
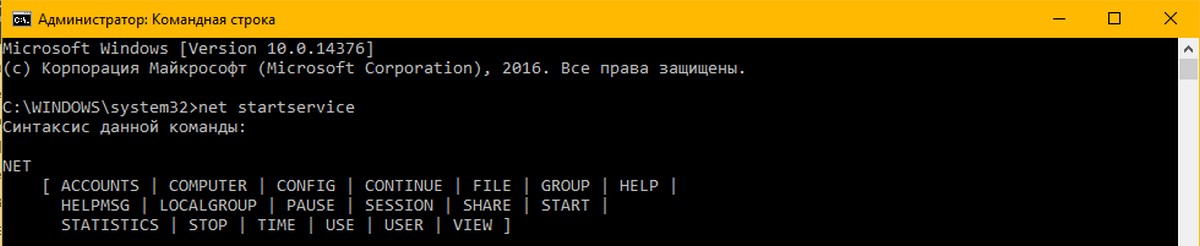
Откройте командную строку (от имени администратора) и выполните одну из следующих команд:
Для примера используется служба
Запустить службу:
net startservice
Остановить службу:
net stopservice
Приостановить обслуживание:
net pauseservice
Возобновить обслуживание:
net continueservice
Примечание: Не рекомендуется изменять настройки по умолчанию, если вы не знаете, что вы делаете, так как это может вызвать проблемы в вашей операционной системе.
Рекомендуем: Все способы открыть Службы в Windows 11
In Windows 10, knowing how to run programs as administrator is very important. By default, apps and games in Windows 10 run without administrator permissions, to prevent unauthorized changes to your system. However, there are times when some programs require administrator permissions to work properly or to run specific commands. Windows 10 offers you the ability to run programs as admin without having to disable anything. Here are all the methods to use «Run as administrator» on any desktop app in Windows 10:
First things first: About UAC and Run as administrator
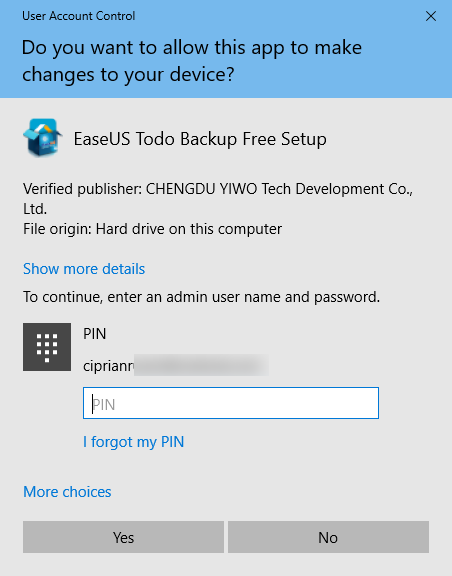
In early versions of Windows, applications had system-wide privileges, which was a security risk. All of Microsoft’s operating systems from Windows Vista onward, including Windows 10, include UAC or User Account Control, a security feature that prevents unauthorized changes to the operating system. Trying to run an application as administrator is one of the changes that require administrative privileges. Before the selected program is launched, a UAC prompt is triggered, asking for permission. If you run the application from an account without administrator permissions, the UAC prompt asks you to enter an administrator password. Without the admin password, the program does not launch.
In Windows 10, you can only run a program with administrator permissions if it is a desktop app. Some of these applications, like security software, cannot run correctly without having administrative permissions. Windows apps that are installed from the Microsoft Store cannot be run with administrative privileges in Windows 10. Furthermore, they have the same level of permissions as a normal user account, so they are not allowed to make changes to advanced system settings or the Windows Registry.
You can learn more about the difference between desktop apps and UWP apps and figure out which ones you can «Run as administrator» by reading What is a Windows app? How is it different from a desktop app or a program?.
1. Run a program as admin from the contextual menu of its Start Menu shortcut or tile
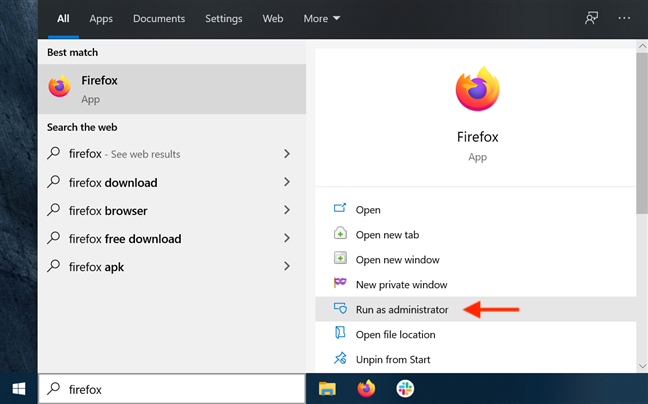
In Windows 10, you can launch a program with administrative permissions by using the contextual menu of its Start Menu shortcut. First, open the Start Menu. Then, find the shortcut of the program you want to launch in the All apps list, and right-click or press-and-hold on it to open a contextual menu. Click, tap, or hover over the More option, and then click or tap on «Run as administrator.«
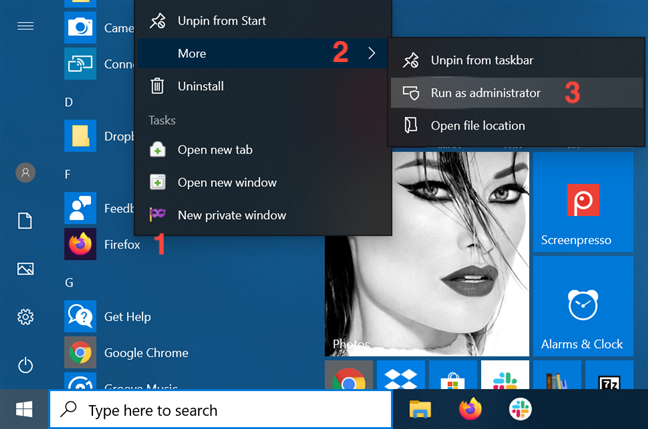
If you have a tile for your desktop app available in the Start Menu, right-click or press-and-hold on it to open a contextual menu. Access More and then click or tap on «Run as administrator.«
2. Run as administrator using «Ctrl + Shift + Click» on its Start Menu shortcut or tile
Open the Start Menu and locate the shortcut of the program you want to launch as administrator. Hold down both the Ctrl and the Shift keys on your keyboard and then click or tap on that program’s shortcut.
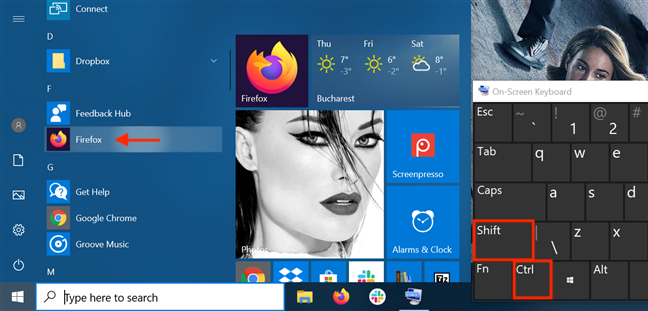
You can also use the «Ctrl + Shift + Click/Tap» shortcut on an app’s Start Menu tile to run it with administrator permissions in Windows 10.
During our tests, this method did not work every time, so if that is the case for you, either try again or consider running the app as administrator another way.
3. Run a program as administrator from its desktop shortcut
Find the desktop shortcut for the program you want to run as admin or create one yourself. Then, right-click or press-and-hold on it to open a contextual menu. Click or tap on the «Run as administrator» option.

4. Run a desktop app as administrator from its taskbar shortcut
In Windows 10, you can also run a desktop app with administrator permissions from its taskbar shortcut. Right-click or press-and-hold on the shortcut, and then right-click or press-and-hold again on the program’s name. Then, from the menu that opens, choose «Run as administrator.»
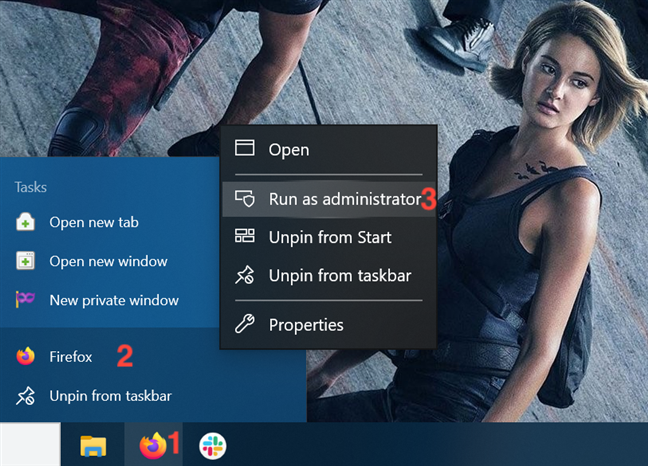
You can also use the «Ctrl + Shift + Click/Tap» shortcut on an app’s taskbar shortcut to run it with administrator permissions in Windows 10.
5. Run a program as administrator from its right-click menu
Although easier to find, shortcuts are not the only way to run a program as administrator in Windows 10. You can perform the same action from the main executable file’s contextual menu.
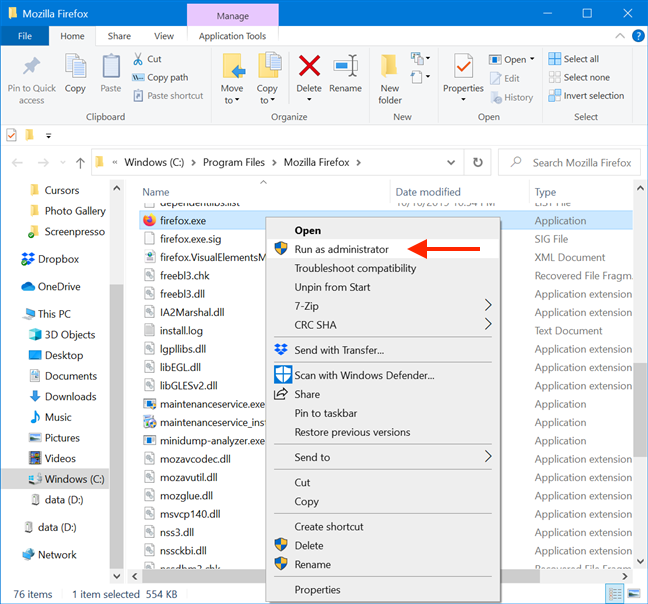
Open File Explorer and find the desktop app’s executable. Right-click or press-and-hold on it to open the contextual menu, and then click or tap on «Run as administrator.«
6. Use «Run as administrator» from File Explorer’s ribbon
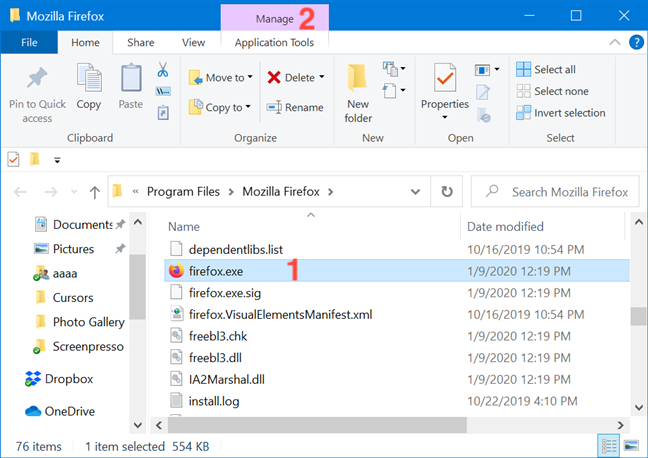
Find the program’s main executable in File Explorer. Select it, and then click or tap on the Manage tab from the ribbon.
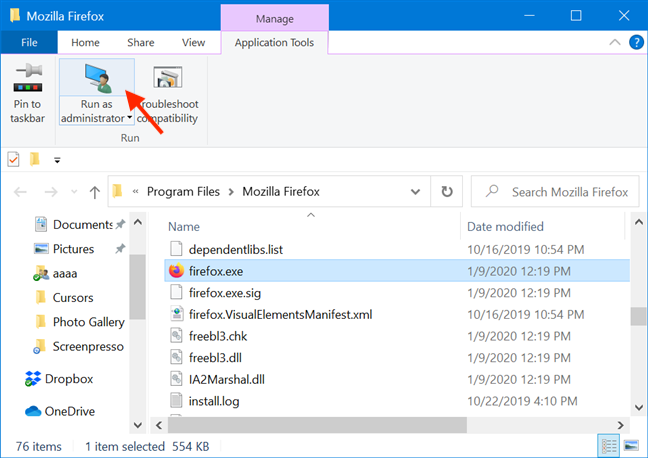
The option you need is displayed in the Run section of Application Tools. Click or tap on the upper half of the «Run as administrator» button to give the selected app admin permissions.
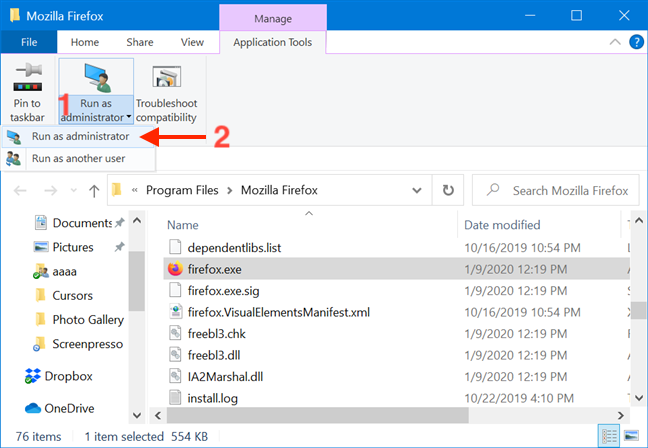
As an alternative, you can also press the lower half of the «Run as administrator» button and then click or tap on the «Run as administrator» option from the drop-down menu.
7. Run a desktop app as admin from the Search window
In the taskbar search field, type in the name of the program that needs to run with administrator permissions. Then, click or tap on the «Run as administrator» option displayed on the right side of the Search window.
Obviously, when you see the UAC prompt asking for permission to run the app as admin, click or tap Yes.
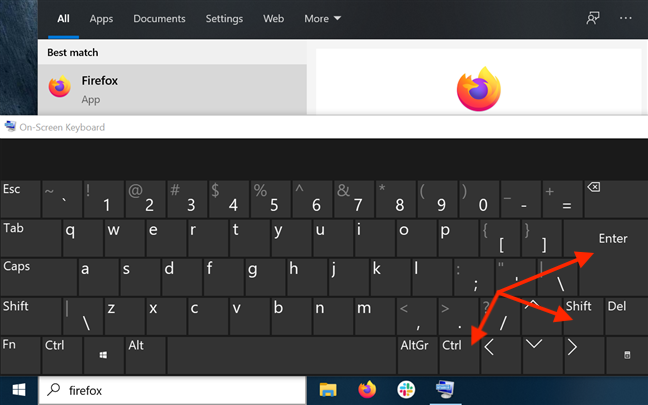
8. Run a program as administrator using «Ctrl + Shift + Enter» on its taskbar search result
Type the name of the program in your taskbar’s search field. If there are multiple results, use the arrow keys on your keyboard to highlight the program you want to run as administrator. Then, simultaneously press the Ctrl + Shift + Enter keys on your keyboard.
9. Run a program as administrator from the Run window
Open the Run window and type in the name of the executable for the program you want to run as administrator. Then hold down the Ctrl and Shift keys on your keyboard and click or tap on OK.
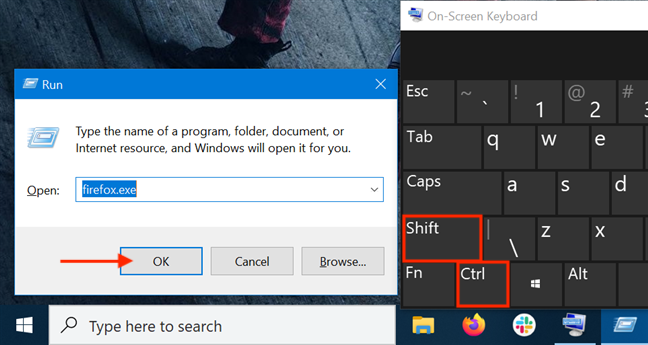
Alternatively, after typing in the name of the program’s main executable, press the Ctrl + Shift + Enter keys on your keyboard at the same time.

10. Run as admin from the Task Manager
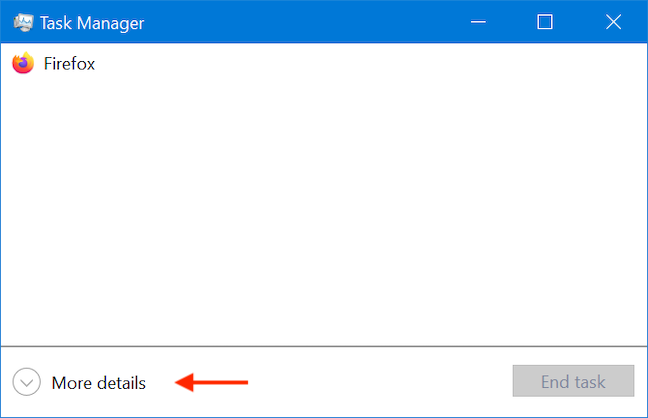
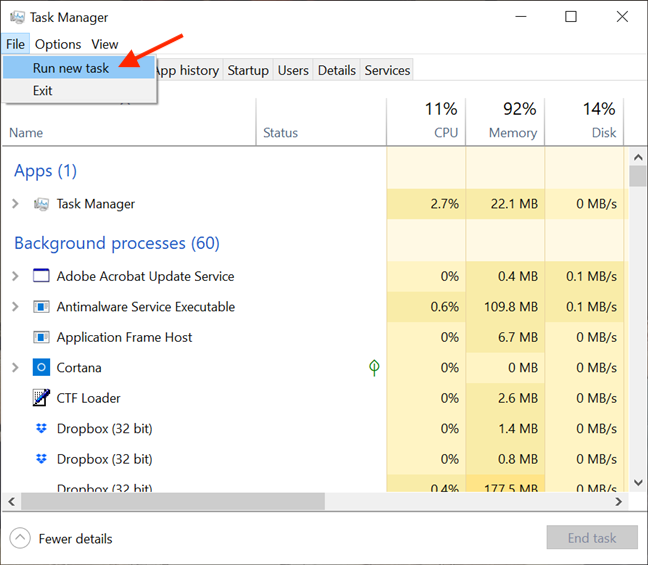
Another way to launch a program as administrator in Windows 10 is to start it using the Task Manager. To begin, open the Task Manager. Then, if it opens up in its compact view, click or tap on the More details button.
In the expanded Task Manager, open the File menu and click or tap on «Run new task.«
This opens the «Create new task» window. You can use its Open field to enter the path to the program you want to launch as administrator, or you can click or tap on Browse to navigate to it. Then, make sure to check the «Create this task with administrative privileges.» option and click or tap on OK.
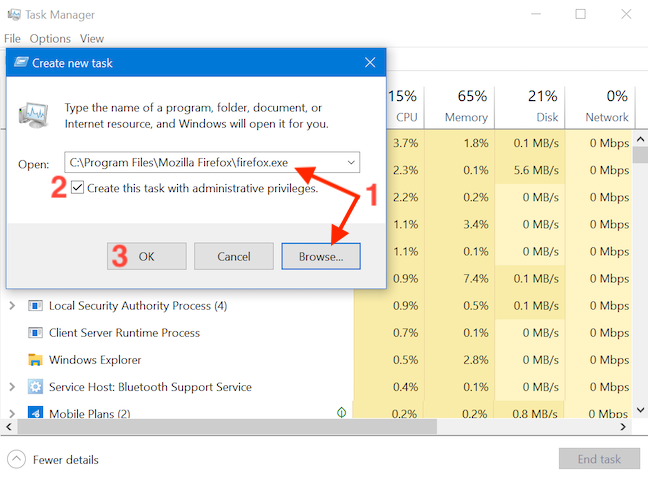
TIP: An advantage of using this method to launch programs as administrator is that you skip the UAC part of the process. That is because the app automatically inherits the permissions of the Task Manager — in our case, administrator permissions — so all you have to do is check the box to enable the option, as seen above. The option is missing if you only have standard user permissions on the device.
11. Run a desktop app as admin using the RunAs command in Command Prompt (CMD) or PowerShell
If the command line is your favorite way of asking your computer to do what you want, you can also access Command Prompt or PowerShell to run a program as administrator. Enter the following command in the CMD or PowerShell window, adjusting it to fit your needs:
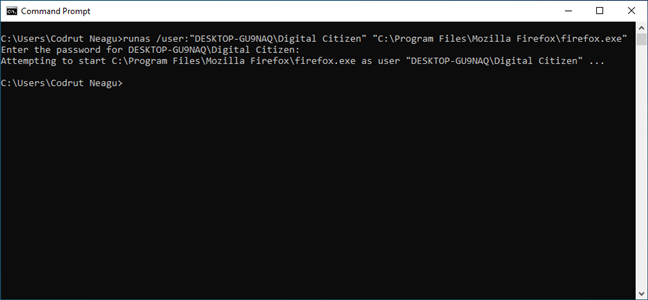
runas /user:»your_computer_name\administrator_name» «C:\path\program.exe«
Replace your_computer_name with your computer’s name, administrator_name with the name of a user account that is an administrator on your system, and C:\path\program.exe with the complete path to the program that you want to run as administrator.
As seen in the image below, if you enter the command correctly, you are also asked to enter the administrator’s password. Then, press Enter on your keyboard once again.
TIP: Using this method to launch programs as administrators, you skip the UAC part of the process.
12. Always run a program with administrator permissions
To avoid constantly having to use the methods illustrated above on desktop apps accessed on a regular basis, you can set a program to always run with administrator permissions.
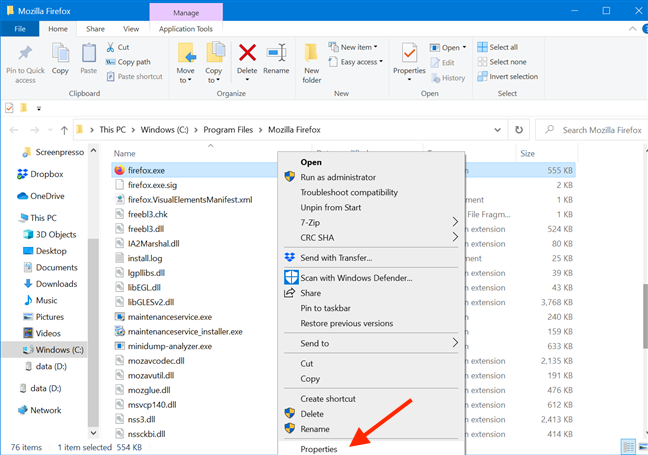
First, open File Explorer and find the main executable of the program you want to run. Right-click or press and hold on it to open the contextual menu. Then, click or tap on Properties.
In the Properties window, go to the Compatibility tab. At the bottom of the window, check the box next to the «Run this program as an administrator» option, and then click or tap on Apply or OK.
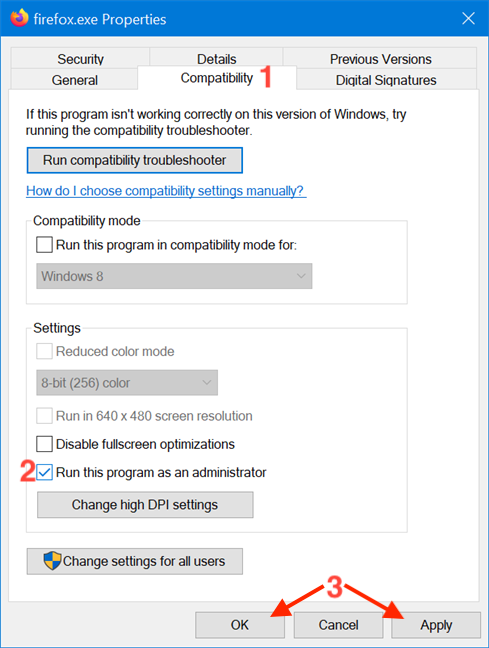
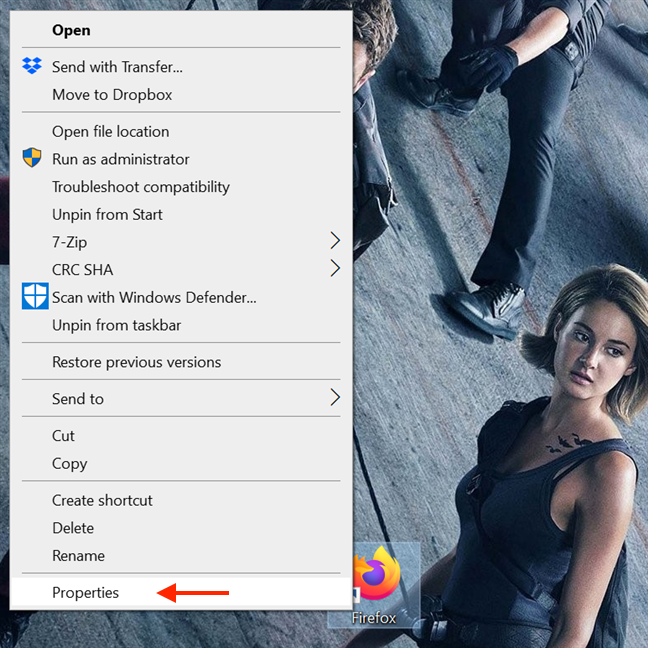
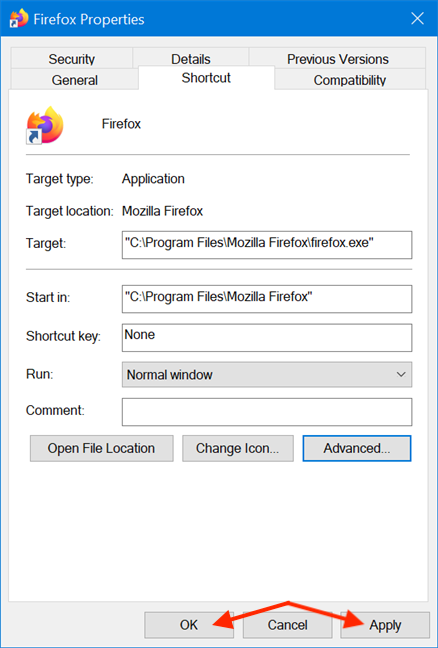
This setting is applied, and, from now on, the program always runs with administrator permissions. Follow the same steps if you want to disable the option. You can also edit the Properties of a program’s shortcut to avoid tampering with its main executable. To begin, right-click or press-and-hold on a program’s shortcut to access its contextual menu, and click or tap on Properties.
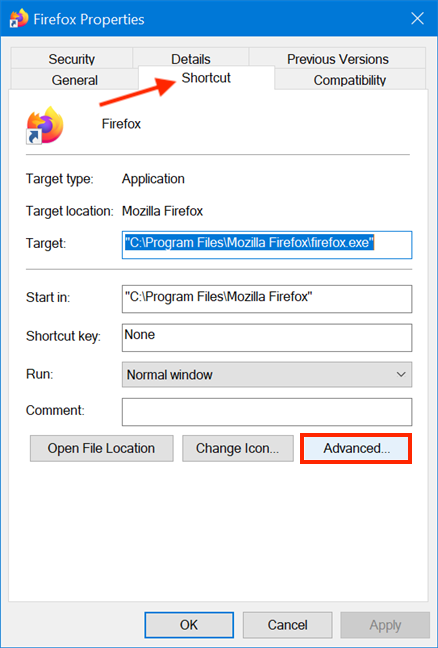
Then, in the shortcut’s Properties window, select the Shortcut tab. Click or tap on the Advanced button to open Advanced Properties.
In the Advanced Properties window, check the box next to «Run as administrator» and then click or tap OK.
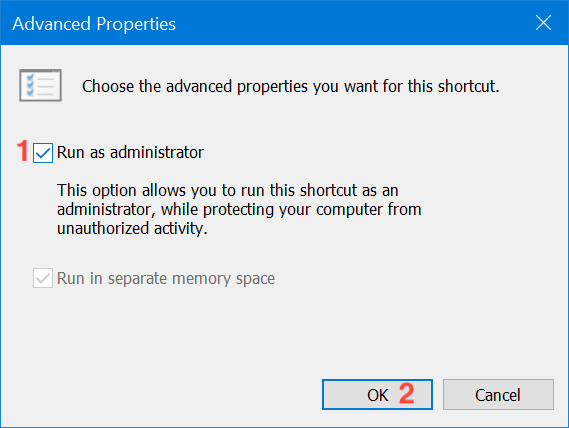
Finally, you are returned to the Properties window, where you have to click or tap on OK or Apply, and you are done.
The settings are applied, and your program works with administrative permissions as long as you open it using the same shortcut. When you use the methods in this section, the UAC prompts you as soon as you try to launch the app.
13. Run a program with administrator permissions and without a UAC prompt
Using the Task Scheduler, you can run a program as administrator without being prompted by the UAC (User Account Control) every time. It is simple, and you don’t have to disable UAC, thus compromising Windows 10’s security. We put together a detailed step by step guide to help you: Use the Windows Task Scheduler to run apps without UAC prompts and admin rights.
Which method(s) do you plan to use?
In Windows 10, there are fewer apps that need to run with administrator permissions than in older versions of Windows. However, a few legitimate programs still require elevated privileges. The main thing to remember is that even if you are logged in with an administrator account, you regularly run apps as a standard user. This means that if you need to run a program that requires administrator permissions, you can just use one of the methods described above and then approve it in the UAC prompt. Which of the method(s) illustrated do you plan to use? Did you already use some of them? Let us know in a comment.
Обновлено:
Опубликовано:
Мы рассмотрим несколько универсальных способов, которые помогут открыть оснастку Службы Windows для различных версий операционной системы. В качестве примеров приведены скриншоты от Windows 10, однако, для других версий системы мало что поменялось, и инструкция подходит для Windows 11 и 7, а также серверной линейке.
Для открытия оснастки «Службы» могут потребоваться права администратора. Необходимо зайти в Windows под соответствующим пользователем. В противном случае, будет предлагаться ввести пароль для привилегированного аккаунта.
Способы открыть службы:
С помощью командной строки
В панели управления
Используя поиск Windows
Способ 1. Командная строка
Вызываем командную строку любым удобным методом:
- Используем комбинацию WIN + R.
- Кликаем правой кнопкой мыши по Пуск и выбираем Терминал / Windows PowerShell от администратора.
- Правой кнопкой мыши по Пуск — Выполнить.
В открывшемся окне или командной стоке вводим services.msc.
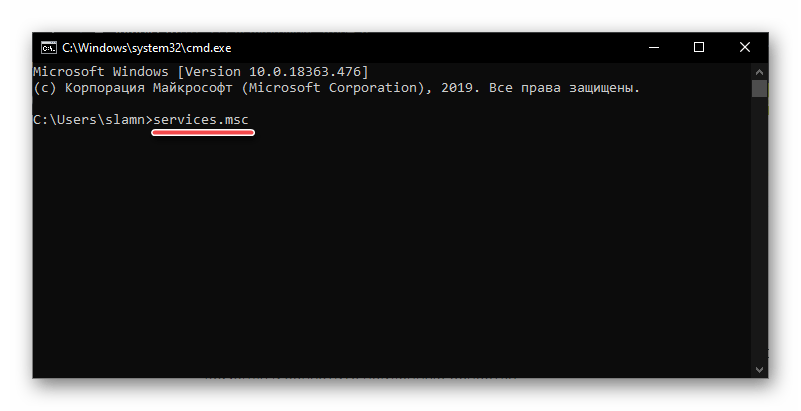
а) командная строка cmd:
services.msc
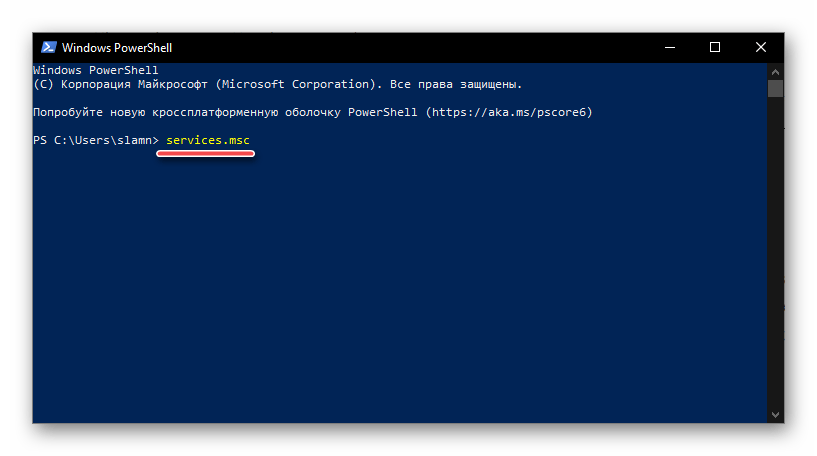
б) PowerShell:
Start-Process services.msc
в) окно Выполнить:

Откроется оснастка «Службы».
Способ 2. Панель управления
Откройте панель управления: в Windows 11 или 10 правой кнопкой мыши по Пуск — Панель управления. В Windows 7: левой кнопкой по Пуск — Панель управления.
Также можно использовать команду:
control
В открывшемся окне в правой верхней части найдите строку поиска и введите Службы:
Среди результатов в разделе Администрирование кликаем по Просмотр локальных служб:
Способ 3. Поиск Windows
Для того, чтобы найти множество оснасток управления системой хорошо подходит встроенная функция поиска. Чтобы ей воспользоваться кликните по значку поиска на нижней панели и введите Службы.
* вместо значка может быть строка поиска.
** ни значка, ни строки поиска может не быть. Тогда нажимаем правой кнопкой по Пуск — Найти.
Среди результатов в самом верху появится нужный пункт. Кликните по нему правой кнопкой мыши и выберите Запуск от имени администратора:

В Windows 7 процесс аналогичен, за исключением того, что строка поиска находится в нижней части меню Пуск.
Была ли полезна вам эта инструкция?
Да Нет
Все способы:
- Вход в «Службы» на ПК с Виндовс 10
- Способ 1: Поиск по системе
- Способ 2: Меню «Пуск»
- Способ 3: «Управление компьютером»
- Способ 4: «Конфигурация системы»
- Способ 5: «Панель управления»
- Способ 6: Ввод команды
- Способ 7: Папка на диске
- Отключение ненужных служб в Виндовс 10
- Заключение
- Вопросы и ответы: 3
В среде операционной системы от Майкрософт функционируют не только стандартные и сторонние программы и компоненты, но и многие службы. Одни из них всегда активны и работают в фоне, другие включаются по запросу, а третьи по умолчанию или по желанию пользователя отключены. Для того чтобы получить доступ ко всем этим процессам и возможности управления ими, необходимо знать, как открыть оснастку «Службы», и сегодня мы расскажем, как это сделать на компьютере с Windows 10.
Вход в «Службы» на ПК с Виндовс 10
Практически любой стандартный компонент ОС Windows может быть запущен несколькими способами. Рассматриваемые нами сегодня «Службы» — не исключение. Далее вы узнаете обо всех возможных вариантах запуска этой оснастки, после чего сможете выбрать наиболее подходящий для себя.
Способ 1: Поиск по системе
Самым простым, но все еще не очевидным для многих пользователей способом запуска какого-либо стандартного компонента Виндовс 10 является его поиск по системе. Для этого следует воспользоваться стандартной функцией, вызвать которую можно с панели задач (по умолчанию необходимая кнопка находится справа от меню «Пуск») либо горячими клавишами «WIN+S».
Любым из обозначенных выше способов откройте окно поиска и просто начните вводить в него наименование искомой оснастки – Службы. Как только вы увидите ее в результатах выдачи, кликните левой кнопкой мышки (ЛКМ) по найденному элементу или воспользуйтесь появившимся пунктом «Открыть». Дополнительно имеется возможность запуска с правами администратора (подчеркнуто на скриншоте ниже).

Способ 2: Меню «Пуск»
Несмотря на то что стартовое меню в десятой версии Виндовс было существенно переработано, многие стандартные для операционной системы программы и компоненты все еще можно в нем отыскать.
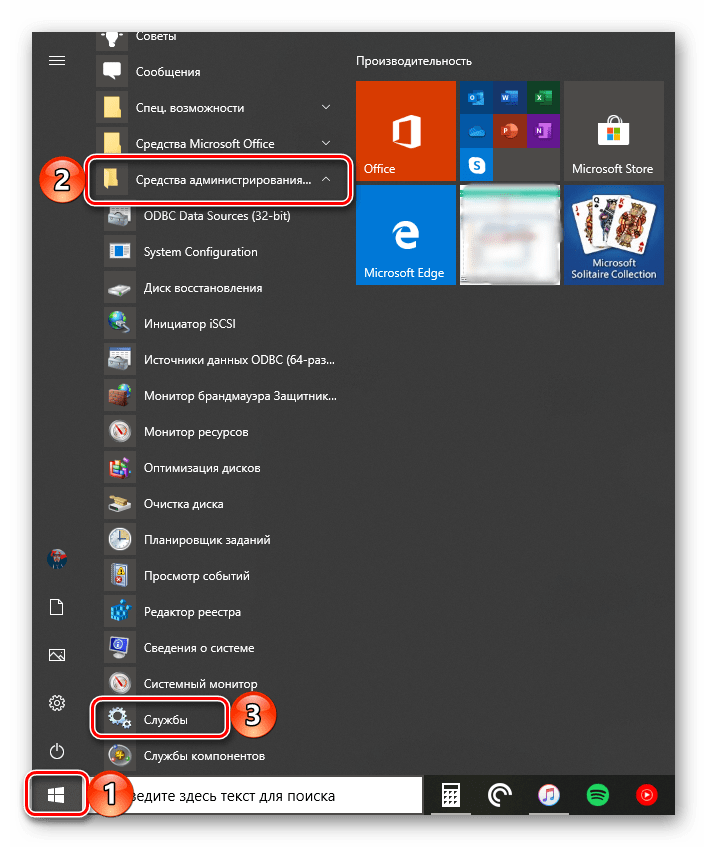
Вызовите «Пуск», нажав по его кнопке на панели задач или воспользовавшись клавишей с логотипом Windows на клавиатуре. Пролистайте список доступных опций вниз, вплоть до папки «Средства администрирования». Откройте ее нажатием ЛКМ, среди представленных элементов найдите «Службы» и запустите их.
Способ 3: «Управление компьютером»
«Службы» — это один из компонентов материнской оснастки «Управление компьютером», поэтому неудивительно, что через нее тоже можно попасть в интересующий нас сегодня раздел.
- Любым удобным способом откройте «Управление компьютером», например, нажав правой кнопкой мышки (ПКМ) по меню «Пуск» и выбрав там соответствующий пункт.
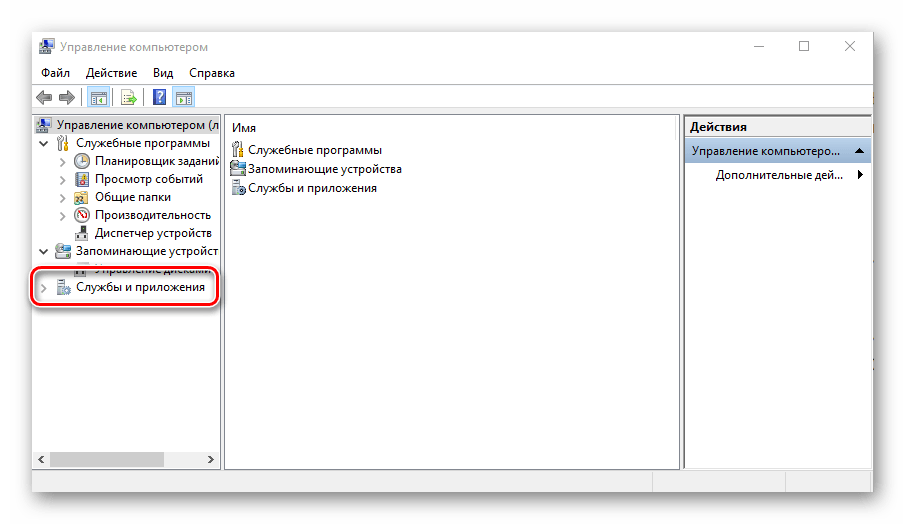
- На боковой панели (левой) разверните последний пункт в списке – «Службы и приложения», внутри которого и содержится искомый компонент.
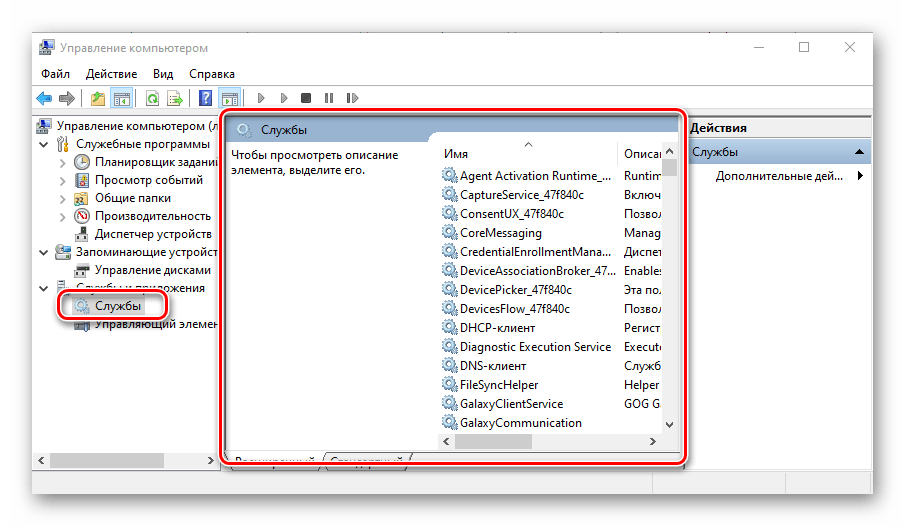
- Нажатие ЛКМ по этому наименованию откроет «Службы» в окне материнской оснастки.
Способ 4: «Конфигурация системы»
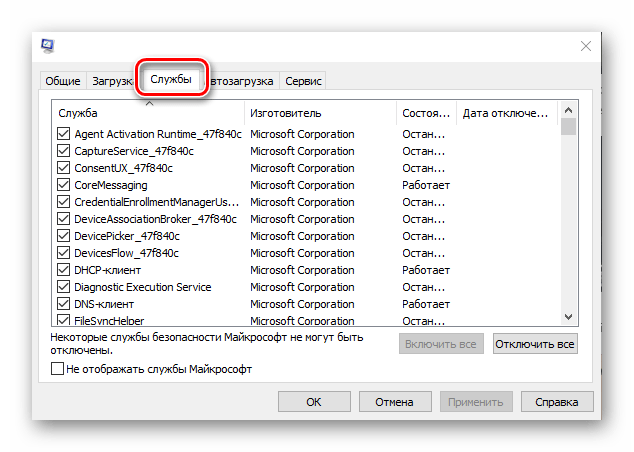
Это один из важных разделов операционной системы, предоставляющий возможность настройки ее поведения и запуска. Обратившись к нему, можно легко открыть «Службы», правда, в несколько ином и функционально ограниченном виде – это будет не отдельная оснастка и не часть таковой, как в предыдущем способе, а вкладка в окне, из которой можно только включать и отключать процессы, но не управлять ими.
msconfig
Откройте раздел «Конфигурация системы», например, воспользовавшись поиском и введя в него указанную выше команду. В окне, которое появится после вашего нажатия ЛКМ по найденному компоненту, перейдите во вкладку «Службы» — ее содержимое от привычной оснастки будет отличаться лишь визуально, однако, как и было сказано выше, возможности управления этими элементами весьма ограничены.
Способ 5: «Панель управления»
Представленные в стандартной для Виндовс «Панели управления» средства в десятой версии ОС постепенно «переезжают» в «Параметры», но те, с помощью которых можно зайти в «Службы», все еще остались на своем прежнем месте.
Читайте также: Как открыть «Панель управления» в Windows 10
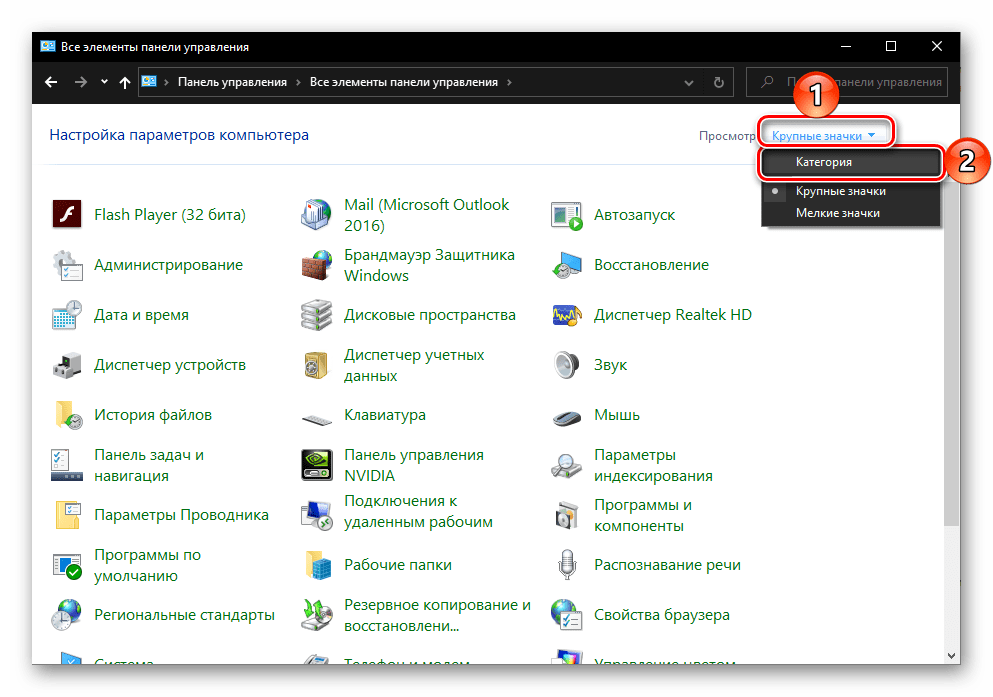
- Вызовите «Панель управления» (например, путем ввода этого наименования в поисковую строку), переключите режим просмотра на «Категории».
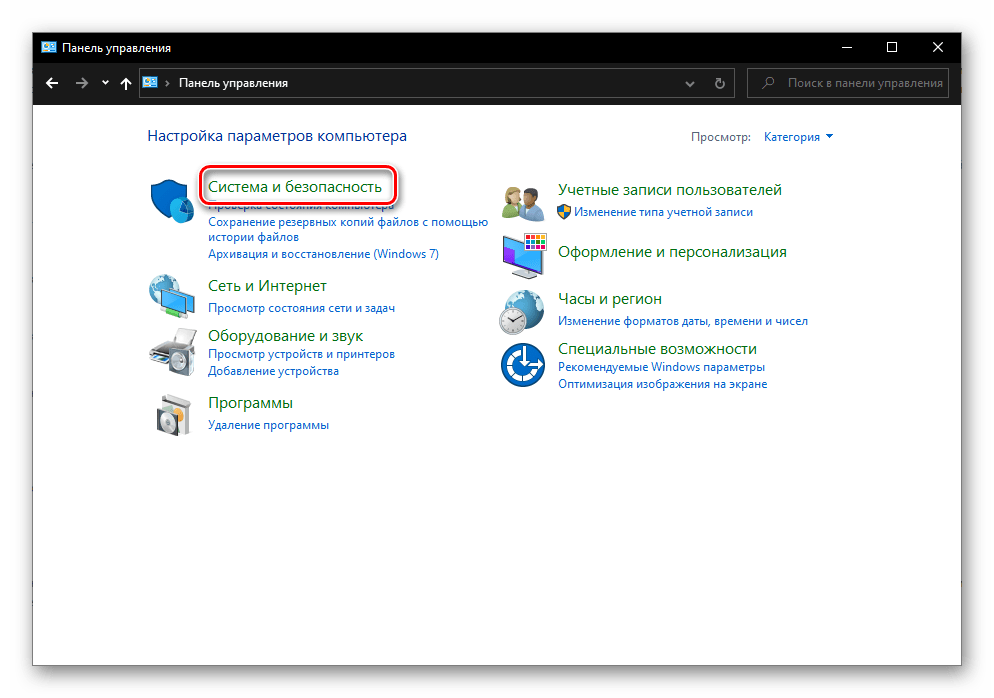
- Далее кликните ЛКМ по разделу «Система и безопасность».
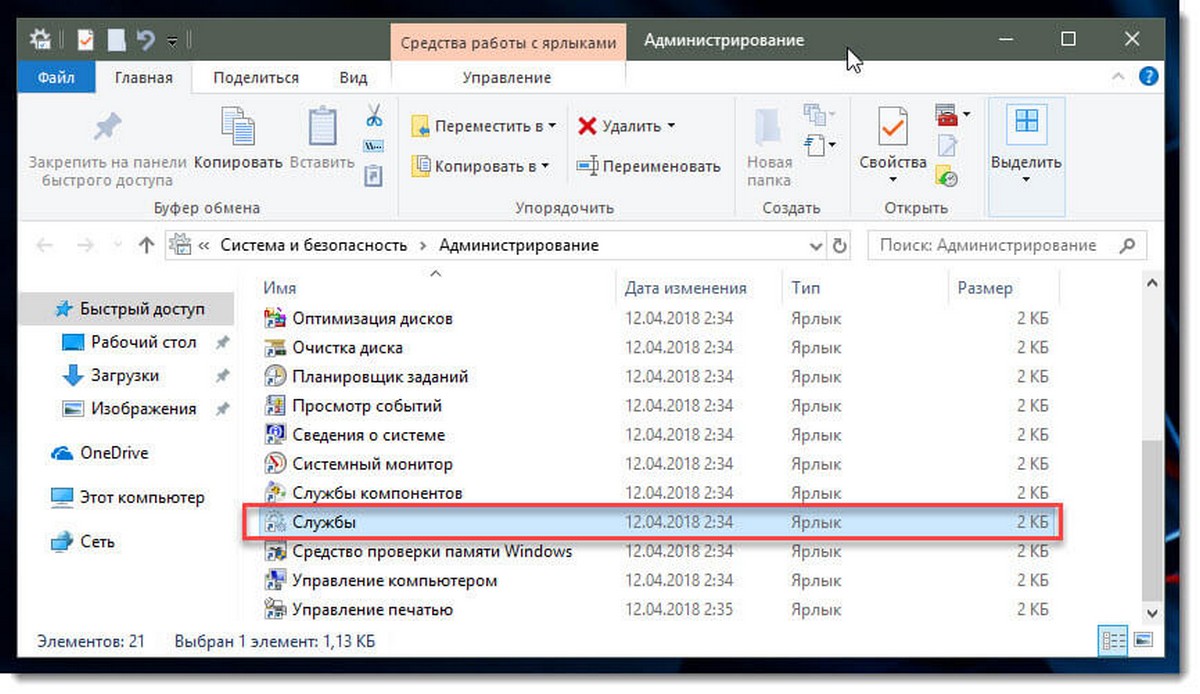
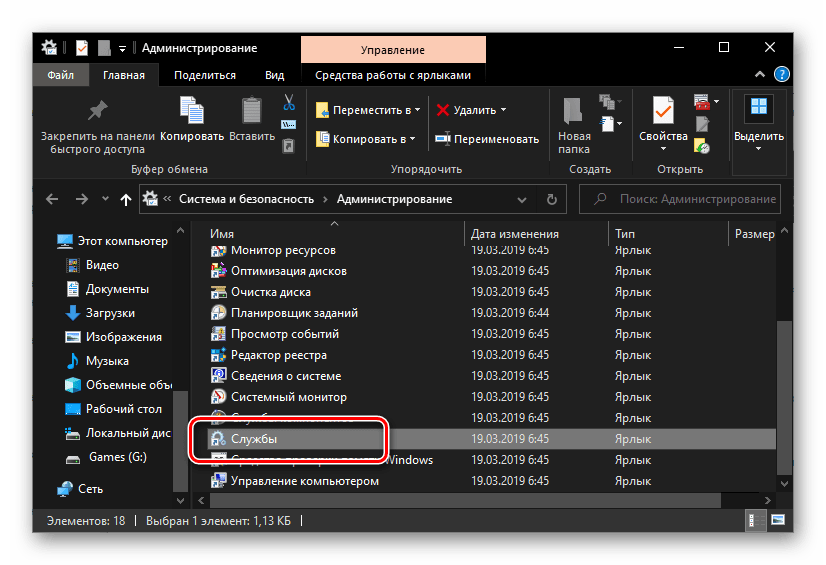
- В следующем окне нажмите на «Администрирование» — это действие откроет папку с системными компонентами,

из которой и можно запустить «Службы».

Читайте также: Средства администрирования в Windows 10
Способ 6: Ввод команды
Абсолютное большинство стандартных для Виндовс программ можно запускать с помощью специальных команд, и для этого важно знать не только синтаксис (обозначение), но и то, куда следует их вводить. Команда, с помощью которой можно быстро открыть «Службы», указана ниже, далее кратко пройдемся по элементам ОС, где ее можно применить.
services.msc
Поиск по системе
О том, как воспользоваться поиском, мы написали в первом способе настоящей статьи. Вызовите эту функцию, введите в нее указанную выше команду, и запустите найденный компонент.

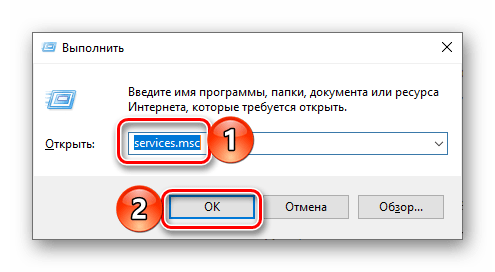
«Выполнить»
Основным назначением этой оснастки является быстрый запуск компонентов операционной системы и/или переход в директории на системном диске. Нас интересует первое. Нажмите клавиши «WIN+R», введите в появившемся окне уже знакомую команду и нажмите «ОК» или «ENTER» для запуска «Служб».
Читайте также: Как открыть окно «Выполнить» в Windows 10
«Командная строка»
Встроенную в Виндовс 10 консоль можно использовать не только для продвинутой работы с операционной системой и ее тонкой настройки, но и для быстрого запуска приложений, аналогично тому, как это делается в оснастке «Выполнить». С помощью поиска или любым другим способом откройте «Командную строку», введите в нее команду для вызова «Служб» и нажмите «ENTER» для ее выполнения.
Читайте также: Как открыть «Командную строку» в Windows 10
PowerShell
Это более функционально богатый аналог консоли, который работает по тому же принципу. Открыть данную оболочку поможет поиск, а о том, что делать дальше, вы уже знаете – вводите команду и инициируете ее запуск.
«Диспетчер задач»
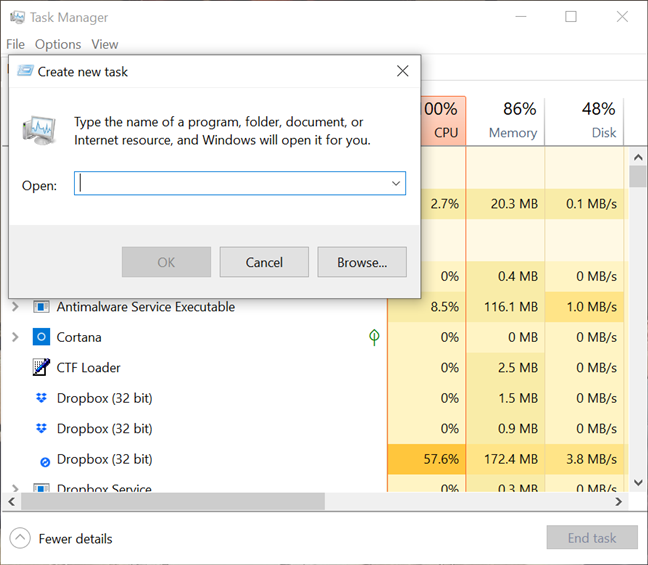
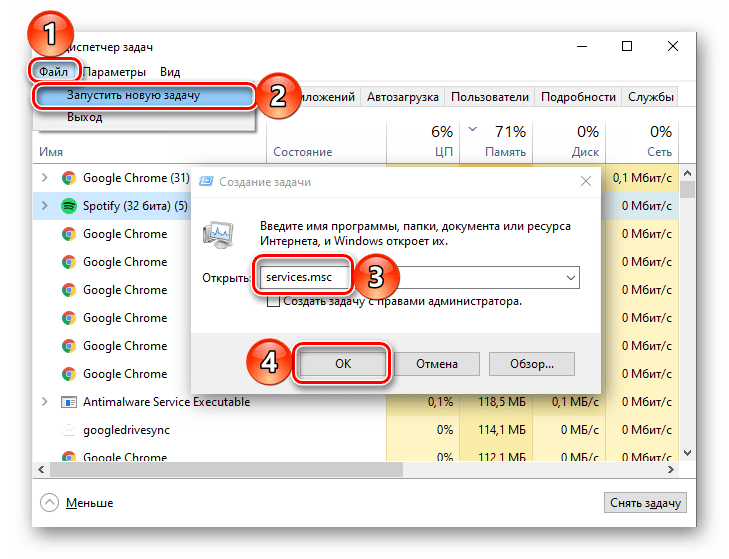
Все привыкли использовать данный компонент операционной системы для отслеживания ее состояния и принудительной остановки работы программ, однако с его помощью можно решать и противоположные задачи – запускать компоненты ОС. Вызовите «Диспетчер задач», нажав «CTRL+SHIFT+ESC», откройте в нем меню «Файл» и выберите пункт «Запустить новую задачу». В открывшемся окошке, которое визуально напоминает окно «Выполнить», введите команду-запрос для вызова «Служб» и нажмите «ОК» или «ENTER».
Читайте также: Что делать, если не открывается «Диспетчер задач» в Виндовс 10
Способ 7: Папка на диске
«Службы» по своей природе ничем не отличаются от любого другого приложения – у данной оснастки тоже есть свое место на системном диске и ярлык, который и можно использовать для запуска.
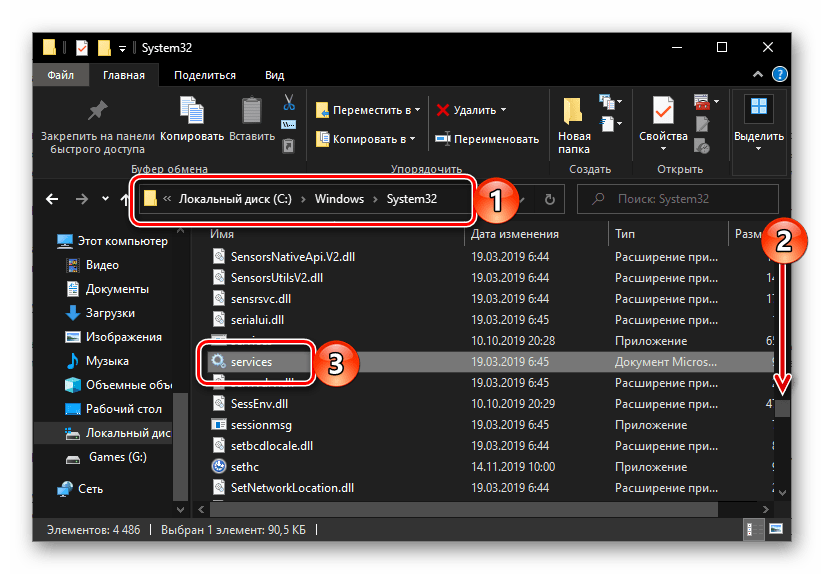
C:\Windows\System32
Скопируйте указанный выше адрес, вызовите «Проводник» (например, клавишами «WIN+E»), вставьте в его адресную строку содержимое буфера обмена и нажмите «ENTER» для перехода. Далее прокрутите перечень элементов в открывшейся папке вниз (где-то на 2/3), найдите там элемент с названием services и уже хорошо знакомым вам значком, и запустите его.
Читайте также: Как открыть «Проводник» в Windows 10
Отключение ненужных служб в Виндовс 10
Открыв любым из рассмотренных выше способов оснастку «Службы», вы сможете увидеть большой перечень важных для операционной системы компонентов. Как уже было сказано во вступлении данной статьи, многие из них выполняются в фоновом режиме, однако это не значит, что абсолютно все они нужны для корректного и стабильного функционирования Windows 10. Более того, некоторые из них не только являются бесполезными, но и оказывают негативное влияние на общую производительность, а потому могут быть отключены без каких-либо негативных последствий. Узнать, работу каких фоновых процессов можно остановить, поможет наше подробное руководство по первой из представленных ниже ссылок. Во втором рассказывается о том, как это сделать.
Подробнее:
Какие службы в Виндовс 10 можно отключить
Заключение
Ознакомившись с этой статьей, вы узнали не только обо всех возможных вариантах запуска оснастки «Службы» в Windows 10, но и о том, какие из ее компонентов можно, а иногда даже нужно отключить.
Наша группа в TelegramПолезные советы и помощь
Download Article
Step-by-step administrator login guide for Windows 10
Download Article
- Making an Account an Administrator (Control Panel)
- Making an Account an Administrator (Settings)
- Enabling Administrator Account in CMD
- Enabling Administrator Account in PowerShell
- Logging In as an Administrator
- Video
- Expert Q&A
- Tips
|
|
|
|
|
|
|
An administrator (admin) account can change security settings, install and uninstall software, access every file, and change settings for other users. When you first start up Windows 10 or 11, you’re walked through the setup of the first user account, which is set to administrator. This wikiHow will show you how to log in as an administrator in Windows 10.
Administrator Login: Quick Steps
- Open the Control Panel.
- Go to User Accounts > User Accounts.
- Click Change account type on your account.
- Select Administrator and click Change account type.
-

If you want to make your own account an administrator on this PC or give admin rights to another account, you can do so in the Control Panel. You will need the current administrator password to do this. To get started, type control panel into the Windows search bar, then click Control Panel.[1]
- Alternatively, you can use the command line to open the control panel.
- You can also use this method to give administrator rights to another user account on this PC.
-
It’s the green text next to an icon that resembles a person. It’s on the right side.
Advertisement
-
It’s next to an icon that resembles two people. This will show you a page with information about the Windows user account you are currently logged in to.
-
In the profile box on the right side of the User Accounts page, you’ll see “Administrator” under the username if the account is an administrator. If you’re already an administrator, you don’t need to proceed—you have full admin access to the system.
- You can check the status of other accounts by click Manage another account in this menu.
- If you are not using a Microsoft account, you will see «Local Account» above «Administrator.»
-
If your account isn’t an administrator, you can change it to one (if you know the administrator login information). To do so:[2]
- Click Change your account type.
- Click the Administrator option.
- Click Change account type.
- Type the admin password when prompted.
- You’re done! Your user account can now perform all tasks as an administrator.


Advertisement
-
If you want to make your own account an administrator on this PC, or give admin rights to another account, it’s easy to do in Settings. You will need to be using an administrator account to do this, or have the password for an administrator-level account. Start by opening the Start menu and selecting Settings.
-
This opens the Accounts settings.
-
You’ll see this in the left panel on Windows 10. If you’re using Windows 11, select Other users in the right panel instead.[3]
-
You may need to click the name of the user first.
-
When prompted, enter the administrator password or click Yes to confirm. This makes the selected account an administrator.
- The «Administrator» account type gives the selected account full admin permissions. Whenever this account logs in to this particular computer, it will be an administrator and can perform all tasks that the administrator account can.


Advertisement
-
If you want to be able to log in with the «Administrator» username and password, you will need to enable the Administrator account, which is disabled by default. To get started, press the Windows key and type cmd.[4]
- You will need to be logged in to an account that has administrative permissions to enable the Administrator account in Windows 10.
-
Click Yes in the box that pops up to continue.
-
You’ll see text confirming your entry. If you see an error, you may have mistyped the command. The default Windows 10 administrative account is active but not password protected.
-
To log in as an administrator, the account will need a password. To set the admin password, type net user administrator * and press Enter. When prompted, enter and confirm a new password for the administrator account.[5]
-
You can access the option to Sign out from your profile picture in the Start Menu. Or, to keep your account logged in, select Switch User instead to return to the login screen.
-
If you don’t see it, click Other Accounts and enter .\Administrator as the username.
-
Click the submit arrow button. This will log you into Windows as an administrator.


Advertisement
-
To enable the administrator account in PowerShell, you’ll need to run PowerShell as an administrator. To do this:
- Press the Windows key on your keyboard.
- Type powershell into the Search bar.
- Right-click Windows PowerShell and select Run as administrator.
- Click Yes to continue.
-
At the prompt, type net user administrator /active:yes and press Enter. This enables the «Administrator» user, but it will not work until you create a password.
-
To do this, you’ll need to enter the following command, but replace «NewPassword» with the password you would like to assign to the Administrator account:
- Set-LocalUser -Name "Administrator" -Password (ConvertTo-SecureString -AsPlainText "NewPassword" -Force).
- Once the password is assigned, you can now log in with the Administrator account.


Advertisement
-
If you’re logged in to Windows already and want to switch to an Administrator account, you can click the Start menu, select your profile photo, and click Sign Out to return to the login screen.
- Alternatively, click your profile photo and select Switch user if you don’t want to log your current account out of the system.
- If you’re at the login screen, skip to step 3 instead.
-
If you are not prompted to enter a username, choose this option to bring up the username and password fields.[6]
-
If you’re signing in as the local «Administrator» account, type .\Administrator as the username, then type the password of the local admin account. Once your password is accepted, you’ll be logged in to the computer as an administrator.
- If you need to log in as the domain administrator, use domain_name\Adminstrator instead.
-
After entering your password, click the arrow to log in as an administrator.


Advertisement
Add New Question
-
Question
I typed in the command on CMD and it said «Access is denied». So what do I do now?
Kyle Smith is a wikiHow Technology Writer, learning and sharing information about the latest technology. He has presented his research at multiple engineering conferences and is the writer and editor of hundreds of online electronics repair guides. Kyle received a BS in Industrial Engineering from Cal Poly, San Luis Obispo.
wikiHow Technology Writer
Expert Answer
Try checking the administrator status of your account by going to Control Panel > User Accounts > User Accounts. If you’re not an administrator but you know who is, ask them for the admin password. Or, ask them to make your account an administrator.
Ask a Question
200 characters left
Include your email address to get a message when this question is answered.
Submit
Advertisement
Video
Thanks for submitting a tip for review!
Advertisement
About This Article
Article SummaryX
1. Run Command Prompt as an administrator.
2. Type net user administrator /active:yes and press Enter.
3. Close Command Prompt.
4. Log out.
5. Click the Administrator account from the login page.
Did this summary help you?
Thanks to all authors for creating a page that has been read 305,178 times.