
The WLANSVC (WLAN AutoConfig) service helps your computer to identify any wireless network and connect to the same as long as your computer has a wireless adapter installed to it. This service identifies which particular network has to be connected to your PC and automatically configures any necessary settings. Hence, the most preferred wireless network is connected to ensure proper internet connectivity. But, sometimes you may face the wireless autoconfig service wlansvc is not running problem in your Windows 10 PC and thus you cannot connect to a wireless network seamlessly. If you are facing the same, you are at the right place! We bring a perfect guide that will help you fix Wlansvc not running issue. So, continue reading.

Table of Contents
If you want to solve Wlansvc is not running issue, you have to analyze which parameter is causing you the trouble. Here are some reasons that cause this issue in Windows 10.
- WLAN AutoConfig service is disabled on your computer.
- Your PC has outdated drivers installed in it.
- Network settings are corrupt.
- The wireless adapter is corrupt or incompatible.
- Operating System is corrupt.
- The Previous OS update is incompatible with Windows services.
So, now move ahead to the next section to learn the troubleshooting steps to resolve the wireless autoconfig service wlansvc is not running issue.
In this section, we have compiled a list of methods that will help you resolve the wireless autoconfig service Wlansvc is not running issue. Follow them in the same order to attain perfect results.
Note: Always create a system restore point to restore your system to its previous version if something goes wrong.
Method 1: Enable WLAN
Before you step into other methods, you must make sure whether the wireless service is turned on your device. If the WiFi service is physically turned off or if the inbuilt settings are incompatible with the device, you will face the wireless autoconfig service wlansvc is not running issue. Yet, you can enable WiFi or WLAN services by following the steps as instructed.
1. Press and hold Windows + I keys together to open Windows settings.
2. Click on Network & Internet.

3. Now, in the left pane click on the Wi-Fi tab and toggle on the Wi-Fi button.

4. Check if you have fixed Wlansvc is not running issue.
Method 2: Enable WiFi Adapters
Also, you must ensure whether the wireless adapters in your device are enabled to ensure proper internet connectivity. Follow the below-mentioned steps to enable WiFi adapters on your computer.
1. Launch the Run dialog box by pressing Windows + R keys simultaneously.
2. Now, type ncpa.cpl and hit Enter key to open Network Connections.

3. Now, right-click on your active network adapter and check whether it is enabled or disabled.
3A. Select Enable if the network adapter is disabled.
3B. If the network adapter is already in Enable status, switch to the next method.

4. Check if you have fixed Wlansvc not running issue.
Also Read: Fix Windows could not automatically detect this Network’s Proxy settings
Method 3: Run Network Troubleshooter
Your Windows 10 PC has an inbuilt tool to troubleshoot any internet connectivity issues. You can use the same tool to analyze common network issues and once you have completed the troubleshooting process, you will be able to fix the wireless autoconfig service wlansvc is not running issue. Learn and implement the steps in our guide to Troubleshoot Network Connectivity Problems on Windows 10 to fix all network-related issues by using the Windows Network Adapter troubleshooter.

Once you have completed the process, you can fix all network issues occurring in Wi-Fi networks, Ethernet connections, and internet adapters on your computer. Check if you have fixed wireless autoconfig service wlansvc is not running issue.
Method 3: Enable Wireless AutoConfig Service
The WLAN AutoConfig services have an inbuilt module that enables your computer to discover any new network. As a result of the network troubleshooting process, you may find that WLAN AutoConfig services are disabled and that’s the reason why you face Wlansvc is not running issue. So, check if this service is disabled on your device, if so start it over again by following the below-mentioned steps.
1. Hit the Windows key and type Services and click on Run as administrator.

2. Scroll and search for WLAN AutoConfig Service and double-click on it.
Note: You can also right-click on WLAN AutoConfig Service and select the Properties option from the drop-down list.

3. Now, choose the Startup type as Automatic.

3A. When the Service status is not Running, then select the Start button.
3B. When the Service status is Running, select the Stop button for a few minutes and start it again.

4. Finally, click on Apply > OK to save the changes. Now, you would have fixed wireless autoconfig service wlansvc is not running issue.
Method 4: Start Wlansvc Service
Apart from the Graphical User Interface method, you can enable the Wlansvc service from the command prompt also. It is possible through MS-DOS (Microsoft Disk Operating System) commands for which you must have administrative rights. These commands interact with the OS of your computer and with the software that functions with the command lines. In this guide, we have demonstrated how to start the Wlansvc service from the command prompt for Windows versions of Vista and above.
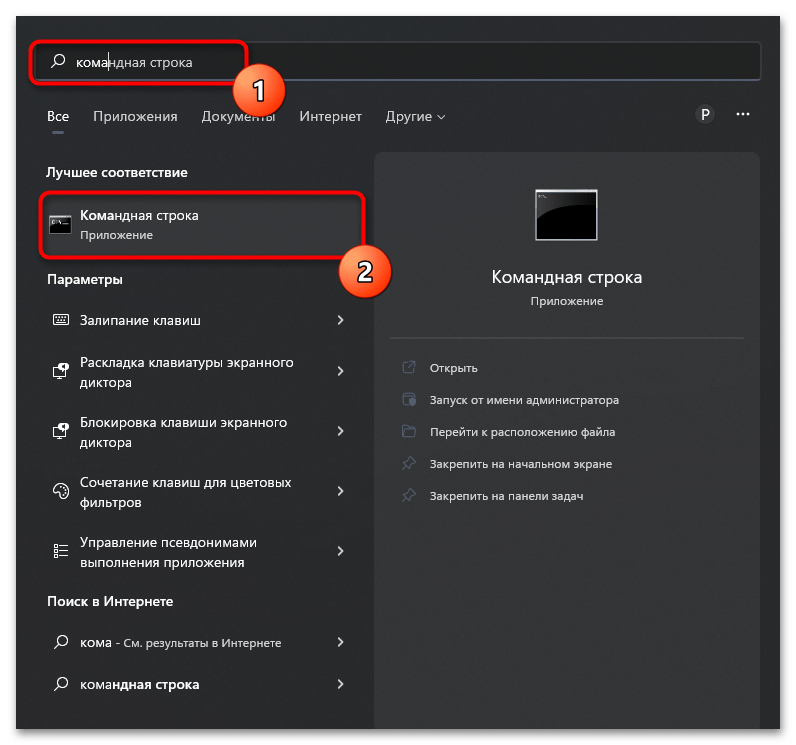
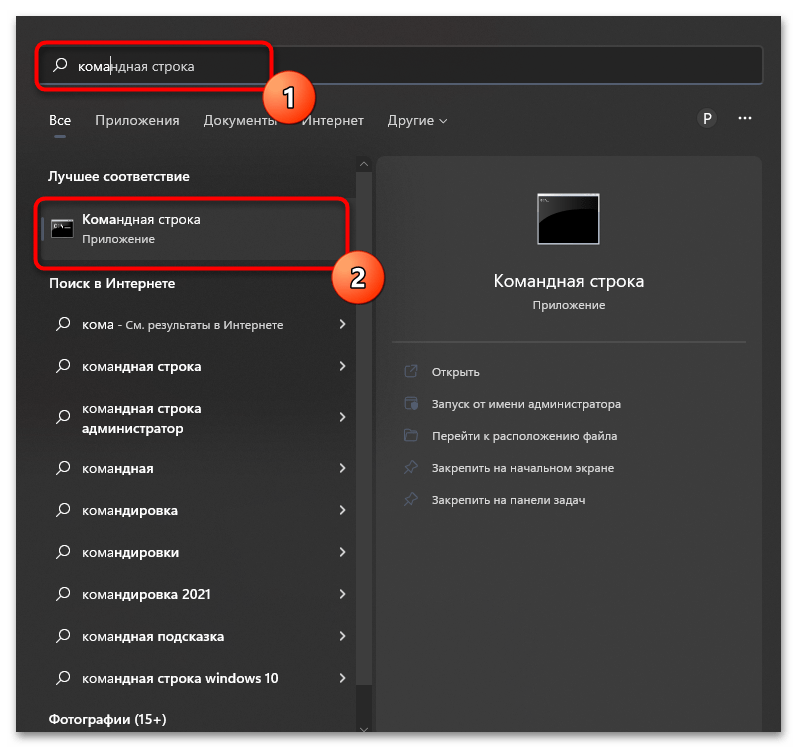
1. Press the Windows key and type Command Prompt and click on Run as administrator.

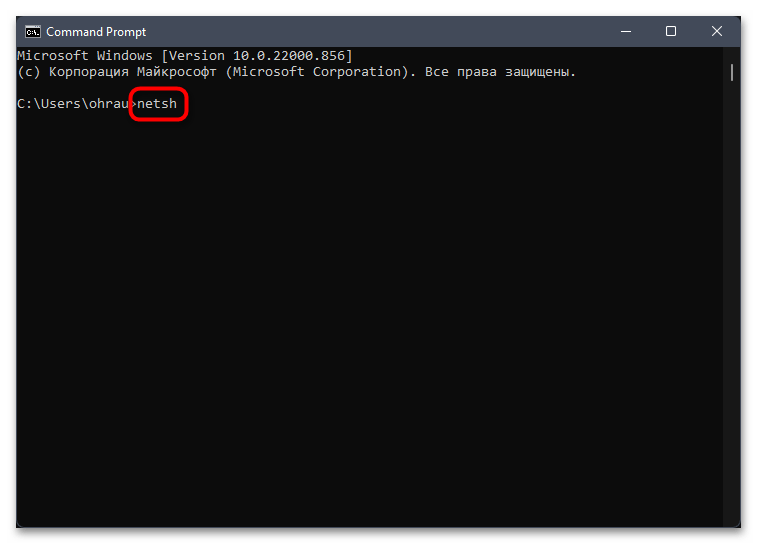
2. Now, type the following commands one by one and hit Enter key after each command.
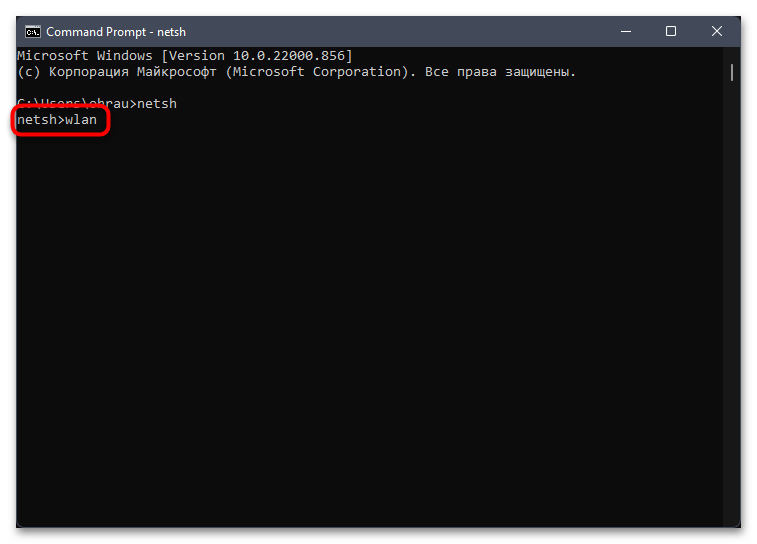
netsh
wlan

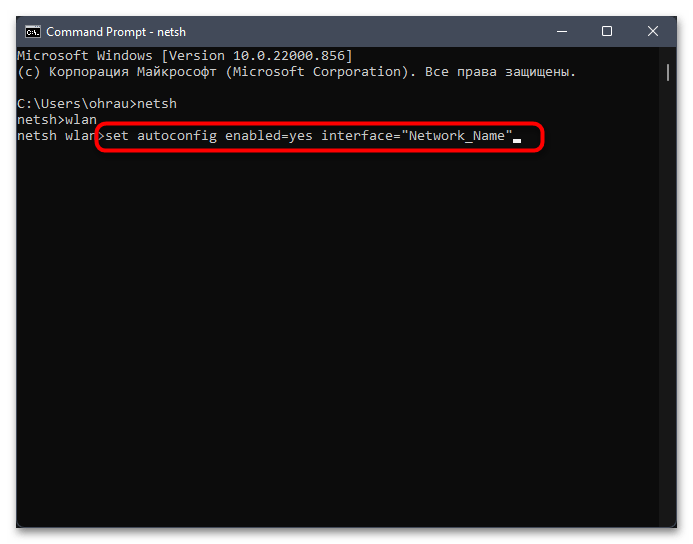
3. Then, to start the service for the wireless interface, type the following command and hit Enter key.
set autoconfig enabled=yes interface="Type the Name of Wireless Network Connection"
Note: Users are advised to type the name of the wireless connection within quotation symbols in place of Type the Name of Wireless Network Connection in the above command. Refer to the example given below.

4. Finally, check if you have fixed wireless autoconfig service wlansvc is not running issue.
Also Read: [SOLVED] Windows detected a hard disk problem
Method 5: Reset TCP/IP
TCP (Transmission Control Protocol) is mandatory for your computer since it establishes rules and standard procedures over the internet. TCP/IP protocols work in chores that are responsible for the mobility of data packets. If there is a conflict in the process, resetting the protocol along with the IP address will help you fix the wireless autoconfig service wlansvc is not running issue. Follow our guide on How to Troubleshoot Network Connectivity Problems on Windows 10 to reset TCP/IP.

After implementing the steps, check if you can fix Wlansvc not running issue or not.
Method 6: Repair Corrupt Files
If your Windows 10 computer has any corrupt or damaged system configuration files, you will face wireless autoconfig service wlansvc is not running issue. This also leads to malfunctioning of your computer thereby causing performance failure. Fortunately, you can repair these corrupt files by using the inbuilt utilities of your computer namely, System File Checker and Deployment Image Servicing and Management. Follow our guide on How to Repair System Files on Windows 10 and implement the steps as demonstrated to repair all the corrupt files on your computer.

After repairing the corrupt files by running the commands, check if you have fixed wireless autoconfig service wlansvc is not running issue.
Also Read: How to set up a VPN on Windows 10
Method 7: Update WLAN Driver
Device drivers establish a connection link between the hardware and Operating System of your computer. Also, faulty or corrupt drivers lead to Wlansvc not running issue. Many users have reported that updating WLAN drivers have helped them fix the issue. You are advised to update WLAN drivers to improve the reliability of your network adapters, fix compatibility issues, and resolve the wireless autoconfig service wlansvc is not running issue. Follow our guide on How to Update Network Adapter Drivers on Windows 10 to do so.

After updating, check if you have fixed wireless autoconfig service wlansvc is not running issue.
Method 8: Reinstall WLAN Driver
Incompatible drivers must be reinstalled to fix Wlansvc is not running problem. You are advised to reinstall device drivers only if you cannot attain any fix by updating them. Steps to reinstall drivers are very easy and you can do so by using a third-party application or manually. Follow our guide How to Uninstall and Reinstall Drivers on Windows 10 to reinstall drivers in your Windows 10 computer.

After reinstalling network drivers, check if you have fixed wireless autoconfig service wlansvc is not running issue.
Method 9: Roll Back WLAN Drivers
When you roll back your drivers, all the current versions of the hardware device will be uninstalled and previously installed drivers will be installed on your PC. This feature will be very helpful when any new driver update does not work well with your computer. Follow the steps as instructed in our guide on How to Rollback Drivers on Windows 10 to fix the wireless autoconfig service wlansvc is not running issue.

After your Windows 10 computer has installed the previous version of drivers, check if you have fixed wireless autoconfig service wlansvc is not running problem.
Also Read: Fix Computers Not Showing Up on Network in Windows 10
Method 10: Delete Previous Windows Updates
Few Windows update components in your Windows 10 computer may cause Wlansvc not running issue. Hence to fix the problem, consider deleting previous Windows updates as instructed below.
1. Press the Windows + R keys simultaneously to open the Run dialog box.
2. Type appwiz. cpl and hit Enter key to open Programs and Features.

3. Click on View installed updates in the left pane.

4. Now, search for the most recent update and select the Uninstall option.

5. If there are any prompts, confirm them and restart your PC. Now, you would have fixed the problem.
Method 11: Reset Network Settings
Despite updating WLAN drivers, and uninstalling recent updates try resetting the network settings if none of the methods have helped you fix the wireless autoconfig service wlansvc is not running issue. To do so, follow our guide on How to Reset Network Settings on Windows 10.

Method 12: Perform System Restore
There are many circumstances where the latest Windows update has broken the wireless mechanism of your computer. If the current version of your Windows 10 PC interferes with the existing architecture of network configurations, you will face the discussed problem. System Restore will bring back the computer to the version where it was working without any errors. To do so, follow our guide on How to use System Restore on Windows 10 and implement the instructions as demonstrated.

After restoring your Windows 10 PC, check if you have fixed the issue.
Also Read: Fix Ethernet Doesn’t Have a Valid IP Configuration Error
Method 13: Clean Install Windows 10
If none of the methods have helped you fix the wireless autoconfig service wlansvc is not running issue, then you need to clean install your Windows Operating System. To do so, implement the steps as instructed in our guide How to do a Clean Install of Windows 10

Recommended:
- Top 36 Best Beat Making Software for PC
- How to Turn On Network Discovery in Windows 10
- 16 Best Free Network Monitoring Software for Windows 10
- Fix Firefox SSL_ERROR_NO_CYPHER_OVERLAP in Windows 10
Without WLANSVC (WLAN AutoConfig) services, you could not connect to a wireless network, but now you would have fixed the wireless autoconfig service wlansvc is not running issue. Keep visiting our page for more cool tips & tricks and leave your comments below. Also, if you have any queries/suggestions regarding this article, then feel free to drop them in the comments section.
Все способы:
- Способ 1: Использование средства автоматического исправления неполадок
- Способ 2: Ручное включение Wi-Fi на компьютере или ноутбуке
- Способ 3: Включение сетевого адаптера
- Способ 4: Ручной запуск службы
- Способ 5: Обновление сетевых настроек
- Способ 6: Сброс сетевых настроек
- Способ 7: Проверка конфигурации системы
- Способ 8: Проверка связанных служб
- Способ 9: Установка последней версии сетевого драйвера
- Вопросы и ответы: 1
Способ 1: Использование средства автоматического исправления неполадок
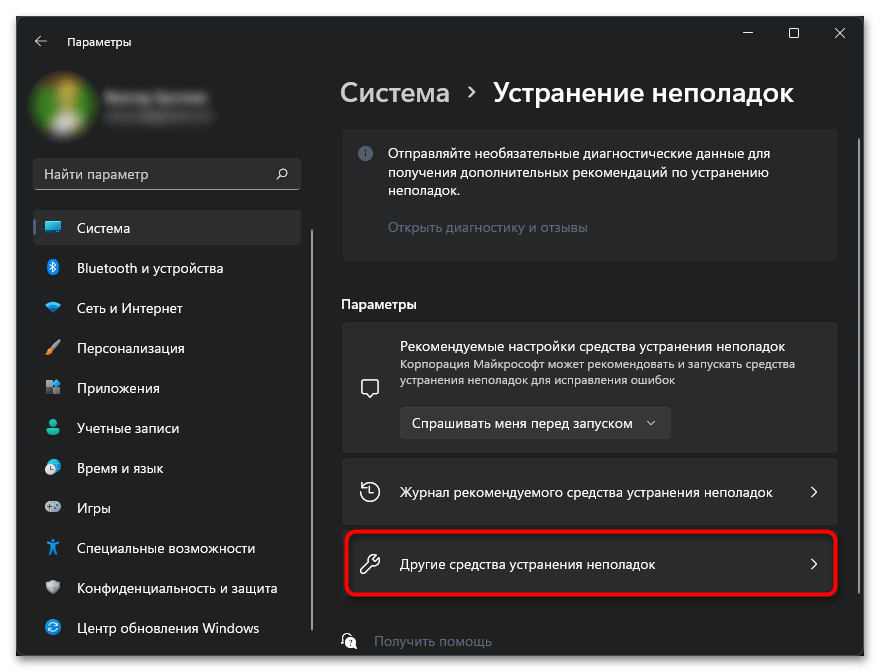
Начнем с самого простого метода решения ошибки с текстом «Служба автонастройки беспроводной сети WlanSvc не запущена», который требует от пользователя минимального количества действий, а все настройки происходят в автоматическом режиме. Метод заключается в использовании штатного средства поиска и устранения неполадок, а выглядит он следующим образом:
- Откройте меню «Пуск» и через него перейдите в «Параметры».
- На панели слева выберите раздел «Система» и отыщите плитку с названием «Устранение неполадок», по которой и щелкните левой кнопкой мыши.
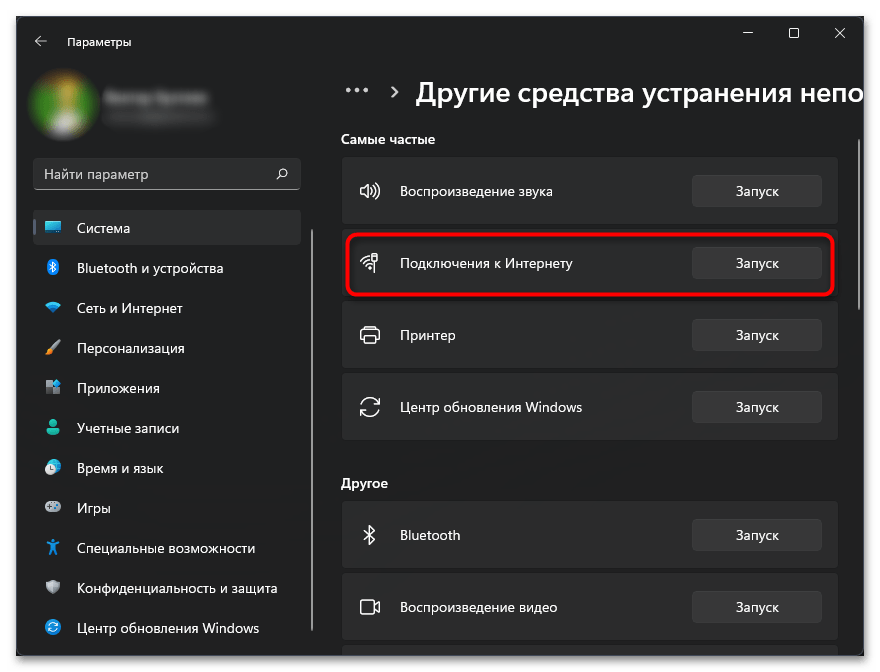
- Изначально нужный инструмент не отображается в окне, поэтому понадобится перейти в раздел «Другие средства устранения неполадок».
- Отыщите средство с названием «Подключения к Интернету» и запустите его.
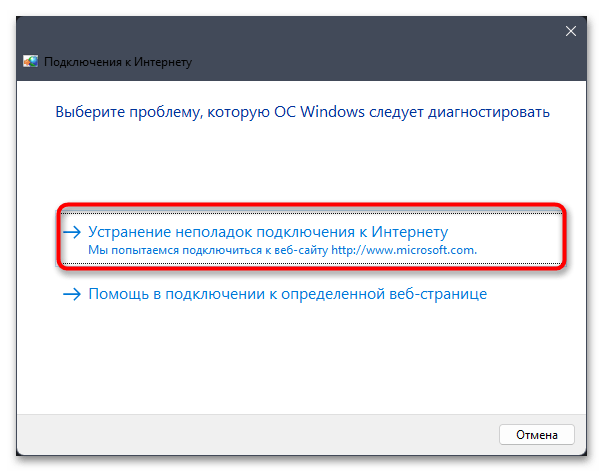
- В новом окне выберите пункт «Устранение неполадок подключения к Интернету», после чего ожидайте завершения анализа. В итоге появится уведомление, были ли найдены и решены какие-то ошибки. Если нет и интернет до сих пор отсутствует либо нельзя раздать Wi-Fi, переходите к следующим методам.


Способ 2: Ручное включение Wi-Fi на компьютере или ноутбуке
Следующий совет максимально банальный, однако в некоторых случаях проблема действительно заключается в отключенном Wi-Fi и неспособности средства автоматического устранения неполадок включить его. Проверка активности сети и ее включение в случае необходимости осуществляется буквально в несколько кликов. Сначала откройте меню «Параметры», выберите раздел «Сеть и Интернет» и обратите внимание на переключатель «Wi-Fi». Его необходимо перевести в состояние «Вкл.», чтобы активировать беспроводную сеть и обеспечить его работу.
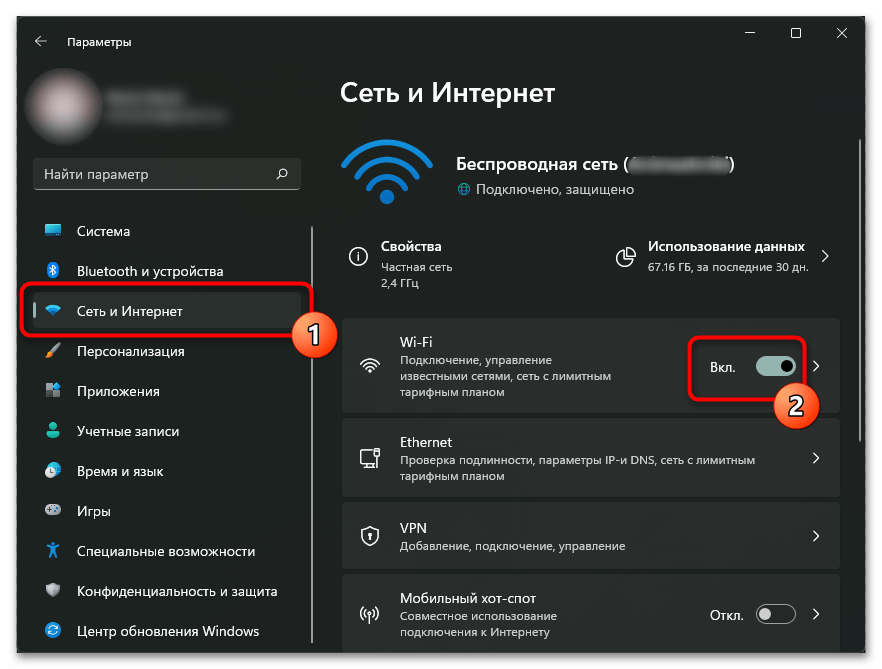
Отметим, что этот метод актуален только в том случае, если у вас вовсе отсутствует подключение к беспроводной сети, а не возникают проблемы исключительно с раздачей. После активации подключение к доступному Wi-Fi должно произойти автоматически, и уведомление «Служба автонастройки беспроводной сети WlanSvc не запущена» должно исчезнуть, если оно появлялось при попытке запуска браузера или передачи файлов по сети.
Способ 3: Включение сетевого адаптера
Если при попытке активировать сеть Wi-Fi вы не нашли соответствующую кнопку, а в списке сетевых подключений при открытии панели задач вовсе нет никаких адаптеров, скорее всего, необходимое устройство просто находится в отключенном состоянии. Это тоже может стать причиной рассматриваемой ошибки и проблем с доступом к сети, поэтому давайте проверим данную настройку и по необходимости исправим ее.
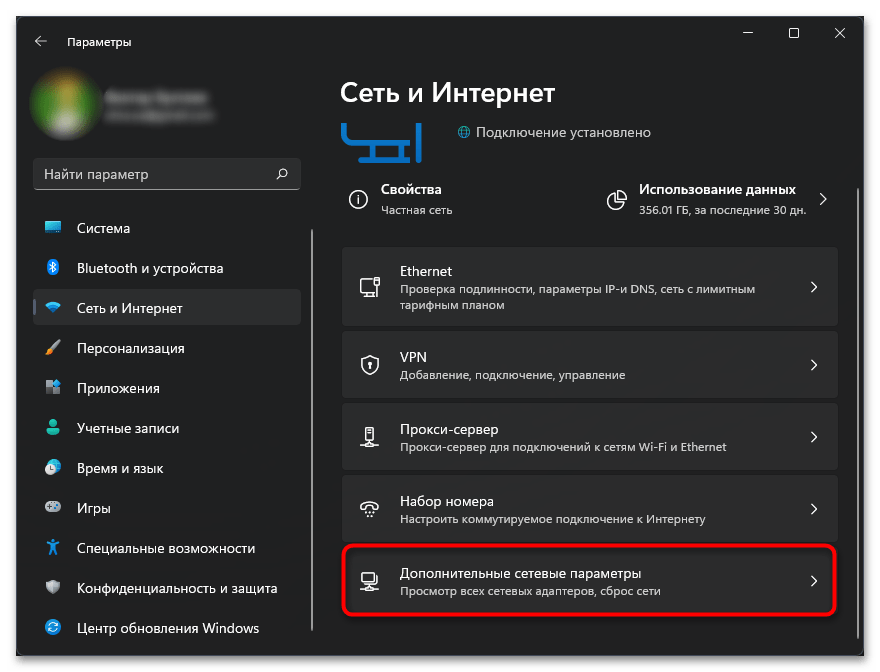
- В том же разделе «Сеть и Интернет» щелкните по плитке «Дополнительные сетевые параметры».
- На экране появится список всех сетевых адаптеров. Если среди них есть отключенный адаптер беспроводной сети, нажмите кнопку «Включить», находящуюся справа в блоке. После этого дождитесь подключения к сети и проверьте, пропала ли ошибка.

Способ 4: Ручной запуск службы
В некоторых случаях сетевые драйверы функционируют не совсем корректно, из-за чего служба автонастройки беспроводной сети WlanSvc не может быть запущена при попытке подключения к сети. Иногда ее настройка вовсе не подразумевает автоматический или ручной запуск. Проверить состояние службы и активировать ее можно самостоятельно, выполнив такие действия:
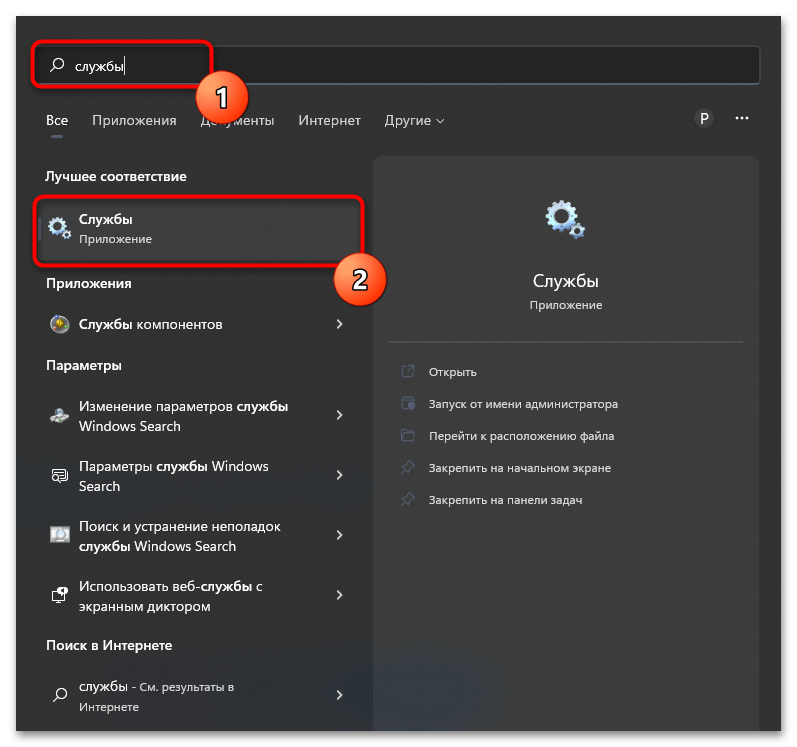
- Откройте меню «Пуск», через поиск отыщите приложение «Службы» и запустите его.
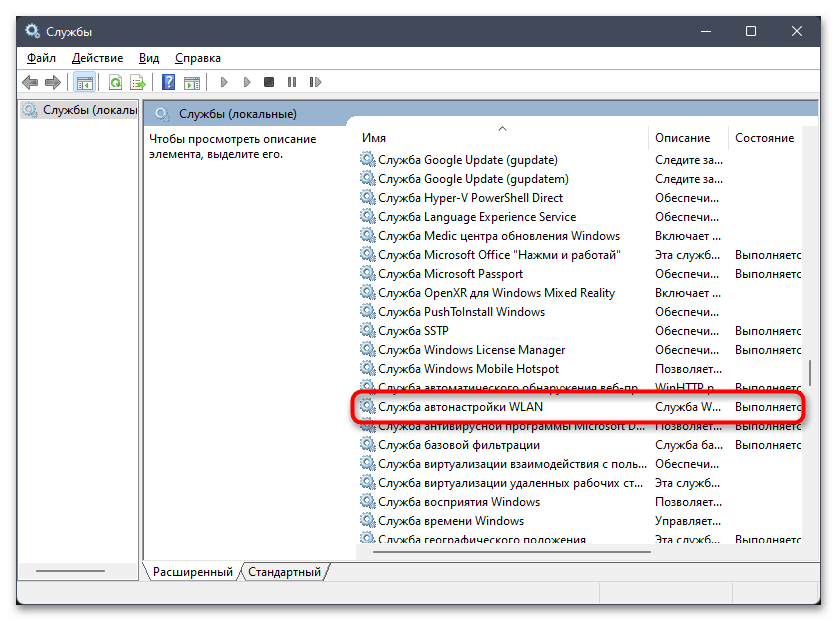
- Опуститесь по списку со службами, найдите строку «Служба автонастройки WLAN» и щелкните по ней дважды левой кнопкой мыши.
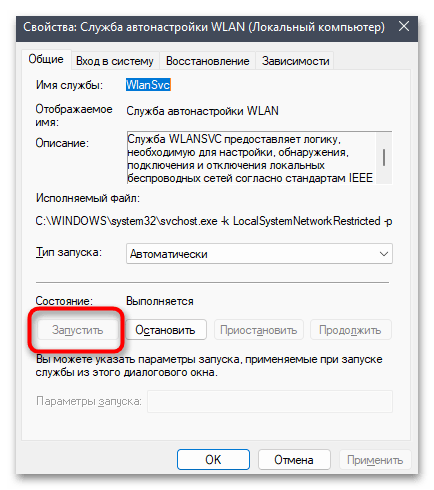
- Если в состоянии указано, что служба сейчас остановлена, вручную нажмите кнопку «Запустить».
- После этого убедитесь в том, что «Тип запуска» установлен «Автоматически». Если это не так, разверните соответствующий список и измените параметр.

Тем пользователям, кому метод управления службой через графическое меню не подходит или же возникают трудности при изменении параметров, советуем выполнить те же самые действия, но уже через «Командную строку». Понадобится ввести всего несколько простых команд, чтобы достичь нужного результата.
- Запустите «Командную строку» удобным для вас методом. Можно отыскать приложение через меню «Пуск» точно так же, как это уже было показано выше со «Службами».
- Сначала перейдите к оснастке
netsh, введя эту команду в консоли и нажав клавишу Enter. - В ней пропишите
wlanи снова нажмите Enter. - Теперь понадобится указать саму команду для запуска беспроводной сети. Выглядит она как
set autoconfig enabled=yes interface="Network_Name", где Network_Name — имя вашей беспроводной сети, при использовании которой и появляется рассматриваемая в этой статье ошибка.
Способ 5: Обновление сетевых настроек
Если ничего из перечисленного выше не помогло достичь нормальной работы беспроводной сети, попробуйте обновить сетевые настройки. Осуществляется это путем последовательного ввода нескольких простых команд в консоли. Давайте наглядно разберемся с выполнением данной операции.
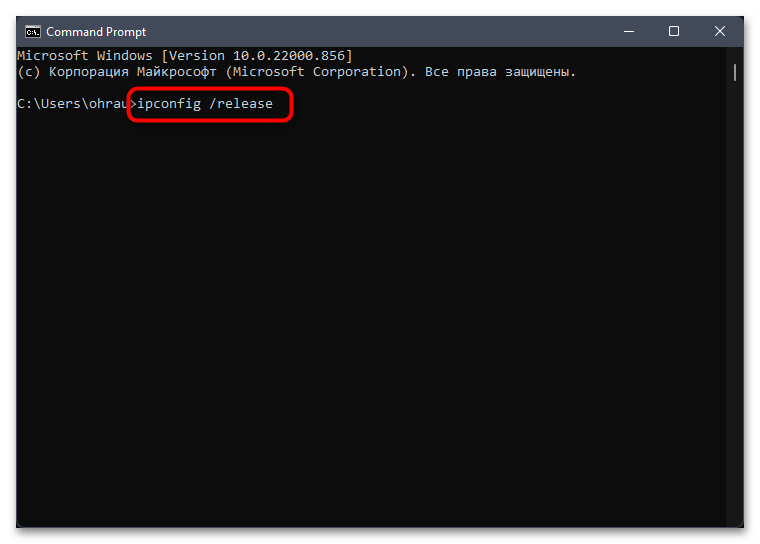
- Запустите «Командную строку». Если вы уже открыли ее, вводя команды для предыдущего метода, важно либо перезапустить консоль, либо предварительно написать команду
exit, иначе вы будете вводить команды в текущей оснастке (т. е. внутри netsh wlan) и они не будут работать. - Введите первую команду для анализа текущий сетевых настроек, которая выглядит как
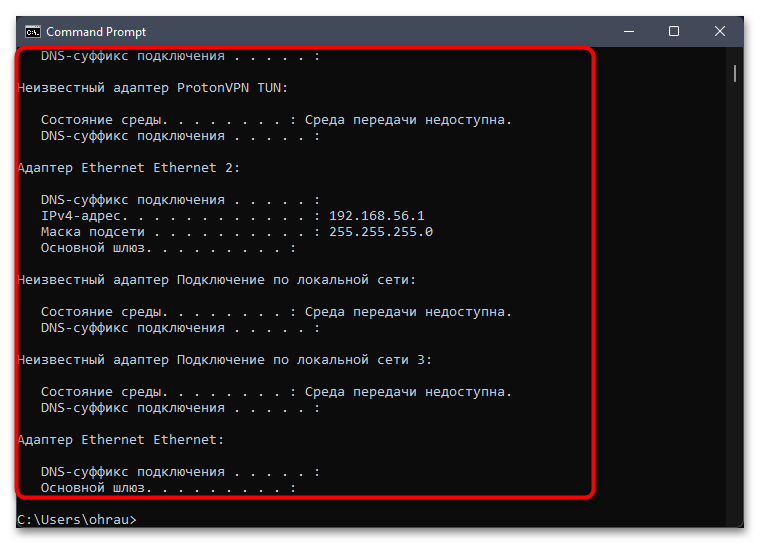
ipconfig /release. - Дождитесь загрузки информации обо всех подключенных сетевых адаптерах и переходите далее.
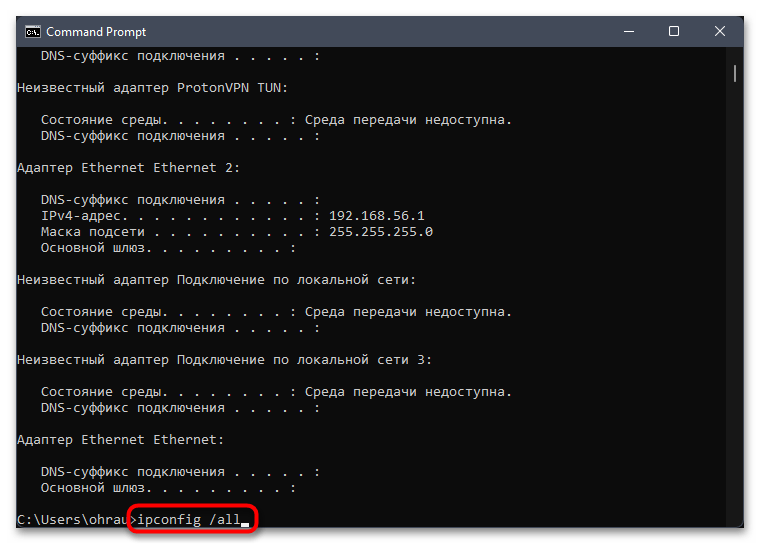
- В поле ввода сначала напишите команду
ipconfig /all, активируйте ее, затем укажитеipconfig /flushdnsиipconfig /renewпоследовательно. На этом процесс получения новых сетевых настроек завершен, вы можете дождаться подключения к Wi-Fi и проверить, не будет ли показываться больше рассматриваемая ошибка.
Способ 6: Сброс сетевых настроек
Этот метод уже более радикальный, нежели предыдущий, а также выполняется автоматически. Вам понадобится только подтвердить начало сброса и дождаться перезагрузки компьютера. После этого все параметры будут возвращены к стандартным, вам понадобится снова подключиться к Wi-Fi, введя пароль от сети, и проверить, будет ли работать интернет или его раздача на этот раз.
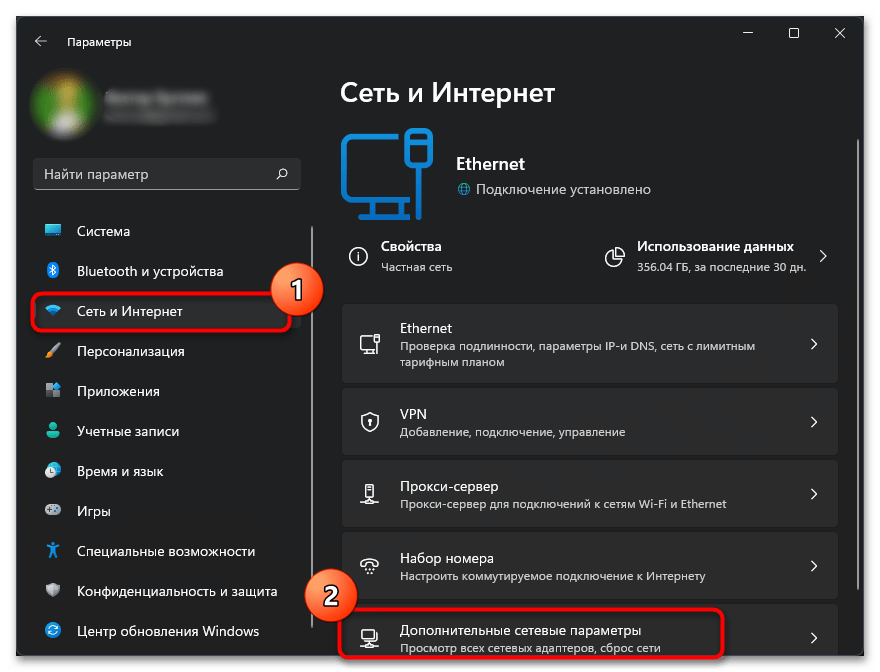
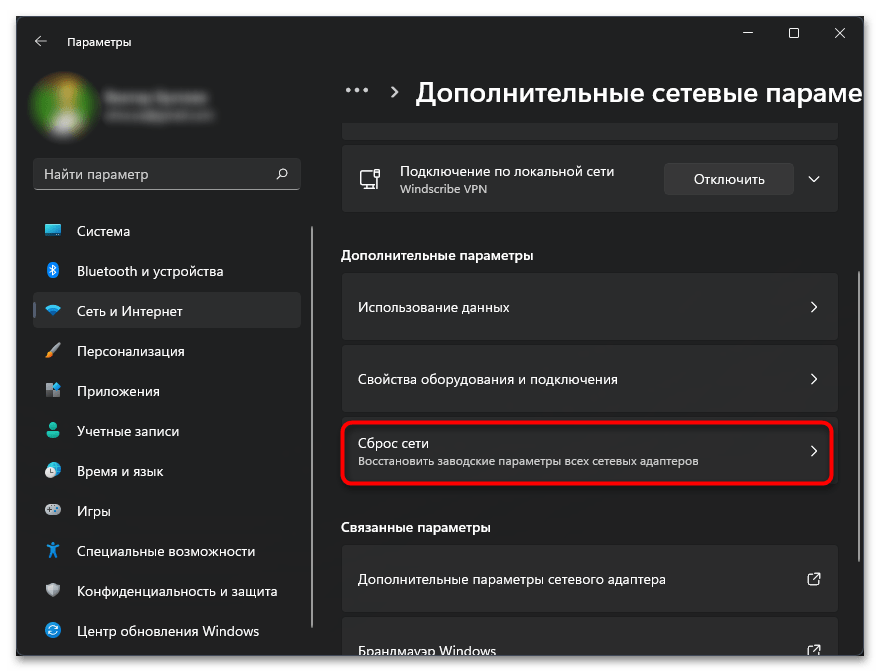
- Для сброса откройте меню «Параметры», на панели слева выберите раздел «Сеть и Интернет», после чего перейдите к категории «Дополнительные сетевые параметры».
- В блоке «Дополнительные параметры» нажмите по плитке «Сброс сети».
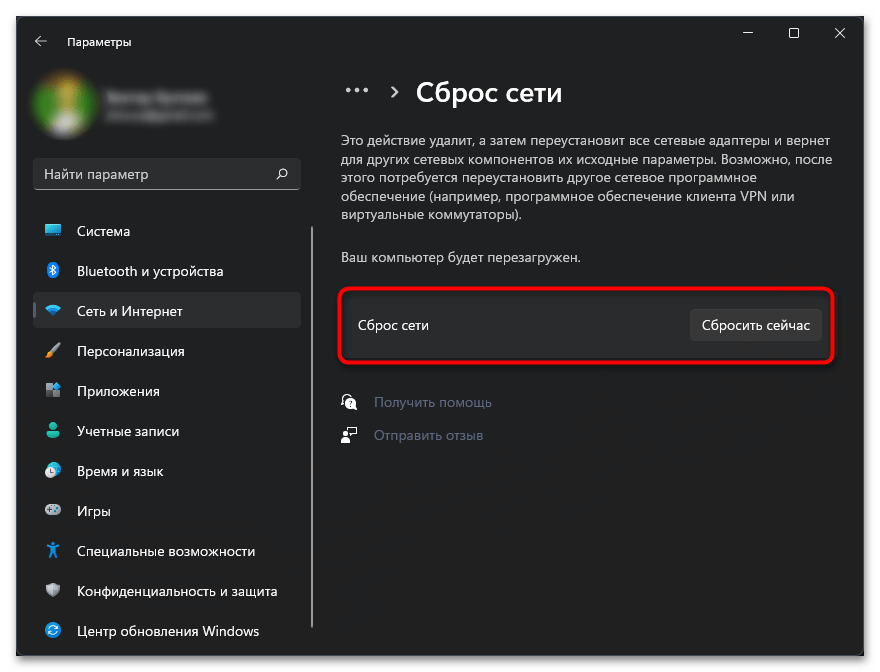
- Остается только щелкнуть по «Сбросить сейчас», подтвердить это действие и дождаться завершения настроек. Компьютер автоматически уйдет на перезагрузку, поэтому убедитесь в том, что завершили все свои важные процессы и сохранили в них изменения.
Способ 7: Проверка конфигурации системы
В операционной системе Windows есть отдельное меню «Конфигурация системы», в котором можно задать параметры запуска компьютера. В результате некоторых пользовательских действий Виндовс включается не в штатном режиме, а с отключенными службами, что и приводит к появлению ошибки с текстом «Служба автонастройки беспроводной сети WlanSvc не запущена». Давайте проверим эти настройки и поменяем их, если в этом будет необходимость.
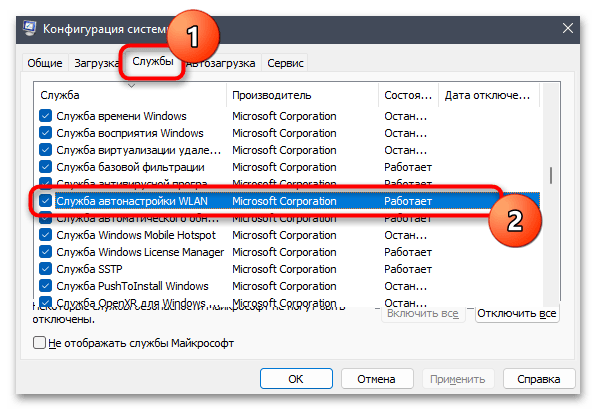
- Откройте утилиту «Выполнить», используя для этого сочетание клавиш Win + R. В поле ввода укажите
msconfigи нажмите Enter для подтверждения своего запроса. - Дождитесь загрузки окна «Конфигурация системы», в нем перейдите на вкладку «Службы», отыщите строку «Служба автонастройки WLAN» и убедитесь в том, что возле нее стоит галочка.
- Вернитесь на первую вкладку и обязательно выберите вариант «Обычный запуск», если сейчас маркер стоит возле другого пункта. Обязательно щелкните «Применить», чтобы сохранить изменения. После этого отправьте компьютер на перезагрузку.


Способ 8: Проверка связанных служб
Есть в Windows две службы, которые могут быть связаны с упоминаемой в тексте ошибки. Если их состояние работы отличается от необходимого, возникает разбираемая проблема, мешающая раздаче интернета или подключению к Wi-Fi. Случается такое редко, но если ничего из предложенного выше не помогло, стоит проверить и эту службу.
- Откройте меню «Пуск», через поиск отыщите приложение «Службы» и запустите его.
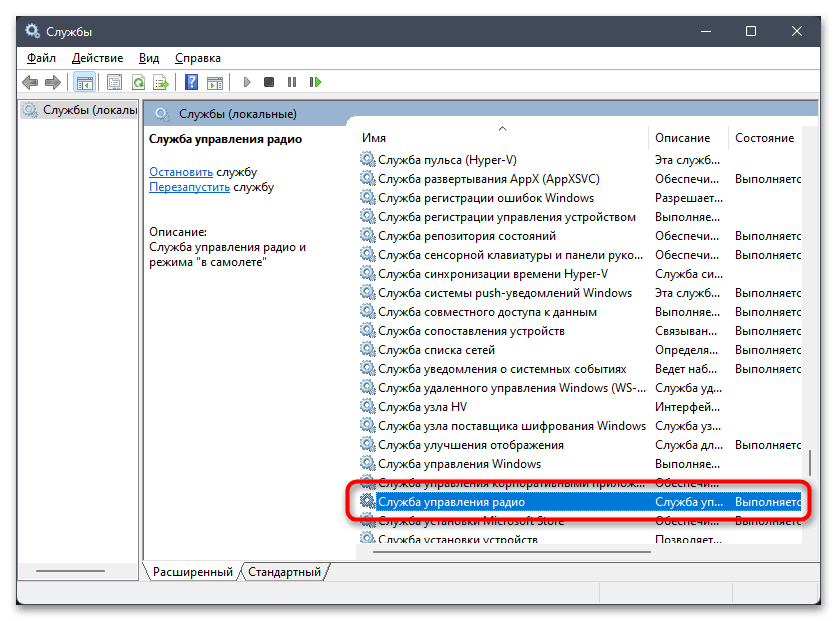
- Сначала найдите службу с названием «Журнал событий Windows» и убедитесь в том, что она имеет тип запуска «Автоматически». Если это не так, кликните по службе дважды ЛКМ и самостоятельно измените параметр.
- То же самое сделайте и со «Службой управления радио», но в этом случае тип запуска должен быть «Вручную». Если вы поменяли какие-либо настройки, рекомендуется перезагрузить ПК перед повторной попыткой подключения к Wi-Fi.


Способ 9: Установка последней версии сетевого драйвера
Напоследок оставили метод, который подразумевает установку обновлений для сетевого драйвера. Рассматриваемая проблема редко возникает из-за отсутствующих обновлений, но все же такое может случиться. Особенно подозрение падает на устаревшие драйверы, если ни один из предыдущих методов так и не принес должного результата. Мы предлагаем выбрать любой из способов установки драйверов для сетевой карты из статьи по ссылке ниже. Прочитайте инструкции и следуйте им, чтобы успешно справиться с поставленной задачей.
Подробнее: Поиск и инсталляция драйвера для сетевой карты

Наша группа в TelegramПолезные советы и помощь
509409
В комментариях часто задают вопросы, по поводу того, что ноутбук не видит Wi-Fi сети (хотя Wi-Fi включен), или не получается запустить раздачу Wi-Fi на ноутбуке. Очень часто, такие проблемы возникают из-за того, что отключена служба автонастройки WLAN. Есть в Windows такая служба, она управляет беспроводными подключениями. Так вот, если служба WlanSvc остановлена, то вы не сможете подключить компьютер к Wi-Fi, или запустить точку доступа на ноутбуке.
Если вы хотите просто подключить свой ноутбук к Wi-Fi сети, то из-за остановленной службы автонастройки WLAN, ноутбук просто не увидит доступные беспроводные сети. Будет статус «Нет доступных подключений». А при попытке раздать Wi-Fi с ноутбука, скорее всего появится ошибка «Не удалось запустить службу автонастройки WLAN (1068)». В любом случае, эту проблему необходимо как-то исправить. Нужно просто проверить, запущена ли на вашем компьютере данная служба. А если нет, то запустить ее, и установить в настройках автоматический запуск.
Я буду показывать как включить службу автонастройки WLAN в Windows 10. Но, если у вас Windows 7, 8 или даже Windows Vista, то все будет точно так же. Сам процесс не отличается.
Что такое служба автонастройки WLAN?
Если без сложных и скучных терминов, то данная служба в операционной системе Windows управляет всеми беспроводными соединениями (по Wi-Fi и Bluetooth). То есть, сервис WlanSvc отвечает за поиск, подключение, отключение и другие операции, которые необходимы для работы беспроводных подключений на ноутбуке. Понятно, что если данная служба остановлена, то Windows не сможет увидеть доступные беспроводные сети, и не сможет к ним подключится.
Так же может быть проблема при попытке запустить раздачу Wi-Fi сети в командной строке Windows. Если эта служба остановлена, то появится ошибка: «Служба автонастройки беспроводной сети (wlansvc) не запущена».
В принципе, это все что нам нужно знать о службе автонастройки WLAN. В системе, эта функция по умолчанию всегда включена. Вы спросите, а почему тогда ее нужно включать? Все очень просто, в интернете есть много инструкций, где советуют отключать данную службу, «чтобы компьютер работал быстрее». Так же, службу могут отключить некоторые программы, особенно это любят делать разные оптимизаторы системы. А если у вас установлен не оригинальный образ Windows, а сборка, то служба может быть отключена сразу после установки системы.
Да, если вы не подключаете свой компьютер к беспроводным сетям, то эта служба вам не нужна, компьютер будет отлично работать и без нее. Но, это не повод, чтобы отключать ее.
Как включить службу автонастройки WLAN в Windows 10, 8, 7
Нажимаем на клавиатуре сочетание клавиш Win + R. Появится окно «Выполнить». Вводим команду «services.msc«, и нажимаем «Ok».

Дальше, в списке находим нужную нам «Служба автонастройки WLAN», нажимаем на нее правой кнопкой мыши, и выбираем «Свойства».
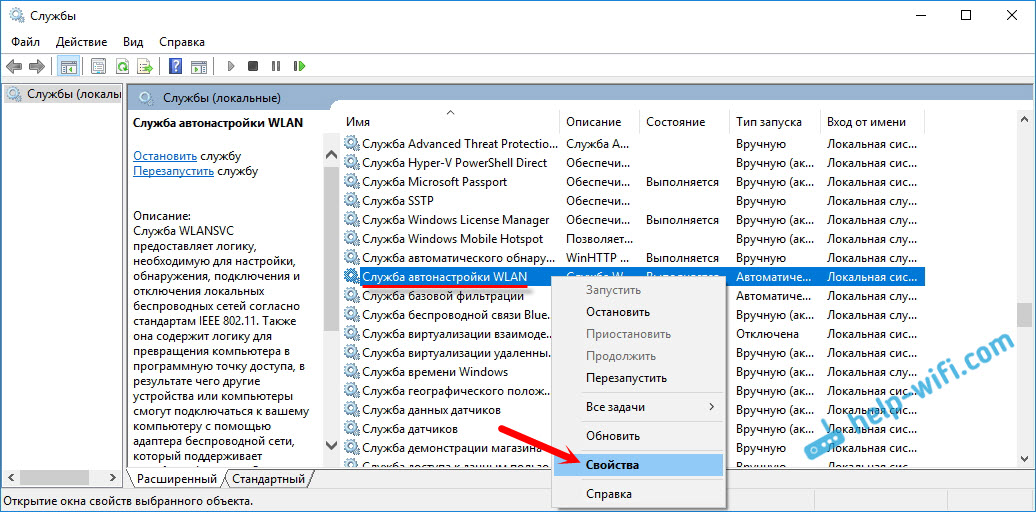
Ставим «Тип запуска» – «Автоматически». Нажимаем кнопку «Ok», и «Применить».

Перезагрузите компьютер. После этих действий все должно заработать.
Что делать, если служба WlanSvc не запускается?
Если вы столкнулись с тем, что служба автонастройки WLAN не запускается, то проблема может быть в том, что сам сервис отключен полностью. Давайте проверим, и включим его.
Снова нажимаем сочетание клавиш Win + R, но на этот раз вводим «msconfig«, и нажимаем «Ok».

Находим в списке нужную нам службу, и смотрим, стоит ли возле нее галочка. Если нет, то поставьте, нажмите «Ok», и «Применить».

Перезагрузите компьютер.
Обновление: включаем «Обычный запуск», если появляется ошибка 1068
Этим решением с нами поделились в комментариях. Оно очень простое и помогло избавится от ошибки 1068 при запуске службы WLAN. Нажмите на клавиатуре сочетание клавиш Win + R, скопируйте в соответствующую строку команду msconfig и нажмите Ok.
Установите вариант запуска «Обычный запуск», нажмите на кнопку «Применить» (должна быть активна) и «Ok».

Выполните перезагрузку компьютера.
Обновление: проверьте другие службы
Проверьте статус следующих служб:
- Журнал событий Windows (тип запуска — Автоматически)
- Служба управления радио (тип запуска — Вручную).
Если эти советы не помогли вам решить возникшую проблему, то опишите ее подробно в комментариях. Если проблема с подключением к Wi-Fi, то посмотрите статью почему ноутбук не подключается к Wi-Fi. А если вы зашли на эту страницу, чтобы найти решение проблемы с раздачей Wi-Fi с ноутбука, и описанный выше способ не помог, то посмотрите решения в этой статье.
The WLANSVC service provides the logic required to configure, discover, connect to, and disconnect from a wireless local area network (WLAN) as defined by IEEE 802.11 standards. It also contains the logic to turn your computer into a software access point so that other devices or computers can connect to your computer wirelessly using a WLAN adapter that can support this. Stopping or disabling the WLANSVC service will make all WLAN adapters on your computer inaccessible from the Windows networking UI. It is strongly recommended that you have the WLANSVC service running if your computer has a WLAN adapter.
Default Settings
| Startup type: |
|
||||||||||||||||||||||||||||||||||||||||||||||||||||||||||||||||||||||||||||||||||||||||||||||||||||||||
| Display name: | WLAN AutoConfig | ||||||||||||||||||||||||||||||||||||||||||||||||||||||||||||||||||||||||||||||||||||||||||||||||||||||||
| Service name: | Wlansvc | ||||||||||||||||||||||||||||||||||||||||||||||||||||||||||||||||||||||||||||||||||||||||||||||||||||||||
| Service type: | own | ||||||||||||||||||||||||||||||||||||||||||||||||||||||||||||||||||||||||||||||||||||||||||||||||||||||||
| Error control: | normal | ||||||||||||||||||||||||||||||||||||||||||||||||||||||||||||||||||||||||||||||||||||||||||||||||||||||||
| Group: | TDI | ||||||||||||||||||||||||||||||||||||||||||||||||||||||||||||||||||||||||||||||||||||||||||||||||||||||||
| Object: | LocalSystem | ||||||||||||||||||||||||||||||||||||||||||||||||||||||||||||||||||||||||||||||||||||||||||||||||||||||||
| Path: | %SystemRoot%\system32\svchost.exe -k LocalSystemNetworkRestricted -p | ||||||||||||||||||||||||||||||||||||||||||||||||||||||||||||||||||||||||||||||||||||||||||||||||||||||||
| File: | %SystemRoot%\System32\wlansvc.dll | ||||||||||||||||||||||||||||||||||||||||||||||||||||||||||||||||||||||||||||||||||||||||||||||||||||||||
| Registry key: | HKEY_LOCAL_MACHINE\SYSTEM\CurrentControlSet\Services\Wlansvc | ||||||||||||||||||||||||||||||||||||||||||||||||||||||||||||||||||||||||||||||||||||||||||||||||||||||||
| Privileges: |
|
Default Behavior
WLAN AutoConfig is a Win32 service. It is starting only if the user, an application or another service starts it in all editions of Windows 10 1507, Windows 10 1511, Windows 10 1607, Windows 10 1703, Windows 10 1709, Windows 10 1803, Windows 10 1809, Windows 10 1903, Windows 10 2004, Windows 10 20H2, Windows 10 21H1, Windows 10 22H2. This service is starting automatically when the operating system starts in all editions of Windows 10 21H2.
When the WLAN AutoConfig service is started, it is running as LocalSystem in its own process of svchost.exe. If WLAN AutoConfig fails to start, the failure details are being recorded into Event Log. Then Windows 10 will start up and notify the user that the Wlansvc service has failed to start due to the error.
Dependencies
WLAN AutoConfig cannot be started under any conditions, if the following services are disabled, deleted or working improperly:
- NativeWiFi Filter
- NDIS Usermode I/O Protocol
- Remote Procedure Call (RPC)
- Windows Connection Manager
Restore Default Startup Configuration of WLAN AutoConfig
Before you begin doing this, make sure that all the services on which WLAN AutoConfig depends are configured by default and function properly. See the list of dependencies above.
1. Run the Command Prompt as an administrator.
2. Depending on the version of your operating system, copy the commands below, paste them into the command window and press ENTER.
For Windows 10 1507 Home, Windows 10 1507 Pro, Windows 10 1507 Education, Windows 10 1507 Enterprise, Windows 10 1511 Home, Windows 10 1511 Pro, Windows 10 1511 Education, Windows 10 1511 Enterprise, Windows 10 1607 Home, Windows 10 1607 Pro, Windows 10 1607 Education, Windows 10 1607 Enterprise, Windows 10 1703 Home, Windows 10 1703 Pro, Windows 10 1703 Education, Windows 10 1703 Enterprise, Windows 10 1709 Home, Windows 10 1709 Pro, Windows 10 1709 Education, Windows 10 1709 Enterprise, Windows 10 1803 Home, Windows 10 1803 Pro, Windows 10 1803 Education, Windows 10 1803 Enterprise, Windows 10 1809 Home, Windows 10 1809 Pro, Windows 10 1809 Education, Windows 10 1809 Enterprise, Windows 10 1903 Home, Windows 10 1903 Pro, Windows 10 1903 Education, Windows 10 1903 Enterprise, Windows 10 1909 Home, Windows 10 1909 Pro, Windows 10 1909 Education, Windows 10 1909 Enterprise, Windows 10 2004 Home, Windows 10 2004 Pro, Windows 10 2004 Education, Windows 10 2004 Enterprise, Windows 10 20H2 Home, Windows 10 20H2 Pro, Windows 10 20H2 Education, Windows 10 20H2 Enterprise, Windows 10 21H1 Home, Windows 10 21H1 Pro, Windows 10 21H1 Education, Windows 10 21H1 Enterprise, Windows 10 22H2 Home, Windows 10 22H2 Pro, Windows 10 22H2 Education, Windows 10 22H2 Enterprise:
sc config Wlansvc start= demand
For Windows 10 21H2 Home, Windows 10 21H2 Pro, Windows 10 21H2 Education, Windows 10 21H2 Enterprise:
sc config Wlansvc start= auto
sc start Wlansvc
3. Close the command window and restart the computer.
The Wlansvc service is using the wlansvc.dll file that is located in the C:\Windows\System32 directory. If the file is removed or corrupted, read this article to restore its original version from Windows 10 installation media.
Welcome to System Administrator training tutorials by CoreNetworkZ Tech Solutions. Today, I will explain the importance and working of WLANSVC service in the Windows Operating System.
So, let me start this tutorial by explaining the WLANSVC service. It is a Microsoft utility that assists the PC to discover and manage wireless networks. It is also known as WLAN AutoConfig.
Duties of WLANSVC Service
Martin Johnson suggested starting this tutorial by referring to the duties of Windows WLANSVC Service.
Martin Johnson is a senior System Administrator at CoreNetworkZ Tech Solutions.
So, let me discuss the duties of WLAN AutoConfig service in this section.
The primary duty of WLAN AutoConfig Utility is to discover and connect to WiFi connections. WLAN AutoConfig service ( WLANSVC ) helps Windows computers discover a wireless network (802.11 standards) and connect to it.
The duty of this service is the same as that of Wireless Zero Configuration(WZC) in Windows XP.
Other duties of the WLANSVC (WLAN AutoConfig) service are maintaining the wireless connection, managing the WiFi profiles, and guiding the wireless adapters to work correctly.
I believe you are clear about the duties of this Windows Utility. So, let me go to the next section.
How To Detect a Failed WLANSVC (WLAN AutoConfig) service?
Julia Sebastian asked a question in the comments about finding a malfunctioned WLAN AutoConfig service in her laptop.
Well, it is simple. All you have to do is to ask this question.
Do you experience frequent problems with your Windows 11 laptop detecting wireless connections? If your answer is yes, I recommend you check the status of the WLAN AutoConfig service.
In my experience, we can fix most wireless connectivity issues by starting the WLAN AutoConfig service instead of vendor wireless utilities on a computer.
Windows 11, 10, and Vista devices use the WLANSVC service to manage wireless networks, and you can find it on the services window under the display name WLAN Autoconfig.
Martin Johnson mentioned that sometimes WLAN AutoConfig does not start automatically for strange reasons. It then leads to issues with detecting WiFi networks.
I explained the best method to find out a malfunctioning WLANSVC. There is one more way to detect it.
I noticed a quick Microsoft notification on a few devices saying, ‘The wireless autoconfig service (wlansvc) is not running.’
So, how do we fix this problem?
The quick solution is to restart this service.
So, we may need to go to the service page and start this service manually. This tutorial tells how to run it on a computer in different ways.
I believe I have answered Julia’s question in this section. So, let us go to the next section of this tutorial.
Different Methods to Start WLAN AutoConfig Service On Local Windows Computer.
I will teach you two ways to restart a stopped WLAN AutoConfig service. They are:
-
Start WLANSVC service from the Services page
-
Start WLANSVC service from the Command Prompt
Let us check how to fix the problem if Windows cannot start the WLAN AutoConfig Service automatically. I will explain each method in detail below.
How to Start WLAN AutoConfig From the Microsoft Services Window?
This section covers the steps to restart the wireless autoconfig service on a Windows device by accessing the services window. As per Martin Johnson and me, it is the easiest method for people from nontech backgrounds.
- Type services.msc on Search.
- Click Services when shown in Search.
- Right-Click on the WLAN AutoConfig from the list of services listed. You may check the bottom of the list for it.

- Click Start to run WLAN AutoConfig(WLANSVC Service)


Joyce Mathews, one of our readers, asked how to ensure the above steps worked on her Windows 11 computer. Her doubt is genuine, and let me answer her.
Once you start WLAN AutoConfig(WLANSVC Service) on your computer, it will begin to discover available WiFi networks in your area.
You have learned how to run the wlansvc service from the services window. There is one more method to do it apart from the GUI method. I will explain that in the next section.
- Advantages of Using Wireless N over Wireless G
- How to Display ARP cache On A Computer?
- Duties of IEEE 802.2 Logical Link Control (LLC)
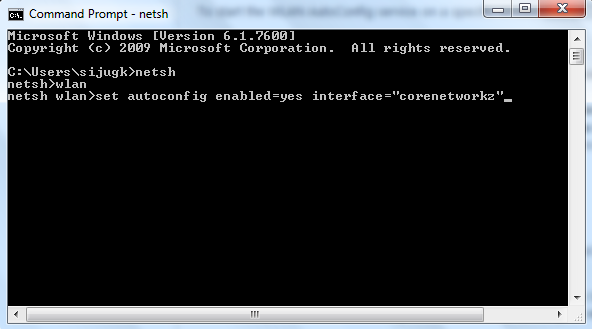
How To Start WLAN AutoConfig Service From the Command Prompt?
Let me explain the second method to start the wlansvc service on a Windows 11 PC. Here, I will teach you how to run wlansvc in cmd.
There is a DOS command to activate this service.
However, we must have the administrative right to run this command because the DOS prompt must run as administrator. I believe it is better to explain this method with a practical example. I will start wlansvc service on my Windows 11 laptop from CMD.
- Start Command Prompt as Administrator
- Type cmd on Windows Search.
- Right Click the Command Prompt, and click the option Run as Administrator.
- Type cmd on Windows Search.
- Type netsh and press the Enter key.
- Type wlan and press the Enter key.
- Start Wlansvc for a Wireless interface
It is the DOS Prompt command to start Wireless service on your Windows 11, 10, and Vista computer.
set autoconfig enabled=yes interface=»Name of Wireless Network Connection«
You must specify the name of the wireless connection as the interface. Here on the image, I typed the name of WiFi network corenetworkz.
- Press enter after entering the command prompt command to start WLAN AutoConfig on your computer to finish the process.

To read more about the Command Prompt commands to activate WLAN AutoConfig, visit the link below.
Where is WZC On Windows 11 Computers?
After compiling this tutorial, I have received inquiries from readers asking what happened to the Wireless Zero Configuration (WZC) service in newer versions of Windows Operating Systems.
- Hindi Letters in a Domain Name
- Show Personal Tour as Business Travel Expenses
- Uses of Network Adapter Flow Control
- Tools to Check Internet Connection Speed
We no longer see WZC on Windows 8, 7, and Vista computers because the WLAN AutoConfig service displaced WZC. So, if you are looking for steps to find and start WZC (Wireless Zero Config) on them, you must look for WLAN AutoConfig instead.
If you are not using Windows 7 or Windows 8 but running XP on your computer, visit the link below to learn how to find and start WZC.
I guess it is time to conclude this tutorial. This article explained the steps to start the WLAN AutoConfig service in Windows 11. To further learning, I suggest the following references.
Reference
- https://www.systosys.com/viewtopic.php?t=75
- https://learn.microsoft.com/en-us/previous-versions/windows/it-pro/windows-server-2012-r2-and-2012/hh994698(v=ws.11)
- https://community.intel.com/t5/Wireless/WLAN-AutoConfig-service/td-p/328246
- https://h30434.www3.hp.com/t5/Notebook-Wireless-and-Networking/LAN-WLAN-switching/td-p/7870576