
Прежде всего необходимо создать файл с расширением bat.
В этом файле написать следующий код:
C:\Users\user\PycharmProjects\venv\Scripts\python.exe C:\Users\user\PycharmProjects\avtozapusk\citaty.py
pause
Где мы сначала указываем путь, где находится python, далее путь к скрипту, который хотим запускать.
Следующая строка — это команда pause — остановка командной строки.
После этого идем в Планировщик заданий, в который можно попасть через Пуск.
В Планировщике заданий наводим мышкой на Библиотеку планировщика и кликаем правой кнопкой мыши, чтобы появилось меню. Там выбираем пункт: Создать простую задачу…

В появившемся окне зададим имя скрипту, а также, если есть желание, описание. После чего кликаем на кнопку Далее.

В следующем окне выберем как часто хотим запускать наш скрипт, в нашем случае выберем ежедневно. И вновь жамкаем на кнопку Далее.

На следующем шаге укажем время, в которое хотим запускать наш python-скрипт.

Выберем какую задачу хотим выполнить, в нашем примере — это Запустить программу.

В следующем окне укажем, расположение созданного нами файл с расширением .bat.

И в последнем окне кликаем на кнопку «Готово!»

На этом все. Если возникнуть сложности или остались вопросы — пишите в комментариях.
Problem
In recent years, there has been a proliferation of Python applications for performing routine tasks, such as web scraping, data cleansing, and ETL processing. These routine jobs may need to run at scheduled times. Task Scheduler, a job scheduler in Microsoft Windows, allows us to run a task at a specific time or when an event occurs. In addition, Windows Event Viewer (sometimes called the event log) stores everything that happens in the operating system. Therefore, it seems reasonable to use Task Scheduler to run Python scripts and then employ Windows Event Viewer to check the Python script execution history. So, how can we use all these techniques to automate routine tasks using Python on Windows?
Solution
The tip “Creating a SQL Server Agent Job to Run Python Scripts in a Virtual Environment” introduces a method to enable a SQL Server Agent job to run a batch file, which executes a Python script. This method uses the batch file to handle an exit code from Python script execution. Besides SQL Server Agent, Windows Task Scheduler can run an executable file automatically at a specific time. However, Windows Task Scheduler does not handle the exit code from Python script execution the same way as SQL Server Agent. For example, the task scheduler does not show any error or warning when abnormal execution throws an exception or exits with a non-zero exit code. To make a failure in the task execution noticeable to IT professionals, we can trigger Windows Task Scheduler to run another task when the task scheduler detects a specific exit code. We also can create custom event views to check the task execution logs.
To exhibit the process of creating an automated task using Windows Task Scheduler and examining the execution status through Windows Event Viewer, we use the project introduced in the author’s other tip (Zhou, 2021). The project asks us to download data from an HTML table to an SQL Server database table every day. Rather than exploring the steps to install Python on Windows, create a Python virtual environment, and organize application files on a server, this article focuses on using Windows Task Scheduler and Windows Event View.
This article consists of three sections. Section 1 first tells us how to run the Python script in a virtual environment. The section then explores creating an automated task in Task Scheduler. Next, we create two other scheduled tasks triggered by the Python script exit codes. Section 2 starts with a brief introduction to Windows Event Viewer. We then create two custom event views to check Python script execution status. Next, in Section 3, we let Task Scheduler automatically run the task to download data from the web page, and we then check if any error happened in Python script execution.
The author tested the project on Windows 10 Pro 10.0 <X64> and ran the Python script with Python 3.10.0 (64-bit). The DBMS is the Microsoft SQL Server 2019 Developer Edition (64-bit). The database table is created by using SQL Server Management Studio 15.0.18338.0. In addition, Notepad++ v8.1.9.2 (64-bit) is used to edit the XML queries for creating custom event view filters.
1 –Scheduling Python Scripts Using Windows Task Scheduler
Windows Task Scheduler is one of the most practical Windows applications (Dinita, 2021). The application enables us to configure and schedule automated tasks. In this section, we create a scheduled task to run a Python script in a virtual environment, and we also want to use Task Scheduler to check Python script execution status. So, we create another two event-triggered tasks to satisfy this requirement. The event-triggered task runs when the Python script exits with code 1 or 2. We then can examine the event logs to know if the Python script runs successfully.
1.1 Prerequisite
We follow the steps in the tip “Creating a SQL Server Agent Job to Run Python Scripts in a Virtual Environment” to install Python on Windows. Next, we click here to download the complete source code. We then use the “requirements.txt” in the downloaded package to create a virtual environment in the “C:\pyvirtuals\htmltablescraping” folder. We put the Python file in the “C:\pyapps\htmltablescraping” folder. We also need to create a database table and configure the connection string in the Python script. Note the following two functions in the Python script, “read_web_page_content()” and “save_html_table_data()”, may exit the program with two codes 1 and 2, respectively.
We use the following command to run the Python script several times. The function “read_web_page_content()” has a 50% chance of failing. The other function, “save_html_table_data(),” fails if we have already downloaded data into the database table. Figure 1 illustrates the output of the program execution.
C:\pyvirtuals\htmltablescraping\Scripts\python.exe C:\pyapps\htmltablescraping\HTML_Table_Scraping.py

Figure 1 The Python Program Exits with Error Message
Since the two exit codes represent failures in executing these two functions, respectively, we can use the event which action completed with a non-zero return code to trigger another two tasks, “failed to access web page” and “failed to save data.” We then know the Python script has not run successfully if one of these two tasks started. Now, let us create a task to run the Python script every day.
1.2 Creating an Automated Task in Windows Task Scheduler
There are several ways to create an automated task using Windows Task Scheduler. For example, we can create a task using either the basic or advanced setting (Huculak, 2019). The basic setting provides us a wizard to create a task; therefore, creating a basic task is convenient for beginners. In this article, we walk through steps to create a basic task.
1.2.1 Launch Windows Task Scheduler
To launch Windows Task Schedule, we first need to ensure that the task scheduler service is running. We use the «Windows + R» keyboard shortcut to open the «Run» command window (Roe, 2020). We then enter the command «services.msc» in the “Open” box, as shown in Figure 2.

Figure 2 Open the Run Command Window
Click on the “OK” button to open the services window, as shown in Figure 3. The task scheduler service should have a «Running» status. We then close the services window.

Figure 3 The Services Window
We use the «Windows + R» keyboard shortcut to access the «Run» command window again. This time, we then enter the command «taskschd.msc» in the “Open” box (Neagu, 2018). Next, click on the “OK” button to launch Windows Task Scheduler. Under the “Task Scheduler (Local)” root, expand the “Task Scheduler Library” folder. The window should look like Figure 4. The middle pane shows a list of tasks, and the “Actions” pane is on the left.

Figure 4 The Task Scheduler Window
1.2.2 Create a Schedule Folder
Under the “Task Scheduler Library” main folder, several folders arrange all tasks into different groups. We want to create a new folder, “MSSQLTips,” for this project. Select the “Task Scheduler Library” folder and click on the “New Folder…” from the “Actions” pane. A dialog appears. We enter “MSSQLTips” in the “Name” box, as shown in Figure 5.

Figure 5 Create a New Folder
Click on the “OK” button to close the dialog. We should see the new folder under the main folder, “Task Schedule Library.” When clicking on the new folder, we can observe that the task list in the middle pane is empty, as shown in Figure 6.

Figure 6 View Tasks in the New Folder
1.2.3 Create a Basic Task
We select the “MSSQLTips” folder. In the “Action” pane, click on “Create Basic Task…” to open the “Create Basic Task Wizard” dialog. We enter the text “Download HTML Table” in the Name field. Then, the “Next” button becomes enabled. The “Description” box is optional. When creating a task on a production server, we should use this box to introduce the task. The dialog should look like Figure 7 . Click on the “Next” button to move to the next step.

Figure 7 Create a Basic Task
1.2.4 Create a Trigger
In the “Task Trigger” dialog, select the “Daily” option, as shown in Figure 8. If a required frequency, such as Hourly, is not in the list, we can select the “Daily” option for now and come back to edit the trigger.

Figure 8 Create a Trigger
Click on the “Next” button to open a new dialog to specify the start date and time. First, we enter a date and time, as shown in Figure 9. We then click on the “Next” button to move to the “Action” dialog.

Figure 9 Specify the Start Date and Time to Run the Task
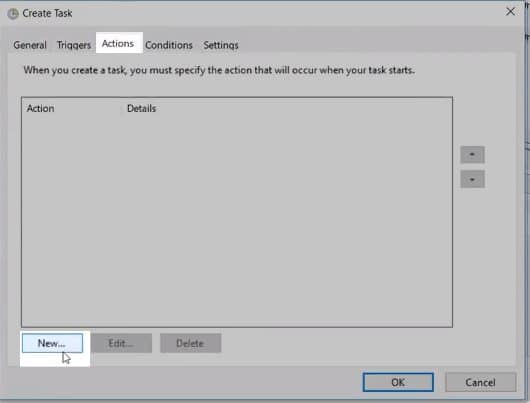
1.2.5 Define an Action
In the “Action” dialog, we select the “Start a program” option, shown in Figure 10. We then click on the “Next” button to open a new dialog.

Figure 10 Define an Action
The title of the new dialog is “Start a Program,” in which we can tell the task to run which program. We enter “C:\pyvirtuals\htmltablescraping\Scripts\python.exe” in the “Program/script” field and enter “C:\pyapps\htmltablescraping\HTML_Table_Scraping.py” in the “Add arguments(optional)” field. Then, the “Next” button becomes enabled. The dialog should look like Figure 11. We click on the “Next” button to complete the action definition.

Figure 11 Specify a Program for the Task to Perform
1.2.6 Complete Creating the Task
After defining the action, we arrive at the “Summary” dialog. Select the “Open the Properties dialog for this task when I click Finish” option. The dialog should look like Figure 12. Click on the “Finish” button to open the “Properties” dialog.

Figure 12 Task Summary
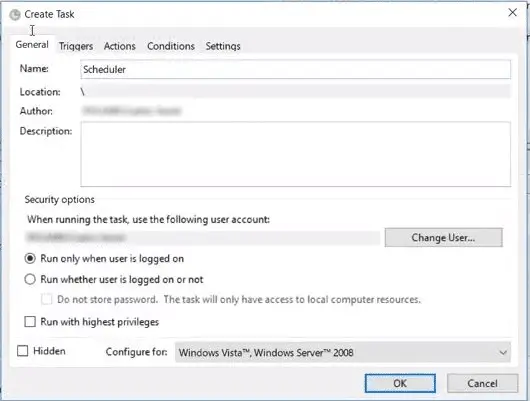
1.2.7 Configure the Task Security
Under the “Security options” section in the “Properties” dialog, we select the “Run whether user is logged on or not” option and select the “Run with highest privileges” option. The dialog should look like Figure 13.

Figure 13 Configure the Task Security
Click on the “OK” button. A pop-up window, shown in Figure 14, appears and asks us to enter the password for the user account that runs the task.
Figure 14 Enter User Account Information for Running this Task
Enter the password and click on the “OK” button to complete the creating task process. Now we can see the new task in the “MSSQLTips” folder, as shown in Figure 15.

Figure 15 Complete Creating a Scheduled Task
1.2.8 Run the Task Manually
Select the new task and then click on the “Run” button in the “Actions” pane. The status of this task, shown in the middle pane, changes to “Running.” To ensure the task is complete, we can click on the “Refresh” button in the “Actions” pane. When the task status changes to “Ready,” the task is complete.
We can also examine the “Last Run Result” column to determine the Python script execution status. The value in this column indicates the return code. For example, the value “0x1” representing a hexadecimal value of 0x80070001 implies the return code 1 from the program execution. When converting the HEX value into a decimal format, the return value is 2147942401. Likewise, the value “0x2” representing HEX 0x80070002 implies the return code should be 2. The HEX value is 2147942402 in decimal format.
We repeat the process several times and write down the “Last Run Result” values. Then, after observing return codes “0x1” and “0x2,” we switch to the “History” tab and select an event “Action Completed” (Event ID: 201), as shown in Figure 16. The return code is 2147942401, which means the function “read_web_page_content()” failed and exited with code 1. However, even though the Python execution throws exceptions, the Task Scheduler considers action completed successfully. Thus, it is not convenient for us to detect exceptions in Python execution by viewing task execution history.

Figure 16 The Function read_web_page_content() Failed and Returned Code 1
Switch to the “Details” tab. We can see more detailed information about the event log, as shown in Figure 17. These three properties, “TaskName,” “ActionName,” and “ResultCode,” help us to identify event logs of interest.

Figure 17 Details About an Event «Action Completed» Log
We can find another “Action Completed” log in the “History” tab, in which the return code is 2147942402. This return code indicates the Python user-defined function “save_html_table_data()” throws an exception.

Figure 18 The Function save_html_table_data() Exited the Program with Code 2
To make these Python script execution errors noticeable to IT professionals, we will create two other tasks in the “MSSQLTips” folder. These two tasks start to run only when the “MSSQLTips\Download HTML Table” task detects return codes 2147942401 and 2147942402, respectively.
1.3 Trigger Other Tasks Based on Exit Codes
In the preceding section, we created a trigger that starts a task at 10:00 PM every day. We call this trigger the time-based trigger. Another trigger type is the event-based trigger, which starts an action after a specific event (Dinita, 2021). In this section, we create the second task, “failed to access web page,” that starts to run when the “MSSQLTips\Download HTML Table” task detects return code 2147942401. Next, we create the third task, “failed to save data,” that starts to run when the task detects return code 2147942402. Therefore, we know the Python script execution status by viewing these two new tasks’ execution.
1.3.1 Create Another Two Basic Tasks
We follow the steps in Section 2.1 to create two basic tasks, “failed to access web page” and “failed to save data” in the “MSSQLTips” folder. Rather than using “python.exe” in the “Start a Program” dialog, we enter a meaningful fake program name, as shown in Figure 19. The action will fail since the fake program name is not an actual program. We use errors from these two tasks to imply exceptions in Python script execution.

Figure 19 Use a Fake Program Name to Fail the Task Intentionally
After we create the two new tasks, there should be three tasks in the “MSSQLTips” folder, as shown in Figure 20.

Figure 20 Three Tasks in the MSSQLTips Folder
1.3.2 Create Event-based Triggers
Select the “failed to access web page” task and click on the “Properties” button in the “Actions” pane to open the “Properties” dialog. In the dialog, switch to the “Trigger” pane, as shown in Figure 21.

Figure 21 The Trigger Used in This Task
Click on the “Edit…” button to open the “Edit Trigger” dialog. Next, we select “On an event” in the “Begin the task” dropdown list and select “Custom” in the “Settings” section. The dialog should look like Figure 22.

Figure 22 Create an Event-based Trigger
Click on the “New Event Filter” button to open the “New Event Filter” dialog. Switch to the “XML” tab and select the “Edit query manually” checkbox. When a dialog with a warning message appears, we click the “Yes” button to continue. Then, the text box becomes editable. We enter the following query in the text box. The “New Event Filter” dialog should look like Figure 23.
<QueryList>
  <Query Id="0">
    <Select Path="Microsoft-Windows-TaskScheduler/Operational">
      *[System[(EventID=201)]]
        and
      *[EventData[Data[@Name='TaskName'] and (Data='\MSSQLTips\Download HTML Table')]]
        and
      *[EventData[Data[@Name='ActionName'] and (Data='C:\pyvirtuals\htmltablescraping\Scripts\python.exe')]]
        and
      *[EventData[Data[@Name='ResultCode'] and (Data='2147942401')]]
    </Select>
  </Query>
</QueryList>

Figure 23 A Custom Event Filter in XPath Form
We click on a series of “OK” buttons one after the other to close dialogs and save changes. Now we want the return code 2147942402 to start the task “failed to save data.” We use the same steps to create the task that uses an event-based trigger. We use the following query to define the custom event filter:
<QueryList>
  <Query Id="0">
    <Select Path="Microsoft-Windows-TaskScheduler/Operational">
      *[System[(EventID=201)]]
        and
      *[EventData[Data[@Name='TaskName'] and (Data='\MSSQLTips\Download HTML Table')]]
        and
      *[EventData[Data[@Name='ActionName'] and (Data='C:\pyvirtuals\htmltablescraping\Scripts\python.exe')]]
        and
      *[EventData[Data[@Name='ResultCode'] and (Data='2147942402')]]
    </Select>
  </Query>
</QueryList>
1.3.3 Run the Download HTML Table Task Manually
Select the “Download HTML Table” task in the middle pane and click on the “Run” button in the “Actions” pane. When the task is complete, we write down the value that is in the “Last Run Result” column. We repeat the process several times until our record has 0x1 and 0x2 values.
Selecting the task “failed to access web page,” we notice some errors, as shown in Figure 24. The Python script execution exception does not directly generate the errors, but the errors tell us that the Python script failed to access the web page.

Figure 24 The Task Detects the Exception in the Python User-defined Function read_web_page_content()
We also see some errors when selecting the task “failed to save data,” shown in Figure 25. The errors inform us that the Python script failed to save data into the database table.

Figure 25 The Task Detects the Exception in the Python User-defined Function save_html_table_data()
These two tasks make the exceptions in Python script execution noticeable to IT professionals who monitor Task Schedule regularly. However, these two tasks are not necessary for downloading HTML data into a database table. The Python script itself should handle all exceptions and notify users.
2 – Checking Python Execution Status in Windows Event Viewer
Windows Event Viewer is a handy tool that shows a log of application and system messages including errors, information messages, and warnings (Hoffman, 2018). The tool categorizes event logs into four main groups, i.e., «Custom Views,» «Windows Logs,» «Applications and Services Logs,» and «Subscriptions.» Besides using Task Scheduler to check Python script execution status, we use Windows Event Viewer to access task execution history in this section.
2.1 Viewing Task Scheduler Logs
The Task Scheduler logs are in the “Applications and Services Logs” main group. We created the task “Download HTML Table” in Section 1.2. We can find the logs for this task in this subfolder: “Applications and Services Logs -> Microsoft -> Windows -> TaskScheduler -> Operational.” However, it is not convenient to view logs through this path.
2.1.1 Launch Windows Event Viewer
We use the «Windows + R» keyboard shortcut to launch the «Run» command window. We then enter the «eventvwr.msc» command in the «Open» box. Finally, click on the «OK» button to launch Windows Event Viewer, which should look like Figure 26.

Figure 26 Launch Window Event Viewer
2.1.2 Navigate to Task Scheduler Logs
Expand the «Applications and Services Logs» folder in the left pane. We follow this path to expand subfolders: «Applications and Services Logs -> Microsoft -> Windows -> TaskScheduler.» Next, under the «TaskScheduler» subfolder, we click on the «Operational» node. We see an extensive list of event logs in the «Operational» pane. As an example, we can find the log for the scheduled task we manually started, shown in Figure 27.

Figure 27 Navigate to Task Scheduler Logs
It is not convenient to view logs in this way. Therefore, the following section creates custom event views to exclude all uninterested logs and only show specific information.
2.2 Viewing the Download HTML Table Task Logs Through Custom Event Views
Custom Views allow us to view the messages that interest us (Buckell, 2018). For example, we want to see logs from the task “Download HTML Table” with return code 1. In this case, we do not need to find these specific logs from all logs in the “Operational” list.
2.2.1 Create Custom Views
Select “Custom Views” on the left pane. Then, on the “Actions” pane, click on the “Create Custom View…” button. A dialog should appear, as shown in Figure 28.

Figure 28 The Create Custom View Dialog
Switch to the “XML” tab and select “Edit query manually.” A warning message shows up, as illustrated in Figure 29.

Figure 29 A Warning Message from Event Viewer
Click on the “Yes” button to continue. Then, the text box becomes editable. We copy the first query in Section 1.3.2 to the text box. The dialog should look like Figure 30. When using XML filtering, we can use custom views to drill through event logs and only display the information we need (Pyle, 2019).

Figure 30 Create a Custom View for the Return Code 1
Click on the “OK” button to secure changes, and a new dialog shows up to ask for more information about this custom view. We enter the text “failed to access web page” as the name of this view and click on the “New Folder” button. We name the new folder “MSSQLTips,” as shown in Figure 31. Click on the “OK” button to save the folder name. Then, click on the “OK” button to close the “Save Filter to Custom View” dialog.
Figure 31 Create a New Folder for Custom View
2.2.2 View Specific Logs in Custom Views
After we close the “Save Filter to Custom View” dialog, we go back to the “Event Viewer” window. Next, we select the new custom view to show the logs of interest, as shown in Figure 32.

Figure 32 View “failed to access web page” Logs in the Custom View
We repeat the steps to create another custom view “failed to save data.” We use the second query in Section 1.3.2 to create a filter during this process. Note that we should select the “MSSQLTips” folder when saving the filter to the custom view. After we create two custom views, the “Event Viewer” window should look like Figure 33.

Figure 33 View “failed to save data” Logs in the Custom View
3 – Python Script Automation Using Task Scheduler
We created a basic task that has a time-based trigger. The task runs the Python script at 10:00 PM every day. The Python script always throws one exception at run-time for testing purposes. We manually started the task during the development phase. We viewed the Python script execution status through the task history tab in the task scheduler and custom views in the event viewer. To ensure the solution works on the production server, we log out of the development machine and let the task scheduler run the Python script. After the task scheduler has executed the script several times, we log into the development machine to check the execution logs.
3. 1 View Task Scheduler History
We launch Windows Task Scheduler by following the steps in Section 1.2.1. We then expand the “Task Scheduler Library” folder to find the “MSSQLTips” folder. Next, click on the “MSSQLTips” folder to show a list of tasks. We then select the “failed to access web page” task. Subsequently, click on the “History” button to open the history tab, shown in Figure 34. We find errors that occurred at 10:00 PM on 2012-12-21. These errors indicate that the Python script failed to access the web page at the scheduled time. Through this approach, we immediately know the Python script execution status. We can then report the errors to the technical support team.

Figure 34 View History Data of the “failed to access web page” Task
Next, we select the “failed to save data” task. Click on the “History” button again to open the history tab, shown in Figure 35. The errors indicate that the Python script failed to save data on 2021-12-19 and 2021-12-20. It is worth noting that the errors are not caused by the Python script execution directly. The message in the general tab does not help fix the issue. Instead, to troubleshoot the errors, we should rely on the logs written by the Python scripts.

Figure 35 View History Data of the “failed to save data” Task
3. 2 Check Custom Event Views
Some IT professionals may prefer to use Windows Event Viewer to check Windows and application logs. To do this, we first launch the event viewer by following the steps in Section 2.1.1. We then expand the “Custom Views” folder to find the “MSSQLTips” sub-folder. There are two custom views in the “MSSQLTips” folder.
Selecting the first view “failed to access web page,” we can see a list of events, as shown in Figure 36. The view displays all events that have returned code 1 from the Python script execution. The user-defined function “read_web_page_content()” exits the program with code 1 when the function fails to access the web page. Therefore, all events in this view imply the failure in this user-defined function. For example, we can observe a failure that occurred at 10:00 PM on 2021-12-21.

Figure 36 The «failed to access web page» Custom View
Selecting the second view “failed to save data” to open another custom view, as shown in Figure 37. All these events have returned code 2 from the Python script execution. The user-defined function “save_html_table_data()” exits the program with code 2 when the function fails to save data into the database table. Therefore, all events in this view imply failure in this user-defined function. For example, we can observe a failure that occurred at 10:00 PM on 2021-12-19 and 2021-12-20.

Figure 37 The «failed to save data » Custom View
Summary
Since Python is easy to learn and read, many IT professionals use Python to perform routine jobs. Windows Task Scheduler is a tool that can execute a program at a pre-defined time. In addition, Windows Event Viewer can show detailed information about significant events on a Windows system. These tools enable us to automate Python scripts to perform routine tasks and examine execution status. This article introduced running a Python script through the Windows Task Scheduler and viewing the Python script execution history through Windows Event Viewer.
We started with a gentle introduction to creating an automated task in Windows Task Scheduler. We then created two event-based tasks that run when the automated task has a return code, either 1 or 2. Subsequently, we manually ran the automated task and examined the Python script execution status through the two event-based tasks.
Next, we created two custom views in Windows Event Viewer. Then, we used these two custom views to view the Python script execution status.
Finally, we let the Task Scheduler run the Python script automatically. We then viewed the Python script execution status through the task history tab in Window Task Scheduler and custom views in Windows Task Viewer.
Reference
Buckell, F. (2018). What Are Custom Views in Windows Event Viewer and How to Create One. https://www.maketecheasier.com/windows-custom-views-event-viewer/.
Dinita, M. (2021). How to schedule tasks in Windows 10. https://windowsreport.com/schedule-tasks-windows-10/.
Hoffman, C. (2018). What Is the Windows Event Viewer, and How Can I Use It?. https://www.howtogeek.com/123646/htg-explains-what-the-windows-event-viewer-is-and-how-you-can-use-it/
Huculak, M. (2019). How to create an automated task using Task Scheduler on Windows 10. https://www.windowscentral.com/how-create-automated-task-using-task-scheduler-windows-10/.
Neagu, C. (2018). 9 ways to start the Task Scheduler in Windows (all versions). https://www.digitalcitizen.life/ways-start-task-scheduler-windows/.
Pyle, N. (2019). Advanced XML filtering in the Windows Event Viewer. https://techcommunity.microsoft.com/t5/ask-the-directory-services-team/advanced-xml-filtering-in-the-windows-event-viewer/ba-p/399761.
Roe, A. D. (2020). 6 ways to open the Run command window in Windows. https://www.digitalcitizen.life/run-window-windows-7-why-use-it-anymore/.
Zhou, N. (2021). Creating a SQL Server Agent Job to Run Python Scripts in a Virtual Environment. https://www.mssqltips.com/sqlservertip/7083/run-python-scripts-sql-server-agent-job/
Next Steps
- This tip used Windows Task Scheduler and Window Event Viewer to check Python script execution status. This method may be convenient for some IT professionals to maintain windows systems and applications. However, Python scripts themselves must handle all exceptions. The exception handling should log all warning or error messages. Python provides a built-in logging module with four main components: loggers, handlers, filters, and formatters. ZetCode offers a Python logging tutorial that shows how to do logging in Python with the logging module.
- Check out these related tips:
- Learning Python in Visual Studio 2019
- CRUD Operations in SQL Server using Python
- Recursive Programming Techniques using Python
- Python Programming Tutorial with Top-Down Approach
- Using Python to Download Data from an HTML Table to an SQL Server Database
- Creating a SQL Server Agent Job to Run Python Scripts in a Virtual Environment
This post will show you how to schedule a Python Script execution using Windows Task Scheduler. This will help you automate tasks using Python on Windows.
Use crontab for python script automation on Mac.
Before we can cover all that, we need to learn how to use Windows Task Scheduler.
What is Windows Task Scheduler?
Windows Task Scheduler is a component that gives the ability to schedule and automate tasks in Windows by running scripts or programs automatically at a given moment.
Get Started Using Windows Task Scheduler
To run your python scheduler you will need to create a task, create an action, add the path to your python executable file and to your python script and add a trigger to schedule your script.
1. Create Your First Task
Search for “Task Scheduler”.
This will open the Windows Task Scheduler GUI.
Go to Actions > Create Task…
Give a name
2. Create an Action
Go to Actions > New
3. Add the Python Executable File to the Program Script
Find the Python Path using where python in the command line.

From the command prompt copy the script to use in the action.
C:\yourpath\python.exeor in my case
C:\Users\j-c.chouinard\AppData\Local\Continuum\anaconda3\python.exe
In Program/Script, add the path that you have copied from the command line.
4. Add the Path to Your Python Script in the Arguments
Go to the folder where your Python script is located. Right-click on the file and select Copy as path.
If you have a file located at this location.
C:\user\your_python_project_path\yourFile.py
In the "Add arguments (optional)” box, you will add the name of your python file.
yourFile.py
In the "Start in (optional)" box, you will add the location of your python file.
C:\user\your_python_project_path
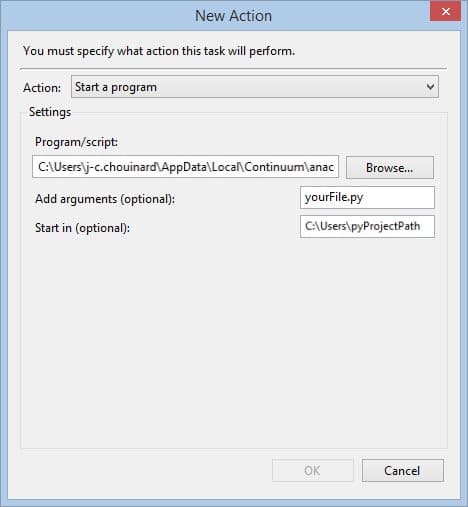
Click “OK”.
Note: Alternatively, you could create a batch file combining your Python script and Python executable file in a
.batfile.
5. Trigger Your Script Execution
Go to “Triggers” > New
Choose the repetition that you want. Here you can schedule python scripts to run daily, weekly, monthly or just one time.
Click “OK”
Once, you have set this up, your trigger is now active and your python script will run automatically every day.
Whether you decide to repeat the task every week or every hour, you may use the task scheduler wizard.
This is the best way to schedule a function to run at a specific time of the day without using CRON job. However, there are alternatives to run it from within your code using Advanced Python Scheduler, but I don’t like that option as it requires the code to keep running.
Example Python Script
from datetime import datetime
import os

def write_file(filename, data):
    if os.path.isfile(filename):
        with open(filename, 'a') as f:
            f.write('\n' + data)
    else:
        with open(filename, 'w') as f:
            f.write(data)

def print_time():
    now = datetime.now()
    current_time = now.strftime("%H:%M:%S")
    data = "Current Time = " + current_time
    return data

write_file('test.txt' , print_time())
Task Scheduler Python Script Automation FAQs
Can Task Scheduler run a Python script?
Yes, you can execute a Python script with Windows Task Scheduler. If your script works using the command prompt, you can schedule your script to run at a specific time and date.
How to schedule a Python script with Task Scheduler?
To schedule a Python script with Task scheduler, create an action and add the path to your Python executable file, add the path to the script in the “Start in” box and add the name of the Python file ase an argument. Then, create a trigger to schedule the execution of your script.
Does Task Scheduler work when computer is sleeping?
It does not work by default, but you could enable it in the conditions tab. To run your script while your computer is sleeping, just select the option: “Wake the computer to run this task”.
About Windows Task Scheduler
| Task scheduler triggers | Time-based or event-based triggers to start a task |
| Task scheduler actions | Actions to be performed by the task |
| Task scheduler conditions | Rules that define if a task can run after being triggered |
| Task Scheduler settings | Settings that define how a task is run, is deleted, is stopped |
Conclusion
That’s it, you now know how to run a Python script automatically using Windows Task Scheduler.
SEO Strategist at Tripadvisor, ex- Seek (Melbourne, Australia). Specialized in technical SEO. Writer in Python, Information Retrieval, SEO and machine learning. Guest author at SearchEngineJournal, SearchEngineLand and OnCrawl.
Last Updated :
07 Apr, 2025
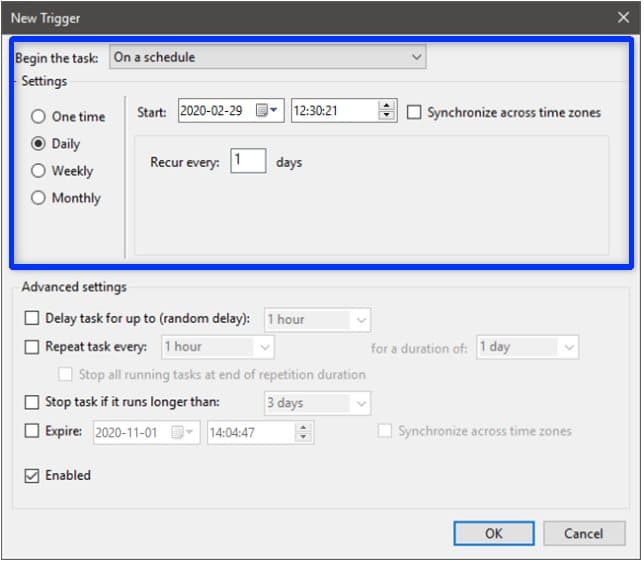
In this article, we are going to see how to schedule a Python Script to run daily. Scheduling a Python Script to run daily basically means that your Python Script should be executed automatically daily at a time you specify.
Step-by-Step Implementation
Create a Python file, for example: gmail_automation.py, and write your script inside it. Make sure everything works as expected when you run it manually, this is the script that will be scheduled to run automatically
Alternatively, you may use any Python script that you’d like to schedule.
Python
import webbrowser

# Gmail URL
url = "https://mail.google.com"

# Path to your Chrome browser
chrome_path = r"C:\Program Files\Google\Chrome\Application\chrome.exe"

# Register and open Chrome browser with Gmail
webbrowser.register('chrome', None, webbrowser.BackgroundBrowser(chrome_path))
webbrowser.get('chrome').open_new_tab(url)
Note: Change your chrome_path according to the location on your system if you want to use the above Python Script.
Now there are two ways to schedule a script:
- Using batch files.
- Using Windows Task Scheduler.
Method 1: Using batch file
Step 1: Create a Batch File.
Open Notepad and add the following (update the paths):
“Path where your Python exe is stored\python.exe” “Path where your Python script is stored\script name.py”
pause
Example of the batch file:

Step 2: Save the File
Save it with a .bat extension, e.g. open_gmail.bat.
To check if the scripts is working or not, navigate to the .bat file and open it (or double click on it) and it should launch the gmail in chrome browser.
Method 2: Using Windows Task Scheduler.
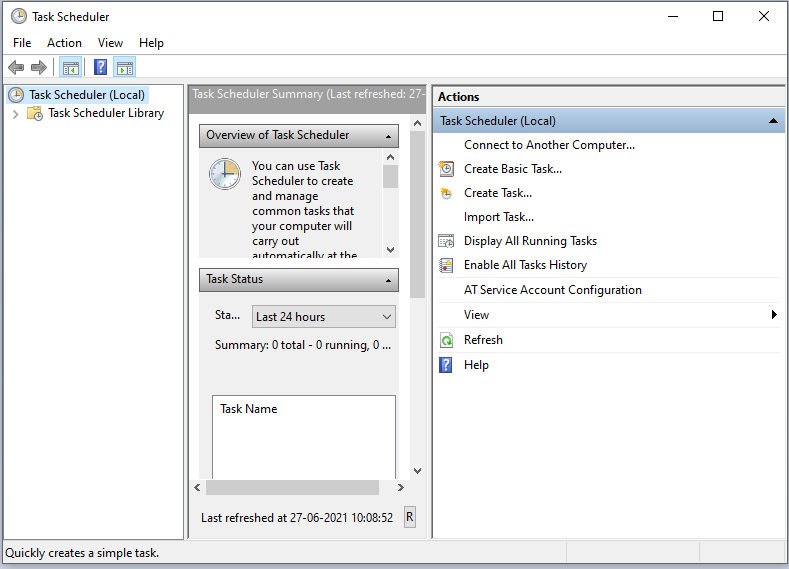
Step 1: Open Task Scheduler by navigating to:
Start Menu > Administrative Tools > Task Scheduler
Or search Task Scheduler in the Start menu.
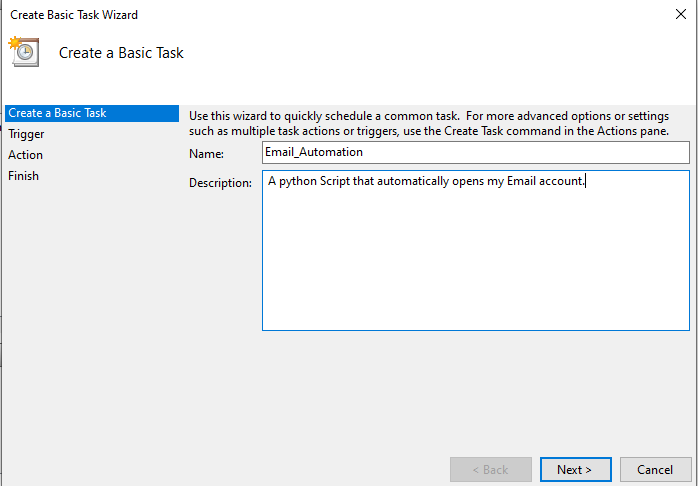
Step 2: Create a New Basic Task
- Click “Create Basic Task…”
- Give your task a name (e.g. “Open Gmail Daily”) and a description.
- Click Next.
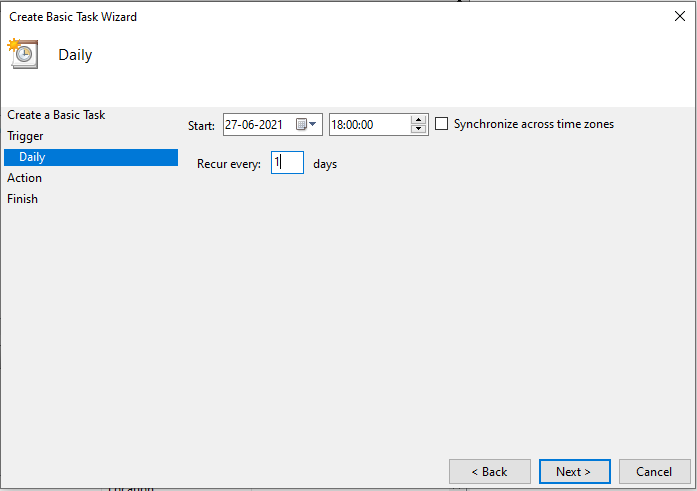
Step 3: Set the Trigger
- Choose “Daily”
- Set the start time when you want the script to run.
- Click Next.
Step 4: Select the “Start a Program” option and click Next.
If you created a batch file earlier, enter its full path in the Program/script field (e.g., C:\path\to\yourbatchfilename.bat), then click Next and Finish. Your Python script will now run daily at the scheduled time.
In this section, you’ll need the file location of the following files:
- python.exe – The path where python.exe is stored.
- the path where your python script file is stored.
You can simply get both the paths by running command- “where python” in the command prompt and copy the paths form there.
In our case :
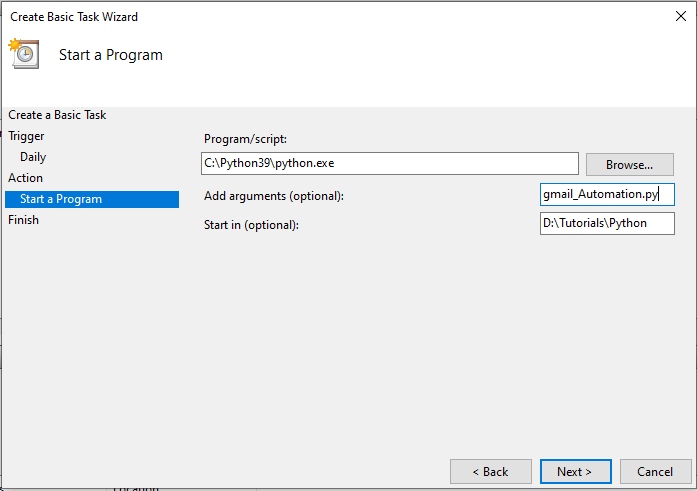
Path of python.exe – C:\Python39\python.exe
Path of my python script – D:\Tutorials\Python
Step 5: Add respective file locations as shown in the figure below and arguments input, specify your python script name.
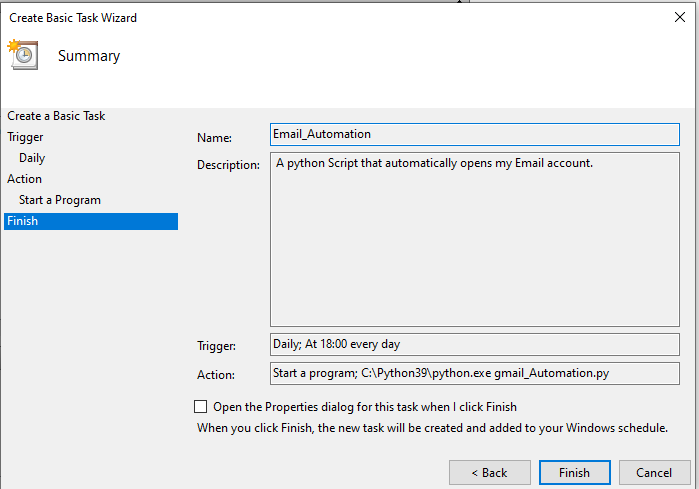
Step 6: In the next tab, you just need to verify your Inputs and then click on ‘Finish’.
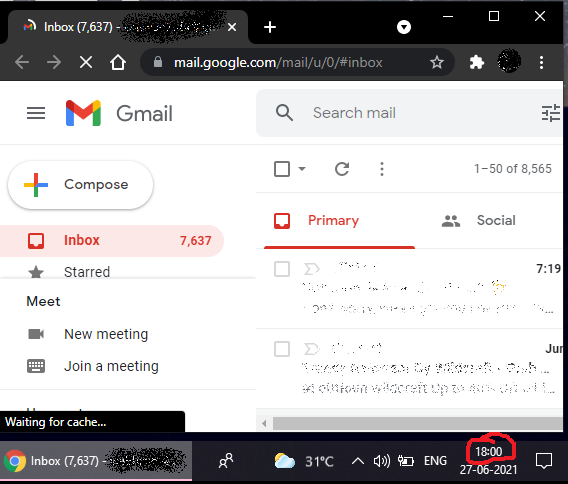
That’s it, your Python Script is now Scheduled and will be executed daily at your Specified time. Here is the Screenshot of our Python Script that got executed.

Recently I had a requirement of implementing a web scraping tool to identify changes in a website. It was the virtual learning environment website of my university where I wanted to create a desktop notification whenever our examination results were uploaded to the website. I started by writing a Python script that checks the website and creates a notification on Windows if updates are detected. I used the Python Beautiful Soup library to parse the HTML content of the web page and the Windows 10 Toast Notifications library to generate Windows 10 toast notifications. These tools made the implementation pretty simple.
The next phase was to run the script every 10 minutes and my initial thought was to use time.sleep() while the script was running in an infinite loop. That’s when I started to realize that even though this approach solves the problem, using time.sleep() does not mean that the code is executed every 10 minutes. What it does is put a 10 minute gap between executions. For a simple expendable application(like what I’m implementing) this is not an issue but for mission-critical applications or streaming applications using time.sleep() for scheduling might have adverse effects. So I decided to use Windows Task Scheduler to run my Python script every 10 minutes.
Steps to schedule a Python script using the Windows Task Scheduler
Step 1 — Create a batch file to run the Python script
Open Notepad, add the following syntax and save it with the .bat extension.
start "" "path_to_python.exe" "path_to_python_script"
Enter fullscreen mode
Exit fullscreen mode
Example:
start "" "C:\Python38\python.exe" "C:\Users\Tharinda\Desktop\web_scraper\main.py"
Enter fullscreen mode
Exit fullscreen mode
Using start makes sure the cmd is closed after the execution. The first «» is the title that should be used with start and in this case, the title is left blank.
After double-clicking on the .bat file the python script should run if the file is configured properly.
Step 2 — Create a task in Windows Task Scheduler
Open the start menu and search for Task Scheduler.
- In the
Actionstab selectCreate Task
- Give a name for the task

- Switch to the
Triggerstab and pressNewto create a new trigger.

- Configure the trigger to suit your needs. In my case, the trigger is scheduled to run daily repeating the task every 10 minutes.

- Switch to the
Actionstab and pressNewto create a new Action.

- Under
Program/Scriptadd the batch file that was created in step 1

Add Conditions and change the Settings depending on your requirement and press OK to save the task. You can refer the Task Scheduler documentation to learn more about the Windows Task Scheduler.
That is pretty much it. Your task should run as intended.
I hope this helps. Cheers!