
30.09.2016
В Windows скрипты PowerShell (расширение .PS1) по умолчанию не ассоциированы с исполнимым файлом PowerShell.exe. При двойном щелке по файлу сценария PS1 открывается окно тестового редактора notepad.exe. Запустить файл PS1 на выполнение в среде PowerShell можно из контекстного меню проводника, выбрав пункт Run With PowerShell. Однако такой сценарий запускается в рамках сессии пользователя, без прав администратора. Хотя для тех же файлов скриптов .bat, .cmd, имеется отдельный пункт меню Run As administrator. В случае с PowerShell приходится открывать консоль Power Shell с повышенными правами и указывать полный путь к файлу скрипта. Не очень-то удобно.
Рассмотрим, как добавить в контекстное меню проводника File Explorer для файлов с расширением *.ps1, пункт, позволявший запустить скрипт PowerShell с правами администратора.
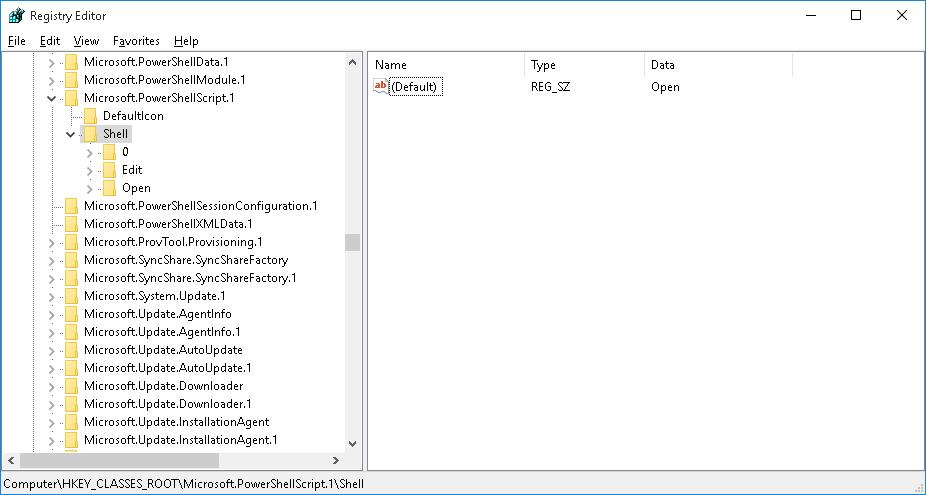
- Запустите редактор реестра (regedit.exe)
- Перейдите в ветку HKEY_CLASSES_ROOT\Microsoft.PowerShellScript.1\shell

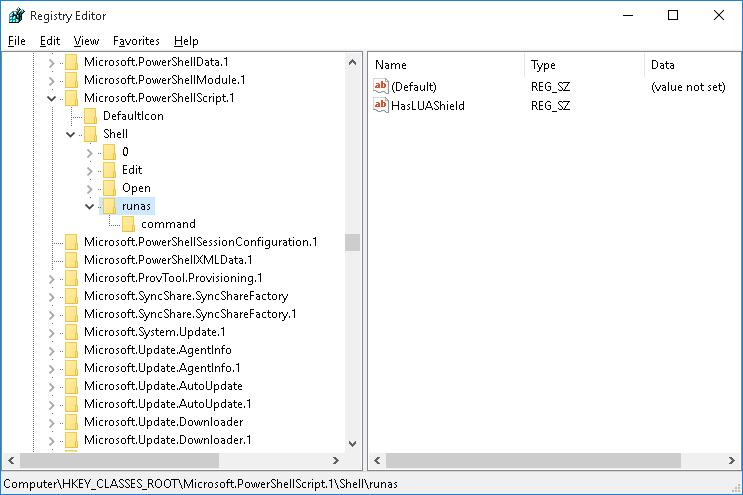
- Создайте подраздел с именем runas и перейдите в него
- Внутри раздела runas создайте пустой строковый параметр (String Value) с именем HasLUAShield (этот параметр добавит иконку UAC в контекстное меню проводника)
- В разделе runas создайте вложенный подраздел command

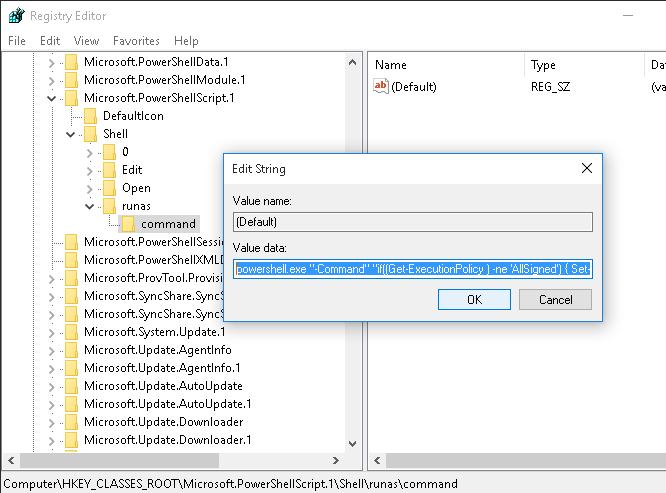
- В качестве значения параметра Default раздела command укажите значение:
powershell.exe "-Command" "if((Get-ExecutionPolicy ) -ne 'AllSigned') { Set-ExecutionPolicy -Scope Process Bypass }; & '%1'"
- Теперь, если щелкнуть ПКМ по любому *.PS1 файлу, в контекстном меню можно выбрать пункт Run as administrator
Совет. Если скрипт отрабатывает быстро, пользователь успевает только увидеть появившееся и быстро исчезнувшее окно PowerShell. А что делать, если результат выполнения скрипта должен остаться на экране для просмотра пользователем?
Чтобы после окончания работы скрипта, окно консоли PowerShell не закрывалось, необходимо добавить в строку параметр –NoExit:
powershell.exe –NoExit "-Command" "if((Get-ExecutionPolicy ) -ne 'AllSigned') { Set-ExecutionPolicy -Scope Process Bypass }; & '%1'"
There are several ways to run PowerShell scripts as an administrator interactively and non-interactively — which is suitable for automation.
Running PowerShell as Administrator (Interactive)
An elevated PowerShell session is required to run PowerShell scripts as an administrator. Opening the elevated PowerShell console triggers the UAC prompt.
- Right-click the Start button or press Win+X on the keyboard to open the Power User Menu on Windows.
- Click Windows PowerShell (Admin) (replaced with Terminal (Admin) on Windows 11) to open the elevated PowerShell console;

- Confirm the elevation at the UAC prompt.
- Any command or PowerShell script that is run from this console will be run as an administrator.
- For example, to run a specific PS1 script file, change the directory and run:
cd C:\PS

.\my_script.ps1


You can create a desktop shortcut that always runs an elevated interactive PowerShell console.
- Right-click anywhere on the desktop and click New → Shortcut.
- Type powershell.exe (Windows PowerShell) or pwsh.exe (PowerShell 7+) and click Next.

- Type the shortcut name and click Finish.
- Open the shortcut properties and click Advanced. Check the “Run as administrator” box and save changes.


Every time you use the new shortcut to start PowerShell, it will run as an administrator.
To run PowerShell script file as an administrator from the command prompt or from a BAT/CMD script, use the following command:
powershell -NoProfile -ExecutionPolicy Bypass -Command "Start-Process -Verb RunAs powershell -ArgumentList '-NoProfile -ExecutionPolicy Bypass -File C:\ps\my_script.ps1'
Note. The Bypass parameter is used to ignore the current settings of the PowerShell execution policy.

How to Check if a PowerShell Script is Running as Administrator
When you run a PowerShell script, you may need to check that it is running in elevated mode. Add the following block code at the beginning of the script to indicate that this script is being run as an administrator:
if (([System.Security.Principal.WindowsPrincipal] [System.Security.Principal.WindowsIdentity]::GetCurrent()).IsInRole([System.Security.Principal.WindowsBuiltInRole]::Administrator)){

"Run as admin - SUCCESSFUL"

}

else {

"Run as admin - FAILED"

}

Start-Sleep -Seconds 10
Run PowerShell Script as Administrator Without UAC Confirmation
In all of the cases described above, running the PowerShell script as an administrator requires UAC elevation confirmation. To run a PowerShell script as an administrator without the UAC prompt, you must create a special scheduled task with Highest Privileges option enabled.
- Open the Task Scheduler (taskschd.msc) and click “Create a task.”

- Under the General tab, configure the following:
- The name is RunMeAsAdmin.
- Select Run only when user is logged on.
- Check Run with highest privileges.


- Switch to the Actions tab and click New.
- In the New Action window:
- Type powershell.exe for Windows PowerShell or pwsh.exe for PowerShell Core in the “Program/script” box.
- Type -NoProfile -ExecutionPolicy Bypass -File C:\ps\my_script.ps1 inside the “Add arguments”.

- Click OK to close the New Action window.
- Click OK to save the new task.
- Once the task is created, select it from the list and click Run in the Actions pane. This will run your PowerShell script elevated without UAC prompt.

- Or you can trigger it from PowerShell by running the below command:
Start-ScheduledTask -TaskName <task name>


This approach allows PowerShell scripts to run in the elevated non-interactive mode without triggering the UAC prompt.
To run a PowerShell script as an administrator, you can right-click on the PowerShell icon and select «Run as administrator,» or use the following code snippet to elevate your script programmatically:
Start-Process powershell -ArgumentList '-NoProfile -ExecutionPolicy Bypass -File "C:\Path\To\YourScript.ps1"' -Verb RunAs
Understanding PowerShell Scripts
What is a PowerShell Script?
A PowerShell script is a text file containing a series of PowerShell commands that automate processes and tasks. Typically, these scripts are used for system administration tasks, such as managing user accounts, configuring network settings, or performing batch processing of files. The power of PowerShell scripts lies in their ability to interact directly with the Windows operating system and perform administrative tasks efficiently.
Why Run PowerShell Scripts as Administrator?
Running a PowerShell script as an administrator is essential when the script needs elevated permissions to perform specific actions. Certain tasks require administrative privileges, such as modifying system files, changing configurations, or accessing sensitive areas of the system. Understanding the need for admin rights will enable you to effectively manage your environment and automate tasks securely.
Run PowerShell Script as Administrator Without Prompt: A Guide
Prerequisites for Running PowerShell Scripts as Administrator
Checking Your PowerShell Version
To ensure compatibility with your scripts and features, it’s vital to verify your PowerShell version. Here’s how you can do it:
- Open PowerShell (you can search for it in the Start menu).
- Type the following command and press Enter:
$PSVersionTable.PSVersion
This command outputs the version number, allowing you to confirm you are using a supported version.
User Account Control (UAC) and Administrative Permissions
User Account Control (UAC) is a security feature that helps prevent unauthorized changes to your operating system. It may prompt you when you attempt to run PowerShell as an administrator. To check if your user account has administrative privileges, follow these steps:
- Go to Control Panel > User Accounts > User Accounts.
- Look for the label «Administrator» under your username.
If administrative privileges are necessary for running your scripts, it’s crucial to ensure you have the proper rights before executing commands.
How to Run PowerShell Script From Command Line Effortlessly
Methods to Run a PowerShell Script as Administrator
Using the Context Menu
One of the easiest ways to execute a PowerShell script as an administrator is through the context menu. Simply locate your script file, then:
- Right-click on the script (.ps1) file.
- Select «Run with PowerShell».
- If prompted by UAC, click Yes to allow it to run.
This method is straightforward and works well for ad-hoc script execution.
Code Snippet Example:
# Sample Script: MyScript.ps1
Write-Host "Hello, Administrator!"
Running PowerShell from the Start Menu
You can also open PowerShell directly from the Start menu with elevated privileges:
- Search for PowerShell in the Start menu.
- Right-click on the Windows PowerShell option.
- Select «Run as Administrator».
- Once the PowerShell window is open, navigate to the script location, and execute it using:
.\MyScript.ps1
This method allows you to run your scripts in an elevated session directly from the command line.
Creating a Desktop Shortcut to Run as Administrator
Creating a shortcut to run a PowerShell script as an administrator simplifies the process for future execution. Here’s how to set it up:
- Right-click on your desktop and select New > Shortcut.
- In the location field, enter:
powershell.exe -ExecutionPolicy Bypass -File "C:\path\to\MyScript.ps1" - Name your shortcut and click Finish.
- After creating the shortcut, right-click it and select Properties.
- Under the Shortcut tab, click Advanced… and check Run as administrator.
Now, double-clicking this shortcut will automatically run your script with elevated permissions.
Using the Command Line
If you prefer working from the Command Prompt, you can execute your PowerShell script as an admin with this command:
- Open Command Prompt as an administrator.
- Type the following command:
powershell -ExecutionPolicy Bypass -File "C:\path\to\MyScript.ps1"
This allows you to run the script without opening a PowerShell window first.
Task Scheduler
For running PowerShell scripts automatically with administrative rights, you can utilize Task Scheduler. Here’s how:
- Open Task Scheduler from the Start menu.
- Click Create Basic Task.
- Follow the wizard to name your task and select a trigger (e.g., daily).
- Under Action, select «Start a program». For the program/script, enter:
powershell.exe - In the Add arguments section, add:
-ExecutionPolicy Bypass -File "C:\path\to\MyScript.ps1" - Finally, in the Conditions tab, check «Run with highest privileges».
Your script will now run automatically with administrative rights at scheduled times.
Run PowerShell Script as Administrator from Batch File Explained
Best Practices for Running PowerShell Scripts as Admin
Ensuring Script Safety
Before running a script as an administrator, it is vital to validate its content and sources. Malicious scripts can compromise your system. Always:
- Review the script for potentially harmful commands.
- Run scripts from trusted sources only.
- Use a text editor to examine scripts before execution.
Logging and Monitoring Scripts
Logging script execution is crucial when performing administrative tasks. It helps in auditing what commands were run and by whom. You can enable logging in PowerShell by adding the following line at the beginning of your script:
Start-Transcript -Path "C:\path\to\logfile.txt"
This command will create a transcript of all command outputs and errors, aiding in any troubleshooting efforts.
Understanding Microsoft.PowerShell.Commands.Internal.Format.FormatStartData
Troubleshooting Common Issues
UAC Prompt Issues
If you’re facing persistent UAC prompts each time you run a script, consider adjusting UAC settings or using Task Scheduler, as discussed earlier, to bypass repeated confirmations.
Script Errors
Common errors might occur when running scripts as an administrator. If an error arises, PowerShell provides mechanisms for exception handling. Utilize a try-catch block for better control:
try {
    # Your script code here
} catch {
    Write-Host "An error occurred: $_"
}
This not only handles errors gracefully but also gives you insight into what went wrong.
Unlocking Windows PowerShell Scriptomatic For Quick Tasks
Conclusion
Understanding how to run PowerShell scripts as admin is crucial for effective system management. By following the outlined methods and best practices, you can leverage the power of PowerShell scripts while maintaining security and compliance. Experiment and practice with PowerShell to enhance your administrative skills, and remember to validate your scripts for safety!
Handy PowerShell Scripts for Everyday Tasks
Additional Resources
- Always refer to the official PowerShell documentation for in-depth information and updates on new features.
- Engage with online forums and communities to learn from other PowerShell users and share your experiences.
Table of Contents
Introduction
When using Powershell, you may need to run an elevated Powershell window to perform a specific task or run a script.
The reason for this is the User Account Control (UAC). Introduced with Windows Vista User Account Control (UAC) keeps the user in a non-elevated state if not explicitly told to be elevated as an administrator. Some scripts and CMDlets in Powershell require you to run with the highest privileges to change the system.
To read more about how the User Account Control (UAC) works in Windows 10, refer to https://docs.microsoft.com/en-us/windows/security/identity-protection/user-account-control/how-user-account-control-works.
This blog post describes how to elevate to an administrator in Powershell.
For learning more about Powershell, I recommend signing up and using Pluralsight!
Which Powershell actions require elevation?
There are some actions in Powershell which require you to elevate, such as:
- Changing of the Execution Policy
- Modifications to System Files
- Modifications of the Registry
It is best practice always to start an elevated Powershell window to not run into any unexpected issues.
The only time I would not recommend this if you are testing a script intending to run as a regular user.
How to elevate Powershell to admin
There are several alternatives for elevating your Powershell command prompt.
Here are three options:
- Elevate Powershell to an administrator through Windows Search
- Create a new task in Task Manager
- Use the runAs command in Powershell
Alternative #1 – Elevate Powershell to admin through Windows Search
The easiest way to start elevated Powershell windows is by searching for the Powershell application.
Press the Windows button to open the start menu and type Powershell. Select Run as administrator to launch run a Powershell window with full privileges.

Press Yes in the UAC prompt, and you are good to go!
Alternative #2 – Create a new task in Task Manager
Press the Windows button and search for Task Manager.
Press File and Create a new task
Enter PowerShell and check Create this task with administrative privileges
Alternative #3 – Use the runAs command in Powershell
Run the following command from a non-elevated Powershell prompt:
Start-Process Powershell -Verb runAs
If prompted by the UAC, enter the administrative credentials.
There are now two Powershell windows, one elevated to an administrator and one not elevated to an administrator.

Conclusion
I hope you have found one way of opening Powershell as an administrator user. How do you elevate to an administrator? Please leave a comment below! 
For learning more about Powershell, I highly recommend the courses provided by Pluralsight.
References
- Microsoft Docs – Powershell Documentation
- Microsoft Docs – User Account Control (Windows applications)
Further learning
- Learn Powershell at Pluralsight
- How To Check Bitlocker Encryption Status on Windows 10
- Add Active Directory users to groups using Powershell and a CSV file
- Add user to local administrator Group using Powershell
- How to check if Powershell is running as an administrator
- Copy a file to a new directory using Powershell
- How to create a Hyper-V Virtual Machine using Powershell
- How to change Powershell version for backward compatibility
- How to export RSOP results using Powershell
-
Using the
Start-ProcessCmdlet to Run PowerShell Script as Administrator -
Run PowerShell Script With Arguments as Administrator
-
Run PowerShell Script as Administrator While Preserving the Working Directory
Most scripts that we write and execute will require permissions, leading to an administrator running the scripts from an elevated PowerShell prompt. In PowerShell, we elevate our permissions by running Windows PowerShell with administrator privileges and entering our administrator credentials.
However, we may need to run our scripts seamlessly for specific situations without keying in administrator credentials. Therefore, we can integrate various self-elevating commands at the beginning of our scripts, and we will show you how in this article.
Using the Start-Process Cmdlet to Run PowerShell Script as Administrator
The Start-Process cmdlet initiates one or more processes, executable or script files, or any files that an installed software can open on the local computer, including Windows PowerShell.
With this cmdlet and a set of parameters, we can run Windows PowerShell as an administrator.
For this example, we have created a Hello_World.ps1 script, which will output a simple Hello World string inside our console.
Hello_World.ps1:
Write-Output 'Hello World!'
We can use the PowerShell file above as an example to check and verify if we are running our scripts in administrator privileges. To start, run the snippet code below.
Note
Windows PowerShell may still need to ask for your confirmation due to your local computer’s User Account Control (UAC). We do not recommend entirely disabling UAC for security purposes.
Start-Process powershell -Verb RunAs -ArgumentList ".\Hello_World.ps1"
Upon running the script above, it will spawn a new instance of Windows PowerShell with administrative rights. The only caveat for the script run above is that if we need to pass arguments to our PowerShell file, we will not carry the arguments over to the newly spawned administrative console.
Run PowerShell Script With Arguments as Administrator
This example can take our previous one-liner script and revise it inside multiple conditional statements.
# Self-elevate the script if required
if (-Not ([Security.Principal.WindowsPrincipal] [Security.Principal.WindowsIdentity]::GetCurrent()).IsInRole([Security.Principal.WindowsBuiltInRole] 'Administrator')) {
    if ([int](Get-CimInstance -Class Win32_OperatingSystem | Select-Object -ExpandProperty BuildNumber) -ge 6000) {
        $Command = "-File `"" + $MyInvocation.MyCommand.Path + "`" " + $MyInvocation.UnboundArguments
        Start-Process -FilePath PowerShell.exe -Verb RunAs -ArgumentList $Command
        Exit
    }
}

# Place your script here
Write-Output 'Hello World!'
Previously, we ran our PowerShell script by calling a separate file, but we can simply place our script (eg. Hello_World.ps1) below this snippet for this example.
Here’s how the snippet works.
- The first
ifstatement checks if the executed script is already running in Windows PowerShell with administrative privileges. - The second
ifstatement checks if the Windows Operating System build number is 6000 or greater. (Windows Vista or Windows Server 2008, or later) - The
$Commandvariable retrieves and saves the command used to run the script, including arguments. - The
Start-Processstarts a new instance of Windows PowerShell with elevated privileges and reruns the script just like our previous script.
Run PowerShell Script as Administrator While Preserving the Working Directory
We may need to preserve the script’s working directory for specific situations. So, here’s a self-elevating snippet that will maintain the working directory:
if (-Not ([Security.Principal.WindowsPrincipal][Security.Principal.WindowsIdentity]::GetCurrent()).IsInRole([Security.Principal.WindowsBuiltInRole]::Administrator)) {
    if ([int](Get-CimInstance -Class Win32_OperatingSystem | Select-Object -ExpandProperty BuildNumber) -ge 6000) {
        Start-Process PowerShell -Verb RunAs -ArgumentList "-NoProfile -ExecutionPolicy Bypass -Command `"cd '$pwd'; & '$PSCommandPath';`"";
        Exit;
    }
}
# Place your script here
Write-Output 'Hello World!'
In this snippet, we passed $PSCommandPath as one of the arguments inside the Start-Process cmdlet to preserve the working directory on where the script has been executed.
Preserving the working directory is vital for performing path-relative operations. Unfortunately, the previous couple of snippets that we showed earlier will not maintain their path, which can cause unexpected errors. Therefore you can use the revised syntax above.
Enjoying our tutorials? Subscribe to DelftStack on YouTube to support us in creating more high-quality video guides. Subscribe