
Edit me
Pygame is a set of Python modules used for writing simple video games and graphical programs. It is cross-platform, which means it can be installed on both Windows and Mac computers. This guide provides the steps needed to install Pygame for Python 3.6 on Windows and macOS.
Procedure (Windows 10)
- Make sure to have the latest version of Python 3 installed on your computer. If you need to install Python 3, you can visit (this site) to install the latest Python 3 release.
-
When running the Python installer, you will have to select Customize installation. Click Next and check the box next to Install for all users at the top of the list in Advanced Options. You can now click Install.

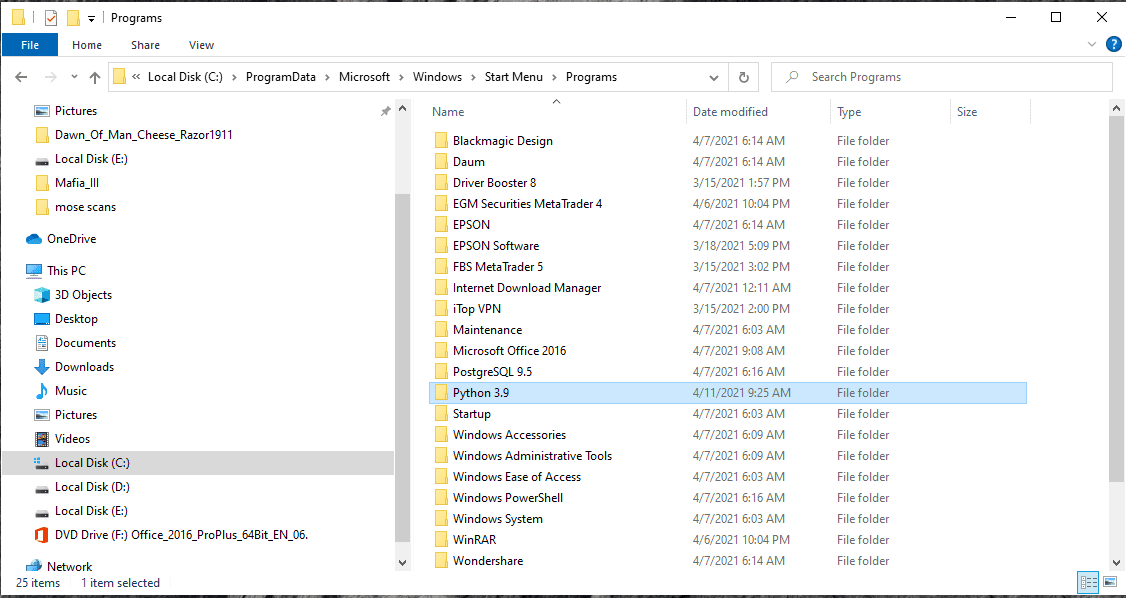
- Once Python 3 is installed, launch the File Explorer.
-
Click This PC, select the drive where Windows is installed (usually the C:\ drive), double-click on the Program Files (x86) folder, and double-click on the Python folder (i.e. Python36-32).
-
Click on the path in the text box towards the top of the File Explorer window and copy it to the clipboard.
- Next, you will need to launch the Control Panel. To do this, open the Start Menu and search control in the search box. The Control Panel should be the first option that appears in the Start Menu.
- Click on System and Security, then System, then Advanced System Settings.
-
In the window that appears, click on Enviroment Variables…
-
You will need to edit the Path system variable. To do this, select Path in the System variables section of the window and click Edit…
- Click New and paste the path copied from earlier into the empty textbox that is generated. Click OK twice to save the changes.
- You will now need to open the Command Prompt as an administrator. To do this, open the start menu and search cmd in the search box. The Command Prompt should be the first option that appears in the Start Menu. Right click on that option and choose Run as administrator.
- In the Command Prompt, type cd and a space and right-click in the Command Prompt to paste the path to Python. Press Enter.
- Type this command into the Command Prompt and press Enter:
- You can now install Pygame. To do this, type the following command and press Enter:
- Pygame should have successfully installed. To verify this, type the following command to launch the Python interactive interpreter:
- Type the following line in the interpreter and press Enter:


If entering the previous line into the interpreter does not throw any errors, you have successfully installed Pygame on Windows. You can now write any graphical program you want using the Pygame library.
Procedure (Mac OS X)
This guide is based on an article found (here)
- Before installing Pygame, there are many dependencies that will need to be installed. Begin by installing the XCode developer tools, which can be done through the app store.
- Next you will need to install the latest version of XQuartz. You can start the installation by visiting the site (here).
-
Open a Terminal window. This can be done by pressing command+Space (⌘+Space) and typing Terminal in the search bar and pressing Enter.
- You now need to install Homebrew. You can do this by typing the following command in the Terminal and pressing Enter:
ruby -e "$(curl -fsSL https://raw.githubusercontent.com/Homebrew/install/master/install)" - After the installation is finished, you will need to type the following commands in the Terminal, pressing Enter after each one:
echo export PATH='usr/local/bin:$PATH' >> ~/.bash_profile - You can now install Python 3 using Homebrew. To do this, type the following command in the Terminal and press Enter:
- Now you need to install several dependencies for Pygame. Type the following commands in the Terminal, pressing Enter after each one:
brew install sdl sdl_image sdl_mixer sdl_ttf portmidibrew tap homebrew/headonly - You are ready to install Pygame. Type the following command in the Terminal and press Enter. Note that you will probably have to enter your password in the Terminal in order for the command to run:
sudo pip3 install hg+http://bitbucket.org/pygame/pygame - To verify the installation, you will have to launch the correct version of IDLE. You can find this by opening Finder, clicking on Go in the top left of the screen, then clicking on the Go to Folder… option.
- In the search bar, enter /usr/local/Cellar/python and click Go.
- Navigate to the folder where Python 3 is located. It will probably be named in this format: 3.x.x.
- Launch the IDLE 3 app within the folder. When launched, it should be using Python 3.x.x.
- In the IDLE interpreter, type the following command and press Enter:
If the command completed without throwing any errors, you have successfully installed Pygame and found the correct version of IDLE to use for Pygame programming.
- To make finding this version of IDLE easier, you can create a Desktop shortcut for IDLE 3. If you want to do this, press and hold the control key and click on IDLE 3. It will open a Menu where you can select Make Alias and create another IDLE 3 icon. You can name this icon whatever you like, but make sure to drag it to your Desktop when you are done.

Last Updated :
21 Apr, 2021
In this article, we will see how to import and initialize PyGame.
Installation
The best way to install pygame is with the pip tool, we can install pygame by using the below command:
pip install pygame
Importing the Pygame library
To import the pygame library, make sure you have installed pygame already. Open the terminal or the IDE which you want to work upon and import this library to check whether pygame is installed or not by using the command given below:
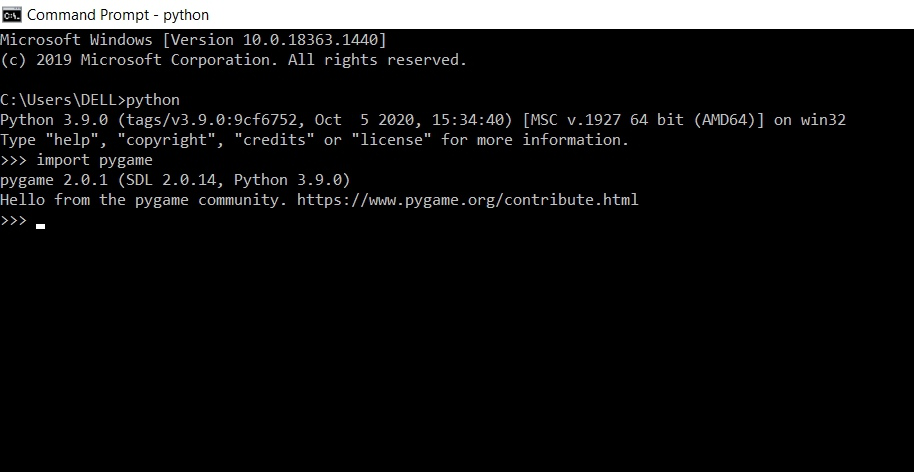
import pygame
This library imports all the available pygame modules into the pygame package.The below image how to perform it with the help of a command prompt. If you don’t find any error and get the message as shown in the image means the pygame library is imported successfully, and now you are good to proceed.
Initializing the Pygame library
Before we can do much with pygame, we first need to initialize it. Just call the method given below to initialize it.
pygame.init()
This method initializes all the necessary pygame modules. This method has nothing like an argument and returns a tuple that returns the no of modules initialized successfully and the number of modules failed respectively.
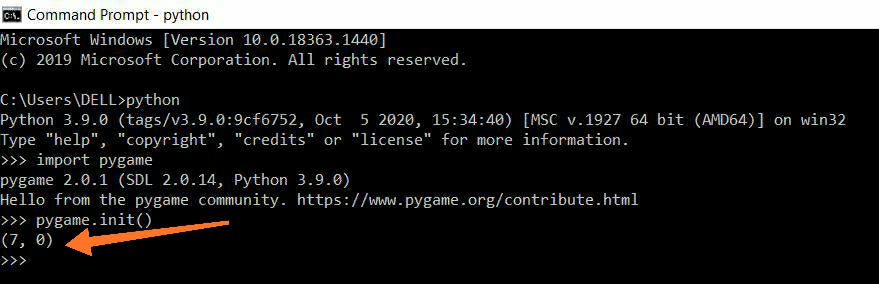
As you can see in the image pygame.init() method returns a tuple (7,0) which means 7 modules are initialized successfully and 0 is failed to initialize.
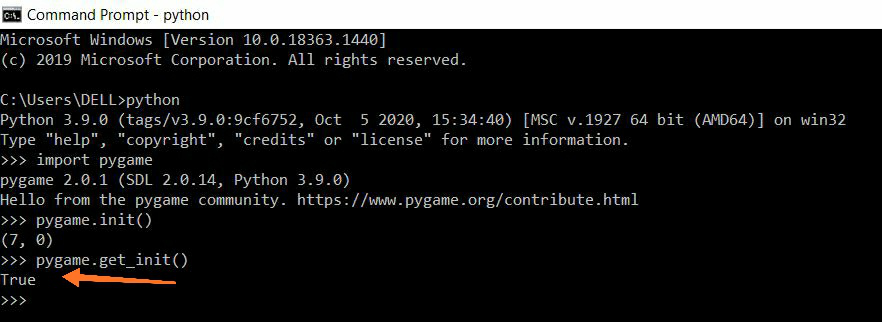
Check whether all the modules are initialized successfully or not
There is a method named pygame.get_init() which shows whether all the pygame modules are initialized successfully or not. If all the modules are initialized successfully, this method returns true.
PyGame is a cross-platform set of modules in the Python programming language which means you can install it on any operating system and are designed to write video games. These modules also include graphics and sound libraries that are used together with the Python programming language. PyGame depends on python, which means we have to install python first before installing PyGame.
In this blog, I’ll be showing you how to install Python and then PyGame.
Installing Python on Windows
Downloading
To install Python, visit their website and download the latest version of python 3. If you are using a 32-bit system, choose the “Windows x32 installer,” If you are using the 64-bit system, choose the Windows x64 installer. You should note that the latest version of python doesn’t work on Windows 7 or earlier. This means that you can only use Python 3 on Windows 8 or later versions.
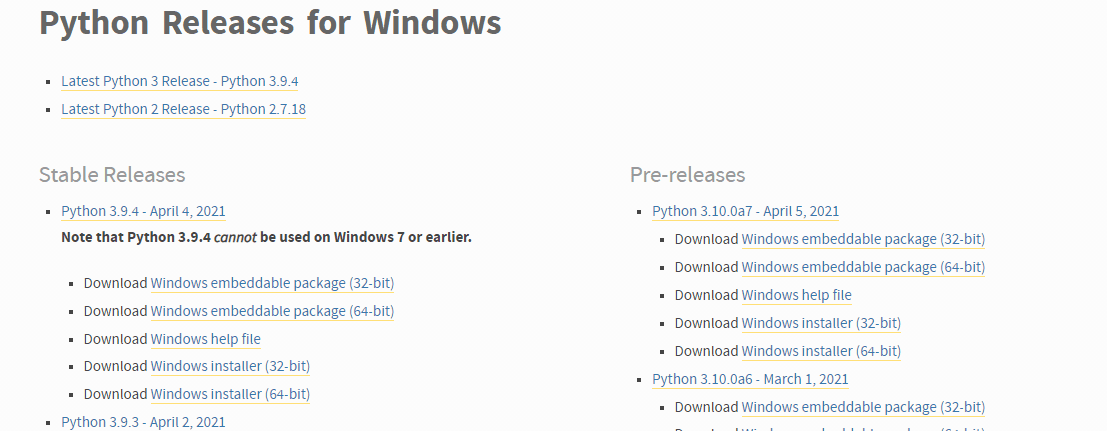
Python Releases
You should be able to download the executable installer. Once downloaded, run the Python installer.
Running the setup
When the installer opens, check the install launcher for all users(recommended) box and add python 3.7 to PATH(optional).
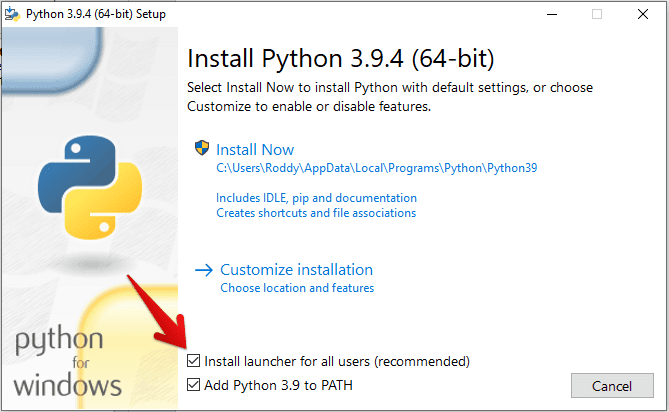
python install
Click on the customize installation and make sure the following boxes are checked.
- Documentation.
- Pip
- Tcl/tk and IDLE(to install tkinter and IDLE)
- Python test suite
- Py launcher
- For all users (requires elevation).
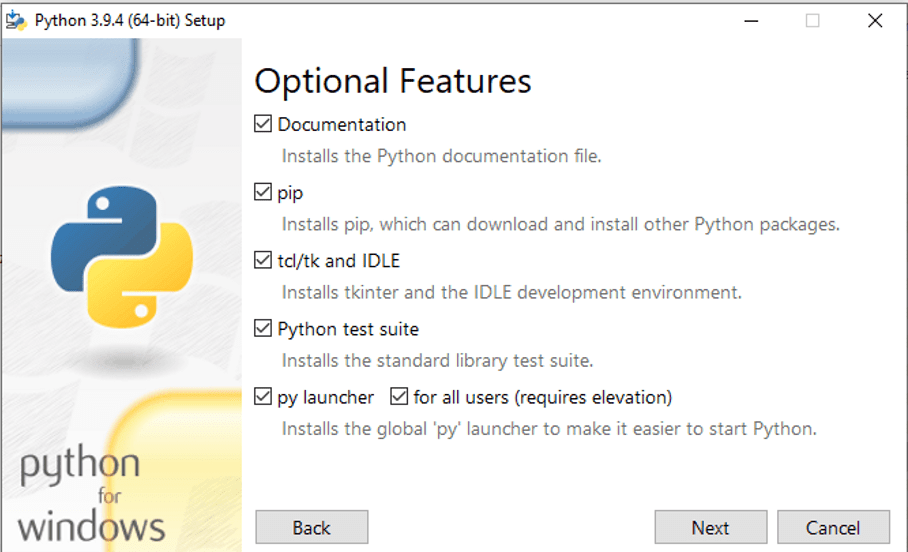
optional features
If you are satisfied with your check box choices, Click “next”.
You will be taken to the advanced options dialog, here you also have to check the following boxes:
- Install for all users.
- Add Python to environment variables (this can be done manually if you don’t check the box, but it will take more time. I recommend checking the box to save time).
Optional
- Associate files with Python (requires py launcher).
- Create shortcuts for installer applications.
You will realize that when you check the install for all users box, precompile standard library will automatically be checked. This is okay.
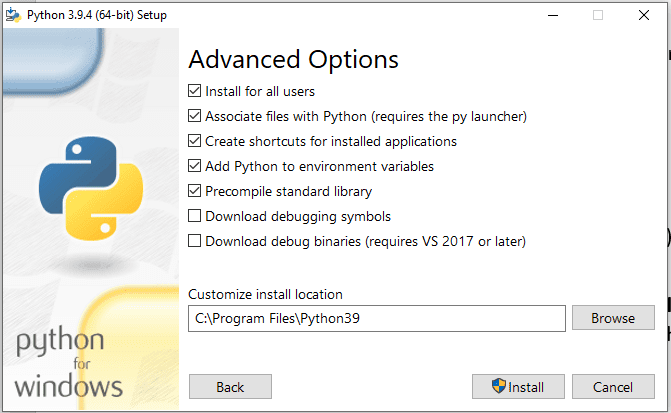
advanced options
Click “Install”.
The installation shouldn’t take very long, and you should see the setup was successful. You have completed your installation, and you can use Python.
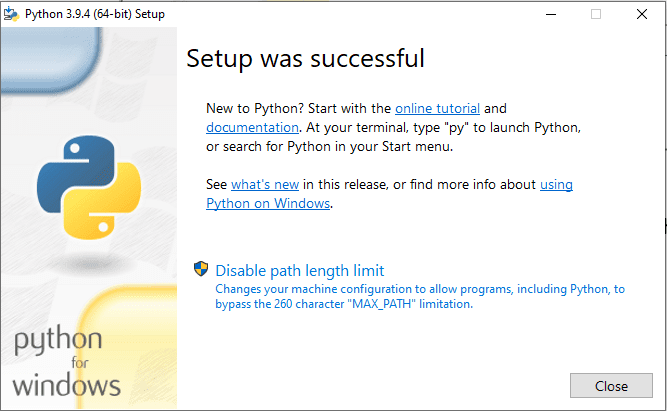
Setup successful
Click “Close”.
Now that we have the latest version of Python running on our computer let’s get to the business that brought us here, that is, installing PyGame on Windows 10.
Installing PyGame on Windows 10
Locating Python folder
Launch file explorer and locate the python folder in the primary disk of your computer. To do this, use the shortcut commands Win+E or open the start menu and search explorer. File explorer should be the first option at the top left of the screen. Click it or press “Enter” to open it.
Python folder location
Copy the address of the Python folder. In my case it is:” C:\ProgramData\Microsoft\Windows\Start Menu\Programs\Python 3.9″
Note: If you did not change the installation on the advanced settings, your python would be installed on the default settings of python installation. Please make sure to change the installation path on the advanced settings as shown above.
Copying the path/address of the python folder
You copy this by right-clicking on the Python name at the top of the screen on file explorer and click “copy address”.
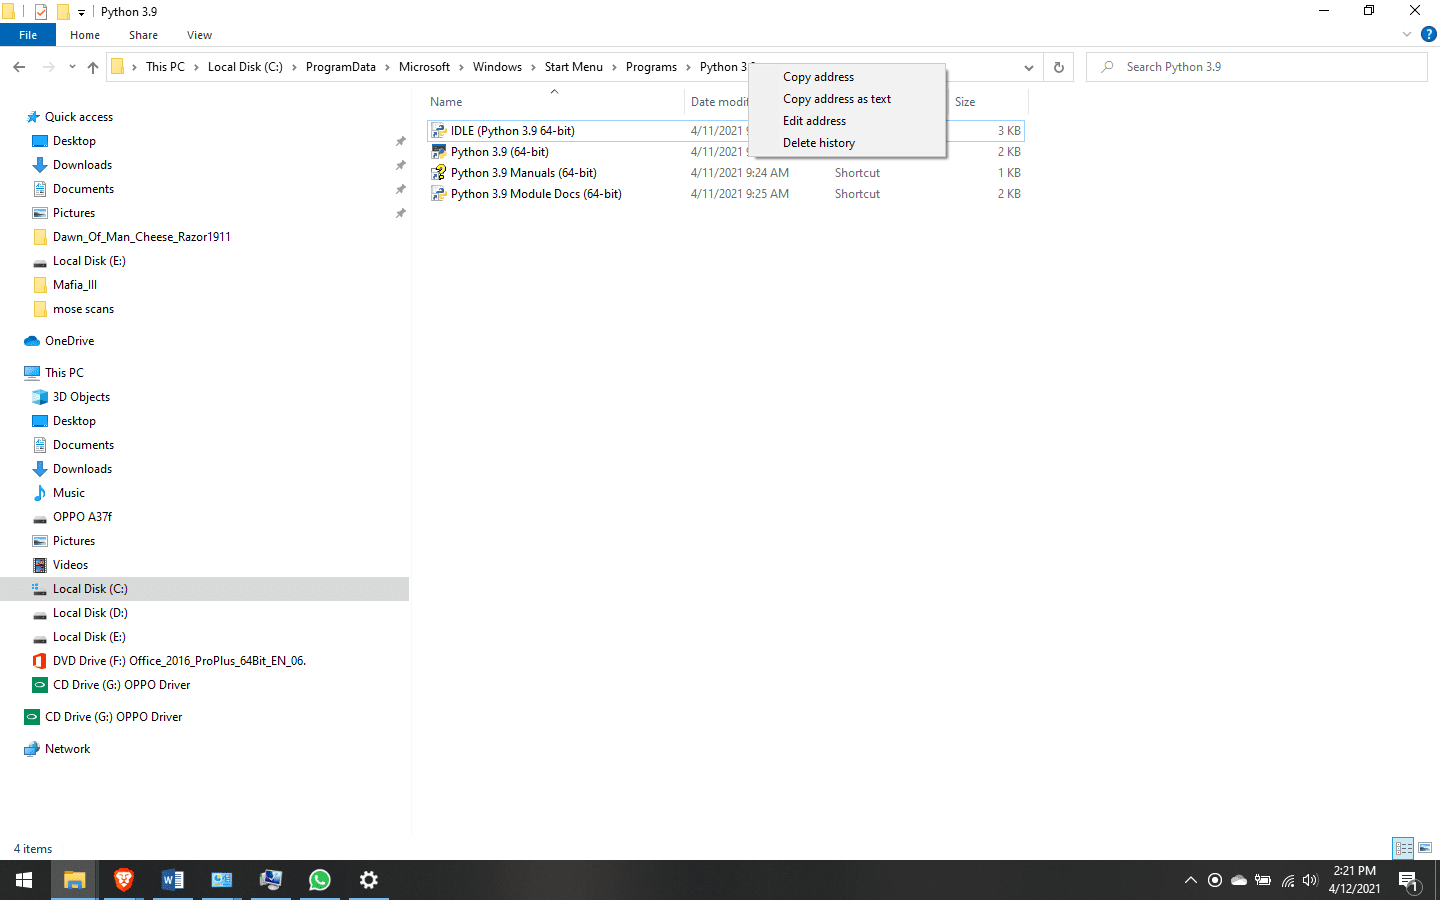
Python folder address
If you changed your installation path, then your location should be as short as this:” C:\Program Files\Python39 ”
Copy this address.
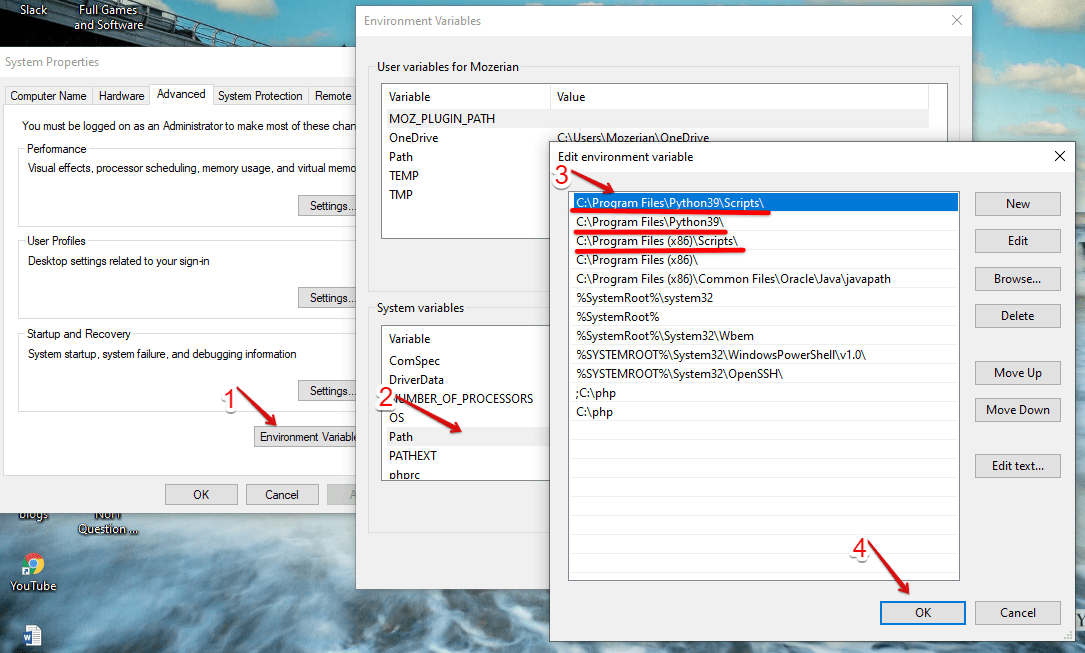
Creating the path
Now that you have your address copied, we want to create a path in the environment variables. So we open the Control Panel. Do this by opening the start menu and search for the Control Panel. The Control Panel should appear at the top left of the screen.
Now click on it or press “Enter” on your keyboard to open it, then click on the System and Security > then Advanced System Settings.
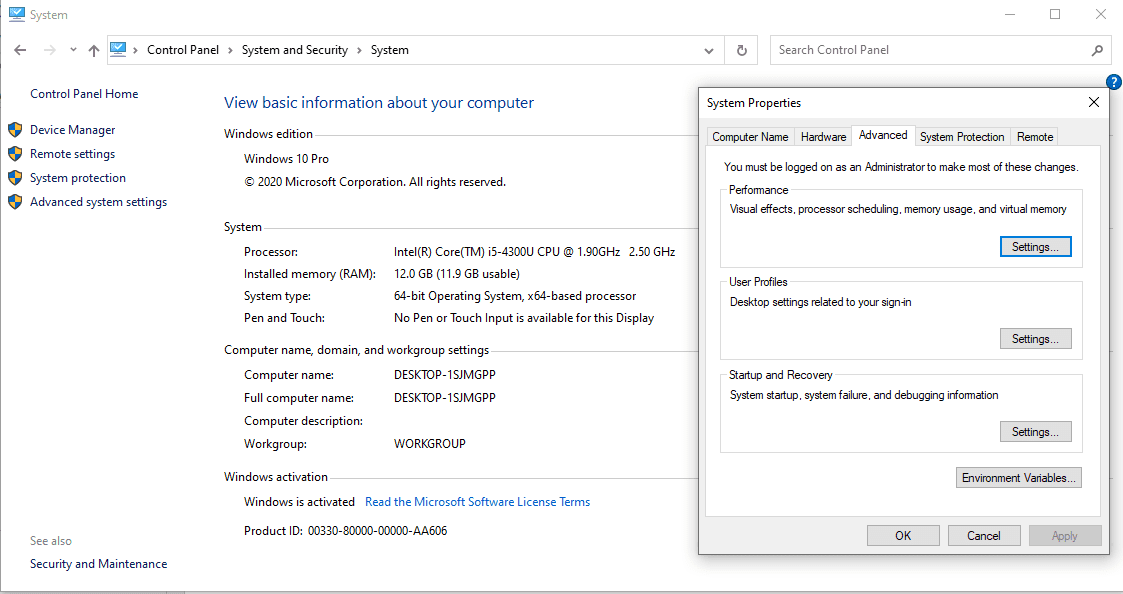
control panel
It would help if you had the above panel opened. Click on Environment Variables.
Environment variables
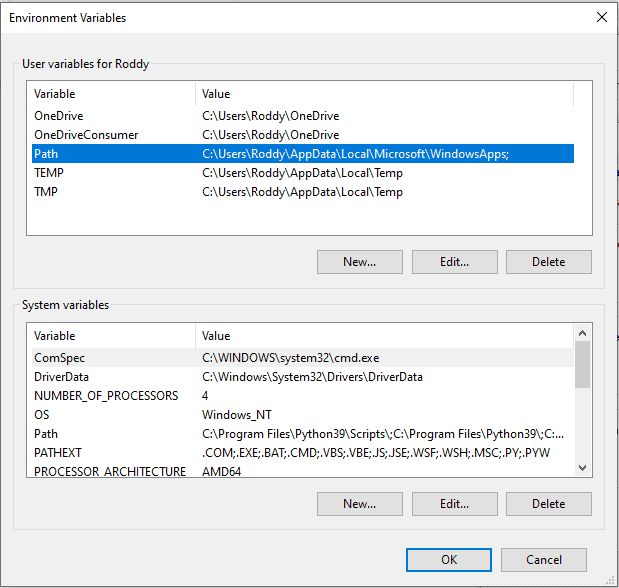
Click “New” and paste the path copied from file explorer into the empty textbox generated on the Environment variables panel like the one above. You can also add Scripts Variable and Click “OK” twice to save the changes.
Python Variables
The two methods of installing Pygame
If all is now set, we can head into the last steps of installing PyGame. In this method, we can use the pip install or download the PyGame set up and install from the setup. The pip install gets PyGame from the internet and installs it on your machine during the setup.
Let’s start by using the setup method:
Head to this website Pygame Installer and download the appropriate installer version for your computer. Save the setup to downloads.
To ensure that we successfully installed Python, Open the command prompt as an administrator and run this command.
“python”

Python Version
This gives you your current installed python version, as shown above.
The next step is to navigate to the location of the downloaded PyGame. In our case:
C:\Users\name\> cd DownloadsThen type the command to install PyGame from the downloads folder as shown below:
C:\Users\name\Downloads> pip install pygame-1.9.1.win32-py2.7.msi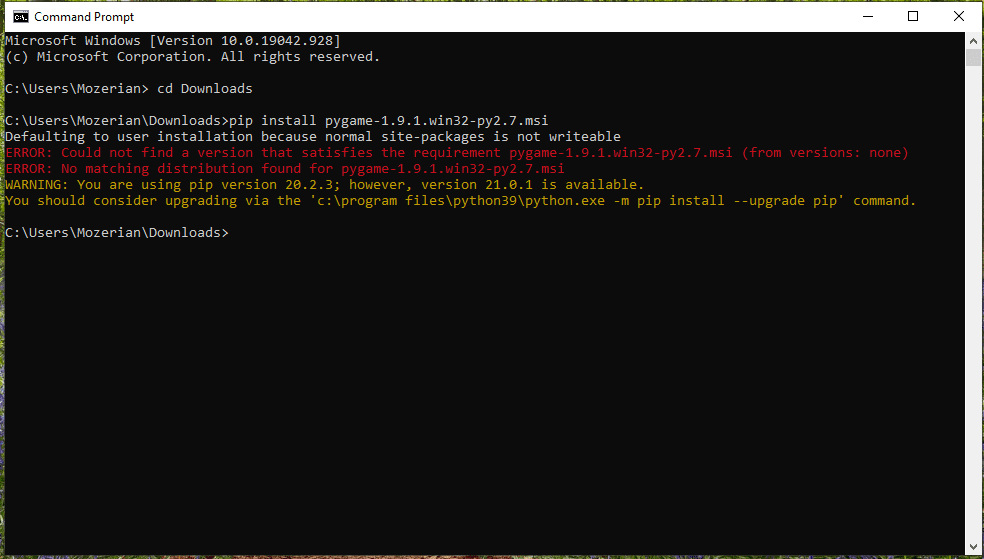
Pygame Install Error
In one way or another, you might encounter this error if your “pip” version is of low version than the current version; hence consider running the below commands to upgrade.
python.exe -m pip install –-upgrade pip

Pip Upgrade
Finally, run the command below to install PyGame from the downloads folder.
C:\Users\Mozerian\Downloads\Programs>pip install pygame-1.9.1.win32-py2.7.msi Let’s now look at the second. The first method can really give you some headaches since you will really do some debugging. I, therefore, recommend using this second option. To install PyGame from the command prompt:
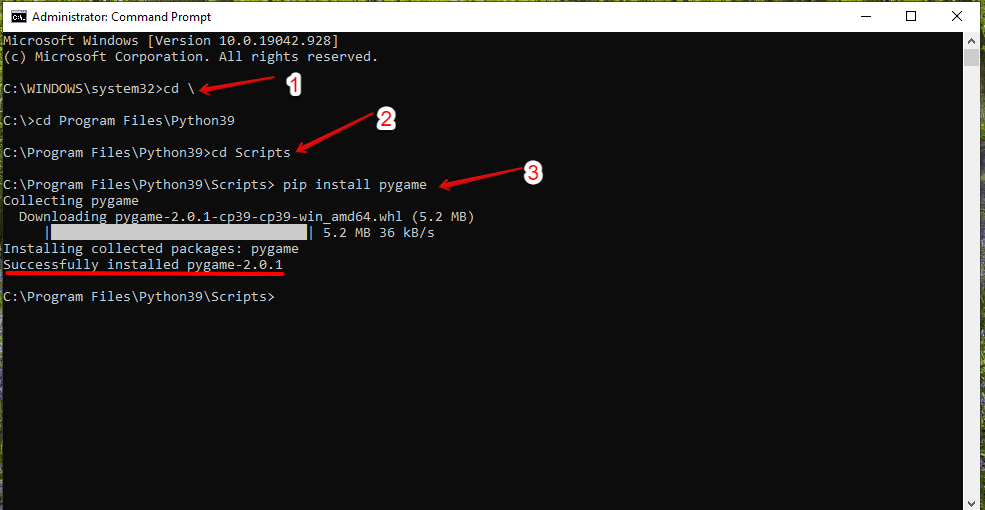
First, open Command Prompt as an Administrator and navigate to the python installation location:
C:\Program Files\Python39
Then cd to Scripts
C:\Program Files\Python39>cd Scripts
You can now install Pygame here: type in “pip install pygame”, and Pygame will be successfully installed.
Install Pygame
PyGame successfully installed. How about running a few commands to launch PyGame and see if it works?
Getting Started with the PyGame
To run Pygame, we must first import all the functions that “Pygame” and “Sys” modules have. Go back to the python location and start python. Write the below commands:
>>> import pygame, sys

Getting started with Pygame
The next step will be to import all PyGame functions. Instead of calling modulename.functionname(), we can do this to import all functions.
from pygame.locals import*We can then initialize Pygame by pygame.init(), and lastly, to display Pygame and run it, we need to set the window size. Type this command, and PyGame will launch.
pygame.display.set_mode((400, 300))

Start Pygame
This will now launch the PyGame, on a window set to (400, 300).
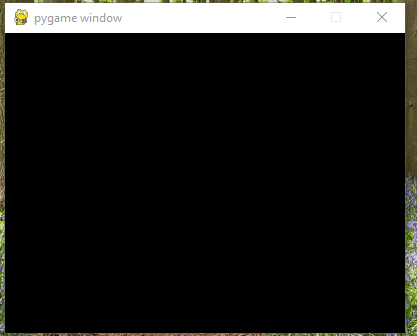
PyGame
Conclusion
We have now successfully installed PyGame using the two methods. The only challenge you may overcome when doing this is the necessity to install python first. If you have no background in python, you do not have to worry since this tutorial guides you on a step-by-step basis. You can know to play around with PyGame, such as setting the Window title and any other thing you wish to. I hope this blog was helpful to you when it comes to installing PyGame on Windows 10.
Installing Pygame on Windows 10 is straightforward. First, ensure you have Python installed. Then, use the Command Prompt to install Pygame via Pip, Python’s package installer. Follow these steps, and you’ll be ready to start creating games and interactive programs with Pygame.
This guide will walk you through the process of installing Pygame on Windows 10. Pygame is a set of Python modules designed for writing video games. It includes computer graphics and sound libraries. Let’s get started!
Step 1: Install Python
Ensure Python is installed on your computer. If not, download and install it from the official Python website (python.org).
Visit the Python website and download the latest version. During installation, check the box that says «Add Python to PATH.» This makes it easier to run Python from the Command Prompt.
Step 2: Open Command Prompt
Open the Command Prompt to prepare for the Pygame installation.
You can do this by typing «cmd» in the Windows search bar and hitting Enter. This opens a black window where you can type commands.
Step 3: Verify Python Installation
Type python --version in Command Prompt to check if Python is properly installed.
If Python is installed correctly, this command will return the version number of Python. If not, you may need to reinstall Python and ensure it’s added to your PATH.
Step 4: Upgrade Pip
Upgrade Pip, Python’s package installer, by typing python -m pip install --upgrade pip.
Pip comes with Python, but upgrading it ensures you have the latest features and security updates.
Step 5: Install Pygame
Finally, type pip install pygame to install Pygame.
This command fetches Pygame from the Python Package Index (PyPI) and installs it on your system. You should see a series of messages indicating the progress of the installation.
After following these steps, Pygame should be installed on your computer, making it ready to use for your game development projects.
Tips for Installing Pygame on Windows 10
- Ensure you have a stable internet connection when downloading Python and Pygame.
- Always add Python to PATH during installation to simplify running Python commands from the Command Prompt.
- Regularly update Pip to take advantage of the latest features and improvements.
- Test Pygame installation by running a simple Pygame script to ensure everything works correctly.
- Consult the official Pygame documentation for troubleshooting tips and advanced features.
Frequently Asked Questions
What is Pygame used for?
Pygame is used for creating video games and multimedia applications in Python. It provides modules for handling graphics, sound, and input.
Do I need to know Python to use Pygame?
Yes, basic knowledge of Python is essential. Pygame is a library that extends Python’s capabilities for game development.
Can I install Pygame on other operating systems?
Absolutely! Pygame can be installed on Windows, macOS, and Linux. The installation process is similar, but the commands and package managers might differ.
How do I check if Pygame is installed correctly?
You can check by running a simple script. Open a Python file and type import pygame. If no errors occur, Pygame is installed correctly.
Is Pygame free to use?
Yes, Pygame is open-source and free to use. You can download, modify, and distribute it without any cost.
Summary
- Install Python from python.org.
- Open Command Prompt.
- Verify Python installation with
python --version. - Upgrade Pip using
python -m pip install --upgrade pip. - Install Pygame using
pip install pygame.
Conclusion
By now, you should have Pygame up and running on your Windows 10 machine. Installing Pygame is a crucial first step for anyone interested in game development using Python. With Pygame, you have a powerful library that simplifies the process of creating games and multimedia applications. Want to dive deeper? Explore Pygame’s extensive documentation and start experimenting with simple projects. Remember, practice makes perfect, so keep coding!
Feel free to share your experiences or ask questions in online forums or communities. Happy game developing!
Kermit Matthews is a freelance writer based in Philadelphia, Pennsylvania with more than a decade of experience writing technology guides. He has a Bachelor’s and Master’s degree in Computer Science and has spent much of his professional career in IT management.
He specializes in writing content about iPhones, Android devices, Microsoft Office, and many other popular applications and devices.
Read his full bio here.
Pygame is a popular library for creating games in Python. It provides tools for handling graphics, sound, and user input. This guide will help you install Pygame and troubleshoot common issues.
Prerequisites
Before installing Pygame, ensure you have Python installed. You can check this by running python --version in your terminal. If Python is not installed, download it from the official website.
Installing Pygame
To install Pygame, use the pip package manager. Open your terminal or command prompt and run the following command:
pip install pygame
This command downloads and installs the latest version of Pygame. Once the installation is complete, you can verify it by importing Pygame in a Python script.
Verifying the Installation
Create a new Python file and add the following code to verify the installation:
    import pygame
    print("Pygame installed successfully!")
Run the script. If you see the message «Pygame installed successfully!», the installation was successful.
Common Errors and Fixes
Sometimes, you may encounter errors like ModuleNotFoundError: No module named ‘pygame’. This usually happens if Pygame is not installed correctly or in the wrong environment.
To fix this, ensure you are using the correct Python environment. If you are using a virtual environment, activate it before running the installation command. For more details, check our guide on How to Fix ModuleNotFoundError: No module named ‘pygame’.
Example: Creating a Simple Pygame Window
Let’s create a simple Pygame window to test the installation. Copy the following code into a Python file:
    import pygame

    # Initialize Pygame
    pygame.init()

    # Set up the display
    screen = pygame.display.set_mode((800, 600))
    pygame.display.set_caption("Pygame Window")

    # Main loop
    running = True
    while running:
        for event in pygame.event.get():
            if event.type == pygame.QUIT:
                running = False

        # Fill the screen with a color
        screen.fill((0, 0, 255))
        pygame.display.flip()

    # Quit Pygame
    pygame.quit()
Run the script. A blue window titled «Pygame Window» should appear. This confirms that Pygame is working correctly.
Conclusion
Installing Pygame is straightforward with pip. However, errors like ModuleNotFoundError can occur if the installation is not done correctly. Follow this guide to ensure a smooth setup.
Once installed, you can start building games with Pygame. For more advanced topics, explore the official Pygame documentation or check out our other tutorials.