
Running File Explorer (aka Windows Explorer) as an administrator in Windows 10 and Windows 11 unlocks a world of possibilities, letting you effortlessly perform tasks that require elevated privileges. Here’s a straightforward and easy-to-follow guide on how to run File Explorer as admin so you can harness this powerful capability in both operating systems.
Opening a normal File Explorer window is simple. There are several ways to do it, including pressing Win+e and searching for Explorer in the Start menu. Here’s another method that opens File Explorer through Task Manager, but with a small twist. Follow these steps to restart Explorer and then open a fresh version:
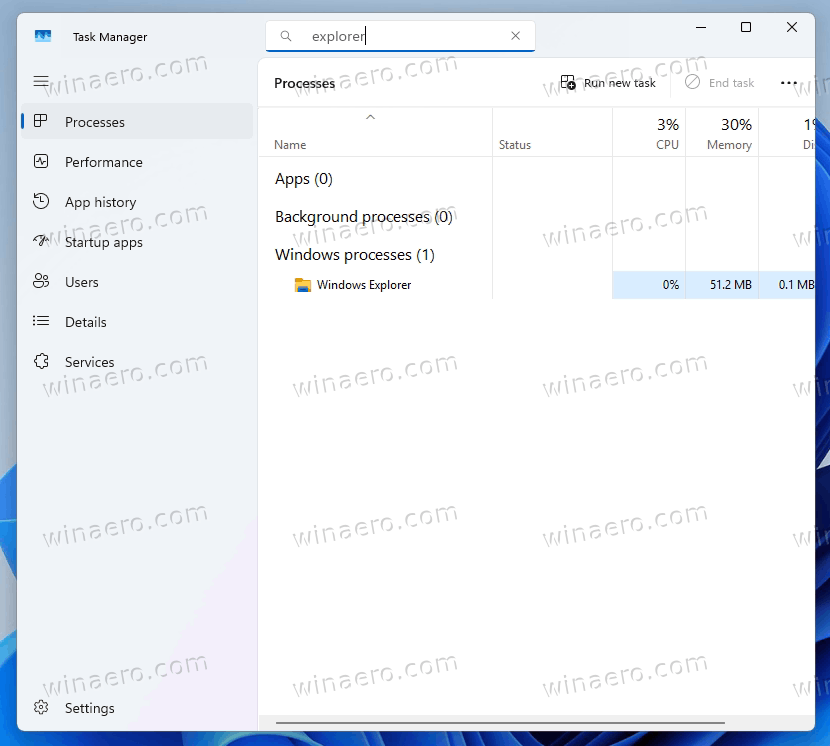
- Right-click the taskbar and select Task Manager, or press Ctrl + Shift + Esc.
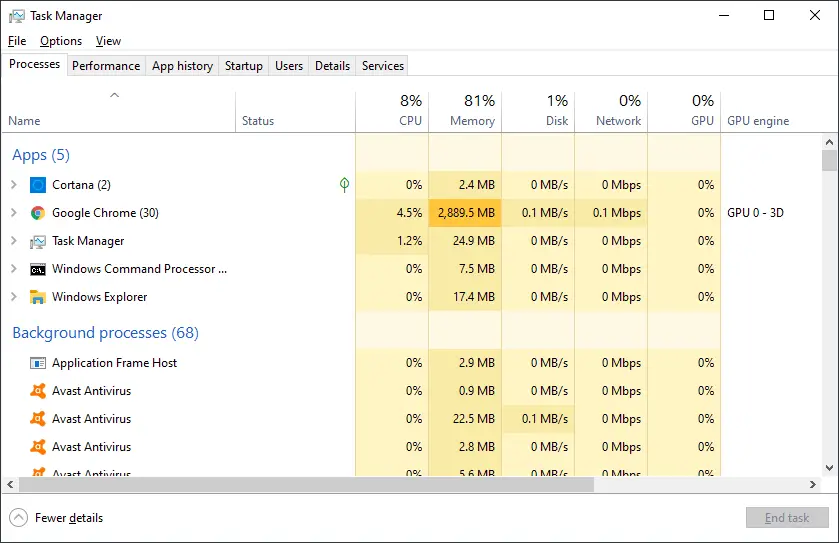
- Go to the Processes tab.
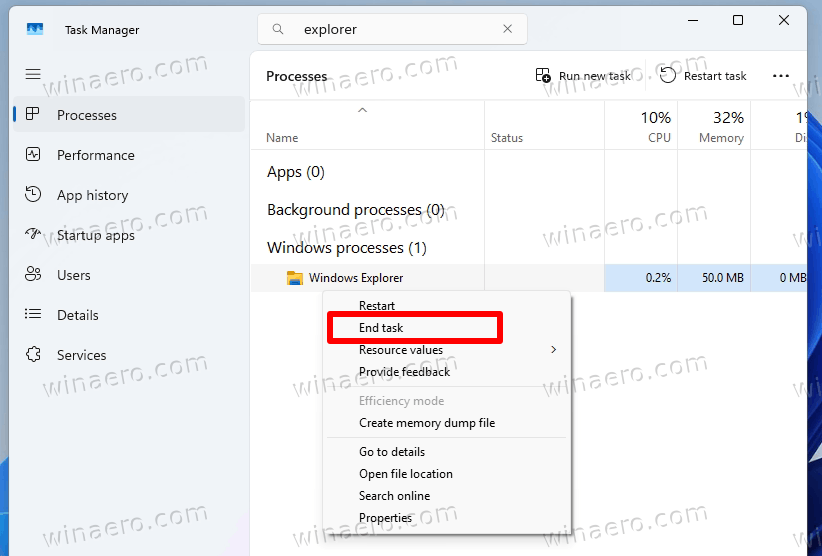
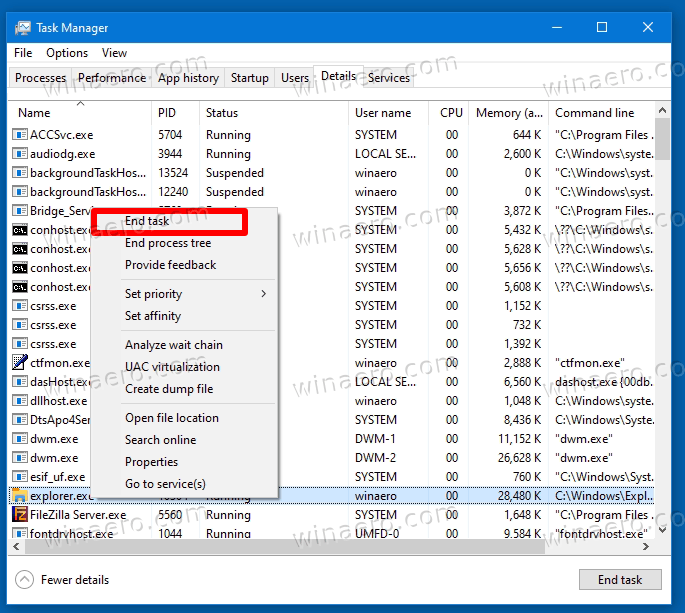
- Right-click Windows Explorer from the list and choose End task.
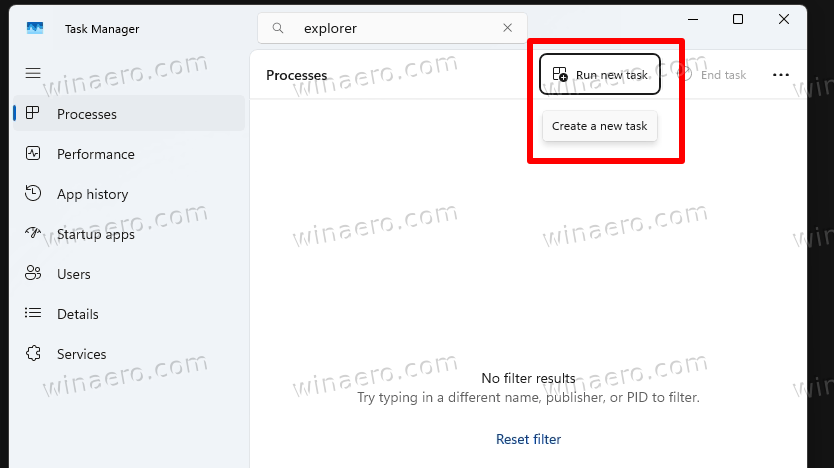
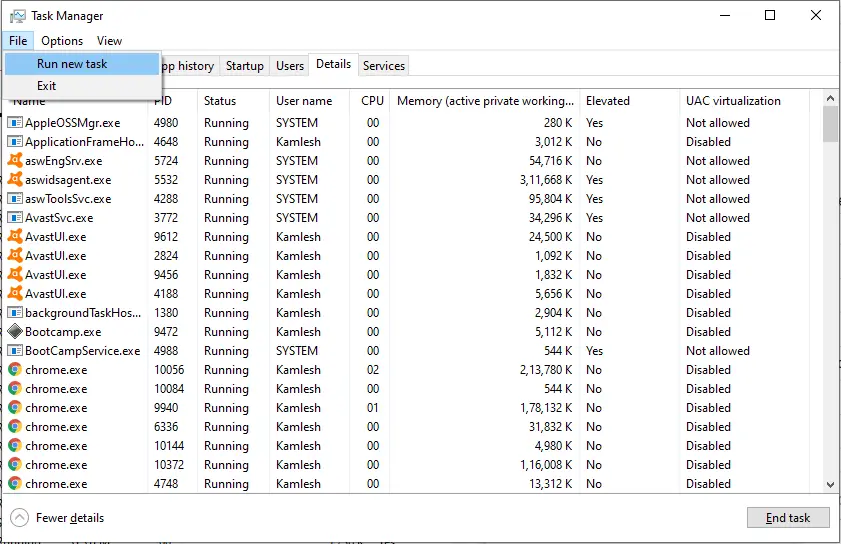
- Open the File menu and select Run new task.
- Type explorer.exe in the text box.
Run File Explorer on Windows 11
This works very similarly on Windows 11:
- Open Task Manager by right-clicking the taskbar and choosing Task Manager. Alternatively, press Ctrl + Shift + Esc.
- From the Processes tab, right-click Windows Explorer and choose End task.
- Select Run new task at the top of Task Manager.
- Type explorer.exe in the text box.
Run File Explorer with Admin Rights
Here are some ways to run File Explorer as admin:
1. From Windows Folder
1. Navigate to C:\Windows in File Explorer.
2. Right-click explorer.exe and select Run as administrator. (Press e a few times to find it.)
3. Accept the UAC prompt.
2. Using Task Manager
1. Open Task Manager (Ctrl+Shift+Esc).
2. Choose Run new task (Windows 11) or File > Run New Task (Windows 10).
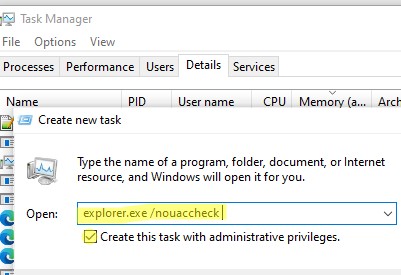
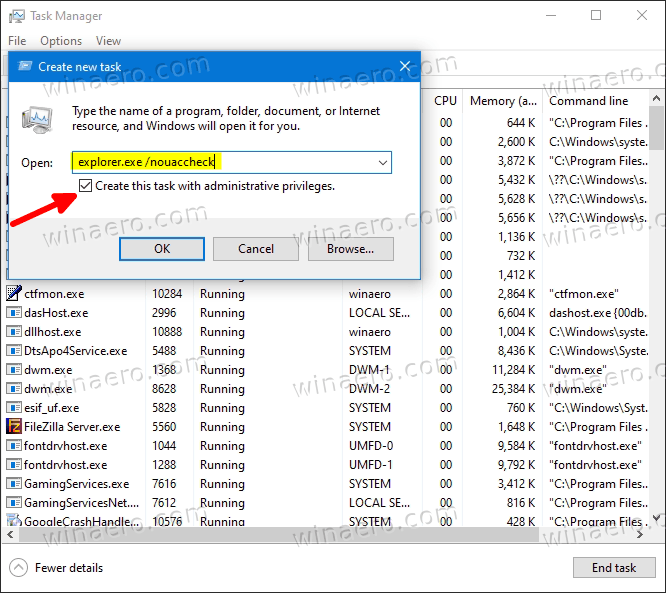
3. Type explorer.exe and check the Create this task with administrative privileges box.
4. Click OK.
3. Via Command Prompt
1. Open Command Prompt as admin (search for cmd, then select Run as administrator).
2. Type explorer.exe and press Enter.
3. A File Explorer window with admin rights will open.
Note: Running File Explorer with elevated privileges only affects the specific instance. Other instances running with normal privileges won’t be elevated.
Benefits of Running File Explorer as Administrator
Running File Explorer as admin can come in handy for certain tasks, especially when you’re dealing with system files or trying to tweak settings that require elevated privileges. Here are some of the biggest ways it’s useful:
- Access to Restricted Files and Folders: Normally, some system files and folders are off-limits to regular users. Once you know how to run File Explorer as admin, you can open, edit, or delete these files without hitting permission walls.
- Change Protected System Settings: Modifying or moving files in system folders (like Windows folders) can be restricted to avoid accidental damage. With admin rights, you can make the changes you need, whether you’re troubleshooting or customizing your system.
- File Ownership and Permissions: If you’re managing multiple users on your system, running File Explorer as administrator lets you take ownership of files or adjust permissions for different users. This can save you headaches when trying to organize or secure important data.
- Batch File Operations: Moving, copying, or deleting lots of files can sometimes trigger permission issues. An admin-level File Explorer avoids these interruptions so you can get the job done without needing to approve each action.
Important Notes
- Running File Explorer as an administrator allows you to access and modify system files and other protected areas of the OS. This should be done with caution to avoid unintended system changes.
- Some system tasks might require administrative privileges and running File Explorer as an administrator can facilitate these operations.
- It’s advisable to revert back to the non-administrative File Explorer for regular use to avoid accidental system modifications.
- If the above steps didn’t work for you, consider simply logging into a user account that already has admin rights.
Now you know how to run File Explorer as an administrator on both Windows 10 and Windows 11. Remember to exercise caution when working with elevated privileges.
Jon Fisher
Tech Writer
Jon G. Fisher is a seasoned tech writer and graduate from Wichita Technical Institute. He has notable publications in Lifewire, TechNorms, and Online-Tech-Tips. With six IT certifications, Jon continues to simplify complex tech for readers worldwide.
В современных версиях Windows проводник (File Explorer) всегда запускается с минимальными привилегиями. Даже если щелкнуть по исполняемому файлу
C:\Windows\explorer.exe
и запустить его в режиме Run as administrator, повышения привилегий не происходит. В этой статье мы рассмотрим способ запуска проводника Windows в привилегированном режиме с правами администратора.
Содержание:
- Как запустить Проводник от имени администратора?
- У вас не разрешений на доступ к этой папке в Windows
Как запустить Проводник от имени администратора?
Чтобы запустить процесс проводника Windows с повышенными привилегиями, сначала нужно завершить непривилегированный процесс explorer.exe.
- Откройте
taskmgr.exe
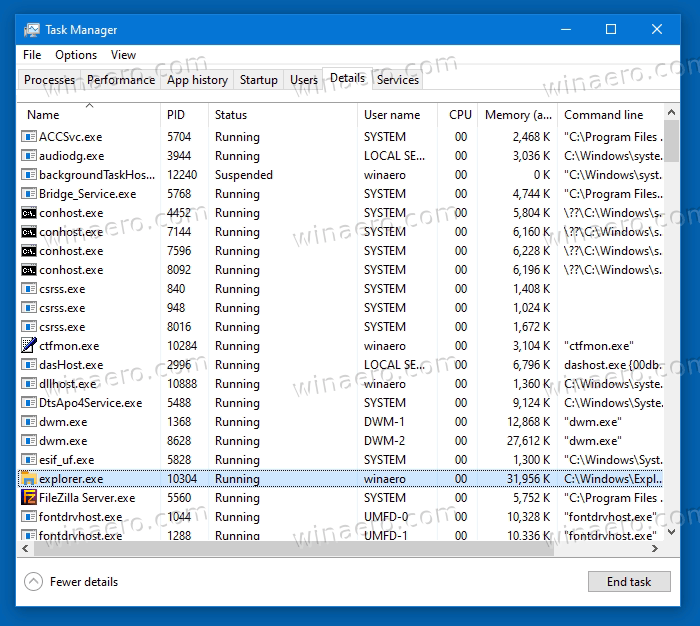
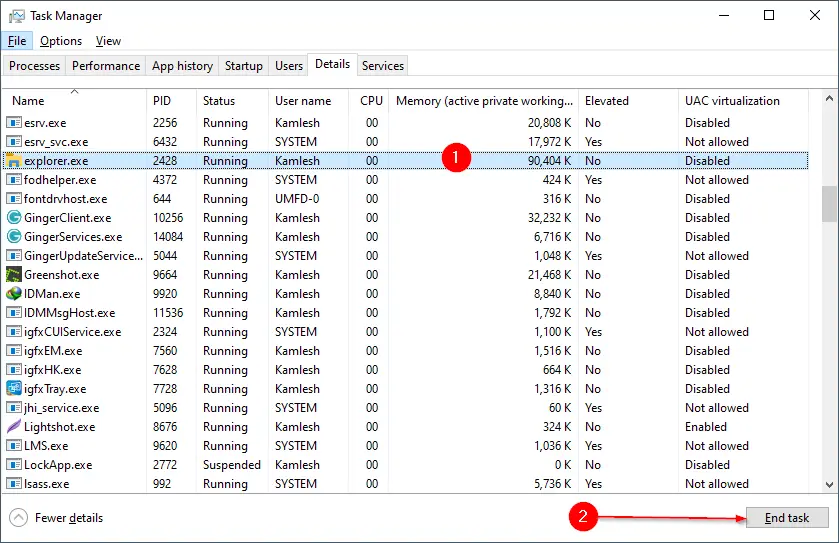
, перейдите на вкладку Details, найдите и завершите процесс
explorer.exe
(End task); - Затем в Task Manager выберите -> File -> Run New Task -> explorer.exe /nouaccheck (обязательно включите опцию Create this task with administrative privileges);

- Это запусит процесс проводника с правами администратора. Как в этом убедиться?
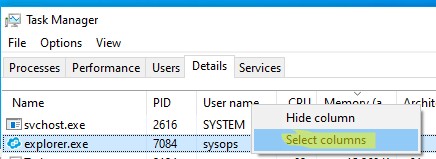
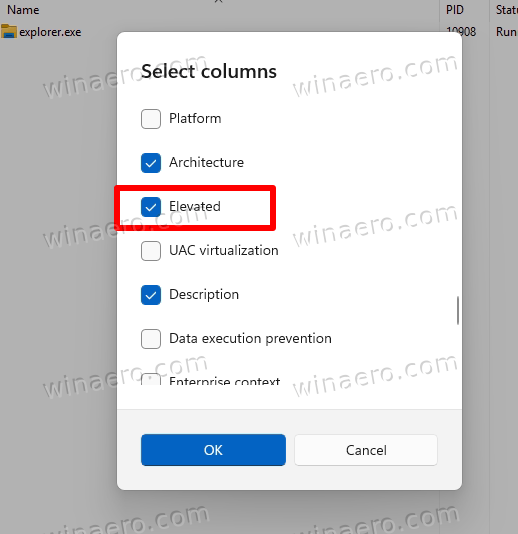
- Щелкните заголовку в списке процессов на вкладке Details и выберите Select Columns;

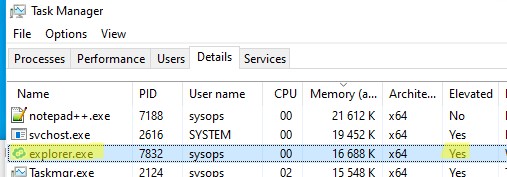
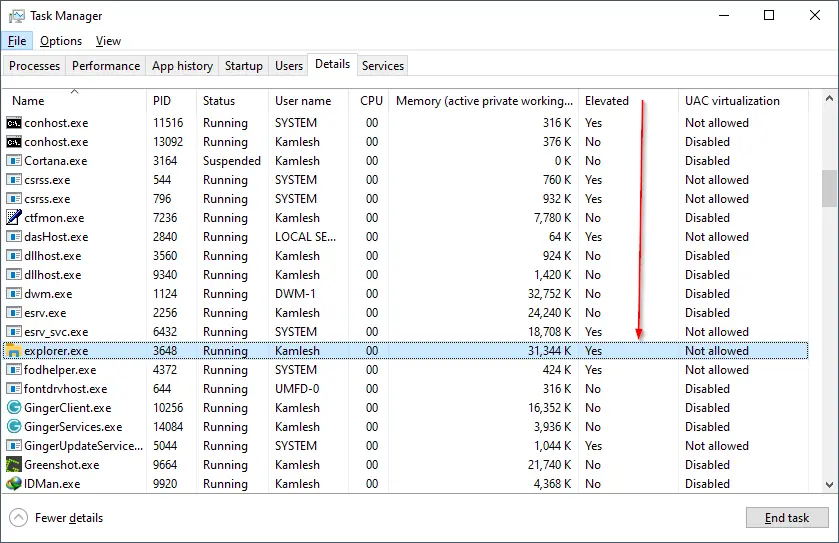
- Включите опцию Elevated;
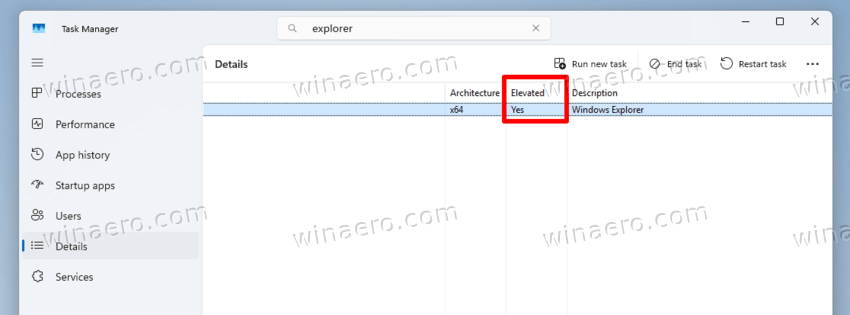
- Теперь видно, что процесс explorer.exe запущен в привилегированном режиме (
Elevated=Yes
).
Также вы можете запустить процесс explorer.exe с правами администратор из консоли PowerShell (обязательно запустите powershell.exe с правами администратора):
taskkill /f /FI "USERNAME eq $env:UserName"/im explorer.exe
Запустите привилегированный процесс explorer.exe:
c:\windows\explorer.exe /nouaccheck

(NO|UAC|CHECK).
Новый процесс explorer унаследует повышенный маркер доступа, с которыми запущена консоль powershell.exe.
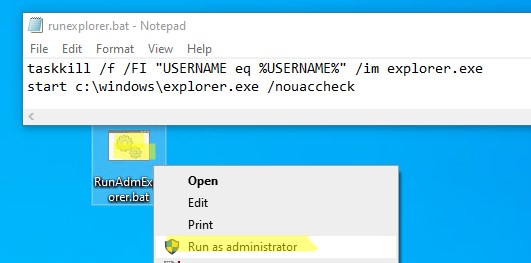
Для быстрого запуска File Explorer с правами администратора можете создать следующий BAT файл на рабочем столе:
taskkill /f /FI "USERNAME eq %USERNAME%" /im explorer.exe
start c:\windows\explorer.exe /nouaccheck
В билде Windows 11 23H2 были внедрены изменения касательно запуска explorer.exe с правами администратора, которые описал Вадим Стеркин в своем блоге. В этом билде Windows контролирует запуск проводника с токеном администратора и прибивает запущенный процесс, а вместо него запускает новый с обычными правами.
Чтобы отключить такое поведение, нужно изменить параметр реестра AutoRestartShell:
$path = 'HKLM:SOFTWARE\Microsoft\Windows NT\CurrentVersion\Winlogon'
New-ItemProperty -Path $path -Name AutoRestartShell -Type Dword -Value 0 -Force | Out-Null
Теперь, при запуске следующей команды в первый раз, Windows все еще стреляет elevated процесс:
taskkill /f /FI "USERNAME eq $env:UserName" /im explorer.exe ; c:\windows\explorer.exe /nouaccheck
Но при повторном запуске, привилегированный explorer.exe останется запущенным.👌
После окончания работы разрешите перзапуск оболочки проводника:
New-ItemProperty -Path $path -Name AutoRestartShell -Type Dword -Value 1 -Force | Out-Null
taskkill /f /FI "USERNAME eq $env:UserName" /im explorer.exe
У вас не разрешений на доступ к этой папке в Windows
Рассмотрим частый сценарий, при котором процесс Проводника, запущенный с правами администратора, может быть особенно удобен.
При работе с проводником Windows (File Explorer) под учетной записью, которая добавлена в группу локальных администраторов (или даже под встроенным администратором Windows), часто приходится открывать системные каталоги, профили других пользователей или редактировать защищенные системные файлы. При попытке открыть такой каталог или файл, появляется предупреждающее окно UAC о необходимости предоставить доступ и повысить привилегии.
Например, попробуйте в проводнике открыть системный каталог C:\Windows\System32\Config. Должно появится окно User Account Control, сообщающее о том, что у вас доступа к каталогу нет:
You don’t currently have permission to access this folder. Click Continue to permanently get access to this folder.
При наличии у вашей учетной записи права администратора вы можете получить через повышение привилегий UAC, нажав кнопку Continue.
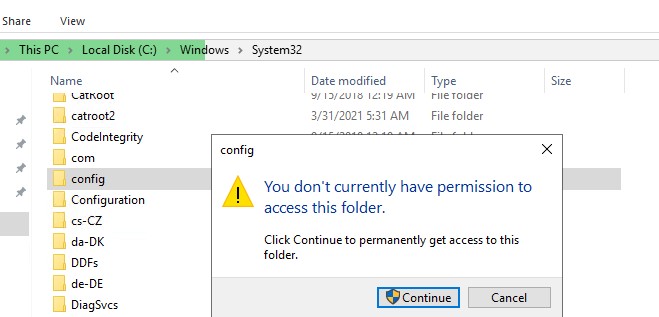
Когда вы нажимаете Continue, UAC временно повышает привилегии вашего процесса explorer.exe и предоставляет вашей учетной записи NTFS права для доступа к данному каталогу (Full Control).
Известные проблемы такого подхода:
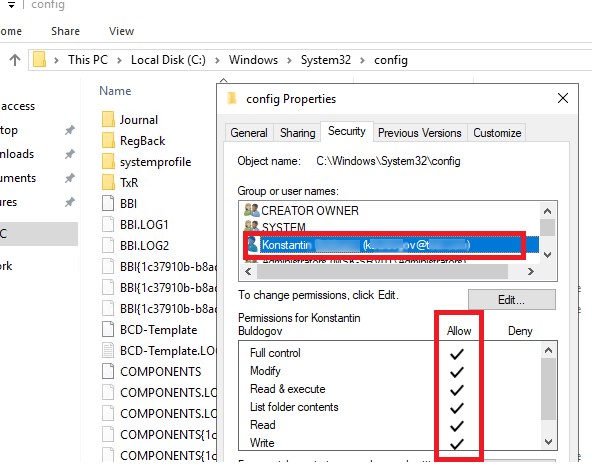
После выполнения такой операции в NTFS разрешениях на папку явно добавляется ваша учетная запись. Хотя все, что вы хотели – просмотреть содержимое каталога, а не менять его ACL! В случае если это хост Windows Server с несколькими администраторами, тогда ACL каталога будет постоянно увеличиваться. Тогда каждый из них при доступе к папке внесет строку доступа для своей учетки и ACL каталога будет постоянно расти.
Данное поведение File Explorer создает большие проблемы при администрировании общих сетевых папок на файловых серверах Windows Server. В качестве обходного решения многие администраторы Windows предпочитаю управлять NTFS разрешениями на сетевые папки не локально, а через UNC путь (
\\msk-fs01\shared\
). В этом случае при доступе к каталогу не нужно повышать привилегии, соответственно, не происходит изменение NTFS разрешений.
При активной работе с системными файлами или общими папками такое выскакивающее уведомление UAC начинает раздражать. Чтобы не отключать UAC полностью, вы можете временно запустить File Explorer от имени администратора .
Когда вы закончите работу с защищенными папками, обязательно перезапустите explorer.exe в обычном режиме.
Данный трюк с запуском процесса проводника Windows с повышенными правами работает как в Windows Server 2016/2019/2022, так и во всех билдах Windows 10/11.
В ранних билдах Windows 10 запуск привилегированного процесса explorer.exe блокировался встроенным заданием планировщика
CreateExplorerShellUnelevatedTask
.
You may want to open File Explorer as Administrator to modify files you have no access to. Those can be files created under a different user account, or some system file you want to play with. In such a situation, you may find that you have no permission to access the file or folder. Running Windows 11 File Explorer as Admin solves the issue.
In order to address issues within a document or access system files for troubleshooting purposes, you may need to run File Explorer elevated. This could be necessary for making significant changes to system files or saving files to protected locations.
If you prefer to maintain control over your workflow without depending on a system administrator to provide elevated permissions, you can manually run File Explorer as an administrator. In modern versions of Windows, File Explorer typically operates with limited privileges as a security measure. Even attempting to run the executable file C:\Windows\explorer.exe as Administrator through the right-click menu does not result in privilege escalation: It will ultimately return to its default permissions.
But this guide will show on how to run Windows 11 Explorer elevated, i.e. with administrative privileges. Note that will require you to terminate
To open Windows 11 File Explorer with administrator rights, do the following.
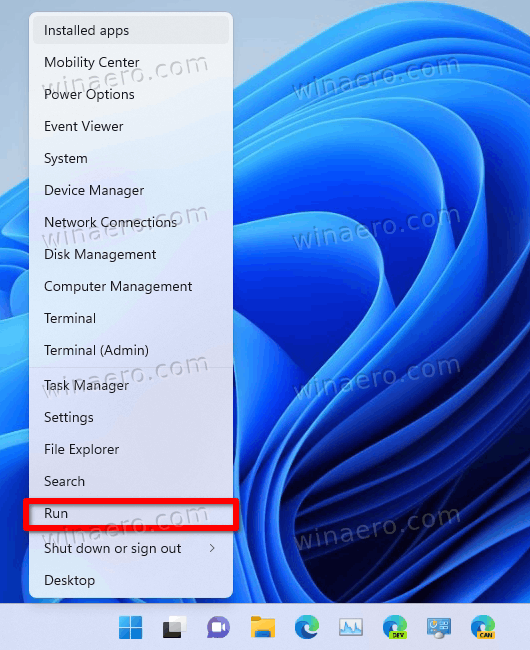
- Right-click the Start button in the taskbar and select Run from the menu.

- In the Run dialog, type
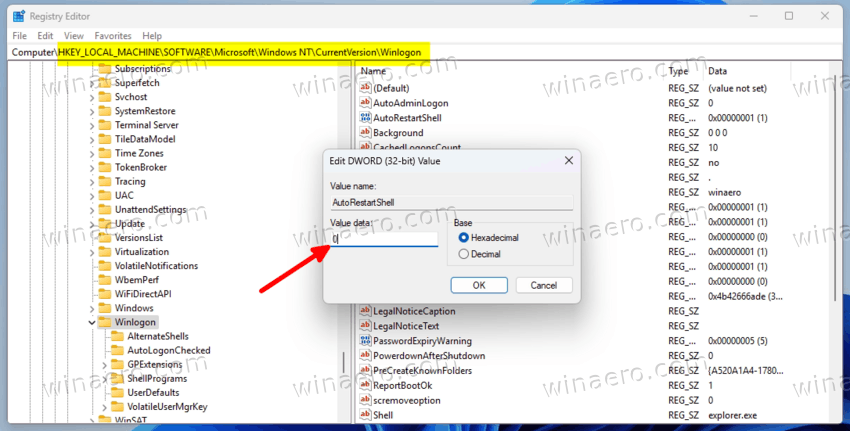
regeditand press the Enter key. - Navigate to the HKEY_LOCAL_MACHINE\SOFTWARE\Microsoft\Windows NT\CurrentVersion\Winlogon key.
- Double-click the AutoRestartShell DWORD value, and change its data from 1 to 0.

- Press Ctrl + Shift + Esc on the keyboard to open the Task Manager.
- In Task Manager, find the explorer process, and right-click it.

- Select End task from the menu, and click OK to confirm. This will stop the Explorer process, so the taskbar and desktop will disappear.

- Now in Task Manager, click on Run new task.

- In the Create new task dialog, type explorer.exe /nouaccheck.

- Place a check mark for the Create this task with administrative privileges option, and click OK.

Done! The Explorer will now run as Administrator. Here is how can you be sure of this.
Check if Explorer runs elevated
In Task Manager, switch to the Details tab.
Now, right-click any column in the process grid, and choose Select columns from the menu.
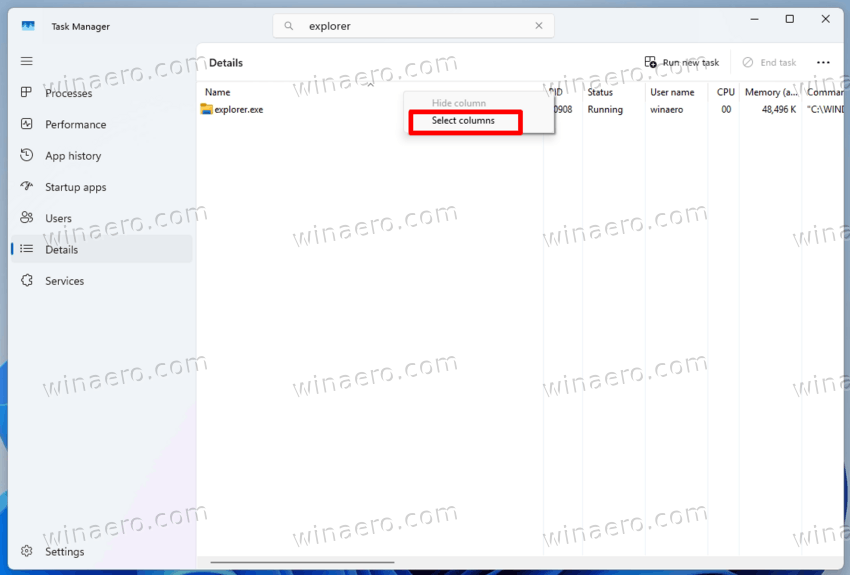
In the list of available columns, enable the Elevated option, and click OK.
You will now clearly see in the Task Manager that Explorer runs as Administrator, and it has Yes in the newly added column.
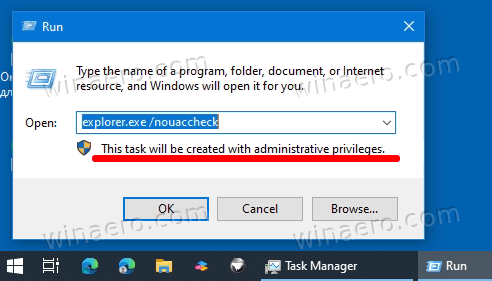
Also, if you now press Win + R to open the Run dialog, you will see a new text message telling that anything you launch will run with administrative privileges.

Keep in mind that now you have all explorer.exe processes running as Administrator. This includes the taskbar, new folder windows — everything. It will also launch all apps (EXE, CMD files) as administrator too. So it is not a good idea to keep with high privileges all the time, as you can accidentally modify or remove a file that was not supposed to be accessed by the regular user.
The same procedure can be done in Windows 10, but it doesn’t require preliminary Registry editing. The latter is new to Windows 11 only. Here are some details.
In Windows 11 version 23H2, Microsoft has done changes to how explorer.exe starts with administrator rights. With 23H2 and above, Windows 11 controls the launch of Explorer with an administrator token and kills the running process, and instead launches a new one with normal rights. The undocumented explorer.exe /nouaccheck argument disables the check, but in order to make it work, you have to restart the automated shell restart in the Registry. But Windows 10 doesn’t perform the automated shell restart, so you can omit the Registry editing.
How to Launch Explorer Elevated in Windows 10
To open Explorer as administrator (elevated) on Windows 10, do the following.
- Open the Task Manager (
taskmgr.exe), and go to the Details tab.
- Find explorer.exe in the list of processes and click on End task. The taskbar and desktop will flash and disappear.

- Again in the Task Manager, select menu > File > Run New Task.
- In the new task box, type
explorer.exe /nouaccheck.
- Now enable the Create this task with administrative privileges option.
- Click OK. This will start the Explorer process with administrator rights (as admin).

You are done!
As you see, there is no much difference between the Windows 11 and 10. Only a small Registry modification is required in case of Windows 11 23H2.
Here’s a final suggestion. Once you finish working with File Explorer running elevated, sign out from Windows and sign in back again. This will reload your user account session and will run the Explorer shell as usual, without administrative privileges. I don’t recommend you running it with high access rights for a long period of time, as it a security risk for your OS.
That’s it.
Support us
Winaero greatly relies on your support. You can help the site keep bringing you interesting and useful content and software by using these options:
If you like this article, please share it using the buttons below. It won’t take a lot from you, but it will help us grow. Thanks for your support!
How do I run File Explorer as an administrator? How do I run Explorer with elevated privileges? By default, Windows 11/10 launches File Explorer with the fewest privileges. If you want to run File Explorer with elevated privileges and don’t want to bother with the UAC prompt, this post will help you do the same. If you frequently run File Explorer as an admin, this post will provide the easiest way to run File Explorer with admin rights in Windows 11/10.
There are multiple ways to open File Explorer with admin privilege; the easiest possible ways are the following:-
- Using Task Manager
- Via File Explorer
How to Run File Explorer with Admin Rights in Windows 11/10 using Task Manager?
Follow these steps to run File Explorer with Admin rights in Windows 11/10 using Task Manager:-
Step 1. Right-click on the free area on the Windows Taskbar and select the Task Manager option. Alternatively, press Windows + Shift + Esc keys simultaneously to open Task Manager in Windows 11/10.
Step 2. If you notice that the Task Manager opens with a few details, click on the More details option on the bottom left to open the Task Manager with full view mode.
Step 3. Once the Task Manager runs on full view mode, switch to the Details tab.

Step 4. Select the explorer.exe process entry and click on the End task button at the bottom right corner of the Task Manager.
Step 5. Once the explorer.exe process ends, click the File menu and select Run new task.
Step 6. A “Create new task” dialog window opens.
Type the following command and check the box labeled “Create this task with administrative privileges”:-
explorer.exe /nouaccheck
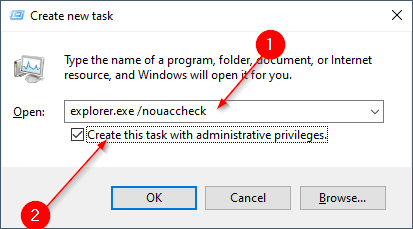
Step 7. Click the OK button.
Step 8. Now, File Explorer opens with administrator or elevated rights.
If you don’t see the Elevated column, you can enable Elevated column in the Task Manager through a few clicks.
Once you run File Explorer or explorer.exe with administrative rights, you will not see a UAC warning when you open any program. Even you can access system files without permission issues.
Ensure you log off or restart your computer as soon as you no longer need to run File Explorer with elevated privileges. When you log back into your account, File Explorer will run in the standard mode again, which means it will no longer run with administrative rights.
How to Run File Explorer with Admin Rights in Windows 11/10 through File Explorer?
It is pretty easy to run File Explorer with admin rights on Windows 11/10. Just open the File Explorer window by pressing the Windows logo + E keys simultaneously and navigate to the following location:-
C:\Windows
In the Windows folder, look for explorer.exe and right-click it. SelectRun as administrator from the context menu, and File Explorer will launch with elevated rights.
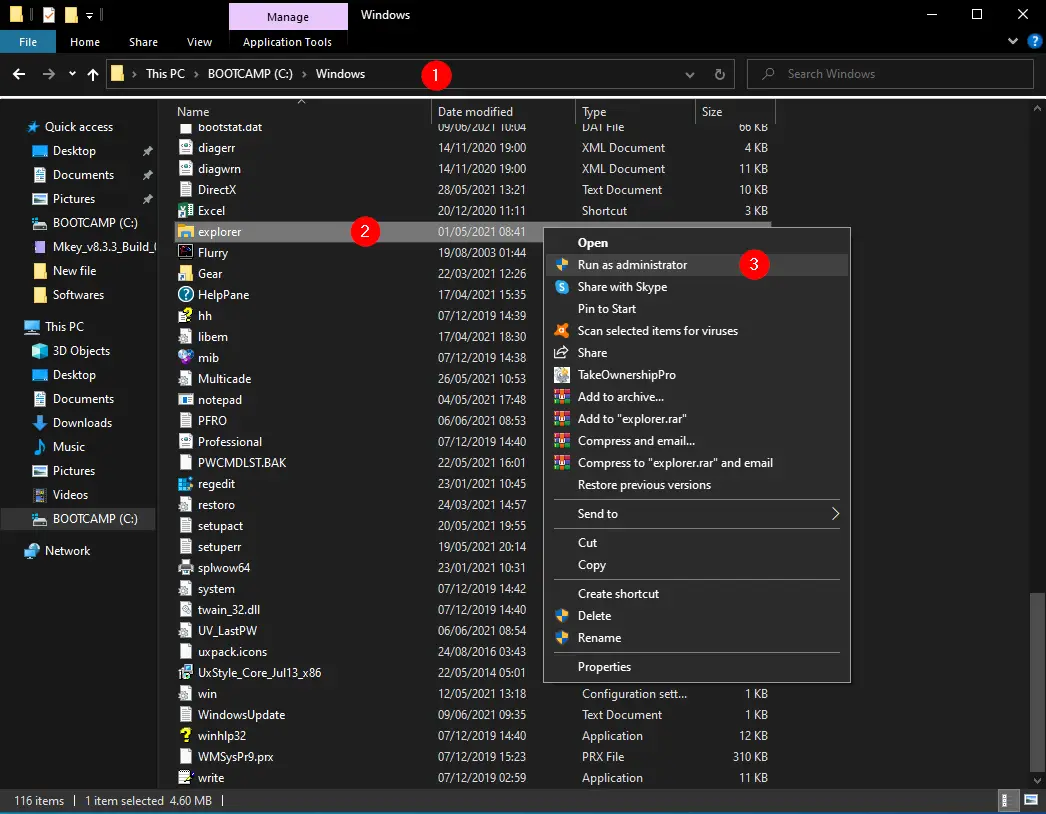
Above mentioned guide to running file explorer as an administrator also works on Windows 7 and 8.
Conclusion
In conclusion, running File Explorer with administrative or elevated privileges in Windows 11/10 is a simple process that can be achieved in two ways: through Task Manager or File Explorer itself. Both methods involve a few easy steps, and once you run File Explorer with elevated rights, you can access system files without any permission issues. However, it is essential to log off or restart the computer as soon as you no longer need to run File Explorer with elevated privileges to prevent any security risks. Additionally, it is worth noting that the same method mentioned in this post works on Windows 7 and 8 as well.
Недавно мой коллега Дмитрий с канала @winitpro_ru обновил свою классику блога про запуск проводника от имени администратора. В статье он объясняет, что это может пригодиться, например, для входа в пользовательские или системные папки без перманентного изменения списков контроля доступа (ACL).
Этот трюк в первую очередь ценен для корпоративных серверов. Дома-то можно и сторонний файловый менеджер с правами администратора запустить. Но любопытно же покопаться в вопросе!
[+] Сегодня в программе
История вопроса
Я интересуюсь этой темой ещё с завещания мистера Гейтса, написанного в 2011 году. Сейчас Дмитрий добавил в свою статью альтернативный метод, который появился уже во времена Windows 10.
Если завершить процесс
explorerи сразу же запустить его с ключом/NoUACCheck, проводник получит полные права.
Этот недокументированный ключ проводника означает «запускать без проверки контроля учетных записей». Впервые он всплыл в рамках запланированного задания CreateExplorerShellUnelevatedTask, которое автоматически создается (а также воссоздается и включается) при первой попытке запустить проводник с полными правами. Это с заметным опозданием разъяснил Рэймонд Чен.
Действительно, если в PowerShell от имени администратора выполнить kill -name explorer; explorer, полноправного процесса не получится. Вместо него из планировщика запустится explorer /nouaccheck. Экспортировав задание в XML, вы увидите, что в него заложен запуск с наименьшими доступными пользователю правами.
<Principal id="Author">
	<UserId>S-1-5-21-1234567890-3333304218-166522979-1000</UserId>
	<LogonType>InteractiveToken</LogonType>
	<RunLevel>LeastPrivilege</RunLevel>
</Principal>
Поскольку администратору выдается два токена (обычный и административный), запуск происходит с обычными правами. Однако, как выяснилось, этот ключ можно приспособить и для запуска с полными правами!
Запуск проводника с полными правами в Windows 10
В Windows 10 22H2 запустите PowerShell от имени администратора и выполните:
kill -name explorer; explorer /nouaccheck
Здесь kill — псевдоним командлета Stop-Process. Но учтите, что эта команда убивает процессы у всех пользователей. Чтобы прибить проводник только у себя, в PowerShell можно так:
Get-Process explorer -IncludeUserName | where UserName -match $ENV:USERNAME | Stop-Process
explorer /nouaccheck
С утилитой taskkill команда будет покороче, но результат тот же — проводник запустится с правами администратора. Чтобы вернуть ему обычные права, завершите процесс и запустите explorer без ключей. Это можно сделать в диспетчере задач и даже в той же консоли.
Отличия в Windows 11
В Windows 11 я этот метод не проверял. Увидев обновление в статье Дмитрия, я решил попробовать, и… способ не сработал у меня в боевой Windows 11 23H2. И в чистой виртуальной машине тоже!
Мы списались с Дмитрием, и в рамках мозгового штурма я отслеживал запуск процессов посредством аудита, а также их завершение с помощью gflags. Выяснились любопытные нюансы.
Последовательность «убил explorer — выполнил от админа с ключом /nouaccheck » запускает цепочку действий под капотом. В игру вступают процессы wermgr (Windows Error Reporting) и winlogon. По ходу дела прибивается запущенный с полными правами процесс, а вместо него стартует новый — с обычными правами.
Детальный разбор ниже, но сразу скажу, что задание планировщика CreateExplorerShellUnelevatedTask здесь не участвует (возможно, потому что проводник уже запускается без проверки UAC).
В итоге различие между поведением Windows 10 и 11 свелось к значению параметра
AutoRestartShellиз раздела реестраHKLM\SOFTWARE\Microsoft\Windows NT\CurrentVersion\Winlogon.
По умолчанию оно равно 1. В Windows 11 23H2 трюк работает, только если установить его равным 0. То есть не перезапускать оболочку автоматически в случае ее закрытия. Иначе winlogon всех побеждает и форсирует перезапуск с обычными правами.
Но даже с отключенным рестартом оболочки первый запуск
explorer /nouaccheckне достигает цели. Его прибивают, поэтому приходится повторять команду. Второй процесс уже выживает.
Возможно, различие в поведении разных поколений ОС является следствием изменений оболочки в Windows 11 — там ведь другой Пуск и панель задач. Кстати, иногда наблюдается побочный эффект — не работает Пуск и поиск (Win + S), некоторые сочетания клавиш (Win + D).
Запуск проводника с полными правами в Windows 11
В сравнении с Windows 10 скрипт для Windows 11 труднее запомнить наизусть:
# https://www.outsidethebox.ms/22306/
# отключение перезапуска оболочки
$path = 'HKLM:SOFTWARE\Microsoft\Windows NT\CurrentVersion\Winlogon'
New-ItemProperty -Path $path -Name AutoRestartShell -Type Dword -Value 0 -Force | Out-Null
# завершение процесса только у текущего пользователя
# Stop-Process -Name explorer #на терминальных серверах убьет процесс у всех
Get-Process explorer -IncludeUserName | where UserName -match $ENV:USERNAME | Stop-Process
explorer /nouaccheck #будет убит
Start-Sleep -Seconds 1
explorer /nouaccheck #останется с полными правами
# включение перезапуска оболочки
New-ItemProperty -Path $path -Name AutoRestartShell -Type Dword -Value 1 -Force | Out-Null
# завершение процесса, и теперь сам перезапустится с обычными правами
# Get-Process explorer -IncludeUserName | where UserName -match $ENV:USERNAME | Stop-Process
При таком раскладе для разовой задачи может быть проще обойтись блокнотом с правами админа.
Демо и разбор поведения в Windows 11
На видео этот же скрипт обставлен дополнительными проверками и выводом вспомогательных сообщений. Я также задействовал
- Сторонний скрипт для определения уровня целостности выполняющегося процесса. Фактически он дублирует столбцы Elevated в диспетчере задач и Integrity Level в Process Monitor.
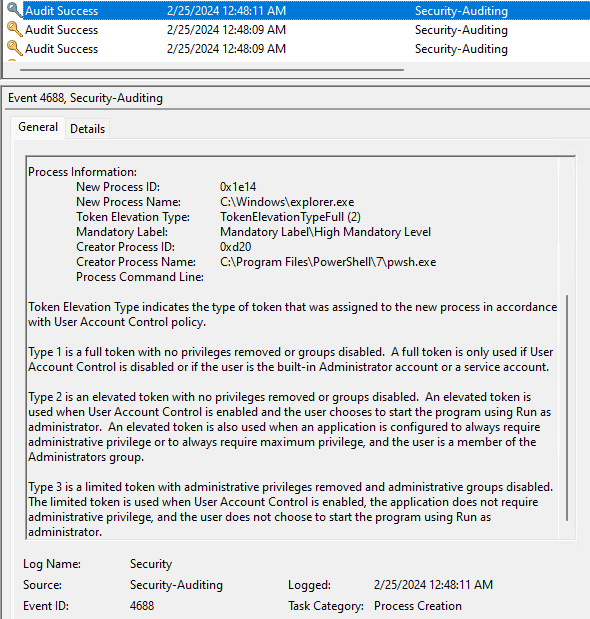
- Мой скрипт для обработки событий аудита процессов. В событии 4688 тоже содержится информация о токене процесса (Token Elevation Type) и его уровне целостности (Mandatory Label).
/blog/wp-content/uploads/explorer-elevated-public.mp4
Для начала я отключаю перезапуск оболочки, убиваю explorer и запускаю новый с ключом /nouaccheck.
Setting AutoRestartShell = 0

AutoRestartShell : 0

Starting explorer elevated...

Sunday, February 25, 2024 12:48:11 AM
Это порождает запуск двух процессов. Консольный вывод списка процессов во время этой операции не слишком точный, поэтому я опираюсь на видео и аудит.
EventTime         : 2024-02-25T08:48:12.3249754Z
NewProcessID      : 8464
NewProcessName    : C:\Windows\explorer.exe
ParentProcessID   : 7700
ParentProcessName : C:\Windows\explorer.exe

EventTime         : 2024-02-25T08:48:11.2992578Z
NewProcessID      : 7700
NewProcessName    : C:\Windows\explorer.exe
ParentProcessID   : 3360
ParentProcessName : C:\Program Files\PowerShell\7\pwsh.exe
Из PowerShell выполняется ИД 7700, в свою очередь из под него запускается ИД 8464. На картинке запуск процесса с ИД 7700 в графическом интерфейсе журнале событий. Идентификаторы процессов выглядят недружелюбно, но в скрипте это легко обрабатывается — [int]$id.
Тут же в дело вступает Windows Error Reporting, чей процесс wermgr.exe запускается с помощью запланированного задания.
   ProviderName: Microsoft-Windows-TaskScheduler

TimeCreated                     Id LevelDisplayName Message
-----------                     -- ---------------- -------
2/25/2024 12:48:13 AM          100 Information      Task Scheduler
                                                    started "{58c1e3bc-
                                                    9637-4830-b106-72d9
                                                    99259bc6}"
                                                    instance of the "\M
                                                    icrosoft\Windows\Wi
                                                    ndows Error Reporti
                                                    ng\QueueReporting"
                                                    task for user "NT
                                                    AUTHORITY\СИСТЕМА".
2/25/2024 12:48:13 AM          129 Information      Task Scheduler
                                                    launch task "\Micro
                                                    soft\Windows\Window
                                                    s Error Reporting\Q
                                                    ueueReporting" ,
                                                    instance "%windir%\
                                                    system32\wermgr.exe
                                                    "  with process ID
                                                    1600.
В результате оба процесса explorer завершаются. В скрипте я убеждаюсь в их отсутствии и снова запускаю проводник с полными правами, после чего проверяю его уровень целостности. Он высокий!
Title               : Displaying Process/Primary Information
ProcessName         : explorer
SessionId           : 1
PID                 : 9132
TokenIntegrityLevel : HIGH_MANDATORY_LEVEL
Этому процессу соответствует запись аудита.
EventTime         : 2024-02-25T08:48:16.3657996Z
NewProcessID      : 9132
NewProcessName    : C:\Windows\explorer.exe
ParentProcessID   : 3360
ParentProcessName : C:\Program Files\PowerShell\7\pwsh.exe
Наконец, я возвращаю все на исходные позиции – восстанавливаю перезапуск оболочки и убиваю ее. В результате автоматически запускается процесс explorer с обычными правами (средним уровнем целостности).
Setting AutoRestartShell = 1, killing explorer. Should auto-start non-elevated...
Sunday, February 25, 2024 12:48:26 AM

AutoRestartShell : 1

Title               : Displaying Process/Primary Information
ProcessName         : explorer
SessionId           : 1
PID                 : 8580
TokenIntegrityLevel : MEDIUM_MANDATORY_LEVEL
В журнале аудита видно, что родительским процессом был winlogon.
EventTime         : 2024-02-25T08:48:26.4698992Z
NewProcessID      : 8580
NewProcessName    : C:\Windows\explorer.exe
ParentProcessID   : 820
ParentProcessName : C:\Windows\System32\winlogon.exe
Конец!
Я благодарю за помощь в подготовке материала участников чата @winsiders — Nirai Charged Pulse и Андрея Шубина.