
Applies ToWindows 11 Windows 10
Средство проверки системных файлов — это служебная программа в Windows, которая проверяет наличие проблем с файлами на компьютере. Чтобы запустить ее, выполните следующие действия.
-
Убедитесь, что установлены последние обновления для Windows, а затем перезапустите компьютер. Дополнительные сведения см. в статье Обновление Windows.
-
В поле поиска на панели задач введите командную строку и щелкните правой кнопкой мыши или нажмите и удерживайте командную строку (классическое приложение) в списке результатов. Выберите Запуск от имени администратора, а затем —Да.
-
Введите DISM.exe /Online /Cleanup-image /Restorehealth (обратите внимание на пробел перед каждой косой чертой «/»), а затем нажмите ВВОД. (Примечание. Запуск и завершение этого шага может занять несколько минут.)
-
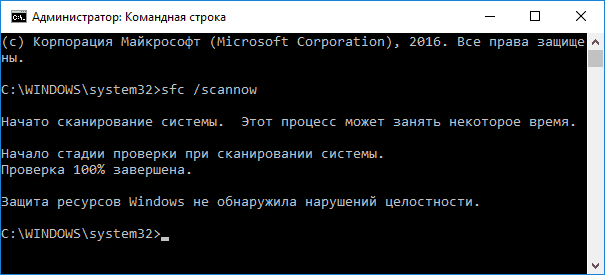
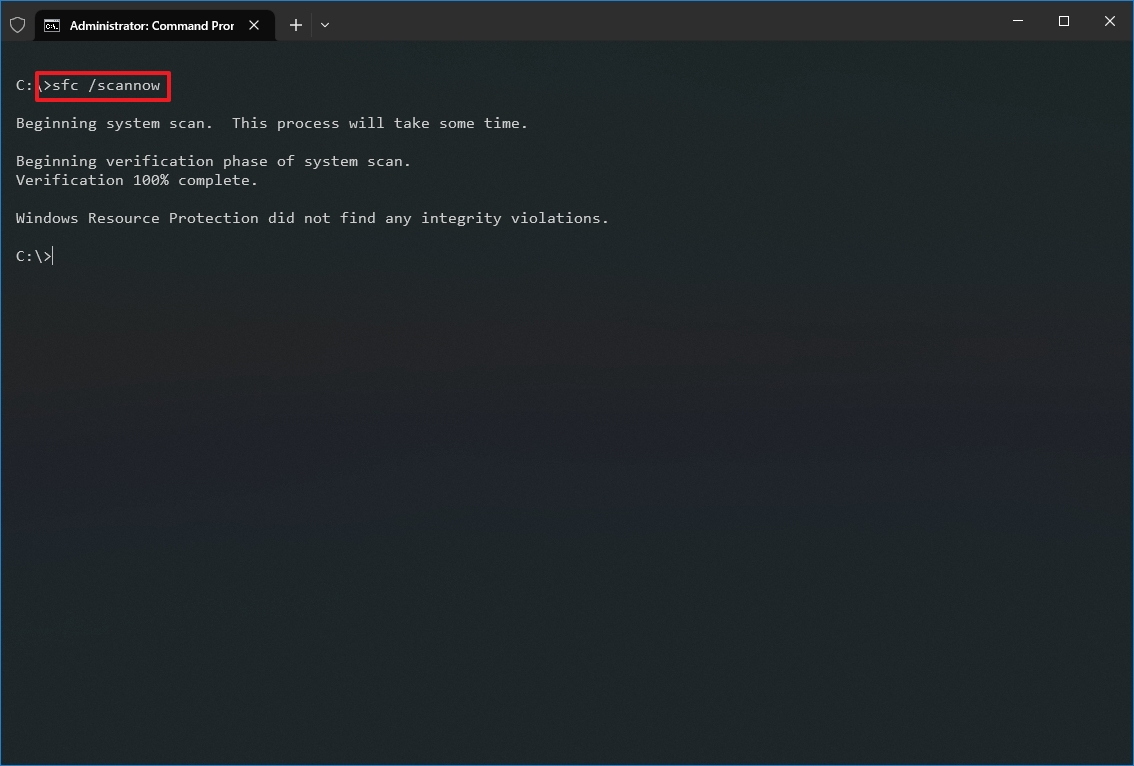
После того как появится сообщение «Операция успешно завершена», введите sfc /scannow (обратите внимание на пробел между «sfc» и «/») и нажмите клавишу ВВОД.
-
Когда появится сообщение «Проверка 100 % завершена», введите exit и нажмите клавишу ВВОД.
Дополнительные сведения о системной проверке файлов
Нужна дополнительная помощь?
Нужны дополнительные параметры?
Изучите преимущества подписки, просмотрите учебные курсы, узнайте, как защитить свое устройство и т. д.
Проверка целостности системных файлов Windows 10 может пригодиться в том случае, если у вас есть основания полагать, что такие файлы были повреждены или же возникли подозрения о том, что какая-либо программа могла изменить системные файлы операционной системы.
В Windows 10 присутствует два инструмента для проверки целостности защищенных системных файлов и их автоматического восстановления при обнаружении повреждений — SFC.exe и DISM.exe, а также команда Repair-WindowsImage для Windows PowerShell (использующая DISM для работы). Вторая утилита служит дополнением первой, в случае, если SFC не удается восстановить поврежденные файлы.
Примечание: описываемые в инструкции действия безопасны, однако, в том случае, если до этого вы проделывали какие-либо операции, связанные с заменой или изменением системных файлов (например, для возможности установки сторонних тем и т.п.), в результате восстановления системных файлов, эти изменения будут отменены.
Использование SFC для проверки целостности и исправления системных файлов Windows 10
Многим пользователям знакома команда проверки целостности системных файлов sfc /scannow которая автоматически проверяет и исправляет защищенные системные файлы Windows 10.
Для запуска команды стандартно используется командная строка, запущенная от имени администратора (запустить командную строку от администратора в Windows 10 можно, введя «Командная строка» в поиске в панели задач, затем — правый клик по найденному результату — Запуск от имени администратора), вводим в нее sfc /scannow и нажимаем Enter.
После ввода команды, начнется проверка системы, по результатам которой найденные ошибки целостности, которые можно исправить (о том, какие нельзя — далее) будут автоматически исправлены с сообщением «Программа защиты ресурсов Windows обнаружила поврежденные файлы и успешно их восстановила», а в случае их отсутствия вы получите сообщение о том, что «Защита ресурсов Windows не обнаружила нарушений целостности».
Также имеется возможность проверить целостность конкретного системного файла, для этого можно использовать команду
sfc /scanfile="путь_к_файлу"
Однако при использовании команды есть один нюанс: SFC не может исправить ошибки целостности для тех системных файлов, которые используются в настоящий момент времени. Чтобы решить проблему, можно запустить SFC через командную строку в среде восстановления Windows 10.
Запуск проверки целостности Windows 10 с помощью SFC в среде восстановления
Для того, чтобы загрузиться в среде восстановления Windows 10, вы можете использовать следующие способы:
- Зайти в Параметры — Обновление и безопасность — Восстановление — Особые варианты загрузки — Перезагрузить сейчас. (Если пункт отсутствует, то вы можете также использовать такой метод: на экране входа в систему, кликните по значку «вкл» справа внизу, а затем, удерживая Shift, нажмите «Перезагрузка»).
- Загрузиться с заранее созданного диска восстановления Windows.
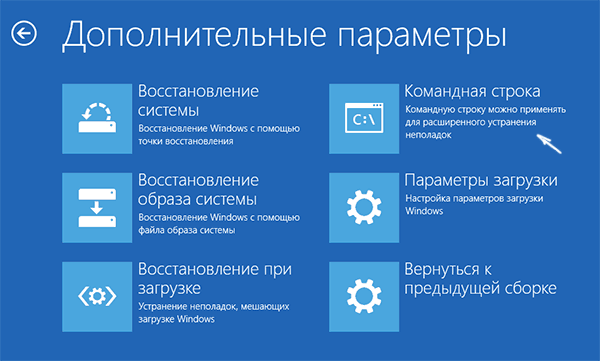
- Загрузиться с установочного диска или загрузочной флешки с дистрибутивом Windows 10, а в программе установки, на экране после выбора языка, слева внизу выбрать «Восстановление системы».

- После этого, зайдите в «Поиск и устранение неисправностей» — «Дополнительные параметры» — «Командная строка» (в случае если вы использовали первый из указанных выше способов, вам также потребуется ввести пароль администратора Windows 10). В командной строке по порядку используйте следующие команды:
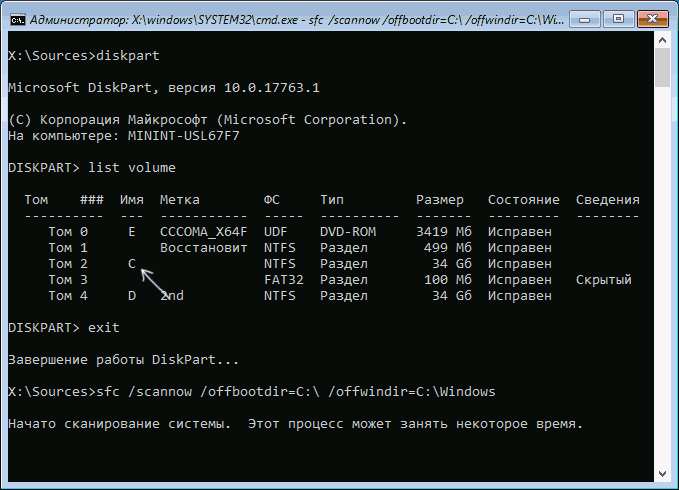
- diskpart
- list volume
- exit
- sfc /scannow /offbootdir=C:\ /offwindir=C:\Windows (где C — раздел с установленной системой, а C:\Windows — путь к папке Windows 10, у вас буквы могут отличаться).

- Запустится сканирование целостности системных файлов операционной системы, при этом в этот раз команде SFC будет доступно восстановление всех файлов, при условии, что не повреждено хранилище ресурсов Windows.
Сканирование может продолжаться в течение значительного времени — пока мигает указатель подчеркивания, ваш компьютер или ноутбук не завис. По завершении закройте командную строку и перезагрузите компьютер в обычном режиме.
Восстановление хранилища компонентов Windows 10 с помощью DISM.exe
Утилита для развертывания и обслуживания образов Windows DISM.exe позволяет выявить и исправить те проблемы с хранилищем системных компонентов Windows 10, откуда при проверке и исправлении целостности системных файлов копируются оригинальные их версии. Это может быть полезным в тех ситуациях, когда защита ресурсов Windows не может выполнить восстановление файлов, несмотря на найденные повреждения. В этом случае сценарий будет следующим: восстанавливаем хранилище компонентов, а после этого снова прибегаем к использованию sfc /scannow.
Для использования DISM.exe, запустите командную строку от имени администратора. После чего можно использовать следующие команды:
Примечание: в случае, если команда восстановления хранилища компонентов не работает по той или иной причине, вы можете использовать файл install.wim (или esd) со смонтированного ISO образа Windows 10 (Как скачать Windows 10 ISO с сайта Microsoft) в качестве источника файлов, требующих восстановления (содержимое образа должно соответствовать установленной системе). Сделать это можно с помощью команды:
dism /Online /Cleanup-Image /RestoreHealth /Source:wim:путь_к_файлу_wim:1 /limitaccess
Вместо .wim можно использовать файл .esd тем же образом, заменив в команде все wim на esd.
При использовании указанных команд, журнал выполненных действий сохраняется в Windows\Logs\CBS\CBS.log и Windows\Logs\DISM\dism.log.
DISM.exe также можно использовать в Windows PowerShell, запущенном от имени администратора (запустить можно из меню правого клика по кнопке Пуск) с помощью команды Repair-WindowsImage. Примеры команд:
- Repair-WindowsImage -Online -ScanHealth — проверка наличия повреждений системных файлов.
- Repair-WindowsImage -Online -RestoreHealth — проверка и исправление повреждений.
Дополнительные методы восстановления хранилища компонентов, если описанные выше не срабатывают: Восстановление хранилища компонентов Windows 10.
Как видите, проверка целостности файлов в Windows 10 — не такая уж и сложная задача, которая порой может помочь исправить самые разные проблемы с ОС. Если не смогла, возможно, вам поможет что-то из вариантов в инструкции Восстановление Windows 10.
Как проверить целостность системных файлов Windows 10 — видео
Также предлагаю ознакомиться с видео, где использование основных команд проверки целостности показано наглядно с некоторыми пояснениями.
Дополнительная информация
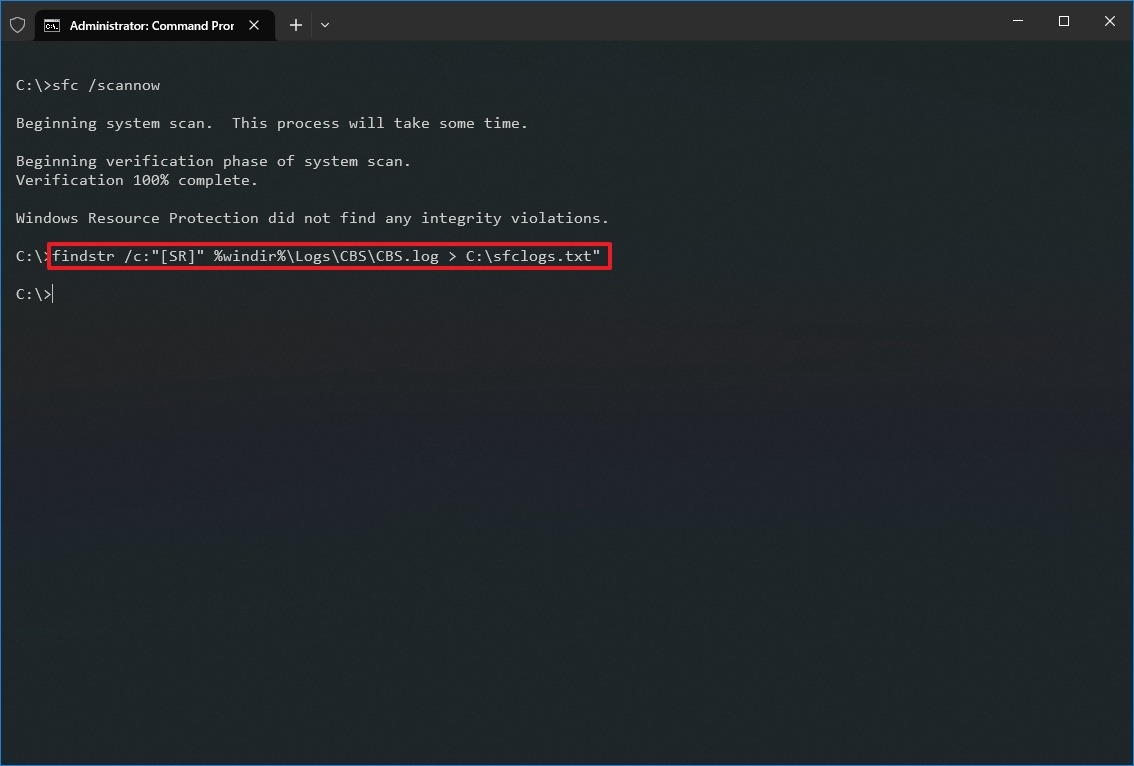
Если sfc /scannow сообщает о том, что защите системы не удалось выполнить восстановление системных файлов, а восстановление хранилища компонентов (с последующим повторным запуском sfc) не помогло решить проблему, вы можете просмотреть, какие именно системные файлы были повреждены, обратившись к журналу CBS.log. Для того, чтобы экспортировать нужные сведения из журнала в текстовый файл sfc на рабочем столе, используйте команду:
findstr /c:"[SR]" %windir%\Logs\CBS\CBS.log > "%userprofile%\Desktop\sfc.txt"
Также, по некоторым отзывам, проверка целостности с помощью SFC в Windows 10 может обнаруживать повреждения сразу после установки обновления с новой сборкой системы (без возможности исправить их, не установив новую сборку «начисто»), а также для некоторых версий драйверов видеокарт (в данном случае ошибка находится для файла opencl.dll. Если что-то из этих вариантов случилось и у вас, возможно, не следует предпринимать никаких действий.
On Windows 10, when you notice issues starting your laptop, random errors occur, or features don’t work correctly, there is a good chance that some system files might be corrupted or missing for unknown reasons. Usually, you may experience problems with system files after installing a cumulative update or driver or making installation changes manually.
Regardless of the reason, if you come across any related issues, Windows 10 includes the System File Checker (SFC), a command-line tool designed to scan the integrity and restore missing or corrupted system files with working replacements.
This guide will walk you through the steps to use the System File Checker tool to repair damaged system files automatically or manually on Windows 10.
Warning: This is a friendly reminder that editing a system file is risky and can cause irreversible damage to your installation if you don’t do it correctly. It is recommended to make a temporary full backup of your PC before proceeding.
How to repair Windows 10 from System File Checker
To repair an installation of Windows 10 using the System File Checker tool, use these steps:
- Open Start.
- Search for Command Prompt, right-click the top result, and select the Run as administrator option.
- Type the following command to repair the Windows 10 system files and press Enter: sfc /scannow
- Confirm the command results:
- Windows Resource Protection did not find any integrity violations – this indicates that the system does not have any corrupted or missing files.
- Windows Resource Protection could not perform the requested operation – indicates a problem during the scan, and an offline scan is required.
- Windows Resource Protection found corrupt files and successfully repaired them. Details are included in the CBS.Log %WinDir%\Logs\CBS\CBS.log – this indicates that the tool detected problems and was able to fix them.
- Windows Resource Protection found corrupt files but was unable to fix some of them. Details are included in the CBS.Log %WinDir%\Logs\CBS\CBS.log – this indicates you may need to repair the corrupted files manually.
Once you complete the steps, the SFC command-line tool will scan, detect, and fix Windows 10 system file problems.
When the tool detects an issue, it is recommended to run the command around three times to ensure that all the problems have been corrected properly.
All the latest news, reviews, and guides for Windows and Xbox diehards.
If you find problems running the tool, use this DISM command tool guide to use the Deployment Image Servicing and Management tool to repair the local Windows 10 image files to allow SFC to complete successfully.
System File Checker logs
To view the details stored in the CBS.Log file from an SFC scan, use these steps:
- Open Start.
- Search for Command Prompt, right-click the top result, and select the Run as administrator option.
- Type the following command and press Enter: findstr /c:»[SR]» %windir%\Logs\CBS\CBS.log > C:\sfclogs.txt»
- Open File Explorer (Windows key + E).
- Click on This PC from the left pane.
- Under the «Devices and drives» section, open the Local Disk (the «C» drive).
- Double-click the sfclogs.txt file to open it with the default text editor app.
After you complete the steps, the log file will reveal all the scanned system files and information for the unrepairable files.
This option is only available when performing a scan within Windows 10, not when performing an offline scan with Command Prompt.
How to repair Windows 10 from System File Checker offline
To repair Windows 10 using SFC with the offline option, use these steps:
- Open Settings.
- Click on Update & Security.
- Click on Recovery.
- Under the «Advanced startup» section, click the Restart now button.

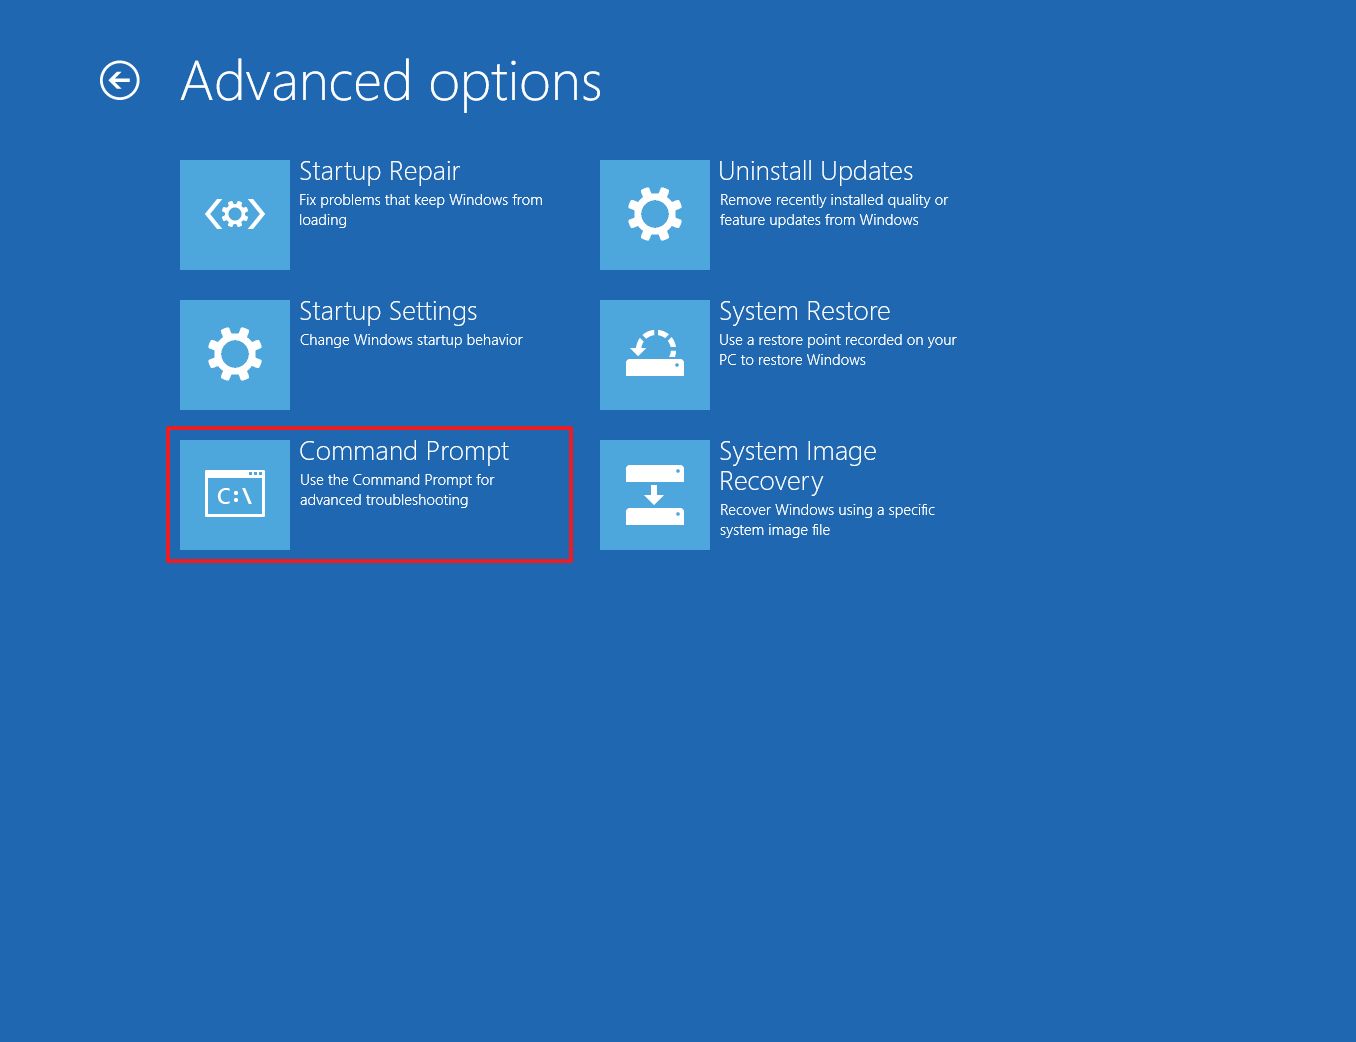
- Click on Troubleshoot.
- Click on Advanced options.
- Click on Command Prompt. (After selecting the option, the device will reboot.)
- Select your account in the Advanced startup options.
- Confirm the account password.
- Click the Continue button.
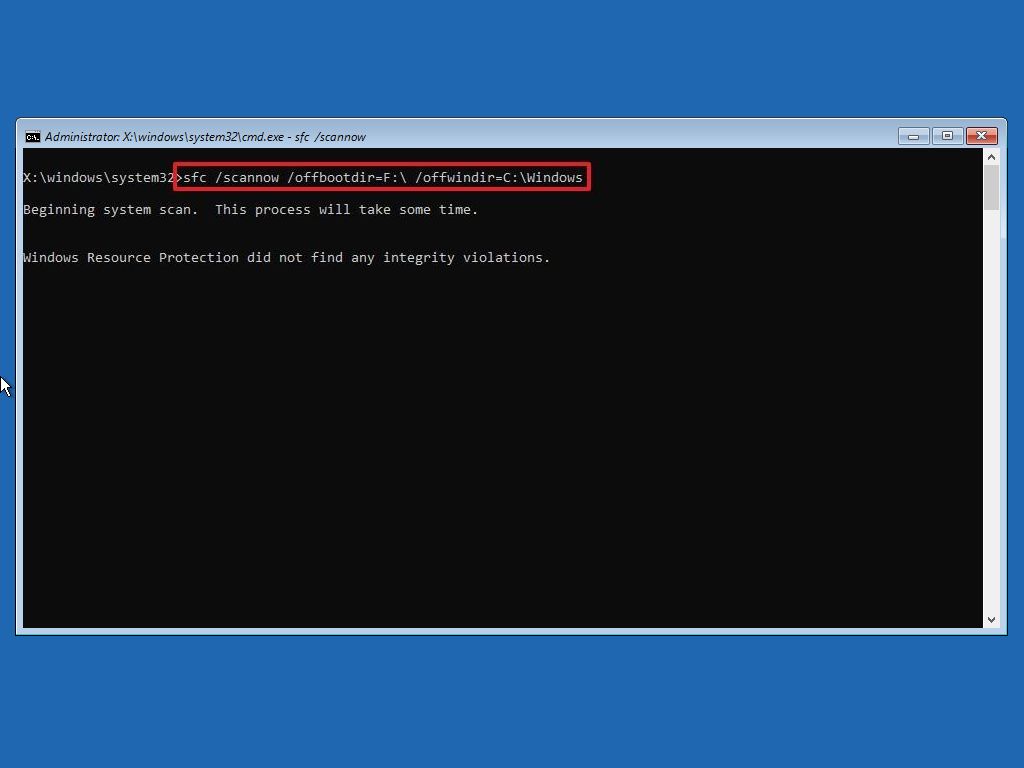
- Type the following command to start the diskpart tool and press Enter: diskpart
- Type the following command to determine the location of the Windows and System Reserved partitions and press Enter: list volume
- Confirm the current drive letter assignment for the System Reserved partition (the one close to 500MB) and Windows 10 partition, usually the volume with the largest size.

- Type the following command to exit diskpart and press Enter: exit
- Type the following command to run the System File Checker offline and press Enter: sfc /scannow /offbootdir=e:\ /offwindir=C:\Windows
In the command, we are using the /offboodir option to specify the drive letter of the System Reserved partition, which in this case is F. Also, the /offwindir option specifies the location of the Windows 10 files, which in this case is C:\Windows.
- Click the X button to close Command Prompt.
- Click on Continue.
Once you complete the steps, the tool will fix problems with system files, and the device will start normally.
How to repair Windows 10 manually without System File Checker
If the System File Checker cannot fix the damaged files, you may need to repair them manually.
Determine corrupted system files
To find out which files need replacing on Windows 10, use these steps:
- Open Start.
- Search for Command Prompt, right-click the top result, and select the Run as administrator option.
- Type the following command and press Enter: findstr /c:»[SR]» %windir%\Logs\CBS\CBS.log > C:\sfclogs.txt»
- Open File Explorer (Windows key + E).
- Click on This PC from the left pane.
- Under the «Devices and drives» section, open the Local Disk (the «C» drive).
- Double-click the sfclogs.txt file to open it with the default text editor app.
After you complete the steps, the log file will reveal all the scanned system files and information for files that could not be repaired.
While in the file, you can use the find option (Ctrl + F) in the text editor and look for the term: «Cannot repair member file» to identify the corrupted files that need replacing.
Repair system files manually
You may be able to get good working files to replace your installation from another computer running the exact edition and version of Windows 10. If you do not know the location of the damaged file, you may need to perform an online search with the information in the SFC log file.
To repair damaged system files on Windows 10 manually, use these steps:
- Open Start.
- Search for Command Prompt, right-click the top result, and select the Run as administrator option.
- Type the following command to take ownership of the corrupted files and press Enter: takeown /f C:\PATH\TO\FILE
In the command, replace C:\PATH\TO\FILE with the actual path to the file that you are trying to fix. This example takes ownership of the «acproxy.dll» file: takeown /f C:\Windows\System32\acproxy.dll
- Type the following command to grant full administrator access to the corrupted file and press Enter: icacls C:\PATH\TO\FILE /Grant Administrators:F
In the command, replace C:\PATH\TO\FILE with the actual path to the file you are trying to fix. This example grants access to the «acproxy.dll» file: icacls C:\Windows\System32\acproxy.dll /Grant Administrators:F

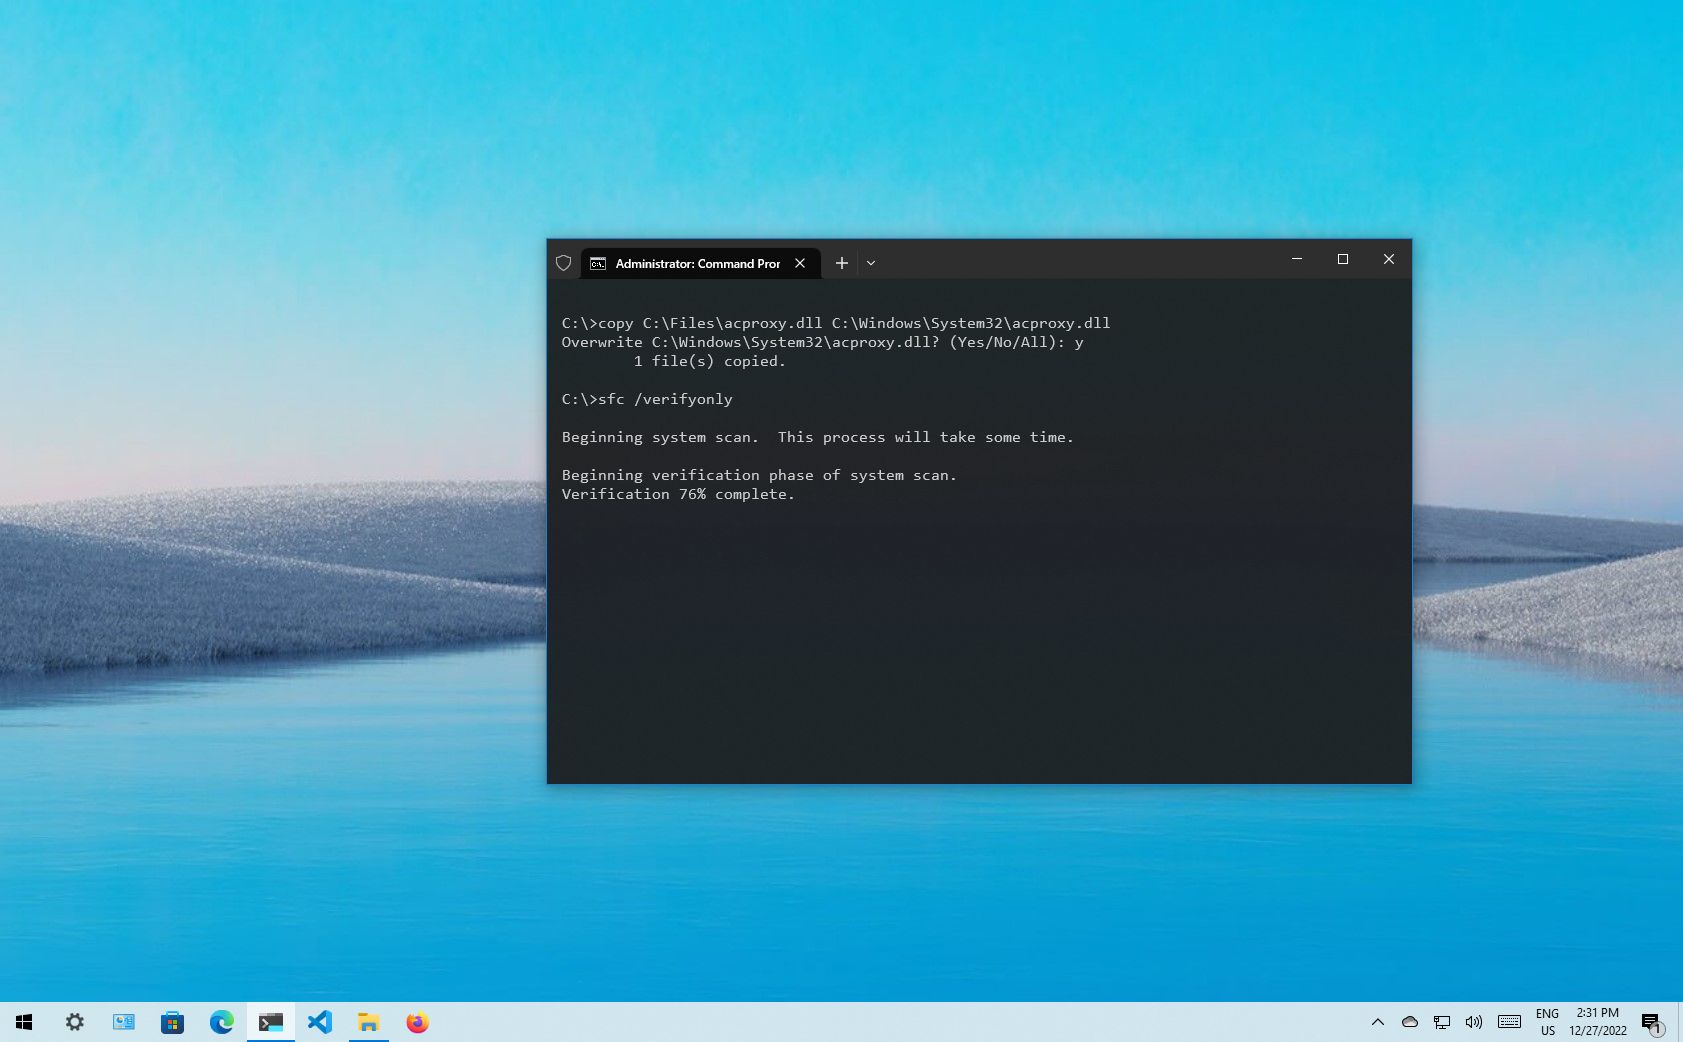
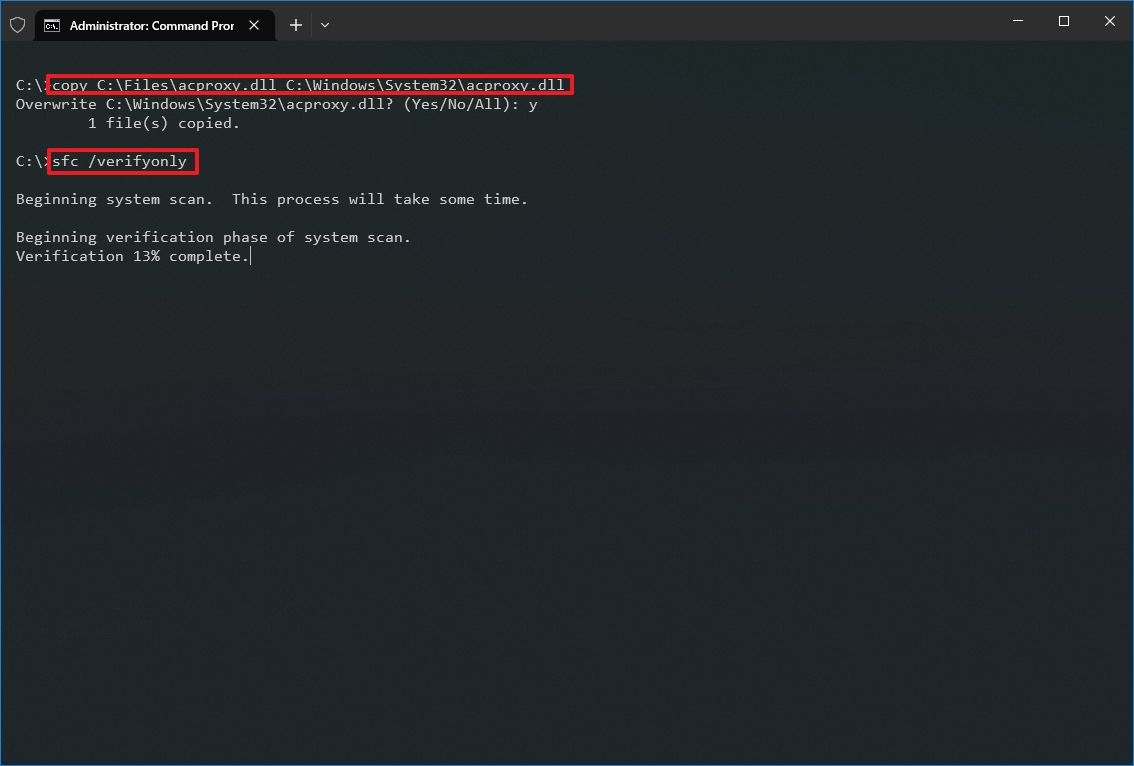
- Type the following command to replace the corrupted files with a good-known version and press Enter: copy C:\PATH\TO\SOURCE\GOOD\FILE C:\PATH\TO\DESTINATION\BROKEN\FILE
In the command, replace C:\PATH\TO\SOURCE\GOOD\FILE with the path of the new file and C:\PATH\TO\DESTINATION\BROKEN\FILE with the path of the corrupted file.
- Quick tip: If you get a message saying you cannot replace the file because another process is using it, then either find and terminate the process or perform this task offline. (See above steps). This example replaces the «acproxy.dll» file in the System32 folder: copy C:\Files\acproxy.dll C:\Windows\System32\acproxy.dll
- Type the following command to verify the integrity of the Windows 10 system files and press Enter: sfc /verifyonly
- (Optional) Type the following command to verify the integrity of the replacement file and press Enter: sfc /verifyfile=C:\PATH\TO\REPLACED\FILE
In the command, replace C:\PATH\TO\REPLACED\FILE with the path of the file you replaced. This example verifies the integrity of the «acproxy.dll» file inside the System32 folder: sfc /verifyfile=C:\Windows\System32\acproxy.dll
Once you complete the steps, if the new files pass the integrity check, you have resolved the problems with Windows 10.
If you cannot repair the installation using the System File Checker, you may consider starting fresh with a clean installation of Windows 10.
More resources
For more helpful articles, coverage, and answers to common questions about Windows 10 and Windows 11, visit the following resources:
- Windows 11 on Windows Central — All you need to know
- Windows 10 on Windows Central — All you need to know

Cutting-edge operating system
A refreshed design in Windows 11 enables you to do what you want effortlessly and safely, with biometric logins for encrypted authentication and advanced antivirus defenses.
Mauro Huculak has been a Windows How-To Expert contributor for WindowsCentral.com for nearly a decade and has over 15 years of experience writing comprehensive guides. He also has an IT background and has achieved different professional certifications from Microsoft, Cisco, VMware, and CompTIA. He has been recognized as a Microsoft MVP for many years.
Download Article
Download Article
This wikiHow will teach you how to scan Windows 10 for errors using the System File Checker (SFC) tool. Before you can use SFC, you need to make sure you have an updated version of Windows.
-

You’ll see this key with the Windows logo on your keyboard near Alt and Ctrl. You can also use the mouse to click the Windows logo and open the Start menu that way.
-
As you type, you’ll see search results display above the Start Menu.
Advertisement
-
It lists under the «Best match» header and a menu will pop up.
-
A Command Prompt window will open. If you’re prompted to allow the app to make changes, click Yes.
-
There is a space before each «/» and make sure you type the command exactly as shown so DISM.exe will run.
- It will take a minute or two to start up and about 30 minutes to finish.
- When it’s done, you’ll see «The operation has completed successfully.»
-
The DSIM.exe should fix whatever corrupt files or damaged files it finds, and the SFC scan will make sure there are no damaged or corrupt files left.[1]
- If you see «Windows Resource Protection found corrupt files and repaired them,» you may want to enter «sfc /scannow» again until you see «Windows did not find any integrity violations.»[2]
- Type «Exit» and press Enter to close the Command Prompt window.
- If you see «Windows Resource Protection found corrupt files and repaired them,» you may want to enter «sfc /scannow» again until you see «Windows did not find any integrity violations.»[2]


Advertisement
What is the Windows command to scan for errors?
Use SFC /scannow and press Enter to scan for errors using System File Checker.
How do you fix corrupted files in Windows 10?
Using the System File Checker tool can repair missing or corrupted files. When you run the commands, DISM will use Windows Update to install the files needed to fix the corruption.
Should I run CHKDSK or SFC first?
Run CHKDSK first to check the Drive Integrity, followed by SFC to check Windows Files Integrity.
How do you check for Windows errors in the Command line?
Open the Start menu and type «command prompt. Click the first option. Type the command SFC /scannow and press Enter.
Thanks for submitting a tip for review!
References
About This Article
Article SummaryX
1. Press the Windows key.
2. Type «Command Prompt».
3. Right-click the «Command Prompt — App» result.
4. Click Run as administrator.
5. Type «DISM.exe /Online /Cleanup-image /Restorehealth» and press Enter.
6. Enter «sfc /scannow» and press Enter.
Did this summary help you?
Thanks to all authors for creating a page that has been read 70,580 times.