
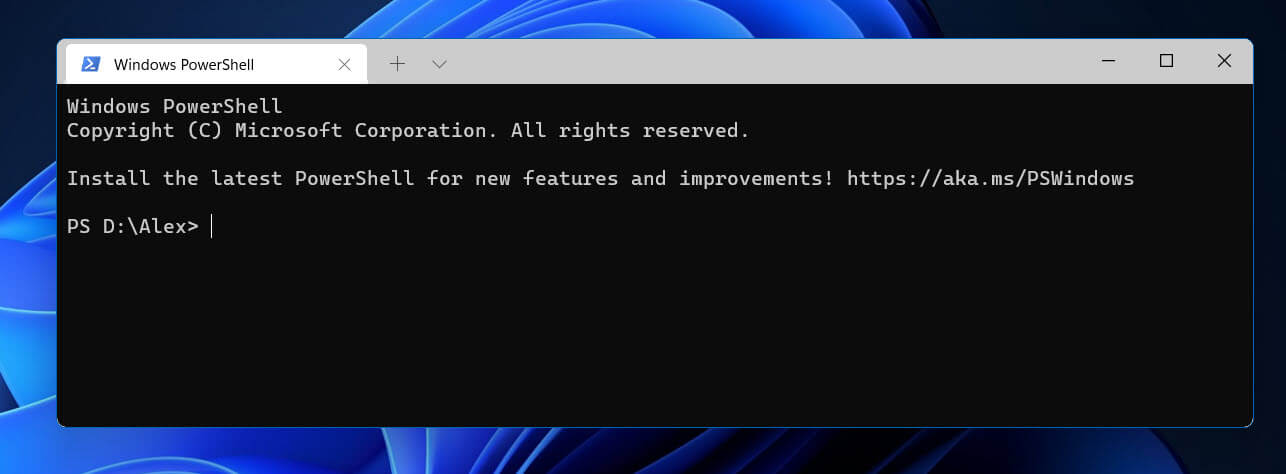
Windows PowerShell is a powerful command-line tool that allows users to perform a variety of tasks, from system management to automation of routine tasks. With the introduction of Windows 11, Microsoft has made several improvements to the user interface and command-line experience. One of the frequently used features of PowerShell is its ability to run in specific folders or directories, making it easier to navigate, manage files, and execute scripts.
In this article, we will explore multiple methods to open Windows PowerShell in a folder on Windows 11. Whether you are a beginner or an experienced user, these methods will help you maximize your productivity and streamline your workflows.
Understanding PowerShell
PowerShell is a task automation and configuration management framework from Microsoft, consisting of a command-line shell and associated scripting language. It is built on the .NET framework and provides an interactive environment for executing commands and scripts.
PowerShell is particularly useful for:
- Managing System Configuration: You can modify system settings, install updates, and configure services.
- Automating Tasks: Automating repetitive tasks can save time, especially in administrative and IT roles.
- File Management: Browsing and managing files and directories can be performed swiftly using command-line commands.
- Administering Processes: Monitoring and managing system processes, services, and resources is made easier via scripting.
Method 1: Using the Context Menu
One of the simplest ways to open PowerShell in any directory is through the context menu. Windows 11 has made access to PowerShell convenient. Follow these steps:
-
Navigate to the Folder:
- Open File Explorer (you can do this by pressing
Windows + E). - Use the left pane or the main area to navigate to the folder where you want to open PowerShell.
- Open File Explorer (you can do this by pressing
-
Open the Context Menu:
- Right-click on an empty space within the folder. This avoids accidentally selecting files or subfolders.
- You should see a context menu populated with various options.
-
Select PowerShell:
- In Windows 11, you will see an option that indicates opening PowerShell directly. This may be labeled as «Open with Windows Terminal» if your settings are configured accordingly.
- If you are using an older version of Windows or have specific configurations, you might see “Open PowerShell window here.”
- Click on that option. This will launch PowerShell in the selected directory.
This method is highly effective for quick access and is preferred by many users for its simplicity.
Method 2: Using the Address Bar in File Explorer
Another straightforward way to launch PowerShell from any folder in Windows 11 is by using the address bar in File Explorer.
-
Open File Explorer: Press
Windows + Eto launch File Explorer. -
Navigate to Your Desired Folder: Use the left sidebar or the main interface to locate and open the folder where you want PowerShell.
-
Use the Address Bar:
- Click once on the address bar at the top of the File Explorer window, which will highlight the current directory path.
- Delete the highlighted path and type
powershell, then hitEnter. - This command directly opens PowerShell in the current directory.
This method is fast and efficient, especially if you prefer keyboard interaction over mouse clicks.
Method 3: Using the Run Dialog
The Run dialog is another versatile tool where you can launch applications and perform a variety of commands, including starting PowerShell in a designated folder.
-
Open the Run Dialog:
- Press
Windows + Ron your keyboard. This will bring up the Run dialog.
- Press
-
Type the Command:
- Use the command:
powershell -noexit -command "cd 'C:PathToYourFolder'" - Replace
C:PathToYourFolderwith the actual path to the folder where you want to open PowerShell.
- Use the command:
-
Execute the Command:
- Press
Enteror click “OK.” This will open PowerShell in the specified directory.
- Press
Using the Run dialog is particularly useful when you want to open a PowerShell session directly without navigating through folders.
Method 4: Creating a Desktop Shortcut
For users who frequently access PowerShell in specific directories, creating a desktop shortcut can significantly increase convenience.
-
Right-click on the Desktop: From the desktop, right-click in an empty space.
-
Select New > Shortcut:
- In the context menu, hover over “New” and then click “Shortcut.”
-
Enter the Location:
- In the dialog box that appears, type the following command:
powershell -noexit -command "cd 'C:PathToYourFolder'" - Click “Next.”
- In the dialog box that appears, type the following command:
-
Name Your Shortcut:
- Give your shortcut a name, such as “Open PowerShell in My Folder.”
- Click on “Finish” to create the shortcut.
-
Utilize the Shortcut:
- Double-click the shortcut whenever you need to open PowerShell in that specific folder.
This method is particularly beneficial if you have specific folders that you manage frequently or work within.
Method 5: Using Windows Terminal
Windows Terminal, introduced with Windows 10 and improved in Windows 11, allows users to run various command-line applications in tabs, including PowerShell and Command Prompt.
-
Open Windows Terminal:
- Press
Windows + Xor right-click on the Start button. - Click on “Windows Terminal.”
- Press
-
Navigate to the Desired Folder:
- In the Windows Terminal, you can use the
cdcommand to change directories. For example:cd C:PathToYourFolder
- In the Windows Terminal, you can use the
-
Open PowerShell Tab:
- If you want the PowerShell tab specifically, ensure you start Powershell when opening the Terminal, or you can open a new tab in PowerShell by clicking the down arrow (▾) at the top of the window and selecting “Windows PowerShell.”
This approach benefits users who work with multiple command-line tools and prefer a unified interface.
Method 6: Using File Explorer’s Ribbon Menu
Windows 11 has a modernized Ribbon menu integrated into File Explorer, which provides quick access to various features, including launching PowerShell.
-
Open File Explorer: Use
Windows + Eto bring up File Explorer. -
Navigate to Your Folder: Go to the folder where you intend to open PowerShell.
-
Click on the “View” Button:
- In the top Ribbon, click on the “View” option.
-
Select “Show” and then “Windows PowerShell”:
- Hover over “Show” and you should find the option to open PowerShell in the context of the currently active directory.
- Click “Windows PowerShell.” This action will open PowerShell in the selected folder.
This method utilizes the modern interface improvements in Windows 11 and is another effective way to open PowerShell.
Method 7: Adding “Open PowerShell” to File Explorer’s Right-Click Menu via Registry (Advanced Users)
For those who need to customize their experience further, it is possible to add an «Open PowerShell Here» option to the right-click menu using the Windows Registry. Please note that modifying the registry can have unintended consequences, so proceed with caution and consider backing up your registry settings.
-
Open the Registry Editor:
- Press
Windows + R, typeregedit, and pressEnter.
- Press
-
Navigate to the Following Key:
HKEY_CLASSES_ROOTDirectoryBackgroundshell -
Create a New Key:
- Right-click on the “shell” key, select “New,” then “Key.” Name it “PowerShell”.
-
Modify Default Value:
- Click on the new «PowerShell» key, double-click the (Default) value on the right, and enter the text you want to display, e.g., «Open PowerShell Here».
-
Create Another Key:
- Still in the PowerShell key, right-click, select “New,” then “Key” and name it
command.
- Still in the PowerShell key, right-click, select “New,” then “Key” and name it
-
Set Command Path:
- Click on the
commandkey. Double-click the (Default) value and enter the command:powershell.exe -noexit -command "Set-Location -LiteralPath '%V'"
- Click on the
-
Saving Changes and Exiting:
- Close the Registry Editor, and the changes should take effect immediately.
Now, you will see “Open PowerShell Here” when you right-click in an empty space within any folder or on the desktop.
Conclusion
Opening Windows PowerShell in a folder on Windows 11 is easier than ever, thanks to various methods available to users. Whether you prefer using right-click context menus, the address bar, creating shortcuts, or utilizing the Windows Terminal, there are several approaches tailored to enhance your experience.
As you explore these methods, you’ll find that PowerShell not only increases efficiency in handling tasks but also serves as an essential tool for those looking to automate processes and manage their systems effectively. Whether you are a novice or a seasoned user, integrating PowerShell into your regular workflow can undoubtedly boost your productivity and streamline everyday tasks.
PowerShell is among the most handy tools for task automation and configuration management. It is especially useful for administrators who use this command-line shell and scripts to automate tasks and manage configurations quickly without the need for an interface.
Opening PowerShell directly in a specific folder can significantly improve efficiency, and productivity and streamline workflow by eliminating the time taken by navigation. It simplifies operations and is specifically useful for IT admins who use an MDM solution like AirDroid Business to manage device configuration. It helps them execute scripts directly in a folder for troubleshooting and support.
This comprehensive guide will walk you through different methods you can use to open PowerShell in a folder across different Windows versions including Windows 10, 11, and 7.
1 How to Open PowerShell in A Folder in Windows 7/10/11
Let’s explore step-by-step what are the 9 different methods to open PowerShell directly into a folder.
1 Method 1: Using Windows File Explorer
One of the easiest and quickest methods to open PowerShell in a folder is through Windows File Explorer. Here is how to do it:
Windows 10/11
- Step 1: Press the keys Win+E simultaneously to open the File Explorer.
- Step 2: Navigate to the folder where you want to open PowerShell.
- Step 3: Hold down on the ‘shift’ key and right-click in the folder.
- Step 4: Select ‘open PowerShell window here’.
-


Windows 7
- Step 1: Navigate to the folder where you want to open PowerShell directly.
- Step 2: Hold the ‘shift’ key and right-click within the folder.
- Step 3: Select the option ‘open command window here’ and type ‘PowerShell’.
2 Method 2: Using the Address Bar
- Step 1: Press the keys Win+E simultaneously to open the File Explorer.
- Step 2: Navigate to the folder where you want to open PowerShell.
- Step 3: In the address bar on the top, type ‘powerShell’.
- Step 4: Wait a moment and the PowerShell window will open.
-


3 Method 3: Open as Administrator
Windows 10
You can also open PowerShell as an administrator in any specific folder by following just a few simple steps. Here is how:
- Step 1: Navigate to the folder where you want to open PowerShell as an admin.
- Step 2: On the top right corner of your screen, click the ‘file’ tab.
- Step 3: Now hover on ‘open Windows PowerShell here’ and select the option ‘Open Windows PowerShell as administrator’.
-


Tip: If you are someone fond of hotkeys, simply use this combination of hotkeys inside the folder and you will be able to open Windows PowerShell as an admin: Alt+f/s/a. This is how simple it is.
Windows 11
Although it is much easier to open PowerShell as an admin in a specific folder with Windows 10, it takes a few more steps to do the same in Windows 11 as the hotkeys Alt+f/s/a inside a folder do not work with Windows 11. Here is the workaround for Windows 11.
4 Method 4: Using the Command Line
You can open PowerShell in a specific folder by navigating to that folder through Command Prompt first and then switching to PowerShell. This is how you do it:
5 Method 5: Using Windows Terminal
This method of opening PowerShell in a folder is for Windows 11 users. They can access PowerShell in any folder by opening it in the terminal and choosing PowerShell. Here are the precise steps involved:
- Step 1: Open Windows File Explorer.
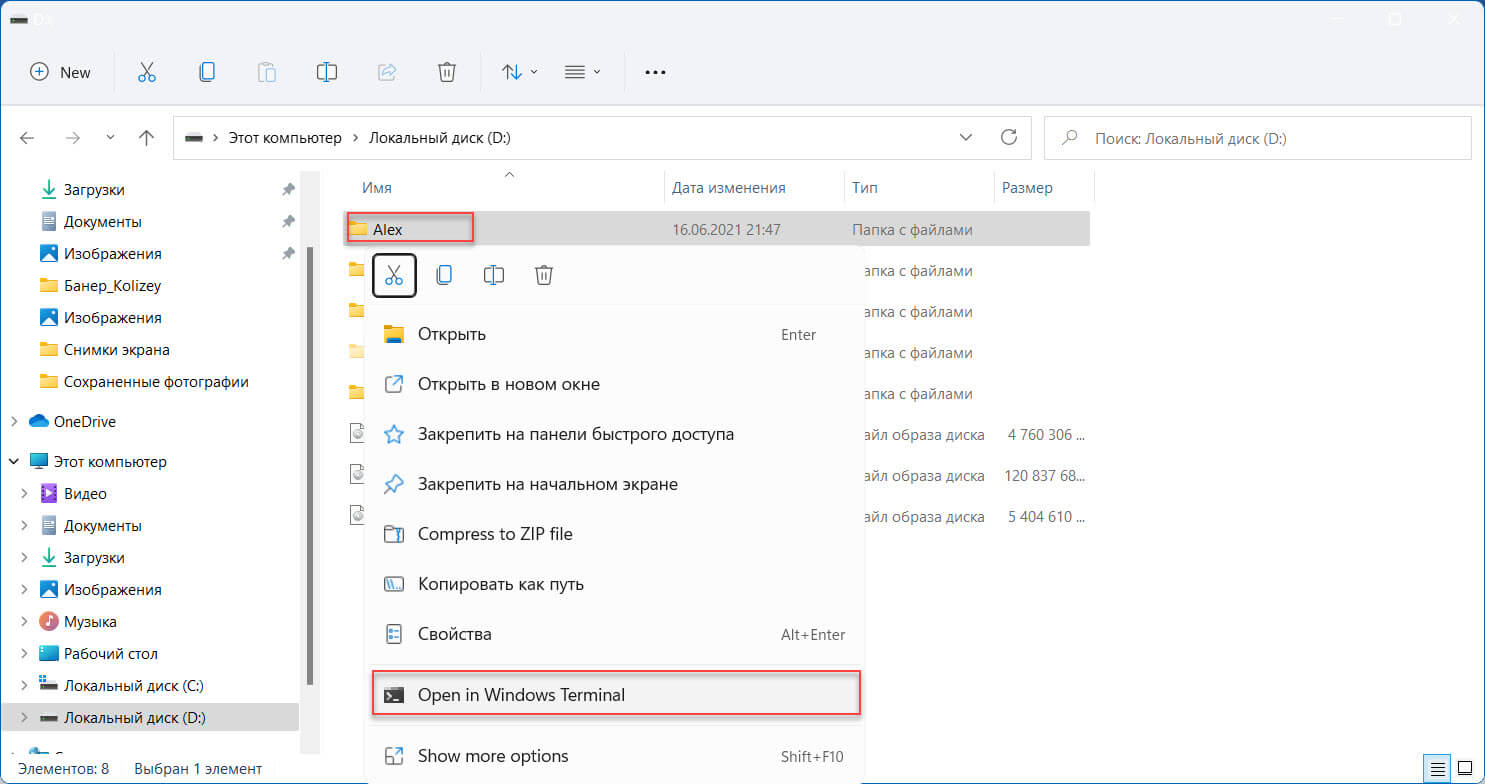
- Step 2: Right-click on the name of the folder where you want to open PowerShell.
- Step 3: Click ‘open in terminal’.
- Step 4: It will open a PowerShell window.
-


6 Method 6: Creating a Shortcut
Opening PowerShell in a folder can be as easy as a single click. You can create a shortcut on the desktop that opens PowerShell in your specified folder every time, sparing you the hassle of navigation. Let’s have a look at the steps involved:
7 Method 7: Using Task Manager
You can use task manager as well to open PowerShell quickly at any location. Here are the steps to do so:
8 Method 8: Using Run Dialogue
This is another quick way to access PowerShell at any location and you can even use it to open an elevated PowerShell Window instead of a regular one if you want. It involves just a couple of steps as described below.
- Step 1: Press the keys Win+R to open a Run Dialogue.
- Step 2: In the provided space, type PowerShell.
-

- Step 3: Now you have two options; you can either press ‘ok’ to open the PowerShell window or press a combination of these keys ‘ctrl+shift+Enter’ and this will take you to an elevated PowerShell window instead of a regular one.

9 Method 9: Using Context Menu Registry Edit
There is even a way to add the option ‘Open PowerShell window here’ to the right-click context menu so that you can easily and quickly open a PowerShell window in any location by simply right-clicking and selecting ‘open PowerShell here’. This is done by editing the registry manually and adding the said option to the right-click context menu, and here is a step-by-step guide on how you can do that:
With these methods in mind, let’s delve into some advanced tips for maximizing your PowerShell usage in folders.
10 Advanced Tips for PowerShell in Folders
Here are a few handy tips to help make your PowerShell experience more productive and get the best out of this powerful tool.
1 Running Scripts from a Folder
You can run scripts you have stored in a specific folder with PowerShell by following these steps:
- Step 1: Open PowerShell as an administrator by clicking the start button, typing ‘powershell’ and then selecting ‘run as administrator’.
-

- Step 2: In the PowerShell window, type the path to the directory that contains scripts. For example, if your scripts are named ‘newscripts’ and located in C. Your path will look like this:
cd "C:\newscripts"
- Step 3: Now execute your scripts by using this syntax
.\as it tells PowerShell to look for the scripts in the current folder. So, here is how it should look like:.\newscripts.ps1
- Step 4: You can execute the script with a single command by using the complete path. For example, in the above case, the command would look like this:
& "C:\newscripts\newscripts.ps1"

Note: Don’t forget to put quotation marks around the path if it has a space or spaces.
2 Pointing PowerShell to a Folder
When your PowerShell prompt is pointed to a certain drive (in most cases it’s a C drive) and you want to change the directory, you can do it using Set-Location cmdlet. Here are the steps in detail:
- Step 1: Let’s say your PowerShell prompt is currently directed to C drive and you want to change it to a folder named ‘new folder’ in D drive.
- Step 2: You should use the Set-Location cmdlet as follows:
PS C:\> Set-Location -Path D:\new folder
- Step 3: The prompt will then be changed like this:
PS D:\new folder>
11 Understanding PowerShell and its Uses
PowerShell, as its name implies, is a powerful command line tool, specifically useful for administrators looking for quick and easy configuration.
Let’s explore a bit in detail what it is, how it works, and what are the benefits of using PowerShell in a folder.
1 What Is PowerShell?
PowerShell is a powerful command-line shell and scripting language designed for system administration. It lets them manage configuration and automate tasks without relying on a user interface.
Importance: Used for task automation and configuration management, making it essential for IT professionals and those using an MDM solution in an enterprise for remote device configuration.
2 Why Open PowerShell In A Specific Folder?
Efficiency: Quickly execute scripts and commands in the desired directory without navigating through folders and hence save time by avoiding tedious, repetitive, and petty tasks.
Use Cases: Ideal for running scripts, managing files, and automating tasks in a specific path, especially while using an MDM solution in an enterprise for remotely configuring devices, troubleshooting, and providing support.
While leveraging PowerShell with MDM offers many advantages, users may still encounter common issues. Here’s how to troubleshoot them effectively.
12 Troubleshooting Common Issues
Let’s have a look at some of the common issues faced by the users during PowerShell usage for various tasks.
1 Why Can’t I Run Scripts in PowerShell?
Possible Causes:
- Execution policy restrictions preventing script execution.
Solutions:
- Set Execution Policy: Use
Set-ExecutionPolicyto allow script execution. For example,Set-ExecutionPolicy RemoteSignedallows scripts to run if they are signed by a trusted publisher.
2 Why Does PowerShell Open in the Wrong Directory?
Possible Causes:
- Incorrect navigation or command input.
Solutions:
- Use Set-Location: Ensure you’re using
Set-Locationorcdto navigate to the correct directory before opening PowerShell. - Address Bar Check: If using the address bar, ensure the path is correct before typing PowerShell.
3 How to Fix PowerShell Opening as a Regular User Instead of Admin?
Possible Causes:
- Incorrect method used to open PowerShell with elevated permissions.
Solutions:
- Open as Administrator: Right-click the folder and select «Open PowerShell window here as administrator» or use keyboard shortcuts (e.g., Shift + Right-click).
AirDroid Business is a Windows and Android device management solution that can be used to enroll, manage, and monitor large fleet devices. With the centralized platform, organizations are able to deploy smartphones, tablets, rugged devices and others dedicated devices like kiosks and digital signage.
It’s available for Cloud Deployment & On-Premises Deployment.
Key features include: remote access & control, Google Play apps & enterprise’s apps management, policy, single & multi-apps kiosk mode, alerts & automated workflows, geofencing & location tracking, file transfer, notification, user management, reports, etc.
14-days Free Trial
Have you ever been in Windows File Explorer and just need to quickly open a PowerShell prompt in a folder? Do you want a open powershell window here option or open command window here option? If so, you’re in luck. In this tutorial, you’re going to learn how to open PowerShell in a specific folder when using Windows file explorer.
Prerequisites
If you intend to follow along, be sure you have the following:
- A Windows 10, Windows Server 2016, or Windows Server 2019 host. This tutorial will use Windows 10.
- Logged in with a local account in the Administrators group or at least with rights to elevate to administrator, if necessary.
Opening PowerShell via the Address Bar
File Explorer has an element at the top of the window that allows you to run programs just like if you were at a command line. You can invoke PowerShell from this address bar by pressing CTRL. From within File Explorer:
- Press and hold the ALT or CTRL key.
- Press the D or L key. This places the cursor in the address bar.
- Type
powershelland press Enter. PowerShell will be opened in the current directory.
If you are logged in as the Administrator, then you will be in an administrative prompt for both PowerShell and Command Prompt.
The animated gif below is what you should see on your screen:
Another handy way to open PowerShell in File Explorer is to use the file menu. Using the file menu, you could use the mouse or keyboard shortcut. Pressing ALT allows you to open the file menu. Within File Explorer:
- Press and hold the ALT key.
- Press the F key. This will open the file menu.
- Press the S key. This option will select Open Windows PowerShell and will expand another sub-menu.
- Lastly, press the R key. PowerShell will open in the current directory.
If you need to open PowerShell as an administrator, use hit A instead of R.
Related: How to Run PowerShell as Administrator
The animated gif below shows what the process should look like:
Holding the
ALTkey while navigating the context menu will display keys to use to jump through menus. The shortcut keys work in Windows 10, Windows Server 2016, and Windows Server 2019.
Now that you have all the shortcut keys in your toolbox, it’s time to dive a little deeper and build a context menu within File Explorer.
A context menu is the menu that you see when you right-click on an item in Windows.
Using a specially placed Windows registry key, you can create a custom context menu item to quickly open a PowerShell window when you right click inside of a folder. Let’s change that.
If you right click within a folder in File Explorer, you’ll see below that there is no context menu entry for opening PowerShell.
However, if hold SHIFT key and then right click in a folder, you’ll then see the context menu item below.
Let’s build a custom context menu item that’ll allow you to open a PowerShell window without holding Shift key.
To create a custom context menu item, you must create a few different Windows registry keys and values. These values, when created, will instantly create a custom context menu item.
Below are the following Windows registry keys and values necessary:
| Path | Name | Value | Notes |
| HKCR:\Directory\shell\powershellmenu | (Default) | Open PowerShell Here | |
| HKCR:\Directory\shell\powershellmenu\command | (Default) | C:\Windows\system32\WindowsPowerShell\v1.0\powershell.exe -NoExit -Command Set-Location -LiteralPath ‘%L’ | |
| HKCR:\Directory\shell\runas | (Default) | Open PowerShell Here as Administrator | |
| HKCR:\Directory\shell\runas | HasLUAShield | This adds a built-in icon for elevated prompts |
To add the custom context menu, you can create the above keys and values manually or you can use a PowerShell script to do the dirty work for you.
Below is a script you can use to quickly create all of the necessary keys and values in one shot.
$Menu = 'Open PowerShell Here'
 $Command = "C:\Windows\system32\WindowsPowerShell\v1.0\powershell.exe -NoExit -Command Set-Location -LiteralPath '%L'"
 $RunAsMenu = 'Open PowerShell Here as Administrator'
 HKCR doesn't exist by defualt in PSDrives, so you need to create it.
 New-PSDrive -PSProvider Registry -Root HKEY_CLASSES_ROOT -Name HKCR
 Now create the keys and values (non-admin)
 New-Item -Path HKCR:\Directory\shell -Name 'powershellmenu' -Force |
     Set-ItemProperty -Name '(Default)' -Value $Menu
 New-Item -Path HKCR:\Directory\shell\powershellmenu\command -Force |
     Set-ItemProperty -Name '(Default)' -Value $Command
 Now create the keys and values (admin)
 New-Item -Path HKCR:\Directory\shell -Name 'runas' -Force |
     Set-ItemProperty -Name '(Default)' -Value $RunAsMenu
     # This adds a built-in icon for elevated prompts
     New-ItemProperty -Path HKCR:\Directory\shell\runas\ -Name HasLUAShield -Value ''
 New-Item -Path HKCR:\Directory\shell\runas\command -Force |
     Set-ItemProperty -Name '(Default)' -Value $Command
When you’ve finished creating the registry keys and values, you should see a value that looks like below:
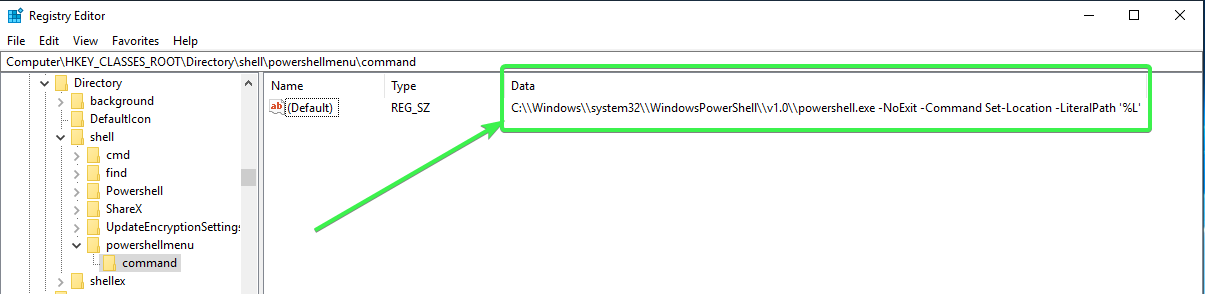
Once complete, close the Windows registry editor if you have it open and right click on any folder within File Explorer. You should now see the new Open PowerShell Here context menu entry you created!
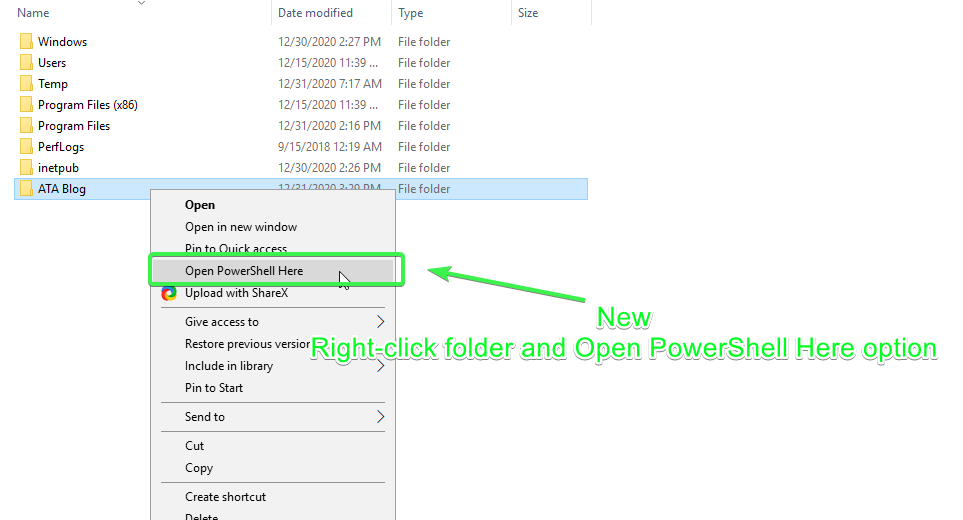
Below is the new context menu Open PowerShell Here option in action:
Next Steps
Now that you know all the ways to open a PowerShell window within File Explorer, what else can you add to your context menus to increase your file explorer productivity? Maybe you can add a Open Command Prompt Here or experiment with opening different PowerShell profiles using context menus. Try adding an icon to the context menu even!
Во многих руководствах на нашем сайте, вы часто видите инструкции, в которых необходимо открыть PowerShell от имени администратора. В Windows 11 вам иногда придется его использовать, поэтому я хотел бы поделиться с вами несколькими способами открытия PowerShell от имени Администратора.
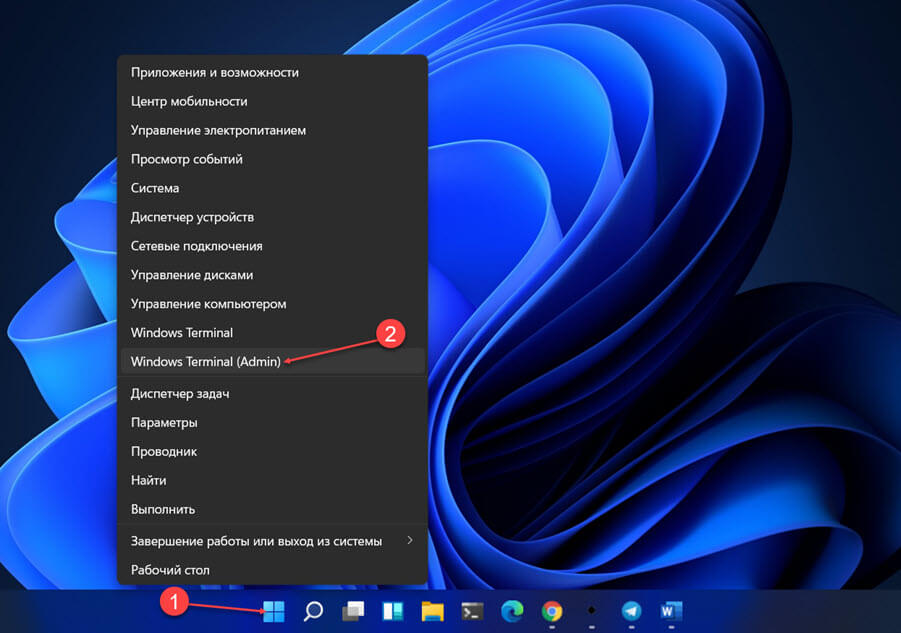
Как открыть PowerShell из меню «Win + X»
- Этот способ очень удобен в Windows 11. Чтобы получить доступ к этому меню Win X в Windows 11, нажмите на клавиатуре сочетание клавиш Win X или кликните правой кнопкой мыши на меню «Пуск».
- В открывшимся меню выберите пункт Терминал Windows (Admin).
Это откроет окно терминала с запущенным PowerShell от имени администратора.
Открыть PowerShell с помощью поиска
В Windows 11 вы можете использовать значок поиска на панели задач. Кликните мышкой на нем и введите «PowerShell», в разделе «лучшее соответствие» кликните на результат правой кнопкой мыши и выберите «Запуск от имени администратора» или в результатах поискам справа нажмите «Запуск от имени администратора».
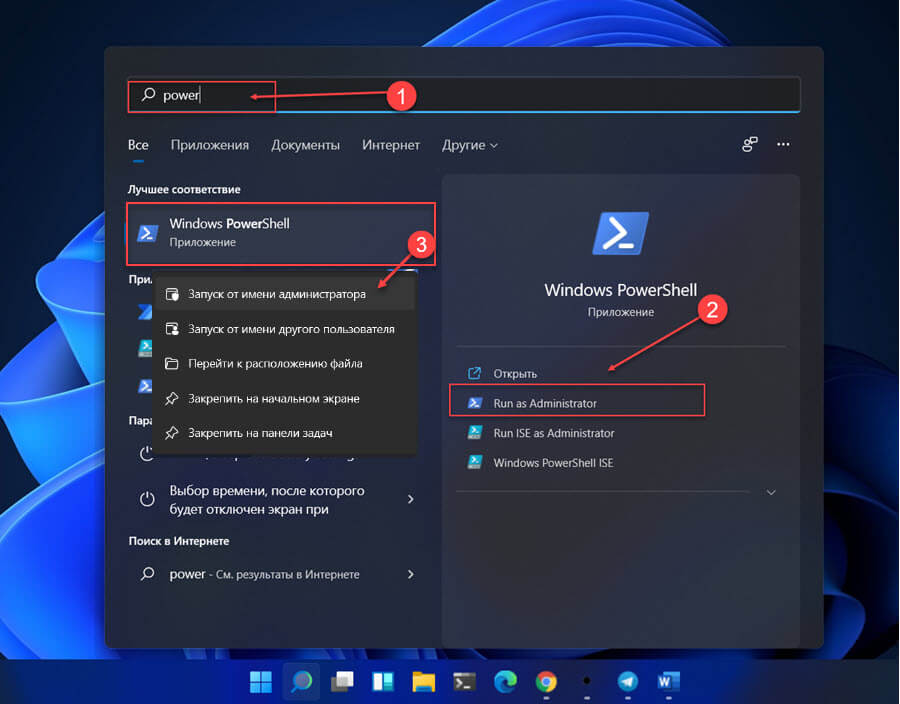
Это также работает в меню «Пуск», просто начните печатать PowerShell, затем кликните правой кнопкой мыши на появившемся представлении Windows PowerShell и выберите «Запуск от имени Администратора».
Как запустить PowerShell из Проводника Windows 11
Вы можете запустить PowerShell из Проводника. Вы можете подумать, зачем? Вот примерный сценарий.
Всякий раз, кликаете правой кнопкой мыши по любой папке в проводнике, вы получите пункт в контекстном меню «Открыть в терминале Windows». Это очень удобно, вы просто открыли окно PowerShell по желаемому пути.
Как Всегда открывать PowerShell от имени администратора
Примечание: Параметр автоматического повышения уровня доступен в Windows Terminal версии 1.13 и выше. Чтобы проверить версию терминала, используйте команду «wt -v». Если вам нужно обновить приложение, используйте команду: winget upgrade —id Microsoft.WindowsTerminal.Preview. Если у вас нет приложения, используйте команду для его установки: winget install —id Microsoft.WindowsTerminal.Preview
Чтобы всегда запускать PowerShell от имени администратора в Windows 11 или Windows 10, выполните следующие действия:
-
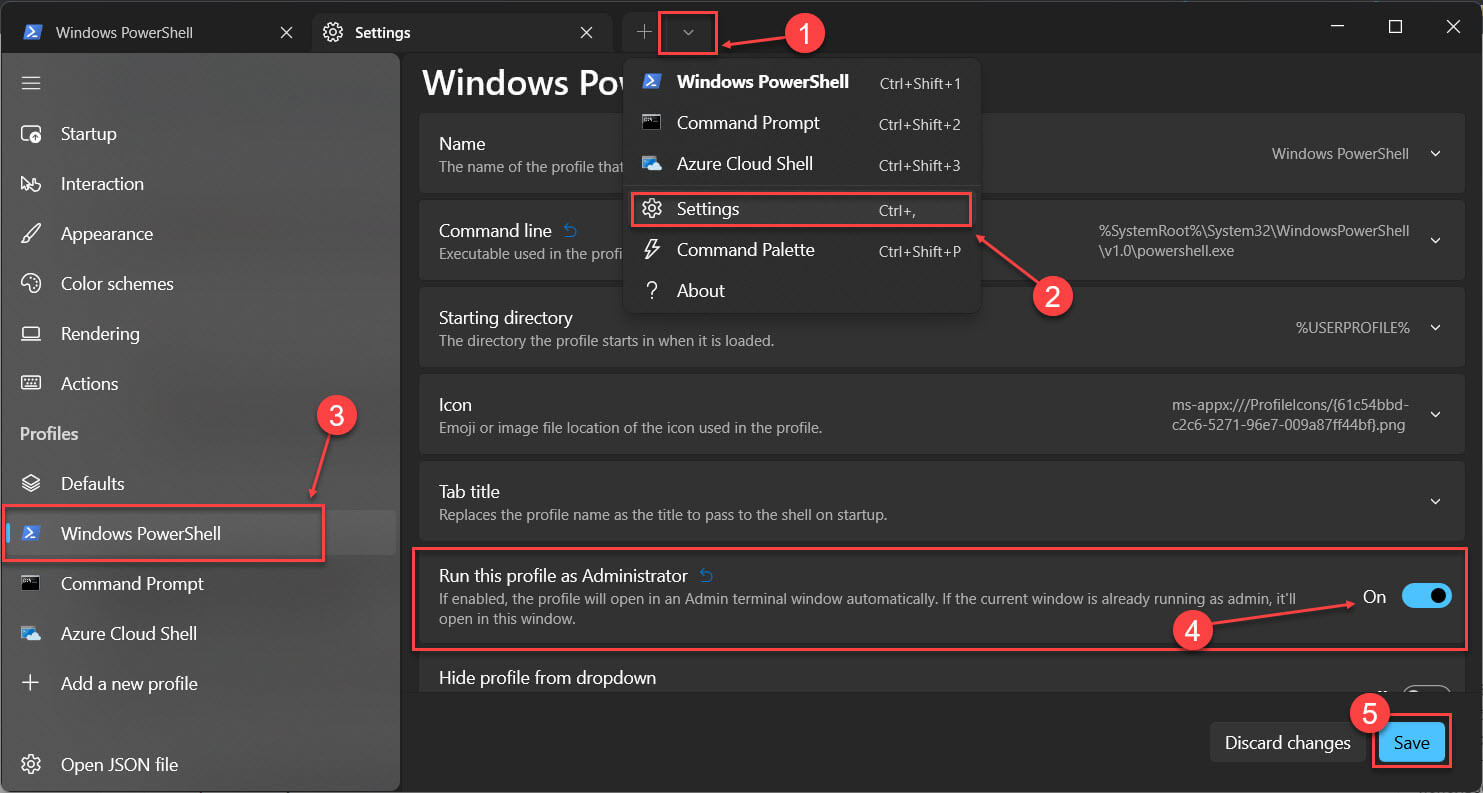
Откройте Терминал Windows.
-
Нажмите кнопку меню рядом с параметром новой вкладки и выберите «Параметры».
-
В разделе «Профили» нажмите PowerShell.
-
Включите переключатель в положение «Вкл.» для «Запускать этот профиль от имени администратора», чтобы автоматически запускать PowerShell с правами администратора.
-
Нажмите кнопку «Сохранить».
После выполнения этих шагов закройте терминал, и когда вы снова откроете PowerShell, консоль откроется от имени администратора. Однако вам все равно нужно будет подтвердить повышение, как и в любом другом приложении.
Все!
Opening a folder in Windows 11 using PowerShell can be a quick and efficient way to access your files and directories. Whether you are a seasoned IT professional or a casual user looking to streamline your workflow, PowerShell offers a range of commands and options to help you navigate and manage your system.
To open a folder using PowerShell, you will first need to launch the PowerShell application. You can do this by searching for “PowerShell” in the Start menu or by pressing the Windows key + X and selecting “Windows PowerShell” from the menu.
Once PowerShell is open, you can use the “cd” command to change to the desired directory. For example, if you want to open the “Documents” folder, you can type “cd Documents” and press Enter. This will change the current directory to the “Documents” folder.
If you are unsure of the exact name or location of the folder you want to open, you can use the “Get-ChildItem” command to list all the files and folders in the current directory. This command will display a detailed list of the items, including their names, sizes, and creation dates.
Once you have located the folder you want to open, you can use the “cd” command to change to that directory. For example, if the folder is named “Photos” and is located in the “Documents” folder, you can type “cd DocumentsPhotos” and press Enter. This will change the current directory to the “Photos” folder.
Alternatively, you can use the full path of the folder to open it directly. For example, if the folder is located at “C:UsersYourUsernameDocumentsPhotos”, you can type “cd C:UsersYourUsernameDocumentsPhotos” and press Enter. This will change the current directory to the “Photos” folder.
Once you have successfully changed to the desired directory, you can use the “dir” command to list the files and folders in that directory. This command will display a simple list of the items, including their names.
In addition to opening folders, PowerShell also allows you to perform various operations on files and directories. You can use commands like “Copy-Item” to copy files, “Move-Item” to move files, and “Remove-Item” to delete files.
Overall, using PowerShell to open folders in Windows 11 provides a flexible and efficient way to navigate and manage your files and directories. Whether you are a power user or a beginner, learning the basics of PowerShell can greatly enhance your productivity and streamline your workflow.
Step 1: Launch PowerShell
To get started, you need to launch PowerShell on your Windows 11 computer. There are several ways to do this:
- Press the Windows key on your keyboard, type “PowerShell,” and click on the “Windows PowerShell” app that appears in the search results.
- Right-click on the Start button, select “Windows PowerShell” from the Power User menu.
- Press the Windows key + X on your keyboard, and then choose “Windows PowerShell” from the menu.
Choose the method that is most convenient for you and open PowerShell.
Once you have launched PowerShell, you will see a command-line interface where you can interact with the Windows operating system using commands. PowerShell is a powerful tool that allows you to automate tasks, manage system configurations, and perform various administrative tasks on your computer.
When you open PowerShell, you will notice a prompt that looks something like this: PS C:UsersYourUsername>. This prompt indicates that PowerShell is ready to accept your commands. The location displayed in the prompt represents the current directory you are in. By default, PowerShell opens in your user directory, but you can navigate to different directories using the cd command.
PowerShell provides a wide range of commands that you can use to perform different tasks. These commands are called cmdlets, and they follow a verb-noun naming convention. For example, the Get-Process cmdlet retrieves information about running processes on your computer, while the Set-ExecutionPolicy cmdlet allows you to change the script execution policy.
In addition to built-in cmdlets, PowerShell also supports the use of scripts, which are files containing a series of PowerShell commands. Scripts can be used to automate repetitive tasks, configure system settings, or perform complex operations. To run a script in PowerShell, you simply need to provide the path to the script file and press Enter.
PowerShell has a rich set of features and capabilities that make it a valuable tool for system administrators, developers, and power users. Whether you are managing a single computer or a network of machines, PowerShell can help you streamline your tasks and improve your productivity.
Now that you have successfully launched PowerShell, you are ready to start exploring its features and unleashing its power. In the next steps, we will guide you through some common tasks and commands that will help you get the most out of PowerShell. So let’s dive in and begin our journey into the world of PowerShell!
Step 2: Navigate to the Desired Folder
Once you have PowerShell open, you need to navigate to the folder you want to open. PowerShell provides various commands to help you navigate through the file system.
To change the current directory to a specific folder, use the Set-Location command followed by the path to the folder. For example, to navigate to the “Documents” folder, you would use the following command:
Set-Location C:Users\YourUsername\DocumentsReplace “YourUsername” with your actual username.
If you are unsure about the exact path to the folder you want to open, you can use the Get-ChildItem command to list the contents of the current directory. This command will display all the files and folders in the current directory.
Get-ChildItemYou can also use the cd command as a shortcut for Set-Location. For example, to navigate to the “Downloads” folder, you can use the following command:
cd C:Users\YourUsername\DownloadsAgain, replace “YourUsername” with your actual username.
Once you have navigated to the desired folder, you can perform various operations on the files and folders within it. PowerShell provides a wide range of commands for file and folder management, including creating new files, renaming files, copying files, and deleting files. You can also create new folders, rename folders, copy folders, and delete folders.
For example, if you want to create a new text file in the current directory, you can use the New-Item command followed by the desired file name and extension. The following command creates a new text file called “example.txt”:
New-Item example.txtIf you want to rename a file, you can use the Rename-Item command followed by the current file name and the desired new file name. The following command renames a file called “oldname.txt” to “newname.txt”:
Rename-Item oldname.txt newname.txtTo copy a file to another location, you can use the Copy-Item command followed by the current file path and the destination path. The following command copies a file called “example.txt” to the “Documents” folder:
Copy-Item example.txt C:Users\YourUsername\DocumentsTo delete a file, you can use the Remove-Item command followed by the file path. The following command deletes a file called “example.txt”:
Remove-Item example.txtSimilarly, you can perform these operations on folders as well. PowerShell provides commands such as New-Item, Rename-Item, Copy-Item, and Remove-Item for folder management.
By using these powerful commands, you can efficiently navigate through the file system, manage files and folders, and perform various operations without the need for a graphical user interface.
Step 3: Open the Folder
Once you have navigated to the desired folder, you can open it using the Invoke-Item command. This command will open the folder in File Explorer.
Invoke-Item .The dot (.) represents the current directory. Running this command will open the current folder in File Explorer.
If you want to open a specific folder within the current directory, you can specify the folder name as an argument to the Invoke-Item command. For example, to open a folder named “Photos,” you would use the following command:
Invoke-Item TestThis will open the “Test” folder in File Explorer. Here is the output of the command that launches the folder:
Opening folders using the Invoke-Item command is a convenient way to quickly access your files and organize your directories. It eliminates the need to manually navigate through multiple folders to reach your desired destination. By simply specifying the folder name as an argument, you can instantly open it in File Explorer, allowing you to view, edit, and manage the files within.
Furthermore, the Invoke-Item command can be particularly useful when working with a large number of folders or when dealing with complex directory structures. Instead of spending time manually searching for and opening folders, you can use this command to automate the process, saving you valuable time and effort.
In addition to opening folders within the current directory, you can also use the Invoke-Item command to open folders located in different directories. By specifying the full path to the folder, you can open it regardless of your current location. This flexibility allows you to easily access folders located in different drives or network locations without having to navigate through the entire directory structure.
Moreover, the Invoke-Item command is not limited to opening folders only. It can also be used to open files, applications, or any other item that can be accessed through File Explorer. This versatility makes it a powerful tool for managing your files and accessing various resources on your computer.
Overall, the Invoke-Item command provides a convenient and efficient way to open folders in File Explorer. Whether you need to quickly access a specific folder or navigate through complex directory structures, this command simplifies the process and enhances your productivity. By incorporating this command into your workflow, you can streamline your file management tasks and focus on the more important aspects of your work.
Hope you find it helpful.