
Нашли ошибку?
SmugWimp at smugwimp dot com 
19 years ago
If you make changes to your PHP.ini file, consider the following.
(I'm running IIS5 on W2K server. I don't know about 2K3)
PHP will not "take" the changes until the webserver is restarted, and that doesn't mean through the MMC. Usually folks just reboot. But you can also use the following commands, for a much faster "turnaround". At a command line prompt, type:
iisreset /stop
and that will stop the webserver service. Then type:
net start w3svc
and that will start the webserver service again. MUCH faster than a reboot, and you can check your changes faster as a result with the old:
<?php>


phpinfo();


?>
in your page somewhere.
I wish I could remember where I read this tip; it isn't anything I came up with...
lukasz at szostak dot biz 
19 years ago
You can have multiple versions of PHP running on the same Apache server. I have seen many different solutions pointing at achieving this, but most of them required installing additional instances of Apache, redirecting ports/hosts, etc., which was not satisfying for me.
Finally, I have come up with the simplest solution I've seen so far, limited to reconfiguring Apache's httpd.conf.
My goal is to have PHP5 as the default scripting language for .php files in my DocumentRoot (which is in my case d:/htdocs), and PHP4 for specified DocumentRoot subdirectories.
Here it is (Apache's httpd.conf contents):
---------------------------
# replace with your PHP4 directory
ScriptAlias /php4/ "c:/usr/php4/"
# replace with your PHP5 directory
ScriptAlias /php5/ "c:/usr/php5/"
AddType application/x-httpd-php .php
Action application/x-httpd-php "/php5/php-cgi.exe"
# populate this for every directory with PHP4 code
<Directory "d:/htdocs/some_subdir">
    Action application/x-httpd-php "/php4/php.exe"
    # directory where your PHP4 php.ini file is located at
    SetEnv PHPRC "c:/usr/php4"
</Directory>
# remember to put this section below the above
<Directory "d:/htdocs">
    # directory where your PHP5 php.ini file is located at
    SetEnv PHPRC "c:/usr/php5"
</Directory>
---------------------------
This solution is not limited to having only two parallel versions of PHP. You can play with httpd.conf contents to have as many PHP versions configured as you want.
You can also use multiple php.ini configuration files for the same PHP version (but for different DocumentRoot subfolders), which might be useful in some cases.
Remember to put your php.ini files in directories specified in lines "SetEnv PHPRC...", and make sure that there's no php.ini files in other directories (such as c:\windows in Windows).
And finally, as you can see, I run PHP in CGI mode. This has its advantages and limitations. If you have to run PHP as Apache module, then... sorry - you have to use other solution (the best advice as always is: Google it!).
Hope this helps someone.
jp at iticonsulting dot nl 
19 years ago
If you get 404 page not found on Windows/IIS5, have a look at C:\SYSTEM32\INETSRV\URLSCAN
There is a .ini file there that prevents some files from being served by IIS, even if they exist, instead IIS will give a 404. The urlscan logfile (same place) should give you some insight into what parameter is preventing a page from loading, if any.
Setting up a local PHP development environment is an important step for any PHP developer. It enables you to test and debug your code on your own computer rather than a live web server. This post will help you through the steps of creating a PHP local development environment on a Windows, Mac, or Linux workstation.
Install a web server
The first step in creating a local development environment for PHP is to install a web server. The most often used web servers for PHP programming are Apache and Nginx. Apache is the most popular web server and is included in the XAMPP and WAMP packages. Nginx is a more current web server that is gaining popularity, particularly for high-traffic websites.
Install PHP
Once you have a web server installed, the next step is to install PHP. You can download the latest version of PHP from the official website (https://windows.php.net/download/). Once downloaded, you can install the package by following the prompts.
Install a Database
PHP is frequently used with a database management system, such as MySQL or MariaDB. To store data for your PHP apps, you will need to install one of these systems. MySQL and MariaDB may both be downloaded from their respective websites (https://www.mysql.com/downloads/ and https://mariadb.org/download/).
You should also install a PHP development environment to make development easier. A development environment is a piece of software that has a collection of tools for authoring, debugging, and testing PHP code. Eclipse, NetBeans, and PhpStorm are some common options.
XAMPP and WAMP
Using a pre-configured package like XAMPP or WAMP instead of manually installing a web server, PHP, and a database is one option. XAMPP is an open-source and free package that contains Apache, PHP, and MariaDB. WAMP is a Windows-only package that includes Apache, PHP, and MySQL. Both XAMPP and WAMP are simple to install and configure, making them excellent choices for newcomers.
We will walk you through the process of setting up XAMPP on your local machine.
Download and Install XAMPP
The first step is to download the latest version of XAMPP from the official website (https://www.apachefriends.org/index.html). Once downloaded, run the installer and follow the on-screen instructions to install XAMPP on your PC.
Start XAMPP
After the installation is finished, launch XAMPP by using the control panel program. This may be located in your Start menu (Windows) or Applications folder in the XAMPP folder (Mac). You may start the Apache and MariaDB services after the control panel is open by clicking the “Start” button next to each service.
Configure PHP and Apache
XAMPP always utilizes the most recent version of PHP. If you wish to use a different version of PHP, you may tell XAMPP to use it by modifying the PHP configuration file (php.ini). This file may be located in the XAMPP installation directory’s “php” subdirectory. You may also customize Apache by modifying the httpd.conf file, which is stored in the XAMPP installation directory’s “apache” subdirectory. This file includes the Apache web server’s configuration parameters, such as the document root and virtual hosts.
Test your Setup
After you have finished installing and configuring XAMPP, you should test it to ensure that everything is operating properly. With the following code, you can construct a basic PHP file:
Save the file as info.php and store it in Apache’s document root directory, which is normally in the XAMPP installation directory/htdocs. After that, navigate to http://localhost/info.php in your web browser to access the file. If everything is in order, you should see a page with information about your PHP installation.
Troubleshoot
If you encounter any problems during the setup process, there are several things you can check. Make sure that the Apache and MariaDB services are running, check your PHP and Apache configuration files for any errors, and ensure that your PHP and database versions are compatible.
In conclusion, setting up a local development environment for PHP is an essential step for any PHP developer. It allows you to test and debug your code on your own computer, without the need for a live web server. This guide has walked you through the process of setting up a local development environment for PHP on Windows, Mac, or Linux machines, including installing a web server, PHP, a database, and a development environment. With the help of pre-configured packages like XAMPP and WAMP, it’s easy to set up the development environment.
Q&A
Q: What are the steps to setting up a local development environment for PHP?
A: The steps to setting up a local development environment for PHP include:
- Install a web server (such as Apache or Nginx)
- Install PHP
- Install a database management system (such as MySQL or MariaDB)
- Install a PHP development environment (such as Eclipse, NetBeans, or PhpStorm)
- Alternatively, you can use a pre-configured package such as XAMPP or WAMP.
Q: What are the most popular web servers for PHP development?
A: The most popular web servers for PHP development are Apache and Nginx. Apache is the most widely used web server, while Nginx is becoming increasingly popular for high-traffic websites.
Q: Where can I download the latest version of PHP?
A: The latest version of PHP can be downloaded from the official website: https://windows.php.net/download/
Q: What is XAMPP and WAMP?
A: XAMPP and WAMP are packages that include Apache, PHP, and a database management system (MariaDB or MySQL respectively). They are simple to install and configure, making them an excellent choice for novices.
Q: How can I test my PHP setup?
A: You can test your PHP setup by creating a simple PHP file with the following code:
Save the file as info.php and store it in Apache’s document root directory, then navigate to http://localhost/info.php in your web browser. If everything is in order, you should see a page with information about your PHP installation.
Q: What should I do if I encounter problems during the setup process?
A: Check the Apache and PHP log files, double-check your configuration settings, and ensure that no other services are utilizing the same port as your web server if you run into issues throughout the setup process.
Первые два года своей профессиональной деятельности в создании сайтов я работал под Linux. Но при всей гибкости и мощности этой системы она, всё же, неудобна в мелочах. Однажды, эти мелочи перевесили все прочие плюсы и я решился пересесть на Windows. Сейчас я совершенно не жалею о потраченном времени на настройку среды разработки, а моим рабочим ноутбуком, который по совместительству является и домашним, стало гораздо удобнее пользоваться.
Этот пост может сэкономить время тем, кто так же как и я собирается перейти на Windows и тем, кто только ещё начинает работать PHP-программистом или веб-разработчиком. Для полноценной веб-разработки понадобятся: виртуальная среда, система контроля версий, менеджеры зависимостей, система сборки приложений, система развёртки приложений и, конечно, хороший редактор кода. Я не буду рассказывать зачем нужен каждый из компонентов, а лишь дам инструкцию по его установке в Windows. Я использую Vagrant, Composer, NPM, Bower, Git, Gulp, Capistrano и PHPStorm, дальше пойдёт речь именно об этих технологиях. Инструкции даны для Windows 10.
Начнём с установки PHP
Для разработки я использую PHP 7, чтобы мой код был совместим с ним, когда я соберусь переезжать. На боевых серверах у меня пока что PHP 5.6. Для того, чтобы случайно не написать код, который не будет работать в продакшене в моём PHPStorm указан уровень языка 5.6.
Для работы в Windows у PHP есть специальная версия языка, которую можно скачать с сайта PHP. Для того, чтобы установить PHP 7 в операционной системе Windows понадобится программа Visual C++ Redistributable for Visual Studio 2015, которую можно скачать с официального сайта Майкрософта. Установка этой программы не содержит никаких трудностей, нужно просто нажимать кнопку «Далее».
После установки Visual C++ Redistributable скачиваем архив PHP 7 для Windows (VC14 Non Thread Safe x64 или x86 в зависимости от разрядности системы) c официального сайта PHP. В архиве нет инсталлятора, его просто нужно распаковать в папку где-нибудь на диске. В пути к этой папке не должно быть пробелов и русских букв, у меня это C:\php.
После распаковки нужно добавить PHP в системный PATH для того, чтобы можно было запускать PHP из любого каталога:
- нажимаем win+x;
- переходим в Advanced system settings;

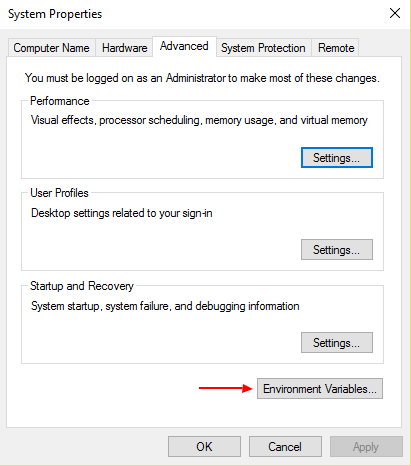
- выбираем Environment Variables;

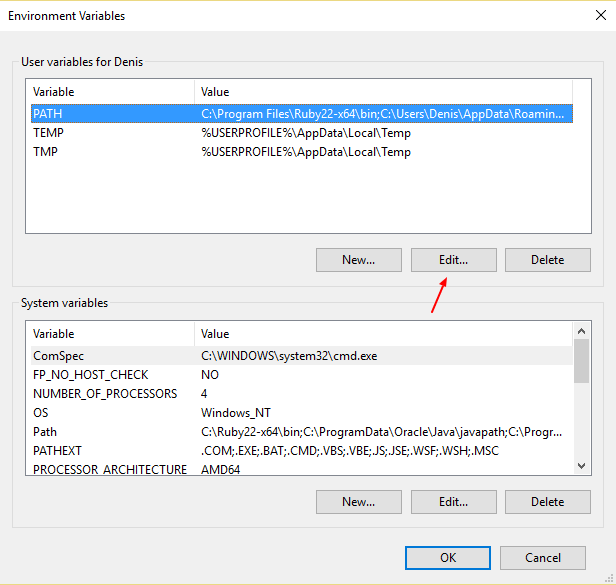
- выбираем переменну PATH и нажимаем кнопку Edit;

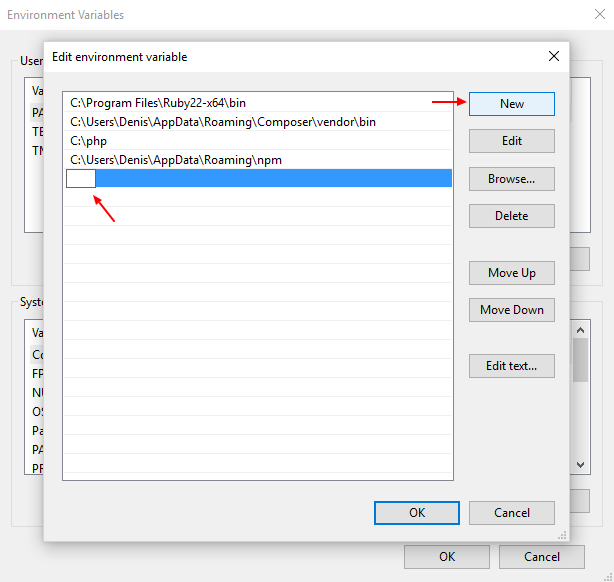
- нажимаем кнопку New и вводим адрес каталога с распакованным PHP, например C:\php;

- нажимаем кнопку Ok.
Теперь нужно настроить PHP для работы:
- переименовываем файл
php.ini-productionвphp.ini; - раскоментируем (убираем знак
;) перед строчками:extension=php_curl.dll;extension=php_gd2.dll;extension=php_mbstring.dll;extension=php_openssl.dll;extension=php_pdo_mysql.dll;extension=php_pdo_sqlite.dll;extension=php_sqlite3.dll.
Всё, PHP 7 установлен в системе и готов к использованию.
Система контроля версий
Установить Git на Windows проще простого. В качестве приятного бонуса вместе с Git поставляется консоль Git bash. Работать с этой консолью гораздо удобнее, чем со стандартной CMD в Windows. Кроме того, она понимает некоторые полезные линуксовские команды, такие как find, ls и прочие.
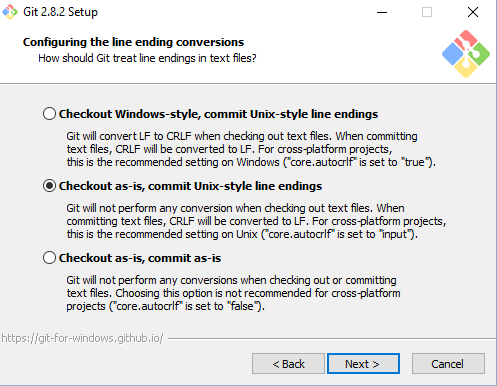
При установке Git под Windows вам нужно будет прописать git.exe в PATH вашей системы, чтобы Git можно было запускать из любого места в командной строке. А также указать Git’у, чтобы при получении кода он не менял символы окончания строк в файлах (эти символы отличаются на системах с Linux и Windows). Всё это делается парой кликов мышкой через инсталятор Git.
Вот скриншоты важных страниц установки Git:
- Экран выбора установки программ в PATH вашей системы. Выбирайте средний вариант — так вы сможете использовать Git из командной строки из любого каталога и не потревожите стандартные программы Windows find и sort;

- Здесь мы указываем как Git будет поступать с символами окончания строк. На Windows и Linux эти символы разные и Git может менять их перед отправкой и получением кода из репозитория. В моём случае лучший выбор — это не вмешиваться в код при получении и следить за тем, чтобы в репозиторий не попадали файлы с символами Windows-style.

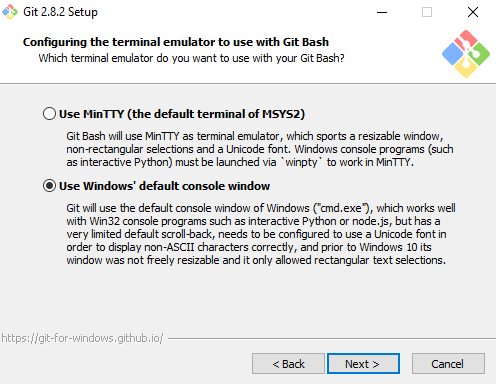
- Последний экран не столь важен, здесь можно указать что будет в основе надстройки Git Bush — стандартная консоль Windows или MinTTY. Если у вас Windows до 10 версии, то лучше выбрать MinTTY.


После установки укажите Git’у ваше имя и электронную почту. Эти данные будут передаваться с каждым коммитом и их нельзя будет изменить.
Откройте Git Bush и запустите две команды:
-
git config --global user.name "Ваше_Имя" -
git config --global user.email Ваша_Электронная_Почта
На этом первоначальная настройка Git закончена.
Менеджеры зависимостей NPM, Bower и Composer
Для того, чтобы получить NPM нужно установить NodeJS.
У NodeJS есть официальный установщик для Windows, поэтому установка будет проще простого:
- скачиваем установщик с официального сайта NodeJS;
- запускаем скаченный установщик и нажимаем несколько раз кнопку Next, попутно соглашаясь с условиями.
Для того, чтобы проверить, установился ли NodeJS и NPM, откройте консоль Windows или Git bush (если консоль уже была открыта, то нужно её закрыть и открыть снова, чтобы обновить системный PATH) и выполните команды:
node -v
и
npm -v
Если команды выдали версии, например: «v6.2.0» и «3.8.8», то это значит, что всё успешно установлено и можно работать.
После установки NPM можно приступить к установке Bower
Здесь всё просто, введите в командной строке:
npm install bower -g
Параметр -g нужен для того, чтобы установить Bower глобально и иметь возможность запускать его из любого каталога.
Composer
У пакетного менеджера Composer есть специальный установщик для Windows. Скачать его можно с официального сайта. Сама установка элементарна и займёт не больше 5 минут, но есть две особенности.
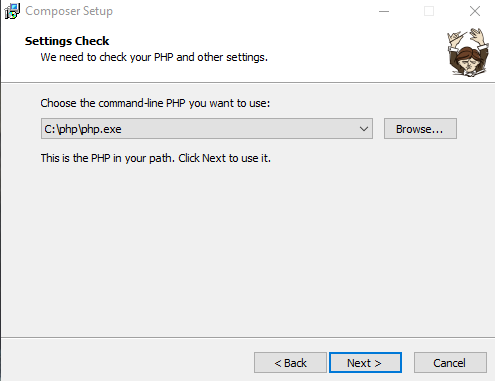
Во первых, перед установкой Composer нужно установить PHP. О том как это сделать написано в начале поста. Во вторых, после установки Composer нужно передать ему специальный GitHub Tokken для того, чтобы обойти ограничени GitHub’а на количество обращений по API.
Но начнём с установки. После скачивания и запуска установщика он попросит указать путь к PHP. Если вы добавили PHP в PATH, как указано у меня в инструкци, то Composer сам определит этоть путь. Если нет, то вам нужно указать этот путь самостоятельно.
После этого нужно ещё несколько раз нажать Next и Composer будет установлен в систему и доступен через командную строку из любого каталога.
В процессе работы с Composer программа в какой-то момент сама предложит вам ввести GitHub Tokken и даст ссылку на его создание. Но можно не ждать этого и сделать всё самому. Создать токен можно на специальной странице GitHub’а. Для того, что передать токен Composer’у нужно ввести в командной строке команду
composer config -g github-oauth.github.com <token>
Всё, на этом Composer установлен и готов к использованию.
Система сборки проекта Gulp
Так как он часть экосистемы NPM, то тут всё просто:
npm install gulp -g
Параметр -g нужен для того, чтобы установить Gulp глобально и иметь возможность запускать его из любого каталога.
Виртуальная среда Vagrant
Для установки Vagrant в Windows предварительно понадобится установить один из провайдеров виртуальной среды. Я использую VirtualBox от Oracle. Установка обеих программ не составляет абсолютно никакого труда и требует только вовремя нажимать кнопку Next.
Ссылки на страницы откуда можно скачать установщики:
- VirtualBox;
- Vagrant.
После установки, Vagrant можно будет запускать из командной строки из любого каталога.
Система развёртывания Capistrano
Для того, чтобы установить Capistrano на Windows в первую очередь нужно установить язык программирования Ruby. В этом нет ничего сложного, для установки языка в Windows существует специальный проект rubyinstaller.org. Нужно лишь скачать установщик и несколько раз нажать кнопку Next. Не забудьте только поставить галочку напротив пункта о добавлении Ruby в PATH Windows.
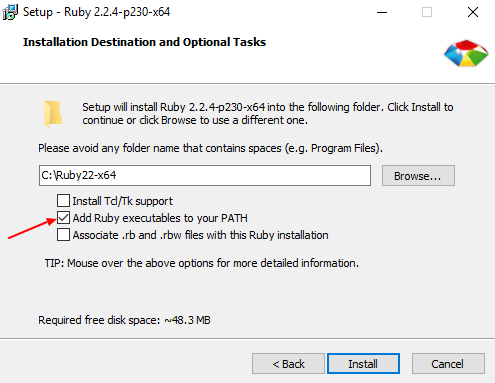
Это позволит запускать Capistrano из любого каталога, что очень удобно.
После установки Ruby настало время установить Capistrano. Откройте командную строку (если она была открыта, до установки Ruby, то закройте и откройте её снова, чтобы обновить данные из PATH) и введите команду:
gem install capistrano
Эта команда установит Capistrano в систему и в дальнейшем его можно будет запускать командой:
cap
Как видите, всё элементарно.
Все необходимые компоненты установлены. Осталось только выбрать хороший редактор кода. Я использую PHPStorm, так как он поддерживает все инструменты, которые перечислены в этом посте и ежемесячная индивидуальная подписка на эту программу стоит меньше $10. Но, конечно, можно установить любой редактор на свой вкус.
Сразу после установки PHPStorm на Windows нужно сделать две важные настройки:
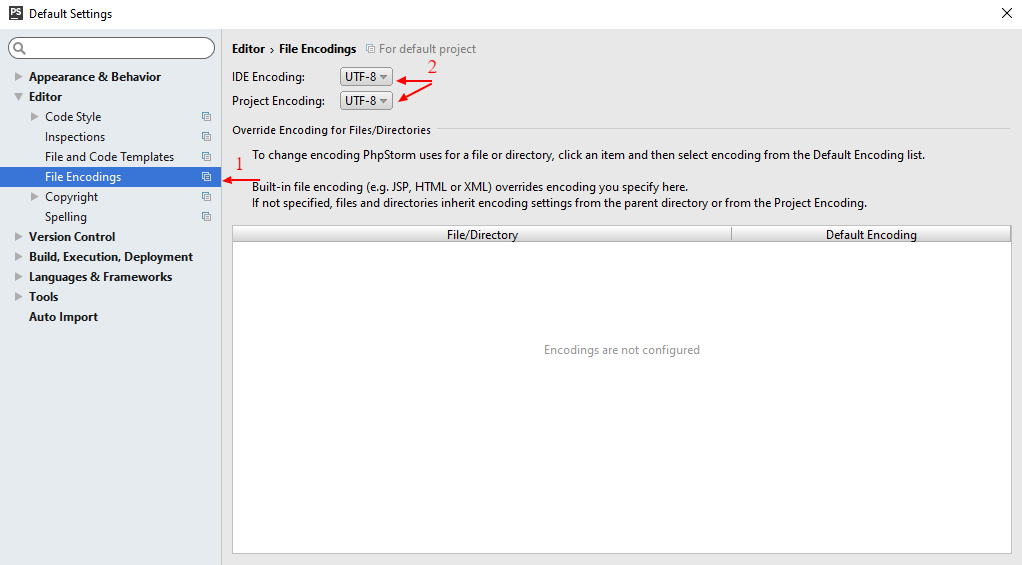
- указать UTF-8 в качестве кодировки всех файлов по умолчанию;
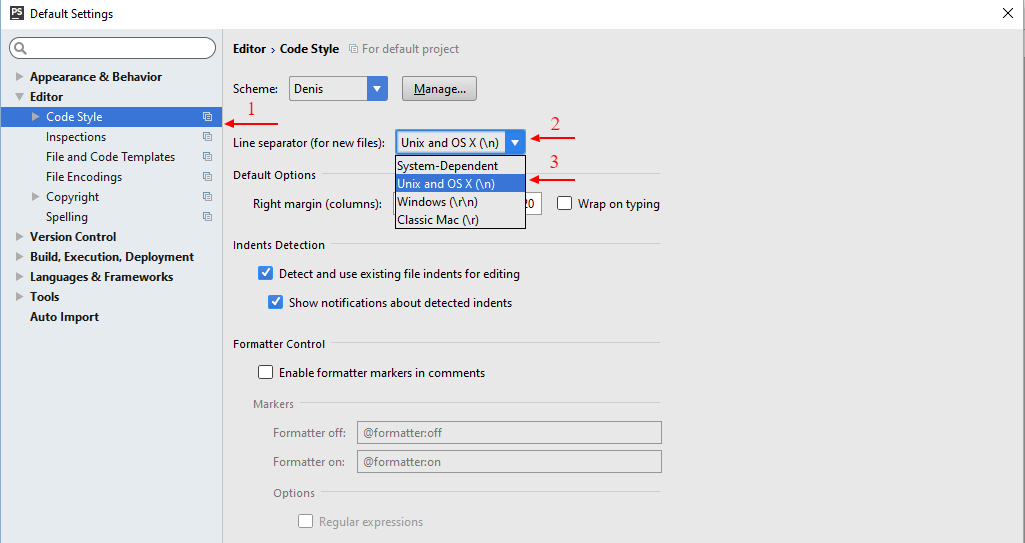
- указать символ
\nв качестве символа окончания строки по умолчанию.
Это необходимо сделать, так как всё тестирование и работа сайтов идёт в среде Linux и неверные символы окончания строк и кодировка файлов может приветси к разным ошибкам, у которых трудно будет выявить причину.
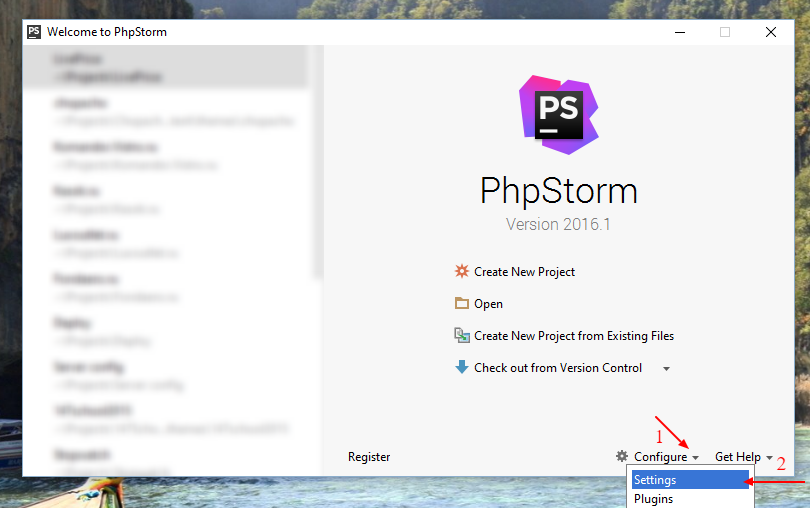
Обе настройки находятся в разделе Editor. Попасть в настройки можно с главного экрана PHPStorm.
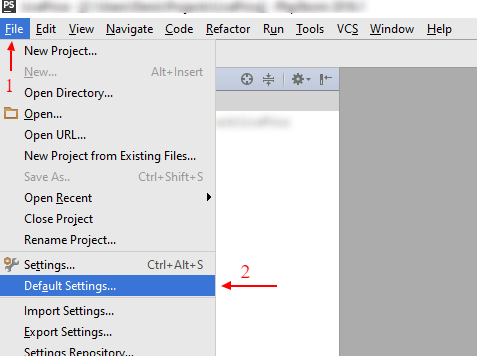
Либо с верхнего меню через File -> Default settings.
Окончание строк в файлах настраиваем в разделе Editor -> Code Style.
Кодировку файлов настраиваем в разделе Editor -> File Encodings.
На этом всё. На установку всех компонентов понадобится примерно час времени.
If you’re looking to develop with PHP on a Windows system, knowing how to install PHP on Windows is essential for setting up your development environment. Installing PHP on Windows can seem a bit tricky at first, but with the right steps, it’s a straightforward process. In this guide, we’ll walk you through how to install PHP on Windows, including configuration and verification, so you can start coding in PHP smoothly and efficiently. Whether you’re a beginner or an experienced developer, these steps will help you get up and running with PHP in no time.
Prerequisites
- A Windows machine with administrative access.
- An internet connection to download PHP and related files.
1: Download PHP
- Visit the PHP Website
Go to the official PHP download page to get the latest stable version of PHP for Windows. - Choose the Thread-Safe Version
Under the Windows downloads section, select the “Thread Safe” version, as it is recommended for web server usage. Download the ZIP file (e.g.,php-8.x.x-Win32-vs16-x64.zip).
2: Extract the PHP Files
- Locate the Downloaded File
Navigate to your downloads folder and locate the ZIP file you downloaded. - Extract PHP to a Folder
Right-click the ZIP file, select “Extract All,” and chooseC:\phpas the destination folder. This is the recommended location for easy configuration, but you can use a different path if needed.
3: Configure PHP Environment Variables
To use PHP from the command line, you’ll need to set it in your system’s PATH environment variable.
- Open Environment Variables
- Go to Start, type “Environment Variables,” and select Edit the system environment variables.
- In the System Properties window, click on Environment Variables.
- Add PHP to the Path
- Under System Variables, find the
Pathvariable and click Edit. - Click New and add the path to your PHP folder (e.g.,
C:\php). - Click OK to save and close all windows.
- Under System Variables, find the
4: Configure php.ini
The php.ini file allows you to configure PHP’s behavior.
- Locate the
php.iniFile
In theC:\phpdirectory, you’ll see two files:php.ini-developmentandphp.ini-production. Choose one based on your environment:- For development, rename
php.ini-developmenttophp.ini. - For a live server, rename
php.ini-productiontophp.ini.
- For development, rename
- Edit Key Settings
Open thephp.inifile in a text editor (like Notepad) and set the following parameters:- Enable Extensions: Uncomment lines for any extensions you need by removing the semicolon (
;) in front of them, e.g.,extension=mysqli. - Set Timezone: Search for
date.timezoneand set it to your timezone (e.g.,date.timezone = "America/New_York").
- Enable Extensions: Uncomment lines for any extensions you need by removing the semicolon (
- Save and Close
Save the changes and close the file.
5: Verify PHP Installation
- Open Command Prompt
PressWin + R, typecmd, and press Enter to open the command prompt. - Check PHP Version
Typephp -vand press Enter. If PHP is installed correctly, it will display the version and other details.
6: Run a Test PHP Script
Now, let’s ensure PHP is working by creating a simple script.
- Create a PHP File
Open a text editor and type the following PHP code:phpCopy code<?php echo "Hello, PHP is working!";Save the file astest.phpin yourC:\phpdirectory or any directory of your choice. - Run the PHP Script from Command Line
In the command prompt, navigate to the directory where you savedtest.phpand run:Copy codephp test.phpYou should see the output:Hello, PHP is working!.
7: Integrate PHP with a Web Server (Optional)
If you want to run PHP scripts via a web server, you can install a local server like Apache or Nginx.
Option A: Install XAMPP or WAMP (Recommended for Beginners)
- XAMPP and WAMP are all-in-one packages that include Apache, PHP, and MySQL.
- Download and install one of these packages, and it will automatically configure PHP with Apache.
Option B: Manual Apache Configuration (Advanced Users)
Restart Apache, and PHP should be configured to work with your server.
Download and install Apache.
Open Apache’s httpd.conf file and add the following lines to configure PHP:apacheCopy code# Add to the end of httpd.conf LoadModule php_module "C:/php/php8apache2_4.dll" AddHandler application/x-httpd-php .php PHPIniDir "C:/php"
Conclusion
And there you have it! You’re now ready to start learning PHP and build interactive web pages on your Windows machine. For more in-depth tutorials, don’t hesitate to visit Newtum. Dive deeper, experiment, and happy coding!
Edited and Compiled by
This blog was compiled and edited by Rasika Deshpande, who has over 4 years of experience in content creation. She’s passionate about helping beginners understand technical topics in a more interactive way.
About The Author
Пройдите тест, узнайте какой профессии подходите
Работать самостоятельно и не зависеть от других
Работать в команде и рассчитывать на помощь коллег
Организовывать и контролировать процесс работы
Введение
PHP — это популярный язык программирования, используемый для создания динамических веб-сайтов и приложений. Он широко используется в веб-разработке благодаря своей простоте и мощным возможностям. В этой статье мы рассмотрим, как установить PHP на различных операционных системах: Windows, macOS и Linux. Независимо от вашей ОС, процесс установки PHP достаточно прост, и мы проведем вас через каждый шаг. Мы также обсудим некоторые важные аспекты, которые помогут вам избежать распространенных ошибок при установке.

Установка PHP на Windows
Шаг 1: Скачивание PHP
Для начала необходимо скачать PHP с официального сайта php.net. Выберите версию, соответствующую вашей системе (обычно это VC15 x64 Thread Safe для современных систем). Обратите внимание на то, что существуют разные версии PHP, и выбор правильной версии может зависеть от ваших конкретных потребностей и конфигурации системы.
Шаг 2: Распаковка архива
После скачивания архива, распакуйте его в удобное для вас место, например, C:\php. Убедитесь, что у вас есть права администратора для выполнения этой операции. Распаковка архива может занять некоторое время, в зависимости от скорости вашего компьютера и размера архива.
Шаг 3: Настройка переменной окружения
Чтобы PHP работал корректно, необходимо добавить путь к папке с PHP в переменную окружения PATH. Это позволит вам запускать PHP из любой директории в командной строке.
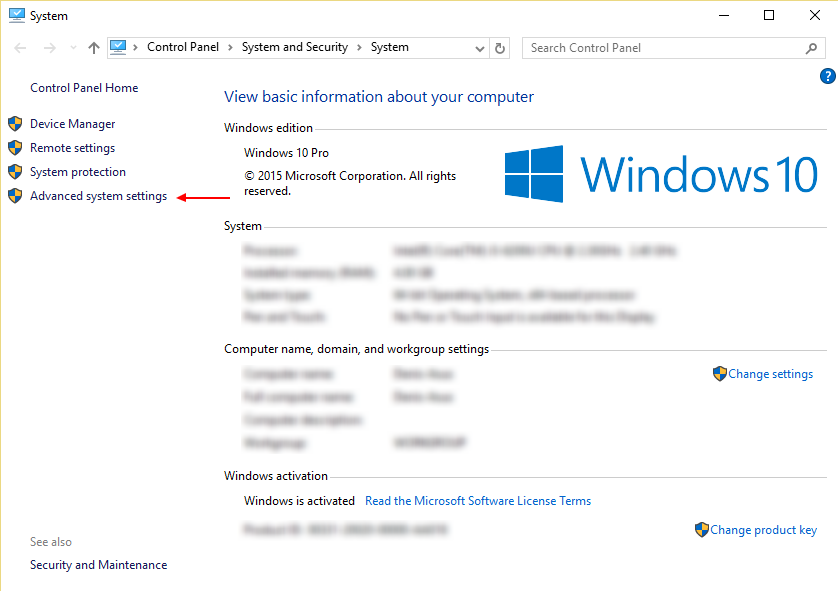
- Откройте «Панель управления» и перейдите в «Система и безопасность» > «Система».
- Нажмите «Дополнительные параметры системы».
- В разделе «Переменные среды» найдите переменную
Pathи добавьте путь к папке с PHP, например,C:\php. Убедитесь, что вы не удалили другие пути, уже существующие в переменнойPath.
Шаг 4: Проверка установки
Откройте командную строку (cmd) и введите команду:
Если установка прошла успешно, вы увидите версию PHP. Это означает, что PHP установлен и готов к использованию. Если вы столкнулись с ошибками, проверьте, правильно ли вы настроили переменную окружения PATH.
Установка PHP на macOS
Шаг 1: Установка Homebrew
Homebrew — это удобный пакетный менеджер для macOS, который значительно упрощает установку различных программ и утилит. Если у вас его еще нет, установите Homebrew, выполнив следующую команду в терминале:
Homebrew автоматически установит все необходимые зависимости и настроит вашу систему для работы с пакетным менеджером.
Шаг 2: Установка PHP через Homebrew
После установки Homebrew, установите PHP, выполнив команду:
Homebrew автоматически скачает и установит последнюю версию PHP, а также все необходимые зависимости. Этот процесс может занять некоторое время, в зависимости от скорости вашего интернет-соединения и производительности компьютера.
Шаг 3: Проверка установки
Чтобы убедиться, что PHP установлен правильно, введите в терминале:
Вы должны увидеть информацию о версии PHP. Если вы видите сообщение об ошибке, попробуйте переустановить PHP через Homebrew или проверьте настройки вашего терминала.
Установка PHP на Linux
Шаг 1: Обновление пакетов
Перед установкой PHP рекомендуется обновить список пакетов. Это гарантирует, что вы установите последнюю версию PHP и все необходимые зависимости. Откройте терминал и выполните команду:
Эта команда обновит список доступных пакетов и их версий, что позволит вам установить самую актуальную версию PHP.
Шаг 2: Установка PHP
Для установки PHP на Ubuntu или Debian выполните следующую команду:
Для других дистрибутивов Linux команды могут немного отличаться. Например, для CentOS используйте:
Эти команды установят PHP и все необходимые зависимости. Убедитесь, что у вас есть права администратора для выполнения этих команд.
Шаг 3: Проверка установки
После завершения установки, проверьте версию PHP с помощью команды:
Если все прошло успешно, вы увидите версию PHP. Если вы столкнулись с ошибками, проверьте, правильно ли вы выполнили все шаги и обновили ли список пакетов перед установкой.
Заключение и проверка установки
После установки PHP на вашей операционной системе, важно убедиться, что все работает корректно. Для этого выполните команду:
Если вы видите информацию о версии PHP, значит, установка прошла успешно. Теперь вы готовы к разработке на PHP! 🎉
В этой статье мы рассмотрели процесс установки PHP на различных операционных системах. Надеемся, что это руководство было полезным для вас. Удачи в ваших начинаниях с PHP! 😉