
Если требуются админские права, то будет выведет соответствующий запрос при сохранении.
Бывает не найти какие то настройки в панели управления
Пользуйтесь поиском.
большинство пунктов панели управления под виндой запускаются через mmc.
поэтому помогает запуск через консоль
runas /u:%adminstrator% mmc
и потом выбор нужного пакета *.msc
но не всегда, обычно еще глубже через ж приходится делать.
еще очень удобный вариант посмотреть в таскменеджере каким commandline запустилась нужная функция и пропустить ее через runas
In Windows 10, knowing how to run programs as administrator is very important. By default, apps and games in Windows 10 run without administrator permissions, to prevent unauthorized changes to your system. However, there are times when some programs require administrator permissions to work properly or to run specific commands. Windows 10 offers you the ability to run programs as admin without having to disable anything. Here are all the methods to use «Run as administrator» on any desktop app in Windows 10:
First things first: About UAC and Run as administrator
In early versions of Windows, applications had system-wide privileges, which was a security risk. All of Microsoft’s operating systems from Windows Vista onward, including Windows 10, include UAC or User Account Control, a security feature that prevents unauthorized changes to the operating system. Trying to run an application as administrator is one of the changes that require administrative privileges. Before the selected program is launched, a UAC prompt is triggered, asking for permission. If you run the application from an account without administrator permissions, the UAC prompt asks you to enter an administrator password. Without the admin password, the program does not launch.
In Windows 10, you can only run a program with administrator permissions if it is a desktop app. Some of these applications, like security software, cannot run correctly without having administrative permissions. Windows apps that are installed from the Microsoft Store cannot be run with administrative privileges in Windows 10. Furthermore, they have the same level of permissions as a normal user account, so they are not allowed to make changes to advanced system settings or the Windows Registry.
You can learn more about the difference between desktop apps and UWP apps and figure out which ones you can «Run as administrator» by reading What is a Windows app? How is it different from a desktop app or a program?.
1. Run a program as admin from the contextual menu of its Start Menu shortcut or tile
In Windows 10, you can launch a program with administrative permissions by using the contextual menu of its Start Menu shortcut. First, open the Start Menu. Then, find the shortcut of the program you want to launch in the All apps list, and right-click or press-and-hold on it to open a contextual menu. Click, tap, or hover over the More option, and then click or tap on «Run as administrator.«
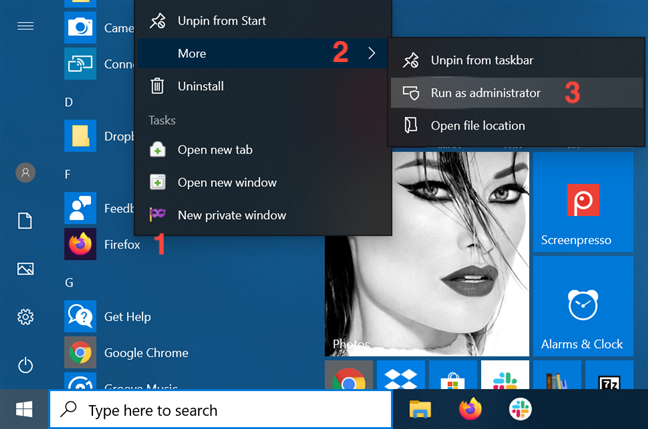
If you have a tile for your desktop app available in the Start Menu, right-click or press-and-hold on it to open a contextual menu. Access More and then click or tap on «Run as administrator.«
2. Run as administrator using «Ctrl + Shift + Click» on its Start Menu shortcut or tile
Open the Start Menu and locate the shortcut of the program you want to launch as administrator. Hold down both the Ctrl and the Shift keys on your keyboard and then click or tap on that program’s shortcut.
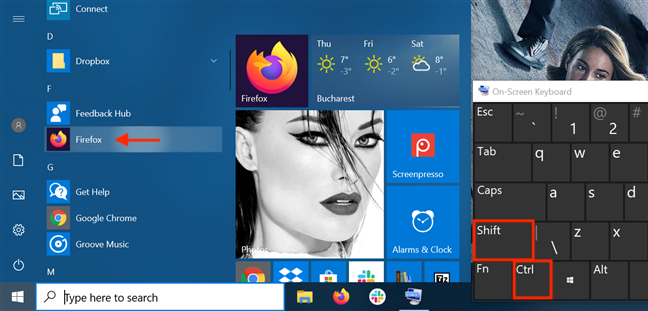
You can also use the «Ctrl + Shift + Click/Tap» shortcut on an app’s Start Menu tile to run it with administrator permissions in Windows 10.
During our tests, this method did not work every time, so if that is the case for you, either try again or consider running the app as administrator another way.
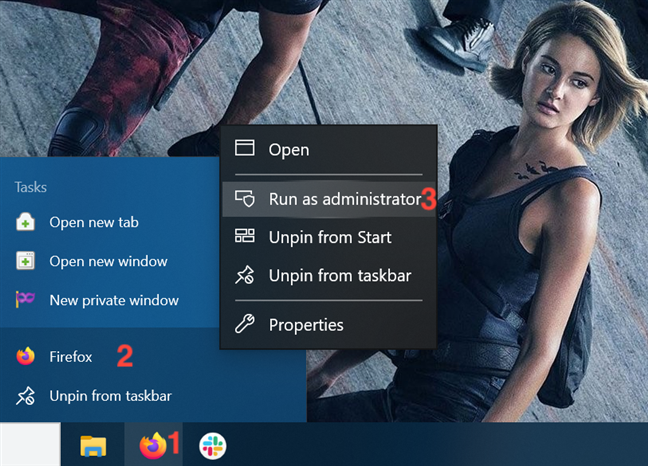
3. Run a program as administrator from its desktop shortcut
Find the desktop shortcut for the program you want to run as admin or create one yourself. Then, right-click or press-and-hold on it to open a contextual menu. Click or tap on the «Run as administrator» option.

4. Run a desktop app as administrator from its taskbar shortcut
In Windows 10, you can also run a desktop app with administrator permissions from its taskbar shortcut. Right-click or press-and-hold on the shortcut, and then right-click or press-and-hold again on the program’s name. Then, from the menu that opens, choose «Run as administrator.»
You can also use the «Ctrl + Shift + Click/Tap» shortcut on an app’s taskbar shortcut to run it with administrator permissions in Windows 10.
5. Run a program as administrator from its right-click menu
Although easier to find, shortcuts are not the only way to run a program as administrator in Windows 10. You can perform the same action from the main executable file’s contextual menu.
Open File Explorer and find the desktop app’s executable. Right-click or press-and-hold on it to open the contextual menu, and then click or tap on «Run as administrator.«
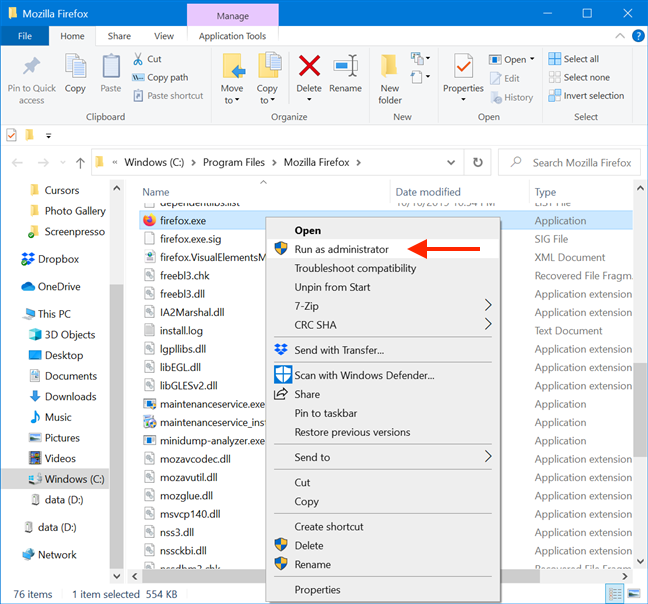
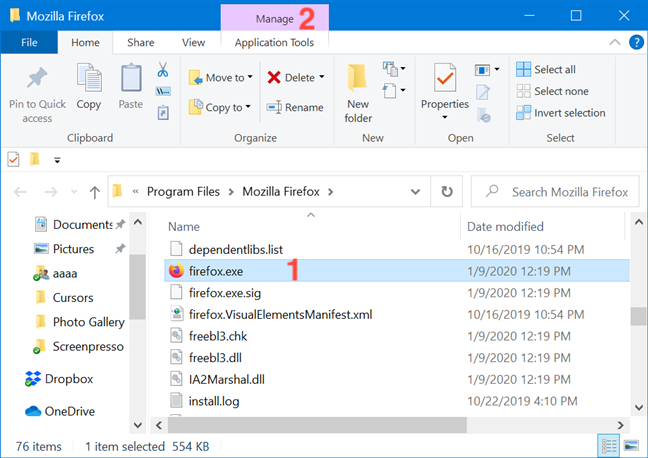
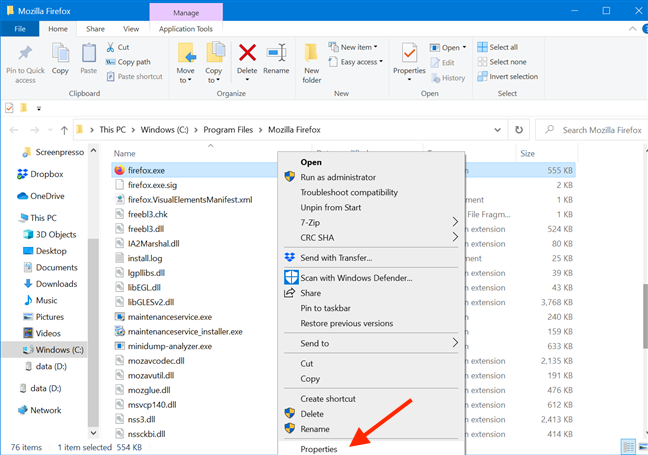
6. Use «Run as administrator» from File Explorer’s ribbon
Find the program’s main executable in File Explorer. Select it, and then click or tap on the Manage tab from the ribbon.
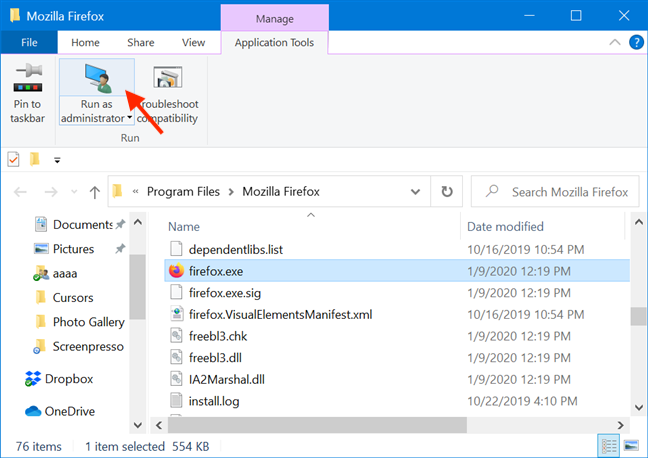
The option you need is displayed in the Run section of Application Tools. Click or tap on the upper half of the «Run as administrator» button to give the selected app admin permissions.
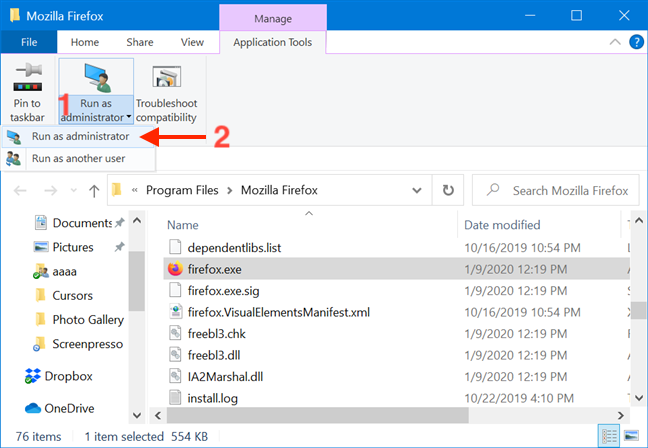
As an alternative, you can also press the lower half of the «Run as administrator» button and then click or tap on the «Run as administrator» option from the drop-down menu.
7. Run a desktop app as admin from the Search window
In the taskbar search field, type in the name of the program that needs to run with administrator permissions. Then, click or tap on the «Run as administrator» option displayed on the right side of the Search window.
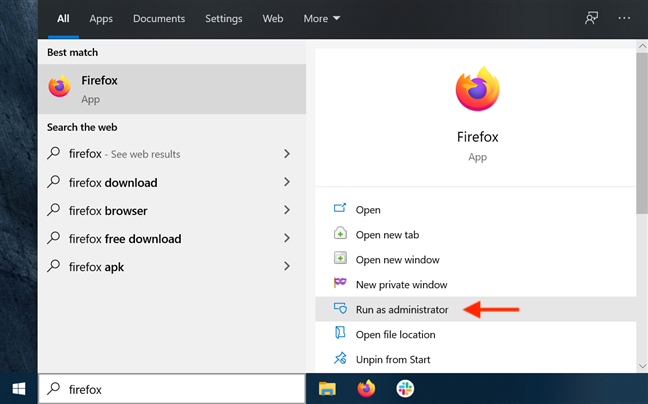
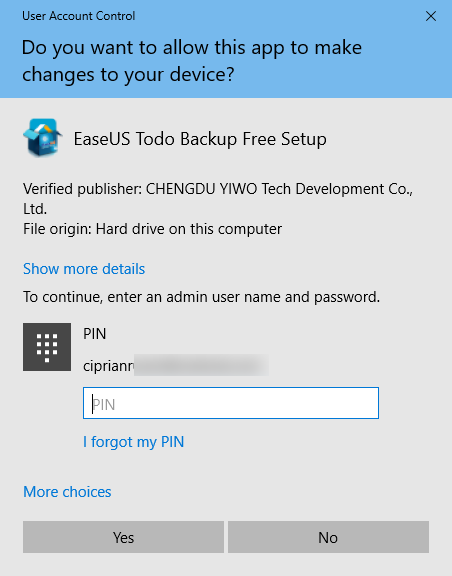
Obviously, when you see the UAC prompt asking for permission to run the app as admin, click or tap Yes.
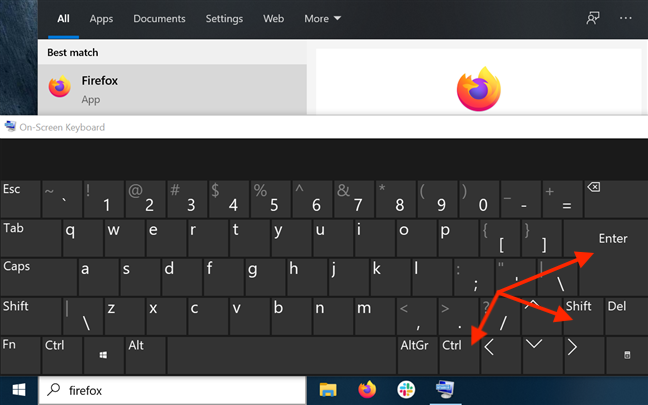
8. Run a program as administrator using «Ctrl + Shift + Enter» on its taskbar search result
Type the name of the program in your taskbar’s search field. If there are multiple results, use the arrow keys on your keyboard to highlight the program you want to run as administrator. Then, simultaneously press the Ctrl + Shift + Enter keys on your keyboard.
9. Run a program as administrator from the Run window
Open the Run window and type in the name of the executable for the program you want to run as administrator. Then hold down the Ctrl and Shift keys on your keyboard and click or tap on OK.
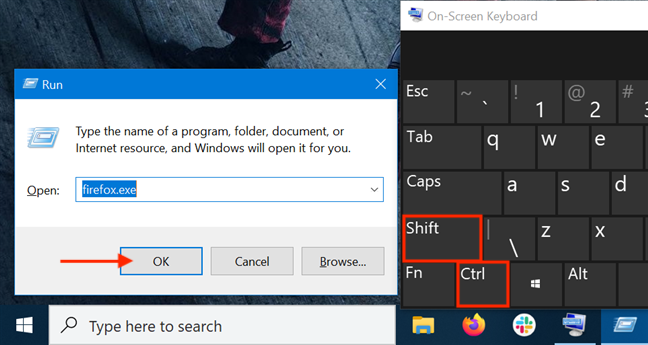
Alternatively, after typing in the name of the program’s main executable, press the Ctrl + Shift + Enter keys on your keyboard at the same time.

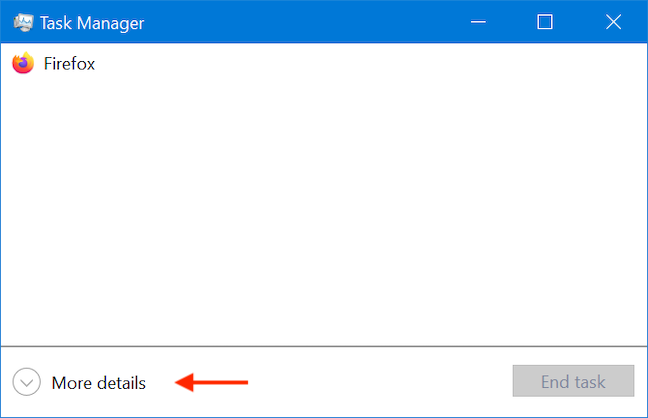
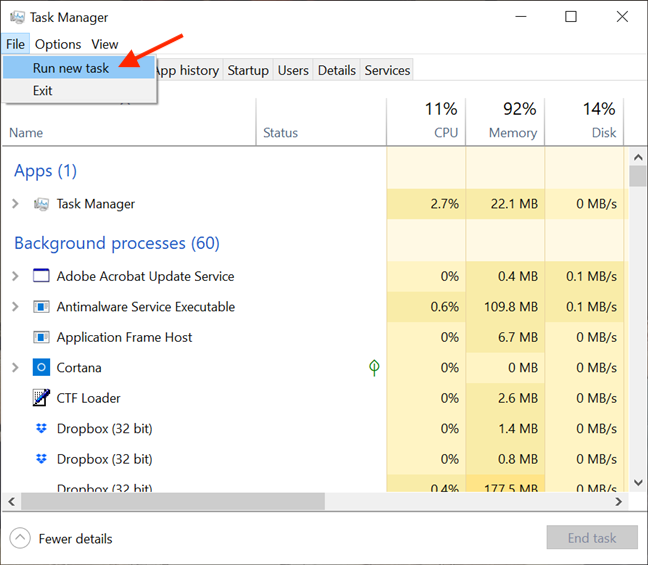
10. Run as admin from the Task Manager
Another way to launch a program as administrator in Windows 10 is to start it using the Task Manager. To begin, open the Task Manager. Then, if it opens up in its compact view, click or tap on the More details button.
In the expanded Task Manager, open the File menu and click or tap on «Run new task.«
This opens the «Create new task» window. You can use its Open field to enter the path to the program you want to launch as administrator, or you can click or tap on Browse to navigate to it. Then, make sure to check the «Create this task with administrative privileges.» option and click or tap on OK.
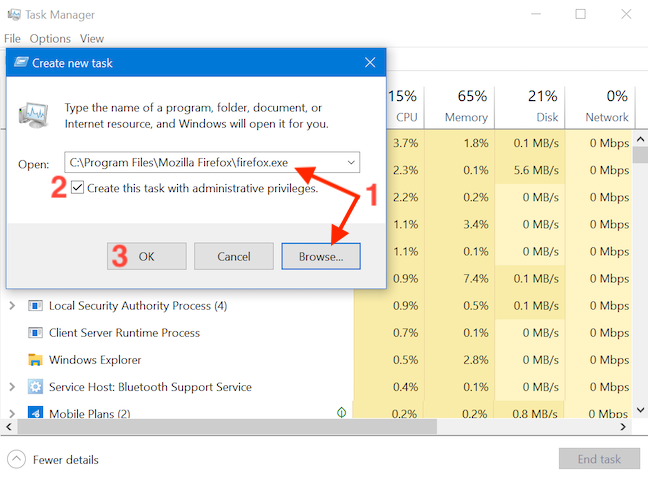
TIP: An advantage of using this method to launch programs as administrator is that you skip the UAC part of the process. That is because the app automatically inherits the permissions of the Task Manager — in our case, administrator permissions — so all you have to do is check the box to enable the option, as seen above. The option is missing if you only have standard user permissions on the device.
11. Run a desktop app as admin using the RunAs command in Command Prompt (CMD) or PowerShell
If the command line is your favorite way of asking your computer to do what you want, you can also access Command Prompt or PowerShell to run a program as administrator. Enter the following command in the CMD or PowerShell window, adjusting it to fit your needs:
runas /user:»your_computer_name\administrator_name» «C:\path\program.exe«
Replace your_computer_name with your computer’s name, administrator_name with the name of a user account that is an administrator on your system, and C:\path\program.exe with the complete path to the program that you want to run as administrator.
As seen in the image below, if you enter the command correctly, you are also asked to enter the administrator’s password. Then, press Enter on your keyboard once again.
TIP: Using this method to launch programs as administrators, you skip the UAC part of the process.
12. Always run a program with administrator permissions
To avoid constantly having to use the methods illustrated above on desktop apps accessed on a regular basis, you can set a program to always run with administrator permissions.
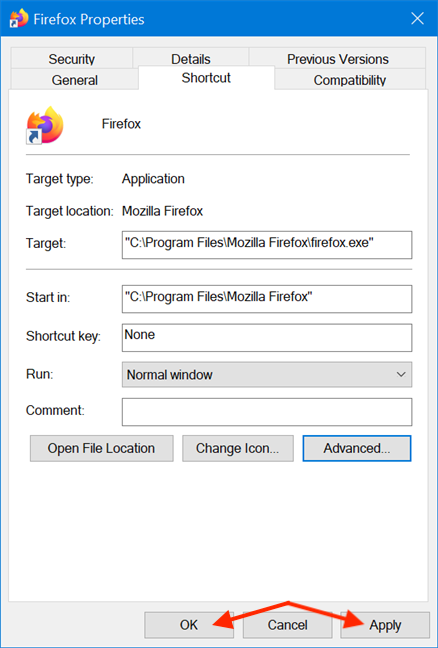
First, open File Explorer and find the main executable of the program you want to run. Right-click or press and hold on it to open the contextual menu. Then, click or tap on Properties.
In the Properties window, go to the Compatibility tab. At the bottom of the window, check the box next to the «Run this program as an administrator» option, and then click or tap on Apply or OK.
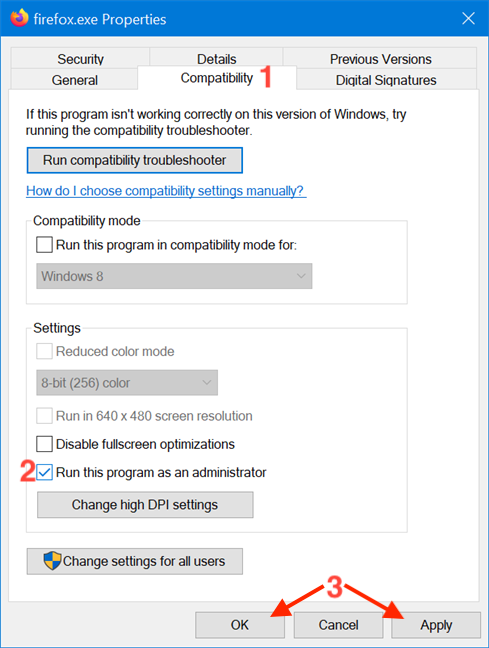
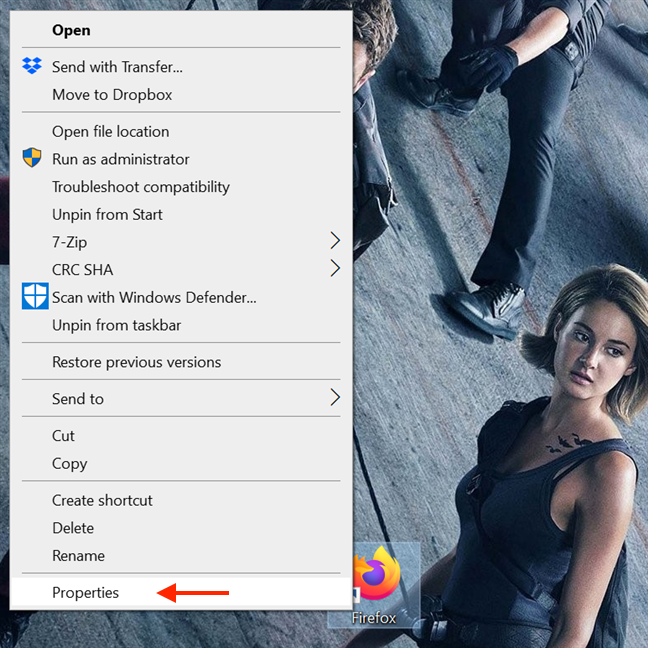
This setting is applied, and, from now on, the program always runs with administrator permissions. Follow the same steps if you want to disable the option. You can also edit the Properties of a program’s shortcut to avoid tampering with its main executable. To begin, right-click or press-and-hold on a program’s shortcut to access its contextual menu, and click or tap on Properties.
Then, in the shortcut’s Properties window, select the Shortcut tab. Click or tap on the Advanced button to open Advanced Properties.
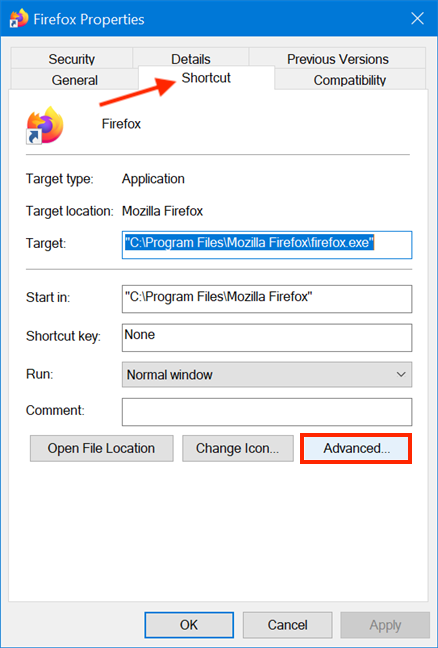
In the Advanced Properties window, check the box next to «Run as administrator» and then click or tap OK.
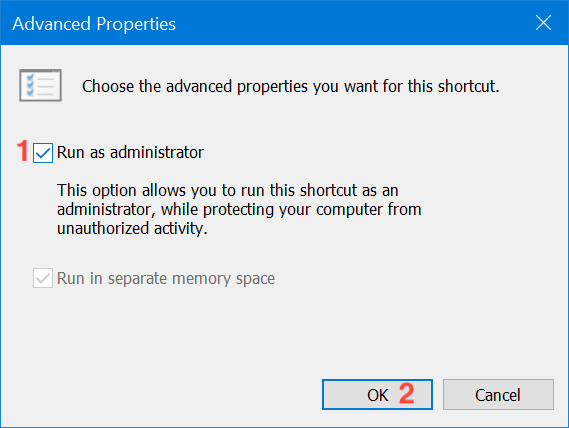
Finally, you are returned to the Properties window, where you have to click or tap on OK or Apply, and you are done.
The settings are applied, and your program works with administrative permissions as long as you open it using the same shortcut. When you use the methods in this section, the UAC prompts you as soon as you try to launch the app.
13. Run a program with administrator permissions and without a UAC prompt
Using the Task Scheduler, you can run a program as administrator without being prompted by the UAC (User Account Control) every time. It is simple, and you don’t have to disable UAC, thus compromising Windows 10’s security. We put together a detailed step by step guide to help you: Use the Windows Task Scheduler to run apps without UAC prompts and admin rights.
Which method(s) do you plan to use?
In Windows 10, there are fewer apps that need to run with administrator permissions than in older versions of Windows. However, a few legitimate programs still require elevated privileges. The main thing to remember is that even if you are logged in with an administrator account, you regularly run apps as a standard user. This means that if you need to run a program that requires administrator permissions, you can just use one of the methods described above and then approve it in the UAC prompt. Which of the method(s) illustrated do you plan to use? Did you already use some of them? Let us know in a comment.
Download Windows Speedup Tool to fix errors and make PC run faster
The Windows Control Panel allows you to control all the settings for your computer. Microsoft is planning to move all these controls over to Windows Settings, but I guess that will still take some time; and so this, till then, the Control Panel will be used by many. Normally, you do not run Control Panel in elevated mode like any other Windows program. So, how would you run Control Panel as Administrator?

Why should I run Control Panel as an administrator?
Having administrative privileges can help the user in more than one way. However, running Control Panel as administrator will not let you do anything extra. Honestly, you will gain nothing much. Keep in mind that if you are already a member of the administrative group, you already have all the required privileges. However, there may be use-cases why you might want to do this, and if so then this post shows how it can be done.
There are two ways to run Control Panel as an administrator in elevated mode in Windows 11/10:
- Open Control Panel in Elevated Mode using Shortcut
- Open Control Panel in Elevated Mode using Run
Let us talk about both of them in detail.
1] Open Control Panel in Elevated Mode using Shortcut
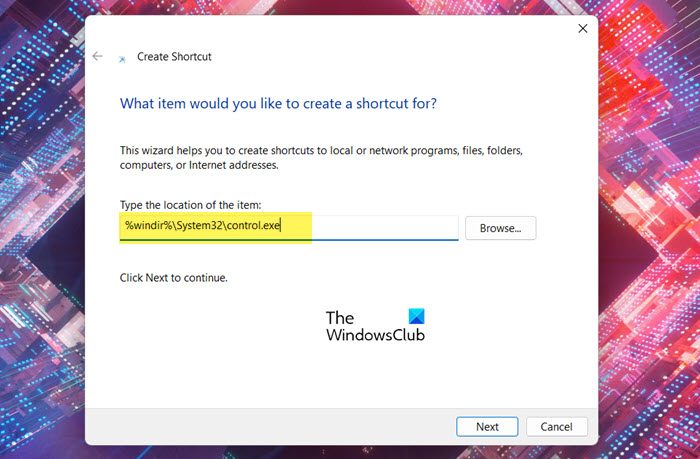
Since Control Panel doesn’t already have a desktop shortcut, you need to create one for Control Panel so that it will run in elevated mode. To do the same, follow the prescribed steps.
- Right-click on your Desktop and select New > Shortcut.
- Paste the following location in the Type the location of the item field.
%windir%\System32\control.exe
- Click on Next.
- In the Type a name for this shortcut field, type “Control Panel”.
- Click Finish.
This will create a desktop shortcut to the Control Panel. To open the app as administrator, just right-click on the shortcut we just created and select Run as administrator. You will see the UAC prompt, click Yes to continue. This will make sure that the program launches with the required permissions. However, if you are someone who wants the Control Panel to always launch with administrative privileges, then there are some other steps you need to follow that will ensure that the shortcut that we just created has administrative privileges by default and you don’t always have to right-click on it and select Run as administrator.
If you want to configure the app so it always opens in elevated mode, follow the prescribed steps to configure the shortcut we created.
- Right-click on Control Panel and select Properties.
- Make sure that you are on the Shortcut tab and click on the Advanced button.
- Tick Run as administrator and click OK.
This will configure the shortcut such that it always launches in elevated mode.
Read: How to allow Standard users to Run a Program with Admin rights
2] Open Control Panel in Elevated Mode using Run
If you don’t want to do all this, there is a way to run Control Panel with the required privileges using Run.
- To do the same, open Run by using Win+R
- Type “control” and hit Ctrl+Shift+Enter.
- You will see a UAC prompt
- Click Yes, and then Control Panel will be launched in elevated mode.
That’s all.
Read: How to check if a process is running with admin rights in Windows
How to open Run box as administrator?
You can open any application as an administrator using the Command Prompt. To do this:
- Press Win+R to open the Run box
- Type the name of the executable file in the space provided
- Now press Ctrl+Shift+Enter
- You will see the UAC prompt that you need to accept.
- The application will open in elevated mode.
Read: How to run Explorer elevated in administrator mode
How do I run Control Panel with administrator rights?
You can run Control Panel with administrator rights by either creating a shortcut and using it as you would any normal app or by a Run command. Either way, the process is pretty simple and can be executed even by an amateur. You can check the steps mentioned in this post to know how to do the same.
Read: Control Panel will not open in Windows
How do I run Command Prompt as administrator Windows 11?
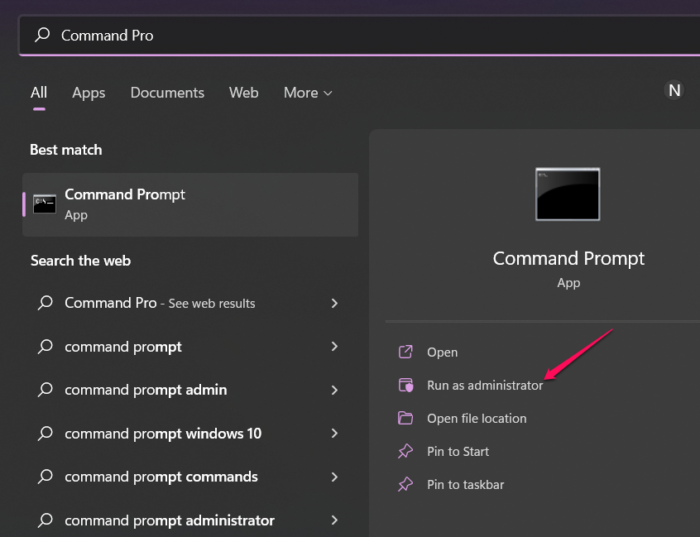
There are various ways to open Command Prompt with administrative privileges. You can search “Command Prompt” from the Start Menu and select Run as administrator. You can check our guide to explore options for running Command Prompt with administrative privileges. Hopefully, you will be able to find the easiest method to run cmd in elevated mode.
Also Read: Command Prompt won’t run as Administrator in Windows.
Yusuf is an Engineering graduate from Delhi. He has written over 1000 technical articles and has knowledge of programming languages including Java, and C++, and technologies such as Oracle 12C and MsSQL. Troubleshooting Windows is his favorite past-time.
When using Windows 10 as a power user, having administrative privileges is essential. Otherwise, you will be constantly blocked from making changes to certain settings and from accessing other resources. Well, the privileges and roles approach on Windows 10 is a complex issue, and should be outlined in a separate article. You can read about privileges and roles in Windows 10 here.
You may need administrative rights to fully benefit from the settings and configurations offered through the Control Panel. This option is only applicable to users who aren’t already members of the Administrator group.
This article explains two different methods of accessing the Control Panel as an administrator. Before proceeding, make sure you are using a standard or Power User account.
Table of Contents
Two Ways to Open the Control Panel as an Administrator In Windows 10
Run Control Panel as administrator using shortcut
A decent way to launch the Control Panel with administrative privileges is by creating a dedicated shortcut to always run as admin. Follow the guide below to do so.
Right-click the blank space on your desktop, expand New, and then select Shortcut. In the Create Shortcut window, paste the following path for the Control Panel into the text field, and then click Next:
C:\Windows\System32\control.exe

On the next page, enter the name for the shortcut and click Finish.

The task is not over yet. The shortcut has been created, but you now need to set it to always run with administrative privileges. Right-click the shortcut and click Properties from the context menu.
In the Properties window, switch to the Shortcut tab and then click Advanced.
In Advanced Properties, check the box next to Run as administrator and then click Ok. You can now close all properties windows by clicking Apply and Ok.

You can now simply run the newly-created Control Panel shortcut and it will run with administrative rights. Any configurations that you were previously unable to do can now be done with the privileges required.
You may experience a User Access Control (UAC) prompt when running the Control Panel with administrative rights – click Yes.
Run Control Panel as administrator using command line
This is another way to launch the Control Panel as an administrator. We would like to point out a key difference with this method: you will launch it not simply with administrative privileges, but as the Windows built-in Administrator account as well.
This will be done using a “Run as” cmdlet in the Command Prompt that allows you to run certain programs and applications as another user account.
Note that the local Administrator account will need to be enabled for this scenario and you will need to acquire its password for authentication. You can use the guide provided to enable the built-in Administrator account in Windows 10.
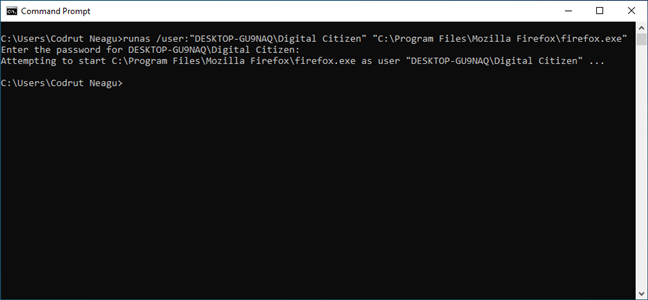
To do this, open the Command Prompt. Running the Command Prompt as an administrator is not required. Now modify the following command by replacing ComputerName with the name of your computer and then copy it into Command Prompt.
runas /user:ComputerName\Administrator "Control.exe"
You will then be asked to provide the credentials for the built-in Administrator account. Type those in. Note that it may seem that the password is not being typed in the command line, but it will be. Here is an example of the command that we used to run the Control Panel as Administrator:

In the image above, an arrow indicates the place where the password for the local administrator account was entered, and the Enter key button was pressed. Thus far, no output has been displayed on the command line.
After entering the above-command, the Control Panel will launch with administrative rights.
How to check if user account has administrative privileges
Make sure that your account is not already a member of the Administrator group on your computer. If so, launching the Control Panel with explicit administrative rights will do no good. If you have a standard account, it may be worthwhile launching it as administrator and making the changes required.
Follow the guide below to confirm which group(s) your user account belongs to:
Open Run by pressing the Windows Key + R shortcut keys simultaneously and then type in compmgmt.msc to launch the Computer Management console.

In the console, expand Local users and groups from the left pane, click Users, and then double-click the user account in the right pane you want to check the privileges of.

The properties window will not popup. Switch to the Members tab. There, you will a list of the groups your account is a member of. If “Administrators” is not listed there, it means your current account does not have the required privileges.

Therefore, you can now proceed to launch the Control Panel with explicit administrative privileges.
Closing words
Windows 10 users can open the Control Panel with administrative rights, but this might not be very beneficial if your company’s administrative staff are managing the Group Policies. If this is the case, you may still be unable to perform the configuration with administrative privileges.
Microsoft is working around the clock to replace the Control Panel and shift all configurations to the Settings app. Thus, it is possible that the Control Panel could be obsolete in the near future.
Download Article
Step-by-step administrator login guide for Windows 10
Download Article
- Making an Account an Administrator (Control Panel)
- Making an Account an Administrator (Settings)
- Enabling Administrator Account in CMD
- Enabling Administrator Account in PowerShell
- Logging In as an Administrator
- Video
- Expert Q&A
- Tips
|
|
|
|
|
|
|
An administrator (admin) account can change security settings, install and uninstall software, access every file, and change settings for other users. When you first start up Windows 10 or 11, you’re walked through the setup of the first user account, which is set to administrator. This wikiHow will show you how to log in as an administrator in Windows 10.
Administrator Login: Quick Steps
- Open the Control Panel.
- Go to User Accounts > User Accounts.
- Click Change account type on your account.
- Select Administrator and click Change account type.
-

If you want to make your own account an administrator on this PC or give admin rights to another account, you can do so in the Control Panel. You will need the current administrator password to do this. To get started, type control panel into the Windows search bar, then click Control Panel.[1]
- Alternatively, you can use the command line to open the control panel.
- You can also use this method to give administrator rights to another user account on this PC.
-
It’s the green text next to an icon that resembles a person. It’s on the right side.
Advertisement
-
It’s next to an icon that resembles two people. This will show you a page with information about the Windows user account you are currently logged in to.
-
In the profile box on the right side of the User Accounts page, you’ll see “Administrator” under the username if the account is an administrator. If you’re already an administrator, you don’t need to proceed—you have full admin access to the system.
- You can check the status of other accounts by click Manage another account in this menu.
- If you are not using a Microsoft account, you will see «Local Account» above «Administrator.»
-
If your account isn’t an administrator, you can change it to one (if you know the administrator login information). To do so:[2]
- Click Change your account type.
- Click the Administrator option.
- Click Change account type.
- Type the admin password when prompted.
- You’re done! Your user account can now perform all tasks as an administrator.


Advertisement
-
If you want to make your own account an administrator on this PC, or give admin rights to another account, it’s easy to do in Settings. You will need to be using an administrator account to do this, or have the password for an administrator-level account. Start by opening the Start menu and selecting Settings.
-
This opens the Accounts settings.
-
You’ll see this in the left panel on Windows 10. If you’re using Windows 11, select Other users in the right panel instead.[3]
-
You may need to click the name of the user first.
-
When prompted, enter the administrator password or click Yes to confirm. This makes the selected account an administrator.
- The «Administrator» account type gives the selected account full admin permissions. Whenever this account logs in to this particular computer, it will be an administrator and can perform all tasks that the administrator account can.


Advertisement
-
If you want to be able to log in with the «Administrator» username and password, you will need to enable the Administrator account, which is disabled by default. To get started, press the Windows key and type cmd.[4]
- You will need to be logged in to an account that has administrative permissions to enable the Administrator account in Windows 10.
-
Click Yes in the box that pops up to continue.
-
You’ll see text confirming your entry. If you see an error, you may have mistyped the command. The default Windows 10 administrative account is active but not password protected.
-
To log in as an administrator, the account will need a password. To set the admin password, type net user administrator * and press Enter. When prompted, enter and confirm a new password for the administrator account.[5]
-
You can access the option to Sign out from your profile picture in the Start Menu. Or, to keep your account logged in, select Switch User instead to return to the login screen.
-
If you don’t see it, click Other Accounts and enter .\Administrator as the username.
-
Click the submit arrow button. This will log you into Windows as an administrator.


Advertisement
-
To enable the administrator account in PowerShell, you’ll need to run PowerShell as an administrator. To do this:
- Press the Windows key on your keyboard.
- Type powershell into the Search bar.
- Right-click Windows PowerShell and select Run as administrator.
- Click Yes to continue.
-
At the prompt, type net user administrator /active:yes and press Enter. This enables the «Administrator» user, but it will not work until you create a password.
-
To do this, you’ll need to enter the following command, but replace «NewPassword» with the password you would like to assign to the Administrator account:
- Set-LocalUser -Name "Administrator" -Password (ConvertTo-SecureString -AsPlainText "NewPassword" -Force).
- Once the password is assigned, you can now log in with the Administrator account.


Advertisement
-
If you’re logged in to Windows already and want to switch to an Administrator account, you can click the Start menu, select your profile photo, and click Sign Out to return to the login screen.
- Alternatively, click your profile photo and select Switch user if you don’t want to log your current account out of the system.
- If you’re at the login screen, skip to step 3 instead.
-
If you are not prompted to enter a username, choose this option to bring up the username and password fields.[6]
-
If you’re signing in as the local «Administrator» account, type .\Administrator as the username, then type the password of the local admin account. Once your password is accepted, you’ll be logged in to the computer as an administrator.
- If you need to log in as the domain administrator, use domain_name\Adminstrator instead.
-
After entering your password, click the arrow to log in as an administrator.


Advertisement
Add New Question
-
Question
I typed in the command on CMD and it said «Access is denied». So what do I do now?
Kyle Smith is a wikiHow Technology Writer, learning and sharing information about the latest technology. He has presented his research at multiple engineering conferences and is the writer and editor of hundreds of online electronics repair guides. Kyle received a BS in Industrial Engineering from Cal Poly, San Luis Obispo.
wikiHow Technology Writer
Expert Answer
Try checking the administrator status of your account by going to Control Panel > User Accounts > User Accounts. If you’re not an administrator but you know who is, ask them for the admin password. Or, ask them to make your account an administrator.
Ask a Question
200 characters left
Include your email address to get a message when this question is answered.
Submit
Advertisement
Video
Thanks for submitting a tip for review!
Advertisement
About This Article
Article SummaryX
1. Run Command Prompt as an administrator.
2. Type net user administrator /active:yes and press Enter.
3. Close Command Prompt.
4. Log out.
5. Click the Administrator account from the login page.
Did this summary help you?
Thanks to all authors for creating a page that has been read 304,629 times.