
- Home
- Blog
-
Step-By-Step Procedure to Install OpenSSL on a Windows Machine
/
/

OpenSSL is an open-source cryptographic library that provides a robust toolkit for securing communications and creating, managing, and verifying digital certificates. It is widely used for implementing Secure Sockets Layer (SSL) and Transport Layer Security (TLS) protocols to encrypt connections between clients and servers.
Some of the common uses of OpenSSL include setting up private certificate authorities, generating public/private key pairs, creating certificate signing requests, exporting private key from certificates, converting between certificate formats like PEM and PFX, validating SSL connections, and more.
In this comprehensive guide, we will cover how to download, install, and configure OpenSSL on Windows machines. While Linux distributions come with OpenSSL pre-installed, Windows users need to manually install OpenSSL by getting the binaries from trusted third-party sources.
We will go over the prerequisites, walk through the installation steps, explain how to set up environment variables, and verify the installation to ensure OpenSSL is ready to use on your Windows PC or server. Whether you are a developer, IT admin, or security professional, this step-by-step procedure will help you get OpenSSL running smoothly on your Windows systems.
What is OpenSSL and Why Should We Install OpenSSL on a Windows PC?
OpenSSL is an open-source cryptographic library that provides a robust toolkit for securing communications and applications. Though primarily used on Linux, installing OpenSSL on Windows unlocks powerful capabilities. OpenSSL is mostly for system administrators, developers, and Windows users who wants to implement SSL/TLS connections in their apps and scripts. It enables generating X.509 certificates and certificate signing requests (CSRs) for securing websites and internal infrastructure. Developers can call OpenSSL crypto functions to encrypt data and implement PKI authentication in their apps.
System administrators can manage certificates, test secure connections, and integrate OpenSSL into automation scripts. OpenSSL also helps troubleshoot connection issues by analyzing network traffic and certificates.
There are a lot of things you can do using OpenSSL. Only a few of them are listed here:
-
You can create your own Certificate Authority and issue certificates on your network.
-
Convert digital certificates from one to another format.
-
Export or Import private keys from the certificates.
-
Validate the HTTPS connections to the destination website.
-
Verify the certificate of the destination website.
-
Run benchmark tests of your server and remote website.
-
Extract information like issuer, subject, issued and expiring dates, and fingerprint from certificates.
-
Create CSR.
-
Decode CSR and Certificates to verify contents.
You can enjoy the features of OpenSSL if you have installed it on your Windows machine. Before we begin the procedure to install OpenSSL on the Windows platform, let’s see the prerequisites.
Download OpenSSL Installer for Windows
Before we jump into the installation of OpenSSL on a Windows PC, let’s cover a few things about the Linux package. As we said in the introduction, OpenSSL will come as part of default installation packages in all the popular Linux distributions, even if you need a specific version of OpenSSL for your Linux machine, you can download the source code of OpenSSL on from its official website alternatively from here and compel it on Linux.
Well, If you are looking to download the OpenSSL package for your Windows machine from its official website, you can’t. It’s because OpenSSL doesn’t release official OpenSSL installers for Windows. You should depend on a few third-party distributors who distribute OpenSSL installer files for Windows platforms. OpenSSL has published the list of all trusted third-party distributors on its Wiki page. Please download and install only from these listed third-party sites.
Disclaimer Message from OpenSSL: The listing of these third-party products does not imply any endorsement by the OpenSSL project, and these organizations are not affiliated in any way with OpenSSL other than by reference to their independent websites here. In particular, any donations or payments to any of these organizations will not be known to, seen by, or in any way benefit the OpenSSL project.
– OpenSSL
Note: OpenSSL says none of these vendors are partnered with OpenSSL, so issues with these installers should be directly communicated with the distributors. OpenSSL doesn’t hold any responsibilities for these installers. Use these OpenSSL-derived products at your own risk; these products have not been evaluated or tested by the OpenSSL project.
List of Third-Party OpenSSL Distributions:
| Product | Description | URL |
|---|---|---|
| OpenSSL for Web (using WebAssembly) | OpenSSL 3.0 ported to WebAssembly (in October 2021). Uses Emscripten and xterm.js to emulate a terminal in your browser. WASI binaries are supported too. The Wasm execution happens using WebWorkers if the browser supports them. Originally developed for the cryptology playground “CrypTool-Online”. Code is open-source on GitHub. | OpenSSL-React app: https://github.com/cryptool-org/openssl-webtermBasic Wasm terminal: https://github.com/cryptool-org/wasm-webtermRunning sample: https://www.cryptool.org/en/cto/openssl |
| OpenSSL for Windows | Works with MSVC++, Builder 3/4/5, and MinGW. Comes in form of self-install executables. | https://slproweb.com/products/Win32OpenSSL.html |
| OpenSSL for Windows | Pre-compiled Win32/64 libraries without external dependencies to the Microsoft Visual Studio Runtime DLLs, except for the system provided msvcrt.dll. | https://indy.fulgan.com/SSL/ |
| OpenSSL for Windows | Reproducible builds with latest MinGW-w64, 64/32-bit, static/dynamic libs and executable. | https://github.com/curl/curl-for-win |
| OpenSSL for Solaris | Versions for Solaris 2.5 – 11 SPARC and X86 | http://www.unixpackages.com/ |
| OpensSSL for Windows, Linux, OSX, Android | Pre-compiled packages at conan.io package manager:Windows x86/x86_64 (Visual Studio 10, 12, 14, 15)Linux x86/x86_64 (gcc 4.6, 4.8, 4.9, 5, 6, 7)OSx (Apple clang).Cross-building ready recipe: Linux ARM, Android. | https://www.conan.io https://conan.io/center/openssl |
| OpenSSL for Windows | Pre-compiled Win32/64 1.0.2, 1.1.0, 1.1.1 and 3.0 libraries without external dependencies, primarily built for François Piette’s Internet Component Suite (ICS) for Embarcadero (Borland) Delphi and C++ development tools, but may be used for any Windows applications. The OpenSSL DLLs and EXE files are digitally code signed ‘Open Source Developer, François PIETTE’, so applications can self verify them for corruption. | http://wiki.overbyte.eu/wiki/index.php/ICS_Download |
| OpenSSL for Windows | OpenSSL 3.1, 3.0, and 1.1.1 pre-compiled for Microsoft Windows with no external dependencies. The binary distributions can be used standalone or integrated into any Windows application. Installer, EXEs and DLLs are digitally signed with ‘FireDaemon Technologies Limited’ Extended Validation (EV) code signing certificate. | https://www.firedaemon.com/get-openssl |
| OpenSSL for NonStop | Pre-compiled NonStop ia64/x86 1.0.2, 1.1.1 executables and libraries for the HPE NonStop Operating Systems. Threaded versions are included. The SPT version depends on FLOSS, otherwise there are no other dependencies. 32-bit versions are available. The builds are done by the ITUGLIB Technical Committee as part of Connect. | https://ituglib.connect-community.org/apps/Ituglib/SrchOpenSrcLib.xhtml |
How To Install OpenSSL On The Windows Platform?
The installation procedure is very simple and straightforward. Since OpenSSL does not provide official Windows installers, you need to download OpenSSL from trusted third-party sources listed on the OpenSSL Wiki.
We used Windows 11 64-bit and OpenSSL v 3.1.3 in this tutorial post.
Step 1. Download OpenSSL Installer
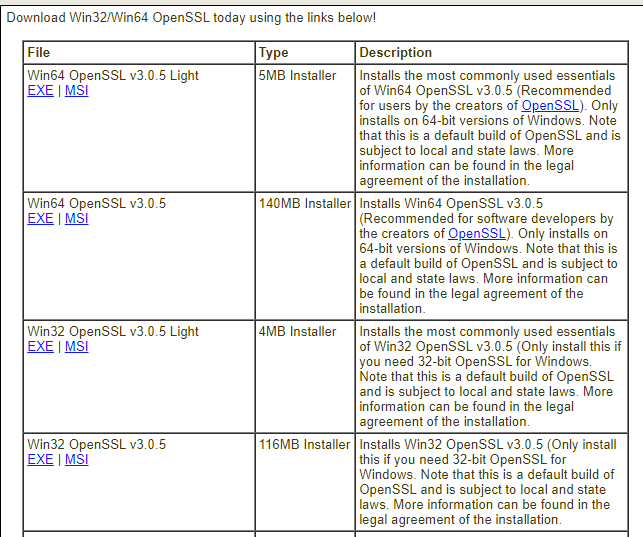
Visit any of the above sites and download the appropriate OpenSSL installer for your Windows version (32-bit or 64-bit). Make sure to pick the correct installer package for your machine.
Step 2. Run the OpenSSL Installer
Once downloaded, run the OpenSSL installer (.exe file) by double-clicking on it.
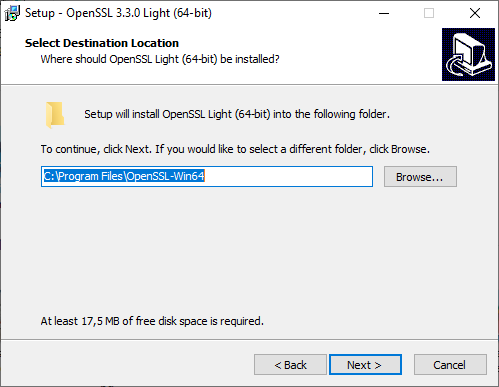
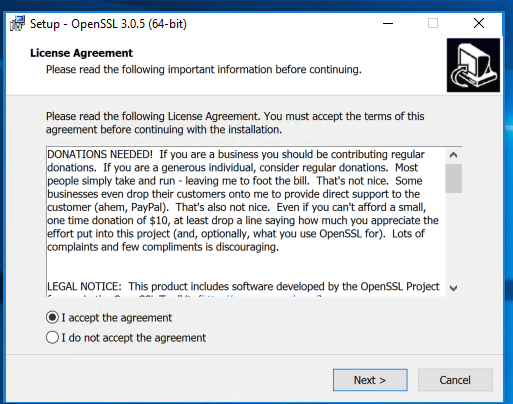
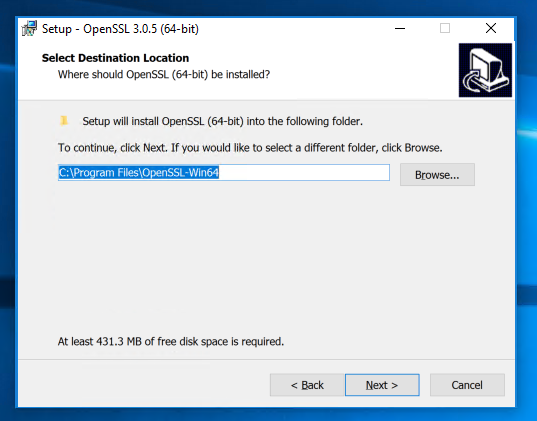
Accept the license agreement and choose the installation directory. The default is C:\Program Files\OpenSSL-Win64 but you can customize it.
The installer will copy all the required DLLs, and libraries, including files and executables. The installation typically finishes within a minute.
Step 3. Installation in progress…….
Step 4. Finish OpenSSL Installation
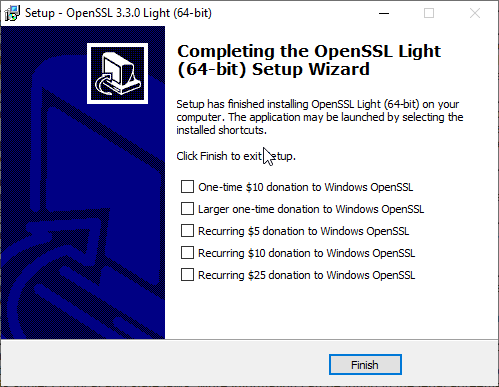
Once the installation completes, the setup wizard will prompt you to finish the installation. Click Finish to complete the OpenSSL installation process.
Step 5. Set Environment Variable
If you just want to set the environment varibles only for a login session, then run these commands.

>set OPENSSL_CONF=C:\Program Files\OpenSSL-Win64\bin\openssl.cfg
>set Path= C:\Program Files\OpenSSL-Win64\bin
If you want to set the env variable for permanently, then add OPENSSL_CONF and Path environment variable on System Properties.
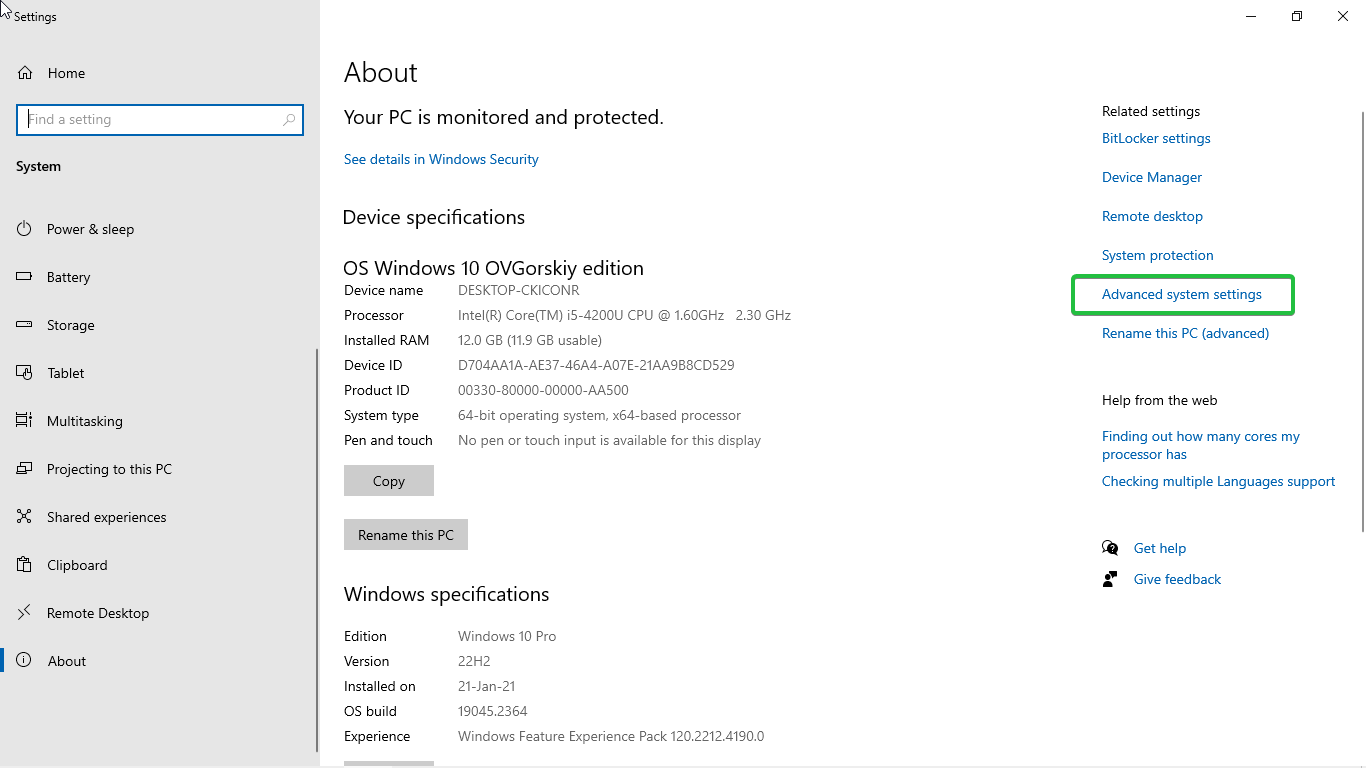
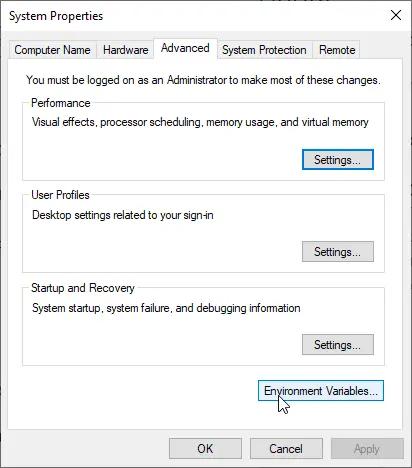
Open Run using ‘Windows’ + ‘r’ then type ‘sysdm.cpl‘. Go to Advanced > Environment Variable.
Set OPENSSL_CONF and Path variables.
Step 6. Verify the Installation
To verify that OpenSSL is installed correctly and added to PATH, open a new command prompt and run:
openssl versionThis will print the installed OpenSSL version and confirm the installation was successful.
You can also check all available commands by running:
openssl helpThis completes the installation of OpenSSL on Windows. You will see openssl.ext file in C:\Program Files\OpenSSL-Win64\bin directory.
Troubleshooting OpenSSL Issues
The real problem is not in installing OpenSSL on your Windows computer. The real problem encountered after the installation is when you start using OpenSSL. Many people reported that they were unable to run OpenSSL commands on their computers. This could be due to one of these reasons:
-
Incorrect environment variables – OpenSSL requires certain env vars like OPENSSL_CONF to be set properly. Not configuring these variables correctly can prevent things from working.
-
OpenSSL path not added – The OpenSSL install location needs to be added to the PATH env variable. Failing to do so will make the openssl command unrecognized.
-
Configuration issues – OpenSSL depends on its config file openssl.cnf. If this file is missing or corrupted, strange errors can occur.
-
Old OpenSSL version – OpenSSL releases new versions periodically with security fixes and improvements. Using an outdated OpenSSL can expose vulnerabilities. Upgrade to a newer version when possible.
-
Wrong architecture – Getting 32-bit and 64-bit versions mixed up can lead to errors. Make sure to install the version that matches your Windows architecture.
-
Missing DLL files – OpenSSL relies on certain DLL files like libeay32.dll and ssleay32.dll. If these files are missing or not in the system path, OpenSSL commands will fail.
The first thing you should do is to download the correct installer file and reinstall the OpenSSL. This solves problems like missing DLL and wrong architecture. Generally, version-related issues were seen least oftentimes. You can try fixing version-related issues by reinstalling a different version.
If your problem still persists, then the reason could either be with environment variables or OpenSSL configuration files. Let’s try to troubleshoot.
You should start troubleshooting by running openssl version command. If you get any error, ensure you configured OPENSSL_CONF and Path environment variable as per step 5. We should tell you about the two prominent configuration files openssl.cfg and openssl.cnf. People often get confused with these files. Just pay attention to the extensions .cfg and .cnf. You should set the environment variable OPENSSL_CONF to openssl.cfg file.
Let’s understand openssl.cfg and openssl.cnf configuration files in OpenSSL.
-
openssl.cfg – This is the default configuration file that comes with OpenSSL. It contains default settings for OpenSSL when no other config file is specified. The openssl.cfg file is located in the apps subfolder of the OpenSSL install directory.
-
openssl.cnf – This is the recommended main configuration file for OpenSSL. It contains sections for settings like certificate authority locations, certificate policies, default algorithms and protocols etc. The openssl.cnf file allows extensive customization of OpenSSL behavior.
It may sound similar. Let’s see the difference between to know more about these two files.
The main differences between openssl.cfg and openssl.cnf are:
-
openssl.cfg contains minimal default settings just to get OpenSSL working out of the box. openssl.cnf has extensive options to control OpenSSL behavior.
-
openssl.cfg is automatically loaded if no other config is specified. openssl.cnf must be explicitly specified using the -config option.
-
openssl.cfg is limited and intended for initial testing. openssl.cnf is meant for production use and customization.
-
openssl.cfg sets insecure default settings like using MD5 hashes. openssl.cnf has more conservative secure defaults.
-
Anything set in openssl.cnf will override the defaults in openssl.cfg. openssl.cnf is treated as the main config.
In Windows, openssl.cfg file is located at C:\Program Files\OpenSSL-Win64\bin directory. The openssl.cnf file is located at two locations: C:\Program Files\Common Files\SSL and C:\Program Files\OpenSSL-Win64\bin\cnf.
If you get an error messages “Can’t open /usr/lib/ssl/openssl.cnf for reading, No such file or directory” and “cannot access ‘/etc/ssl/openssl.cnf’: No such file or directory“. Make sure you have both files in their path and that environment variables are set.
If in case your openssl.cnf file is missing or unable to see, you can download openssl.cnf file from MIT (Massachusetts Institute of Technology). MIT provides a generic configuration file that you can use. You can download the file to these directories to fix the errors.
-
C:\Program Files\Common Files\SSL\
-
C:\Program Files\OpenSSL-Win64\bin\cnf\
If you set all these things, you are not going to see any issues in OpenSSL.
Bottom Line
Installing OpenSSL on Windows provides access to a robust cryptographic toolkit for secure communication and certificate management. This step-by-step guide covered downloading OpenSSL installers from the trusted third-party distributors, installing it on a Windows machine, setting up environment variables, and verifying the installation.
With OpenSSL added to your Windows desktop or server, you can now generate public/private key pairs, create and manage X.509 certificates, test SSL/TLS connections, implement encryption in your apps, and much more.
We hope this step-by-step procedure helps understand everything about the instillation of OpenSSL on a Windows machine. Thanks for reading this post. Please share this post and help secure the digital world. Visit our website, thesecmaster.com, and our social media page on Facebook, LinkedIn, Twitter, Telegram, Tumblr, Medium, and Instagram and subscribe to receive updates like this.
You may also like these articles:
Arun KL
Arun KL is a cybersecurity professional with 15+ years of experience in IT infrastructure, cloud security, vulnerability management, Penetration Testing, security operations, and incident response. He is adept at designing and implementing robust security solutions to safeguard systems and data. Arun holds multiple industry certifications including CCNA, CCNA Security, RHCE, CEH, and AWS Security.
Последнее обновление

Установка OpenSSL в системе Windows позволяет разработчикам и пользователям использовать его мощные возможности шифрования для различных целей, включая защиту веб-серверов, шифрование файлов и многое другое.
В этом руководстве Вы узнаете, как установить OpenSSL в Windows и устранить возможные проблемы, которые могут возникнуть при его использовании.
Перед установкой
Перед установкой OpenSSL в Windows убедитесь, что у Вас есть следующие предварительные условия:
- Административные привилегии в системе Windows для установки программного обеспечения.
- В Вашей системе установлен Microsoft Visual C++ Redistributable for Visual Studio (последняя версия).
- Надежное подключение к Интернету для загрузки программы установки OpenSSL.
- Достаточно места на диске для установки.
Шаг 1: Загрузка OpenSSL
Первым шагом будет загрузка пакета установщика OpenSSL, подходящего для архитектуры Вашей системы Windows (32- или 64-битной). Выполните следующие действия:
- Откройте веб-браузер и перейдите к пакетам OpenSSL для систем Windows.
- Выберите версию OpenSSL, которую Вы хотите загрузить. Мы рекомендуем загрузить последнюю стабильную версию для оптимальной безопасности и производительности.
- Выберите подходящий пакет установщика (EXE или MSI) для Вашей системы Windows (32- или 64-битной) и нажмите на него, чтобы начать загрузку.
Шаг 2: Установка OpenSSL
После того, как Вы загрузили установочный пакет OpenSSL, выполните следующие шаги, чтобы установить его в Вашей системе Windows:
- Найдите загруженный пакет программы установки в Вашей файловой системе (обычно в папке Downloads).
- Дважды щелкните по файлу программы установки, чтобы начать процесс установки.
- Если появится запрос от User Account Control (UAC), нажмите“Да“, чтобы позволить программе установки изменить Вашу систему.
- Появится мастер установки OpenSSL. Следуйте инструкциям на экране, чтобы продолжить установку.
- Выберите каталог установки, в который Вы хотите установить OpenSSL. По умолчанию обычно используется каталог
C:\Program Files\OpenSSL.

- Выберите компоненты, которые Вы хотите установить. Мы рекомендуем установить все компоненты, чтобы обеспечить полную функциональность OpenSSL.
- Нажмите“Далее“, чтобы начать процесс установки.
- Подождите, пока программа установки скопирует необходимые файлы и завершит установку. Этот процесс может занять несколько секунд.
- Когда установка будет завершена, Вы увидите подтверждающее сообщение. Нажмите“Finish“, чтобы выйти из программы установки.
Шаг 3: Настройка переменных окружения
После установки OpenSSL Вам необходимо настроить переменные окружения, чтобы сделать его доступным из командной строки. Переменные среды в Windows – это динамические значения, которые определяют окружение и поведение операционной системы. Выполните следующие действия:
- Щелкните правой кнопкой мыши на кнопке“Пуск” и выберите“Система” из контекстного меню.
- В окне “Система” нажмите“Дополнительные системные настройки” с правой стороны.

- В окне “Свойства системы” нажмите кнопку“Переменные среды…”.

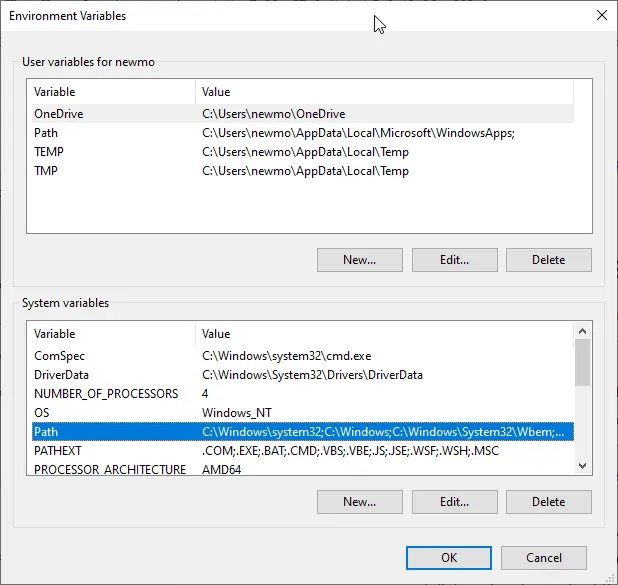
- В окне “Переменные среды”, в разделе“Системные переменные“, выберите переменную“Путь” и нажмите“Изменить…”.

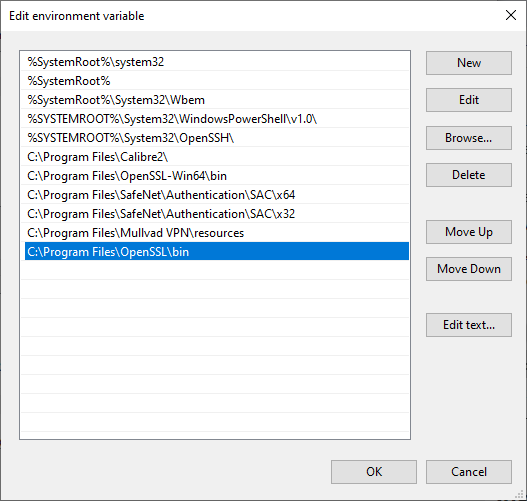
- В окне “Редактировать переменную окружения” нажмите“Создать” и добавьте путь к директории OpenSSL bin. Путь по умолчанию – C:\Program Files\OpenSSL\bin. Если Вы выбрали другую директорию установки, скорректируйте путь соответствующим образом.

- Нажмите“OK“, чтобы сохранить изменения и закрыть все открытые окна.
Шаг 4: Проверка установки
Чтобы убедиться в том, что Вы успешно установили OpenSSL в своей системе Windows, выполните следующие действия:
- Откройте Командную строку, набрав“cmd” в строке поиска Windows и нажав Enter.
- В окне Командная строка введите следующую команду и нажмите Enter:
версия openssl
- Если OpenSSL установлен правильно, Вы увидите номер версии и другую информацию об установке OpenSSL.

Шаг 5: Тестирование OpenSSL
Чтобы проверить OpenSSL и убедиться, что он работает правильно, Вы можете выполнить простой тест на шифрование и дешифрование. Выполните следующие действия:
- Создайте текстовый файл, содержащий пример текста. Например, создайте файл с именем plaintext.txt и добавьте в него текст.
- Нажмите клавишу Windows на клавиатуре, чтобы открыть меню “Пуск”, введите“cmd” и нажмите Enter. Это откроет Командную строку.
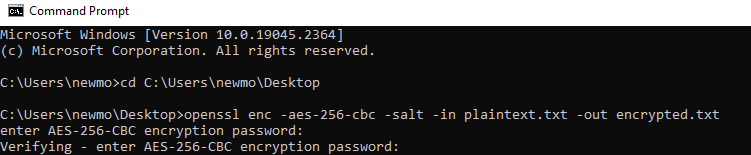
- С помощью команды cd перейдите в директорию, содержащую файл plaintext.txt. Если Вы знаете полный путь к директории, Вы можете ввести его напрямую. Например:
cd C:\Path\To\Directory
- Чтобы зашифровать текстовый файл, введите следующую команду OpenSSL и нажмите Enter:
openssl enc -aes-256-cbc -salt -pbkdf2 -in plaintext.txt -out encrypted.txt
- OpenSSL предложит Вам ввести кодовую фразу. Введите надежную парольную фразу и запомните ее для расшифровки.
- После завершения процесса шифрования у Вас будет файл с именем encrypted.txt, содержащий зашифрованные данные.
- Чтобы расшифровать зашифрованный файл и получить оригинальный текст, введите следующую команду и нажмите Enter:
openssl enc -d -aes-256-cbc -pbkdf2 -in encrypted.txt -out decrypted.txt
- OpenSSL предложит Вам ввести кодовую фразу, которую Вы использовали для шифрования. Введите кодовую фразу и нажмите Enter.
- OpenSSL расшифрует файл и сохранит расшифрованный текст в файле с именем decrypted.txt.
Если Вы можете успешно зашифровать и расшифровать файл с помощью OpenSSL, это означает, что OpenSSL установлен и правильно функционирует в Вашей системе Windows.
Общие проблемы при настройке OpenSSL в Windows
После установки OpenSSL в Windows Вы можете столкнуться с некоторыми типичными проблемами или трудностями. Вот список возможных проблем и шаги по их устранению:
- Проблемы с конфигурацией пути: Иногда Командная строка может не распознать двоичные файлы OpenSSL. Убедитесь, что каталог OpenSSL bin правильно добавлен в системную переменную PATH. Отредактируйте переменную PATH, если она отсутствует или неверна.
- Ошибки разрешений доступа: Если Вы столкнулись с сообщениями “Access Denied”, убедитесь, что Вы запускаете Command Prompt с правами администратора. Щелкните правой кнопкой мыши на Command Prompt и выберите “Запуск от имени администратора”.
- Вмешательство антивирусов: Некоторые антивирусные программы могут вмешиваться в работу OpenSSL или отмечать его как угрозу. Добавьте каталог установки OpenSSL в список исключений Вашего антивируса.
- Неправильный каталог установки: Если OpenSSL был установлен в неправильную директорию, подумайте о переустановке и выборе правильной директории во время установки.
- Проблемы с зависимостями: Отсутствие зависимостей может привести к ошибкам. Установите все необходимые зависимости, такие как пакеты Visual C++ Redistributable или другие библиотеки.
- Ограничения брандмауэра: Настройки брандмауэра могут блокировать доступ OpenSSL к Интернету или необходимым ресурсам. Настройте параметры брандмауэра так, чтобы разрешить доступ к OpenSSL.
- Устаревшее программное обеспечение: Использование устаревшей версии OpenSSL может подвергнуть Вас ошибкам или уязвимостям. Всегда используйте последнюю стабильную версию, чтобы воспользоваться улучшениями и исправлениями безопасности.
- Проблемы с разрешениями: Недостаточные разрешения на файлы или каталоги могут привести к сбою команд OpenSSL. Проверяйте и корректируйте разрешения по мере необходимости.
Решив эти распространенные проблемы, Вы сможете обеспечить беспроблемную установку и работу OpenSSL в Вашей системе Windows.
Нижняя линия
Изучение установки OpenSSL в Windows – это навык, который пригодится Вам при создании и управлении SSL-сертификатами. Следуя этим инструкциям, пользователи любого технического уровня смогут уверенно установить OpenSSL, обеспечив надежное шифрование для защиты данных и безопасного общения.
Сэкономьте 10% на SSL-сертификатах при заказе сегодня!
Быстрая выдача, надежное шифрование, 99,99% доверия к браузеру, специализированная поддержка и 25-дневная гарантия возврата денег. Код купона: SAVE10
Опытный автор контента, специализирующийся на SSL-сертификатах. Превращает сложные темы кибербезопасности в понятный, увлекательный контент. Вносите свой вклад в повышение уровня цифровой безопасности с помощью впечатляющих рассказов.
Исторически использование OpenSSL требовало либо работы в среде Linux, либо ручной компиляции исходного кода для пользователей Mac и Windows. Однако с появлением Win32/Win64 OpenSSL эта мощная криптографическая библиотека с открытым исходным кодом стала доступна пользователям как 32-битных, так и 64-битных операционных систем Windows, что обеспечивает плавную интеграцию в Windows средах посредством простого процесса установки. OpenSSL известен своей ключевой ролью в защите данных во множестве приложений и сетевых подключений. Он играет важную роль в шифровании данных для протоколов SSL/TLS, тем самым обеспечивая безопасные соединения HTTPS, а также используется, среди прочего, в процессах шифрования для SSH, OpenVPN и DNSSEC. Благодаря усилиям Shining Light Productions, развертывание OpenSSL в Windows был значительно упрощен. Проект установки Win32/Win64 OpenSSL, доступный на slproweb.com, предлагает установщик, который упрощает процесс, минуя сложность ручной компиляции, предоставляя готовые к использованию двоичные файлы. Эта разработка не только облегчает доступ к надежным функциям безопасности OpenSSL, но и расширяет инфраструктуру безопасности систем на базе Windows с минимальными усилиями.
Полное руководство по настройке OpenSSL на Windows
Развертывание OpenSSL в Windows 10 и Windows 11 стало более доступным, и в этом руководстве описаны два простых метода установки. Начните с самого прямого подхода, используя диспетчер пакетов Windows. Чтобы начать этот процесс, одновременно нажмите клавиши Windows-логотип + R, чтобы открыть диалоговое окно «Выполнить», введите «cmd» и выберите «ОК». Альтернативно вы можете нажать клавишу Windows, выполнить поиск «cmd», а затем выбрать значок командной строки в результатах поиска. Открыв окно командной строки, введите следующую команду, чтобы установить OpenSSL. Если ваша учетная запись пользователя не имеет административных привилегий, щелкните правой кнопкой мыши командную строку и выберите «Запуск от имени администратора» для получения повышенного доступа.<“C:\> winget install openssl”>Инструмент командной строки «winget» служит универсальным менеджером пакетов для Windows, упрощая установку программных приложений и пакетов непосредственно из интерфейса командной строки. Когда ты бежишь 'winget‘ в первый раз он может попросить вас принять условия исходного соглашения. Вы можете сделать это, нажав клавишу «Y» при появлении соответствующего запроса.
Этот метод демонстрирует простоту и эффективность использования. 'winget' для установки программного обеспечения на платформах Windows, упрощая процесс установки и запуска OpenSSL в вашей системе без необходимости выполнения сложных шагов или загрузки вручную.Пакет OpenSSL теперь установлен. Второй способ — загрузить и установить пакет.
Пошаговое руководство по загрузке и установке Win64 OpenSSL
Найдите установщик: посетите официальный веб-сайт Shining Light Productions по адресу: https://slproweb.com/products/Win32OpenSSL.html чтобы найти установщик. Рекомендуется выбрать самую последнюю версию, чтобы гарантировать наличие новейших улучшений безопасности и функциональности. На момент последнего обновления этого руководства рекомендуется использовать версию Win64 OpenSSL v3.0.7 EXE Light из-за ее баланса функций и облегченной установки.Запустите процесс установки: найдите «Win64 OpenSSL v3.0.7 EXE Light» вариант, который должен быть заметно вверху списка. Загрузите этот файл и после завершения загрузки перейдите в каталог загрузки и дважды щелкните значок Win64OpenSSL_Light-3_0_7.exe файл, чтобы начать процесс установки.Перейдите к мастеру установки. При запуске установщика вы можете столкнуться с приглашением контроля учетных записей (UAC). Нажмите 'Yes' чтобы подтвердить свое решение продолжить установку. Это действие активирует мастер установки, который проведет вас через необходимые шаги для успешной установки OpenSSL в вашей системе Windows. Мастер автоматизирует процесс распаковки и переноса необходимых файлов OpenSSL в назначенные места на вашем компьютере.
Интеграция OpenSSL в среду Windows
Доступ к свойствам системы. Начните с открытия диалогового окна «Выполнить» с помощью Ярлык Windows + R, затем введите «РАСШИРЕННЫЕ СВОЙСТВА СИСТЕМЫ» и нажмите «ОК», чтобы продолжить.Перейдите к переменным среды: в появившемся окне «Свойства системы»найдите и нажмите кнопку «Переменные среды», расположенную в нижней части окна.Измените системный путь. В окне «Переменные среды» прокрутите список, чтобы найти ‘Путь’ переменная под «Системные переменные» раздел. Выберите его, а затем нажмите кнопку ‘Редактировать’ кнопка. Это действие открывает «Редактировать переменную среды» окно, в котором вы добавите путь к установке OpenSSL.
В частности, вы хотите включить путь к OpenSSL-Win64\bin каталог, который обычно находится в каталоге Program Files. По этому пути находится исполняемый файл openssl.exe. Используйте кнопку «Обзор» или вставьте путь напрямую, если он у вас готов. Подтвердите выбор, нажав «ОК». Добавьте переменную OPENSSL_CONF: для правильной работы OpenSSL необходимо знать, где найти файл конфигурации. Добейтесь этого, добавив новую системную переменную. Нажмите ‘Новый’ в разделе «Системные переменные» и введите OPENSSL_CONF в качестве имени переменной. В поле значения переменной введите путь к вашему openssl.cnf файл, который обычно находится по адресу C:\Program Files\OpenSSL-Win64\bin\cnf\openssl.cnf. Подтвердите все действия, нажав ОК.
Проверка установки
Чтобы убедиться, что OpenSSL правильно настроен и работает, откройте окно командной строки и выполните следующие команды: Чтобы проверить версию и информацию о сборке вашей установки OpenSSL, введите:“C:\> openssl version -a”Эта команда отобразит такие детали, как номер версии и дату сборки. Чтобы определить каталог, в котором OpenSSL ищет свои файлы конфигурации, используйте:“C:\> openssl version -d”Это возвращает путь OPENSSLDIR, указывающий, где находятся файлы конфигурации OpenSSL. Использование OpenSSL в Windows. Хотя Windows не поддерживает страницы «man», распространенные в Linux для подробной документации по командам, OpenSSL в Windows предоставляет полезную альтернативу. Команда openssl help предлагает контекстно-зависимые инструкции по использованию различных функций. Например, вы можете использовать openssl help s_client, openssl help x509 или openssl help req, чтобы получить конкретную информацию об этих командах. Кроме того, в Интернете доступна обширная документация и страницы руководств, предлагающие массу информации как новым, так и опытным пользователям.
Освоение OpenSSL: ключевые команды и операции
OpenSSL — это невероятно надежный набор инструментов, предлагающий множество функций для управления и манипулирования сертификатами SSL/TLS, ключами и другими криптографическими задачами. Ниже мы рассмотрим несколько основных команд OpenSSL, которые широко используются для обеспечения безопасности и управления сертификатами. Этот список не является исчерпывающим, но содержит некоторые практические примеры эффективного использования OpenSSL.
Основные команды OpenSSL для экспертов по безопасности
– Проверка сведений о сертификате. Чтобы просмотреть сведения о файле сертификата с именем ca-cert.pem без изменения его содержимого, используйте следующую команду:openssl x509 -noout -text -in ca-cert.pemЭта команда выводит сведения о сертификате в читаемом формате, что упрощает просмотр его содержимого. – Проверка запросов на подпись сертификата (CSR): для проверки и подтверждения данных в файле CSR с именем `x509-check.csr`, выполнять:openssl req -text -noout -verify -in x509-check.csrЭто обеспечивает целостность и правильность информации CSR. – Проверка целостности файла ключа: проверка структурной целостности файла ключа, например `rootCA.key`Используйте:openssl rsa -check -in rootCA.keyЭта команда помогает убедиться, что файл ключа действителен и не поврежден. – Вычисление контрольной суммы сертификата: для расчета контрольной суммы MD5 файла сертификата. `ca-cert.pem`, облегчая проверку его целостности, выполняют:openssl x509 -noout -modulus -in ca-cert.pem | openssl md5– Преобразование форматов сертификатов: преобразование сертификата формата PEM. `servercert.pem` в формат PKCS#7 и сохраните его как `servercert.p7b` во временном каталоге, выполните:openssl crl2pkcs7 -nocrl -certfile servercert.pem -out c:\temp\servercert.p7b– Экспорт в формат PKCS#12: для преобразования сертификата rootCA.pem и его ключа. `rootCA.key` в файл формата PKCS#12 с именем rootCA.p12, используйте:openssl pkcs12 -export -in rootCA.pem -inkey rootCA.key -out c:\temp\rootCA.p12 -name "PKCS12 certificate"– Генерация сертификатов SSL: для создания нового сертификата SSL и ключа с шифрованием RSA 2048 и хешированием SHA256, действительным в течение одного года, используется команда:openssl req -new -newkey rsa:2048 -sha256 -days 365 -nodes -x509 -keyout server.key -out server.crt– Тестирование подключений к серверу. Чтобы проверить подключение к службе IMAP на `imap.gmail.com` в порту 993 используйте:openssl s_client -connect imap.gmail.com:993Для SMTP с включенным STARTTLS `smtp.gmail.com` на порту 587 команда:openssl s_client -crlf -connect smtp.gmail.com:587 -starttls smtpИ чтобы проверить детали подключения `www.ietf.org` на порту 443 тихо и кратко:openssl s_client -verify_quiet -brief www.ietf.org:443– Генерация случайных паролей: чтобы создать безопасный случайный пароль в формате base64, который можно использовать для защиты личных ключей, выполните:openssl rand -base64 20Эти команды представляют собой лишь малую часть того, что может сделать OpenSSL. Его универсальность выходит далеко за рамки этих примеров, поскольку он служит важнейшим инструментом для всех, кто работает с шифрованием, сертификатами и защищенными коммуникациями.
- Details
- Written by
- Last Updated on 21 October 2024 | Print Email
Are you stuck in setting up the OpenSSL library on a Windows operating system? What is the right and official way to install OpenSSL? Are you wondering why it is so difficult? You’ve come to the right place! In this article, I will show you an easy way to install OpenSSL on Windows.
OpenSSL is an open-source cryptographic toolkit widely used to implement secure communication and encryption based on Transport Layer Security (TLS) and Secure Sockets Layer (SSL). You can use it to generate and install SSL certificates for web servers, create private keys, verify certificates, and perform more cryptographic operations.
Follow the steps below to install OpenSSL on your Windows OS.
1. Download Windows Installer for OpenSSL
If you visit the official OpenSSL website and OpenSSL library, you’ll notice that it seemingly provides only the source code and you would need to build the binaries from the source! Of course, you just want to use the tool right away and might be hesitant of going through the complexities of building the code, right? There should be an easier way.
No worries. I’ll save you time by pointing out this OpenSSL binaries download page from third-party distributions:
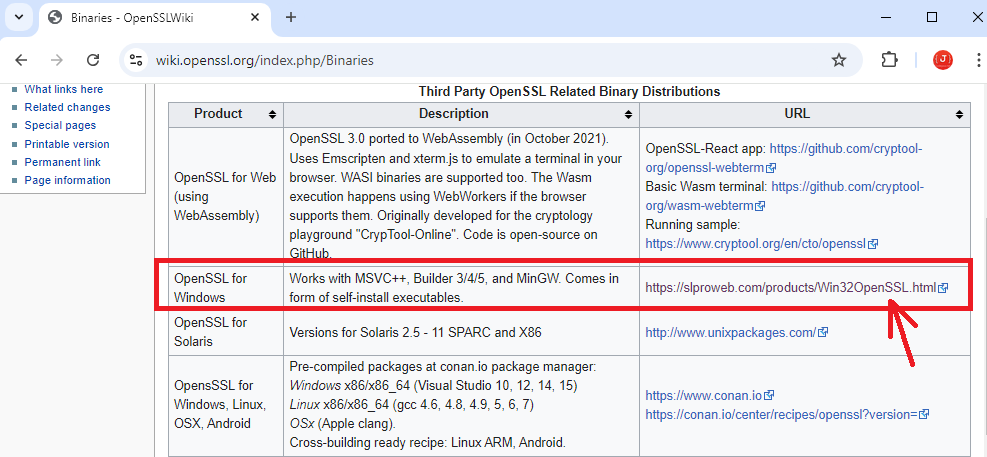
As you can see, there are several binary distribution (installers) of OpenSSL, but I recommend downloading the second one on the list (OpenSSL for Windows). So click this link to go to the download page, as shown below:
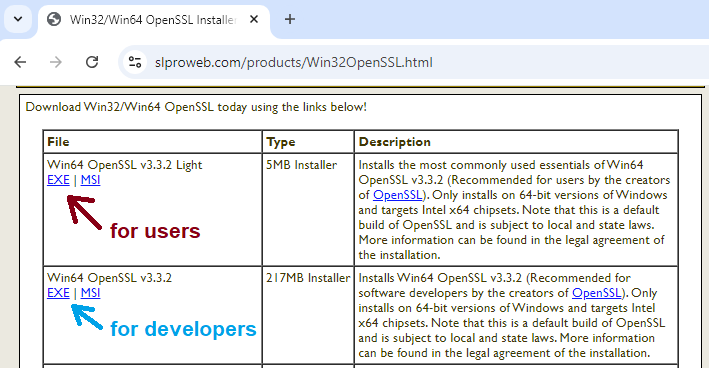
This is an OpenSSL distribution provided by Shining Light Productions. And there are 2 types of installers for the 64-bit Windows operating system:
- Win64 OpenSSL v3.3.2 Light: this installer is recommended for users.
- Win64 OpenSSL v3.3.2: this installer is recommended for software developers.
If you only need the essential features of the OpenSSL library, download the Light version (5MB). However, if you want to use advanced features, download the full installer (217MB). Since I am just an end user of OpenSSL, I clicked on the EXE link to download the Win64 OpenSSL Light installer.
2. Set up OpenSSL on Windows
Double-click the downloaded EXE file to launch the installer. Click Install anyway if you see the warning message ‘The app you’re trying to install isn’t a Microsoft-verified app’. The setup program for OpenSSL 3.3.2 Light (64-bit) will appear as follows:
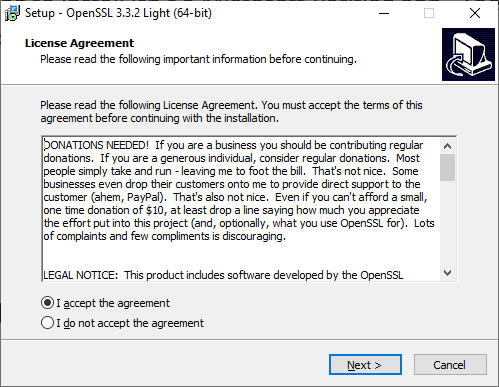
Check “I accept the agreement” and click Next 3 times to proceed with the installation using the default settings, which will install OpenSSL binaries into the C:\Program Files\OpenSSL-Win64 directory and copy the OpenSSL DLLs to the Windows system directory. Then, click the Finish button to close the setup wizard. It’s quick and easy, isn’t it?
3. Verify the OpenSSL Installation
Press the Windows Start button, and type openssl. Click the result that shows “Win64 OpenSSL Command Prompt”:
It will open up a new command prompt window that is customized for using the OpenSSL library. When you see the following screen, it means you have successfully installed OpenSSL on your Windows operating system:
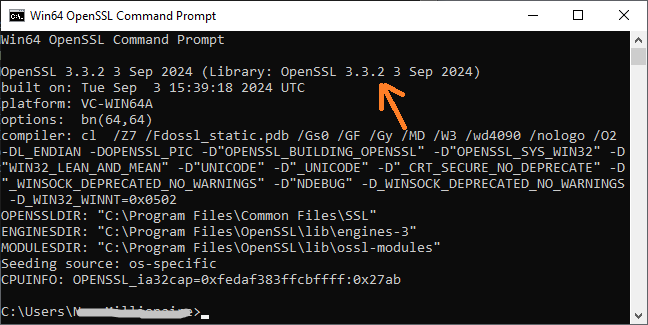
You can also type openssl -version to verify, and it will print the full version of the library in the command prompt. This means that openssl is the command-line tool used to perform cryptographic operations.
NOTES: If you want to use the openssl command-line tool anywhere in the Windows Command prompt, watch the following video to learn how:
About the Author:
Nam Ha Minh is certified Java programmer (SCJP and SCWCD). He began programming with Java back in the days of Java 1.4 and has been passionate about it ever since. You can connect with him on Facebook and watch his Java videos on YouTube.
Add comment

The OpenSSL Toolkit is a collection of libraries and programs used for the secure communications of data. It was created in 1995 by Eric Young and Tim Hudson.OpenSSL is a small but powerful open source cross–platform utility library, written in C, that implements the SSL, TLS, and DTLS protocols, as well as a full–strength, general–purpose cryptography library.
Why OpenSSL in Windows?
OpenSSL is generally not used by normal users. OpenSSL doesn’t come preinstalled on the windows platform. OpenSSL is a cryptographic SSL/ TLS tool kit, Which helps provide solutions and troubleshoot issues on Digital certificates, SSL/TLS Security testing, Application testing, and Security testing. Based on the data available on the internet, I have listed out few things which can be done through OpenSSL.
- We can create your own certificate authority and issue the certificate on the network.
- We perform the conversion of digital certificates in various formats.
- Export and import private keys from the certificates.
- Validate Secure HTTPS connections to the destination website.
- Verify the certificate is offloaded on the destination website.
- Extract information like CN name, issuer, issued and expiring dates, and fingerprint on the certificate offloaded.
- Create CSR (Certificate signing request).
- Decode CSR and certificate to verify the contents offloaded on the client side.
It would be fun to install the OpenSSL on the windows machine so we don’t need to run any additional Linux machines to use the features present in the OpenSSL.
Step by Step Procedure to install OpenSSL on Windows Platform :
Since it windows platform installation procedure is pretty simple and straightforward, the Steps would involve down the OpenSSL installer, Install and configure the environment variables in the windows machine.
Step 1: Download the OpenSSL installer from the OpenSSL download link: https://slproweb.com/products/Win32OpenSSL.html
Step 2: Run the installer as an administrator and install OpenSSL on the windows machine, Accept the License Agreement and click the Next button.
Step 3: Specify the location where OpenSSL needs to be installed and click the next button.
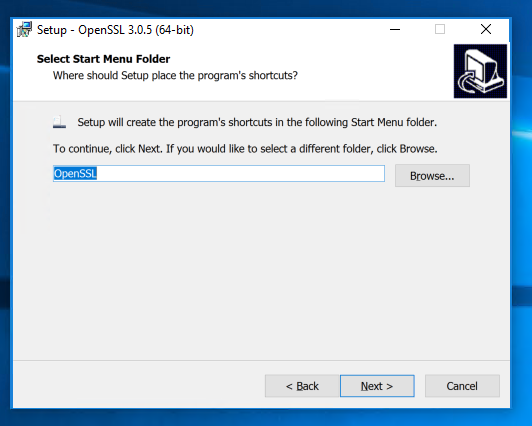
Step 4: Give the name for which program shortcut would get created and click the next button.
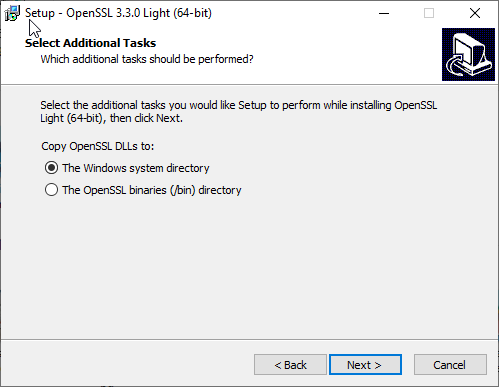
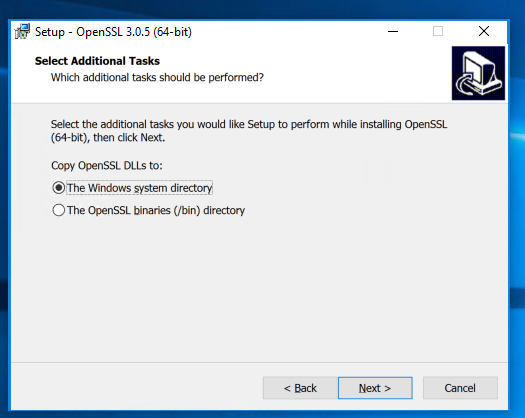
Step 5: Select the Windows system directory for which OpenSSL DLLs will be installed and click the next button.
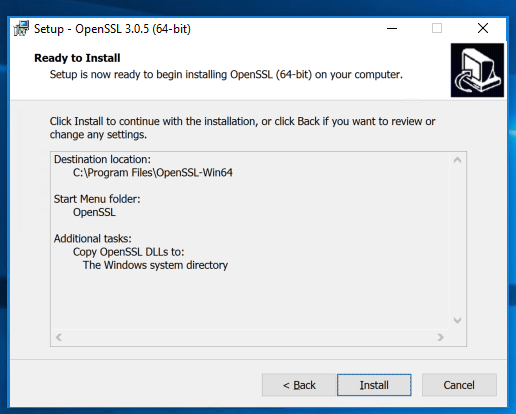
Step 6: Initiate the installation of OpenSSL by selecting the install button as shown below.
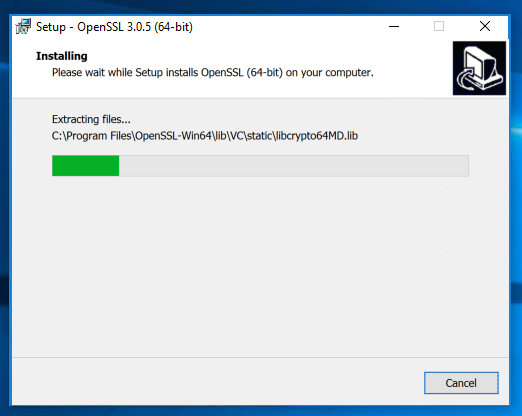
Step 7: installation will be in progress
Step 8: After 10-30 seconds complete the installation of the OpenSSL by selecting the finish button as shown below.

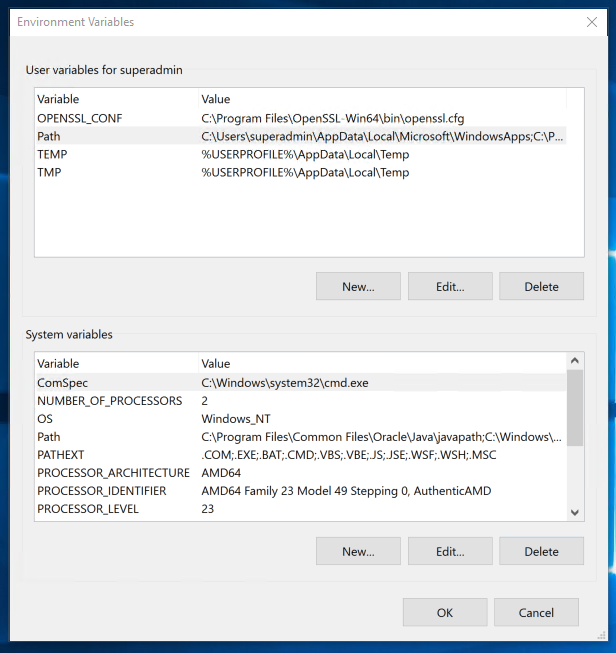
Step 9: Set the Environment Variables for the OpenSSL, Open Run from the start menu, and enter ‘sysdm.cpl‘. Once the System properties are opened go to Advanced > Environment variable.
- Create New Variable named as OPENSSL_CONF and Value as C:\Program Files\OpenSSL-Win64\bin\openssl.cfg
- Edit the path variable and add the new path: C:\Program Files\OpenSSL-Win64\bin
Step 10: Validate the installation by running the command OpenSSL version in the command prompt, we should get the output as shown below.

Once validation you can start playing or troubleshooting the certificate-related issues or data points using various OpenSSL commands.
Thanks for spending your time reading the article, In case of any queries or suggestions please drop them in a comment box below.