

Вместо предисловия
Рассматривается версия Community. Материал ориентирован на тех, кто желает постичь основы управления базами данных, в частности, MySQL.
Необходимые компетенции: базовые навыки работы с командной строкой (консолью) MS Windows и самой операционной системой ( редактирование реестра, копирование, вставка, удаление объектов, строк в консоли ), 1-2 драгоценных часа жизненного цикла :-).
В статье приведены многочисленные ссылки на разъясняющий материал — не пропадете :-). Вопросы, предложения и комментарии читателей приветствуются. Перед тем, как написать возмущенный комментарий, представьте на минуточку орду изголодавшихся фанатов MySQL на Хабре, жаждущих чьей-то крови :-).
Мотивация
Скорый обзор публикаций по ключевым словам в поисковике выявил ряд материалов — сборников сборной солянки, как мне показалось, в т.ч. ошибок и неточностей. Наиболее интересными по содержанию показались следующие материалы Рунета:
-
Изучаем переменные среды в Windows 10
-
Переменные среды Windows
-
Переменные среды Windows 10-11
-
не могу не отметить инструкцию для MySQL на английском с непереводимым, но очень метким названием «Put MySQL in PATH»
-
а также переведенную, очевидно, машинным способом, с китайского языка статью на портале «Русские блоги» с фотками китайской версии Windows — такая у нас международная любовь к MySQL; своей экзотики, видимо, уже не хватает :-).
Переменная среды́ ( англ. environment variable ) — текстовая переменная операционной системы, хранящая какую-либо информацию, например данные о настройках системы [ 1 ].
Каждый процесс имеет блок среды [окружения], который содержит набор переменных среды и их значений. Существует два типа переменных среды: переменные среды пользователя (устанавливаются для каждого пользователя) и переменные среды системы (устанавливаются для всех) [ 2 ].
Настраивать переменные среды возможно 3-мя способами
При манипуляциях с переменными среды «мануал» настоятельно рекомендует сделать резервные копии реестра и всех изменяемых файлов, т. к. в случае ошибки компьютер может тупо не загрузиться. А лучше скопировать весь ноутбук или что там у вас…
Ну, это они на своих ламеров пусть страх нагоняют! А у нас, у кулхацкеров, любой код с первого раза работает, как часики! :-Е)
Вариант 1 — через «Панель управления» -> «Система» -> «Дополнительные параметры системы» -> «Переменные среды» ( рис. 1 — 4 ) (через «Свойства» Моего-Твоего-Нашего-Вашего-Общего компьютера получается быстрее).


Здесь необходимо создать новую строковую запись с путем до папки «bin», например
C:\mysql\bin
, и перезагрузить компьютер.

Вариант 2 — с помощью редактора реестра. Так делают настоящие кулхацкеры :-). Win+R/»Выполнить» -> «regedit» -> «Enter»/»OK». Полный путь: HKEY_LOCAL_MACHINE\System\CurrentControlSet\Control\Session Manager\Environment ( рис. 6 ).

Двойной клик на переменной «Path»-> дописать в конце строки, после знака «;» путь к папке «bin», например
C:\mysql\bin;
( рис. 7 ), -> перезагрузить компьютер.

Проверка результатов обновления путей в консоли командой ( рис. 8 ):
echo %path%
После ввода команды «mysqld» курсор начинает моргать, ошибки запуска исполняемого файла по некорректному пути отсутствуют. Это значит, что сервер успешно запущен и к нему можно подключиться из параллельного окна командной строки ( рис. 9 ).


Вариант 3 — с помощью консольных команд «set» и «setx».
Команда «Setx» Создает или изменяет переменные среды в пользовательской или системной среде без необходимости программирования или написания скриптов, а также извлекает значения разделов реестра и записывает их в текстовые файлы [ 3 ].
Доп. материал по команде «set»:
-
Команда SET — работа с переменными среды Windows
Особенности команды «Setx» [ 4 ]:
-
переменные, созданные или отредактированные через «Setx»на локальном компьютере, будут доступны в будущих окнах командной строки, но не в текущем;
-
переменные, созданные или отредактированные через «Setx»на удалённом компьютере, будут доступны со следующего сеанса входа.
Команда «set» , которая является внутренней для интерпретатора команд (Cmd.exe), задает переменные среды пользователя только для текущего окна консоли [ 3 ].
Доп. материал по команде «SetX»:
-
SetX — создание или изменение переменных среды Windows
-
How do I add to the Windows PATH variable using setx? Having weird problems
Поскольку основная задача — прописать постоянный путь до исполняемых файлов, который распространялся бы на все процессы и сохранялся после перезагрузки компьютера, команда «set» не представляет большого интереса.
Проверка содержимого строкового параметра «Path» осуществляется с помощью команды
echo %path%

Как видно на рис. 10 пути выводятся дважды. Очевидно, что представлено содержимое переменных «Path» для среды пользователя и для системного окружения. Проверка через Панель управления подтверждает вывод. Этот факт нужно учитывать при манипуляциях с переменной, особенно при перезаписи путей и удалении подстрок.
При текущем положении попытка запустить MySQL приведет к ошибке ( рис. 11 ).

Путь до каталога bin устанавливается командой:
setx /m path "%path%;C:\mysql\bin;"
Если каталог «bin» находится в другой директории, запись команды должна соответствовать полному пути! Командная строка должна быть запущена от имени администратора! Иначе будет ошибка ( рис. 12 ).

Запуск консоли от имени администратора характеризуется адресом «C:\Windows\system32». Успешное добавление пути к каталогу «bin» ( рис. 13 ) можно проверить, только запустив новое ( новый процесс ) окно консоли, чтобы обновить содержание переменных среды.

Как следует из вывода нового процесса ( консоли ), вначале выводятся пути системного окружения, а затем — пользовательского.

В этом же, новом окне, или в другом вновь запущенном окне командной строки можно запускать сервер MySQL, теперь указывая лишь имя исполняемого файла «mysqld» ( рис. 15 — 16 )

Аналогичным образом теперь можно запускать и клиент ( рис. 16 ).

Варианты с powershell — кому интересно. И на всякий случай — «мануал по powershell от производителя» — еле выпросил. Ну, что ни сделаешь ради любимых читателей :-). Примечательно, что обращение к командам setx в powershell идет через двойное двоеточие аналогично обращению к константам внутри класса, например в PHP:
self::CONSTANT
Итоги и рекомендации
Манипулирование переменными среды ( окружения ), конечно, удобно, т. к. упрощает ввод команд запуска исполняемых файлов, но не во всех случаях. Запустить таким способом, к примеру, 2 или 3 процесса ( сервера ) MySQL одновременно и в одной той же операционной системе уже не получится. Придется запускать каждый процесс, полностью прописывая в командной строке путь до каждой отдельной папки «bin». Кроме того, если запускать MySQL в нескольких экземплярах, как службу, нужно иметь ввиду, что все службы должны иметь уникальные имена. Если же необходимость запускать несколько копий сервера одной и той же СУБД отсутствует, можно смело пользоваться переменными окружения. При частом использовании сервера проще установить MySQL, как службу, и поставить ее на автозапуск, чтобы сервер запускалсся при старте операционной системы. Эти варианты я постараюсь описать в следующих материалах.
Сопутствующие публикации
Как установить СУБД MySQL noinstall ZIP Archive на Windows
Источники
-
Переменная среды
-
Environment Variables
-
windows-commands / setx
-
Команда SETX: создание и редактирование переменных среды Windows
Skip to content
Summary: in this tutorial, you will learn how to start MySQL Server on Windows and Linux.
To start MySQL Server on Linux, you follow these steps:
First, open the Terminal program.
Second, run the following command to start the MySQL service:
sudo systemctl start mysqlIn this command, you need to replace the “mysql” with the actual service name if the MySQL service is different.
Third, check the status and confirm that the service has started successfully, you run the following command:
sudo systemctl status mysqlIf the MySQL service has started successfully, you should see “Active: active (running)“.
Start MySQL Server on Windows
Typically, the MySQL installer installs the MySQL Server as a service on Windows and starts the MySQL Server automatically when the Windows operating system starts up. If this is not the case, you can start the MySQL Server using the following steps:
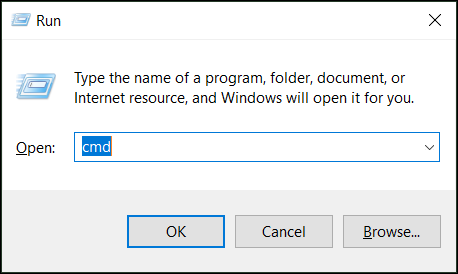
First, open the Run dialog by pressing Windows+R keyboard shortcut.
Second, type cmd and press Ctrl+Shift+Enter to run the Command Prompt as an administrator.
Third, type the following command:
sc query mysqlIn this command, mysql is the name of the MySQL service that you specified when setting up MySQL. You can replace it with the one on your server.
This command shows the following output:
SERVICE_NAME: mysql
        TYPE               : 10  WIN32_OWN_PROCESS
        STATE              : 1  STOPPED
        WIN32_EXIT_CODE    : 0  (0x0)
        SERVICE_EXIT_CODE  : 0  (0x0)
        CHECKPOINT         : 0x0
        WAIT_HINT          : 0x0
The STATE line indicates that the MySQL Server is currently STOPPED.
Finally, use the net start command to start the MySQL Server:
net start mysqlIt’ll show the following output:
The MySQL service is starting.
The MySQL service was started successfully.
Summary
- Use the
sudo systemctl start mysqlcommand to start MySQL server on Linux. - Use the
net start <mysql_service>command to start MySQL Server on Windows.
Was this tutorial helpful?
Introduction
MySQL is a highly customizable relational database management system (RDBMS) that allows users to store and manage data in a structured manner tailored to their specific needs. As with any other RDBMS, it is essential to know how to manage the database service.
This article provides in-depth instructions on how to start, stop, or restart the MySQL server in Linux, macOS or Windows.
Prerequisites
- A system with MySQL installed and configured.
- Access to the terminal or Command Prompt. (depending on the OS).
- A user account with sudo or root privileges.
Start MySQL Server
MySQL is available on a range of operating systems, including Linux, Windows, and macOS. To manage a MySQL-based application or website, it’s crucial to have a grasp of how to start a MySQL server.
Start MySQL Server on Linux
Depending on the Linux distribution and init system, there are several ways to start MySQL on Linux:
1. The systemctl start command.
The latest Linux distributions use systemd and its sytemctl command to start, stop and restart services. For example, to start MySQL in Ubuntu or other Debian-based systems, run:
sudo systemctl start mysql
To start MySQL on RHEL-based systems is the same, except for the process name:
sudo systemctl start mysqldThe command doesn’t provide any output. However, systemctl offers a way to verify whether a service is running. To confirm that MySQL has started, run:
sudo systemctl status mysql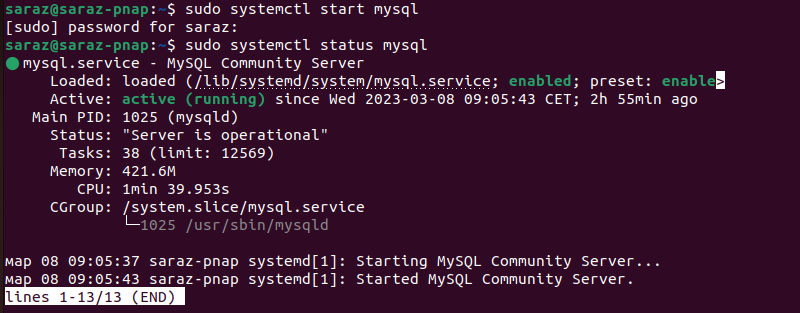
2. The service command.
Older versions of Linux systems don’t use systemd. If the systemctl command did not work for you, use the service command. To start Linux using the service command, run:
sudo service mysql startNote: For the service name, use mysql for Debian-based systems and mysqld for RHEL-based systems.
The command doesn’t produce any output. Use the argument status with the service command to verify the result:
sudo service mysql start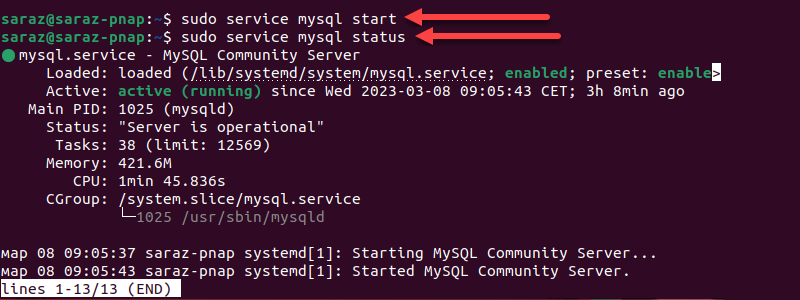
Note: While older Linux distributions usually use the service command, it works on newer distributions as well.
3. The mysql script.
In earlier versions of Ubuntu and CentOS, the /mysql script was commonly used to change the MySQL service state. The script is located in the /etc/init.d directory.
To start MySQL by executing the script, run:
sudo /etc/init.d/mysql startThe command works on older versions of Linux distributions and provides no output. However, in newer versions, the command was deprecated and replaced with other commands. For instance, when the script is run in Ubuntu 22.04, it invokes the systemctl command to start the MySQL service instead:

Note: The path in the example above is the default location for the mysql script. If the script is not in the /etc/init.d directory, the command returns an error message. Use the find command to locate any file on the system.
4. The mysqld_safe command.
The mysqld_safe command is a script that provides a wrapper around the mysqld binary. The script sets environment variables and checks for errors before launching the MySQL server.
Running the command starts the MySQL server process in the foreground and outputs the process as well as any errors. Execute:
sudo mysqld_safe
Both output messages confirm that the MySQL server has started successfully. Note that the command is slower since it performs error checking before launching the server.
Start MySQL Server on Windows
MySQL is commonly used on Linux platforms. However, many Windows-based applications use a MySQL database as the backend. Developers or database administrators who work with MySQL databases on Windows machines need to start the MySQL server to access the database. The following text elaborates on methods to start the MySQL server on Windows.
1. Running the mysqld command.
Start the MySQL server on a Windows-based system from the Command Prompt. with the mysqld start command. To accomplish this, open the Windows Run dialog box (Windows Key + R) and type in cmd.
Once the Command Prompt starts, execute:
mysqld start
The command gives no output. However, in case Windows doesn’t find the command, the MySQL bin directory is not in the system’s PATH environment variable. Add the directory to the PATH environment variable or use an alternative command.
2. Executing the net start command.
An alternative to mysqld start is the net start command. The command syntax is:
net start MySQL[version_number]Therefore, the MySQL version number is necessary to start the server. To find the version number, run the following in the Command Prompt:
net start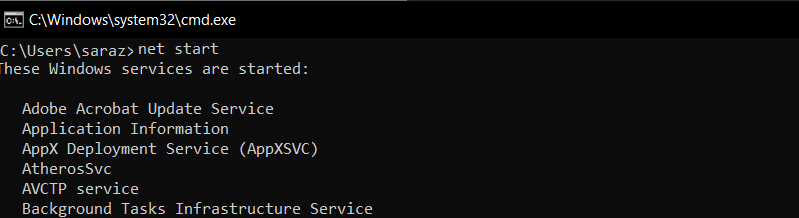
The command lists all active services. Locate the MySQL version running on the system.

Run the command with the version number. In this case, the system runs MySSQL80:
net start MySQL80
The terminal shows the process and informs the user once the service is installed.
3. Using the services window.
The MySQL service starts and stops the MySQL server process in the background and manages it. It comes installed together with the server.
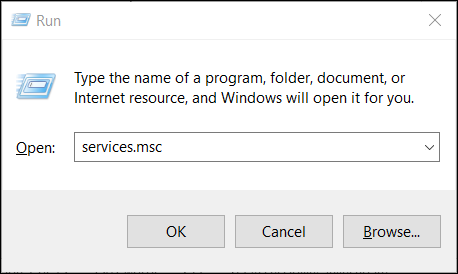
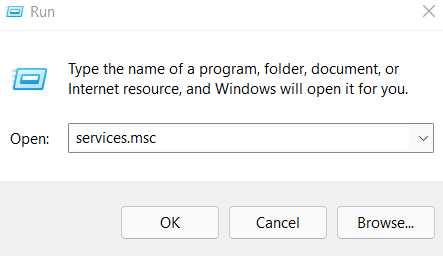
To start MySQL service and server, open the Run dialog (Windows key + R) and type in services.msc.
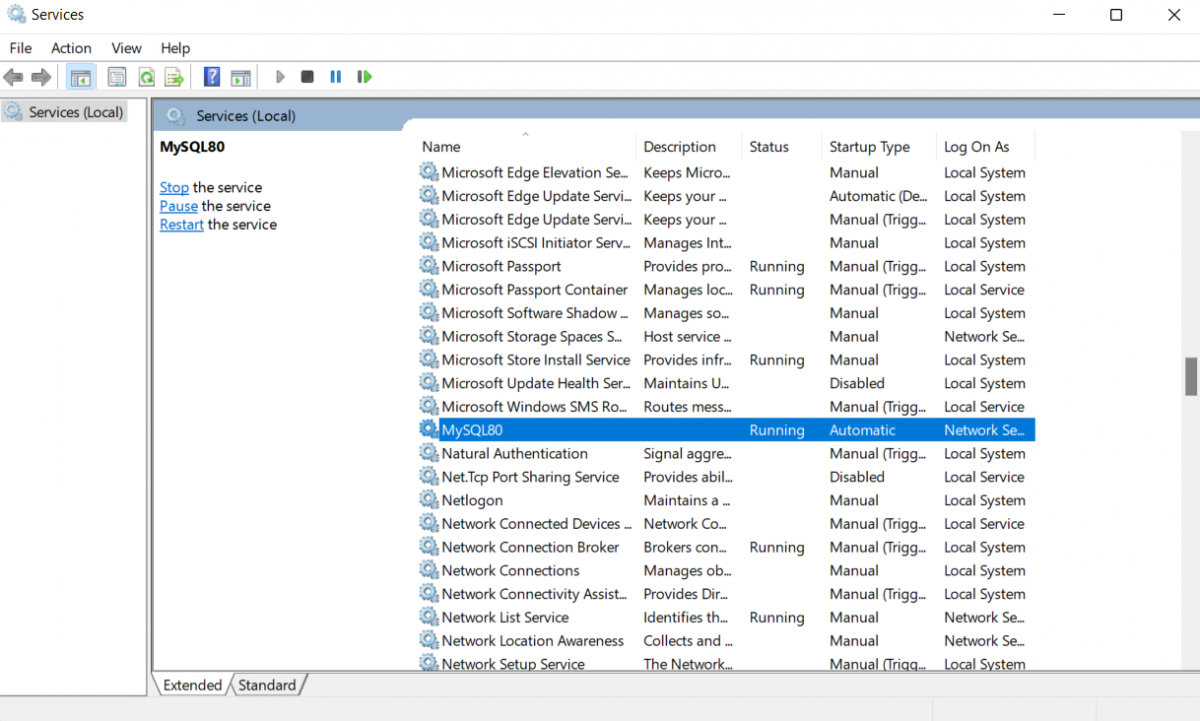
Once the Services Window opens, find the SQL Server service. The service name starts with SQL Server followed by the version.
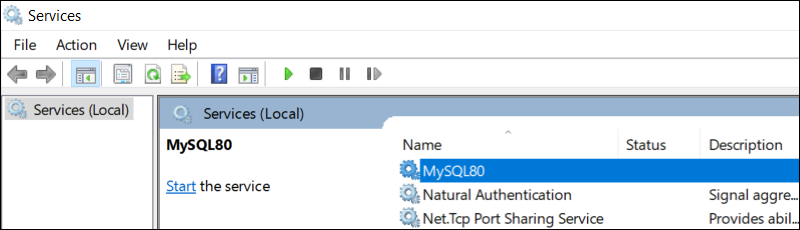
To enable the service and the server, click Start the service on the right-side menu.
It takes a few moments for the service to start. Wait for the service to start.
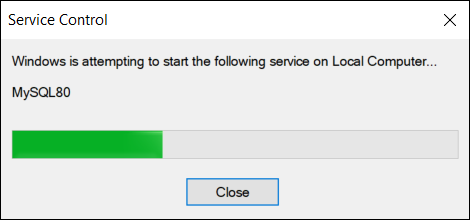
4. Via the task manager.
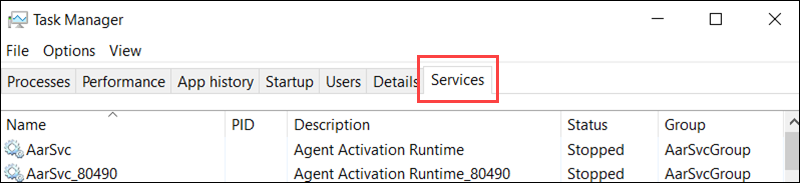
Another way to start MySQL is with the Windows Task Manager. Access the Task Manager (Ctrl+Shift+Esc) and go to the Services tab.
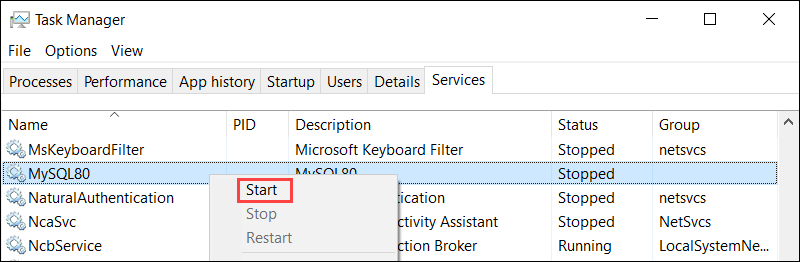
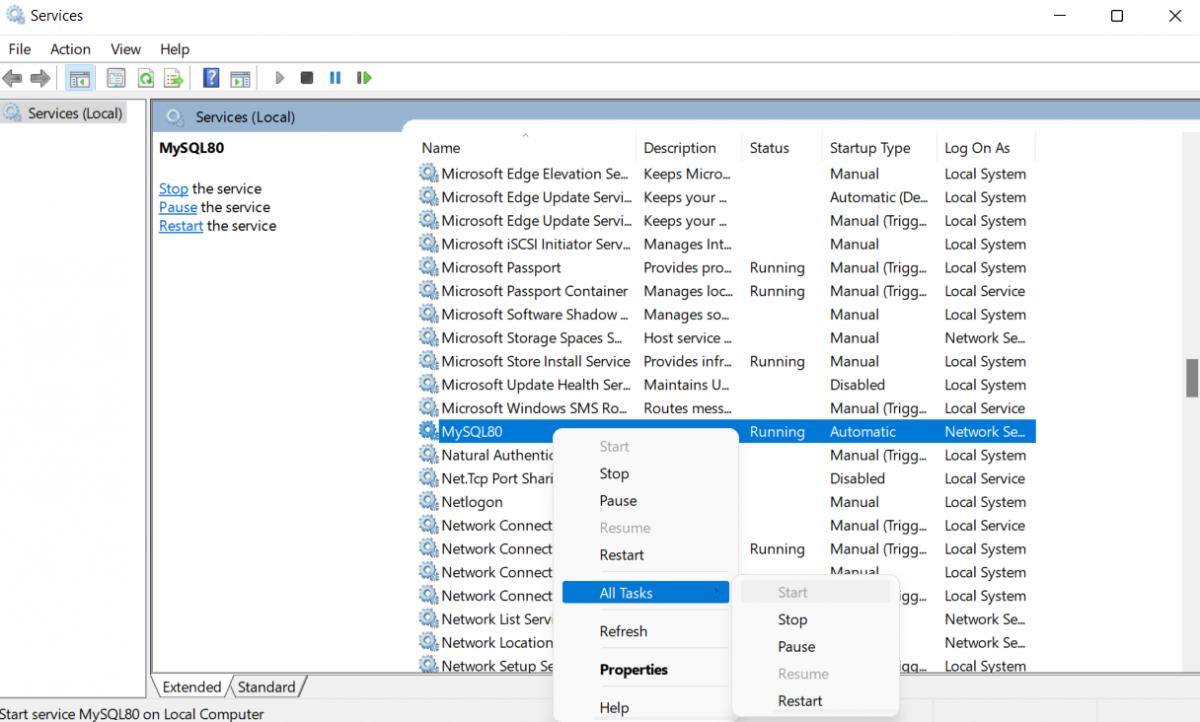
Locate the MySQL service, right-click on it, and select Start.
Start MySQL Server on Mac
Mac users who work with web applications and services that rely on MySQL databases, need to know how to start a MySQL server on this OS. Mac offers several ways to turn on MySQL.
1. Via the Terminal.
There are several commands to start the MySQL server via the terminal. Open the terminal and run:
mysql.server startThe output depends on the specific version of MySQL on Mac and the system configuration.
The second command executes the mysql. server script located in the /usr/local/mysql/support-files/ directory and starts the MySQL server. Run the following:
/usr/local/mysql/support-files/mysql.server start2. Via the System Preferences Panel.
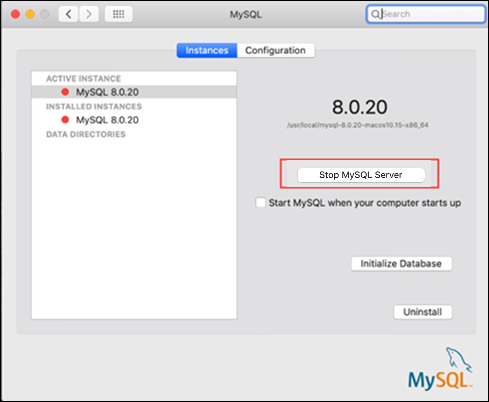
In case the Terminal commands don’t deliver, start MySQL by accessing the System Preferences panel.

In the System Preferences section, choose the MySQL icon. Once the new window opens, click the Start MySQL Server button to start the server.

4. Using Homebrew.
Homebrew provides an easy and convenient way to install and manage MySQL on Mac. If MySQL is installed via Homebrew, run the following to start the server:
brew services start mysqlSince the command has no output., verify that the server is running with:
BB$ brew services list4. Using MySQL Workbench.
MySQL Workbench is a GUI tool that manages MySQL servers. MySQL Workbench interface offers plenty of ways to adjust and manipulate the server, as well as to set basic settings.
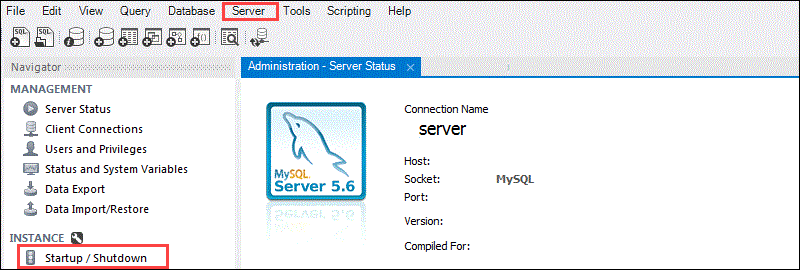
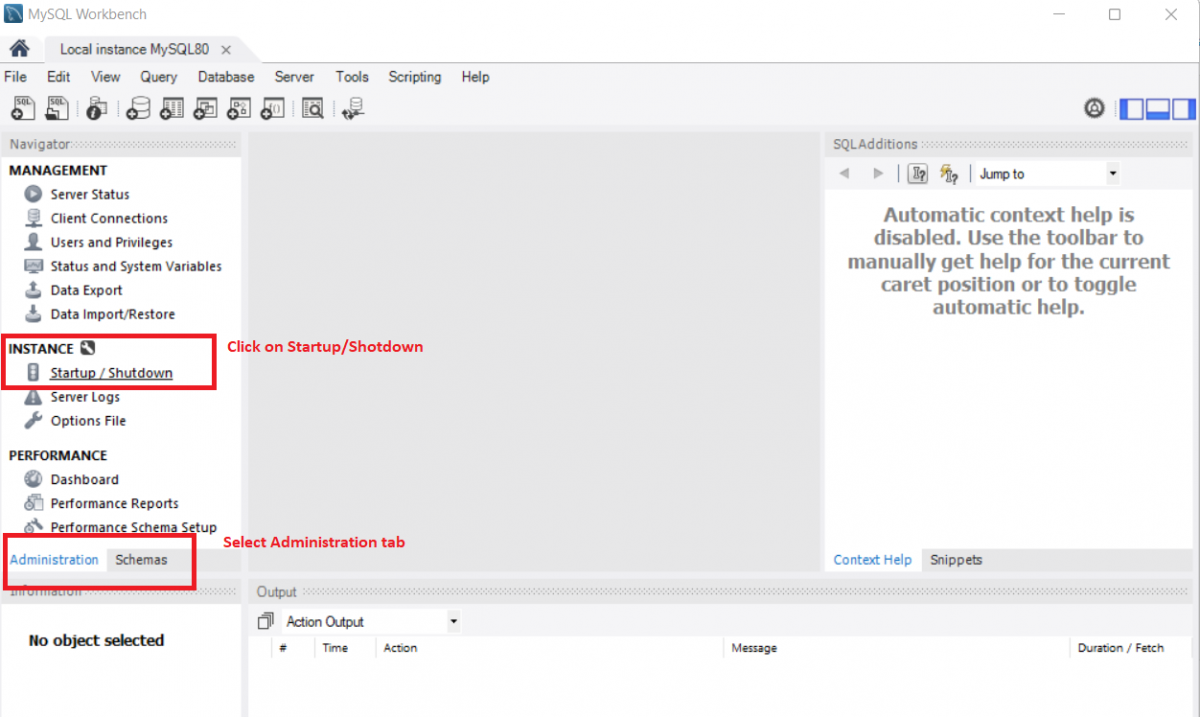
To start the server with MySQL workbench, select Server from the top menu or Startup/Shutdown from the Navigator sidebar.
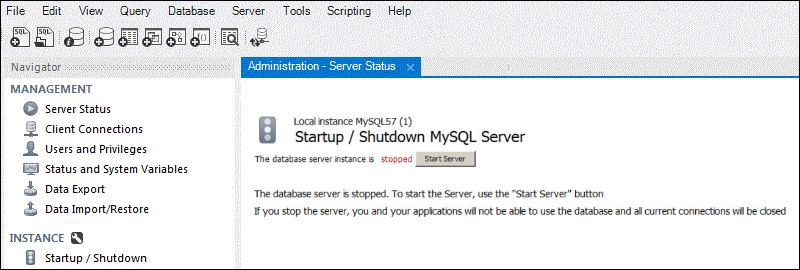
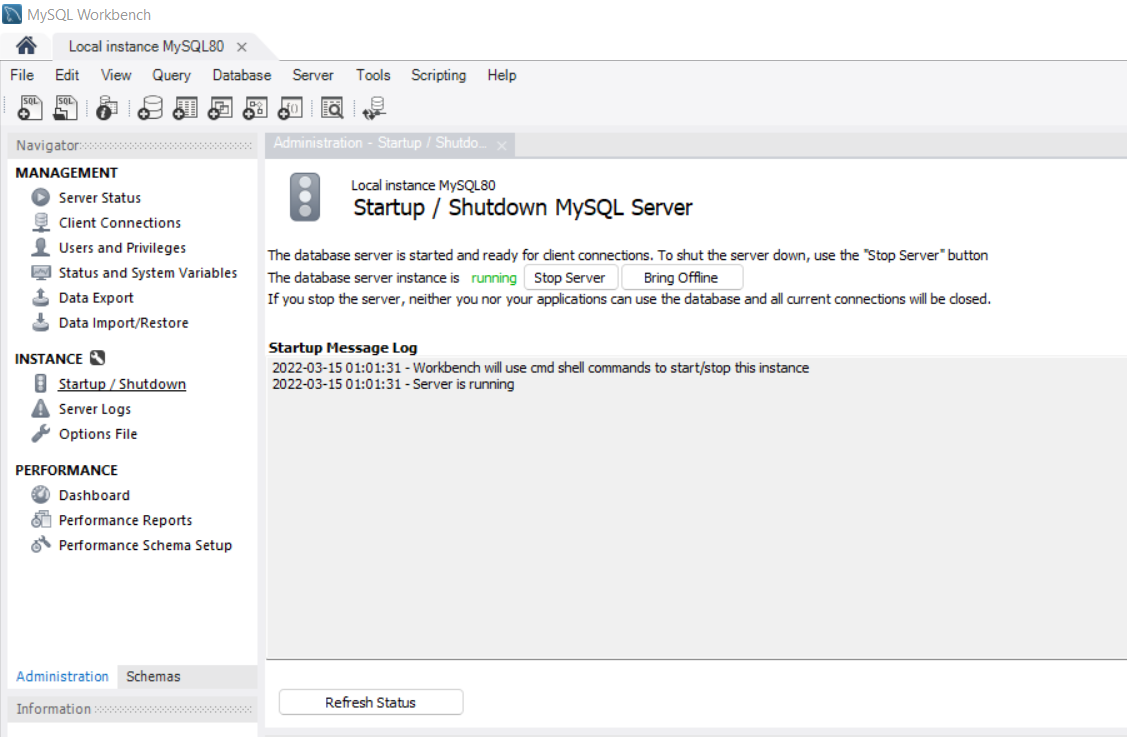
Once the MySQL server is visible, click the Start Server button,
Stop MySQL Server
The ability to suspend a MySQL server is fundamental for server management and database administration. Whether for maintenance, troubleshooting, or resource optimization, it is essential to know how to stop the server when needed.
Stop MySQL Server on Linux
Shutting down a MySQL server on Linux depends on the distribution and init type, just like starting the server. The methods used to achieve a proper shutdown are presented in detail below.
1. Using the systemctl command.
The systemctl stop command is the go-to method for stopping the server on modern Linux distributions that use systemd. The main syntax is:
sudo systemctl stop [process_name]The different names for the MySQL server process in Ubuntu and CetOS also apply here. Therefore, stop MySQL in Ubuntu with:
sudo systemctl stop mysqlThe command takes a few seconds to execute but does not print any output. Verify the result with:
sudo systemctl status mysql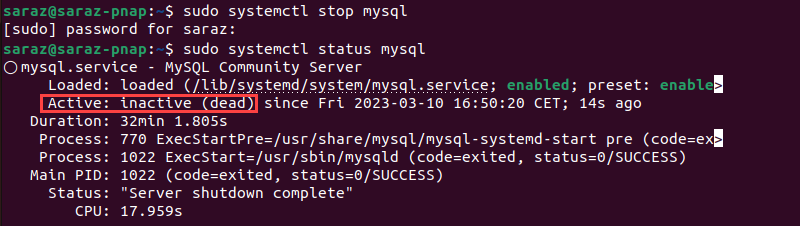
The same command applies for CentOS, Fedora, and Red Hat Enterprise Linux, with the change in the process name:
sudo systemctl stop mysqld2. Using the service command.
In older Linux distributions that use systemd, the service command is the preffered way of stopping MySQL. However, the command does work in new systems as well.
To stop MySQL on Debian, Ubuntu, or Linux Mint, run:
sudo service mysql stopCheck the server status with:
sudo service mysql status
For CentOS, Fedora, and Red Hat Enterprise Linux, execute:
sudo service mysqld stopSince the command prints no output, verify the result with:
sudo service mysqld status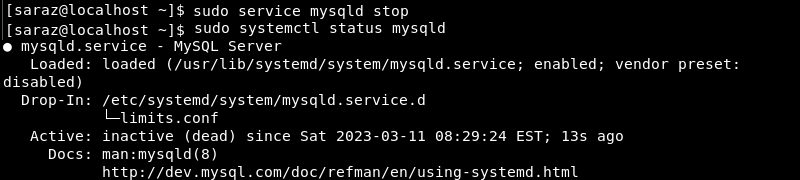
Note: The service and systemctl commands stop or restart a service in a controlled manner. Therefore, they are generally considered safe methods for stopping (or restarting) the MySQL server in Linux. Using other commands carries a higher risk of data loss or corruption.
3. Running the mysql script.
The mysql script is used to stop the server in older Linux distros. To do this, use the following syntax:
sudo [script_path] stopFor example, if the script is located in /etc/init.d, run
sudo /etc/init.d/mysql stopNote: The script has been deprecated in newer Linux distributions and triggers the system to run the systemctl command instead.
4. Executing the mysqld_safe command.
To shut down the MySQL server that is running using the mysqld_safe script with elevated privileges, execute the command with the --shutdown argument. The command stops the MySQL server by manually shutting down the MySQL process.
Execute the following:
sudo mysqld_safe --shutdown
The command logs any output to the error.log file and shuts down the server. However, this command is often unreliable. If an existing mysqld process is running, the --shutdown command may not stop the server or may lose data before shutting down the server.
5. Running the mysqladmin shutdown command.
The mysqladmin command is a command-line utility that comes installed with the MySQL server and performs administrative tasks. Run mysqladmin with the shutdown argument to turn off the server:
sudo mysqladmin shutdownThe command stops the MySQL server, even if there are active client connections or running transactions, possibly resulting in the loss and corruption of data.
6. Using the kill command.
Another way to terminate MySQL is with the kill command. The command first looks for the mysqld process ID (PID) with:
ps aux | grep mysqld
The command prints the mysqld PID. Use the PID with kill to stop MySQL:
sudo kill 3662
7. Using the MySQL Client.
MySQL client is a command-line tool that provides a simple interface to execute SQL commands and a simple way to stop the server. Execute the following to log in to the MySQL Client:
sudo mysql -u root -pProvide the MySQL root password when prompted.

Once the client starts, type SHUTDOWN; to stop the server and hit Enter. Typing exit gets you back to the CLI.

Stop MySQL Server on Windows
Windows also offers several ways to stop the MySQL server. The following text presents several methods to shut down this server on Windows.
1. Using the mysqld command.
The mysqld stop is the basic Windows command for shutting done MySQL. Access the terminal and type:
mysqld stopIf the command works, the terminal shows no output.
2. Executing the net stop command.
If the mysqld stop is not an option, run net stop to shut down the server. First, run net start without arguments to find the MySQL version number. Next, scroll down to find MySQL and verify the version running on the system.

Execute the following command with the version number to shut down the server:
net stop MySQL80
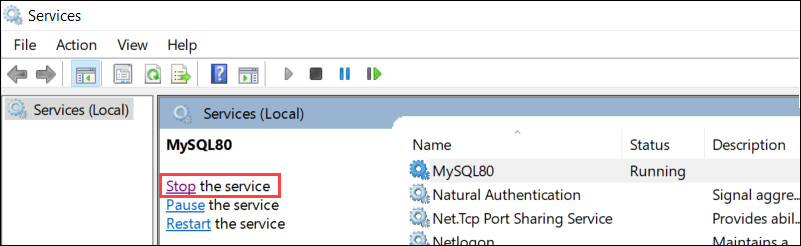
3. Using the Services Window.
Another way to shut down the MySQL server is to turn off its service. Access the Service Window through the Run dialog box (Windows key + R), by typing services.msc.

Scroll down to the SQL Server service, select it, and click Stop the service from the right-side menu.
4. Using the MySQL Command Line Client.
MySQL Command Line Client is a tool that comes preinstalled with MySQL and enables users to perform different administrative tasks, such as shutting down the server.
Search for the MySQL Client in the Search bar and open the app.
Once the Client opens, provide the password and run:
SHUTDOWN;
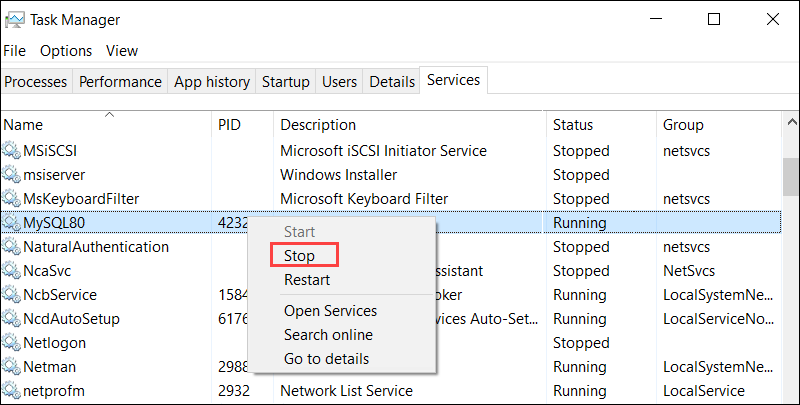
5. Via the Task Manager.
Windows Task Manager has the ability to stop any service, including MySQL. To accomplish this, access the Task Manager (Ctrl+Shift +Esc) and choose the Services tab.
Find the MySQL service, right-click on it, and choose Stop:
Stop MySQL Server on Mac
There are several ways to shut down MySQL servers. The following text offers efficient methods for stopping MySQL both via the terminal and GUI.
1. Via the Terminal.
The basic command to stop MySQL on macOS is:
mysql.server stopThe output depends on the MySQL version, but it does inform the user that the server is shutting down.
An alternative command is:
/usr/local/mysql/support-files/mysql.server stop2. Using the System Preferences Panel,
To shut down MySQL via the System Preferences Panel, access the panel and find and click the MySQL icon. Once the new window opens, click the Stop MySQL Server button to shut it down.
4. Using Homebrew.
As an ultimate managing tool, Homebrew allows users to stop MySQL. Open the terminal and run:
brew services stop mysqlThe command has no output, but run the following command to verify the server is no longer running.
BB$ brew services list4. Working with MySQL Workbench.
One more way to stop the server is with the MySQL Workbench. Access the Startup/Shutdown Navigator section or the Server tab at the top menu. Shut down the server by clicking the Stop Server button.
5. Executing the kill command.
Turn off MySQL with the kill command. Execute the following:
sudo kill `cat /usr/local/mysql/data/*.pid`This command works by reading the PID of the MySQL server from the .pid file and terminating the associated process. If the process is successful, there is no output.
Restart MySQL Server
It’s crucial to understand how to restart the MySQL server, as it allows users to resolve issues, implement configuration changes, upgrade the system, or perform maintenance tasks. While shutting down and starting the server again manually is an option, several methods simplify the process and enable a quick and efficient server restart.
Restart MySQL Server on Linux
Linux offers three commands that allow for a one-step MySQL server restart. The following text elaborates on these methods:
1. Running the systemctl command.
The systemctl restart command follows the same rules as the systemctl start and stop commands. The main syntax is:
sudo systemctl restart [process_name]For example, restart MySQL in Ubuntu with:
sudo systemctl restart mysql
While the command shows no output, the systemctl status command verifies the result.
2. Executing the service command.
The service command is the go-to tool for restarting MySQL in older systems, though it works in newer distros as well. The syntax is:
sudo service [service_name] restartTo restart MySQL in older Debian, Ubuntu, and Linux Mint systems, run:
sudo service mysql restartAs the command has no output, verify the result with:
sudo service mysql status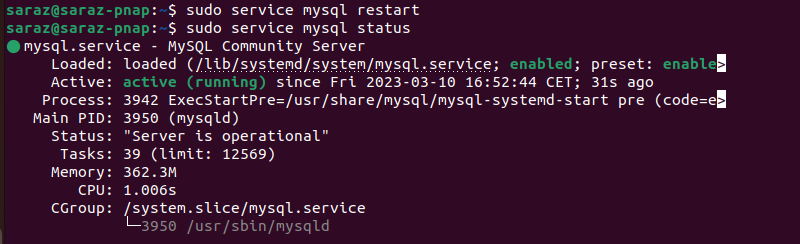
3. Run the mysql script.
The mysql script offers another way to restart the server. The script is, by default, in the /etc/init.d directory.
Restart MySQL using the script with:
sudo /etc/init.d/mysql restartThe command is used in older systems, where it provides no output. However, on newer distributions, the script is deprecated. When run in a newer distribution, the system replaces the script with the appropriate command. For example, in Ubuntu 22.04, the output is:
Restart MySQL Serves on Windows
On Windows, there are a few ways to restart the MySQL server, such as using the mysqld or net start commands to stop and then start it again. However, there are also two other methods available to restart the server in a single step.
1. Using the Services Window.
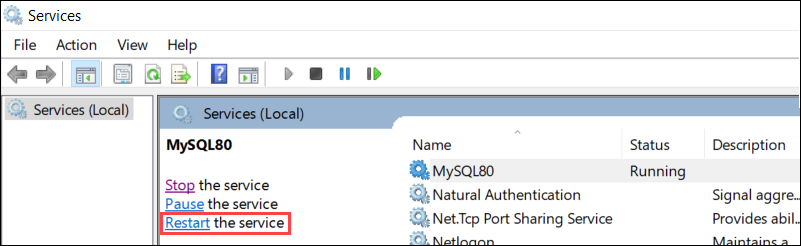
Apart from starting and stopping MySQL, the Services Panel lets users restart the server. To accomplish this, access the Run dialog box (Windows key + R) and type in services.msc:

Once the Services Window opens, Find the MySQL Server service and select it. The right-side menu includes the name of the service and three options. Choose Restart the Service.

2. Via the Task Manager.
Windows Task Manager offers another way to restart MySQL in one go. After accessing the Task Manager (Ctrl + Shift + Esc), click the Services tab and look for the MySQL service.
Right-click on the MySQL service and choose Restart.
Restart MySQL Server on Mac
On macOS, users restart a MySQL server by either using the command line to shut it down and then start it up again or accessing the System Preferences panel or MySQL Workbench to turn it off and on. However, there are alternative methods available that are more efficient or easier to use.
Note: All of these methods require administrator privileges to execute.
1. Restarting the server via the Terminal.
Using the Terminal is an efficient way to restart MySQL on macOS in one go. To restart the server via Terminal, use one of two commands:
mysql.server restartThe mysql.server restart command triggers the built-in MySQL server script, which restarts the server.
However, the command also stops any ongoing queries or active connections to the database. Therefore, users need to re-establish a connection to the server and restart their queries.
The alternative command is:
/usr/local/mysql/support-files/mysql.server restartThe second command restarts the server using the MySQL server script located in the /usr/local/mysql/support-files/ directory, instead of the default, built-in script. Execute the command to specify which MySQL version to restart if multiple versions are present on the system.
2. Using Homebrew.
For users who are familiar with Homebrew, the brew services restart command is a convenient option:
brew services restart mysqlConclusion
After reading this tutorial, you now know how to start, stop, and restart a MySQL server on Linux, Windows, and macOS. Next, learn how to create a table in MySQL.
Was this article helpful?
YesNo
-
Скачиваем Community Server в виде zip-архива.
(Если пугают новшества последних версий, можно остановиться на 5.7. Например, 5.7.26-winx64.)
На странице загрузки можно перейти по ссылке No thanks, just start my download в нижней части страницы. -
Распаковываем куда-нибудь.
-
Удаляем папку
lib(она содержит исходный код для самостоятельной компиляции и при работе сервера не требуется).
Также можно удалить файлыbin/*.pdb(они нужны только для отладки исполняемых файлов MySQL и при обычной работе не требуются).
Это позволит снизить общий размер инсталляции примерно в 4 раза, он станет порядка 200 Мб. -
Добавляем в системную переменную
PATHпуть{каталог MySQL}\bin, чтобы было удобней запускать exe-файлы.
Выбор места для хранения данных и конфигурационный файл my.ini
Нужно выбрать каталог, где MySQL будет хранить файлы баз данных и некоторые служебные файлы.
Рекомендуется это сделать вне каталога сервера MySQL, т.к. файлы БД следует рассматривать независимо от конкретной инсталляции/версии.
Затем нужно создать файл my.ini, поместив его в корневой каталог сервера MySQL (т.е. рядом с bin и пр.; my.ini в корневом каталоге запуска сервер будет пытаться найти и прочитать автоматически). Содержимое файла должно быть следующим:
[mysqld]
datadir = 'D:/s/.mysql-datadir'
character_set_server = utf8
sql_mode =
# skip-networking = 1 # Сеть приходится слушать для работы JetBrains и MySQL Workbench
named-pipe = 1
local_infile = 1 # С версии 8.0
skip_log_bin = 1 # С версии 8.0 против долгого waiting for handler commit при вставках
# log-syslog = 0 # До версии 5.7 включительно

[client]
# mysql, mysqldump, mysqladmin
user = someone
password = "a password"
pipe
loose-local-infile = 1 # С версии 8.0 для LOAD DATA LOCAL INFILE

[mysqldump]
# С версии 8.0
# https://dba.stackexchange.com/a/273040
no-tablespaces = 1 # чтобы не нужна была привилегия PROCESS
single-transaction = 1 # чтобы не нужна была привилегия LOCK TABLES
Указание datadir является обязательным. Без этого сервер не запустится.
Обратный слэш (\), стандартно используемый в путях Windows, интерпретируется как экранирующий и образующий управляющие последовательности (\n, \s и др.) символ, поэтому его самого нужно экранировать или же использовать вместо него прямой слэш:
datadir = "D:\\somedir\\data"
datadir = "D:/somedir/data"
Как правило, данные требуют хранения в кодировке UTF-8. Настройка character_set_server позволяет избежать явного указания кодировки при каждом случае создания базы данных или таблицы.
Если при запуске сервера возникают сообщения об ошибках насчет невомзожности записи в системный журнал событий Windows, можно добавить в my.ini запись log-syslog = 0.
Все настройки сервера перечислены здесь и здесь.
Первый запуск mysqld — инициализация каталога данных
С версии 5.7 нужно проводить первичную инициализацию каталога данных, для чего при первом запуске служит специальный ключ:
mysqld --initialize
Может возникнуть сообщение от брандмауэра Windows, которому нужно указать соотв. разрешения.
Инициализировав каталог данных, сервер завершит работу и вернёт управление командной строке.
В каталоге данных среди прочих будет файл с расширением .err, где можно посмотреть журнал сервера и поискать сообщения об ошибках, если что-то пошло не так.
Второй запуск mysqld — установка пароля пользвателю root
При первом запуске сервера для рута был сгенерирован временный пароль (действительный только на одну сессию) и записан в err-файл. Вместо того, чтобы искать его там, удобнее лишний раз запустить сервер в режиме без проверки прав:
mysqld --skip-grant-tables
Этот режим позволит залогиниться под рутом без указания пароля, после чего по специальной процедуре установить желаемый пароль. Нужно выполнить следующие шаги:
-
Из командной строки запускаем консольный клиент
mysql. -
Даем команду
FLUSH PRIVILEGES;(она требуется после запуска сервера с ключом--skip-grant-tables, чтобы начали работать команды по управлению учетными записями). -
Устанавливаем пароль:
-
MySQL 5.7.6 и выше:
ALTER USER 'root'@'localhost' IDENTIFIED BY 'somepass'; -
5.7.5 и ранее:
SET PASSWORD FOR 'root'@'localhost' = PASSWORD('somepass');
-
-
Останавливаем сервер с помощью команды
SHUTDOWN.
Сервер завершит работу и вернёт управление командной строке, из клиента нужно выйти вручную (продолжать сессию смысла нет, т.к. соединение разорвано и автоматически возобновлено не будет).
Остановка сервера необходима, чтобы прекратить работу в режиме отсутствия проверки прав доступа.Для MySQL 5.7.8 и ранее следует использовать утилиту
mysqladmin, дав из терминала командуmysqladmin -u root -p shutdown(потребуется ввести пароль рута).
Создание учетных записей, загрузка данных и дальнейшая работа
Теперь нужно создать учетные записи обычных пользователей и базы данных для них.
Для этого снова запускаем mysqld, уже без каких-либо дополнительных ключей, после чего соединяемся с ним с помощью клиента mysql от имени пользователя root. Теперь потребуется указать пароль:
mysql -u root -p
tmp 26.08.2023: если при попытке соединиться возникает ошибка ERROR 2061 (HY000): Authentication plugin 'caching_sha2_password' reported error: Authentication requires secure connection., нужно добавить опцию --get-server-public-key. Подробнее см. https://bugs.mysql.com/bug.php?id=106852. Для каждой учетной записи потребуется однократный запуск mysql с такой опцией.
Далее создаем учетные записи пользователей и базы данных. Как правило, каждому пользователю выделяется своя база данных, к которой он получает полный доступ. Набор команд при этом следующий:
CREATE USER someone@localhost IDENTIFIED BY 'a password';

CREATE DATABASE somedb;

GRANT ALL ON somedb.* TO someone@localhost;
Упрощенный вариант: один пользователь (не root) с доступом ко всем базам — более подходящий вариант для локальной машины, за которой работает один человек и разделение прав доступа ни к чему. В таком случае первая команда выполняется только один раз.
Работа через named pipe
Сервер MySQL на компьютере разработчика обычно принимает соединения только с этого же компьютера. Такие соединения можно принимать через named pipe, а сетевой интерфейс сервера MySQL вообще закрыть за ненадобностью и по соображениям безопасности.
За включение named pipe и отключение сети отвечают две разных настройки (причем второе без первого не сработает). Запуск сервера с ними выглядит следующим образом:
mysqld --named-pipe --skip-networking
Или указать эти же опции в my.ini, чтобы запускать сервер без аргументов:
[mysqld]
...
named-pipe
skip-networking
В каталоге данных появится файл .pid.
Как PHP под Windows, так и различные GUI для работы с базами данных (например, MySQL Workbench, однако не(!) JetBrains DataGrip) умеют устанавливать соединение через named pipe.
Утилитам командной строки (mysql, mysqladmin и пр.) нужно указывать опцию --pipe.
Настройки для клиента ([client])
В конфигурационном файле также можно указать настройки для клиентских программ (например, чтобы не вводить каждый раз пароль и пр.).
В отличие от Linux, конфигурационный файл из домашнего каталога пользователя не читается. Список мест, откуда файлы будут прочитаны, можно посмотреть командой mysql --help (где-то в середине вывода будет фраза Default options are read from the following files in the given order).
Можно указыать клиентские настройки в том же файле, что и настройки сервера:
[mysqld]
...

[client]
user = someone
password = "a password"
pipe
Обновление сервера MySQL
-
Повторяем пункты 1-3 из раздела Загрузка и подготовка к запуску.
Пакет можно разместить в каталоге рядом с имеющимся, чтобы на всякий случай было две версии одновременно. -
Открываем командную строку и останавливаем текущую версию сервера:
mysqld stop
или
mysqladmin -u root -pпароль shutdown -
Заменяем путь в переменной
PATH. -
Копируем файл
my.iniиз старого каталога в новый. -
Даём команду на запуск, не забыв необходимые ключи.
Например,mysqld --skip-networking --named-pipe.
Первый запуск может проходить долго. -
Если возникает ошибка про файл с названием вида
VCRUNTIME*.dll— значит, нужно обновить версию Microsoft Visual Studio.
Скачиваем файлvc_redist.x64.exeс официального сайта Microsoft и запускаем его.
После этого повторяем предыдущий пункт, всё должно пройти нормально. -
Если сервер все-таки не запускается (завершает работу и отдает управление в командной строке), нужно найти в файл с расширением
*.errв каталоге для хранения данных и посмотреть, что там написано.
Один из вариантов решения проблемы — сначала запустить сервер с ключом--initialize, и после того, как он завершит работу, запустить его снова уже в штатном режиме.
*Замечено, что при обновлении с версии 5.7 при запуске над теми же данными (без перезаливки) сервер требует запуска два-три раза подряд, и только последний из них проходит успешно. -
Выполняем запрос
SELECT VERSION(), убеждаемся, что запущена обновлённая версия сервера.
Загрузка данных часовых поясов
Информацию о часовых поясах нужно загрузить вручную. В противном случае сервер будет работоспособен, но некоторые операции с датами не будут работать. Например:
SELECT CONVERT_TZ(NOW(), @@time_zone, 'UTC'); # вернет NULL
Для Windows пригодных для этого системных файлов нет, поэтому нужно скачать SQL-файл (выбрать POSIX), и загрузить его на сервер под пользователем root:
mysql -u root -p mysql < timezone_2024a_posix_sql
После этого нужно перезапустить сервер MySQL.
There are several ways to start, stop and restart the MySQL server depending upon the operating system you are using. In this tutorial, we’ll learn how to start-stop and restart MySQL servers in windows, mac, and Linux operating systems.
There are 3 ways by which you can perform these tasks on the MySQL server on Windows:
- Using services.msc
- Using Command Prompt
- Using MySQL Workbench
We’ll learn all three methods one by one:
Using services.msc
Step 1: On the keyboard press Windows, Type run on the search area, and click on open:
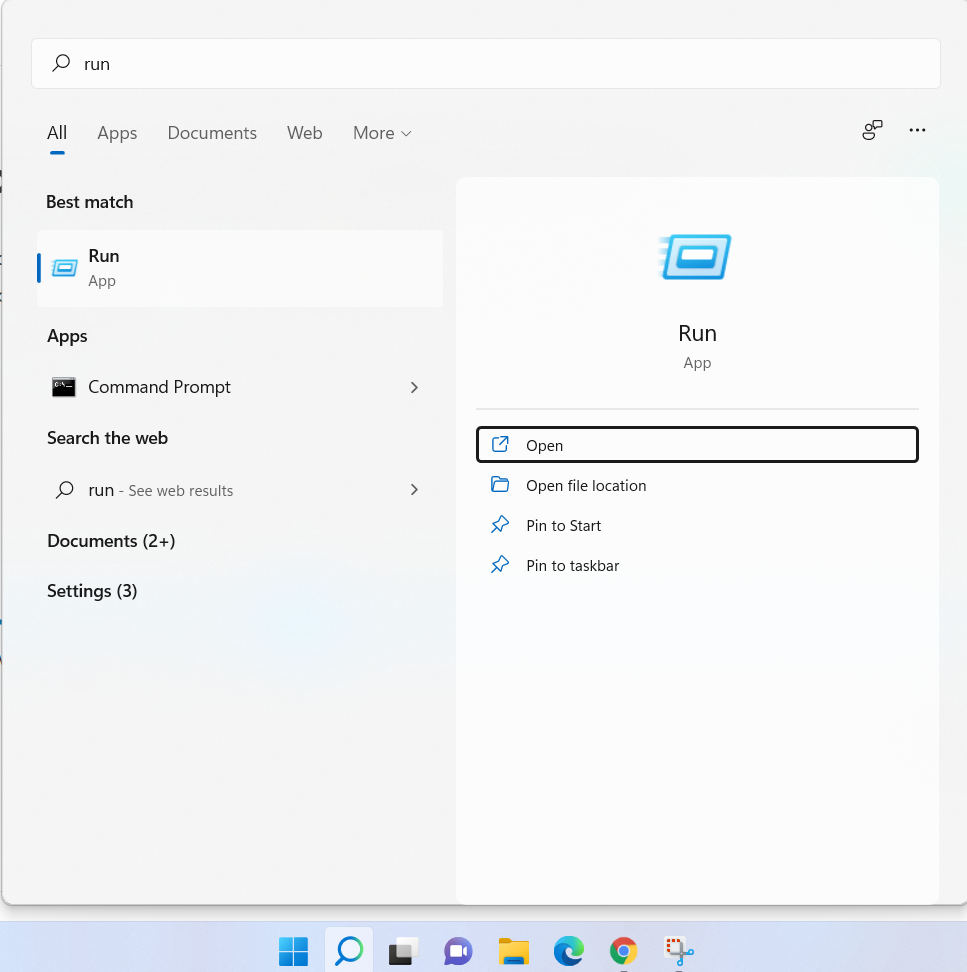
Step 2: Type Services.msc on run and click on OK:
Step 3: Search for MySQL under the name column, Please keep in mind that the numeric extension after MySQL, as in the below example is MySQL80 may vary depending on the version of MySQL installed on your desktop. You can click on the MySQL80 section and a section on the left-hand side will be available to you with all the operations you can perform on that service.
Step 4: Currently MySQL server is running, you can either choose to start, stop and restart the service from the left-hand side panel by selecting any of the options, or you can right-click on MySQL80 service and restart or stop the MySQL server from there.
That’s how you can start, stop or restart the MySQL server in windows using services.
Using Windows Command Line
Step 1: Open Command Prompt, you can open it by pressing the Windows key on your keyboard and typing cmd on the search area.
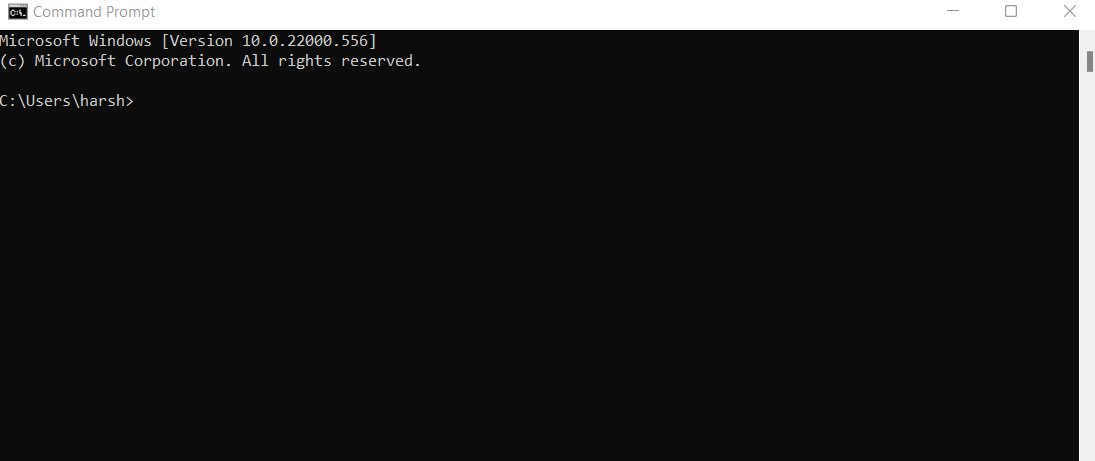
Step 2: Start, stop or restart the MySQL server.
To stop the MySQL server you can type the following command:
net stop MySQL80Code language: SQL (Structured Query Language) (sql)To start the MySQL server you can type the following command:
net start MySQL80Code language: SQL (Structured Query Language) (sql)Using MySQL Workbench
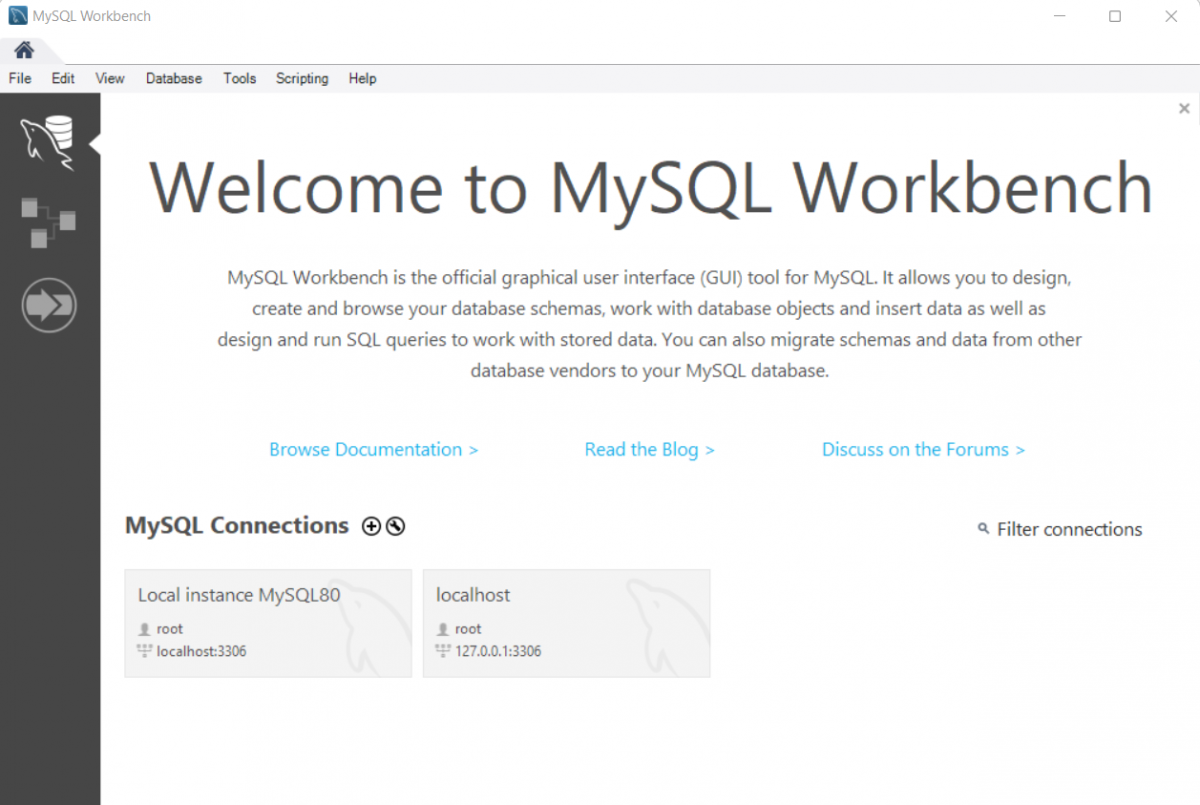
Step 1: Press the Windows key on your keyboard, type MySQL Workbench on the search bar, and open MySQL Workbench.
Step 2: Select the Administrator tab, in the Instances section select the Startup/Shutdown section.
Step 3: You can start or stop the server in this window.
These are the three ways, you can use to start or stop of MySQL server.
Start, Stop and restart MySQL Server on Linux
For performing these activities on Linux, you must be a superuser as only the superuser has these privileges.
Step 1: Open your Linux terminal and we need to check if MySQL is running on your operating system or not. To do so, we’ll need to type the following command:
service mysqld statusCode language: Bash (bash)If MySQL is properly configured on your OS then the command will return Active status as Active(running) which means that MySQL is running on your operating system.
Step 2: Start, stop or restart MySQL
There will be two commands, service and sudo, both should work properly, but it depends if you have the privilege to use the service or sudo command on Linux. Make sure that you are a root user or a super user to perform the activity on MySQL.
To stop the MySQL server on Linux, use the following command:
service mysqld stop
sudo /etc/init.d/mysql stopCode language: Bash (bash)
The above command will stop the MySQL server. Now if you will try to check again for the MySQL status it will show inactive(dead) on the active status.
To Start the MySQL server on Linux, use the following command:
service mysqld start
sudo /etc/init.d/mysql startCode language: Bash (bash)
The above command will start the MySQL server. Now, if you will try to check again for the MySQL status it will again be active(running) on the active status.
To restart the MySQL server on Linux, use the following command:
service mysqld restart
sudo /etc/init.d/mysql restartCode language: Bash (bash)
The above command will restart the MySQL server. Now, if you will try to check again for the MySQL status it will again be active(running) on the active status because we restarted the server.
Start, Stop or Restart MySQL Server on macOS
Open terminal on your Mac, we’ll be using the Sudo command to start, stop or restart the MySQL server.
For MySQL versions which are newer than 5.7:
To start MySQL server on Mac:
sudo launchctl load -F /Library/LaunchDaemons/com.oracle.oss.mysql.mysqld.plistCode language: Bash (bash)To Stop MySQL server on Mac:
sudo launchctl unload -F /Library/LaunchDaemons/com.oracle.oss.mysql.mysqld.plistCode language: Bash (bash)For versions older than MySQL 5.7:
To Start MySQL server on Mac:
sudo /usr/local/mysql/support-files/mysql.server startCode language: Bash (bash)To Stop MySQL server on Mac:
sudo /usr/local/mysql/support-files/mysql.server stopCode language: Bash (bash)To Restart MySQL server on Mac:
sudo /usr/local/mysql/support-files/mysql.server restartCode language: Bash (bash)Conclusion
Mysql is a powerful database management system. In order to use it effectively, you need to be familiar with the different ways to start, stop and restart it. By following the instructions in this article, you should be able to do just that. Thank you for reading!