
Are you struggling to login as an administrator in Windows 11? It can be frustrating when you need to access certain settings or programs only available to administrators. But fear not, as there are simple steps you can take to regain control. By following these instructions, you’ll be able to login as an administrator and have full control over your Windows 11 system.
To login as the administrator in Windows 11, you need to first ensure that your account has administrative privileges. This can be done by going to the «Settings» menu, selecting «Accounts,» and then clicking on «Your Info.» From here, you can check if your account is an administrator or make changes to grant it administrative rights. Once you’ve confirmed your account’s status, you can easily login as an administrator by simply selecting the «Sign In» option and entering your credentials. It’s as simple as that!
To login as the Administrator in Windows 11, follow these steps:
- Power on your Windows 11 computer.
- On the login screen, click on the «Other user» option.
- Now, type «Administrator» in the username field.
- Enter the password associated with the Administrator account.
- Click on the «Sign in» button.
By following these steps, you can login as the Administrator in Windows 11 and access administrative privileges.

Enhanced Security Measures for Administrator Login in Windows 11
Windows 11 introduces enhanced security measures for administrator login, ensuring better protection against unauthorized access and potential security breaches. These measures are designed to safeguard sensitive data and provide users with a secure computing experience. In this article, we will explore the various methods and steps to log in as an administrator in Windows 11 and understand the security features in place to protect your system.
Method 1: Using the Local Administrator Account
The first method to log in as an administrator in Windows 11 is by using the local administrator account. This account is created during the initial setup of Windows 11 and has elevated privileges that allow you to perform administrative tasks on your system.
Step 1: Accessing the Sign-in Options
To log in as the local administrator, start by accessing the sign-in options. On the Windows 11 login screen, click on the power button located at the bottom right corner. Press and hold the Shift key on your keyboard and then click on the Restart option. This will take you to the Advanced Startup menu.
In the Advanced Startup menu, select Troubleshoot, followed by Advanced options. From the list of advanced options, choose Startup Settings. Finally, click on the Restart button to reboot your system and access the Startup Settings.
In the Startup Settings, you will see various options. Press the number key that corresponds to the option labeled «Enable Safe Mode.» Windows 11 will now boot into Safe Mode.
Step 2: Logging in as the Local Administrator
Once in Safe Mode, you will be presented with the login screen. Click on the Administrator account to log in as the local administrator. If you have set up a password for the local administrator account during the initial setup, enter it when prompted.
After successfully logging in as the local administrator, you will have full administrative privileges to perform various tasks on your Windows 11 system.
Step 3: Returning to Normal Mode
To return to normal mode, simply restart your system. Windows 11 will boot back into the regular login screen, where you can log in using your regular user account.
Method 2: Using the Command Prompt
If you prefer using the Command Prompt, you can log in as an administrator in Windows 11 through this method as well. The Command Prompt allows you to execute various commands and perform administrative tasks.
Step 1: Accessing the Command Prompt
To access the Command Prompt, boot your Windows 11 system into the Advanced Startup menu. Follow the same steps as mentioned in Step 1 of Method 1, where you access the Troubleshoot > Advanced options > Startup Settings.
In the Startup Settings, press the number key corresponding to the option labeled «Enable Safe Mode with Command Prompt.» Windows 11 will now boot into Safe Mode with Command Prompt.
Step 2: Logging in as an Administrator
Once in Safe Mode with Command Prompt, you will see a Command Prompt window. Type the command «net user administrator /active:yes» (without quotes) and press Enter. This command enables the built-in administrator account.
Next, restart your system. On the login screen, you will now see the Administrator account available. Click on it to log in as the administrator.
Step 3: Performing Administrative Tasks
Upon logging in as the administrator, you can now utilize the Command Prompt to execute various administrative tasks, such as managing user accounts, changing passwords, or performing system maintenance.
Method 3: Using the Microsoft Management Console (MMC)
The Microsoft Management Console (MMC) provides a centralized platform for managing system configuration and performing administrative tasks in Windows.
Step 1: Opening the Microsoft Management Console
To open the Microsoft Management Console, press the Windows key + R on your keyboard to open the Run dialog box. Type «mmc» (without quotes) and press Enter.
Step 2: Adding the Local Users and Groups Snap-in
In the Microsoft Management Console, go to the File menu and select Add/Remove Snap-in. In the Add or Remove Snap-ins window, scroll down and double-click on Local Users and Groups.
From the Local Users and Groups window, click on the Browse button and select the Users folder. In the Users folder, right-click on the Administrator account and choose Properties. In the Properties window, uncheck the «Account is disabled» option and click on OK.
Step 3: Logging in as the Administrator
Restart your system. On the Windows 11 login screen, you will now see the Administrator account. Click on it to log in as the administrator.
Method 4: Using the Windows PowerShell
The Windows PowerShell is a powerful command-line tool that allows users to automate system tasks and perform administrative functions. You can use it to log in as the administrator in Windows 11 as well.
Step 1: Opening Windows PowerShell
To open the Windows PowerShell, press the Windows key + R on your keyboard to open the Run dialog box. Type «powershell» (without quotes) and press Enter.
Step 2: Enabling the Built-in Administrator Account
In the PowerShell window, type the command «net user administrator /active:yes» (without quotes) and press Enter. This command enables the built-in administrator account.
Step 3: Logging in as the Administrator
Restart your system. On the login screen, you will now see the Administrator account. Click on it to log in as the administrator.
Conclusion
Logging in as an administrator in Windows 11 is essential for performing various administrative tasks and managing system settings. Whether it’s using the local administrator account, Command Prompt, Microsoft Management Console, or Windows PowerShell, these methods provide you with the necessary access and privileges to carry out administrative functions on your Windows 11 system. It’s important to keep in mind that administrative tasks should be performed with caution and within the scope of your responsibilities to ensure system stability and security.
Logging in as Administrator in Windows 11
Logging in as an administrator on Windows 11 allows you to access and manage advanced system settings, install applications, and make changes that require administrative privileges. Here’s how to do it:
Method 1: Using the Settings App
1. Click on the «Start» icon in the taskbar and select «Settings.»
2. In the Settings menu, click on «Accounts» and then select «Accounts» again in the left pane.
3. Click on «Family & other users» on the right side and then select your account from the list.
4. Under your account name, click on «Change account type» and select «Administrator.» Confirm any prompts that appear.
Method 2: Using the Command Prompt
1. Press the «Windows» key + «R» to open the Run dialog box.
2. Type «cmd» and press «Enter» to open the Command Prompt.
3. In the Command Prompt, type «net user administrator /active:yes» and press «Enter.»
4. You should see a message saying «The command completed successfully.» Restart your computer.
Once you have completed these steps, you can log in as an administrator on Windows 11 by selecting the administrator account on the login screen. Remember to use the administrator account responsibly, as it has full control over the system.
Key Takeaways — How to Login as Administrator in Windows 11
- Press the Windows key and search for «Command Prompt» to open it.
- Right-click on Command Prompt and select «Run as Administrator.»
- Enter the Administrator password and press Enter to log in as Administrator.
- If you don’t remember the Administrator password, reset it through the built-in Administrator account.
- Use the «net user» command followed by the Administrator username and desired password to reset the Administrator password.
Frequently Asked Questions
Here are some common questions about logging in as Administrator in Windows 11.
1. How can I log in as Administrator in Windows 11?
To log in as Administrator in Windows 11, you can follow these steps:
1. On the login screen, click on the «Other user» option.
2. Type in «Administrator» as the username and leave the password field blank.
3. Press Enter or click on the arrow button to log in as Administrator.
Please note that this method will only work if you have enabled the Administrator account in Windows 11.
2. How do I enable the Administrator account in Windows 11?
To enable the Administrator account in Windows 11, you can follow these steps:
1. Open the Command Prompt as an administrator. You can do this by right-clicking on the Start button and selecting «Command Prompt (Admin)».
2. In the Command Prompt window, type in the following command and press Enter: «net user administrator /active:yes».
3. After executing the command, the Administrator account will be enabled.
Please note that it is recommended to create a strong password for the Administrator account for security purposes.
3. Can I log in as Administrator if I forgot my Windows 11 password?
If you have forgotten your Windows 11 password, you will not be able to log in as Administrator or any other user. In this case, you can follow these steps to reset your password:
1. Restart your computer and press the F8 key repeatedly to access the Advanced Boot Options menu.
2. Select the «Safe Mode» option and press Enter.
3. On the login screen, you will see a new user account named «Administrator». Click on that account to log in.
4. Once logged in, go to the Control Panel and open the User Accounts settings.
5. Select your user account and click on «Change Password». Follow the on-screen instructions to set a new password.
After resetting your password, you can log in as Administrator or your own user account using the new password.
4. What should I do if the Administrator account is disabled?
If the Administrator account is disabled in Windows 11, you will need to enable it using a different user account with administrative privileges. Here’s how:
1. Log in to Windows 11 with another user account that has administrative privileges.
2. Open the Command Prompt as an administrator.
3. Type in the following command and press Enter: «net user administrator /active:yes».
4. After executing the command, the Administrator account will be enabled.
Please note that you will need to know the password for the other user account to perform these steps.
5. Can I change the Administrator password in Windows 11?
Yes, you can change the Administrator password in Windows 11. Here’s how:
1. Log in to Windows 11 as Administrator.
2. Press the Ctrl + Alt + Del keys together and click on «Change a password».
3. Follow the on-screen instructions to set a new password for the Administrator account.
In summary, logging in as an administrator in Windows 11 is a straightforward process that can be done by following a few simple steps. First, you need to ensure that you have the necessary administrator credentials or permissions. If you don’t, you may need to contact your system administrator or use an existing administrator account. Once you have the required credentials, you can easily switch to the administrator account by accessing the Windows 11 login screen and selecting the administrator account from the available options.
Remember to exercise caution when working in the administrator account, as it grants you full control over the system. Be mindful of the changes you make and always adhere to best practices to ensure the security and stability of your computer. By following these steps, you can effectively log in as an administrator in Windows 11 and carry out administrative tasks with ease.
To run as administrator in Windows 11 means launching an application with elevated privileges. To prevent unauthorized changes to the operating system, Windows 11 apps and games start, by default, with standard permissions, but there are certain programs, like security software, that require admin rights to run correctly or perform specific tasks. Luckily, the process is easy: all you need are administrator credentials and our instructions. Read this guide to learn how to run as Administrator in Windows 11:
NOTE: Using most of the methods in this guide to run as administrator triggers a UAC prompt asking for further confirmation and, if you’re launching an app using a regular account, an administrator password.
1. How to Run as administrator from an app’s pinned Start Menu shortcut
In Windows 11, you can use the contextual menu of any pinned app to run it with administrative permissions. To begin, open the Windows 11 Start Menu and find the app you want to launch in the Pinned section. Next, right-click or press and hold on it to open its contextual menu, and then click or tap on “Run as administrator.”
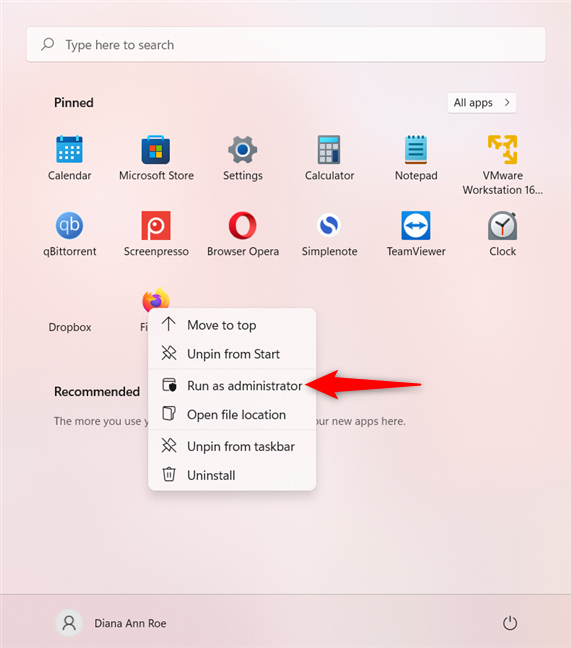
Choose Run as administrator from a pinned app’s contextual menu
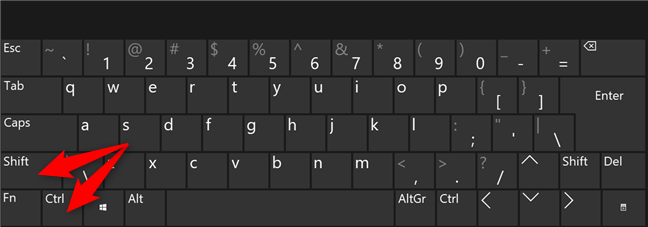
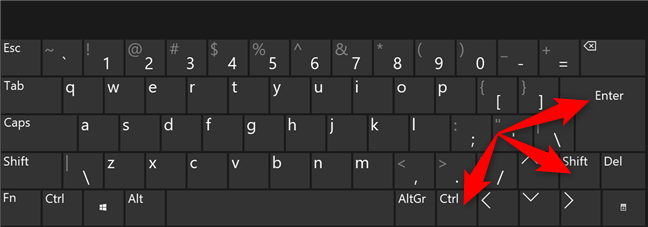
Alternatively, you can also hold down the Ctrl and Shift keys on your keyboard and click/tap on the app you want to run as administrator in Windows 11, or use your keyboard to highlight it and then the Ctrl + Shift + Enter keyboard shortcut to launch it.

Use Ctrl + Shift + Enter on the highlighted pinned app
TIP: If you like this method, you may be interested in learning more about pinning apps to the Windows 11 Start Menu.
2. Run a program as admin using its shortcut from the All apps list of the Windows 11 Start Menu
The All apps section of the Start Menu can also be used to run as administrator in Windows 11. First, open the Start Menu and access All apps.

Access the All apps list in Windows 11
Find the program’s shortcut in the list, and right-click or press-and-hold on it to open a contextual menu. Next, click, tap, or hover over the More option, and then press on “Run as administrator.”
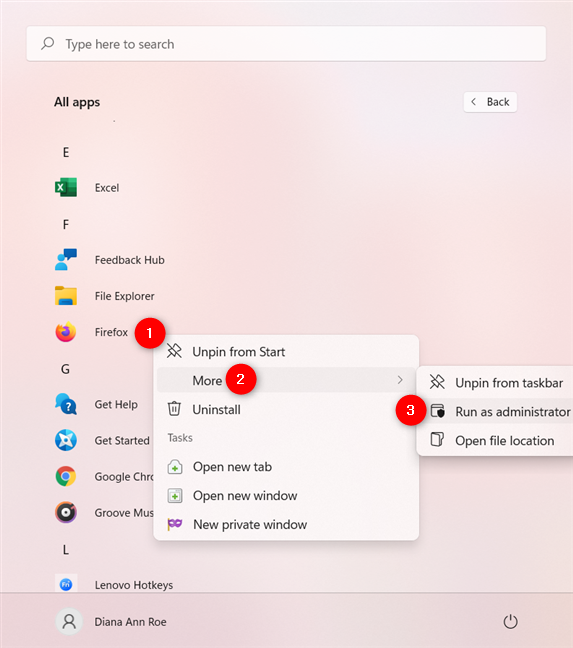
Choose Run as administrator from the shortcut’s contextual menu
Alternatively, you can hold down Ctrl and Shift on your keyboard and click or tap on the app you want to run as administrator in Windows 11.

Use Ctrl and Shift on the app you want to run as administrator
3. How to Run as administrator from an app’s shortcut
If you have a shortcut for the app you want to run as admin on your desktop or anywhere else, you can open its right-click menu. Then, click or tap on the “Run as administrator.”
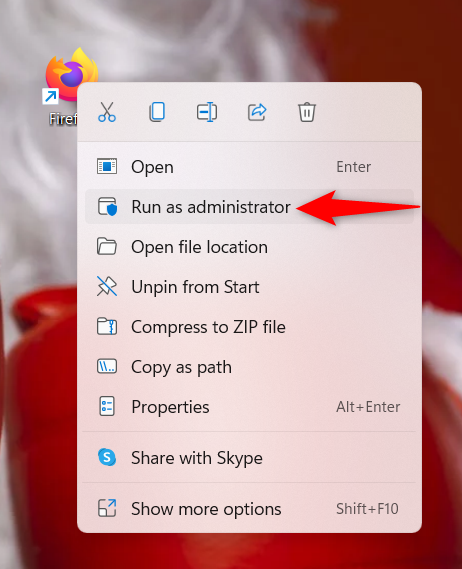
Press Run as administrator from the contextual menu
4. Run an app as administrator from its taskbar shortcut
In Windows 11, another way to run an app with administrator permissions is from its taskbar shortcut. First, right-click or press-and-hold on the shortcut. Next, right-click or press-and-hold again on the program’s name. Finally, click or tap on “Run as administrator” from this menu.
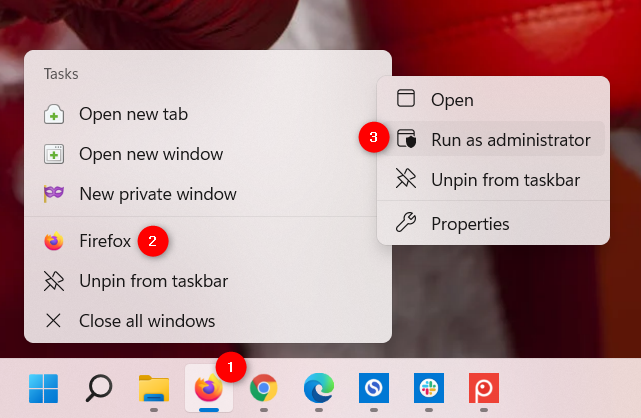
Use a taskbar shortcut to run as administrator in Windows 11
You can also hold down Ctrl + Shift and click/tap on an app’s taskbar shortcut to run it with administrator permissions in Windows 11.
Use Ctrl and Shift on the app you want to run as administrator
TIP: To pin an app to the taskbar, read our guide about adding shortcuts to the taskbar in Windows 11.
5. How to run as administrator from an executable’s contextual menu
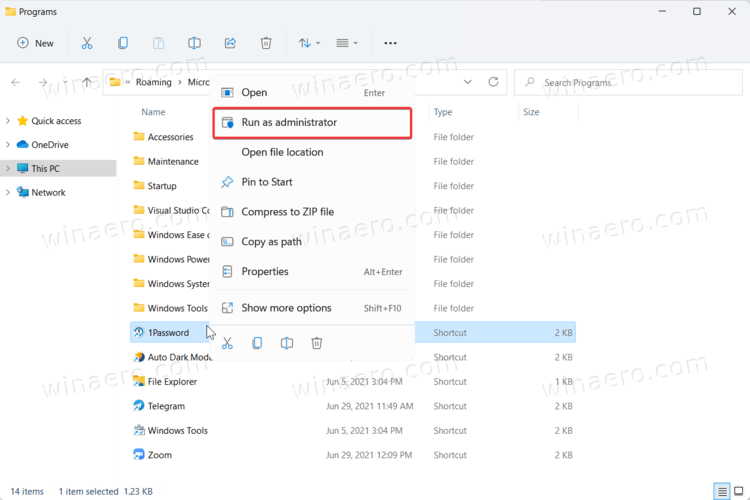
While shortcuts are easy to find, you can also run a program as administrator in Windows 11 from the main executable file’s contextual menu. In File Explorer, navigate to the app’s executable file. Right-click or press-and-hold on it to open the contextual menu, and then click or tap on “Run as administrator.”
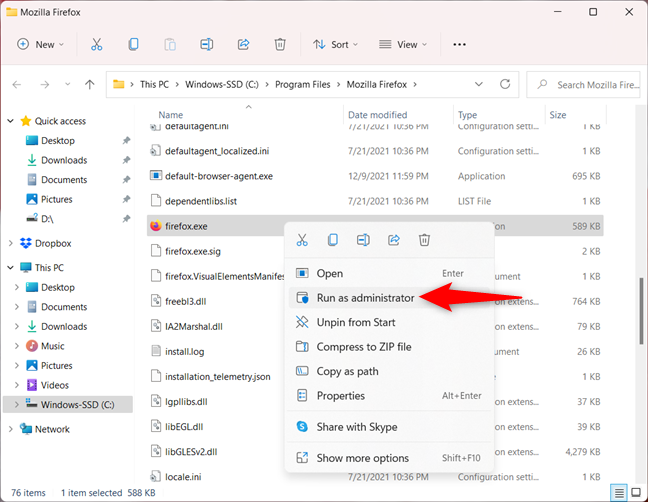
Click or tap on Run as administrator
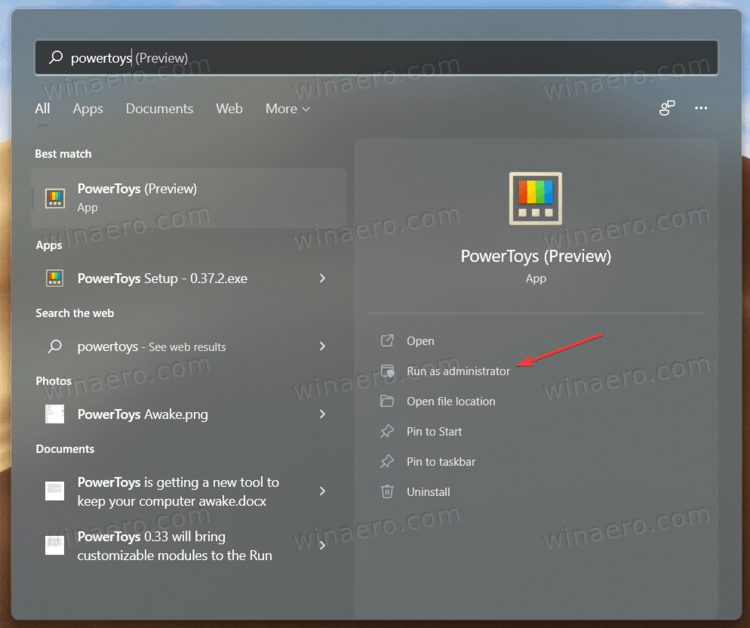
6. Run a program as admin using the Windows 11 Search
First, use the Windows 11 Search to find the program you want to run as admin. On the right pane, click or tap on “Run as administrator.”
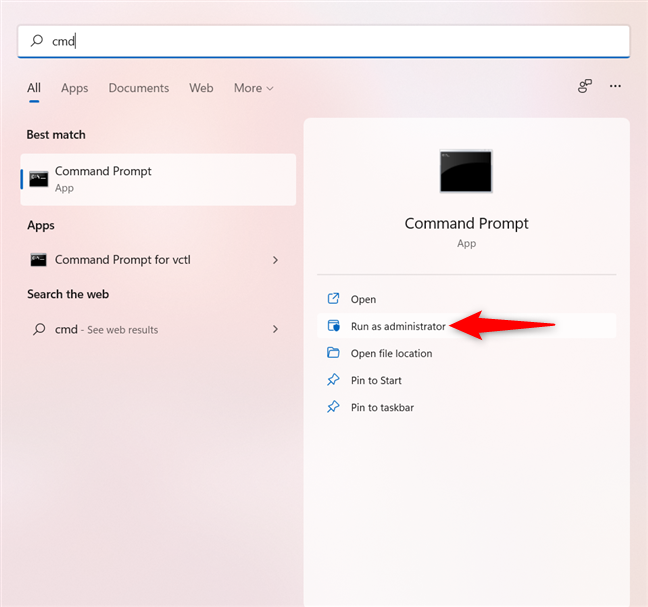
For CMD, the Run as administrator option is immediately available
If you don’t see the option in the right pane, use the down arrow to expand the list of options.
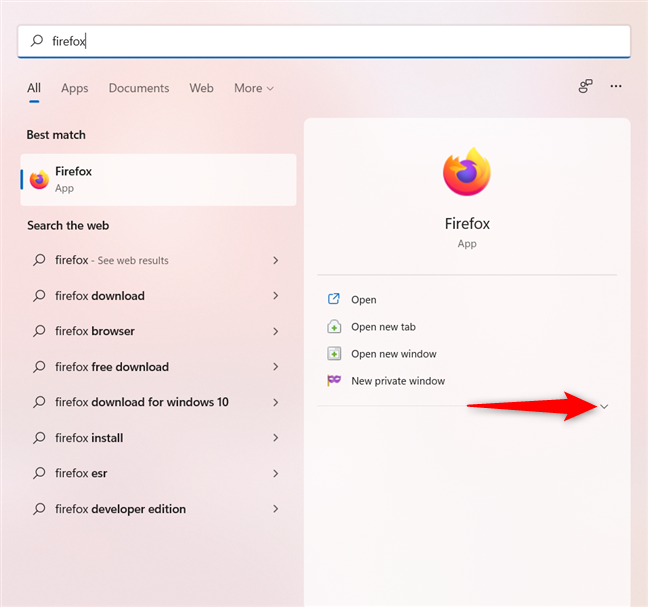
Use the arrow down to reveal the Run as administrator option
Alternatively, right-click or press-and-hold on the correct search result and click or tap on “Run as administrator” from the contextual menu.
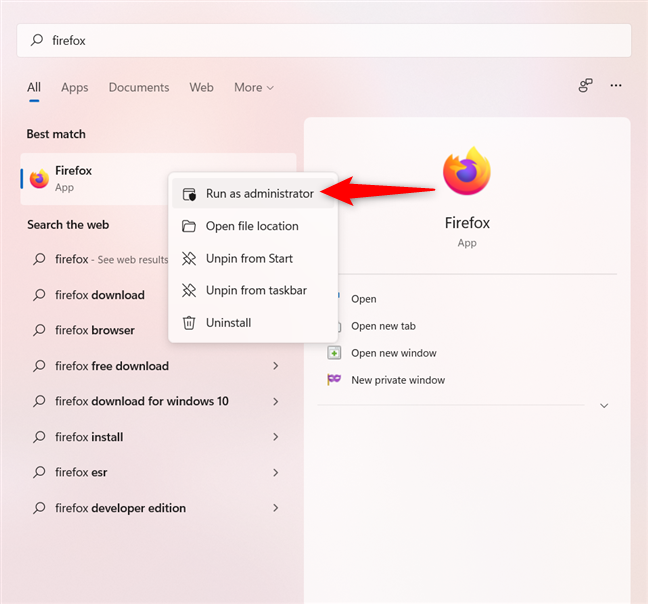
Press Run as administrator from the contextual menu
You can also use the arrow keys to highlight the appropriate search result in the left pane. Then, use the Ctrl + Shift + Enter keyboard shortcut to run that program as administrator.
Use Ctrl + Shift + Enter on the highlighted search result
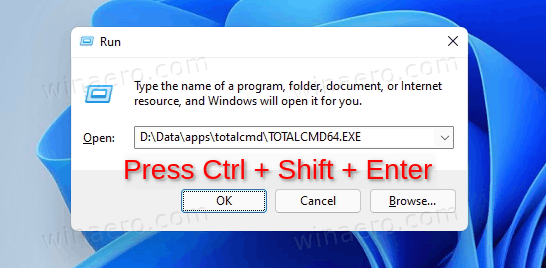
7. How to run as administrator on Windows 11 from the Run window
First, open the Run window and insert the name of the executable for the program you want to run as admin.
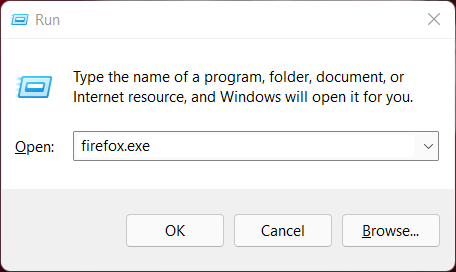
Type the name of the executable in the Run window
Then, hold down Ctrl and Shift on your keyboard and click/tap OK or the Enter key.

Use Ctrl + Shift + Enter to launch the app as administrator
8. Run as admin from the Task Manager
You can also launch a program as administrator in Windows 11 by using the Task Manager. First, start the Task Manager and, if it opens up in its compact view, click or tap on More details.
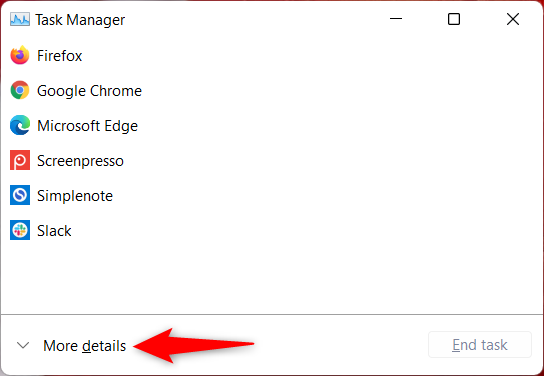
Click or tap on More details
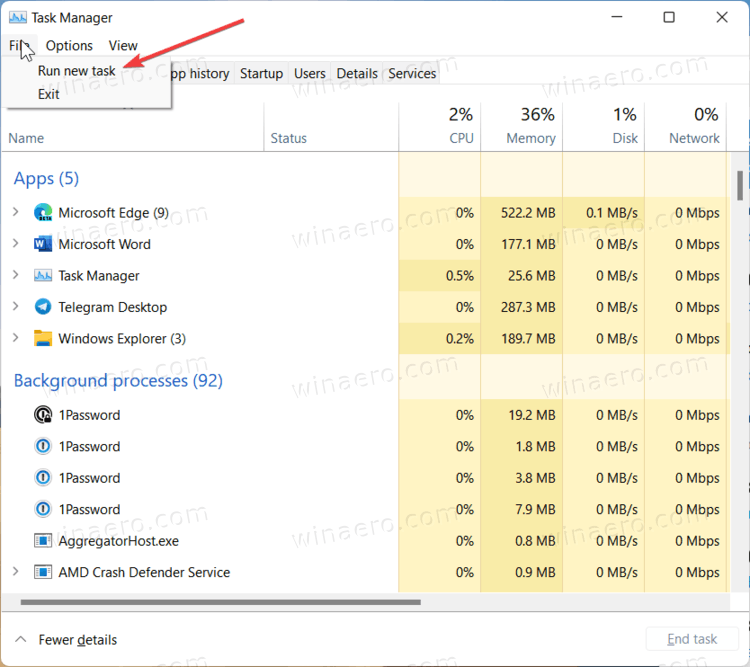
Open the File menu from the upper-left corner and click or tap on “Run new task.”
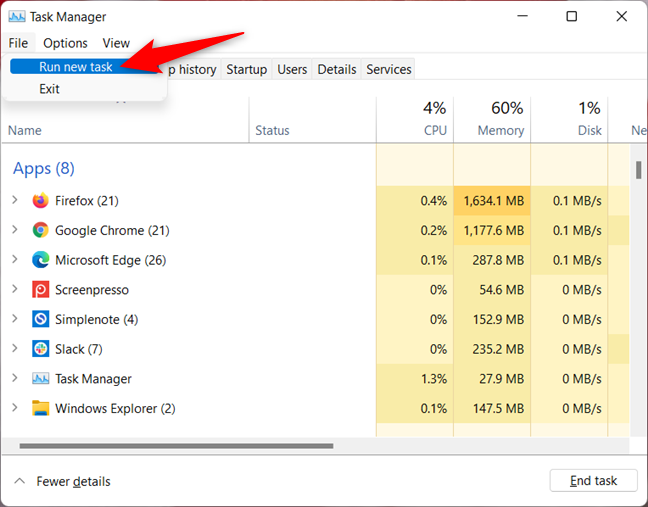
Access Run new task from the File menu
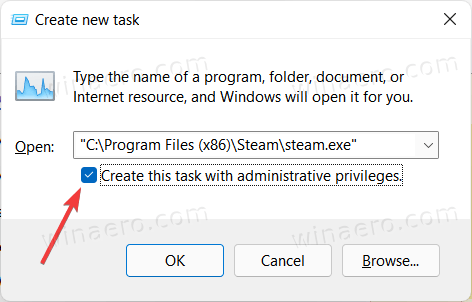
In the “Create new task” window, use the Open field to enter the path to the program you want to launch as administrator, or click or tap on Browse to navigate to it. Make sure to check the “Create this task with administrative privileges” option, and then click or tap on OK.
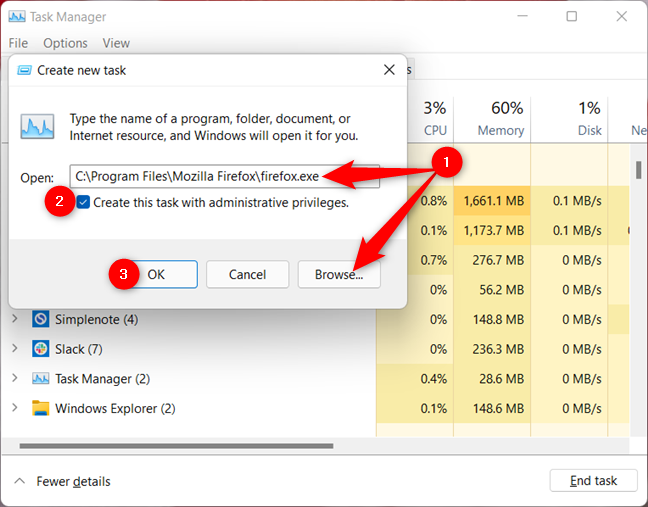
Enter the path to the program, check the box, and hit OK
TIP: Using this method of launching programs as administrator lets you skip the UAC part of the process because the app automatically inherits the permissions of the Task Manager — in our case, administrator permissions. If you only have standard user permissions on the device, the checkbox is missing.
9. Use Windows Terminal, PowerShell, or CMD to run as administrator in Windows 11
If you like command-line environments, access Windows Terminal, PowerShell, or Command Prompt to run a program as administrator. Enter the following command in the Windows Terminal, CMD, or PowerShell window:
runas /user:»your_computer_name\administrator_name» «C:\path\program.exe«
Replace your_computer_name with your computer’s name, administrator_name with the name of a user account with administrator permissions on your system, and C:\path\program.exe with the complete path to the app you want to run as administrator. If you enter the command correctly, you are prompted to enter the administrator’s password. Then, press Enter on your keyboard once again.
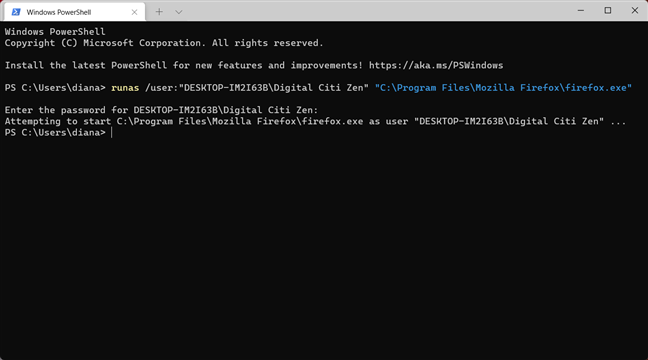
Run a program as administrator from Windows Terminal
TIP: This method is more complicated, but you get to skip the UAC part of the process.
10. Always run a program with administrator permissions
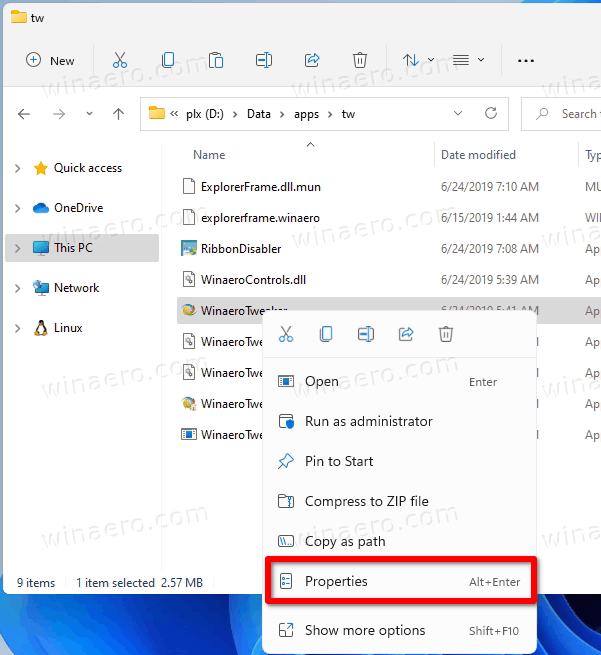
To set a program to always run with administrative permissions, first, locate its main executable file. Right-click or press-and-hold on it, and then click or tap Properties.
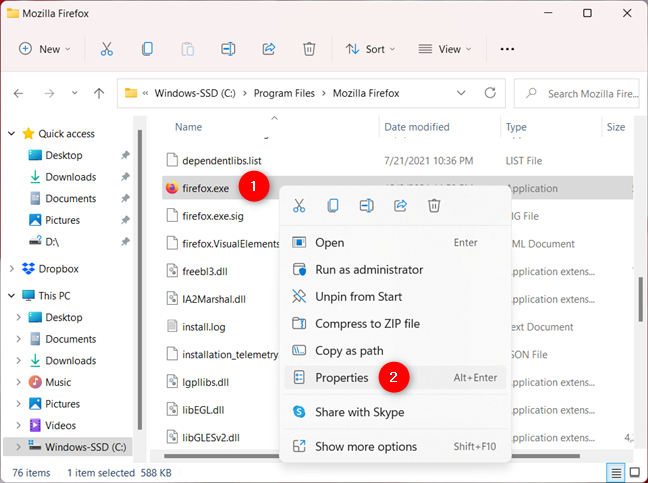
Right-click and access Properties
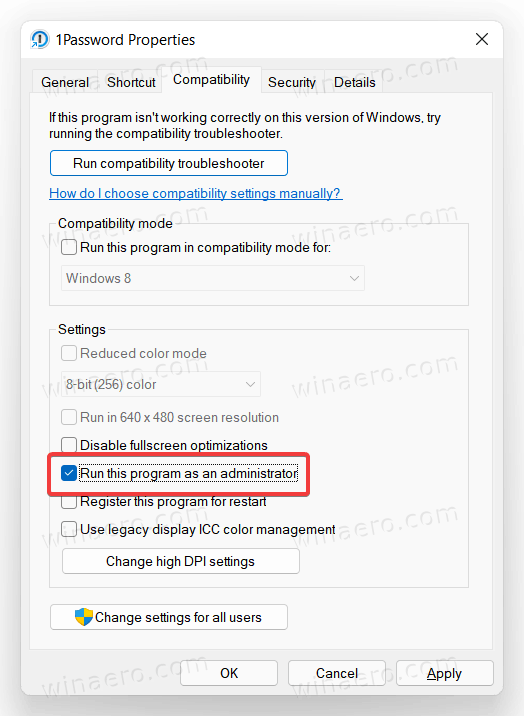
In the Compatibility tab, check the box next to “Run this program as an administrator” and click or tap on Apply or OK.
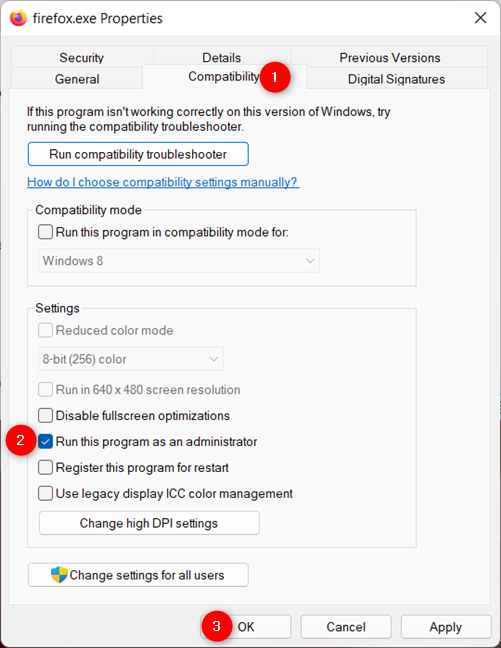
Enable the option to run as admin and press OK
This setting is applied, and, from now on, the program always runs with administrator permissions.
TIP: You can also get the same result by editing the Properties of a program’s shortcut.
11. Use the Windows Task Scheduler to run a program with administrative permissions
You can use the Task Scheduler to run a program as administrator without the UAC (User Account Control) prompt. The process is simple, as you can learn from this step-by-step guide on using the Windows Task Scheduler to run apps without UAC prompts.
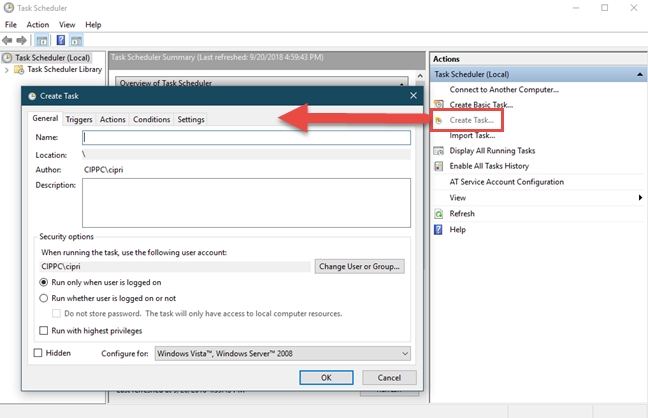
Task Scheduler can run a program as administrator
Which way to Run as administrator do you prefer?
Very few programs actually require elevated privileges in Windows 11. However, the eleven methods above should be more than enough for those rare cases when you do need to run an app with administrative permissions. Before you close this guide, let us know which method(s) you plan to use. Did you already use some of them? Let us know in a comment.
-
Home
-
News
- How To Run A Program As Administrator In Windows 11
By Sarah |
Last Updated
Windows users have to provide administrative permissions when they plan to change some system related settings or modify system files. Besides, only administrators can run some programs correctly or use it to perform specific tasks. This page on MiniTool will show you different ways to run as administrator in Windows 11.
Many users encounter the same situation when they’re using Windows 11: some programs can’t be run or some tasks can’t be performed since they don’t have administrative privilege. Windows requires people to provide administrative permissions whenever they need to change system related settings and files. This is a good way to stop unauthorized changes in the system.
What does run as administrator Windows 11 mean? To put it simply, run as administrator is a term to describe the process of starting a program elevated with the highest privileges. As a user of Windows 11 or other Windows systems, you often run applications and programs with standard (limited) privileges. This page discusses on the ways to run program as administrator Windows 11.
You Need Permission To Perform This Action: Solved.
Tip: Windows 11 has included many new features and changes when compared to Windows 10. You’d better make backups of your system, disks, and data in case of data loss caused by wrong & improper operations. If some important files get lost before you back them up, please get a professional recovery tool to restore them at once.
MiniTool Power Data Recovery TrialClick to Download100%Clean & Safe
How to Run as Administrator in Windows 11
The following sections show you how to run as administrator in Windows 11 using different ways.
Way 1: Run as Administrator on Desktop
The first way to run program as administrator Windows 11 is to locate it on desktop and run as administrator.
- Browse your items on the Windows 11 desktop.
- Find the program you want to open and right click on its shortcut.
- Select Run as administrator from the context menu.
Also, you can press Ctrl + Shift buttons while clicking on the program to open it as an administrator. Alternatively, you can select the program and press Ctrl + Shift + Enter to launch it directly.
Way 2: Run as Administrator from Start Menu
How to run as administrator Windows 11 from the Start menu:
- Open the Start menu as you usually do (click Start on taskbar, press Start on keyboard, etc.).
- Browse the Pinned section to find the program you need. Right click on it and select Run as administrator.
- If you can’t find it there, please click All apps to display all the programs and applications installed on your PC. Then, navigate to the More option and select Run as administrator from the submenu.
Your Windows 11 Start Menu Not Working? Here’s How To Fix It?
Way 3: Run as Administrator from Task
- Go to the Windows 11 taskbar at the bottom of the screen.
- Find the target program shortcut and right click on it.
- Right click on the program icon again in the pop-up window and select Run as administrator.
Way 4: Run as Administrator Using Windows Search
The more direct way to run as administrator in Windows 11 is to use the search feature.
- Click on the search icon on the taskbar or press Windows + S to open Windows search.
- Type the name of the application you need.
- Right click on the application from the search result and select Run as administrator. Also, you can navigate to the right pane and click on the Run as administrator option under the app directly.
How To Troubleshoot Search Not Working On Windows 11 PC?
Way 5: Run as Administrator via Run
- Press Windows + R to open Run.
- Type the executable name of the program.
- Press Ctrl + Shift + Enter.
Way 5: Run as Administrator in File Explorer
- Press Windows + E to open File Explorer.
- Locate the app you want to run.
- Right click on the executable file.
- Select Run as administrator.
Way 6: Run as Administrator from Task Manager
- Press Ctrl + Shift + Esc to open Task Manager.
- Select File -> Run new task.
- Type the correct path of the program.
- Check Create this task with administrative privileges.
- Click OK.
Way 7: Run as Administrator from Command Prompt
- Open Command Prompt as you usually do.
- Type the complete path of the program.
- Press Enter.
You can also use the Windows Terminal or PowerShell to run a program as administrator.
Windows 11 Always Run as Administrator
Some users complained that they find run as administrator Windows 11 not working or Windows 11 run as administrator missing. How to always run a program with administrator permissions?
- Go to the program you need.
- Right click on the program.
- Select Properties.
- Shift to the Compatibility tab.
- Check Run this program as an administrator.
- Click OK.
About The Author
Position: Columnist
Sarah has been working as an editor at MiniTool since she graduated from university. Sarah aims at helping users with their computer problems such as disk errors and data loss. She feels a sense of accomplishment to see that users get their issues fixed relying on her articles. Besides, she likes to make friends and listen to music after work.
Run as administrator in Windows 11 is a term that describes the process of starting an app elevated with highest privileges. Windows 11, like any other modern OS version, runs applications and programs with standard (limited) privileges. Some programs require administrator access to perform specific tasks. In such cases, you may need to quit the app and run it elevated. There are several ways to run a program as an administrator in Windows 11. This article will show you most of them.
Note: Do not run programs as an administrator without reason. We recommend launching programs with elevated privileges only if you know exactly why the app requires administrator access level.
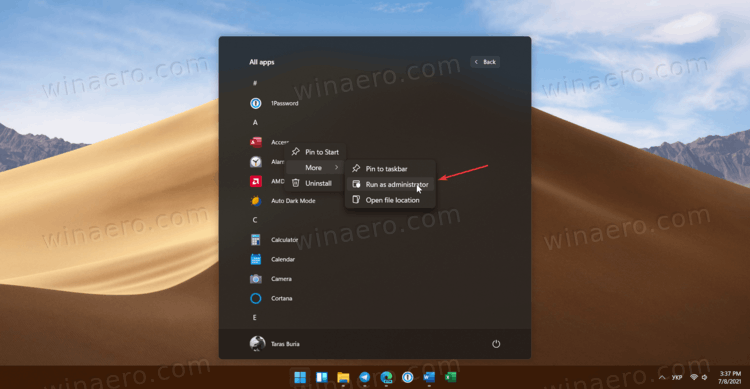
- Open the Start menu, then click All Apps.
- Find the app you want to run as an administrator and right-click it. Select More.
- Select Run as administrator.

- Alternatively, press and hold Ctrl + Shift and click an app shortcut while holding those keys. The app will start elevated.
Note that the context menu method works in both the Start menu and File Explorer. Simply right-click an app or shortcut, then select Run as administrator. The command has the icon with a window and a shield.
Using Windows Search
Another way to launch a program with elevated privileges in Windows 11 is by clicking the appropriate command in Windows Search.
- Open the Start menu and start typing the app’s name you want to launch. Alternatively, press Win + S to open the search box.
- If the program shows up under the Best Match section, click Run as Administrator on the right side of the search window. Alternatively, press Ctrl + Shift + Enter to launch the app with the administrator access level.

- If the program appears lower, click the button with a small arrow pointing to the right, then select Run as Administrator.

Launch a pinned app from the taskbar
If the app you want to run as an administrator is pinned to the taskbar, there is no need to use search or the list of all apps. Press Ctrl + Shift, then click the program on the taskbar. Windows 11 will start the app with elevated privileges.

Also, you can directly run a pinned app elevated with the Ctrl + Shift + Win + <Number> hotkey, where <Number> is a digit from 1 to 9. The first pinned app is 1, the next after it is 2, and so on. In my case, the first icon is Total Commander, so I have to use the Ctrl + Shift + Win + 1 sequence to start it as admin.
Using Command Prompt, PowerShell, or Windows Terminal
Windows 11 allows launching an app as an administrator from the elevated Command Prompt, PowerShell, or Windows Terminal. All that is needed is to run your preferred console app as an administrator. Then, use the app’s executable path to launch it.
Using the Run dialog
Press Win + R to open the Run dialog. Alternatively, you can right-click the Start button and select Run from the menu.
In the Run box, type the executable name of the app you want to start as Administrator. You can also use the Browse… button to find the app using the open file dialog.
Finally, press Ctrl + Shift + Enter, or press and hold Ctrl + Shift and click the OK button. The app will start elevated.
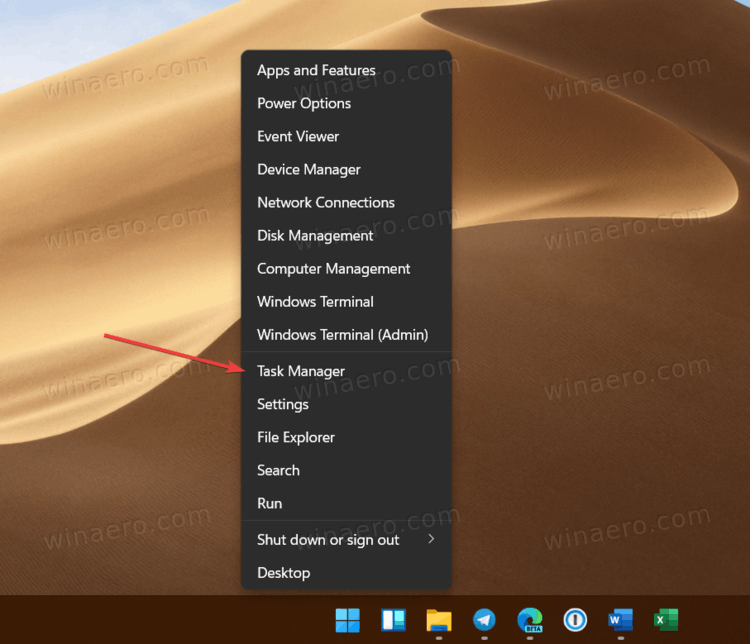
Open an app as Administrator from Windows 11 Task Manager
- Open Task Manager with the Ctrl + Shift + Esc shortcut. Alternatively, right-click the Start menu and select Task Manager.

- Click File > Run new task.

- Type the path to the program you want to launch as an administrator, then place a checkmark next to the Create this task with administrative privileges.

- Click OK.
Always run an app as Administrator in Windows 11
All the methods below are «single-use.» In other words, you need to repeat the procedure every time you launch your program. If you need to always start an application as an administrator in Windows 11, do the following:
- Find the app you need and right-click it.
- Select Properties. Tip: You can open the properties window without opening context menus. Just select a file or program, then press Alt + Enter.

- Go to the Compatibility tab and place a checkmark next to the Run this app as an administrator option.

- Click OK.
That is how you set a program to always run as an administrator in Windows 11.
However, this method has one drawback. Every time you start the app using such a modified shortcut, it will bring you a User Account Control confirmation (UAC), where you have to click on Yes. It is a minor, but very annoying inconvenience. Here is a workaround that you can use to suppress the UAC request.
Run as Administrator without UAC Confirmation
The idea here is to create a special task in the Task Scheduler, and then run the task instead of the direct launch of the app. The task will start the specified app elevated, however, it will not bring an UAC prompt.
This can be useful in certain cases. For example, if you often work with a Registry editor, you will find it annoying to confirm UAC every time you launch.
Create a task in Task Scheduler
To run an app as Administrator without UAC Confirmation, do the following.
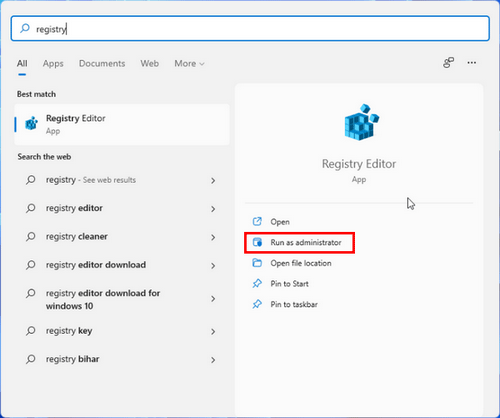
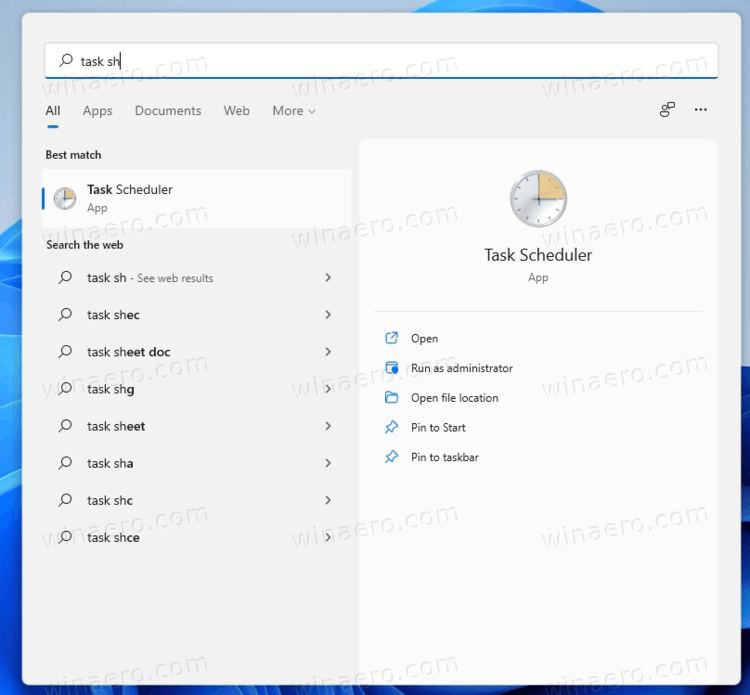
- In Windows Search (Win + S), and enter task scheduler in the search box.

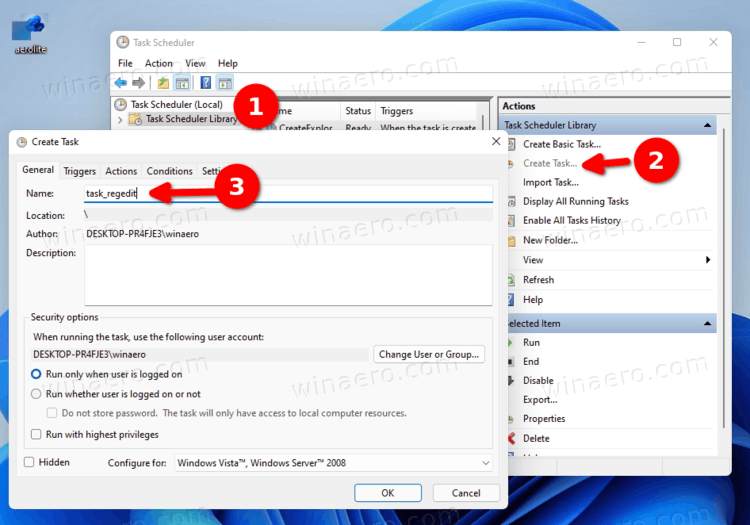
- In the Task Scheduler, create a new task and give it a short and meaningful name. For example, task_regedit.

- On the General tab, turn on (check) the checkbox Run with highest privileges.

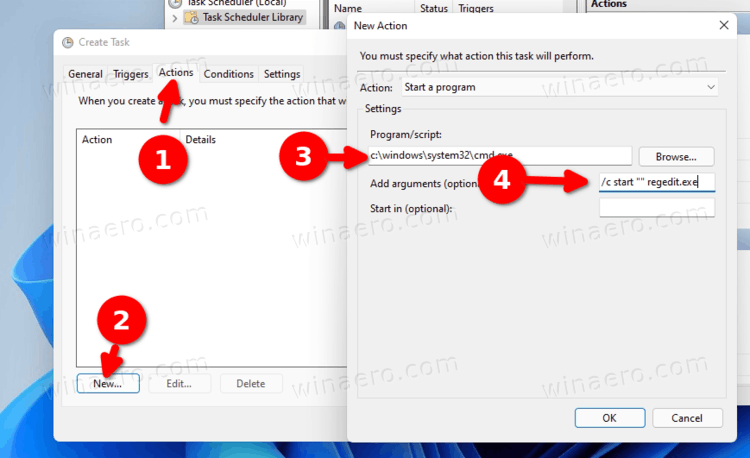
- On the Actions tab, create a new action with the following parameters.
- In program/script, specify
c:\windows\system32\cmd.exe. - In «Add arguments», enter:
/c start "" program.exe <program arguments if required>. Substituteprogram.exewith the actual app path or built-in tool likeregedit.exe.
- Switch to the Conditions tab and uncheck the Stop if the computer switches to battery power and Start the task only if the computer is on AC power options.


Done. You can now test your task. Simply right-click it in the Task Scheduler library and select Run. The app of your choice will start elevated. Now, let’s create a shortcut for it to directly launch it.
Create a shortcut for your task
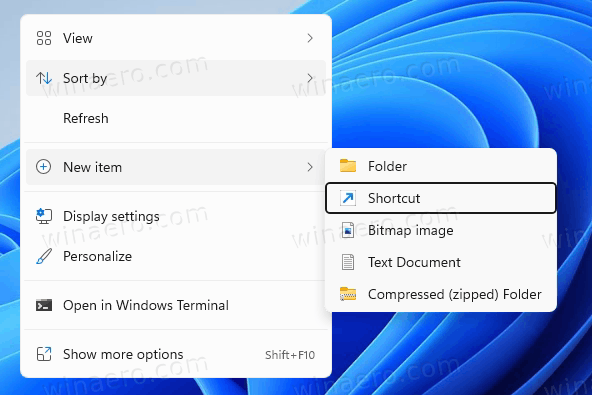
- Right-click the desktop background and select New item > Shortcut.

- Specify
schtasks /run /tn "your task name"in the location of the item box. For example,schtasks /run /tn "task_regedit".
- Customize the shortcut name and its icon.

- Now, double click on the shortcut. It will start the app elevated without a UAC request.

Finally, you can save your time and automate the task creation with Winaero Tweaker.
Using Winaero Tweaker
- Download and install Winaero Tweaker using this link.
- Go to Tools > Elevated Shortcut on the left.
- On the right, simply specify the path to your app, and set the desired name and folder location for your shortcut.

- Click on the Create Elevated Shortcut button and you are done.
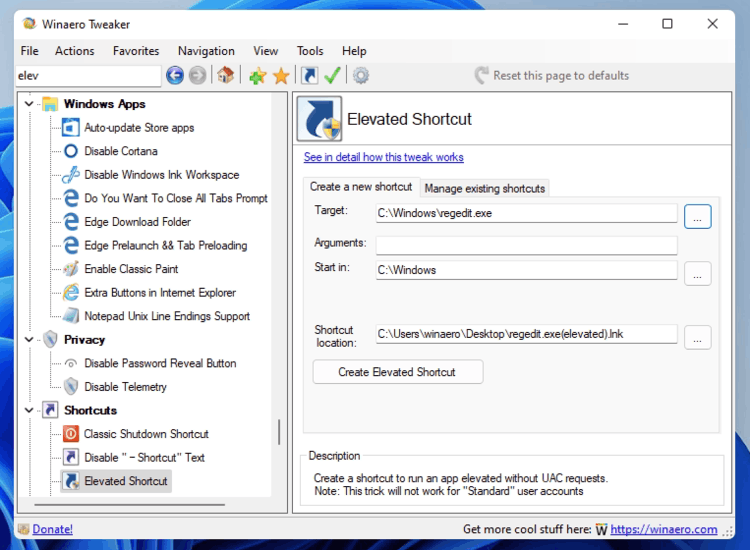
This is a convenient and fast method to create such a shortcut.
That is it.
Support us
Winaero greatly relies on your support. You can help the site keep bringing you interesting and useful content and software by using these options:
If you like this article, please share it using the buttons below. It won’t take a lot from you, but it will help us grow. Thanks for your support!
Статус администратора в Windows дает пользователю ряд прав и привилегий. И порой они могут понадобиться даже для решения банальных задач. Из нашего материала вы узнаете о том, как получить права администратора в Windows 11.
Получение статуса администратора обычным пользователем
По умолчанию администраторский статус получает та учетная запись Windows, которая была создана самой первой. Он дает доступ к ряду действий, недоступных простым пользователям. Однако и в обычном режиме без таких привилегий бывает не обойтись.
Меню «Параметры»
Это самый простой вариант решения вопроса подобного рода для ОС Windows.
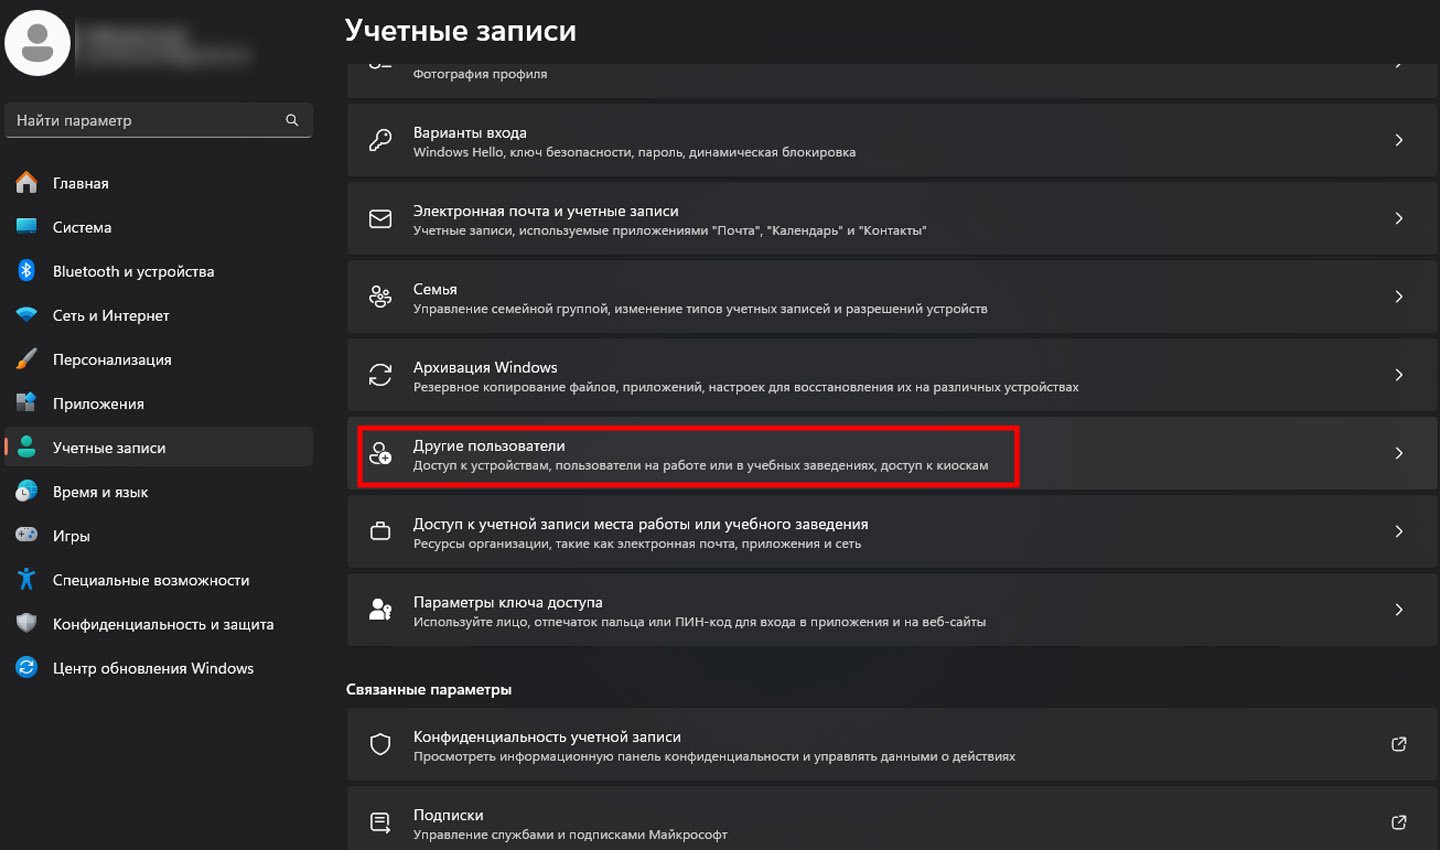
Источник скриншота: CQ / Учетные записи
Что нужно сделать:
- Зайти в текущий администраторский профиль;
- Открыть настройки системы. Выполнить это удобно с помощью выбора через «Пуск» либо через комбинацию Win+I;
- Зайти в «Учетные записи», а затем в окно «Другие пользователи»;
- Найдя имя нужного клиента, кликнуть на стрелке рядом, а после — на строку «Сменить тип учетной записи»;
- В соответствующем поле «Тип учетной записи» выбрать администратора и после принять изменения.
На этом процедура окончена. При очередном включении ПК ранее упомянутый пользователь будет располагать всеми возможностями статуса администратора. Как видно, вариант действительно быстрый, однако для его осуществления требуется доступ к учетной записи текущего админа.
Настройка с помощью «Панели управления»
Работать с учетными записями пользователей компьютера можно также и через «Панель управления системой».
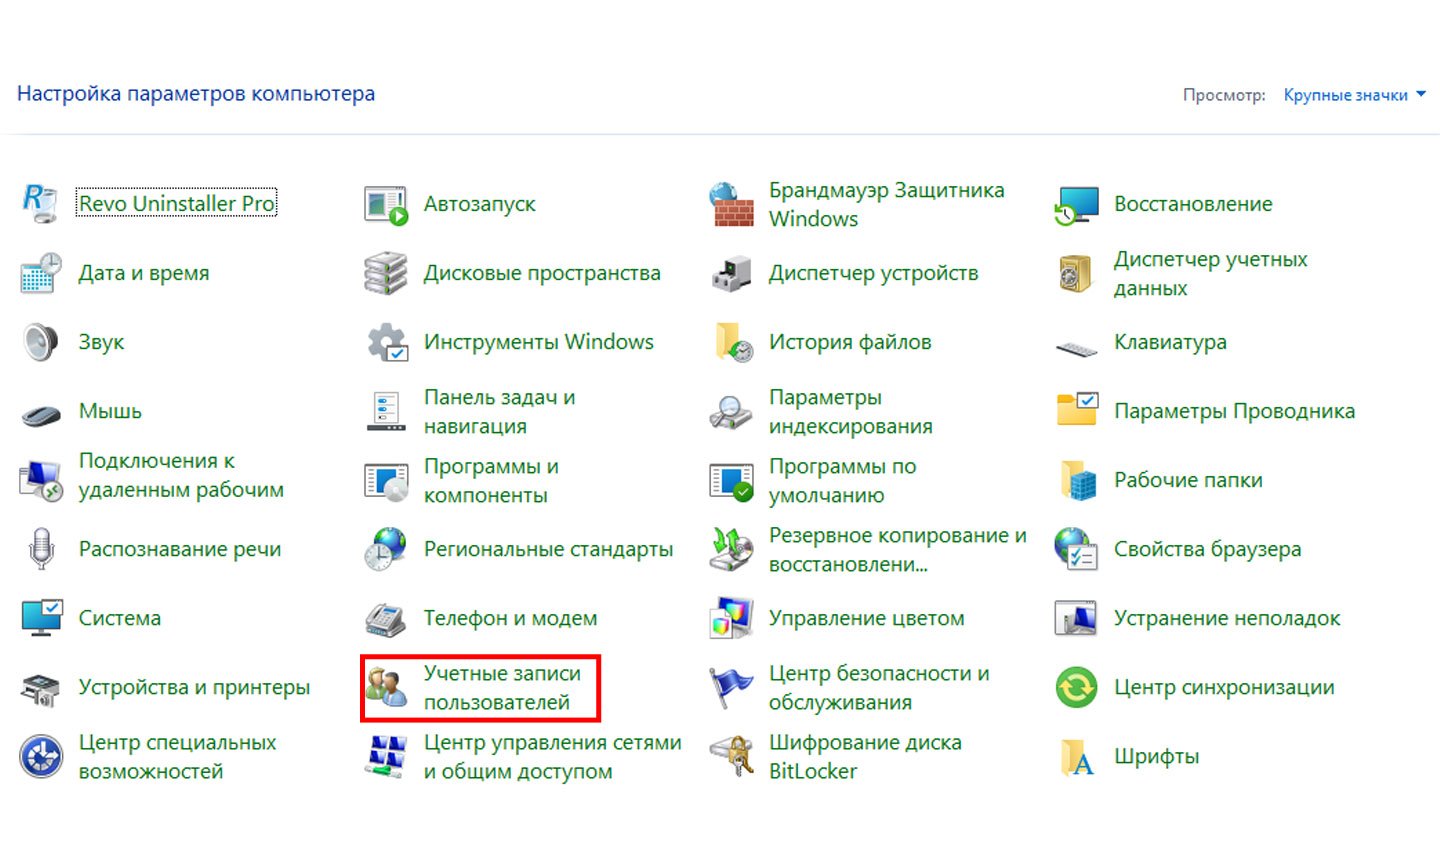
Источник скриншота: CQ / Панель управления
Как все выполнить:
- Зайти в нужное окно, используя «Поиск» в панели задач и там открыть нужное окно — «Учетные записи»;
- Там выбрать управление иными записями;
- Нажать мышкой на клиента, которому нужно изменить статус профиля, и затем изменить тип записи, кликнув на соответствующую строку;
- Останется только выбрать вариант администратора и согласиться со сделанным выбором.
Выбранный пользователь изменит свой статус уже при следующем включении компьютера.
Локальные пользователи и группы
Также несложный и быстрый способ, который поможет с решением проблем — «Локальные пользователи и группы».
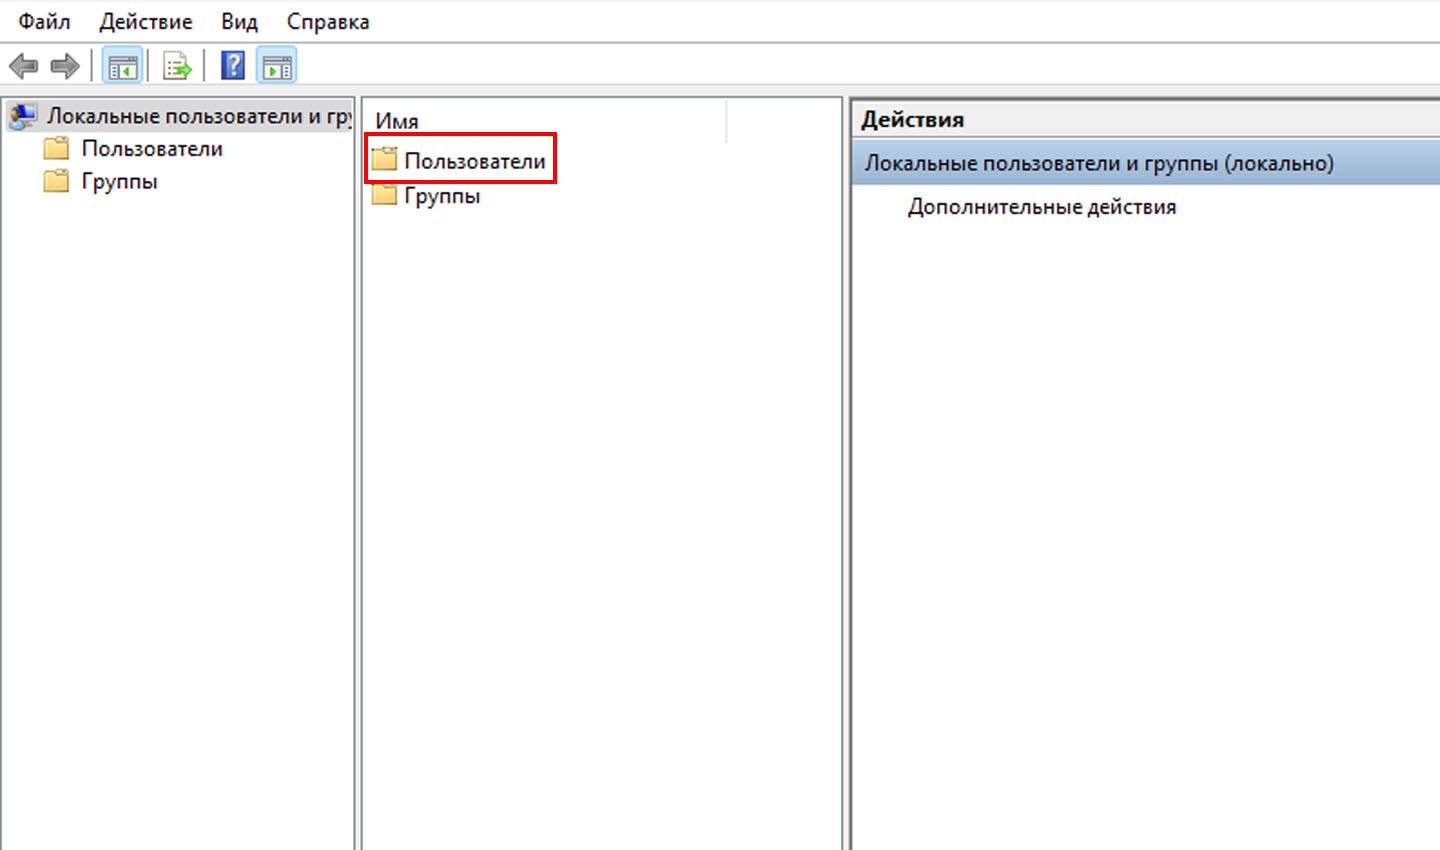
Источник скриншота: CQ / Локальные пользователи и группы
Что делать:
- Вызвать окно «Выполнить» с помощью комбинации Win+R, а также вписать команду lusrmgr.msc и подтвердить ее;
- В окошке «Пользователи» дважды нажать мышкой на нужное имя;
- В появившемся окне перейти в «Членство в группах» и там выбрать «Добавить»;
- Вписать «Администраторы» в поле ввода или же Administrators, если используемая версия Windows на английском языке;
- Нажать «Ок» и затем подтвердить изменения.
Статус администратора выбранный пользователь получит только после того, как войдет в систему в другой раз.
Использование командной строки
Еще один несложный способ — использование командной строки.
Как ее сделать все правильно:
- Активировать командную строку через поиск в панели задач либо другим удобным способом. Единственное условие — запуск должен осуществляться от имени администратора;
- Вписать команду net user и подтвердить, это позволит увидеть список всех пользователей на этом ПК, включая и системных;
- Далее вписать команду: net localgroup Администраторы пользователь /add;
- Останется указать имя нужного пользователя и кликнуть на Enter, чтобы передать нужному клиенту администраторские права.
Если команда вводится не в русскоязычной версии системы, в вышеупомянутой команде Администраторы нужно поменять на Administrators.
Похожим образом можно активировать для пользователя полноценный статус администратора при помощи терминала.
Источник скриншота: CQ / Терминал Windows
Что сделать для этого:
- Запустить Windows PowerShell. Для этого требуется кликнуть правой кнопкой мышки на «Пуск» и выбрать соответственный пункт всплывающего меню. Важно, что запускать терминал требуется именно от имени администратора;
- Чтобы получить перечень всех пользователей данного компьютера, нужно задействовать команду Get-LocalUser;
- Далее требуется ввести команду: Add-LocalGroupMember -Group «Администраторы» -Member «пользователь» и прописать имя пользователя, которому нужно сменить статус, и нажать на Enter;
- Если команда вводится не в русскоязычной версии системы, в вышеупомянутой команде «администраторы» нужно поменять на Administrators;
После этого указанный пользователь получит права администратора на данном компьютере.
Как быть, если нет доступа к нужным «учеткам» на ПК
В том случае, если нет доступа, придется задействовать окольные пути, чтобы нужный пользователь получил обновление статуса. Самый простой вариант — воспользоваться вспомогательными средствами. К примеру, WinPE 10-8. Файл нетрудно найти на сайте sergeistrelec.name или на других сторонних сайтах.
Каков алгоритм действий:
- Скачать указанный файл и использовать его, чтобы создать загрузочную флэшку. Сделать это можно, к примеру, с помощью Ventoy либо Rufus;
- Загрузить с этой флэшки ПК;
- Через «Пуск» перейти в «Программы WinPE», затем в «Сброс паролей» и там открыть Login Unlocker;
- Кликнуть правой кнопкой мышки по имени клиента, выбрать пункты Administrators и Add to group.
Все готово — пользователь получил нужные права.
Альтернативный вариант — использование O&O UserManager.
Что делать:
- Запустить программу и выбрать диск с текущей версией Windows;
- Два раза нажать мышкой в выпавшем списке на имя клиента, которого нужно сделать администратором;
- В окошке «Членство в группах» кликнуть на кнопку «Добавить». Таким образом, пользователя можно добавить в определенную группу;
- Выбрать пункт «Администраторы» и добавить с помощью стрелочки внизу;
- Останется только подтвердить решение добавить конкретного клиента в администраторскую группу.
Кроме того, можно активировать скрытую учетную запись «Администратор» , и уже с ее помощью выполнить нужные манипуляции. Чтобы выполнить активацию, в терминале, запущенном от имени администратора, нужно просто вписать команду net user Администратор /active:yes.
Заглавное фото: freepik