
В последнее время стали задавать довольно много вопросов по использованию Hashcat. Многие из этих вопросов являются элементарными и даже уже рассмотрены в русскоязычной документации. Тем не менее, из-за большого объёма документации новичкам не всегда просто в ней сориентироваться и найти ответ на свой вопрос.
В данной инструкции я выделил самые базовые шаги по использованию Hashcat и детально расписал основные режимы работы программы. Эта инструкция рассчитана на абсолютных новичков. Надеюсь, она уменьшит количество «детских» вопросов.
Как запустить и использовать hashcat (инструкция для взлома паролей)
Hashcat – это программа для взлома паролей, это мощный комбайн с большим количеством возможностей.
Тем не менее, это не самая простая в использовании программа – необходимо потратить время на её изучение. В данной инструкции раскрыты самые типичные ситуации работы с hashcat.
Будут рассмотрены как совсем «детские» вопросы, вроде того, «как запустить hashcat», так и довольно сложные, вроде правильного составления масок, пользовательских наборов символов, опции программы, решение проблем и прочее.
Особенностью hashcat является очень высокая скорость перебора паролей, которая достигается благодаря одновременному использованию всех видео карт, а также процессоров в системе. Возможна работа если установлено несколько видеокарт или карты разных производителей (например, AMD и NVIDIA).
Когда я кликаю на hashcat64.exe мелькает чёрное окно, а затем исчезает
Hashcat – это утилита командной строки. Т.е. у неё нет графического интерфейса в виде привычного окна. Поэтому пользователям Windows может показаться, что программа запускается необычным образом.
Для запуска программы необходимо открыть окно командной строки (либо PowerShell). Чтобы это сделать нажмите сочетание клавиш Win+x, и выберите Windows PowerShell:
Далее можно действовать двумя способами.
Первый вариант: можно просто перетащить исполнимый файл в окно командной строки. Исполнимым файлом является hashcat64.exe или hashcat32.exe в зависимости от вашей системы.
Второй вариант: в командной строке можно сменить текущую рабочую директорию на ту, где размещены исполнимые файлы hashcat. К примеру, у меня программа расположена в папке C:\Users\Alex\Downloads\hashcat-4.1.0\, чтобы сменить текущую рабочую папку используется команда cd, после которой указывается папка, в которую требуется перейти, в моём случае команда выглядет так:
cd C:\Users\Alex\Downloads\hashcat-4.1.0\

Как можно увидеть из скриншота, папка C:\WINDOWS\system32 изменена на C:\Users\Alex\Downloads\hashcat-4.1.0.
Теперь для запуска программы достаточно набрать имя исполнимого файла с указанием на текущую папку. Текущая папка обозначается точкой (.), затем необходимо поставить обратный слеш, получается так:
.\hashcat64.exe

Поскольку мы не ввели никаких опций, то ничего не происходит, только выводится краткая подсказка.
На протяжении всей инструкции мы будем запускать исполнимый файл hashcat с опциями. Простейшей опцией является -h, если написать её, то будет выведена справка по использованию программы:
.\hashcat64.exe -h

Скачать hashcat
Скачайте hashcat с официального сайта по ссылке: https://hashcat.net/hashcat/
Вы увидите:

На сайте присутствует hashcat binaries и hashcat sources. Первое – это бинарные (исполнимые) файлы, второе – это исходный код. Нам нужны бинарники, т.е. hashcat binaries.
Как установить hashcat
Как таковая установка hashcat не требуется, поскольку это портативная программа. Достаточно распаковать скаченный архив. Если у вас проблемы с распаковкой формата .7z, то используйте программу 7-Zip (архиватор с высокой степенью сжатия).
Для работы hashcat необходимо, чтобы были установлены свежие версии драйверов видеокарт.
Драйверы для hashcat
Примечание: Если у вас Linux, то инструкцию по установке OpenCL смотрите в статье «Как в Linux взламывать пароли видеокартой и центральным процессором».
Необходимы следующие драйвера для видеокарт:
- Видеокарты AMD на Windows требуют «AMD Radeon Adrenalin 2020 Edition» (20.2.2 или более поздняя версия)
- Intel CPUs требует «OpenCL Runtime for Intel Core and Intel Xeon Processors» (16.1.1 или более поздняя версия)
- Видеокарты NVIDIA требуют «NVIDIA Driver» (440.64 или более поздняя) и «CUDA Toolkit» (9.0 или более поздняя)
Скорее всего, драйверы для видеокарт AMD и NVIDIA в Windows у вас уже установлены, либо вы знаете как это сделать.
Поэтому я расскажу только об установке OpenCL Runtime и драйвера OpenCL.
OpenCL Runtime поставляется вместе с драйвером Windows, поэтому вам нужно скачать только один файл OpenCL Runtime for Intel Coreand Intel Xeon Processors for Windows, например, сейчас последней версией является: «OpenCL™ Runtime 16.1.2 for Intel® Core™ and Intel® Xeon® Processors for Windows* (64-bit & 32-bit)». Ранее они распологались на странице загрузки https://software.intel.com/en-us/articles/opencl-drivers#graph-win
Ранее Intel CPU Runtime for OpenCLApplications for Windows OS скачивался в одном файле вместе с графическим драйвером центрального процессора. Сейчас ситуация поменялась: графический драйвер процессора и CPU Runtime for OpenCLApplications разделены на два файла. Причём драйвер можно просто скачать с сайта, а для скачивания среды выполнения нужно регистрироваться на сайте Intel.
Чтобы скачать последнюю версию драйвера для CPU Intel перейдите на страницу драйверов и ПО, а затем выберите там Drivers. Например, если у вас версия Windows 10 и центральный процессор 6го, 7го, 8го, 9го поколений, Apollo Lake, Gemini Lake, Amber Lake или Whiskey Lake, тогда выберите опцию «Intel® Graphics — Windows® 10 DCH Drivers» (самая верхняя строка). Это самая последняя версия на момент написания 27.20.100.8190 Если у вас другая версия Windows или более старый процессор, то выберите соответствующий вариант загрузки. Скорее всего, придётся установить какую-то из версий 15.**
Чтобы скачать Intel® CPU Runtime for OpenCL™ Applications for Windows* OS, перейдите на эту страницу: https://registrationcenter.intel.com/en/products/download/3600/ (для доступа к файлу требуется регистрация).
Если ссылки станут неактуальными, то перейдите на эту страницу и попробуйте найти ссылки самостоятельно: https://software.intel.com/en-us/articles/opencl-drivers
Опции hashcat
Работа с программами в интерфейсе командной строки сильно отличается от работы в графическом пользовательском интерфейсе. В графическом интерфейсе мы нажимаем разные кнопки, передвигаем переключатели, ставим галочки и т.д. Ничего этого у программ с интерфейсом командной строки нет. Но при этом утилита командной строки может обладать даже большими возможностями, чем аналогичная программа с оконным интерфейсом. Чтобы можно было управлять функционалом консольных утилит, используются опции.
В выведенной справке вы наверняка заметили большое количество информации. Эта информация в большей части посвящена именно опциям.
Опции указываются после запускаемого файла через пробел. Некоторые опции требуют указания определённого значения. Некоторые используются без значений (такие опции ещё называют «флагами»).
Опции могут применяться по одной или сразу по несколько. С помощью опций можно очень точно настроить программу, использовать её на максимальных возможностях.
С одной опцией мы уже познакомились – это -h, которая выводит справку по программе, далее мы познакомимся с ещё большим количеством опций и их возможными значениями.
Следующей на очереди является опция -b.
Запуск бенчмарка hashcat
Опцией -b запускается бенчмарк hashcat. Этот бенчмарк меряет, с какой скоростью перебираются пароли.
Запуск бенчмарка пройдёт успешно только если драйвера установлены правильно и всё в порядке. Т.е. бенчмарк это ещё и способ сделать проверку системы и hashcat.
Чтобы запустить проверку скорости перебора по самым популярным алгоритмам в командной строке выполните:
.\hashcat64.exe -b

Для досрочной остановки нажмите CTRL+c. Этим сочетанием клавиш досрочно останавливаются все утилиты командной строки. Запомните эту комбинацию!
Скорость выводится для каждого устройства в отдельности, а также для всех устройств вместе взятых (запись Speed.Dev.#*).
Пример:
Hashmode: 2500 - WPA/WPA2 (Iterations: 4096)

Speed.Dev.#1.....:     5591 H/s (46.19ms) @ Accel:512 Loops:256 Thr:1 Vec:4
Speed.Dev.#2.....:    22374 H/s (69.23ms) @ Accel:128 Loops:32 Thr:256 Vec:1
Speed.Dev.#3.....:      171 H/s (1205.03ms) @ Accel:1024 Loops:128 Thr:1 Vec:4
Speed.Dev.#*.....:    28136 H/s
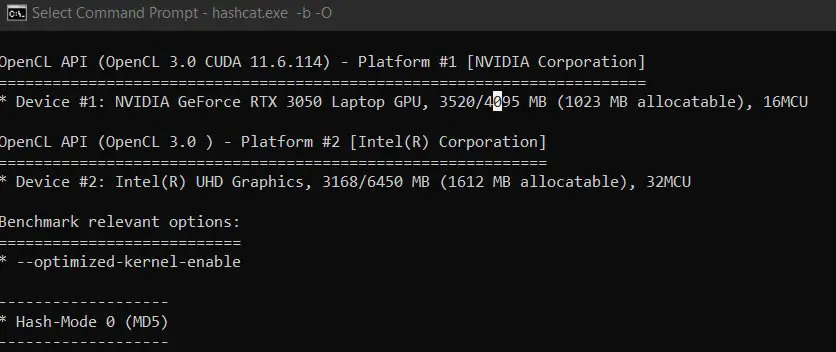
Какое именно устройство какой имеет номер написано в самом начале при запуске программы, например:
OpenCL Platform #1: Intel(R) Corporation
========================================
* Device #1: Intel(R) Core(TM) i7-3630QM CPU @ 2.40GHz, 4085/16342 MB allocatable, 8MCU

OpenCL Platform #2: Advanced Micro Devices, Inc.
================================================
* Device #2: Capeverde, 1523/2048 MB allocatable, 10MCU
* Device #3: Intel(R) Core(TM) i7-3630QM CPU @ 2.40GHz, 4085/16342 MB allocatable, 8MCU
Предупреждения и ошибки при запуске hashcat
Сразу при запуске бенчмарка могут начаться выводиться ошибки. К примеру:
* Device #3: Not a native Intel OpenCL runtime. Expect massive speed loss.
             You can use --force to override, but do not report related errors.
В ошибке сказано, что используется не родная среда выполнения OpenCL и ожидается значительное падение скорости. По этой причине устройства OpenCL будут пропущены (на скриншоте ниже это видно по слову skipped, т.е. пропущено). Если мы всё равно хотим их использовать, то нужно добавить опцию —force.

Запуск бенчмарка с двумя опциями:
.\hashcat64.exe -b --force
Если у вас всё равно пропущены некоторые устройства, то вы можете добавить ещё одну опцию -D. После этой опции нужно добавить цифру или цифры, обозначающие тип устройства:
  # | Типы устройств
 ===+=============
  1 | CPU
  2 | GPU
  3 | FPGA, DSP, Co-Processor
Обратите внимание на очень важную вещь – для опции используется заглавная буква. Регистр букв влияет на значение опции! Т.е. опция с буквой в другом регистре (большая вместо маленькой или маленькая вместо большой) может иметь совершенно другое значение, вплоть до противоположного.
Т.е. 1 – это центральные процессор, а 2 – это графический процессор, тогда полная команда вместе с выбором всех доступных у меня устройств будет выглядеть :
.\hashcat64.exe -b --force -D 1,2
clGetPlatformIDs(): CL_PLATFORM_NOT_FOUND_KHR
Ошибка
clGetPlatformIDs(): CL_PLATFORM_NOT_FOUND_KHR
возникает в том случае, если не найдено устройств, на которых может работать Hashcat. Если подходящие устройства имеются, значит всё дело в неправильных драйверах или в отсутствии драйверов.
Графический интерфейс hashcat
Для hashcat отсутствуют официальные графические интерфейсы. Тем не менее имеется несколько интерфейсов, которые были созданы энтузиастами. Самым актуальным является этот: https://hashkiller.io/downloads/
Для установки графического интерфейса hashcat скачайте архив со страницы, на которую выше дана ссылка.
Распакуйте скаченный архив, в него уже включены:
- hashcat-utils-1.0
- cap2hccap
Требования для работы графического интерфейса hashcat:
- только операционная система Windows
- dotNET Framework: v4
- hashcat версии 3.00 или более поздний
Hashcat вам нужно скачать отдельно, как это показано выше. Также у вас должны быть установлены необходимые драйверы.
После того, как вы распаковали Hashcat GUI и саму Hashcat, вам нужно папку с Hashcat переместить в папку с Hashcat GUI. Должна получиться примерно следующая структура папок:

Подсвечена папка с Hashcat – hashcat-4.1.0. Обратите внимание, что переименовывать каталог с хешкэт не нужно.
Для запуска программы дважды кликните файл HashcatGUI.exe. Посмотрите на графический интерфейс Hashcat:

На мой взгляд, он сложный. По моему субъективному ощущению, проще разобраться с опциями командной строки, чем с графическим интерфейсом в котором, между прочим, всё равно присутствуют не все функции.
Более того, без понимания концепций работы Hashcat, вряд ли вы что-то сможете сделать даже в графическом интерфейсе. Поэтому продолжайте чтение данной статьи, а к графическому интерфейсу мы вернёмся позже на страницах сайта HackWare.ru.
Как использовать hashcat
Запуск программы выполняется следующим образом:
hashcat [опции]... хеш|файл_хеша|файл_hccapx [словарь|маска|директория]...
Здесь под hashcat подразумевается имя исполнимого файла, в моих примерах это .\hashcat64.exe.
После имени исполнимого файла через пробел следуют опции, с которыми мы уже начали знакомство.
Символ | (труба) в данном случае означает логическое «ИЛИ». Т.е. после опций следует ИЛИ файл, ИЛИ файл с хешем, ИЛИ файл hccapx. А затем через пробел указывается ИЛИ словарь, ИЛИ маска, ИЛИ директория – в зависимости от выбранной атаки.
Рассмотрим использование программы на конкретных примерах. Допустим нам дан хеш 53ab0dff8ecc7d5a18b4416d00568f02, который нужно взломать. Об этом хеше известно, что он получен с помощью алгоритма хеширования MD5 (т.е. это MD5 хеш). Также известно, что зашифрованная строка состоит только из маленьких букв английского алфавита и имеет длину от шести до десяти символов.
Далее будет показано, как запускать атаку, используя разнообразные приёмы перебора паролей.
Указание типа хеша
Разные хеши вычисляются по различным алгоритмам. Аналогично и их взлом происходит по различным алгоритмам. Для того, чтобы правильно запустить атаку в Hashcat, необходимо указать тип атакуемого хеша. Для этого используется опция -m, после которой необходимо указать число, соответствующее выбранному типу хеша.
В исходных условиях нам дано, что предоставленный хеш является MD5. Значит на странице https://kali.tools/?p=3825 мы ищем «MD5»:

Напротив найденного хеша, смотрим столбец «#», т.е. номер. В нашем случае этот номер равен «0».
Значит, к команде запуска Hashcat необходимо добавить -m 0 — опция и её значение.
Если бы нам был дан хеш SHA1, то его номер бы был 100 и к команде запуска Hashcat мы бы добавили -m 100 и аналогично для любого другого алгоритма.
Обычно тип хеша известен исходя из источника, где этот хеш был получен. В случае, если достоверно неизвестен тип атакуемого хеша, его можно попытаться угадать с помощью специализированных инструментов, как это сделать описано в статье «Хеши: определение типа, подсчёт контрольных сумм, нестандартные и итерированные хеши».
Режимы атаки Hashcat
Hashcat поддерживает различные режимы атак, самыми распространёнными являются:
- атака по словарю, когда в качестве кандидатов в пароли используется список слов
- атака по маске (брут-форс, полный перебор), когда кандидаты в пароли генерируются исходя из описанных критериев.
Для указания режима атаки используется опция -a. С помощью неё можно указывать любой тип атаки, поддерживаемый в Hashcat, самыми популярными является атака по словарю – значение 0 – и атака по маске (брут-форс, полный перебор) – значение 3.
Т.е. если мы запускаем атаку по словарю, значит мы указываем -a 0, а если атаку по маске, то -a 3.
Атака по словарю в Hashcat
Запуск атаки по словарю происходит следующим образом:
hashcat [опции]... хеш|файл_хеша|файл_hccapx [путь_до_словаря]...
Чтобы взломать наш хеш, создайте небольшой словарик – обычный текстовый файл с именем dictionary.txt и скопируйте в него:
Примечание: кстати, с Hashcat поставляется пример словаря, он называется example.dict.
Итак, на данном этапе у нас имеется всё необходимое для запуска атаки по словарю. Собираем всё воедино:
.\hashcat64.exe -m 0 -a 0 53ab0dff8ecc7d5a18b4416d00568f02 dictionary.txt
Здесь:
- .\hashcat64.exe – исполнимый файл
- -m 0 – опция, устанавливающая тип хеша MD5
- -a 0 – опция, значение который запускает атаку по словарю
- 53ab0dff8ecc7d5a18b4416d00568f02 – хеш, который необходимо взломать
- dictionary.txt – путь до файла словаря.
Поскольку словарь очень маленький, то программа завершит свою работу очень быстро:

Результат работы программы:
53ab0dff8ecc7d5a18b4416d00568f02:hackware

Session..........: hashcat
Status...........: Cracked
Hash.Type........: MD5
Hash.Target......: 53ab0dff8ecc7d5a18b4416d00568f02
Time.Started.....: Mon Mar 05 07:23:25 2018 (0 secs)
Time.Estimated...: Mon Mar 05 07:23:25 2018 (0 secs)
Guess.Base.......: File (dictionary.txt)
Guess.Queue......: 1/1 (100.00%)
Speed.Dev.#1.....:    17783 H/s (0.04ms) @ Accel:1024 Loops:1 Thr:1 Vec:4
Speed.Dev.#2.....:        0 H/s (0.00ms) @ Accel:256 Loops:1 Thr:256 Vec:1
Speed.Dev.#3.....:    12530 H/s (0.03ms) @ Accel:1024 Loops:1 Thr:1 Vec:4
Speed.Dev.#*.....:    30313 H/s
Recovered........: 1/1 (100.00%) Digests, 1/1 (100.00%) Salts
Progress.........: 24/48 (50.00%)
Rejected.........: 0/24 (0.00%)
Restore.Point....: 0/48 (0.00%)
Candidates.#1....: aaaaaaaaaa -> dancing2009
Candidates.#2....: [Copying]
Candidates.#3....: danciotu -> hackware
HWMon.Dev.#1.....: N/A
HWMon.Dev.#2.....: Util: 37% Core: 800MHz Mem:1000MHz Bus:16
HWMon.Dev.#3.....: N/A
Первая строка 53ab0dff8ecc7d5a18b4416d00568f02:hackware содержит атакуемый хеш и после двоеточия взломанный пароль – в данном случае это hackware.
Об успешном взлома говорит строка Status………..: Cracked
Хеш необязательно указывать в строке команды – он может быть записан в файл, тогда при запуске взлома указывается путь до файла, содержащего хеш. Например, создадим файл hashmd5.txt и скопируем в него 53ab0dff8ecc7d5a18b4416d00568f02.
Тогда запускаемая команда будет такой:
.\hashcat64.exe -m 0 -a 0 hashmd5.txt dictionary.txt
Команда содержит те же опции, что и предыдущая, только вместо непосредственно хеша, мы указали путь до файла, содержащего взламываемый хеш.
Примечание: поскольку в учебных целях мы взламываем один и тот же хеш разными способами, то в случае если вы повторяете примеры, вы увидите сообщение:
INFO: All hashes found in potfile! Use --show to display them.
Оно означает, что хеш, который вы пытаетесь взломать, уже был взломан ранее. Все взломанные хеши храняться в файле hashcat.potfile в той же директории, что и Hashcat. Это обычный текстовый файл, его можно открыть и посмотреть содержимое, в моём случае это:
53ab0dff8ecc7d5a18b4416d00568f02:hackware
Этот файл можно удалить, чтобы запускать заново атаку на один и тот же хеш различными способами.
Также имеется опция —show, после которой нужно указать интересующий хеш:
.\hashcat64.exe --show 53ab0dff8ecc7d5a18b4416d00568f02
и если он найден в файле hashcat.potfile, то будет выведена информация о взломанном пароле.
Атака по маске в Hashcat (полный перебор, брут-форс)
В Hashcat нет такого режима как брут-форс – полного перебора паролей. Его поглатил режим «атака по маске». Это более гибкий тип атаки, который позволяет как реализовать полный перебор, так и перебор по тонко настроенным критериям.
В общем виде атака по маске имеет следующий вид:
hashcat [опции]... хеш|файл_хеша|файл_hccapx [маска]...
Т.е. она аналогична предыдущей, но вместо словаря указывается маска.
Как составлять маски в Hashcat
Для составления масок используются наборы символов. Наборы символов в Hashcat бывают двух видов:
- встроенные наборы символов
- пользовательские наборы символов
Начнём с разбора встроенных наборов символов, т.к. для многих ситуаций их бывает достаточно.
В Hashcat встроенными наборами символов являются:
  ? | Набор символов
 ===+=========
  l | abcdefghijklmnopqrstuvwxyz
  u | ABCDEFGHIJKLMNOPQRSTUVWXYZ
  d | 0123456789
  h | 0123456789abcdef
  H | 0123456789ABCDEF
  s |  !"#$%&'()*+,-./:;<=>?@[\]^_`{|}~
  a | ?l?u?d?s
  b | 0x00 - 0xff
Первая колонка означает условное обозначение набора символов. Для использования в масках, перед данным обозначением необходимо поставить знак вопроса. Например, ?u означает все заглавные буквы, ?d – все цифры.
Допустим, нам известно, что пароль состоит из четырёх символов, первыми двумя символами являются прописные буквы, а третьим и четвёртым символами являются цифры, тогда маска будет следующая:
?l?l?h?h
Чтобы взломать пароль из нашего хеша, данного в качестве примера, необходимо составить маску, состоящую из восьми символов, каждый из которых является маленькой буквой. Это маска: ?l?l?l?l?l?l?l?l
.\hashcat64.exe -m 0 -a 3 53ab0dff8ecc7d5a18b4416d00568f02 ?l?l?l?l?l?l?l?l
Здесь:
- .\hashcat64.exe – исполнимый файл
- -m 0 – опция, устанавливающая тип хеша MD5
- -a 3 – опция, значение который запускает атаку по маске
- 53ab0dff8ecc7d5a18b4416d00568f02 – хеш, который необходимо взломать
- ?l?l?l?l?l?l?l?l – маска, которая задаёт генерацию паролей длиной в восемь символов, состоящих из маленьких букв.
Менее чем через минуту пароль успешно взломан:

Обратите внимание на строку:
Progress.........: 15724838912/208827064576 (7.53%)
Т.е. было перебрано 15724838912 вариантов паролей из 208827064576 общего количества вариантов.
Маска при неизвестной длине пароля
Не всегда точно известна длина пароля. Даже по условию нашей задачи пароль имеет длину от шести до десяти символов.
Для того, чтобы генерировались пароли различной длины, имеются следующие опции:
- -i — Включить режим приращения маски
- —increment-min | Числ | Начать прирост маски на X, пример использования: —increment-min=4
- —increment-max | Числ | Остановить прирост маски на X, пример использования: —increment-max=8
Опция -i является необязательной. Если она используется, то это означает, что длина кандидатов в пароли не должна быть фиксированной, она должна увеличиваться по количеству символов.
Опция —increment-min также является необязательной. Она определяет минимальную длину кандидатов в пароли. Если используется опция -i, то значением —increment-min по умолчанию является 1.
И опция —increment-max является необязательной. Она определяет максимальную длину кандидатов в пароли. Если указана опция -i, но пропущена опция —increment-max, то её значением по умолчанию является длина маски.
Правила использования опций приращения маски:
- перед использованием —increment-min и —increment-max необходимо указать опцию -i
- значение опции —increment-min может быть меньшим или равным значению опции —increment-max, но не может превышать его
- длина маски может быть большей по числу символов или равной числу символов, установленной опцией —increment-max, НО длина маски не может быть меньше длины символов, установленной —increment-max.
Итак, скорректируем команду запуска для нашей задачи (пароль имеет длину от шести до десяти символов):
.\hashcat64.exe -m 0 -a 3 -i --increment-min=6 --increment-max=10 53ab0dff8ecc7d5a18b4416d00568f02 ?l?l?l?l?l?l?l?l?l?l
Эта команда аналогична предыдущей, но здесь добавлены три новые опции (которые объяснены чуть выше):
- -i
- —increment-min=6
- —increment-max=10
А также увеличена длина маски до 10 символов: ?l?l?l?l?l?l?l?l?l?l (как это требуют правила использования опций приращения).
На перебор понадобилось чуть больше времени, поскольку дополнительно были опробованы кандидаты в пароли длиной 6 (+1 секунда на моём железе) и 7 символов (+22 секунды):

Обратите внимание на новое значение строки Status:
Status...........: Exhausted
Оно означает, что перебраны все кандидаты в пароли, но ни один из них не подошёл.
Взлом пароля, когда известны некоторые символы
Бывают ситуации, когда известны некоторые из символов пароля. Например, нам дан тот же самый хеш 53ab0dff8ecc7d5a18b4416d00568f02 и каким-то образом нам стало известно, что первыми тремя символами в пароле являются «hac». Тогда эти символы можно указать прямо в маске:
hac?l?l?l?l?l?l?l
Получается команда:
.\hashcat64.exe -m 0 -a 3 -i --increment-min=6 --increment-max=10 53ab0dff8ecc7d5a18b4416d00568f02 hac?l?l?l?l?l?l?l
Известные символы могут находится в любом месте маски – в начале, середине, конце; это могут быть одиночные символы или группы символов.
Пользовательские наборы символов Hashcat
Выше уже перечислены встроенные наборы символов, которых обычно бывает достаточно. Тем не менее, вы можете задать до четырёх своих собственных, пользовательских наборов.
Предположим, нам известно, что первыми тремя символами в пароле являются цифры, причём не все, а только цифры от 0 до 4, четвёртым символом являются только большие буквы, а пятым и шестым символом являются буквы от a до h, а также цифры от 5 до 9.
Если в маске для первых трёх символов мы укажем просто цифры, то будут перебраны также заведомо не подходящие кандидаты в пароли – содержащие в первых трёх позициях цифры, не входящие в диапазон от 0 до 4. Нужно стараться всячески исключить заведомо неподходящие пароли. Это можно сделать с помощью пользовательских наборов символов.
Всего доступно четыре пользовательских набора символов. Они задаются в опциях и обозначаются цифрами. Но в опциях перед цифрой ставится дефис (например, первый пользовательский набор -1), а в маске перед цифрой ставится знак вопроса (например, использование символов из первого пользовательского набора ?1).
Итак, для решения поставленной задачи начинаем с того, что в опциях задаём необходимое количество пользовательских набора. Эти наборы могут состоять из непосредственно перечисленных символов, также можно использовать встроенные наборы символов, например ?l или ?d или ?u (в любых комбинациях).
Первый пользовательский набор символов для нашей задачи (только цифры от 0 до 4):
-1 01234
Второй пользовательский набор символов (буквы от a до h, а также цифры от 5 до 9)
-2 abcdefgh56789
Напомню – пользовательские наборы символов пишутся среди опций (т.е. до маски и до хеша).
Теперь создаём маску (первыми тремя символами в пароле являются цифры, причём не все, а только цифры от 0 до 4, четвёртым символом являются только большие буквы, а пятым и шестым символом являются буквы от a до h, а также цифры от 5 до 9):
?1?1?1?u?2?2
Разберём маску – первые три символа обозначены как ?1?1?1 (это единички, а не маленькая буква эль) – это символы из первого пользовательского набора. Далее идёт ?u – это встроенные набор символов, обозначающий только заглавные буквы. Последующие два символа обозначены как ?2?2 – это символы из второго пользовательского набора.
При указании пользовательских наборов можно использовать обозначения встроенных наборов символов, например:
-1 ?l?u
обозначает первый пользовательский набор, состоящий только из больших и маленьких латинских букв.
А
-1 ?l?u?d
означает первый пользовательский набор, состоящий только из больших и маленьких латинских букв, а также цифр.
Как уже было показано выше, в маске можно использовать пользовательские и встроенные наборы символов в любых комбинациях.
Как показать пароли (создать словарь) в Hashcat без запуска взлома
После создания сложных масок, особенно с использованием пользовательских наборов символов, хочется проверить, всё ли правильно мы сделали. Также, благодаря гибкости синтаксиса Hashcat её удобно использовать для генерации словарей по любым критериям.
Для того, чтобы только показать пароли без запуска взлома, используется опция —stdout. Эта опция требует -a 3 (режим атаки по маске). Поскольку взлом в этом случае не запускается, то не нужно указывать какие-либо хеши.
Пример генерации паролей для рассмотренной чуть выше задачи (известно, что первыми тремя символами в пароле являются цифры, причём не все, а только цифры от 0 до 4, четвёртым символом являются только большие буквы, а пятым и шестым символом являются буквы от a до h, а также цифры от 5 до 9):
.\hashcat64.exe --stdout -a 3 -1 01234 -2 abcdefgh56789 ?1?1?1?u?2?2
Поскольку паролей будет создано много (более полумиллиона), то вместо отображения на экране, их можно сохранить в файл. Для этого после основной команды нужно поставить символ > (означает перенаправление вывода в файл) и написать имя файла. Например, для сохранения всех паролей в файл lab1.dic, который будет создан в той же папке, где размещён исполнимый файл hashcat64.exe:
.\hashcat64.exe --stdout -a 3 -1 01234 -2 abcdefgh56789 ?1?1?1?u?2?2 > lab1.dic
Как составить маску, если о пароле ничего не известно
Если неизвестно, какие символы присутствуют в пароле, а также какая его длина, приходится перебирать все возможные варианты.
Условно можно выделить три допущения:
- В пароле могут быть любые цифры, а также большие и маленькие буквы.
- В пароле могут быть любые цифры, большие и маленькие буквы, а также другие символы (точки, тире, запятые, кавычки, пробелы, знаки процента, решётки и т.д.)
- В пароле могут быть любые цифры, большие и маленькие буквы, другие символы (точки, тире, запятые, кавычки, пробелы, знаки процента, решётки и т. д.), а также буквы национальных алфавитов (кириллица, иероглифы и т.д.)
В чём проблема задать искать пароль сразу по всем символам? Обратимся к формуле количества возможных комбинаций:
количество символов(длина пароля)
То есть количество возможных символов в пароле в степени числа, которое является длиной пароля. Причём если мы не знаем длину, то необходимо перебрать:
количество символов1 + количество символов2 + количество символов3 + количество символов4 + количество символов5 + …
То есть нужно перебрать все пароли длиной в один символ, затем все пароли длиной в два символа и так далее.
На практике для многих алгоритмов взлома это означает невозможность подобрать пароль за разумный срок.
Поэтому если нет никаких представлений о пароле, то, пожалуй, можно начать с атаки по словарю. Она может оказаться эффективнее, чем ожидание в миллиарды лет полного перебора паролей.
Тем не менее, если нужно запустить полный перебор, когда в пароле могут быть большие и маленькие латинские буквы, а также цифры и длина пароля от 1 до 12, то нужно использовать следующие опции и маску:
-i --increment-min=1 --increment-max=12 -1 ?l?u?d ?1?1?1?1?1?1?1?1?1?1?1?1
Чтобы вывести все кандидаты в пароли или сохранить их в словарь:
hashcat --stdout -a 3 -i --increment-min=1 --increment-max=12 -1 ?l?u?d ?1?1?1?1?1?1?1?1?1?1?1?1
Если нужно запустить полный перебор, когда в пароле могут быть большие и маленькие латинские буквы, цифры, а также символы !»#$%&'()*+,-./:;<=>?@[\]^_`{|}~ и длина пароля от 1 до 12, то нужно использовать следующие опции и маску:
-i --increment-min=1 --increment-max=12 ?a?a?a?a?a?a?a?a?a?a?a?a
Чтобы вывести все кандидаты в пароли или сохранить их в словарь:
hashcat --stdout -a 3 -i --increment-min=1 --increment-max=12 ?a?a?a?a?a?a?a?a?a?a?a?a
Образцы хешей
В программу Hashcat встроена не только справка, но и примеры хешей. Они могут быть полезными, если у вас трудности с правильным написанием формата хешей.
Чтобы вывести сразу все примеры хешей, запустите программу с опцией —example-hashes:
.\hashcat64.exe --example-hashes
Можно посмотреть образец одного определённого хеша. К примеру, мне нужно узнать, как выглядит хеш для взлома пароля архива RAR5; тогда я перехожу на страницу справки программы https://kali.tools/?p=578 и ищу RAR5 (используйте CTRL+f). Нахожу, что номер данного хеша 13000; далее я запускаю программу с опцией —example-hashes и уже известной нам опцией -m (после которой указывается номер режима хеша)
.\hashcat64.exe --example-hashes -m 13000

Итак, для взлома паролей от архивов RAR5 хеш должен иметь вид:
$rar5$16$38466361001011015181344360681307$15$00000000000000000000000000000000$8$cc7a30583e62676a
Дополнительный материал для изучения Hashcat
В данной статье рассмотрены самые базовые концепции по работе с Hashcat, без понимания которых вряд ли получится запустить взлом пароля.
Для продолжения знакомства с программой рекомендуется к прочтению:
- Опции Hashcat на русском языке
- Статья «Взлом рукопожатий (handshake) с использованием графического процессора в Windows»
- Инструкция «Взлом паролей MS Office, PDF, 7-Zip, RAR, TrueCrypt, Bitcoin/Litecoin wallet.dat, htpasswd в Hashcat»
- Книга «Продвинутый взлом паролей с Hashcat» на русском языке»
- Инструкция «Как в hashcat продолжить перебор с места остановки (сессии hashcat)»
- Как конвертировать рукопожатие (хендшейк) в новый формат Hashcat. Решение проблемы «Old hccap file format detected! You need to update»
Связанные статьи:
- Взлом сетевой аутентификации Windows (92.5%)
- Взлом рукопожатий (handshake) с использованием графического процессора в Windows (91.1%)
- Как взломать пароль Windows (89.4%)
- Взлом паролей MS Office, PDF, 7-Zip, RAR, TrueCrypt, Bitcoin/Litecoin wallet.dat, htpasswd в oclHashcat (86.4%)
- Базовое и продвинутое использование oclHashcat (Hashcat) для взлома WPA/WPA2 паролей из хендшейков (86.4%)
- Аудит безопасности SMB и Samba (RANDOM — 15.2%)
Hashcat is my favorite password cracker. You can use it on any operating system or distribution, but it’s often easier to use Windows to avoid drivers issues (especially with a recent GPU). Anyway, I will explain how to install it on Windows in this tutorial.
Hashcat is officially supported on Windows, binaries files can be downloaded on the official website directly. Once the files extracted, Hashcat can be used directly in the command prompt, there is no installation required.
If you are new to this, it might not be obvious to you, but don’t worry, I’ll explain everything in this step-by-step tutorial.

Master Linux Commands
Your essential Linux handbook
Want to level up your Linux skills? Here is the perfect solution to become efficient on Linux. 20% off today!
Download now
Hide your IP address and location with a free VPN:
Try it for free now, with advanced security features.
2900+ servers in 65 countries. It’s free. Forever.
Here are the required steps to install Hashcat on Windows:
- Download the latest Hashcat version from the official website.
- Extract the files on your computer.
- Open a command prompt and run hashcat in command line.
I will now explain each step in details.
Download Hashcat
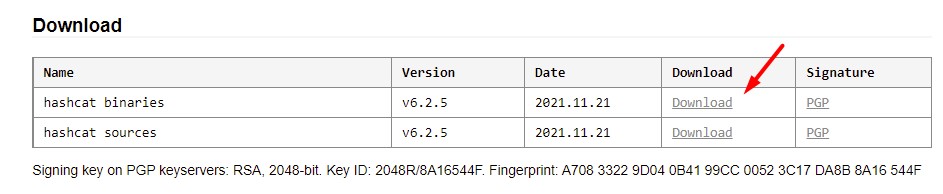
The first step is to download the latest Hashcat version. It’s available on their official website:
- Go to the Hashcat website homepage.
- Find the binaries and click on “Download” to get the archive on your computer.

The file is an archive, so the next step will be to extract the files before using them.
Extract the files
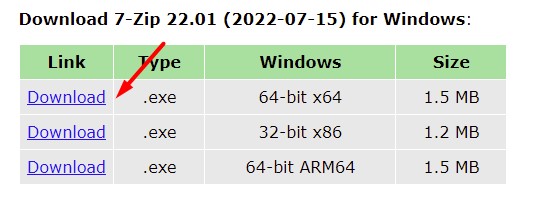
The files are compressed with 7zip. If you can’t open the archive, you might need to install it first:
- Go to the 7zip website.
- Download the file corresponding to your operating system (the first link should be fine if your computer is recent, or use the 32-bit version if you have any doubt).

- Once downloaded, double-click on the file to install 7zip on your computer.
Follow the installation wizard, keep the default options.
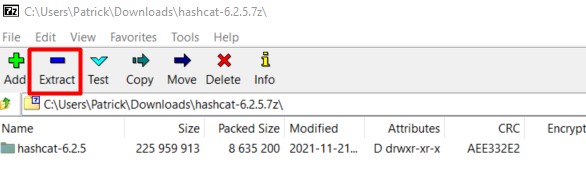
Once done, you should be able to open the Hashcat archive and extract the files.
Click on the “Extract” button in the top bar:
I recommend choosing a different path for the extract location. I don’t know you, but in my case, I tend to delete everything in the “Downloads” folder from time to time, and if I keep hashcat there, I will need to reinstall it eventually.
So, for the example, I’m extracting the files to C:\hashcat, but you can put them wherever you want:
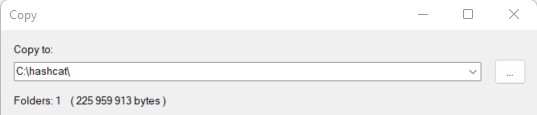
Remember the files location, as you’ll have to go to this path on the next step.
Run Hashcat for the first time
We are almost done, we’ll just make sure everything is working as expected:
This command will run a benchmark of your system, telling you the decryption rate you can expect on this computer, but also showing errors if there is something misconfigured on your system (like missing GPU drivers).
How to use Hashcat on Windows
If the benchmark command is working correctly, you can now use Hashcat on your Windows computer with the same commands as on Linux. It’s the same thing.
I already have several tutorials on this topic on the website, so I won’t repeat myself here, but if you need further assistance, feel free to read these tutorials:
- Is MD5 Easy to Crack? (and how long does it really takes)
- How to Brute Force a Password? (MD5 Hash)
- How to Install and Use Hashcat to Decrypt MD5? (Tutorial)
Hashcat FAQ
Is there a GUI for Hashcat?
Hashcat doesn’t include a graphic interface by default, but a few projects exist with the goal to add an interface to it, like the hashcat GUI toolkit (Windows interface) or Crackerjack (web interface).
Is Hashcat cross-platform?
Hashcat can run on most operating systems (Linux, Windows and macOS). The installation is slightly different on each system, but the command usage is the same on all platforms.
You can find my guide on how to install Hashcat on Ubuntu there.
How to install OpenCL on Windows?
Running hashcat on Windows require the latest drivers for your OpenCL device (your GPU). AMD and Nvidia official drivers include OpenCL by default, and for Intel GPU you have to install an additional package (link here).
If you experience any issue, make sure you installed the latest version of your graphic card driver, downloading it from the official website.
Installing this on Linux could be a nightmare with some distributions and hardware, but on Windows it’s pretty straightforward (in theory).
Hi, my name is Patrick, I’m a web developer and network administrator. I have always been interested in security, and I created this website to share my findings with you.
In today’s digital age, the protection of sensitive information is of utmost importance. Whether it’s guarding our personal data or securing our online accounts, passwords play a vital role in safeguarding our digital lives. But have you ever wondered how secure your passwords really are? Welcome to “Unlocking the Power of Password Cracking:
A Step-by-Step Guide to Installing Hashcat on Windows.” In this comprehensive guide, we will take you through the fascinating world of password cracking and introduce you to Hashcat, a powerful tool used by ethical hackers and security professionals to test the strength of passwords.
Whether you’re a curious tech enthusiast wanting to enhance your knowledge or an aspiring cybersecurity professional looking to sharpen your skills. This guide will provide you with the essential knowledge and step-by-step instructions to get started with Hashcat on Windows. Get ready to delve into the world of password cracking and unlock the secrets to stronger digital security!
Complete Guide to Using Mask Attack With Hashcat
Understanding Hash Functions and Encryption
To comprehend the fundamentals of password cracking, it’s crucial to understand the concept of hash functions and encryption. A hash function is a mathematical algorithm that takes an input (in this case, a password) and generates a fixed-size string of characters, known as the hash value or hash code.
This process is irreversible, meaning you cannot derive the original password from the hash value alone. Encryption, on the other hand, involves transforming data into an unreadable format using an encryption key. Hash functions and encryption are essential components of password security, as they ensure that passwords are not stored in plain text.
However, with the advancement in computing power, traditional hashing algorithms have become vulnerable to various hacking techniques. One of the most prevalent methods used by ethical hackers and security professionals to assess password strength is password cracking. Password cracking involves attempting to guess or discover passwords by systematically testing all possible combinations or using precomputed tables of password hashes.
Hashcat, the subject of this guide, is a powerful password cracking tool that utilizes the computing power of modern GPUs to accelerate the cracking process. By understanding the inner workings of hash functions and encryption, you’ll be better equipped to grasp the significance of tools like Hashcat in evaluating the security of passwords.
What is Hashcat?
Hashcat is an open-source, advanced password recovery tool used for password cracking. Developed by Jens “Atom” Steube, Hashcat is renowned for its speed and versatility in cracking a wide range of hash types, including MD5, SHA-1, NTLM, and many others.
It leverages the power of modern GPUs to achieve unparalleled processing speeds, making it a go-to tool for security professionals and researchers. Hashcat supports various attack modes, including dictionary attacks, mask attacks, hybrid attacks, and rule-based attacks, providing flexibility and customization options to suit different cracking scenarios. Whether you’re testing the strength of passwords for an organization or conducting research on password security, Hashcat is a valuable tool in your arsenal.
Benefits of Using Hashcat for Password Cracking
Using Hashcat for password cracking offers several advantages over other password recovery tools. Firstly, Hashcat is highly optimized for GPU acceleration, allowing it to perform password cracking at lightning-fast speeds. Modern GPUs have thousands of cores, which Hashcat harnesses to perform parallel processing, significantly reducing the time required for cracking passwords compared to CPU-based approaches. Additionally, Hashcat supports distributed cracking, enabling multiple systems to work together in a coordinated manner, further enhancing cracking speed and efficiency.
Another notable benefit of Hashcat is its extensive hash type support. It can crack a wide range of hash algorithms commonly used in various operating systems, databases, and applications. This versatility makes Hashcat a valuable tool for assessing password security in diverse environments. Moreover, Hashcat allows for highly customizable attack modes, enabling users to tailor their cracking strategies based on specific requirements. From dictionary attacks to rule-based attacks that apply transformation rules to wordlists, Hashcat provides flexibility to adapt to different cracking scenarios.
System Requirements for Installing Hashcat on Windows
Before diving into the installation process, it’s essential to ensure that your system meets the necessary requirements for running Hashcat. Since Hashcat leverages GPU acceleration, having a compatible GPU is crucial. Ideally, you should have a modern NVIDIA or AMD GPU with CUDA or OpenCL support. Hashcat’s performance varies depending on the GPU model, so it’s recommended to use a high-end GPU for optimal cracking speed. Additionally, you’ll need a Windows operating system (Windows 7 or later) and the latest GPU drivers installed.
Apart from the hardware requirements, you’ll also need to have the appropriate software dependencies installed. Hashcat relies on a few libraries, namely, OpenCL runtime, OpenSSL, and zlib. These libraries are typically bundled with the GPU drivers, but you may need to install them separately if required. Ensuring that your system meets these requirements will pave the way for a smooth installation and usage of Hashcat on Windows.
Now that we have a solid understanding of the concepts and benefits of using Hashcat, let’s walk through the step-by-step process of installing Hashcat on a Windows system. Follow these instructions carefully to set up Hashcat and get ready for password cracking.
1. Download Hashcat: Visit the official Hashcat website (https://hashcat.net/hashcat/) and download the latest version of Hashcat for Windows. Choose the appropriate binary package based on your system architecture (32-bit or 64-bit).

2. Extract the Hashcat Archive: Once the download is complete, extract the contents of the Hashcat archive to a location of your choice. You can use a file archiving utility like 7-Zip to extract the files.
3. Install GPU Drivers: Ensure that you have the latest GPU drivers installed on your system. Visit the respective GPU manufacturer’s website (NVIDIA or AMD) to download and install the latest drivers compatible with your GPU model.
4. Open a Command Prompt: Press `Win + R` to open the Run dialog box, type `cmd`, and press Enter. This will launch the Command Prompt.
5. Navigate to the Hashcat Directory: In the Command Prompt, navigate to the directory where you extracted the Hashcat files using the `cd` command. For example, if you extracted the files to the `C:\Hashcat` directory, you would use the command `cd C:\Hashcat`.
6. Test Hashcat Installation: To verify that Hashcat is installed correctly, run the command `hashcat --version`. If Hashcat is installed properly, you should see the version information displayed in the Command Prompt.
Congratulations! You have successfully installed Hashcat on your Windows system. Now that Hashcat is up and running, let’s explore some additional configurations and techniques to maximize its performance and effectiveness.
Configuring Hashcat for Optimal Performance
While Hashcat works out of the box, tweaking certain configurations can enhance its performance and improve the chances of cracking passwords. Here are a few key configurations to consider:
1. **Choosing the Right Attack Mode**: Hashcat supports various attack modes, each with its own strengths and weaknesses. Depending on the nature of the passwords you’re cracking and the available information, you can select the most suitable attack mode. For example, dictionary attacks are effective when you have a list of potential passwords, while mask attacks are useful when you have knowledge about the password pattern.
2. **Optimizing Workload Distribution**: Hashcat allows you to distribute the workload across multiple GPUs or systems, improving cracking speed and efficiency. By utilizing distributed computing, you can harness the power of multiple GPUs or systems working in parallel.
3. **Fine-Tuning Rule-Based Attacks**: Rule-based attacks in Hashcat involve applying transformation rules to wordlists to generate variations of potential passwords. These rules can significantly increase the chances of cracking passwords by generating permutations based on common patterns. Experimenting with different rule sets and combinations can yield better results in cracking passwords.
By understanding and configuring these aspects of Hashcat, you can maximize its potential and achieve faster and more accurate password cracking results.
Generating and Using Wordlists for Password Cracking
Wordlists are a crucial component of password cracking, as they form the basis for dictionary attacks and rule-based attacks. A wordlist is essentially a text file containing a list of potential passwords that Hashcat will attempt to crack. While Hashcat comes with a default wordlist, creating custom wordlists tailored to the target environment can significantly improve cracking success rates. Here are a few methods for generating and using wordlists in Hashcat:
1. Using Prebuilt Wordlists:
Numerous prebuilt wordlists are available online, covering various categories such as common passwords, leaked passwords, and specific terms related to industries or interests. These wordlists can be used directly with Hashcat or serve as a starting point for further customization.
2. Customizing Wordlists:
Customizing wordlists involves tailoring them to the target environment or specific scenarios. This can be done by adding domain-specific terms, personal information, or relevant keywords that might be used in passwords. Combining prebuilt wordlists and customizing them can enhance the chances of cracking passwords in specific contexts.
3. Applying Transformation Rules:
Hashcat allows you to apply transformation rules to wordlists, generating variations of potential passwords. These rules can manipulate the words in the wordlist by capitalizing letters, adding common suffixes or prefixes, or substituting characters with similar-looking symbols. By applying rules, you can significantly expand the password search space and increase the chances of cracking complex passwords.
Generating and utilizing wordlists effectively is a skill that comes with experience. As you gain more knowledge and exposure to different password cracking scenarios, you’ll be able to create targeted wordlists and fine-tune your cracking strategies for optimal results.
Advanced Techniques for Password Cracking with Hashcat
While the previous sections covered the fundamentals of password cracking and the basic usage of Hashcat, there are several advanced techniques that can further enhance your password cracking endeavors. These techniques involve utilizing additional resources, employing specialized hardware, or leveraging specific attack methodologies. Here are a few advanced techniques to consider:
1. Using Rainbow Tables:
Rainbow tables are precomputed tables containing a vast number of password hashes and their corresponding plaintext passwords. These tables can significantly speed up the cracking process by eliminating the need to compute hashes for each password guess. Hashcat can utilize rainbow tables to crack passwords quickly, especially for common hash types. However, rainbow tables can be resource-intensive and require substantial storage space.
2. Utilizing Distributed Computing:
As mentioned earlier, Hashcat supports distributed computing, allowing multiple systems or GPUs to work together on a cracking task. By pooling the computational power of multiple resources, you can achieve faster cracking speeds and distribute the workload more efficiently.
3. Using Hardware Accelerators:
In addition to GPUs, Hashcat can utilize specialized hardware accelerators, such as FPGA (Field-Programmable Gate Array) or ASIC (Application-Specific Integrated Circuit) devices. These hardware solutions are designed to perform password cracking tasks efficiently and can offer significant speed improvements compared to traditional CPUs or GPUs.
4. Combining Attack Modes:
Hashcat allows you to combine different attack modes, such as dictionary attacks, mask attacks, and rule-based attacks, to create hybrid attacks. Hybrid attacks leverage the strengths of multiple attack modes, increasing the chances of cracking complex passwords. Experimenting with different combinations can yield better results in certain cracking scenarios.
By exploring these advanced techniques and staying up-to-date with the latest advancements in password cracking, you can further refine your skills and become a proficient password cracker.
Best Practices for Password Security
While password cracking can be a fascinating and educational endeavor, it’s essential to remember the importance of password security. As individuals and organizations, we should strive to implement robust password practices to protect our digital assets. Here are some best practices to keep in mind:
1. Use Strong and Unique Passwords:
Create passwords that are long, complex, and unique for each account. Avoid using common words, personal information, or easily guessable patterns. Consider using a password manager to generate and store strong passwords securely.
2. Enable Multi-Factor Authentication:
Whenever possible, enable multi-factor authentication (MFA) for your online accounts. MFA adds an extra layer of security by requiring additional verification, such as a fingerprint or a one-time password, in addition to your password.
3. Regularly Update Passwords:
Periodically update your passwords, especially for critical accounts or after a potential security breach. Changing passwords regularly minimizes the risk of unauthorized access to your accounts.
4. Stay Informed About Password Security:
Stay updated on the latest trends, techniques, and vulnerabilities related to password security. By staying informed, you’ll be better equipped to protect yourself and make informed decisions regarding password practices.
By following these best practices and adopting a security-conscious mindset, you can significantly enhance your personal and organizational password security.
Conclusion
In this comprehensive guide, we have explored the fascinating world of password cracking and introduced you to Hashcat, a powerful tool used by ethical hackers and security professionals. From understanding hash functions and encryption to installing and configuring Hashcat on Windows, we have covered the essential aspects of password cracking.
We have delved into advanced techniques, such as utilizing wordlists, optimizing performance, and exploring hybrid attacks. Additionally, we have emphasized the importance of password security and outlined best practices to protect your digital assets.
As you embark on your journey into the world of password cracking, remember to always approach this field ethically and responsibly. Password cracking is a valuable tool for evaluating the strength of passwords and enhancing digital security.
By arming yourself with knowledge, staying up-to-date with advancements, and practicing good password hygiene, you can contribute to a safer digital world. So, go forth and unlock the secrets to stronger digital security with Hashcat!
Read Also:
20 Best Ethical Hacking Tools You Need to Know
The 9 Best Penetration Testing Tools for Linux
John the Ripper Password Cracking Tool: A Comprehensive Guide
Table of Contents
HOWTO: Using hashcat on Windows through an SSH session
Hashcat can run on multiple operating systems. While Linux/UNIX operating systems provide an easy way to connect to a remote workstation using SSH, this is not the case for Windows.
Solutions like Bash on Windows or OpenSSH by the PowerShell team attempt to address this need, but they also have some major caveats (rendering problems, tty-based communications problems, etc.).
Cygwin and MSYS/MSYS2 also have some tty-based problems. Cygwin and MSYS/MSYS2 rely on mintty, but don’t provide unbuffering capabilities. The consequence is that the ‘s’, ‘b’, ‘q’, ‘p’ keystrokes used by hashcat are buffered wshen pressed, causing them to not function as intended.
Another solution must be found to use hashcat through an SSH session on Windows. One solution is winpty.
The following is directly taken from the winpty README, and provides instructions for both Cygwin and MSYS/MSYS2.
Disclaimer
THIS GUIDE IS PROVIDED “AS IS” AND WITHOUT ANY EXPRESS OR IMPLIED WARRANTIES, INCLUDING, WITHOUT LIMITATION, THE IMPLIED WARRANTIES OF FITNESS FOR A PARTICULAR PURPOSE. WE WILL NOT ACCEPT ANY LIABILITY FOR ANY SECURITY RISKS YOU INTRODUCE TO YOUR ENVIRONMENT UPON FOLLOWING THIS GUIDE.
At a minimum, you should ensure that all commands are executed in a trusted – and preferably isolated – environment.
Prerequisites
You need the following to build winpty:
-
A Cygwin, MSYS or MSYS2 installation
-
GNU make
-
A MinGW g++ toolchain capable of compiling C++11 code to build winpty.dll and winpty-agent.exe
-
A g++ toolchain targeting Cygwin or MSYS to build winpty.exe
Cygwin packages
The default g++ compiler for Cygwin targets Cygwin itself, but Cygwin also packages MinGW-w64 compilers. As of this writing, the necessary packages are:
-
Either mingw64-i686-gcc-g++ or mingw64-x86_64-gcc-g++. Select the appropriate compiler for your CPU architecture (x86 or x64).
-
gcc-g++
-
make
As of writing this tutorial, winpty over an SSH session using MSYS or MSYS2 has not been tested. Nevertheless, things should not been different from Cygwin case.
MSYS packages
For the original MSYS, use the mingw-get tool (MinGW Installation Manager), and select at least these components:
-
mingw-developer-toolkit
-
mingw32-base
-
mingw32-gcc-g++
-
msys-base
-
msys-system-builder
When running ./configure, make sure that mingw32-g++ is in your PATH. It will be in the C:\MinGW\bin directory.
MSYS2 packages
For MSYS2, use pacman and install at least these packages:
-
msys/gcc
-
mingw32/mingw-w64-i686-gcc or mingw64/mingw-w64-x86_64-gcc. Select the appropriate compiler for your CPU architecture (x86 or x64).
-
make
MSYS2 provides three start menu shortcuts for starting MSYS2:
-
MinGW-w64 Win32 Shell
-
MinGW-w64 Win64 Shell
-
MSYS2 Shell
To build winpty, use either MinGW-w64 Win32 shortcut or MinGW-w64 Win64 shortcut, depending of the architecture matching your MSYS2 installation.
These shortcuts will put the g++ compiler (from mingw32/mingw-w64-i686-gcc packages if your installation is 32bits or from mingw64/mingw-w64-x86_64-gcc packages if your installation is 64bits) into the PATH.
Alternatively, instead of installing mingw32/mingw-w64-i686-gcc or mingw64/mingw-w64-x86_64-gcc, install the mingw-w64-cross-gcc and mingw-w64-cross-crt-git packages.
These packages install cross-compilers into /opt/bin, and then any of the three shortcuts will work.
Build winpty
In the project directory, run:
$ ./configure
$ make
$ make install
By default, winpty is installed into /usr/local. Pass PREFIX=<path> to make install to override this default.
Use winpty with hashcat
To run a Windows console program in mintty or Cygwin/MSYS/MSYS2 sshd, prepend winpty to the command line:
$ winpty hashcat64.exe -m 0 ....
Unbuffered-related problems should now be resolved.
Because winpty is not aware of chroot’ed environments, all paths to files (like output files or wordlists) must either be relative to the current directory, or absolute within the Windows filesystem (ie. ‘/opt/data/wordlists/MyWordlist’ must be replaced by ‘DRIVELETTER:/INSTALLATION_PATH/opt/data/wordlists/MyWordlist’).
Example:
When connected with the “sshd” account to your remote Windows workstation “TimmyStation”, if your Cygwin/MSYS/MSYS2 environnement is located in C:\INSTALL_PATH, and your hashcat folder is in C:\INSTALL_PATH\opt\data\hashcat-3.20, a typical successful command line should look like this:
sshd@TimmyStation /opt/data/hashcat-3.20
$ winpty hashcat64.exe -m 0 -o C:/INSTALL_PATH/opt/data/hashcat_outputhashes C:/INSTALL_PATH/opt/data/RawMD5_test.dump -a 0 C:/INSTALL_PATH/opt/data/wordlists/MyWordlist -r rules/best64.rule
If you want to use Hashcat for password cracking, you’ve come to the right place.
Hashcat is a great tool for cracking passwords offline using the power of your graphics processor unit computational power. It can process an astounding number of password guesses per second, cutting down the time it takes to crack password hashes.
In this article, we will show you how to use Hashcat. We will discuss password lists, and running Hashcat in different environments, be it on a local machine, a virtual environment, or even in the cloud.
Finally, we’ll provide hands-on demonstrations to show you how to deploy Hashcat to crack some of the most commonly encountered hashes.
What Is Hashcat?
Let’s look at what Hashcat is and how it can use the power of the graphics processing unit (GPU) to crack hashes.
Hashcat
Hashcat is a popular open-source software for cracking passwords that can crack various hashes using various attack modes.
It takes advantage of hardware acceleration from the GPU, which can perform computational tasks more efficiently than a general-purpose CPU could.
The speed of a GPU directly affects the cracking speed because a faster GPU can process more password guesses simultaneously, significantly reducing the time required to find the correct password.
Depending on the type of hash, the complexity of the password, and the GPU being used, Hashcat can test up to millions of password combinations per second during a brute force attack, greatly beyond the capacity of a CPU.
What’s a Hash?
A hash is a fixed-length string representation created from the password using a hash function.
Simply put, a hash function takes input data and returns a fixed-length string through mathematical computations. Once the data has been hashed, there is no way to reverse the process and retrieve the original data from the hash.
Here is an example of an MD5 hash of the password “password123”.

And here is the MD5 hash of the password “password1234”.

As you can see, even though we only added a single number to the end of “password123”, it created a completely unique hash.
Websites create a hash of the password as a measure of security to protect users’ sensitive data. When a user logs in, the password entered is hashed, and if this hash matches the hash stored in the database, the user is logged in.
Now that you understand Hashcat and password hashes, let’s look at where we can find password lists to use with it.
Password Lists In Kali
Kali comes pre-packaged with wordlists that can be used for cracking passwords. The wordlist files are in the /usr/share/wordlists directory.
The one that is used the most, especially when doing a CTF (capture the flag), is the rockyou.txt file. This file is massive, It contains over fourteen million user passwords.


The rockyou.txt file comes from the over 32 million user credentials exposed due to a data breach in 2009 on the social media platform RockYou. These passwords were kept in plain text, not hashed or otherwise obfuscated.
Other Locations for Password Lists
Another great resource for passwords is SecLists on GitHub. This list contains many password lists, including “500-worst-passwords.txt” and “darkweb2017-top10000.txt.” The password lists are collections of commonly used, default, or leaked passwords.

The right wordlist for Hashcat can significantly boost the effectiveness of password cracking by being tailored to the organization or demographic being tested.
It should be comprehensive yet specific and consider common weak passwords, organization-specific terms, language and localization, and common password mutations.
Hashcat in Virtual Machine, Host Machine, or the Cloud?
Now let’s discuss three options for running Hashcat.
Hashcat in a Virtual Machine
Hashcat can be run inside a virtual machine such as Kali Linux, however it will not use the GPU but the CPU instead, making it much slower.
If you’re looking to install Kali Linux in a virtual machine, we have two great articles on installing it on VirtualBox and VMware.
It can have both advantages and disadvantages. Here’s a quick rundown:
Pros:
Environment Isolation: Running Hashcat in a VM keeps your main OS separate from your Host OS
Ease of Setup: Hashcat is already installed on Kali, making it easier to get up and running without installation or configuration.
Testing and Experimentation: Using Hashcat in a VM allows you to test and experiment without affecting your host OS.
Cons:
Performance Overhead: Running Hashcat in a VM is slower than running it on native hardware, especially due to its GPU-intensive tasks, because of the additional layer of abstraction provided by the VM.
Hardware Access: While most VM solutions support passing through USB devices to the guest operating system, GPU passthrough (beneficial for a tool like Hashcat) can be complex and may only be supported on some systems or with some VM software.
Resource Allocation: VMs require a portion of your system’s resources. Running intensive applications in a VM could impact the performance of the host system.
Hashcat on Host Machine
The decision to run Hashcat directly on the host OS versus in a VM depends on your specific needs and resources. Running Hashcat natively on the host operating system like Windows has its own set of pros and cons.
Pros:
Performance: Running Hashcat on the host OS performs better than running it inside a VM. This is because there are no additional layers of abstraction between the application and the hardware.
Simplicity: It might be simpler to install and run for users who are more comfortable working in a Windows environment than a Linux one or for those unfamiliar with setting up VMs.
Cons:
Resource Consumption: Hashcat is designed to use as much of your system’s resources as possible to perform its tasks quickly. While running, your computer might be slow to respond to other tasks.
System Compatibility: While Hashcat is built to be compatible with a wide range of systems and hardware, there can always be unforeseen compatibility issues or bugs that could impact its performance or stability on some systems.
Installing Hashcat on Windows
Let’s walk you through installing Hashcat on a Windows system.
The first step is to download the binary from the Hashcat site.

Once downloaded, you will need to extract the 7Zip file, we put ours in the C:\Hashcat folder, but you can put yours wherever makes the most sense for you.

To start using Hashcat in Windows, head to the command line and move into the directory you saved it. Next, you need to load hashcat.exe and any options you want to run. We’ll discuss these in another section.

Hashcat in the Cloud
Running Hashcat in the cloud, like on AWS, Azure, or Google Cloud, also comes with its own set of advantages and disadvantages:
Pros:
Scalability: Cloud platforms offer the ability to easily scale up your resources. If you need more computing power quickly, you can start a powerful GPU instance, run your task, and shut it down when you’re done.
Cost-Effectiveness: You only pay for what you use. This can be much more cost-effective than buying expensive hardware, particularly if you only need it occasionally.
Access from Anywhere: Your cloud environment can be accessed from anywhere, which can be beneficial if you work from different locations or collaborate with others.
Cons:
Price: While cloud services can be cost-effective, the costs can also add up quickly if you’re running powerful instances for long periods of time. GPU instances can be particularly expensive.
Complexity: While cloud platforms can offer a lot of flexibility, they can also be complex to set up and manage, particularly if you’re unfamiliar with the particular service.
Legal and Ethical Considerations: Using cloud resources for cracking passwords might violate the provider’s terms of service. Be sure to verify this before proceeding.
If you’re interested in setting up resources in the cloud to perform your cracking, we recommend checking out a few resources:
Cracking With Hashcat in the Cloud
Good cloud GPU providers?
Now that you’ve seen the pros and cons of running Hashcat on a VM, host machine, or in the cloud, the choice ultimately depends on your specific requirements, resource availability, and the level of risk you’re willing to accept.
How to Use Hashcat
Now that you’re ready to crack hashes with Hashcat, let’s talk about the different hashes you may encounter and how to identify them. Then, we’ll show you this tool in action.
Hashes Available in Hashcat
The Hashcat Wiki has a great resource for finding all the hashes that work with the program. It gives you a table view of hashes.

You can easily search through this with the find command in your browser. This will help you find which hash mode to use with the hash you need to crack.

You can also view the list of hashes from the command line using --help.

And scroll down a little until you see the section titled “Hash modes.”

On a Linux system, you can also use the grep command to search quickly for a specific hash, such as hashcat --help | grep md5.
Popular Hashes Used
Here are some hash types you may see as a penetration tester or ethical hacker.
SHA-256 (Secure Hash Algorithm 256-bit): This is part of the SHA-2 family and is widely used in cryptographic applications and protocols, including TLS and SSL, PGP, SSH, and Bitcoin, among others.
Here is an example of an SHA-256 hash:
f2881bb653e5a11780fad1b3a7ef2d4fd10f1cced3d71c76443d7670aa0257d8
AS-REP (Authentication Service Response): This hash is part of the Kerberos protocol used for network authentication, including in Windows Active Directory domains and some Unix environments. This hash is acquired through AS-REP roasting, which extracts users’ password hashes with the activated «Do not require Kerberos preauthentication» setting.
Here is an example of a Kerberos AS-REP hash:
$krb5asrep$23$auston@xyz.local:3171EA207B3A6FDAEE52BA247C20362E$56FE7DC0CABA8CB7D3A02A140C612A917DF3343C01BCDAB0B669EFA15B29B2AEBBFED2B4F3368A897B833A6B95D5C2F1C2477121C8F5E005AA2A588C5AE72AADFCBF1AEDD8B7AC2F2E94E94CB101E27A2E9906E8646919815D90B4186367B6D5072AB9EDD0D7B85519FBE33997B3D3B378340E3F64CAA92595523B0AD8DC8E0ABE69DDA178D8BA487D3632A52BE7FF4E786F4C271172797DCBBDED86020405B014278D5556D8382A655A6DB1787DBE949B412756C43841C601CE5F21A36A0536CFED53C913C3620062FDF5B18259EA35DE2B90C403FBADD185C0F54B8D0249972903CA8FF5951A866FC70379B9DA
NTLM Hash: The NTLM hash is utilized in older Microsoft systems and applications, notably in workgroup environments and for local authentication on non-domain controllers. While it remains in use, more secure protocols like Kerberos are favored. NTLM support remains across all Windows systems to maintain compatibility with older server and client setups.
Here is an example of an NTLM hash:
58A478135A93AC3BF058A5EA0E8FDB71
Identify Hashes
If you come across a hash and aren’t sure what hashing algorithm is being used, some tools can help you identify them, such as Hash-Identifer or hashID.
hashID replaces Hash-Identifier, although it can still be used and is installed by default on Kali.
hashID can be installed from the command line using the following.
pip install hashid
Once installed, you simply type hashid -m and the hash you need to be identified, as seen below. This will show the corresponding Hashcat mode alongside the potential hash. Let’s take the following hash and put it into hashID.
7eb126739275d3717e981a78311dbdf6f71b7a74

The hash is identified as being a SHA-1 hash.
These tools do their best at guessing the correct hash but may not be able to accurately identify all hashes you input. Understanding the technology you are working with will go a long way in knowing which hash is being used.
Using Hashcat
Now we will show you how to crack multiple hashes using Hashcat.
Hashcat can run different attacks, such as a dictionary, combination, mask, and hybrid, but we will use the dictionary attack for our demo.
In dictionary attacks, each word in the password file is hashed and compared with the target hashes. If the hashes match, then the original password has been found.
You can run a basic Hashcat dictionary attack using the following command.
hashcat -m 0 -a 0 hash.txt wordlist.txt
- hashcat: This is the main command to run the Hashcat program (on Windows, use hashcat.exe).
- -m 0: This is the option for the hash type. In this case, 0 represents MD5. The value here would change depending on the hash type you are trying to crack. For instance, -m 1000 would be used for NTLM hashes.
- -a 0: This is the attack mode. In this case, 0 stands for «straight» mode, a dictionary attack.
- hash.txt: This file contains the hash or hashes you’re trying to crack. It should be a text file with one hash per line.
- wordlist.txt: This is your dictionary or list of potential passwords. Like the hash file, this should be a text file with one entry per line.
Hahscat can be used with other options, depending on what you need. Here are some examples:
- -r: This option allows you to specify a rules file. Rules in Hashcat allow you to modify the words from your wordlist in certain ways, which can greatly expand the number of potential passwords you’re testing. For example, a rule could be to try the word in lowercase and uppercase or to append certain numbers to the end of the word.
- —debug: This option enables debug mode. In debug mode, Hashcat will provide additional output to help you troubleshoot issues. For instance, if you’re using a rules file, debug mode can show you exactly how the rules modify the words from your wordlist.
- —force: This option forces Hashcat to start even if it detects that your system might not be capable of running it correctly. Using this option’s generally only recommended if you know what you’re doing, as it could lead to incorrect results or even damage your hardware.
Let’s try to crack two of the hashes from our popular hashes section. We will be using the rockyou.txt as our wordlist file.
This demonstration will show you how to run Hashcat in Windows, but it’s the same syntax when you run this in Linux. Ensure that you save the hash as a .txt file.
Our first hash is the Kerberos AS-Rep one shown in the previous section.
hashcat.exe -m 18200 asrep.txt -a 0 rockyou.txt

And we’ve cracked the password in only two seconds. As you can see, the weaker the password, the easier for Hashcat to crack.
You’re likely to encounter the NTLM hash, our second hash type, quite frequently if you’re pursuing a career as a penetration tester or interested in learning to attack Active Directory. The NTLM hash is still frequently used today in Windows operating systems.
The syntax you need to use is:
hashcat.exe -m 1000 ntlmhash.txt -a 0 rockyou.txt

This time we have the password cracked in only three seconds.
Conclusion
Hashcat is a potent tool that can be deployed to crack a diverse range of hashed passwords, from SHA-256 to NTLM and Kerberos. Hashcat can swiftly crack many passwords by harnessing your GPU’s power using a dictionary attack.
You’ve now learned how Hashcat works and how to use it. Additionally, you’ve discovered that Hashcat can run in various environments, including in a virtual machine (VM) or the cloud, expanding its versatility.
If you’re ready to level up your skills, join our StationX Accelerator for a massive selection of courses.
Frequently Asked Questions
What is password hashing?
Password hashing transforms a password by passing it through a hashing function, resulting in some fixed-length string. An example of the MD5 hash of the password “MyPassword” is 48503dfd58720bd5ff35c102065a52d7. Each password will have a unique string.
Can I use Hashcat without GPU?
Yes, you can use Hashcat without a GPU. In this case, Hashcat will default to using the CPU for processing, but be aware that this will result in significantly slower performance compared to using a GPU.
Is Hashcat better than John the Ripper?
If you’re cracking common hashes and speed is your primary concern, Hashcat is typically the better choice. However, if you’re dealing with a wider variety of hashes or non-standard hashes, John the Ripper may be more suitable. It ultimately depends on your specific requirements and resources.
How do you use Hashcat on Windows?
To use Hashcat on Windows, you need to download the binary, extract the 7zip file and then run it in the command line from the folder you installed it in. Such as hashcat.exe -m 1000 hash.txt -a 0 wordlist.txt
-
Richard is a cyber security enthusiast, eJPT, and ICCA who loves discovering new topics and never stops learning. In his home lab, he’s always working on sharpening his offensive cyber security skills. He shares helpful advice through easy-to-understand blog posts that offer practical support for everyone. Additionally, Richard is dedicated to raising awareness for mental health. You can find Richard on LinkedIn, or to see his other projects, visit his Linktree.