
Введение
В этой инструкции покажем, как установить Git на Windows, и поможем выбрать правильные параметры при установке. Затем создадим репозиторий и зафиксируем в нем изменения. Все это поможет вам сделать первые шаги в освоении Git.
Что такое Git и зачем он нужен
Git — это одна из самых популярных систем контроля версий (VCS). Такие системы помогают разработчикам хранить и версионировать исходный код приложений, настройки систем и другие текстовые файлы. И хотя ничего не мешает использовать VCS в других областях, чаще всего они применяются именно в IT.
Каждое состояние файлов в Git можно зафиксировать (сделать коммит), причем это навсегда останется в истории репозитория. Поэтому можно в любой момент посмотреть историю изменений файлов, сравнить различные версии и отменить отдельные изменения.
Также Git упрощает ведение параллельной разработки несколькими членами команды. Для этого используется ветвление. Условно можно сказать, что в Git-репозитории есть одна основная ветка, в которой хранится текущая стабильная версия исходного кода. Когда разработчик хочет изменить этот код, он «откалывает» себе отдельную ветку от основной и работает в ней. Когда работа закончена, он «вливает» изменения в основную ветку, чтобы его доработками смогли воспользоваться другие члены команды.
На самом деле все это описание довольно грубое, и по работе с Git можно написать не одну статью. На официальном сайте Git есть бесплатная электронная книга, в том числе она переведена на русский язык. А в этой статье мы сосредоточимся на установке Git в Windows и его первоначальной настройке.
Установка Git в Windows
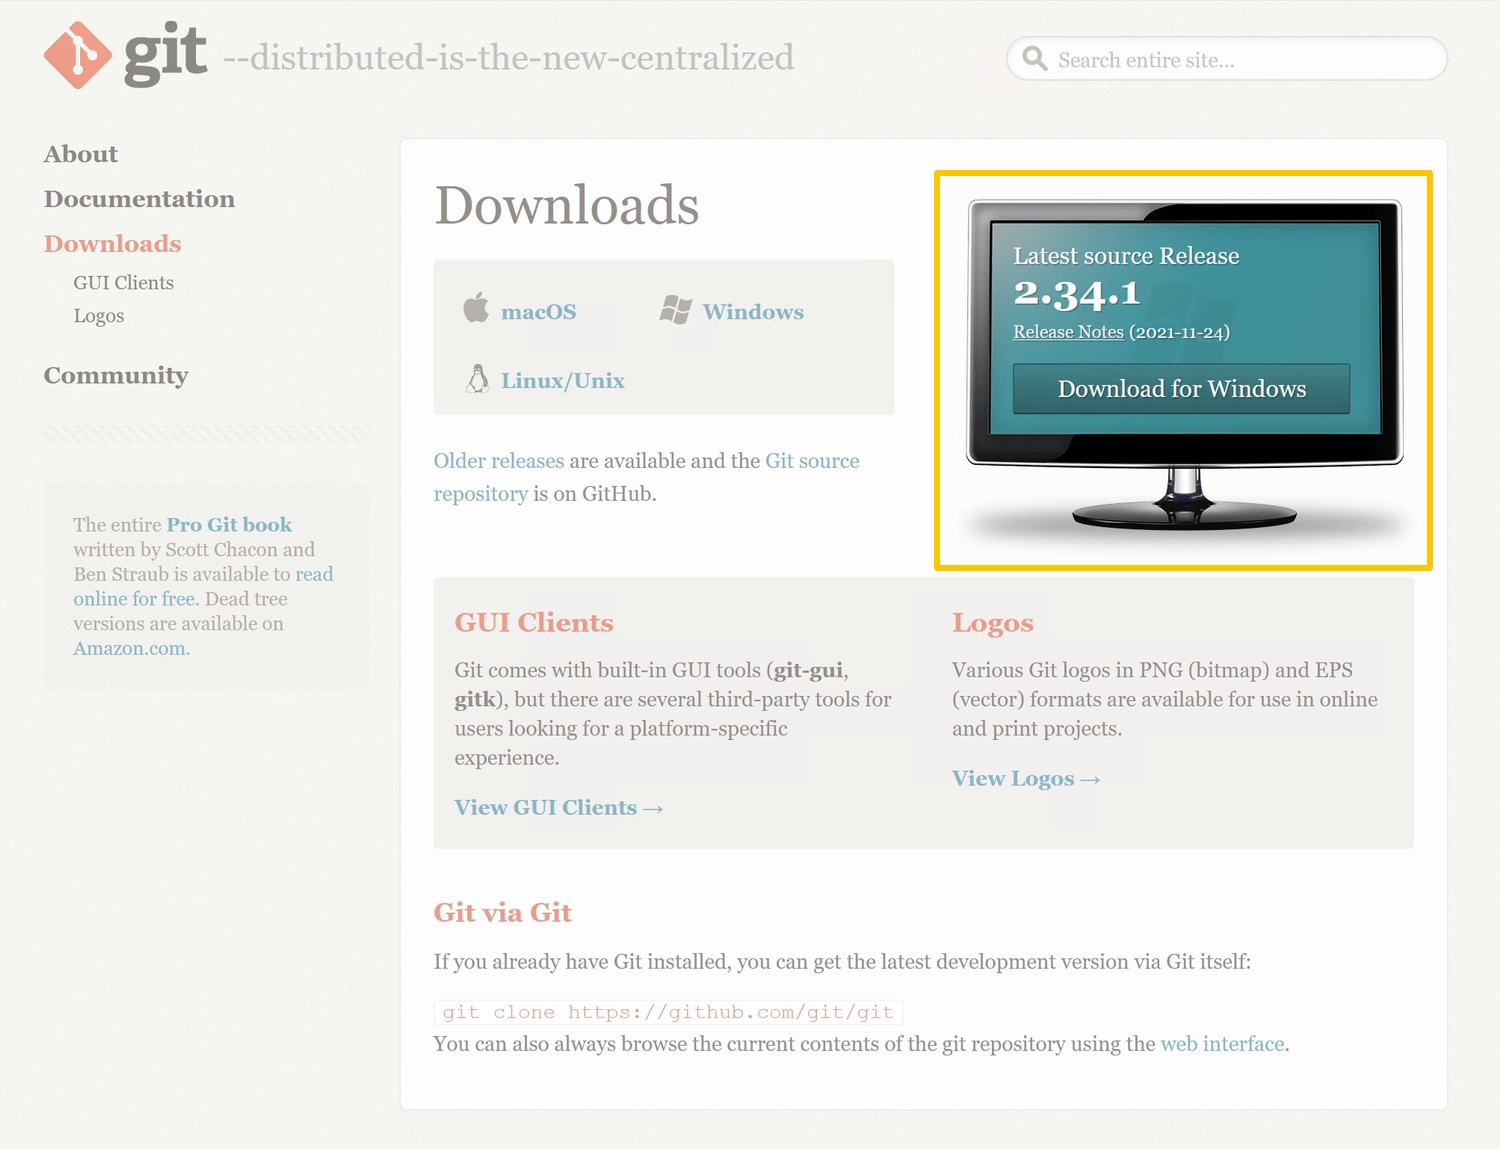
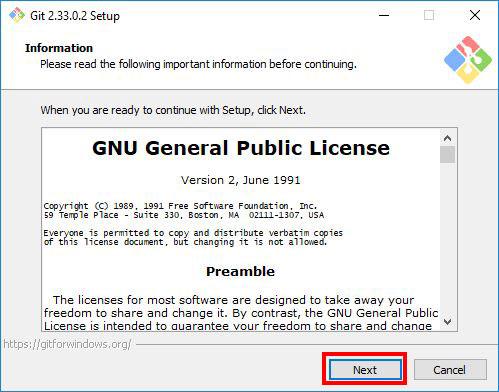
Переходим на официальный сайт Git, в раздел загрузок. Мы увидим несколько вариантов установки: разные разрядности, портативная версия и даже установка из исходников. Мы выберем Standalone-версию, для этого проще всего нажать ссылку Click here to download, она всегда ведет на самую актуальную версию. Запускаем скачанный файл.
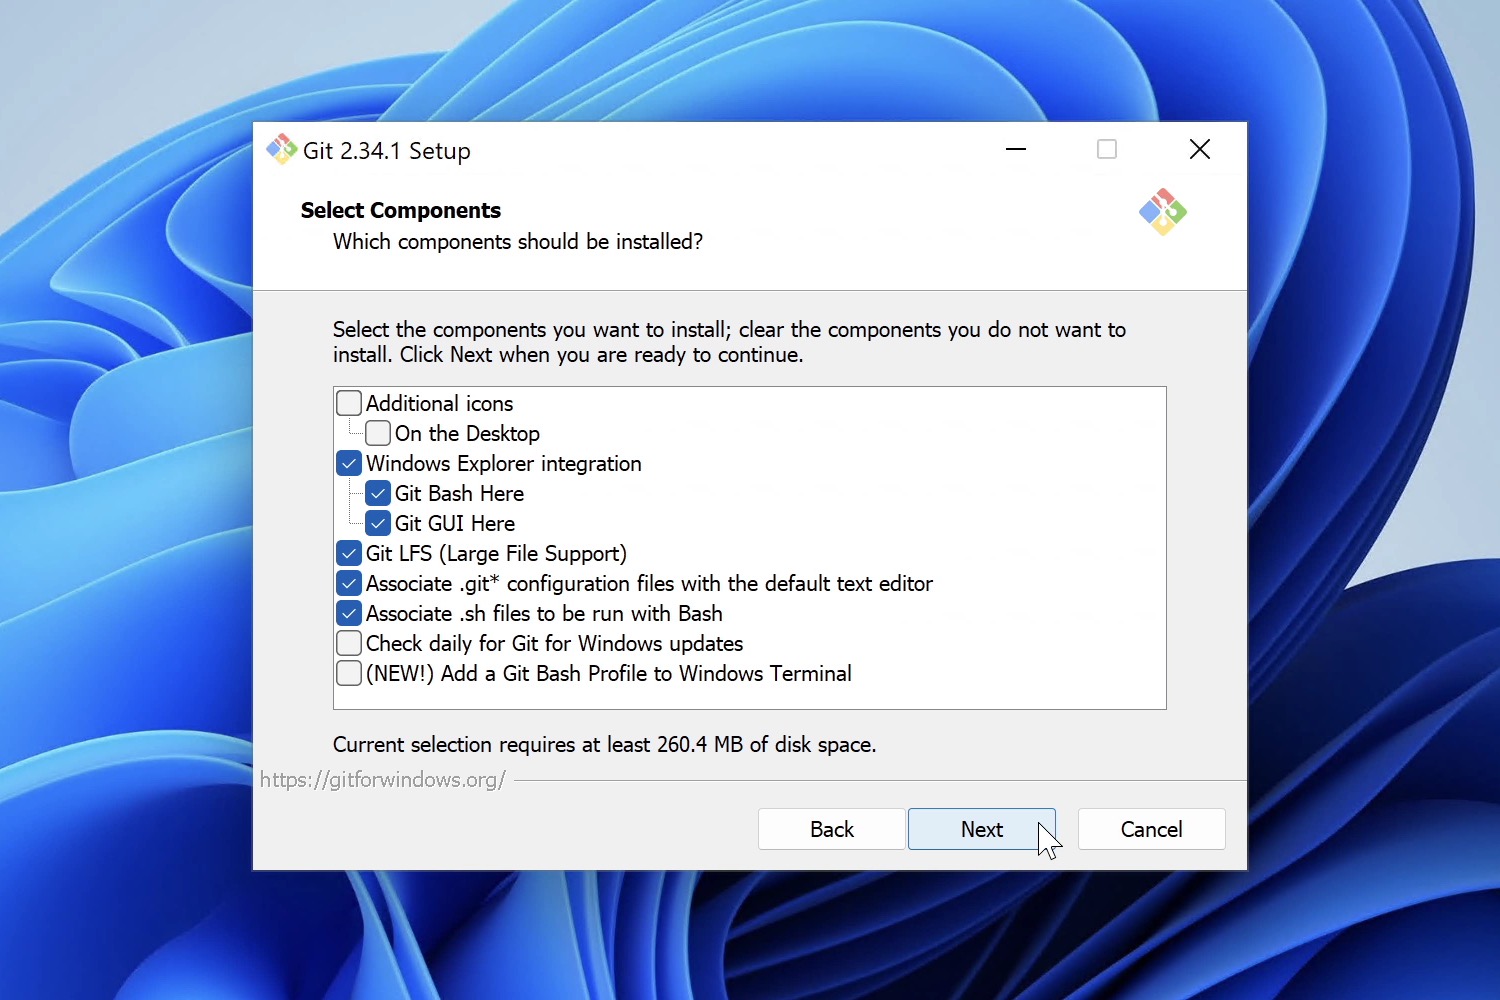
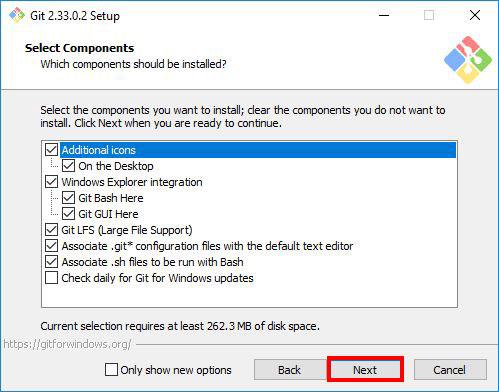
Выбор компонентов. Первый экран — выбор компонентов для установки. Если вам нужны дополнительные иконки на рабочем столе, или если вы хотите, чтобы Git ежедневно проверял наличие новой версии, — отметьте соответствующие опции. Остальные параметры лучше оставить по умолчанию.
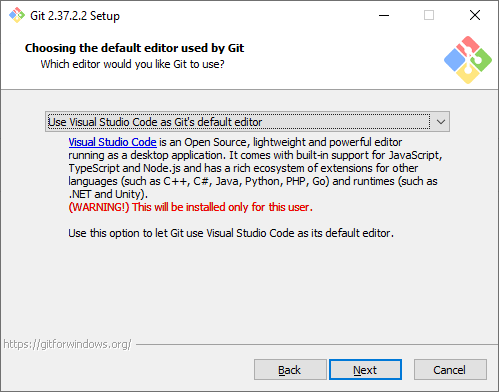
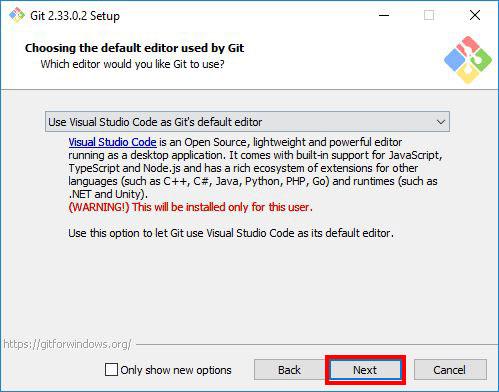
Текстовый редактор по умолчанию. Необходимо выбрать редактор, который будет использовать Git — например, когда вы будете писать сообщение для коммита. Это не обязательно должен быть редактор, в котором вы планируете писать исходный код.
По умолчанию в установщике выбран Vim — консольный текстовый редактор, который для многих может показаться сложным в освоении. Если вы не знакомы с Vim и при этом хотите именно консольный редактор — выберите nano. Если у вас уже установлен какой-нибудь текстовый редактор — выбирайте его. Мы для примера будем использовать VSCode.
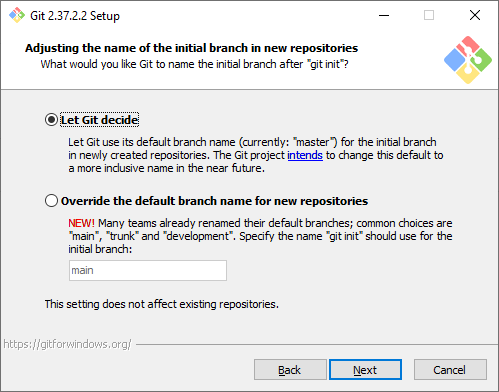
Название первой ветки. Тут нужно выбрать, как Git будет называть первую ветку в каждом репозитории. Раньше такая ветка всегда называлась master, но со временем это стало напоминать о временах рабства, и многие проекты и компании стали переименовывать ветки в своих репозиториях. Поэтому разработчики Git добавили эту опцию, чтобы название первой ветки можно было изменить. Мы будем придерживаться старого поведения и оставим название master.
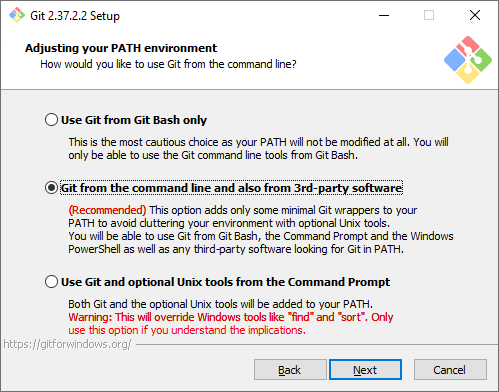
Способ использования Git. Первая опция сделает Git доступным только из командной строки Git Bash. Это не очень удобно, потому что не позволит пользоваться Git-ом из других оболочек или интегрировать его с редактором кода. Вторая опция самая оптимальная (ее мы и выберем) — она позволяет работать с Git-ом из разных оболочек и интегрировать его с другими приложениями. Третья опция кроме установки Git также «перезапишет» некоторые системные команды Windows аналогами из Unix, и эту опцию нужно выбирать только если вы точно понимаете, что делаете.
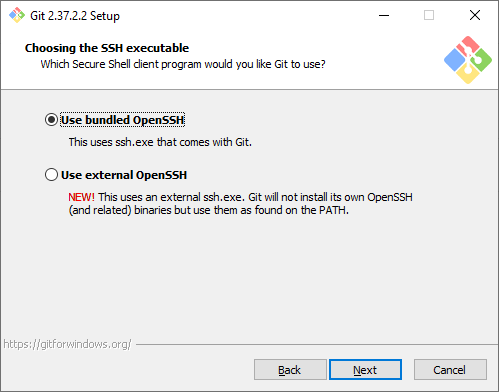
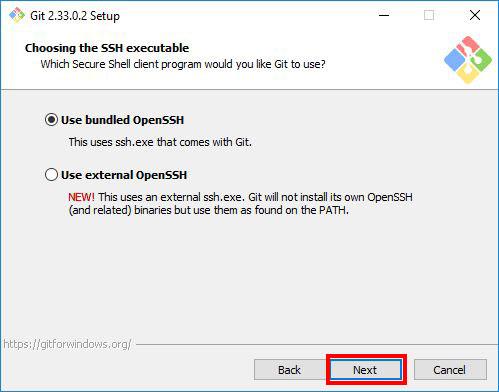
Выбор SSH-клиента. Изначально Git поставлялся со встроенным SSH-клиентом, но недавно появилась опция, где можно использовать внешний клиент. Если у вас уже что-то установлено на компьютере — можете выбрать вторую опцию. Мы же остановимся на первой, так как предварительно ничего не устанавливали.
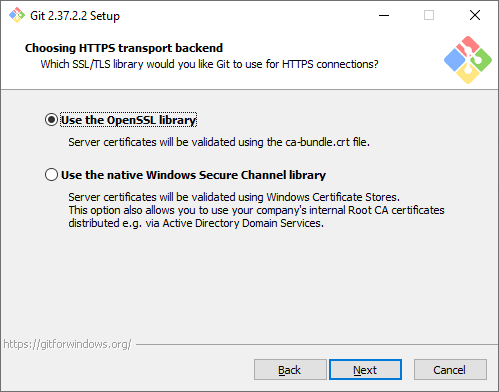
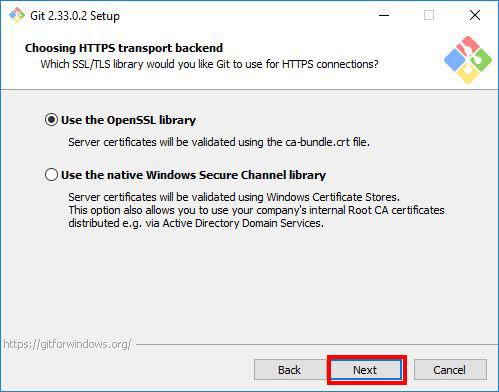
Выбор SSL/TLS библиотеки. По умолчанию Git будет использовать свою OpenSSL библиотеку с заранее определенным списком корневых сертификатов. Обычно этого достаточно, но если вам нужно работать со внутренними репозиториям внутри компании, которые используют самоподписанные сертификаты, выберите вторую опцию. Тогда Git будет использовать библиотеку и сертификаты из вашей операционной системы.
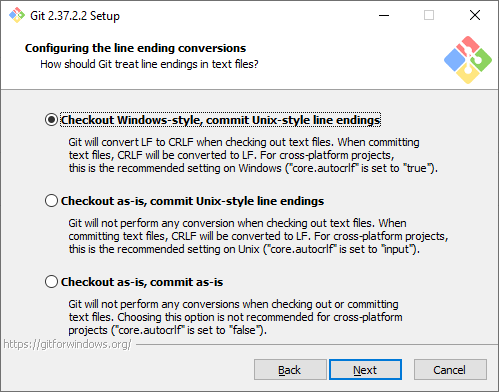
Символы перевода строки. Существует два основных способа формирования конца строки в файлах — CRLF и LF. Первый используется в Windows, второй — в Unix-like системах. Первая опция позволяет извлекать файлы из репозитория в Windows-стиле, при этом отправлять файлы в репозиторий в Unix-стиле. Мы рекомендуем использовать этот вариант, потому что он лучше всего подходит для кросс-платформенной команды, когда над одним кодом могут работать разработчики на разных ОС.
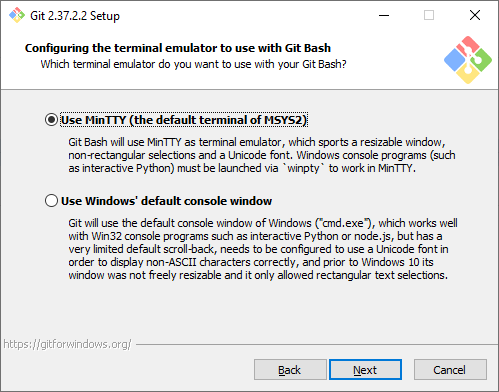
Эмулятор терминала. Эмулятор, который будет использоваться в командной строке Git Bash. MinTTY — удобный вариант, поэтому он выбран по умолчанию. Встроенный эмулятор CMD не очень удобен, у него есть некоторые ограничения, поэтому выбирайте его, только если делаете это осознанно.
Стратегия git pull. Первая опция будет пытаться обновить историю коммитов без создания коммитов слияния. Это самый оптимальный и часто используемый вариант, оставим его.

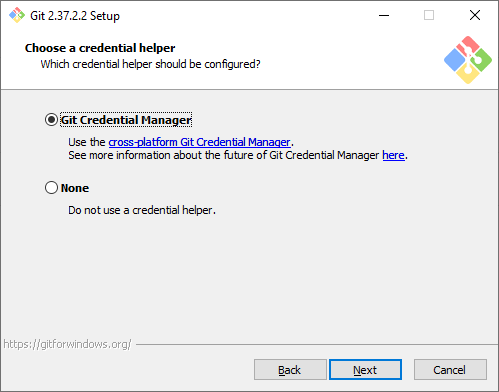
Credential Manager. Установка этого параметра позволит Git запоминать логины и пароли для подключения к удаленным репозиториям (например, GitHub, GitLab или корпоративное хранилище) и не вводить их постоянно.
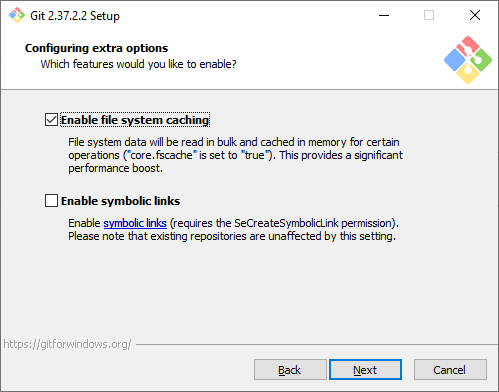
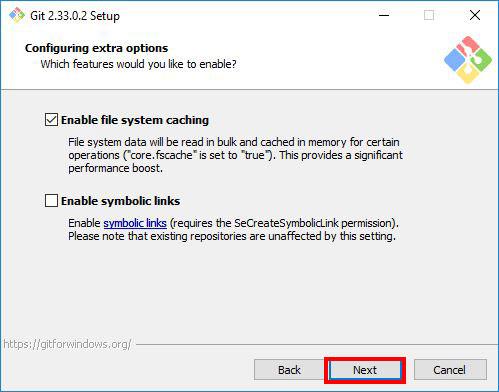
Дополнительные настройки. Кэширование позволит ускорить работу Git, эту опцию рекомендуем оставить. А вот символические ссылки нам не нужны.
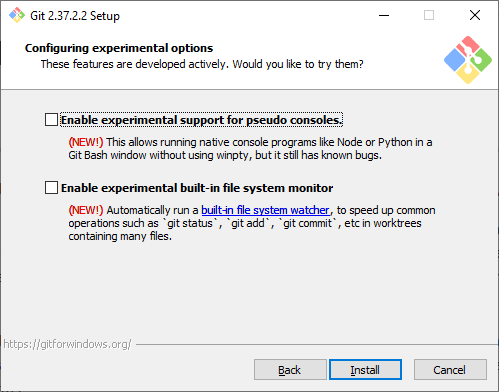
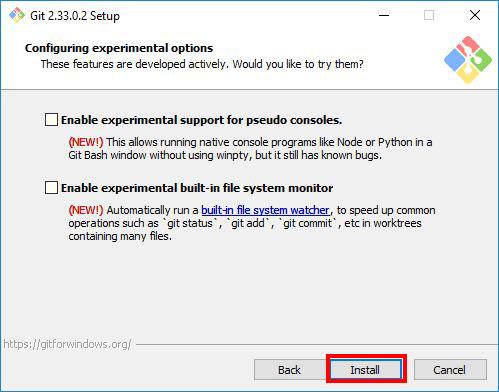
Экспериментальные настройки. Эти опции еще не переведены в стабильную стадию, поэтому их использование рекомендуется, только если вы точно понимаете, что делаете. Мы не будем ничего отмечать.
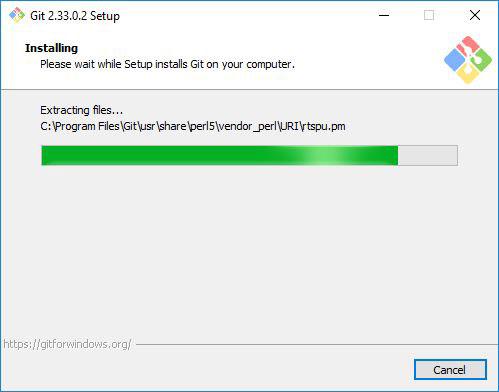
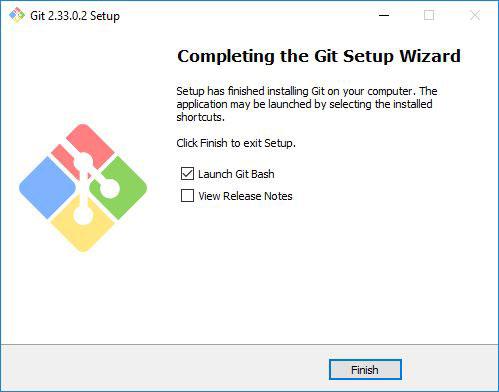
Git установлен и готов к работе.
Установка в различные дистрибутивы Linux
Также коротко покажем, как можно установить Git в различные дистрибутивы Linux. Как правило, самостоятельно скачивать ничего не нужно, достаточно воспользоваться встроенным в дистрибутив пакетным менеджером.
Debian
pt-get install gitUbuntu
add-apt-repository ppa:git-core/ppa # apt update; apt install gitFedora 21
yum install gitFedora 22+
dnf install gitGentoo
emerge --ask --verbose dev-vcs/gitArch Linux
man -S gitOpenSUSE
ypper install gitMageia
rpmi gitFreeBSD
pkg install gitOpenBSD
g_add gitRHEL, CentOS, Oracle Linux и др.
Как правило, пакетный установит довольно старую версию Git, поэтому рекомендуется собирать Git из исходных кодов, или воспользоваться сторонним репозиторием IUS Community.
Первоначальная настройка и создание репозитория
Перед началом работы с Git нужно указать свое имя и email, которые в дальнейшем будут записываться в историю изменений при каждом коммите. В будущем это позволит понять, кто именно внес те или иные изменения.
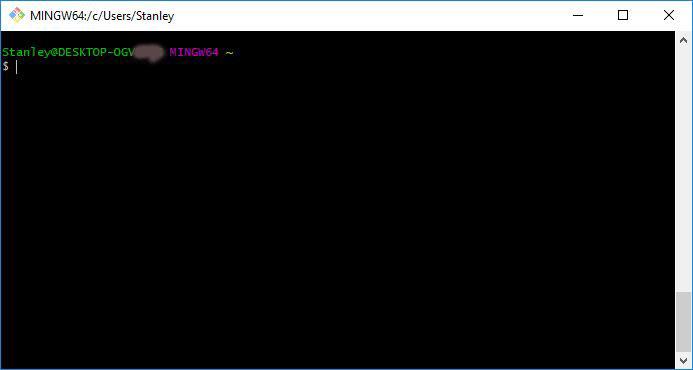
Откроем любое из приложений — Git Bash или Git CMD. Первое — это командная строка в стиле Linux, второе — командная строка в стиле Windows. Выбирайте то, что вам ближе. Мы выберем Git Bash и выполним две команды:
git config --global user.email "git-user@selectel.ru"
git config --global user.name "Selectel Git User"
Теперь Git полностью готов к работе. Давайте создадим репозиторий и зафиксируем в нем первое изменение (сделаем коммит). Для начала создадим каталог для будущего репозитория и сразу перейдем в него:
mkdir first-repo && cd first-repoСоздаем новый репозиторий в этом каталоге:
git initУвидим ответ:
Initialized empty Git repository in C:/Users/git_user/first-repo/.git/.Это означает, что в директории создан новый репозиторий. Далее создадим текстовый файл, назовем его README.md, и напишем в нем любой текст. Но сам по себе этот файл не попадет в следующий коммит. Мы должны проиндексировать изменения, то есть явно сказать Git-у, что этот файл нужно учитывать в следующем коммите:
git add README.mdДалее введем команду:
git commitОткроется текстовый редактор, который мы выбирали на этапе установки Git. Тут нам нужно ввести комментарий для коммита, то есть кратко описать изменение, которое мы сделали. Мы напишем такой комментарий:
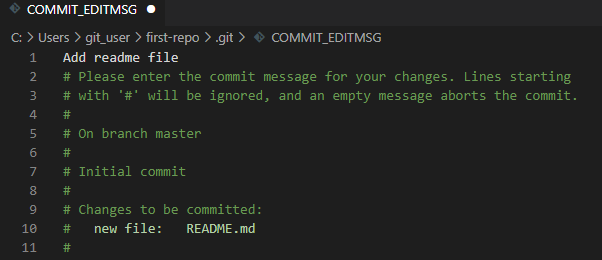
Обратите внимание, что Git автоматически добавил небольшую подсказку в это окно. При этом она не войдет в коммит, потому что в начале строки стоит символ решетки, и Git проигнорирует ее. Но она может быть полезна для дополнительной проверки: мы видим название текущей ветки и список файлов, которые войдут в коммит.
Сохраним файл и закроем редактор. Увидим примерно следующее сообщение:
[master (root-commit) 2b8f7a5] Add readme file
 1 file changed, 3 insertions(+)
 create mode 100644 README.md
Мы успешно сделали первый коммит.
Работа с Git в визуальном интерфейсе
Сам по себе Git — это утилита командной строки. Но не всем может быть удобно запоминать и писать команды в терминале, поэтому часто разработчики пользуются графическим интерфейсом. Есть несколько вариантов:
- Встроенный GUI. В базовой установке Git есть две простые утилиты: gitk и git gui. Но у них довольно старый интерфейс и пользоваться ими не всегда удобно.
- Отдельные графические утилиты. Они могут быть понятны и красивы, но неудобны тем, что код нужно писать в одной программе, а для работы с Git нужно переключаться в другую. Примеры таких программ: GitKraken, Sourcetree, GitAtomic. Большой список таких клиентов есть на официальном сайте Git.
- Встроенные в IDE или текстовый редактор. В большинстве популярных редакторов кода или IDE уже есть поддержка Git. Как правило, ничего дополнительно настраивать не нужно. Мы рассмотрим именно такой вариант на примере редактора VSCode.
Откроем директорию с репозиторием в редакторе VSCode. Внесите любое изменение в файл README.md и сохраните изменения. Обратите внимание, что в левой части редактора кое-что изменилось:
- Файл README.md подсветился желтым цветом, а рядом с ним появилась буква M (означает Modified — изменен).
- На панели Source Code появилась цифра 1, означающая, что есть одно изменение, которое можно зафиксировать.
Перейдем на панель Source Code. Слева находится список файлов, которые были изменены. Если кликнем на файл, то увидим какие именно изменения мы внесли: в этом случае добавили новую строчку This is the second commit.

Теперь давайте зафиксируем наши изменения. Рядом с названием файла нажмем на «плюс», чтобы проиндексировать его. Это аналогично команде git add, которую мы выполняли ранее. Затем в поле Message внесем комментарий и нажмем кнопку Commit. Это аналогично команде git commit.
Поздравляем, вы сделали уже два коммита в свой репозиторий!
Заключение
Итак, мы рассмотрели процесс установки Git под Windows, рассказали об основных параметрах установки и последующей настройки. Увидели, как репозиторий и внести в него первый коммит. Познакомились с работой в командной строке и с помощью графического интерфейса.
Установочный пакет можно скачать здесь https://git-scm.com/download/win (см. также https://gitforwindows.org/).
Далее будет рассмотрена работа с portable-версией.
В пакете присутствует не только сам git, но и средства для работы в командной строке, которые позволяют сделать рабочий процесс практически полностью идентичным таковому в Unix-системах. (При этом, в отличие от подсистемы Windows for Linux, нет ни необходимости устанавливать дополнительные компоненты ОС, ни жёстких требований к новизне версии Windows).
В первую очередь, это оболочка bash, которая поддерживает цвета и комбинации клавиш, а также сопутствующие программы из числа наиболее часто используемых в Linux (ls, grep, curl, vim, ssh(!) и пр.) делают возможными многие привычные операции.
Настройка
Для настройки bash (например, вида системного приглашения) используется стандартный файл .bashrc, который нужно разместить в домашнем каталоге пользователя (C:/Users/пользователь).
В первую очередь, необходимо указать работу в кодировке UTF-8:
export LANG=ru_RU.UTF-8
(Кодировку также нужно будет указать самому терминалу — см. ниже).
Также наверняка захочется настроить вид системного приглашения (текущее можно посмотреть, дав команду echo $PS1):
PS1="New system prompt"
Перечитать конфигурационный файл без перезапуска терминала можно командой . ~/.bashrc.
Пути файловой системы
Все пути начинаются с / (как в Unix-системах). Путь вида C:/somedir отображается в виде /c/somdeir. Можно использовать и в оригинале (C:/...), но с ним не будет работать достройка путей по Tab.
Действует сокращение ~, указывающее на домашний каталог пользователя.
Имена системных переменных нужно писать, начиная с $, а не обрамляя %: echo $PATH, а не echo %PATH.
Кодировка терминала
При прямом запуске из командной строки bash стартует в стандартной консоли Windows cmd, которая работает в кодировке CP866. Чтобы консоль работала в UTF-8, перед запуском bash нужно дать команду CHCP 65001.
Автоматизировать этот процесс можно так:
- Создать рядом с
bash.exeфайлb.bat(короткое имя — для быстрого запуска):
@echo off
CHCP 65001 > nul
{каталог git}\bin\bash
- Запускать bat-файл из диалога Run:
Win+R; b; Enter.
В результате будет получен полностью готовый к работе терминал с командной оболочкой bash.
vi
Редактор vi (а точнее, vim) используется как стандартный редактор при написании commit-сообщений git. Для корректной работы с кириллическим текстом в настройках запуска vim нужно явно указать кодировку UTF-8. Это делается в файле .vimrc, который нужно поместить в домашний каталог пользователя (по аналогии с *nix-системами):
Предварительно терминалу Windows обязательно должна быть установлена кодовая страница 65001 (см. предыдущий пункт), иначе редактор будет работать некорректно.
git
Первичная настройка
Глобальные настройки на уровне пользователя ОС git хранит в файле .gitconfig в домашнем каталоге пользователя так же, как в Linux. Можно сразу скопировать этот файл с какого-нибудь рабочего сервера и исправить в нем нужные места, вместо того, чтобы давать набор команд git config --global.
Как правило, необходимо указать имя и email:
git config --global user.name = "..."
git config --global user.email = "..."
Без этого git не даст отправлять изменения в удаленные репозитории (git push).
SSH
Чтобы получать и отправлять изменения в удалённые репозитории без ввода пароля, git должен иметь возможность пользоваться ssh-ключом. У самого git нет настроек, позволяющих явно указывать ключ — в этом он всецело полагается на команду ssh.
Самый простой путь задействовать свой приватный ключ — скопировать его openssh-версию в файл ~/.ssh/id_rsa (снова точно так же, как в Linux). Он будет использоваться не только при работе git, но и при использовании команды ssh для соединения к удаленным сервером напрямую (которую можно использовать как альтернативу putty).
Такой подход предполагает, что для всех соединений будет использоваться один и тот же ключ.
Другой способ — создать файл .ssh/config в домашнем каталоге Windows (типа C:/Users/пользователь), где указать расположение приватного ключа:
Host *
 IdentityFile "D:/.../ключ.openssh"
Подробнее см. https://stackoverflow.com/a/25924462.
Странности (то, что работает не так, как в Linux)
git helpвместо вывода консоль открывает в браузере html-страницу мануала из каталога{git}/mingw64/share/doc/git-doc/
To open Git Bash on your computer, simply navigate to your Start menu or the application folder, find Git Bash, and click to launch it.
# On Windows, you can also use the Run dialog:
win + r
# Then type
"C:\Program Files\Git\git-bash.exe"
# and hit Enter.
What is Git Bash?
Git Bash is a command-line interface that allows developers to interact with the Git version control system in a more flexible way. It brings Unix-like commands and features to the Windows environment, enabling users to execute scripts, navigate the file system, and manage Git repositories efficiently. Unlike traditional terminals, Git Bash offers additional functionalities, such as better scripting options and support for a wider range of commands commonly found in various Unix-based systems.
Key Features
- Unix-like Environment: Git Bash mimics a Linux shell, making it easier for those familiar with Unix commands to navigate and manipulate files.
- Integration with Git: Direct access to Git commands means developers can efficiently manage their repositories right from the terminal.
- Support for Shell Commands: Git Bash allows users to run a variety of shell commands, making it a versatile tool for software development tasks.
How to Use Git Bash: Mastering Command Line with Ease
Prerequisites
Installing Git
To open Git Bash, you first need to have Git installed on your machine. Download the latest version of Git from the official Git website by visiting [Git Downloads](https://git-scm.com/downloads). The installation process is straightforward; simply follow the prompts in the installation wizard to complete the setup.
Supported Operating Systems
Git Bash is available for various operating systems, including Windows, macOS, and Linux. Each system has different methods for accessing Git Bash, which we will cover in detail in the following sections.

Download Git Bash: A Quick Guide to Get Started
Opening Git Bash on Different Operating Systems
Opening Git Bash on Windows
To open Git Bash on a Windows machine, follow these steps:
-
Using the Start Menu: After installation, you can find Git Bash by clicking the Start Menu and typing «Git Bash». Select it from the search results to launch.
-
Using a Desktop Shortcut: If you prefer quicker access, you can create a shortcut on your desktop. Right-click on your desktop, go to New > Shortcut, and locate `git-bash.exe` in the Git installation folder (usually found in `C:\Program Files\Git\`). This way, you can double-click the icon whenever you need to use Git Bash.
For users who prefer command-line access:
# Win + R opens the Run dialog
run: bash
Opening Git Bash on macOS
-
Using Terminal: On macOS, Git Bash isn’t natively available, but you can use the built-in Terminal application. Simply open Terminal and enter Git commands directly.
-
Alternative Application: Many developers prefer a more enhanced terminal experience. You can download iTerm2, a powerful terminal for macOS that provides additional features such as split panes and better customization options.
Opening Git Bash on Linux
Git Bash is primarily used on Windows, but if you want to use Git commands on Linux, ensure you have Git installed. For Ubuntu users, use the following command to install Git:
sudo apt-get install git
For other Linux distributions, the installation method may vary, so refer to your distribution’s package manager for details.
How to Git Push: A Quick User’s Guide
Navigating Git Bash
Understanding the Command Line Interface
Once you have Git Bash open, understanding the command line interface is crucial for effective navigation. Basic commands you will frequently use include:
-
`pwd`: This command stands for «print working directory» and tells you your current location in the file system.
-
`ls`: This command lists all files and directories in the current working directory, helping you navigate through your file structure.
Basic Navigation Commands
Using these basic navigation commands is essential for efficient interaction with your system. Here’s how they work:
- Check Your Current Directory: Use `pwd` to see where you are at the moment.
pwd
- List Files: To display all files and directories, execute:
ls
Customizing Git Bash Appearance
To enhance your experience in Git Bash, consider customizing its appearance to suit your preferences.
-
Changing Colors and Font Style: Right-click on the top of the Git Bash window, select Options, then navigate to the Text section to customize colors and fonts.
-
Using .bash_profile for Custom Aliases: Create convenient shortcuts for frequently used commands. Open or create a `.bash_profile` file in your home directory and add your custom aliases. For example, to make it easier to check the status of your Git repository:
alias gs='git status'
This way, instead of typing `git status`, you can simply type `gs`.
How to Paste in Git Bash: A Quick Guide
Common Issues and Troubleshooting
Git Bash Won’t Open
If Git Bash fails to open, several things could be causing the issue. Try these troubleshooting steps:
-
Reinstalling Git: Sometimes, a corrupted installation can cause Git Bash not to open. Uninstall Git completely and reinstall it from the official site.
-
Checking System PATH: Ensure that your system’s PATH variable includes the directory where Git is installed. A missing path can lead to command recognition issues.
Command Not Recognized Errors
Encountering «command not recognized» errors is common, especially if you are new to Git Bash. To resolve this:
-
Verify the Command: Double-check your command syntax and ensure there are no typos.
-
Check Git Installation: Use the following command to verify that Git is installed correctly:
git --version
If Git is installed, this command will return the version number. If it does not, you may need to revisit the installation steps.
How to Add Git Stash Back: A Quick Guide
Conclusion
Opening Git Bash is your first step towards mastering Git commands and version control. With practice, you will become more comfortable navigating the command line, executing commands, and managing your projects efficiently. Don’t hesitate to delve deeper into Git functionalities as your proficiency grows.
VSCode How to Open Git Change from Explorer: A Quick Guide
Additional Resources
Recommended Books and Tutorials
For further exploration of Git and Git Bash, consider these resources:
- Pro Git by Scott Chacon and Ben Straub (available online for free).
- GitHub Learning Lab for hands-on tutorials.
Community and Support
Engage with the Git community by visiting forums or platforms like Stack Overflow where you can ask questions and share knowledge.
How to Get Git Token: Your Quick Guide
Call to Action
Stay updated and enhance your Git skills by subscribing to our newsletter. Follow us on social media for more quick tips and in-depth tutorials as you continue your journey with Git and Git Bash!
Git Bash is a very popular package for Windows. As the name suggests, it includes not only Git, a Version Control System for tracking code changes, but also Bash, a UNIX command line shell. In this guide, let’s install Git Bash to get you up and running with Git!
Before we get started, let’s understand why we need to install Git Bash. Couldn’t we just use CMD or Windows PowerShell to work with Git?
Git is a combination of command line programs that were built to execute on a Unix environment. Operating systems based on Unix, like Linux or macOS, come with Bash (Bourne Again SHell), which ensures that Git runs smoothly across these systems.
Windows is not included in this list (it’s a DOS-based operating system), so it doesn’t support Git out of the box. This is solved by — you guessed it! — installing Git Bash, which will provide the necessary emulation to access all the command line tools Git needs. You will also be able to use other useful Bash utilities, such as ssh, cat, scp or nano.
Now that you understand why you need Git Bash, it’s time to download and install it!
How to Install Git Bash on Windows
Let’s start by downloading the Git Bash executable from the official website. You should quickly notice the «download» area on the right.
Once the download is finished, run the installer (make sure you have Windows administrator privileges). After allowing the app to make changes to your Windows device and reading the GNU General Public License, the Git Bash installation wizard will prompt you some questions.
The default options should be fine for most users, but there are a couple of questions worthy of your attention. Let’s have a look at these before clicking «Next» blindfold.
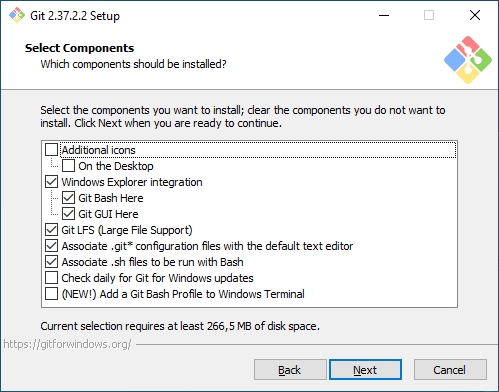
Select Components
On this screen, you can pick the components you would like to install. For instance, you can add the «Additional Icons» component if you want to have a Git Bash shortcut on the desktop.
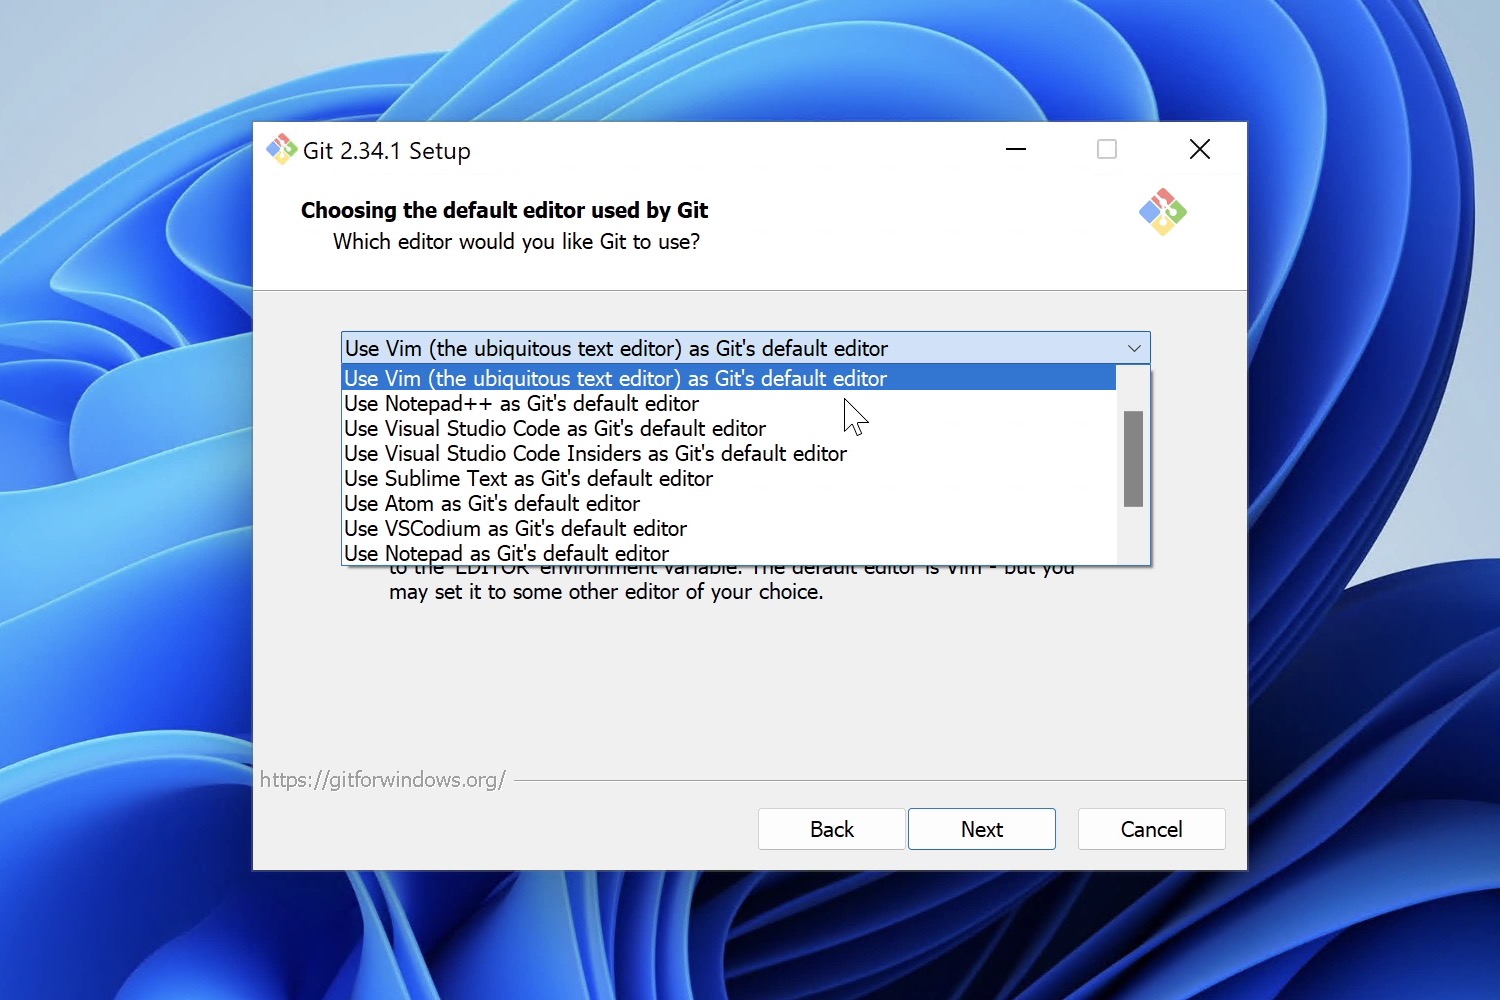
Choosing the Default Editor used by Git
You can use any text editor with Git. For historical reasons, Vim is the default option, but even the wizard recommends switching to a more modern GUI editor, like VS Code or Sublime Text.
We also suggest you pick a different one, unless you’re comfortable with Vim already! Have a look at these suggestions if you haven’t settled for a particular text editor yet.
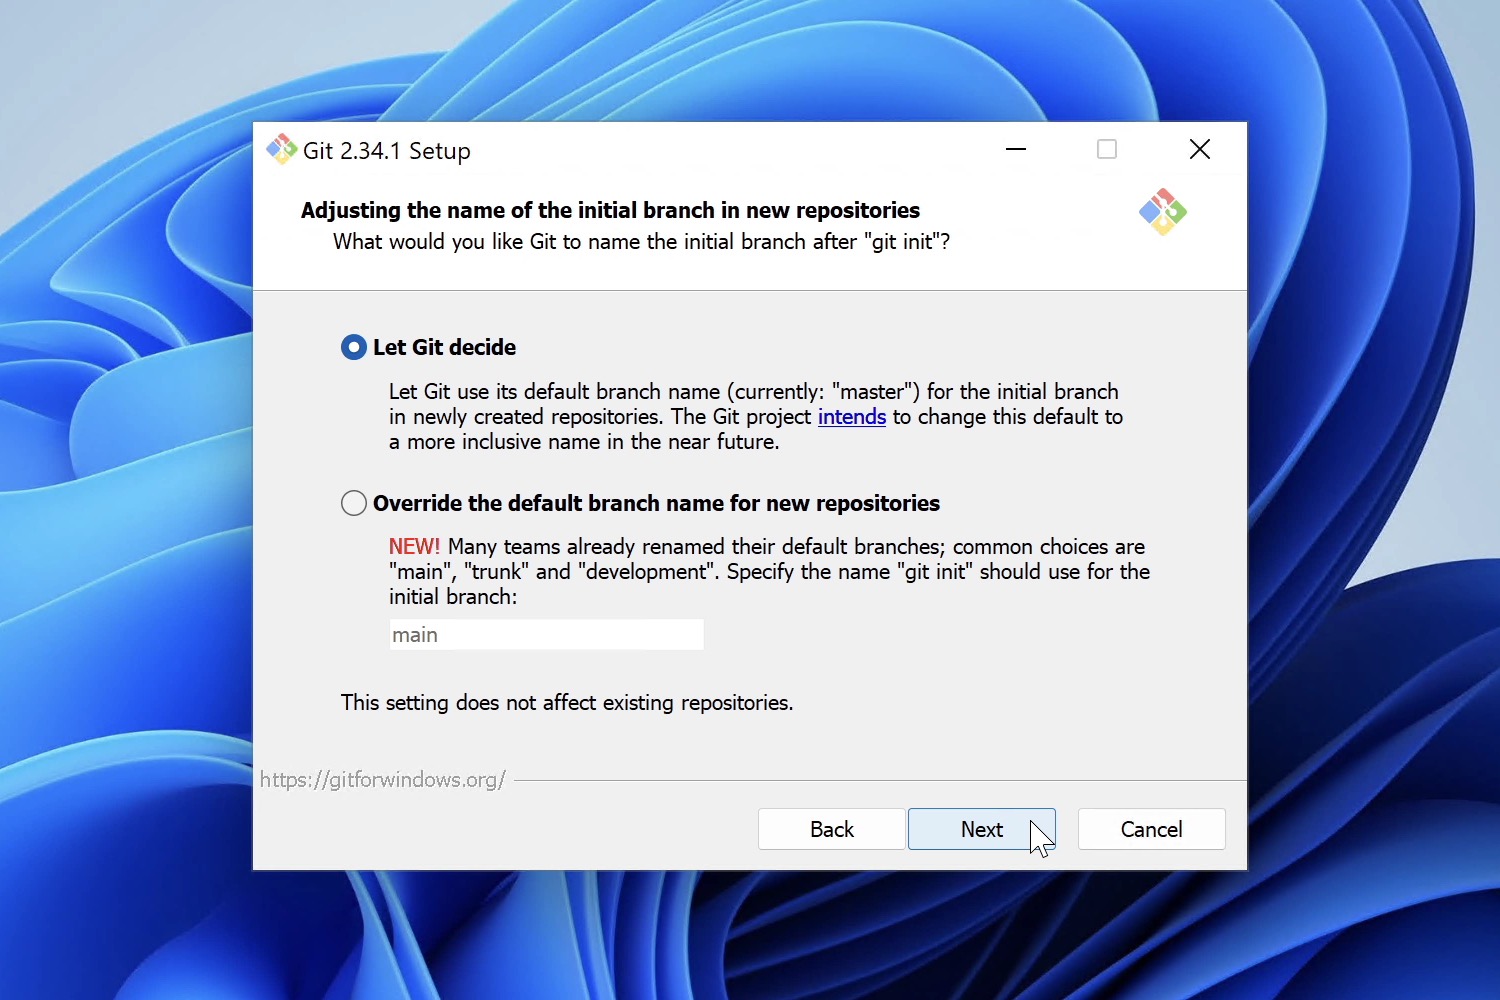
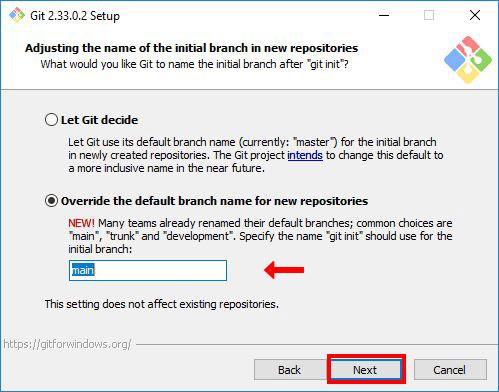
Adjusting the Name of the Initial Branch in New Repositories
When you initialize a new Git repository, you will have an initial branch created for you. The default branch name is «master»; because of the negative association with this word, that is bound to change soon — many organizations in the Git ecosystem, like GitHub or GitLab, are replacing «master» with «main».
While this won’t affect existing repositories, you may want to select «Override the default branch name for new repositories» and type a different default branch name for new projects.
After carefully reviewing these questions, proceed until you complete the Setup Wizard.
If you leave «Launch Git Bash» selected, the Wizard will finish by launching the Git Bash Terminal. Otherwise, you can launch Git Bash from the Windows Start Menu or by right-clicking any folder and selecting the «Git Bash Here» option.
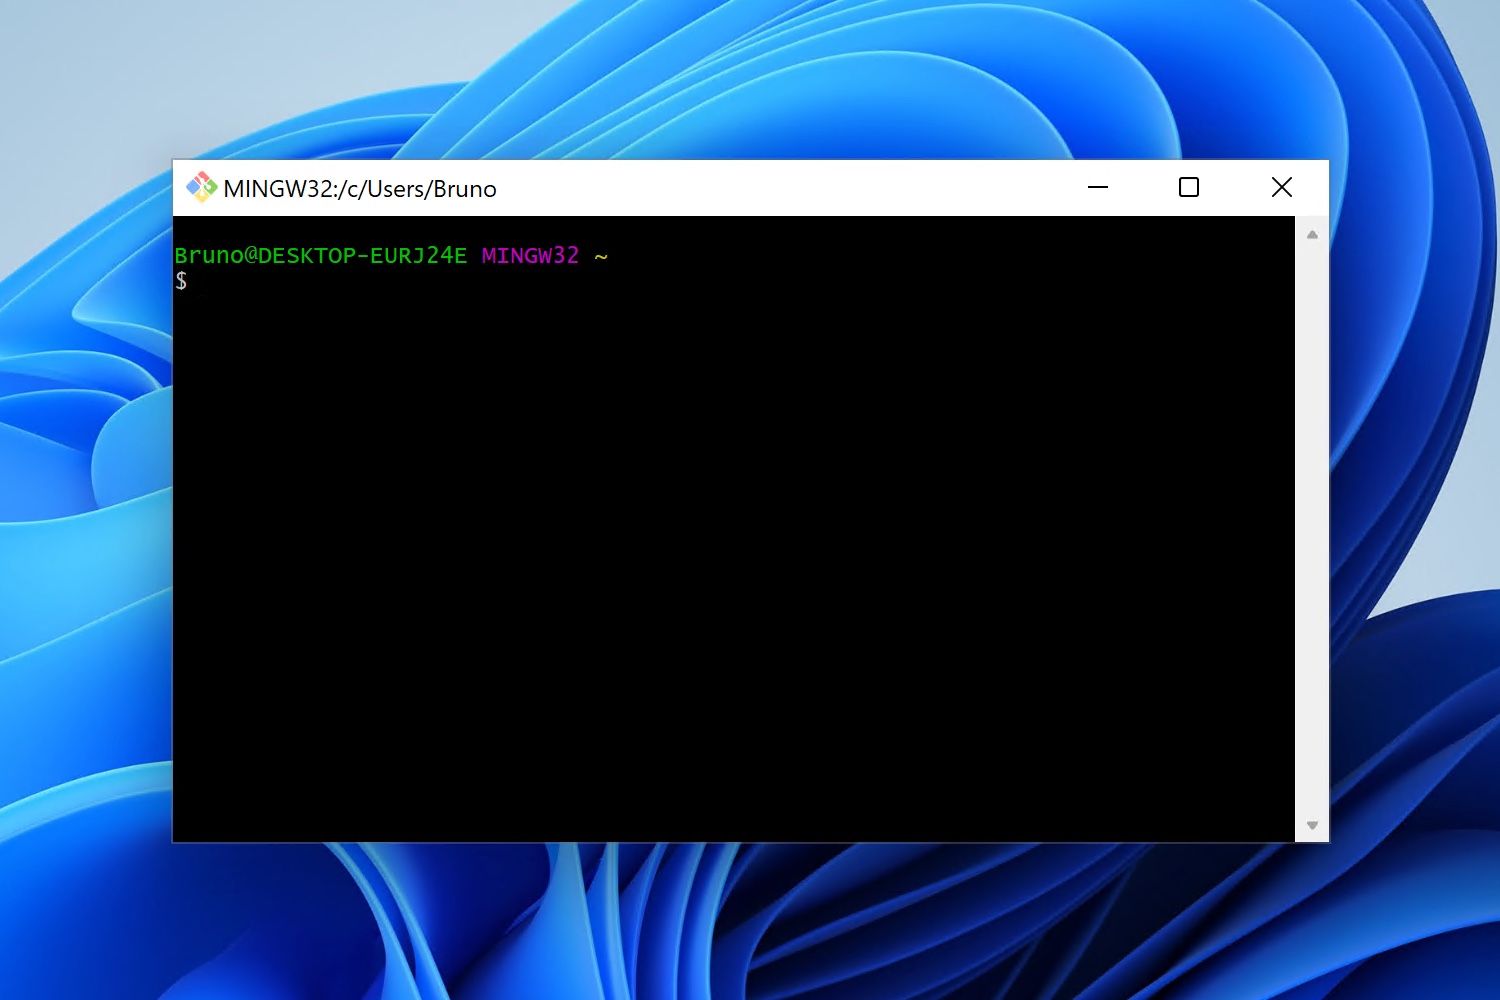
Once in the command line, you can confirm Git is installed by typing git --version (this will tell you the currently installed version). Git will now also work on CMD and Windows PowerShell.
We’re almost there! There’s just one more step…
Defining the Username and Email Address
Before we can start working with Git, we still need to define our username and email address. We will only be able to add commits after setting these options.
To set the username:
git config --global user.name "FIRST_NAME LAST_NAME"To set the email address:
git config --global user.email "MY_NAME@example.com"You can always review all the configuration items by typing:
git config --listIf you prefer, you can also edit these settings with a text editor. Git Bash installed nano, so we could type nano ~/.gitconfig to make some changes directly in the Terminal. When you’re done, press CTRL + X to exit.
We’re all set. Hooray! 🎉
Let’s look into some basic Bash and Git commands next.
Not a Tower user yet?
Download our 30-day free trial and experience a better way to work with Git!
Basic Bash Commands
To be productive with Bash (or any other Shell), you will need to get comfortable with the Terminal. Practising — and a bit of patience — will be key.
Working with Files and Folders
Here are some essential commands you will use every day:
pwd— displays the path of your current working directory;cd <directory>— navigates to specified directory;cd ..— navigates to parent directory;ls— lists directory contents;mkdir <directory>— creates a new directory;touch <file>— creates a new file.
There are many others. I recommend you have a look at this guide to learn the most important commands to work with files and directories. There are also some examples to make it easier to follow along.
You can also download this useful cheat sheet which summarizes the most indispensable commands!

Working with Git
Let’s shift gears to Git now. If you’re new to Git, our online ebook would be a good starting point — it’s aimed at beginners and it’s free!
Git can be used in the command line or with the help of a Git GUI. Git clients can help you work faster with Git by offering a lot of visual aid and more intuitive commands, such as Drag and Drop. You can use both in combination.
Regardless of your Git experience, we suggest you give Tower (our Git client) a try. Tower is available for macOS and Windows and you can try it free for 30 days!
While we recommend Tower to become productive (and confident) with Git, due to its many advanced features, let’s have a look at the most noteworthy Git commands you can type in the Terminal:
git init— creates a new local repository;git clone <repository>— clones an existing repository;git status— lists changed files in your working directory;git add .— adds all current changes to the next commit;git commit— commits previously staged files;git branch <new-branch>— creates a new branch based on your current HEAD;git checkout <branch>— switches to a different HEAD branch;git push <remote> <branch>— publishes local changes on a remote repository;git pull <remote> <branch>— downloads changes from a remote repository and integrates them into HEAD;git merge <branch>— merges the specific branch into your current HEAD.
We also provide a handy Git cheat sheet with the most essential actions listed.
Congratulations! You’re now ready to explore the wonderful world of Git!
We have a lot of free documentation around Git. If you’d like to learn more, visit our Learn section to access videos, webinars and our online book. We share resources for both the Command Line Interface and Tower.
Introduction
In this tutorial you will install Git Bash on your Windows operating system. Git Bash is one of the most popular packages on Windows system. It comprises of git and bash. Git was created in 2005 by Linus Torvalds, and was built around a Unix-based system, such as the Linux operating system and MacOS. These operating systems have a built-in shell called bash that allows Git to run smoothly.
On the other hand, Windows is not a unix-based system and uses a different shell from bash, which git doesn’t support out of the box. To bridge the gap, Git Bash was created. Git bash installs both git and bash shell on a Windows system giving it access to command line tools that allow git to run properly. Additionally, git bash also installs bash tools such as ssh, cat, nano that makes developing on Windows easier.
What is Git?
Git is an open-source version control system for tracking source code changes when developing software. It keeps a commit history which allows you to revert to a stable state in case you mess up your code. Another common use for git is collaboration. git also allows multiple developers to collaborate on the same code base. it tracks all the changes each developer has made, and once the changes are accepted, the changes are merged into one code base which is deployed in production.
What is Bash?
Bash is a Unix command-line shell. The name is an acronym for the ‘Bourne-Again Shell’. A shell is a command line interpreter that gives the user an interface to interact with the computer through the use of commands.
Bash has a lot of useful commands, such as rsync,ssh, SCP, etc., which are not available on windows by default.
Now that you have an idea of that git bash and the tools it installs on Windows, you will download git bash in the next section.
Prerequisites
To follow this tutorial you will need:
- Windows administrator privileges.
- A text editor. You can download Visual Studio Code or Notepad++.
Step 1: Downloading Git Bash
In this section, you will download Git Bash executable from the official website.
Open your preferred browser and visit Git Bash downloads page by clicking the following link: Git Download Page
Once the page loads, click the Download for Windows button.
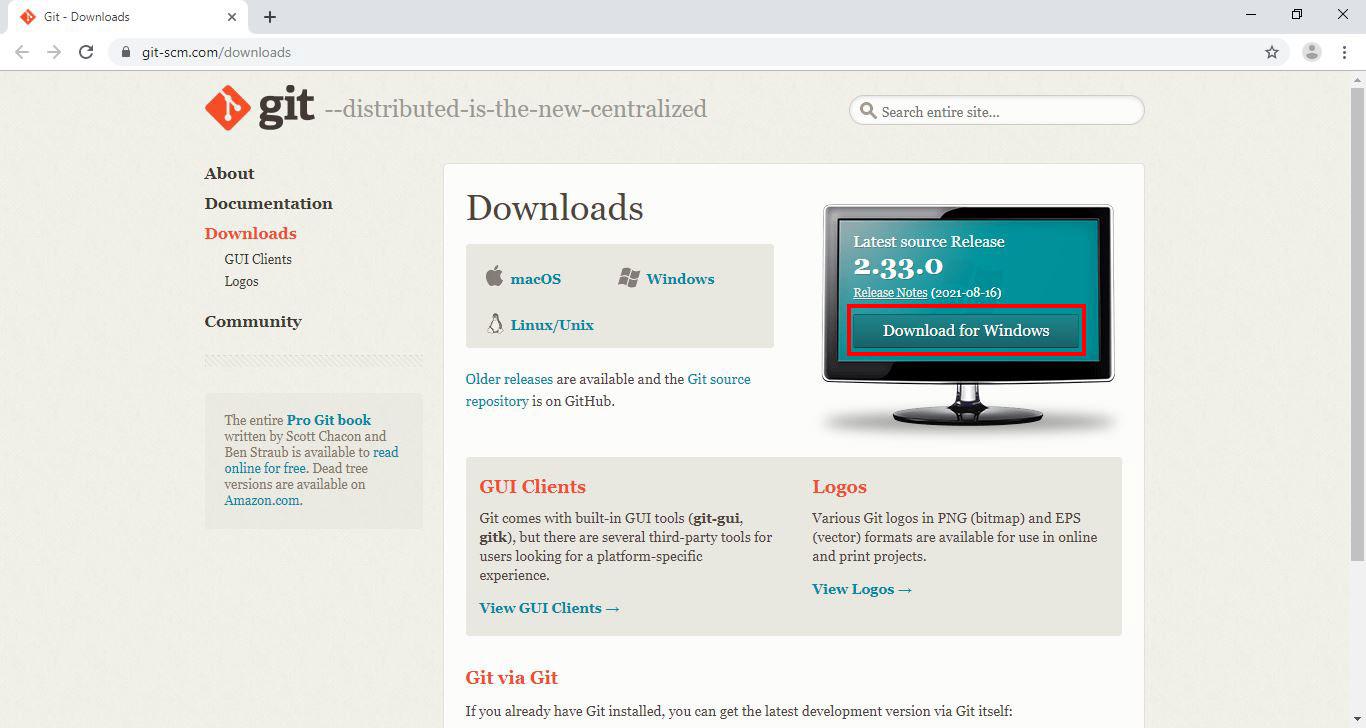
Next, you will be redirected to a different page and download will start automatically in a few seconds.
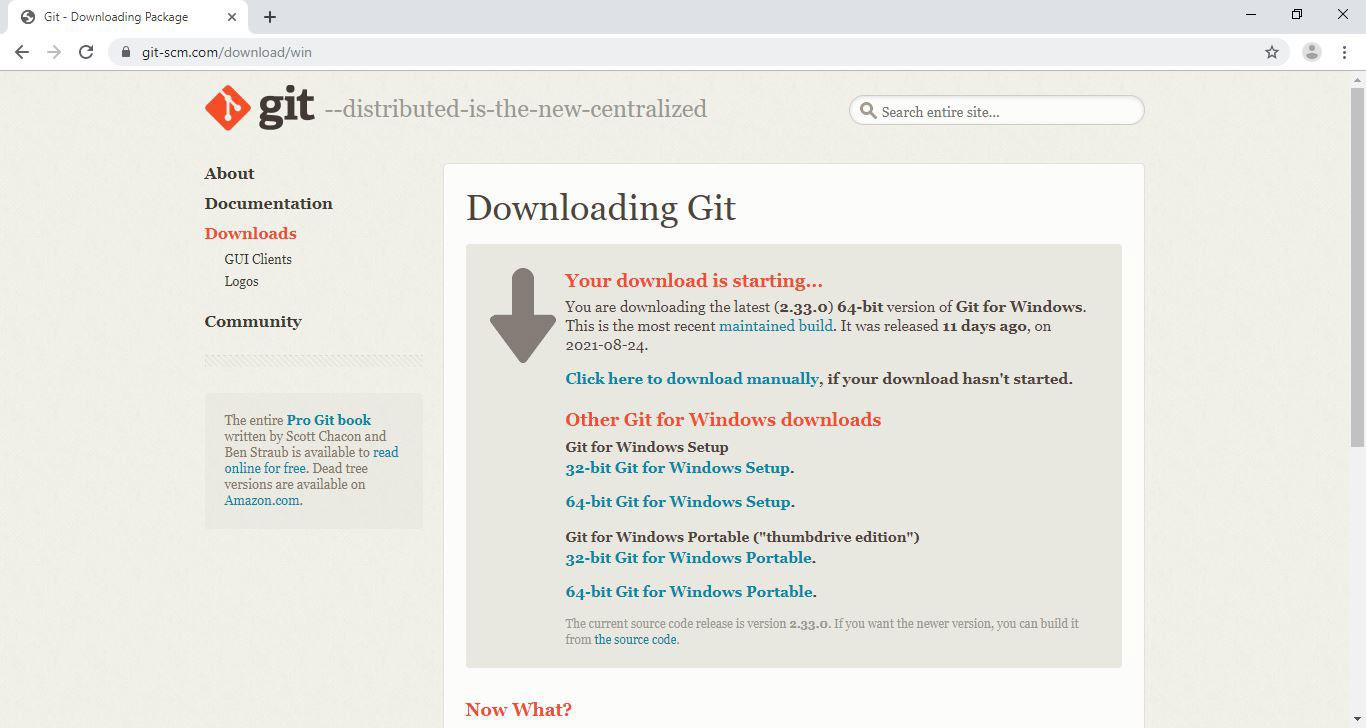
Tip: If the download doesn’t start, click on the click here to download manually link.
Now that you have downloaded the Git Bash executable, you will run the installer.
Step 2: Running the Installer
In this step you will start the Git Bash installation wizard. Go into your Downloads directory or the location where your browser download things in. Click the Git Bash executable(.exe file) to run the installer.
Windows will prompt you with the message «Do you want to allow this app to make changes to your device?», click Yes.
Next, read the GNU General Public License and click Next.
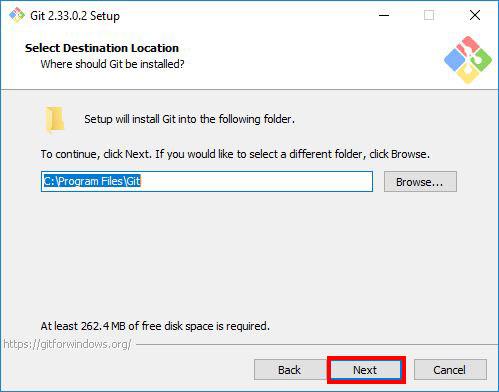
Step 3: Selecting the Destination Location
In this step, the installer will ask you select the location you want to install Git Bash. Proceed with the default option, and click Next.
Step 4: Selecting Components
Select the components you want to install. I prefer selecting the Additional icons component which creates a Git Bash shortcut on the desktop. After you’ve selected the components, click Next.
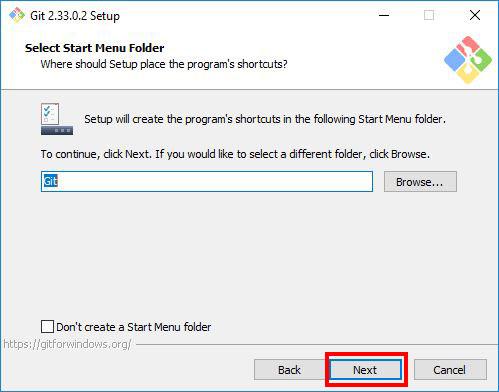
The installer will ask you to choose the folder to create Start Menu folder. Proceed with the default name by clicking Next.
Step 6: Choosing the Default Editor for Git
In this step, the installer will ask you to choose the default editor for Git. By default it chooses Vim, please don’t proceed with the Vim editor as it has a steep learning curve.
Instead, choose a text editor that you like. If you looking for recommendations, you can download Visual studio code or notepad++ which are much easier to use and restart the installation wizard.
I prefer Visual Studio code, so I will select that.
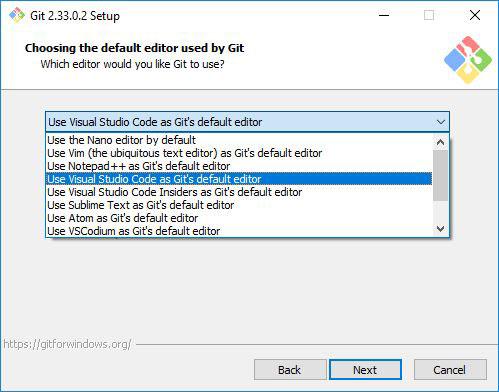
After choosing the editor, click Next.
Step 7: Adjusting the Name of the Initial Branch in New Repositories.
The installer will now ask you to choose the branch name for new repositories. Naming a branch master used to be a popular naming convection, but lately there has been a shift to naming branches main. This due to negative association with the word master. Even GitHub changed the default branch name from master to a more inclusive name main.
So in this step, we will name the branch name main. select the Override the default branch name for new repositories option, and type main. After that, click Next.
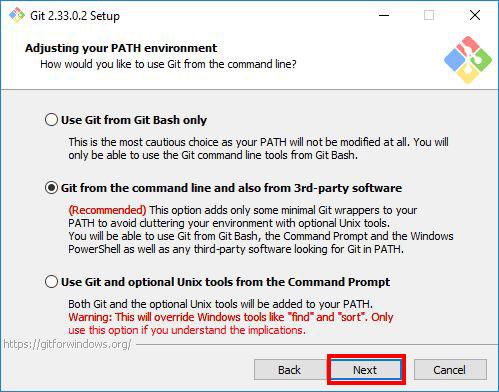
Step 8: Adjusting your PATH Environment
In this section, the installer will ask you to choose how you want to use Git. It offers you the following options:
-
Use Git from Git Bash only: allows you to run Git and Bash commands in the Git Bash terminal only. The commands won’t work on Windows Command Line(CMD) or PowerShell.
-
Git from the command line and also from 3rd-party software(recommended): allows you to run Git commands only on CMD, PowerShell and when you need bash commands, you will need to open the Git Bash terminal.
-
Use Git and optional Unix tools from the Command Prompt: Allows you to run both Git and Bash commands on CMD or Powershell. This option overrides default CMD tools like find and sort.
We will go with the default option Git from the command line and also from 3rd-party software. We will be able to use Git on all terminals: CMD, PowerShell and Git Bash terminal. And we can always open the Git Bash Terminal when we need more bash tools. Click Next to proceed.
Step 9: Choosing the SSH executable
Select the Secure Shell(SSH) client, it’s recommended to go with the default option. So select Use bundled OpenSSH, and click Next.
Step 10: Choosing HTTPS Transport Backend
The installer will ask you to choose the SSL/TLS library for Git HTTPS connections. Proceed with the default option Use the OpenSSL library and click Next.
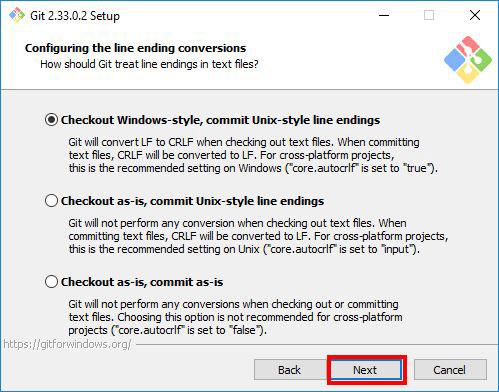
Step 11: Configuring the Line Ending Conversions
In this step, you will be prompted to choose how Git should treat line endings in text files. Since you are on Windows system, go with the default option Checkout Windows-Style, commit Unix-style line endings and click Next.
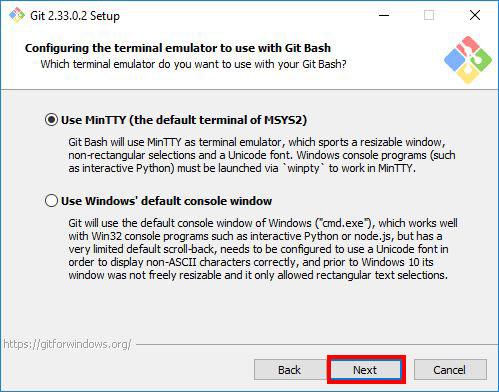
Step 12: Configuring the Terminal Emulator to use with Git Bash
Choose the terminal emulator you want Git Bash to use. MinTTY works well, so I would recommend you to proceed with the default option Use MinTTY(the default terminal of MSYS2) and click Next.
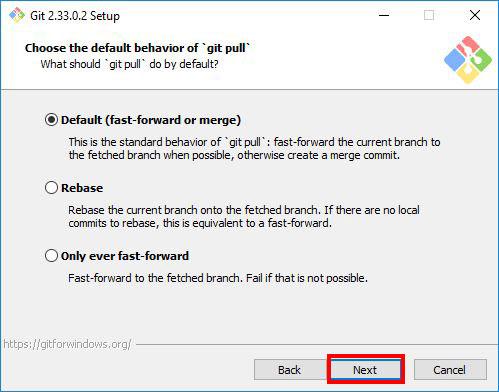
Step 13: Choosing the Default Behaviour of git pull
In this step, the installer asks you if you want to change the default behaviour of git pull(a git command). Unless you know what you doing, proceed with the default option Default (fast-forward or merge) and click Next.
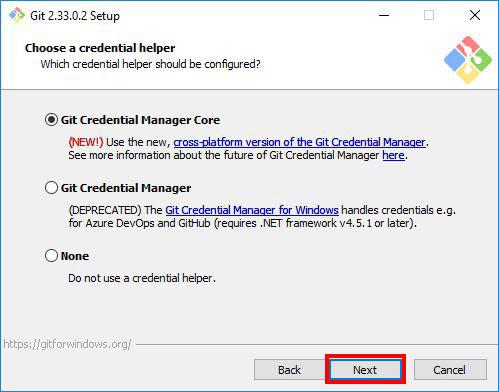
Step 14: Choosing a Credential Manager
In this step, you will be asked to choose a credential manager. Proceed with the default option Git Credential Manager Core and click Next.
Select the features you want. I find the default options sufficient for my needs. You can proceed with them and click Next.
Step 16: Configuring Experimental Options
If you are feeling adventurous, you can try new experimental features. I like to play it safe and I don’t enable them, so I will proceed to start the installation process by clicking Install.
Step 17: Waiting for Git Bash to install
In this step, you take a step back and wait for a few minutes for the Setup Wizard to install Git Bash on your computer.
Step 18: Completing the Installation
After the installation has finished, select Launch Git Bash and click Finish to launch Git Bash.
The Git Bash terminal will now open and you will be able to enter Git and Bash commands.
Congratulations on successfully installing Git Bash.
Step 19: Launching Git Bash
The following are just some tips on how you can easily launch Git Bash.
1. Right-click on any folder, anywhere and it will have the launch Git Bash option on the context menu.
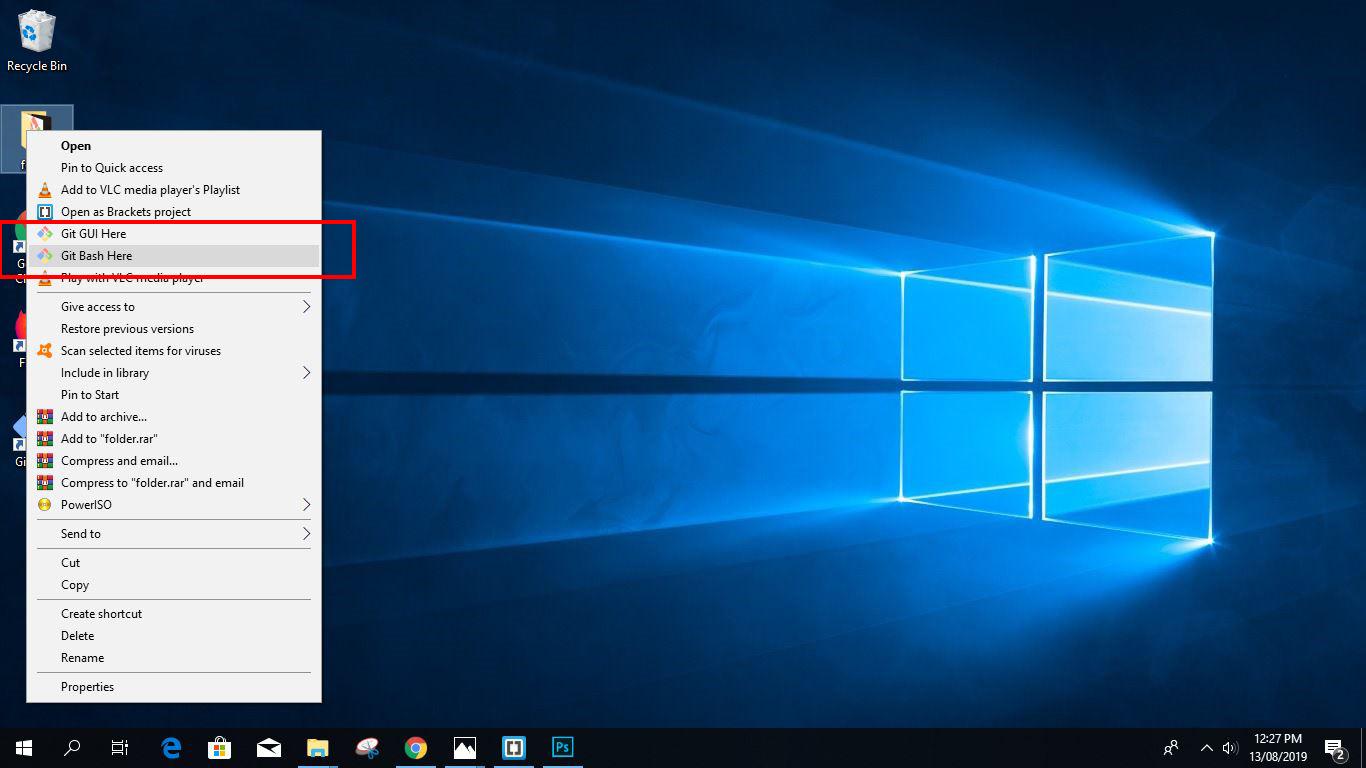
2. If you enabled the «Additional icons» option on Step 4, you can easily launch Git Bash by clicking the Git Bash desktop icon.
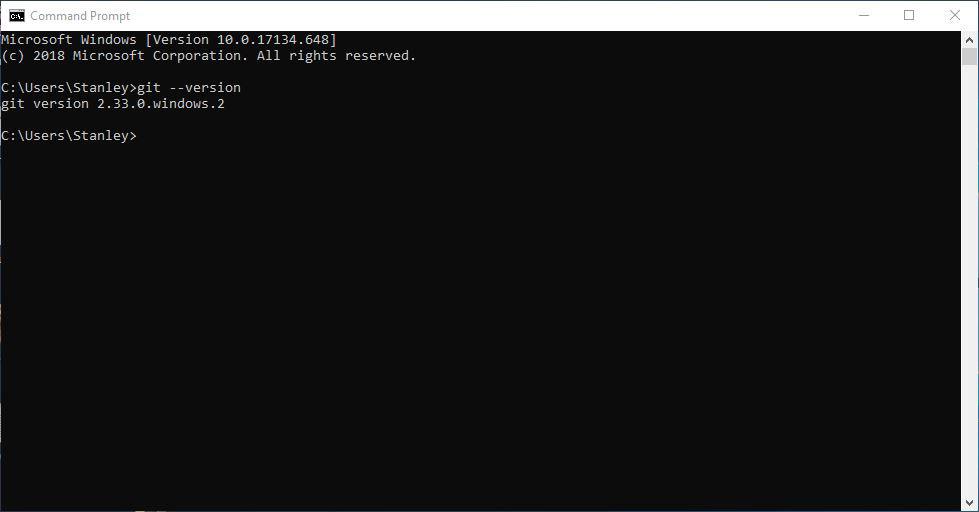
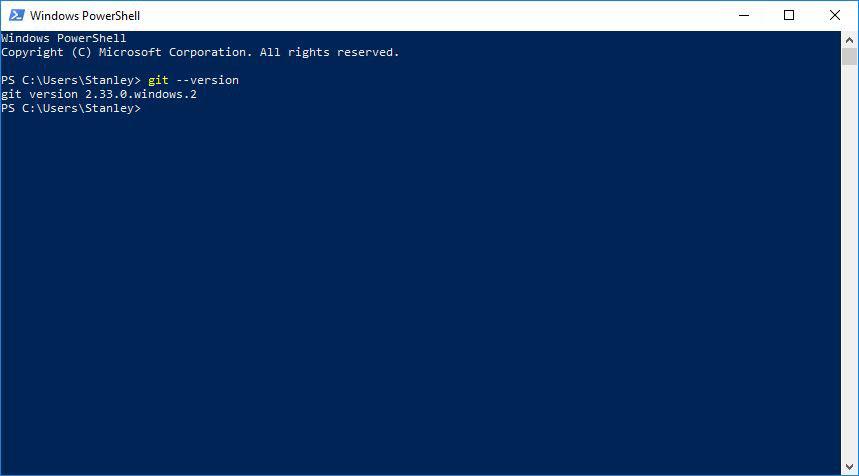
As mentioned in Step 7, you will be able to run Git commands on Git bash terminal, Windows Command Prompt, and Powershell.
Quickly, lets verify that Git works on CMD and PowerShell by typing the following commands:
- git --version
git --version tells you the Git version currently installed on your system.
Conclusion
In this article you installed Git Bash on your windows system. You also verified that Git works on CMD, and PowerShell. You are now ready to start learning Git. Visit gittutorial — A tutorial introduction to Git to learn the basics.
Thanks for reading.