
Некоторые обновления Windows, драйверов, а в некоторых случаях и программных компонентов могут распространяться в виде сжатых файлов с расширением .cab — Windows Cabinet File и не всегда ясно, как именно устанавливать такие файлы.
В этой инструкции подробно о способах установить CAB файлы в Windows 11, Windows 10 и других версиях системы.
Установка CAB в командной строке или PowerShell
Первый способ подойдёт не для всех файлов: обычно он срабатывает лишь для CAB-файлов обновлений Windows. Шаги для установки будут следующими:
- Запустите командную строку или Windows PowerShell от имени администратора.
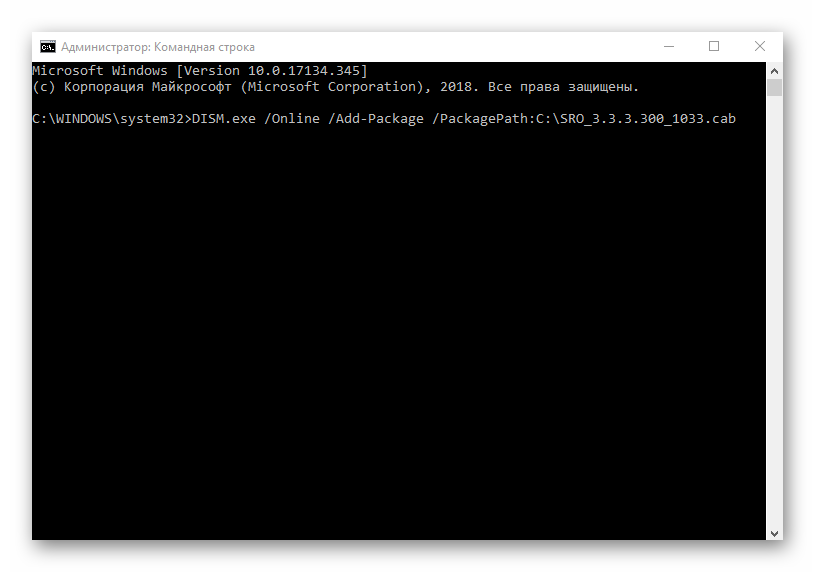
- В командной строке используйте команду
dism /online /Add-Package /PackagePath:"путь_к_файлу.cab"
- В Windows PowerShell команда будет иметь следующий вид:
Add-WindowsPackage -Online -PackagePath "путь_к_файлу.cab"
- Устаревший вариант команды для установки CAB файлов:
pkgmgr /ip /m:путь_к_файлу.cab
Если файл предназначен для установки таким способом, соответствующий пакет будет установлен в Windows, но это происходит не всегда.
Для многих файлов CAB выполнение указанных команд приведёт к появлению сообщения об ошибке 0x80070002 (Ошибка 2) «Не удается найти указанный файл».
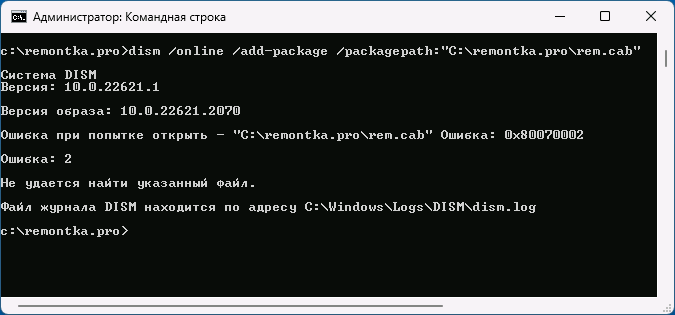
Речь в сообщении об ошибке идёт не о самом файле .cab, а о необходимом для установки описанным способов «вложенном» файле, обычно — update.mum, который содержит сведения для установки пакетов или обновлений Windows описанным способом.
Распаковка файлов CAB и установка вручную
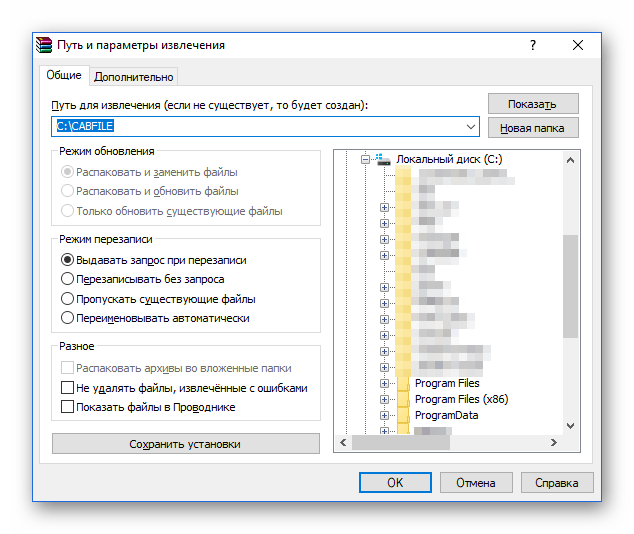
Если установить файл .cab описанным выше способом не получается, вы можете распаковать его содержимое в удобное расположение:
Внимание: не следует использовать проводник для распаковки — несмотря на то, что он «открывает» файл .cab и позволяет скопировать его содержимое, набор файлов, полученный таким образом, будет непригоден к использованию.
После распаковки файла .cab в удобном расположении, в зависимости от его содержимого, вы можете:
- Запустить установку соответствующих файлов, используя находящийся в папке файл установщика .exe или другого типа (при его наличии в папке).
- В случае, если в CAB файле находились файлы драйвера, использовать ручную установку драйвера в диспетчере устройств с указанием папки, подробнее об этом в инструкции Как установить драйвер INF в Windows.
Если у вас остаются вопросы, касающиеся установки файла .cab в Windows, вы можете задать их в комментариях, желательно с описанием того, о каком именно файле идёт речь — возможно, мне удастся вам помочь.
Все способы:
- Как устанавливать пакеты CAB в Виндовс 10
- Способ 1: Диспетчер устройств (для драйверов)
- Способ 2: Консоль (для обновлений системы)
- Способ 3: Lpksetup (для языковых пакетов)
- Вопросы и ответы: 0
Апдейты для операционных систем от Майкрософт изначально поставляются в качестве инсталляционных файлов формата MSU или же с менее распространенным расширением CAB. Также пакеты нередко используются для установки сетевых компонентов и различных драйверов.
Некоторые пользователи Windows 10 сталкиваются с необходимостью установки системных апдейтов в офлайн-режиме. Причины тому обычно имеются разные, будь то возникновение сбоев в штатном механизме Центра обновлений или ограничение трафика на целевом компьютере. О том, где взять и как установить апдейт для Виндовс 10 вручную, мы уже рассказывали в отдельном материале.
Подробнее: Устанавливаем обновления для Windows 10 вручную
Но если с MSU-пакетами все предельно ясно, ведь процесс их установки практически не отличается от других исполняемых файлов, то с CAB придется выполнить чуть больше лишних «телодвижений». Зачем и что для этого нужно делать, мы далее и рассмотрим с вами в данной статье.
Как устанавливать пакеты CAB в Виндовс 10
По сути, пакеты CAB являются очередной разновидностью архивов. В этом с легкостью можно убедиться, выполнив распаковку одного из таких файлов при помощи того же WinRAR или 7-ZIP. Так, извлечь все компоненты придется, если вам нужно установить драйвер из CAB. А вот для обновлений потребуется использовать специальную утилиту в системной консоли.
Способ 1: Диспетчер устройств (для драйверов)
Этот метод подходит для принудительной установки контролирующего ПО устройства стандартными средствами Виндовс 10. Из сторонних элементов вам понадобится архиватор и непосредственно сам CAB-файл.
Читайте также: Обновляем драйвера на Windows 10
- Первым делом скачайте необходимый инсталляционный пакет и извлеките его в отдельную папку корневого каталога диска. Конечно, это не совсем обязательно, но так будет значительно удобнее выполнять дальнейшие действия с сопутствующими файлами.

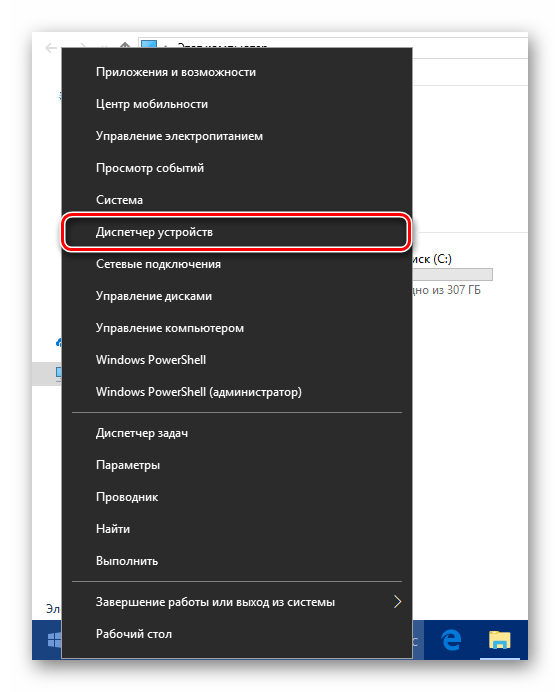
- Щелкните по кнопке «Пуск» правой кнопкой мыши или нажмите «Win + X», а затем выберите пункт «Диспетчер устройств» в контекстном меню.

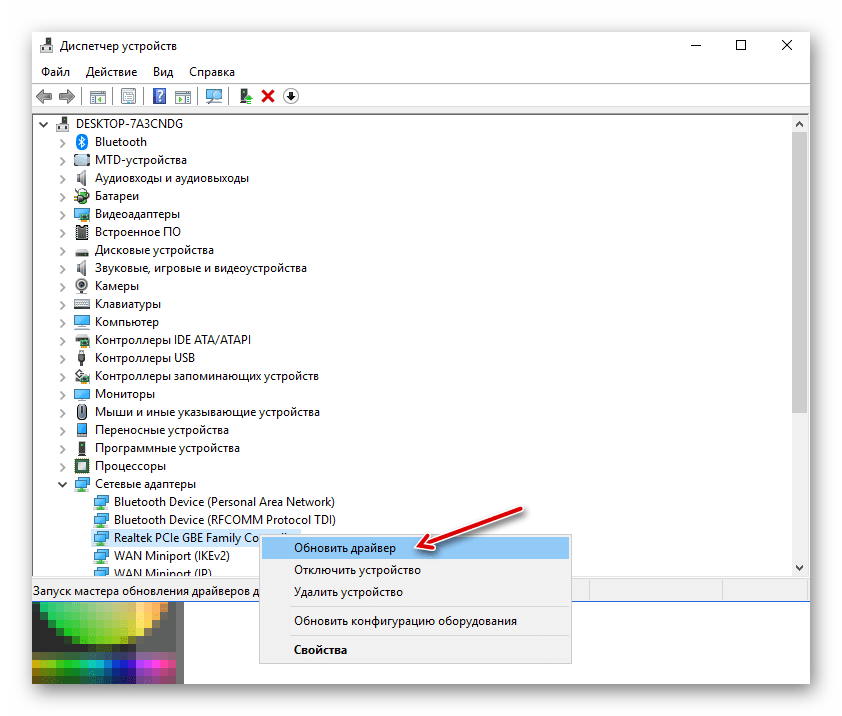
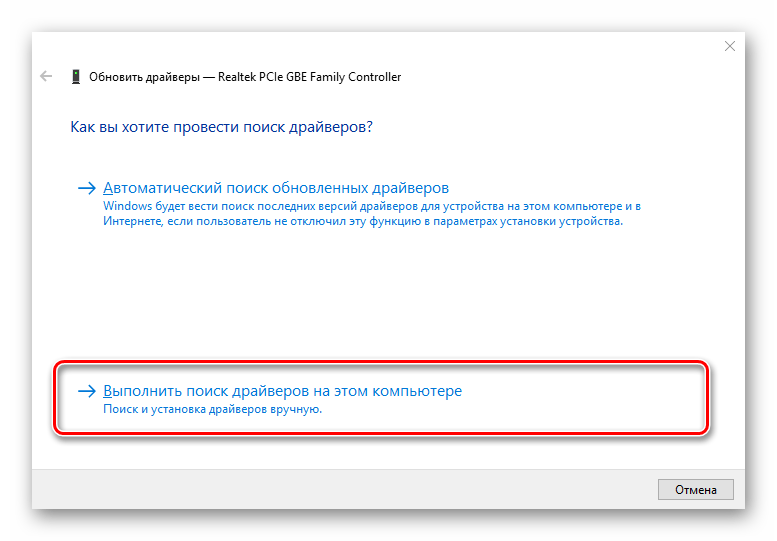
- Найдите нужный аппаратный компонент в открывшемся списке и опять же вызовите для него контекстное меню. Щелкните «Обновить драйвер», чтобы перейти к процессу ручной инсталляции контролирующего ПО для устройства.

Далее нажмите «Выполнить поиск драйверов на этом компьютере».

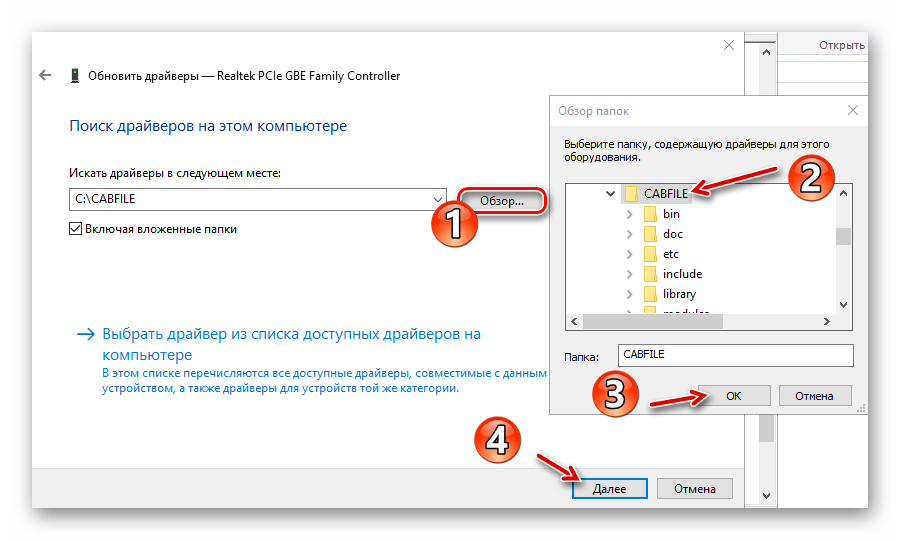
- Теперь щелкните по кнопке «Обзор» и выберите папку, в которую вы извлекли CAB-файл. Затем кликните «Далее», после чего компьютер найдет и установит из указанного каталога соответствующие драйверы для устройства.

Учтите, что инсталлируемый таким образом пакет должен полностью подходить для целевого оборудования. Иначе же после проведения вышеописанной процедуры устройство может перестать корректно функционировать или вовсе откажется работать.
Способ 2: Консоль (для обновлений системы)
Если скачанный вами файл CAB представляет собой инсталлятор для накопительного апдейта Windows 10 или отдельных системных компонентов, здесь уже не обойтись без командной строки или PowerShell. Точнее, нужен нам конкретный консольный инструмент Виндовс — утилита DISM.exe.
Читайте также: Открытие командной строки в Виндовс 10
Указанная программа используется для подготовки и обслуживания системных образов. Также в ней заложен функционал для интеграции апдейтов в систему, что нам, собственно, и требуется.
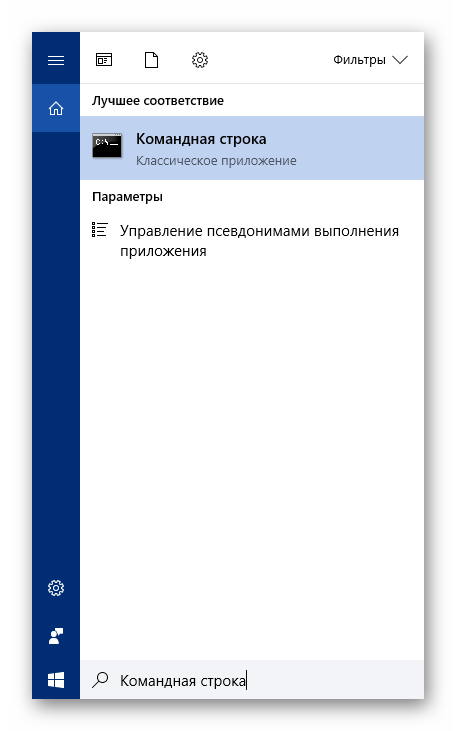
- Чтобы перейти к установке CAB-файла в Виндовс, откройте поисковую строку с помощью комбинации клавиш «Win + S» и введите словосочетание «Командная строка» или «cmd».

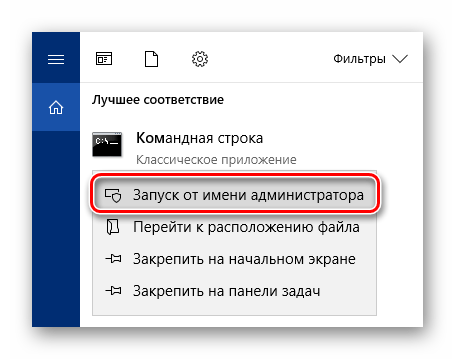
Затем запустите окно консоли с правами администратора. Чтобы выполнить это действие, щелкните по соответствующему приложению правой кнопкой мыши и выберите пункт «Запуск от имени администратора».
и поместите его на целевой аппарат.
- Введите в консоль команду вида:
DISM.exe /Online /Add-Package /PackagePath:"Расположение пакета"При этом вместо слов «Расположение пакета» укажите путь к документу CAB на вашем компьютере. Нажмите клавишу «Enter», чтобы запустить процедуру установки, а по завершении операции перезагрузите компьютер.

Таким образом вы можете вручную устанавливать любые накопительное обновления Windows 10, кроме языковых пакетов, которые также поставляются в виде CAB-файлов. Для этого более корректным будет использовать отдельную утилиту, предназначенную именно для этих целей.
Способ 3: Lpksetup (для языковых пакетов)
При необходимости добавить новый язык в систему, когда подключение к интернету отсутствует или является лимитированным, можно установить его офлайн из соответствующего файла в формате CAB. Для этого скачайте актуальный языковой пакет с проверенного профильного ресурса на устройство с доступом в сеть и поместите его на целевую машину.
- Первым делом откройте окно «Выполнить» при помощи комбинации клавиш «Win + R». В поле «Открыть» введите команду
lpksetupи нажмите «Enter» или «ОК».
- В новом окне выберите «Установить языки интерфейса».

- Нажмите на кнопку «Обзор» и отыщите CAB-файл языкового пакета в памяти компьютера. Затем щелкните «ОК».


После этого, если выбранный пакет совместим с установленной на вашем ПК редакцией Windows 10, просто следуйте подсказкам установщика.
Читайте также: Добавление языковых пакетов в Windows 10
Как видите, есть ряд способов установки файлов формата CAB в десятую версию ОС от Microsoft. Все зависит от того, какой именно компонент вы намерены таким образом инсталлировать.
Наша группа в TelegramПолезные советы и помощь
Installing a CAB file on Windows 11 isn’t as daunting as it sounds. Basically, you need to open Command Prompt, navigate to the location of your CAB file, and use a specific command to install it. Follow these steps, and you’ll have your CAB file installed in no time.
In this guide, we’ll walk you through the steps to install a CAB file on your Windows 11 computer. These steps will help you quickly and easily install the CAB file, ensuring your system is up-to-date or your software is functioning correctly.
Step 1: Open Command Prompt
First, you need to open the Command Prompt with administrative rights.
To do this, click on the Start menu, type “cmd” or “Command Prompt,” right-click on the Command Prompt app, and select “Run as administrator.” This is crucial because installing a CAB file requires elevated permissions.
Step 2: Navigate to the CAB File Location
Next, you need to navigate to the folder where your CAB file is located.
You can use the cd command to change directories. For example, if your CAB file is in the Downloads folder, you would type cd C:UsersYourUsernameDownloads and hit Enter. Make sure you replace “YourUsername” with your actual username.
Step 3: Install the CAB File
Now, it’s time to install the CAB file.
Type the following command: dism /online /add-package /packagepath:filename.cab, where “filename.cab” is the name of your CAB file. Press Enter. This command will start the installation process. Just wait for the Command Prompt to tell you the installation is complete.
Step 4: Restart Your Computer
Finally, restart your computer to apply the changes.
You can simply click on the Start menu, select the power icon, and choose “Restart.” This ensures that all changes are properly applied and your system runs smoothly with the new updates or software.
After completing these steps, your CAB file should be installed, and your system will incorporate the changes. It’s always a good idea to check that everything is working as expected after the restart.
Tips for Installing a CAB File on Windows 11
- Ensure your CAB file is from a trusted source to avoid potential malware issues.
- Always run Command Prompt as an administrator to avoid permission errors.
- Double-check the file path to avoid the “file not found” error.
- If the installation fails, run Windows Update to make sure your OS is up-to-date.
- Keep a backup of your system before installing significant updates.
Frequently Asked Questions
What is a CAB file?
A CAB file, short for Cabinet file, is a compressed file format used by Microsoft to distribute software updates, device drivers, and other system files.
Do I need to restart my computer after installing a CAB file?
Yes, restarting your computer ensures that the changes take effect and your system runs smoothly with the new updates or software.
Can I install a CAB file without using Command Prompt?
Yes, you can also use PowerShell to install CAB files, but Command Prompt is a more straightforward method for most users.
What should I do if I get an error during installation?
First, make sure you are running Command Prompt as an administrator. If the problem persists, check the file path and ensure the CAB file is not corrupt.
Can I uninstall a CAB file?
Yes, you can uninstall updates installed via CAB files by going to the Control Panel, selecting “Programs and Features,” and then “View installed updates.”
Summary
- Open Command Prompt.
- Navigate to the CAB file location.
- Install the CAB file using the
dismcommand. - Restart your computer.
Conclusion
Installing a CAB file on Windows 11 is a straightforward process if you follow the steps outlined above. While it might seem a bit technical at first, you’ll find that using Command Prompt to manage these kinds of files is a skill worth having. It can help you keep your system updated, install necessary drivers, and even troubleshoot issues.
Remember to always ensure your CAB files come from trusted sources to avoid any malware risks. If you encounter problems, don’t hesitate to leverage the tips and FAQs provided in this guide.
By mastering this simple yet crucial task, you take control of your PC’s performance and reliability. So next time you need to install a CAB file, just revisit this guide, and you’ll be good to go!
Matthew Burleigh has been writing tech tutorials since 2008. His writing has appeared on dozens of different websites and been read over 50 million times.
After receiving his Bachelor’s and Master’s degrees in Computer Science he spent several years working in IT management for small businesses. However, he now works full time writing content online and creating websites.
His main writing topics include iPhones, Microsoft Office, Google Apps, Android, and Photoshop, but he has also written about many other tech topics as well.
Read his full bio here.
- On Windows 11, open Command Prompt and run the DISM Add-Package command to install a CAB file.
- You can also install a CAB file using the Add-WindowsPackage PowerShell command.
On Windows 11, you can install a .cab file using Command Prompt with the Deployment Image Servicing and Management (DISM) command-line tool and PowerShell commands. A CAB extension file refers to the cabinet archiving file format that can be used to store compressed files in a file library.
Typically, developers use cabinet files as part of the process of packaging app files. For example, Microsoft sometimes uses the format to distribute standalone updates for Windows 11 and other packages.
If you have a Windows 11 update in a CAB format, you can use Command Prompt or PowerShell to install packages on a computer quickly.
This guide will teach you the steps to install a cabinet file on Windows 11.
- Install CAB file with Command Prompt on Windows 11
- Install CAB file with PowerShell on Windows 11
- Extract CAB file with File Explorer on Windows 11
- Install CAB file for driver update on Windows 11
Install CAB file with Command Prompt on Windows 11
To install a “.cab” file with Command Prompt on Windows 11, use these steps:
-
Open Start on Windows 11.
-
Search for Command Prompt, right-click the top result, and select the Run as administrator option.
-
Type the following command to install the CAB file with Command Prompt and press Enter:
dism /Online /Add-Package /PackagePath:"PATH\TO\CAB"
This example installs the update KB5012592 on Windows 11:
dism /Online /Add-Package /PackagePath:"C:\Users\username\Downloads\Windows10.0-KB5012592-x64.cab"


Once you complete the steps, the package contents will install on Windows 11. If this is an update, you may have to restart the device to complete the installation.
Install CAB file with PowerShell on Windows 11
To install a “.cab” file with PowerShell commands, use these steps:
-
Open Start on Windows 11.
-
Search for PowerShell, right-click the top result, and select the Run as administrator option.
-
Type the following command to install the CAB file on Windows 11 and press Enter:
Add-WindowsPackage -Online -PackagePath "PATH\TO\CAB"
This example installs the update KB5012592 on Windows 11:
Add-WindowsPackage -Online -PackagePath "C:\Users\username\Downloads\windows10.0-KB5012592.cab"


After you complete the steps, the CAB file will install the contents on your computer.
Some developers may use this container to compress a folder to distribute specific content.
To extract a “.cab: file on Windows 11, use these steps:
-
Open File Explorer.
-
Open the folder with the cabinet file.
-
Double-click the “.cab” file.
-
Select all the contents (Ctrl + A keyboard shortcut).
-
Right-click the selection and select the Extract option (Click the OK button in the warning).

-
Select the folder destination to extract the files.
-
Click the Extract button.

After you complete the steps, you can use the files to apply an update, configure a driver, or install an application, depending on the contents of the cabinet file.
Install CAB file for driver update on Windows 11
If the driver package fails to install using Command Prompt or PowerShell, you might be able to extract the contents of the CAB file to install the driver manually.
To update a driver using a .cab file on Windows 11, use these steps:
-
Open File Explorer.
-
Open the folder with the cabinet file.
-
Double-click the “.cab” file.
-
Right-click the selection and select the Extract option (Click the OK button in the warning).
-
Right-click the selection and select the Extract option (Click the Yes button in the warning).
-
Select the folder destination to extract the files.
-
Click the Extract button.
-
Open Start.
-
Search for Device Manager and select the top result.
-
Right-click the device and select the Update driver option.

-
Click the “Browse my computer for drivers” option.

-
Click the Browse button.
-
Select the folder with extracted files from the CAB file.
-
Click the OK button.
-
Click the Next button.
-
Click the Close button.


After you complete the steps, the driver files in the .cab container will install on Windows 11 to set up the component.
Why You Can Trust Pureinfotech
The author combines expert insights with user-centric guidance, rigorously researching and testing to ensure you receive trustworthy, easy-to-follow tech guides. Review the publishing process.
Are you looking to install a Cab file on your Windows 11 system? Well, you’re in luck! Installing a Cab file on Windows 11 can provide you with additional functionality and features. It’s a simple process that can be completed in just a few steps. So, let’s dive right in and discover how to install a Cab file on your Windows 11 device!
To install a Cab file on Windows 11, you’ll need to follow a few steps. First, locate the Cab file that you want to install on your system. This can be done by downloading the file from a trusted source or acquiring it from a software installation disc. Once you have the Cab file, right-click on it and select ‘Extract All’ to extract the contents of the file. After extraction, you can either run the installation file directly to install the software or follow any specific instructions provided with the Cab file. And that’s it! You’ve successfully installed a Cab file on Windows 11 and can now enjoy the additional features it provides.
To install a CAB file on Windows 11, follow these steps:
- Open File Explorer by pressing Win + E.
- Navigate to the location where the CAB file is saved.
- Double-click the CAB file to open it.
- Click the «Extract» button in the toolbar.
- Choose the destination folder where you want to save the extracted files.
- Click «Extract» to start the extraction process.
- After the files are extracted, you can access them in the destination folder.

Why Install Cab Files in Windows 11?
Windows 11 brings a range of new features and improvements, enhancing the overall user experience. However, there may be instances where you need to manually install specific files on your system. One such method is installing Cab files, which are a common file format used for software installation, updates, and driver packages. Installing Cab files can help you troubleshoot issues, update system files, install additional components, and more. This article will guide you through the process of installing Cab files in Windows 11, allowing you to take control of your system’s software and configuration.
What Are Cab Files?
Cabinet files, or Cab files for short, are a type of compressed archive format commonly used in Microsoft software installations and updates. They contain a collection of files, along with metadata such as file attributes and timestamps. Cab files are often used to package drivers, updates, and additional software components. These files are self-contained and can be easily distributed and installed on Windows-based systems. To install a Cab file on Windows 11, you’ll need to utilize specific commands or tools to extract and install the files contained within.
Obtaining the Cab File
The first step in installing a Cab file is to obtain the file itself. Cab files can typically be downloaded from official software or driver sources, such as the manufacturer’s website or Windows Update. Make sure you download the correct version of the Cab file that matches your Windows 11 system architecture (e.g., 32-bit or 64-bit). Once you have downloaded the Cab file, ensure that you remember its location as you will need it later during the installation process.
Using Command Prompt to Install Cab Files
Command Prompt is a powerful tool in Windows 11 that allows you to execute various system commands and perform administrative tasks. To install a Cab file using Command Prompt, follow these steps:
- Open Command Prompt as an administrator by right-clicking on the «Start» button and selecting «Command Prompt (Admin).»
- In the Command Prompt window, navigate to the directory where the Cab file is located. You can use the «cd» command followed by the file path to change directories.
- Once you are in the directory containing the Cab file, use the «DISM» (Deployment Image Servicing and Management) command to install the Cab file. The command syntax is as follows:
dism /online /add-package /packagepath:"C:\Path\To\Cab\File.cab" - Replace
"C:\Path\To\Cab\File.cab"in the command with the actual file path of the Cab file you want to install. - Press «Enter» to execute the command and start the installation process.
- Wait for the Cab file to install. Once the installation is complete, you will see a message indicating the success of the installation.
Using PowerShell to Install Cab Files
PowerShell is another versatile command-line tool in Windows 11 that provides more advanced scripting capabilities. To install a Cab file using PowerShell, follow these steps:
- Open PowerShell as an administrator by right-clicking on the «Start» button, selecting «Windows PowerShell (Admin).»
- In the PowerShell window, navigate to the directory where the Cab file is located using the «cd» command, similar to the Command Prompt method.
- Once you are in the directory containing the Cab file, use the following command to install the Cab file:
Add-WindowsPackage -PackagePath "C:\Path\To\Cab\File.cab" - Replace
"C:\Path\To\Cab\File.cab"in the command with the actual file path of the Cab file you want to install. - Press «Enter» to execute the command and initiate the installation process.
- Allow the installation process to complete. You will receive a notification or confirmation message once the Cab file has been installed successfully.
Verifying the Installation
After installing the Cab file, it is essential to verify its successful installation and ensure that the intended changes or updates have been applied. Here are a few methods to verify the installation:
- Check Windows Update History: Open the Settings app, go to «Windows Update,» and click on «View update history.» Look for the Cab file installation entry in the list to confirm its installation.
- Confirm Driver Installation: If you installed a Cab file containing drivers, you can check the Device Manager to see if the drivers are listed and functioning correctly.
- Test Software or Component: If the Cab file installed additional software or components, launch the relevant application or feature to ensure that it is working as expected.
Exploring Additional Uses for Cab Files
Aside from the installation of system files, drivers, and software components, Cab files can serve other purposes in Windows 11. Some additional uses for Cab files include:
- Extracting Files: Cab files can be extracted using native Windows tools or third-party software, allowing you to access the individual files contained within the Cab file.
- Customizing Windows Installations: Cab files can be used to include customizations, such as additional drivers or software, during Windows installation using unattended setup scripts.
- Modifying System Components: Advanced users and developers can modify system files and components contained within Cab files to customize or enhance specific aspects of Windows functionality.
Extracting Files from Cab Files
If you need to extract individual files from a Cab file, you can do so using built-in Windows tools or third-party software. Here’s how to extract files from a Cab file using Command Prompt:
- Open Command Prompt as an administrator.
- Navigate to the directory where the Cab file is located using the «cd» command.
- Use the following command to extract the files:
expand -F:* "C:\Path\To\Cab\File.cab" "C:\Path\To\Destination\Folder" - Replace
"C:\Path\To\Cab\File.cab"with the actual path of the Cab file and"C:\Path\To\Destination\Folder"with the desired folder location to extract the files. - Press «Enter» to execute the command and extract the files from the Cab file.
- You will find the extracted files within the specified destination folder.
Using Cab Files in Unattended Windows Installations
Unattended Windows installations, also known as silent or automated installations, allow you to customize and automate the Windows installation process. Cab files can be used to include additional drivers, software packages, or customizations during these installations. To utilize Cab files in unattended Windows installations, you will need to create an answer file (e.g., an XML file) that references the Cab file and specifies the desired components and configurations. This advanced topic is beyond the scope of this article but can be a powerful tool for system administrators and IT professionals.
Conclusion
Installing Cab files in Windows 11 allows you to take control of your system’s software and configuration. Whether you need to troubleshoot issues, update system files, or install additional components, Cab files can be a valuable resource. By following the steps outlined in this article, you should now have the knowledge and tools needed to install Cab files using Command Prompt or PowerShell. Remember to verify the successful installation of Cab files and explore additional uses, such as file extraction and customization. Harness the power of Cab files to enhance your Windows 11 experience and optimize your system according to your needs.

Installing Cab File on Windows 11
If you need to install a Cab file on Windows 11, follow these steps:
- Make sure you have administrative privileges on your Windows 11 device.
- Download the Cab file from a trusted source.
- Create a new folder on your computer to extract the contents of the Cab file.
- Right-click on the Cab file and select «Extract All» from the context menu.
- Choose the destination folder where you want to extract the contents.
- Click «Extract» to extract the files from the Cab file.
- Once the extraction is complete, you can use the extracted files as needed.
By following these steps, you will be able to successfully install a Cab file on your Windows 11 device.
Key Takeaways — How to Install Cab File Windows 11
- 1. Download the Windows 11 cab file from a trusted source.
- 2. Open the Command Prompt as an administrator.
- 3. Navigate to the folder where the cab file is located.
- 4. Use the DISM tool to install the cab file: «dism.exe /Online /Add-Package /PackagePath:C:\path\to\cabfile.cab»
- 5. Wait for the installation process to complete.
Frequently Asked Questions
Installing cab files is a common task when it comes to managing and updating Windows operating systems. Here are some frequently asked questions related to installing cab files on Windows 11.
1. Can cab files be installed on Windows 11?
Yes, cab files can be installed on Windows 11. Cab files contain compressed system files that are used for installing updates, drivers, and various system components. To install cab files on Windows 11, you can use the built-in DISM (Deployment Image Servicing and Management) tool.
The DISM tool allows you to add, remove, or update system files in a Windows image. It is a command-line tool that can be run from the Command Prompt or PowerShell. With the DISM tool, you can install cab files by specifying the path to the cab file and the destination where you want to install it.
2. How do I use the DISM tool to install cab files on Windows 11?
To use the DISM tool to install cab files on Windows 11, follow these steps:
Step 1: Open Command Prompt or PowerShell with administrative privileges.
Step 2: Type the following command and press Enter:
dism /online /add-package /packagepath:"C:\path\to\cabfile.cab"Replace «C:\path\to\cabfile.cab» with the actual path to the cab file you want to install. The DISM tool will then start the installation process and update the necessary system files with the contents of the cab file.
Note that you may need to restart your computer for the changes to take effect. It’s also important to ensure that you have the correct version of the cab file for your specific version of Windows 11.
3. Can I install multiple cab files at once on Windows 11?
Yes, you can install multiple cab files at once on Windows 11 using the DISM tool. To do this, you can specify multiple /packagepath parameters followed by the paths to the cab files you want to install. For example:
dism /online /add-package /packagepath:"C:\path\to\cabfile1.cab" /packagepath:"C:\path\to\cabfile2.cab"This command will install both «cabfile1.cab» and «cabfile2.cab» in one go. Make sure to replace the file paths with the actual paths to the cab files you want to install.
4. How can I check if a cab file is installed on Windows 11?
To check if a cab file is installed on Windows 11, you can use the DISM tool with the /Get-Packages parameter. Here’s how:
Step 1: Open Command Prompt or PowerShell with administrative privileges.
Step 2: Type the following command and press Enter:
dism /online /get-packages /format:tableThis command will display a list of installed packages, including any cab files that have been installed. You can search for the specific cab file you’re looking for in the list.
If the cab file is listed, it means it is installed on your Windows 11 system.
5. Can I uninstall a cab file from Windows 11?
Yes, you can uninstall a cab file from Windows 11 using the DISM tool. To uninstall a cab file, follow these steps:
Step 1: Open Command Prompt or PowerShell with administrative privileges.
Step 2: Type the following command and press Enter:
To conclude, installing a CAB file in Windows 11 is a simple and straightforward process. By following the steps outlined in this guide, you can effortlessly add new system components or update existing ones on your computer. Remember to download the correct CAB file from a trusted source and ensure compatibility with your Windows 11 version.
Once you have the CAB file, use the DISM command-line tool or the Device Manager to install it. Both methods offer a convenient way to incorporate the desired changes into your system. Just make sure to follow the instructions closely and take note of any error messages that may arise. With a bit of patience and attention to detail, you’ll be able to successfully install CAB files on Windows 11 and enhance your computing experience.