
Windows firewall can be enabled/disabled from command line using netsh command.
Windows 10 / Windows 8/ Windows 7 / Server 2008 /Vista:
Let’s see the syntax of netsh advfirewall to configure firewall on these Windows versions. Firewall settings are different for each of the 3 networks(Domain, private, public). So based on which network firewall you want to enable/disable, the command would vary.
You can turn on firewall for the current network profile(does not matter if it’s domain/private/public network) using the below command.
netsh advfirewall set currentprofile state on
Turn off firewall for the current profile:
netsh advfirewall set currentprofile state off
These commands should be run from an elevated administrator command prompt. Otherwise you would get the below error.
C:\>netsh advfirewall set  currentprofile state on
The requested operation requires elevation (Run as administrator).
To enable/disable firewall for a specific network profile, you can use the below commands.
Domain network
Turn on Domain network firewall:
netsh advfirewall set domainprofile state on
Turn off domain network firewall:
netsh advfirewall set domainprofile state off
Private network
Turn on private network firewall:
netsh advfirewall set privateprofile state on
Turn off private network firewall:
netsh advfirewall set privateprofile state off
Public network
Turn on public network firewall:
netsh advfirewall set publicprofile state on
Turn off public network firewall:
netsh advfirewall set publicprofile state off
Configure for all networks
Turn on firewall for all networks
netsh advfirewall set allprofiles state on
Turn off firewall for all networks
netsh advfirewall set allprofiles state off
Older Windows versions – XP / Server 2003:
Below is the command to turn on firewall.
netsh firewall set opmode mode=ENABLE
The command to turn off firewall is:
netsh firewall set opmode mode=DISABLE
Administrator privileges are required to configure firewall so above command can be run only from admin accounts.
netsh firewall is deprecated in new versions.
In Windows 10/ 8 / 7 / Vista/ Server 2008, ‘netsh firewall‘ command prints message like below.
c:\>netsh firewall set opmode mode=ENABLE
IMPORTANT: "netsh firewall" is deprecated;
use "netsh advfirewall firewall" instead. Though the command still works,
 it's preferable to use the new set of commands provided with netsh command.
Related Posts:
How to turn off firewall in Windows 7
Given the rise of online threats, enabling a firewall on Windows is more important now than ever. In general, starting the firewall is not something that requires you to be super tech savvy. For the most part, you need to navigate through a few menus and select “Turn on Windows Defender Firewall.”
But is there an easier way to do it? Of course, there is. It removes the hassle of traversing the Windows menus, though you will need to use the Command Line. With this in mind, you should know that the commands in this article are straightforward and there is no risk of messing up your system.
The following methods apply to Windows 7 and 10 and the article also includes sections on how to firewall particular apps from the Command Line.
Starting or Stopping Windows Firewall
Step 1
First, you need to run the Command Prompt with administrative privileges. Click the Start menu and search for Command Prompt. Once the app appears in the results, right-click, and choose “Run as administrator.”

Step 2
When the app pops up, type the following command into the command line.
netsh advfirewall set allprofiles state on
Hit Enter and your firewall will instantly switch on. If you wish to stop it, just end the command with off instead of on. Here’s what the turn off command looks like:
netsh advfirewall set allprofiles state off
Note: Command Prompt allows you to make changes without typing or copying and pasting the command twice. For example, you can use the arrow keys and go to the previous command, then replace on with off (or vice versa) and hit Enter.
Blocking Specific Apps
The command to block specific apps from Command Prompt is a bit more complicated. But if you follow the instructions to the T, you shouldn’t have any problems with it. Before you get to the steps, it’s important to make a distinction between outbound and inbound rules.
Outbound/Inbound Rules Explained
These rules follow a straightforward logic. The outbound rules prevent an app from sending information from your PC and the inbound ones prevent an app from receiving information. Of course, these rules work both ways. You can easily turn them back on after you disable inbound/outbound data for any particular app. The path to this from the Windows user interface is simple.
Firewall & Network Protection > Advanced Settings > Outbound > New Rule
If you’d like to manage inbound rules, click on the Inbound Rules tab in the Windows Defender Firewall with Advanced Security window.
Then, you chose Program under Rule Type, click the Next button, and follow the onscreen wizard. On the other hand, the Command Prompt method is not that straightforward and there are certain decisions to be made. These are the steps you need to follow.
Step 1
First, determine if you want to block the outbound or inbound data and find the exact file path of the app. For example, let’s say you’d like to prevent Chrome from going online.
Find Chrome .exe file on your system (it should be in C:\Program Files) and copy the entire path to your clipboard. The path should look like this.
C:Program Files (x86)GoogleChromeApplicationchrome.exe
Step 2
Run Command Prompt as an administrator and execute the following command with the app path included.
netsh advfirewall firewall add rule name=”Chrome block” program=”C:Program Files (x86)GoogleChromeApplicationchrome.exe” dir=out action=block profile=public
Now you can run Chrome to see whether the command worked.
Important Notes
The file path for the app you want to block/allow goes inside the parenthesis. The command line section is program=”” dir … and if you want to block inbound data put in instead of out next to dir – dir=in. To unblock an app, replace block with allow next to action – action=allow.
Using App Port Number
There is also an option to put an app behind a firewall using its port number and here are the necessary steps.

Step 1
Go to the Start menu, search for Resource Monitor, and run the app with administrative privileges. Right-click the app and select “Run as administrator.”
Step 2
Click the Network tab in Resource Monitor and open Listening Ports. Find the port number and enter it into the command. This explanation assumes you’ve already opened Command Prompt (with administrative privileges on) and we’ll also use the Chrome example. This is the command you need.
netsh advfirewall firewall add rule name=”Chrome block” localport=443 protocol=tcp dir=out action=block profile=public
If you’re not sure about the exact port number, you can block a range and use port=1500-3000 instead of localport=443.
Deleting the Command
As you are not likely to keep Chrome blocked forever, check out the command to delete this rule.
netsh advfirewall firewall delete rule name=”Chrome block”
Just hit Enter after you type the command and everything should revert back to normal.
Build a Wall Around Your PC
The commands to start or stop windows firewall are easy to use, even if you have never opened Command Prompt before. Admittedly, firewalling a specific app takes a bit more skill, but it’s not something you cannot do.
While we are at it, which apps would you like to put behind the firewall? And do you always keep the firewall on? Give us your take on the matter in the comments section below.
As part of its built-in security suite, both Windows 11 and Windows 10 offer a powerful firewall application named Windows Defender Firewall. Whether you want to turn off the Windows Firewall or just to make sure it is running to protect your PC, you first need to know how to access it. Without further ado, let’s see all the methods to open the Windows Defender Firewall:
NOTE: This guide covers Windows 11 and Windows 10. If you do not know which version of Windows you have, read this tutorial: How to tell what Windows I have (11 ways).
1. Open the Windows Defender Firewall using the search
Windows Defender Firewall is a simple tool for managing incoming and outgoing connections on your Windows device. If you want to know more about the feature, read this article: Windows Defender Firewall with Advanced Security: What is it? How to open it? What can you do with it?
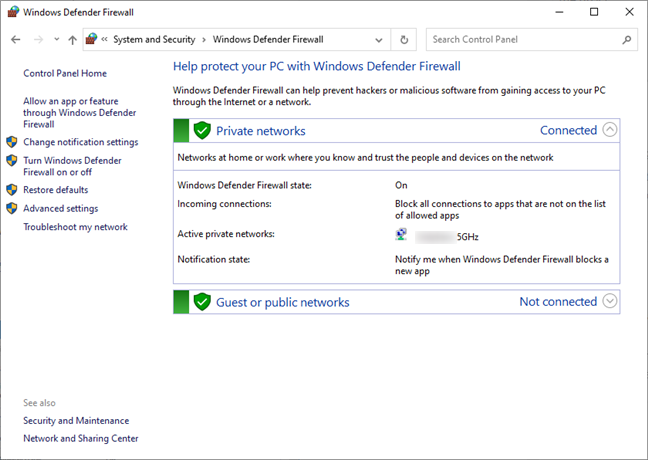
The Windows Defender Firewall page
The easiest way to access Windows Defender Firewall is to look for it using the search feature in Windows. For Windows 11, start by pressing Windows + S on your keyboard or by clicking/tapping the magnifier icon on the taskbar, then type “firewall” in the search box, and finally click or tap the Windows Defender Firewall search result.
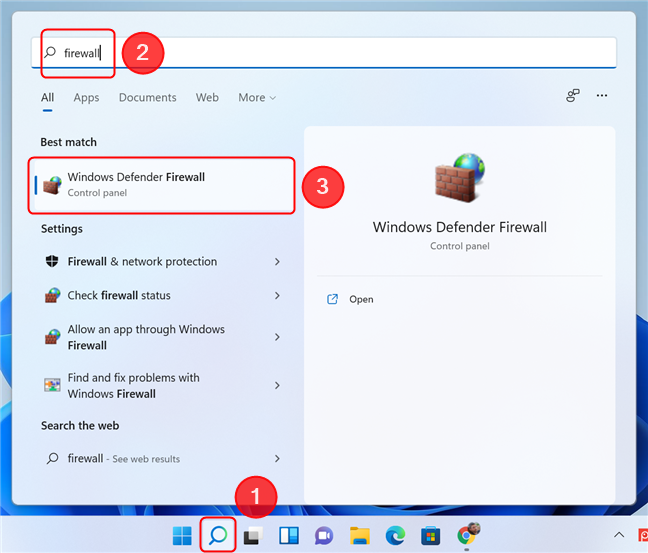
Use Search in Windows 11 to open Windows Defender Firewall
In Windows 10, the steps are similar. Press Windows + S or just type in “firewall” in the search box located on the taskbar, then select the Windows Defender Firewall search result.
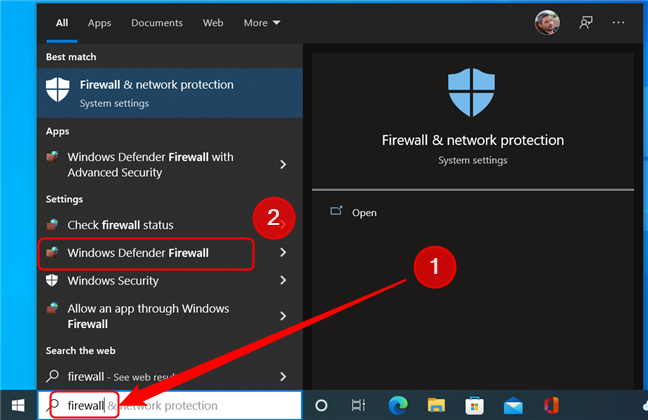
Open Windows Defender Firewall in Windows 10 by using the Search feature
TIP: You can also use the Start Menu to initiate a search. Simply open it by pressing the Windows key or clicking the Start button on the taskbar, then start typing.
2. Start the Windows Defender Firewall using Control Panel
The Windows Firewall can be accessed from the Control Panel too. Open the Control Panel and go to System and Security. Next, click or tap on Windows Defender Firewall.
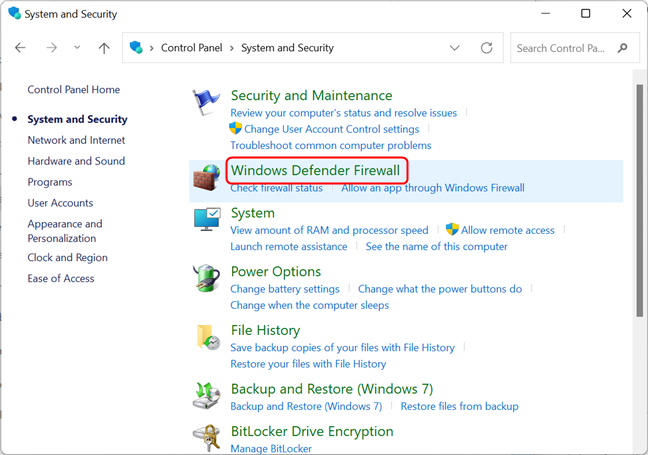
Open Windows Defender Firewall from the Control Panel
Alternatively, you can input “firewall” in the Control Panel search box located in the top-right corner of the window. Then, in the list of search results, click or tap Windows Defender Firewall.

Use the search box in the Control Panel to locate the Windows Defender Firewall page
3. Open Windows Defender Firewall using the Settings app
You can also reach the Defender Firewall page by opening the Settings app, then typing “firewall” and selecting Windows Defender Firewall in the drop-down result list. Here’s how it looks in Windows 11:
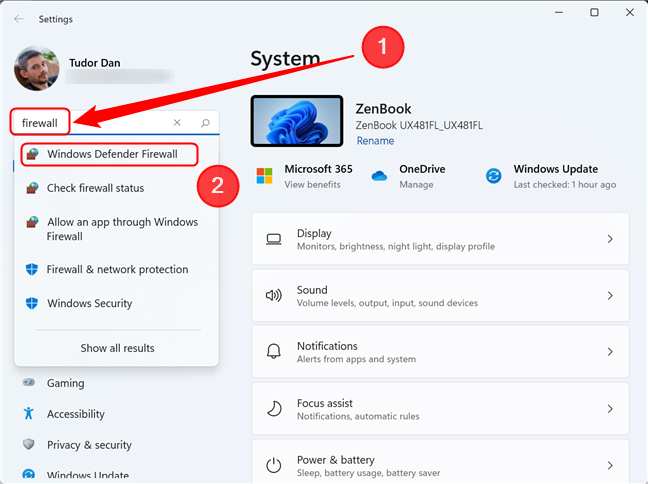
Search for Windows Defender Firewall in the Settings app in Windows 11
In Windows 10, the steps are the same: open Settings and type “firewall” in the Search box, then click the appropriate result.
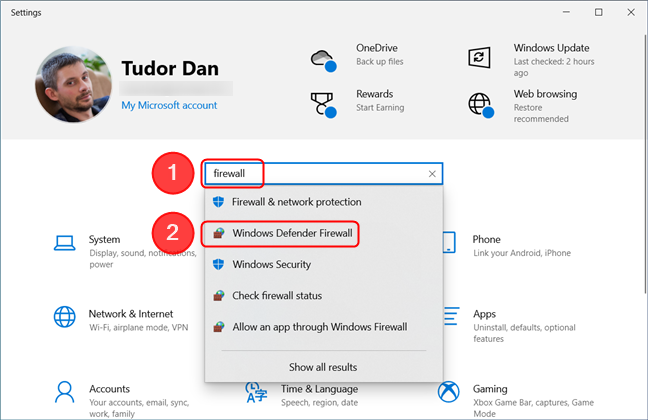
Locating the Windows Defender Firewall using the Settings app is similar in Windows 10
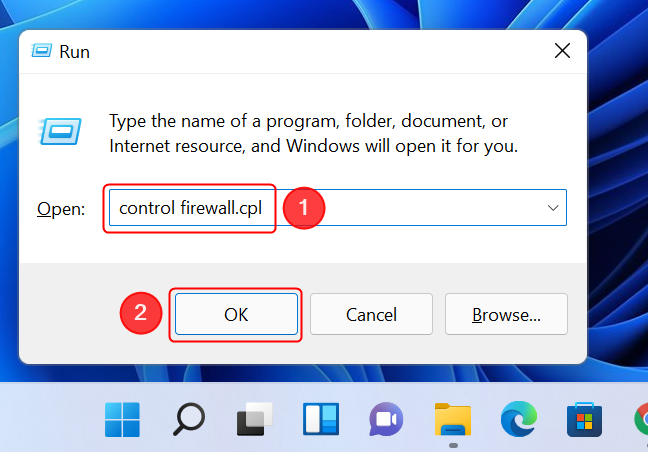
4. Start the Windows Defender Firewall using the Run window
Press the Windows + R keys on your keyboard to open the Run window. Then, type “control firewall.cpl” in the Open field and hit Enter or press OK.
Open Windows Defender Firewall from the Run window
TIP: Typing “control /name Microsoft.WindowsFirewall” in the Open field will yield the same result.
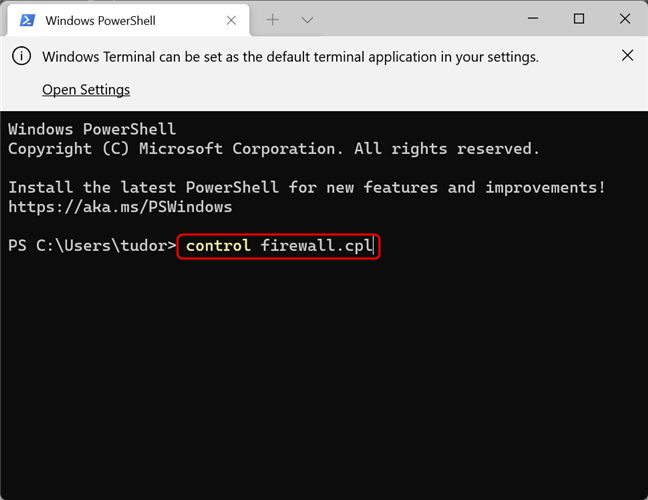
5. Use Command Prompt, PowerShell, or Windows Terminal to open the Windows Defender Firewall
If you are a fan of the command line, you can use Command Prompt, PowerShell, or Windows Terminal to open Windows Defender Firewall. Type the same command as the one used in the Run window, followed by Enter:
control firewall.cpl
This immediately opens the Windows Defender Firewall page.
Windows Defender Firewall can be opened by using a command-line interface
You can also use the command
control /name Microsoft.WindowsFirewall
with the same outcome.
Do you use the Windows Defender Firewall?
You have learned five different ways to open the Windows Defender Firewall. Before closing this tutorial, we have a question for you: do you use Windows’ built-in firewall or do you prefer a third-party application for managing your network connections? Why is that? Comment below and let’s discuss.
Обновлено:
Опубликовано:
Тематические термины: брандмауэр, Windows.
Графический интерфейс
Командная строка
Брандмауэр не включается
Начиная с Windows Vista / 7, брандмауэр не стоит отключать через службы, так как на нем завязана работа многих сетевых функций. Правильное отключение выполняется через панель управления.
Графический интерфейс
В нижней панели находим значок сети — кликаем по нему правой кнопкой мыши и выбираем Центр управления сетями и общим доступом:
В открывшемся окне в левом нижнем углу переходим по ссылке Брандмауэр Windows:
Теперь нажимаем по ссылке Включение и отключение брандмауэра Windows:
Отключаем или включаем во всех профилях сети брандмауэр:

и кликаем по OK.
* в данном примере всего два сетевых профиля, еще может быть доменный . Это стоит учесть при настройке.
Командная строка
Запускаем командную строку от имени администратора.
Отключить брандмауэр для всех профилей:
netsh advfirewall set allprofiles state off
Включить:
netsh advfirewall set allprofiles state on
Отключение для отдельных профилей:
netsh advfirewall set publicprofile state off
netsh advfirewall set privateprofile state off
netsh advfirewall set domainprofile state off
* где publicprofile — публичный профиль, privateprofile — рабочая сеть, domainprofile — для доменов.
Если брандмауэр не включается
Проверьте следующее:
- Служба «Брандмауэр Windows» находится в состоянии «Выполняется». Подробнее как запустить службы.
- На компьютере не установлен антивирус со своим собсвенным фаерволом.
Была ли полезна вам эта инструкция?
Да Нет
There may come a time when you need to write a script or remotely connect to a PC and run a command to enable or disable the Windows firewall. For most IT environments, using Group Policy is the easiest way to configure the Windows Firewall on client computers.
It’s also the easiest way to add port exceptions for services such as HTTP, file sharing, software applications, and more. However, it’s also good to know how to configure the Windows Firewall from the command prompt just in case you have computers and servers that are not in Active Directory.
First, to see whether the Windows Firewall is enabled on a server or computer, type this command at the command prompt:
netsh advfirewall show allprofiles
Make sure you open an administrator command prompt (click on Start, type in CMD and then right-click on Command Prompt and choose Run as Administrator). You should get something similar to what is shown below:

By default, you should see three separate listings here: Domain profile settings, private profile settings and public profile settings. These three correspond to the three states you can place each network connection on your computer into. If you are connected to your home network and you chose the Home Network option, the Private profile settings will be applied.
State means if the firewall is turned on or off. The Firewall Policy tells you what inbound and outbound policies are being applied to each profile.
To disable the firewall for a specific profile, you would use the following command:
netsh advfirewall set privateprofile state off
The other options are currentprofile, publicprofile, domainprofile, and allprofiles. So if you wanted to disable the firewall completely, you would use allprofiles instead of privateprofile. To enable again, just put on at the end instead of off.
Open Port in Firewall using Command Line
Now what if you want to open a port in the firewall using the command line? That’s simple too!
Let’s say you want to open port 3389, which is for remote desktop in Windows. You would simply run this command:
netsh advfirewall firewall add rule name="Open Remote Desktop" protocol=TCP dir=in localport=3389 action=allow
The command is quite long, but it’s fairly easy to break down. You add a rule, give it a name, choose the protocol (TCP or UDP), choose the direction (In or Out), give it the port number and choose the action (Allow or Deny).
If you were to run this command, then go view the allowed apps in Windows Firewall, you would see that the Remote Desktop item is now checked:

If you need to open up a range of ports, just use a simple dash. For example, here I am opening ports 600o to 7000 for UDP outbound traffic:
netsh advfirewall firewall add rule name="UDP ports" protocol=UDP dir=out localport=6000-7000 action=allow
There are many more advanced commands you can use to manage all aspects of the Windows Firewall, so make sure to use the /? characters at the end of any command to see all the options and examples.
Related Posts
- How to Fix a “This file does not have an app associated with it” Error on Windows
- How to Fix an Update Error 0x800705b4 on Windows
- How to Resolve “A JavaScript error occured in the main process” Error on Windows
- How to Fix the Network Discovery Is Turned Off Error on Windows
- How to Change Folder Icons in Windows