
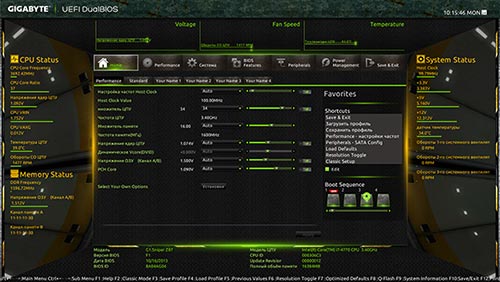
Один из частых вопросов, касающихся последних версий ОС от Майкрософт, включая Windows 10 — как зайти в БИОС. При этом чаще имеется в виде все-таки UEFI (часто характеризующийся наличием графического интерфейса настроек), новый вариант ПО материнских плат, который пришел на замену стандартному БИОС, и предназначенный для того же — настройки работы оборудования, опций загрузки и получения информации о состоянии системы.
В связи с тем, что в Windows 10 (как и в  реализован режим быстрой загрузки (представляющий собой вариант гибернации), при включении компьютера или ноутбука вы можете не увидеть приглашение наподобие Press Del (F2) to enter Setup, позволяющее зайти в БИОС по нажатию клавиши Del (для ПК) или F2 (для большинства ноутбуков). Тем не менее, попасть в нужные настройки несложно.
Вход в параметры UEFI из Windows 10
Для использования этого способа, Windows 10 должна быть установлена в режиме UEFI (как правило, так и есть), а вы должны иметь возможность либо войти в саму ОС, либо хотя бы попасть на экран входа в систему со вводом пароля.
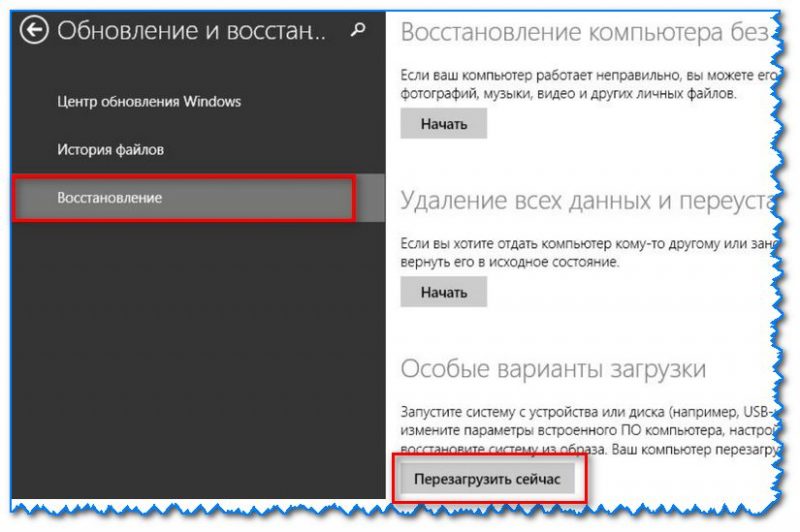
В первом случае вам достаточно кликнуть по значку уведомлений и выбрать пункт «Все параметры». После чего в настройках открыть «Обновление и безопасность» и перейти к пункту «Восстановление».
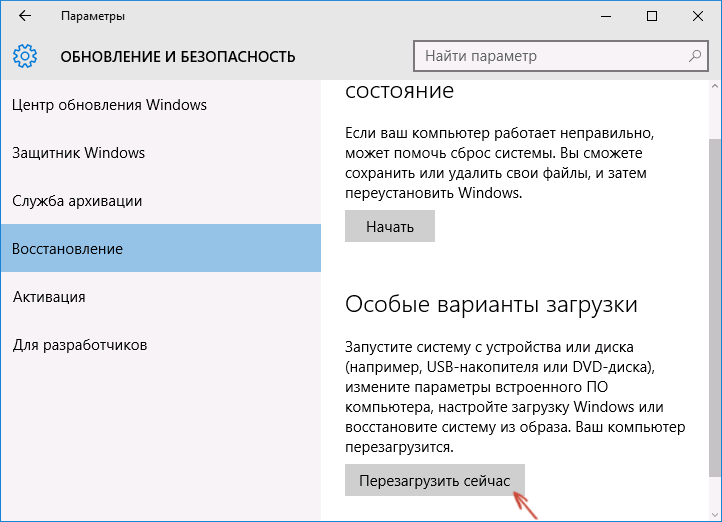
В восстановлении нажмите в разделе «Особые варианты загрузки» кнопку «Перезагрузить сейчас». После того, как компьютер перезагрузится, вы увидите экран такой же (или подобный) тому, что изображен ниже.
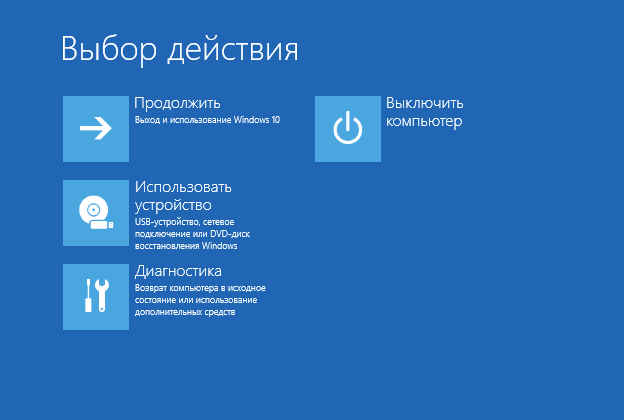
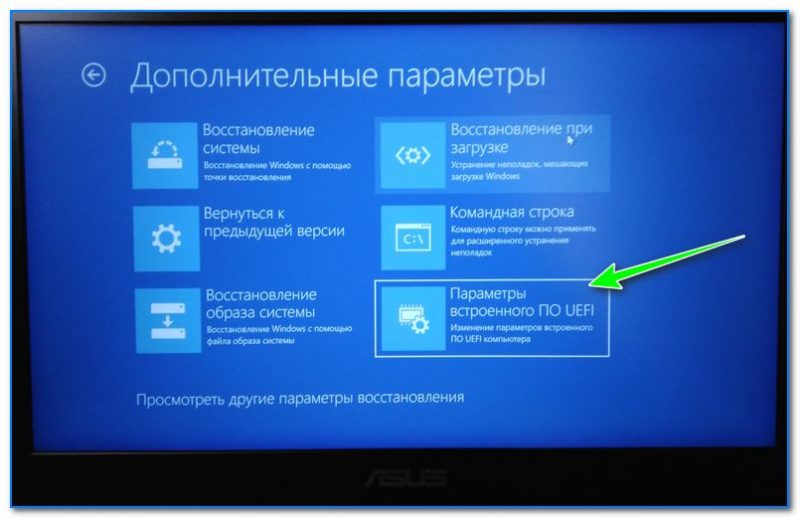
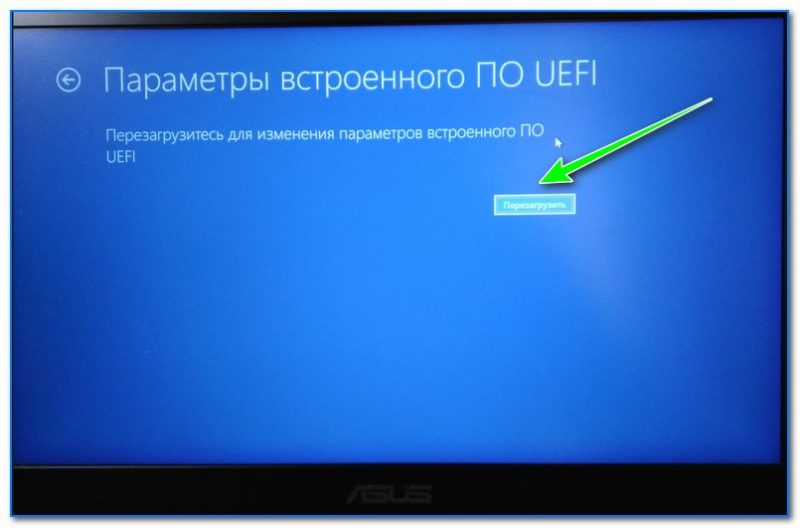
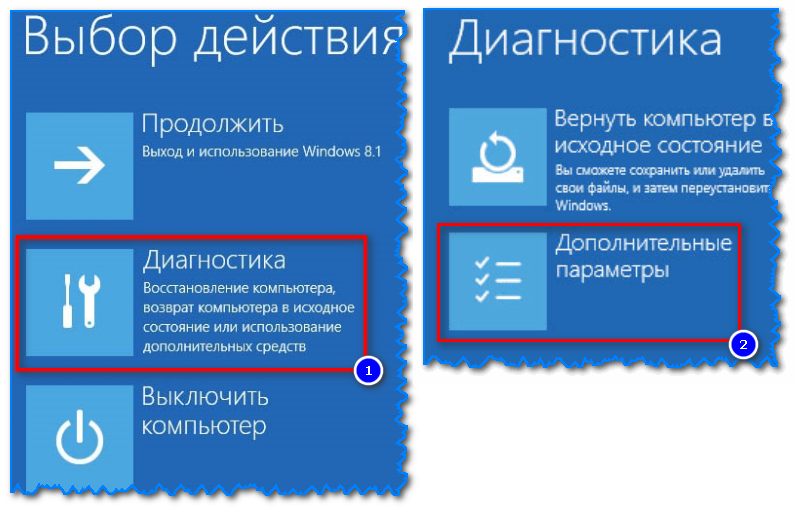
Выберите пункт «Диагностика», затем — «Дополнительные параметры», в дополнительных параметрах — «Параметры встроенного ПО UEFI» и, в завершение, подтвердите сове намерение, нажав кнопку «Перезагрузить».

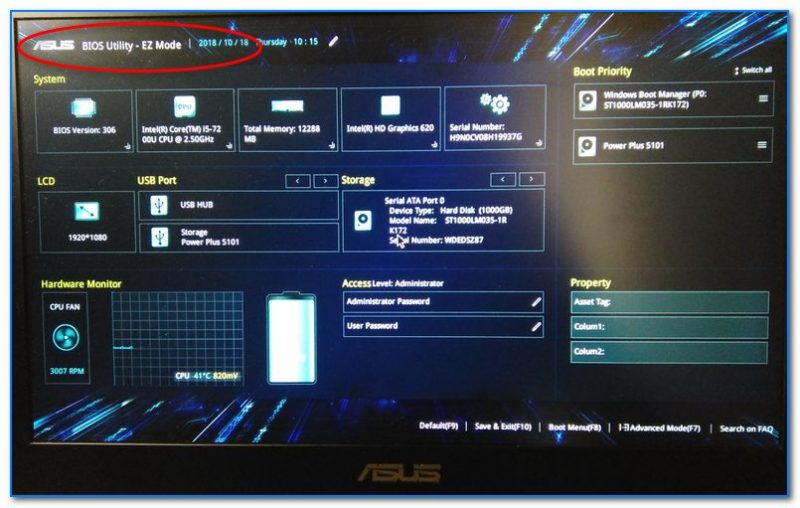
После перезагрузки вы попадете в БИОС или, если точнее, UEFI (просто у нас по привычке настройки материнской платы обычно называют БИОС, наверное, так будет продолжаться и в дальнейшем).
В том случае, когда вы не можете войти в Windows 10 по каким-либо причинам, но можете попасть на экран входа, вы также можете зайти в настройки UEFI. Для этого, на экране входа в систему, нажмите кнопку «питание», а затем, удерживая клавишу Shift нажмите пункт «Перезагрузка» и вы попадете в особые варианты загрузки системы. Дальнейшие шаги уже были описаны выше.
Вход в БИОС при включении компьютера
Есть и традиционный, всем известный метод войти в БИОС (подходит и для UEFI) — нажать клавишу Delete (для большинства ПК) или F2 (для большинства ноутбуков) сразу при включении компьютера, еще до начала загрузки ОС. Как правило, на экране загрузки внизу отображается надпись: Press Название_Клавиши to enter setup. Если такой надписи нет, вы можете ознакомиться с документацией к материнской плате или ноутбуку, там должна присутствовать такая информация.
Для Windows 10 вход в БИОС этим способом это осложняется тем, что загрузка компьютера происходит действительно быстро, и не всегда эту клавишу можно успеть нажать (или даже увидеть сообщение о том, какую именно).
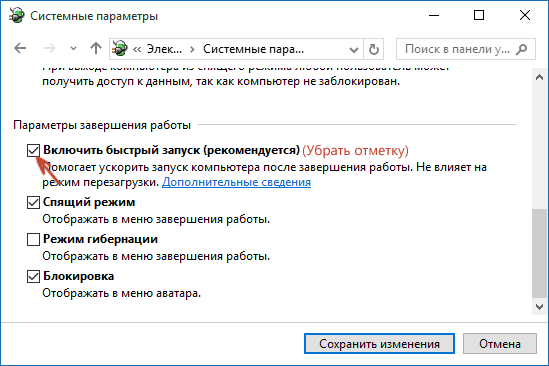
Для решения этой проблемы, вы можете: отключить функцию быстрой загрузки. Для этого, в Windows 10 кликните правой кнопкой мыши по кнопке «Пуск», выберите в меню «Панель управления», а в панели управления — электропитание.
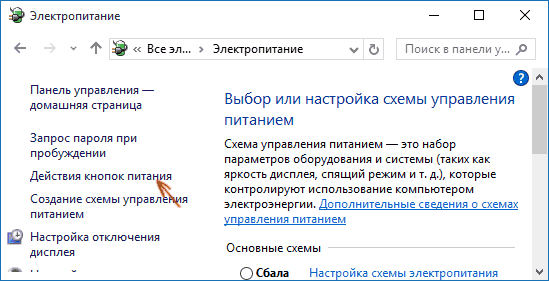
Слева кликните «Действия кнопок питания», а на следующем экране — «Изменение параметров, которые сейчас недоступны».
Внизу, в разделе «Параметры завершения работы» уберите отметку «Включить быстрый запуск» и сохраните изменения. После этого, выключите или перезагрузите компьютер и попробуйте войти в БИОС с помощью необходимой клавиши.
Примечание: в некоторых случаях, когда монитор подключен к дискретной видеокарте, вы можете не увидеть экран БИОС, а также информацию о клавишах для входа в него. В этом случае может помочь его переподключение к интегрированному графическому адаптеру (выходы HDMI, DVI, VGA на самой материнской плате).
Доброго времени!
Не многие пользователи знают, что в UEFI (BIOS) можно войти без использования и нажатия спец. клавиш (тех же Delete или F2). Это очень может выручить, если вы перебрали все возможные кнопки, а компьютер никак не реагирует на ваши нажатия…
Отмечу, что воспользоваться этим способом можно только при условиях, что:
- у вас установлена современная ОС Windows 8, 8.1, 10, 11 (в остальных данной возможности нет);
- ваша мат. плата должна поддерживать UEFI (если ваш ПК/ноутбук не старше 3-4 лет — то наверняка поддержка есть!);
- ОС должна загружаться и «хоть как-то» работать (если же ОС не установлена — рекомендую ознакомиться со справочной статьей с кнопками входа в BIOS для устройств разных производителей).
*
Итак, теперь ближе к теме…
*
Из Windows 11
Все действия рассмотрю по шагам (для большей наглядности и доступности).
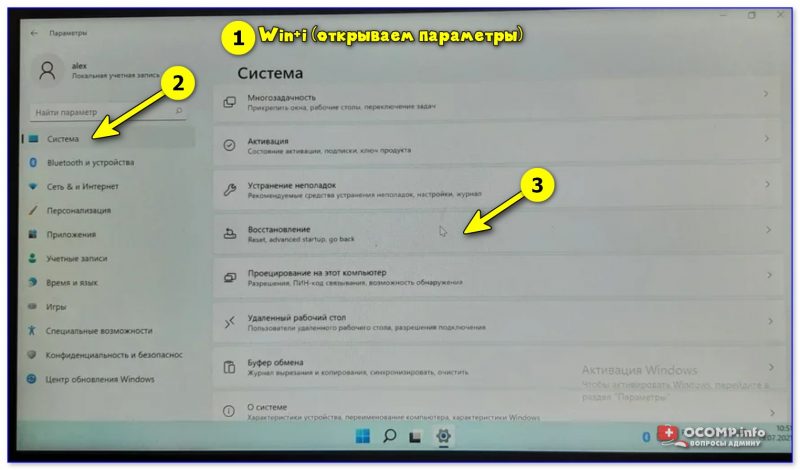
- для начала необходимо открыть параметры Windows и перейти в раздел «Система / восстановление» (сочетание клавиш Win+i // либо Win+R, и команда «ms-settings:» (без кавычек));

Открываем параметры Windows 11 — вкладку восстановление
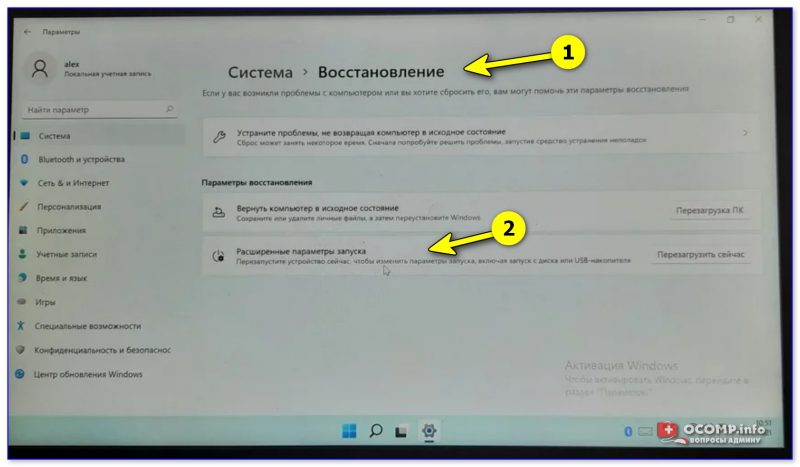
- далее согласиться на перезагрузку и запуск ПК с расширенными параметрами. См. пример ниже на фото; 👇

Расширенные параметры запуска
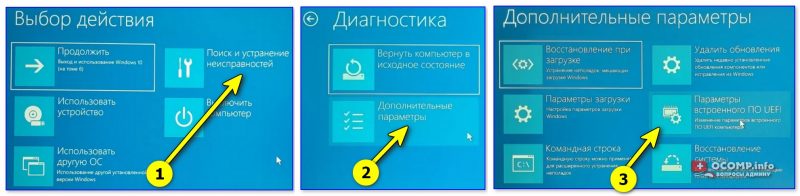
- после перезагрузки появится «синее меню»: в нем нужно будет выбрать вариант «Поиск и устранение неисправностей / доп. параметры / Параметры встроенного ПО UEFI»; 👇

Параметры встроенного ПО
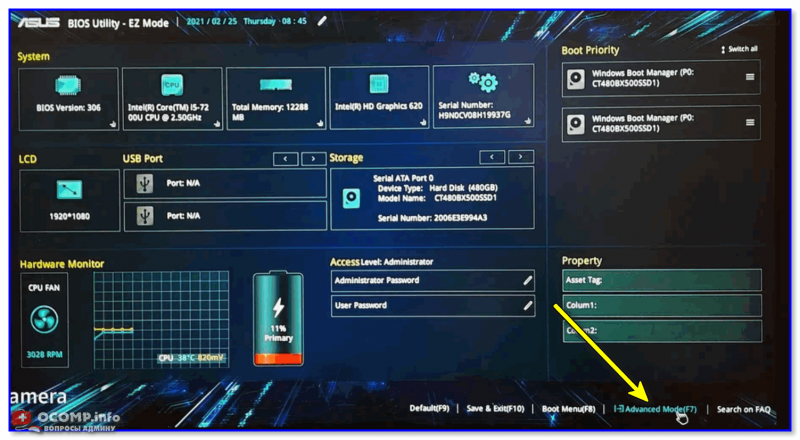
- ну и после еще одной перезагрузки — появится окно BIOS (UEFI). Можно приступить к настройкам! 👌

UEFI (Asus) — Advanced Mode
*
Из Windows 10
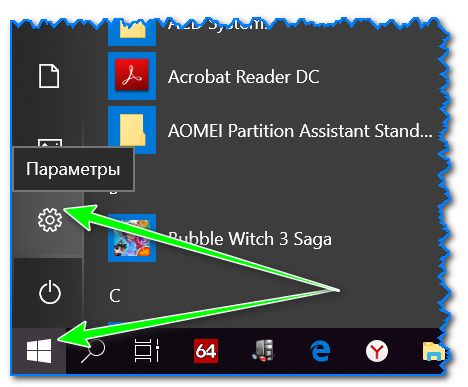
- Сначала необходимо зайти в параметры Windows (можно использовать сочетание Win+i, можно воспользоваться меню ПУСК);

Параметры (Windows 10)
- далее необходимо открыть раздел «Обновление и безопасность/Восстановление» и найти подраздел «Особые варианты загрузки»: нажать в нем кнопку «Перезагрузить сейчас». См. пример ниже (цифры 1, 2, 3); 👇

Обновление и безопасность — восстановление (кликабельно)
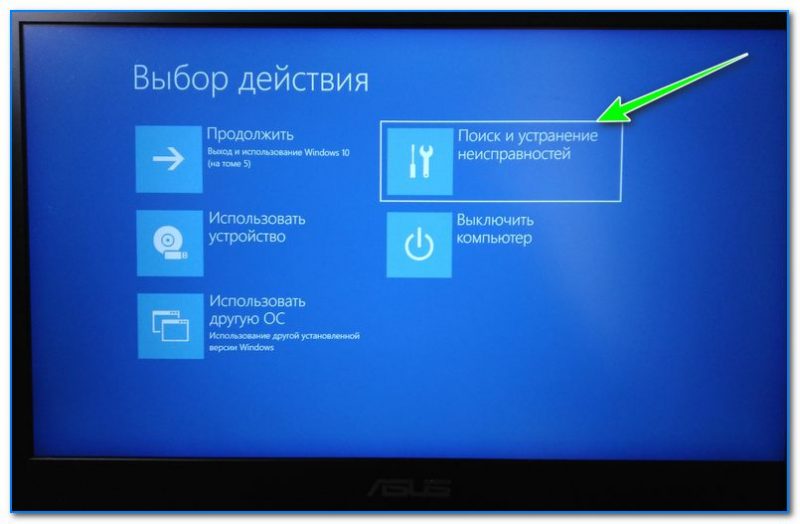
- после чего откройте раздел «Поиск и устранение неисправностей»;

Выбор действия (Windows 10)
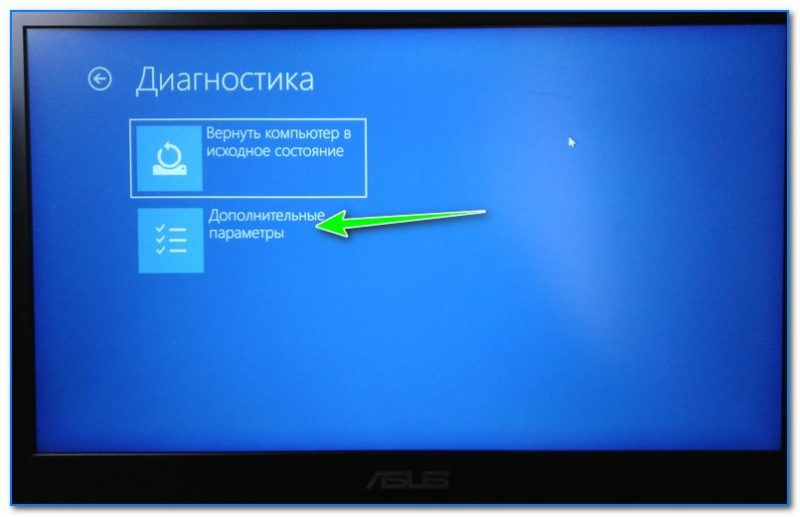
- затем подраздел «Дополнительные параметры»;

Диагностика — доп. параметры
- далее вкладку «Параметр встроенного ПО UEFI» (пример на фото ниже 👇);

Параметры встроенного ПО
- ну и последнее, что осталось — это согласиться на перезагрузку; 👇

Перезагрузить
- после перезагрузки компьютера (ноутбука) у вас автоматически будет осуществлен вход в настройки UEFI (пример ниже 👇). Никаких кнопок дополнительно нажимать не нужно!

BIOS Utility — вход выполнен

*
Из Windows 8, 8.1
В принципе действия аналогичны, правда, интерфейс несколько отличается от Windows 10.
- сначала передвиньте ползунок мышки вправо, чтобы появилось боковое меню: выберите «Параметры» (см. скрин ниже 👇);
Windows 8 — параметры
- далее щелкните по ссылке «Изменение параметров компьютера»;
Изменение параметров компьютера
- затем откройте раздел «Обновление и восстановление»;
Обновление и восстановление
- после чего в разделе «Восстановление» найдите подраздел «Особые варианты загрузки» и щелкните по кнопке «Перезагрузить сейчас»; 👇

Восстановление — перезагрузить сейчас
- далее компьютер будет перезагружен, и вы увидите меню с выбором действия: откройте вкладку «Диагностика», затем «Доп. параметры»; 👇

Выбор действия — диагностика
- затем «Параметры встроенного ПО UEFI» и согласитесь на перезагрузку: после нее компьютер сам автоматически откроет настройки UEFI (BIOS). 👇

Параметры встроенного ПО (Windows


*
С помощью командной строки, меню ПУСК
👉 Командная строка
- открываем командную строку (если не знаете как — см. вот эту инструкцию);
- далее нужно ввести команду shutdown.exe /r /o и нажать Enter;

shutdown.exe в командной строке
- после чего увидите сообщение, что через минуту ваш сеанс будет завершен;

Ваш сеанс будет завершен
- по прошествии этой минуты, вы увидите меню с выбором действия (дальше действия аналогичны предыдущим описываемым шагам, см. выше). 👇
Выбор действия


*
Меню ПУСК
Еще один альтернативный вариант — это зайти в меню ПУСК, нажать по кнопке «Выключения», после зажать клавишу SHIFT и выбрать вариант «Перезагрузка». Дальнейшие действия аналогичны предыдущим шагам.
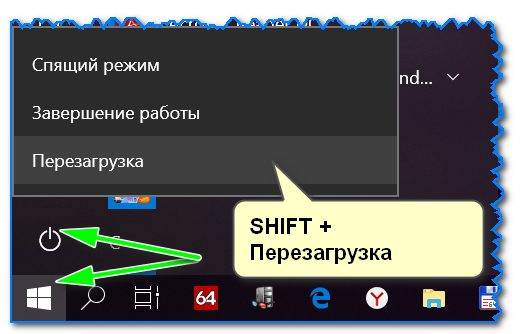
SHIFT + Перезагрузка
*
Дополнения по теме приветствуются…
Удачной работы.
👋
Первая публикация: 18.10.2018
Корректировка: 9.07.2021
78
78 people found this article helpful
Boot into BIOS on startup
Updated on November 15, 2021
What to Know
- Enter BIOS by pressing a specific key at the precise time.
- F2, F10, or DEL are the common hotkeys, but this can differ for each PC brand.
- Newer computers have UEFI BIOS which can be booted into from Windows Settings.
This article explains how to enter BIOS (Basic Input / Output System) on Windows 10.
How To Access (Legacy) BIOS on Windows 10
Entering the BIOS may be necessary to change the system date and time, hardware settings, or the boot order. You can enter BIOS with a keypress on a specific hotkey while the system is booting. But the time interval is short so be ready to press the right key at the right time just after the POST beep.
Newer computers with UEFI BIOS offer an easier way to enter the BIOS (or the Setup as it is often called) by booting into Windows 10 first.
The precise moment to press the BIOS hotkey is somewhere after the computer switches on and Windows initializes. Older computers on legacy BIOS give some time (though not much) to press the key. If the brand logo disappears before the keypress, the time has passed and you will need to restart the PC again to enter BIOS.
Tip:
Look out for a message that says “Press to Enter Setup”. Here, Key_Name can be the DEL, ESC, F2, F10, or any other key supported by the manufacturer.
-
Press the Power button to switch on your computer.
-
Press the BIOS hotkey (e.g. F2, F10, Esc, or DEL) as soon as the brand’s splash screen appears.
-
Tap on the hotkey repeatedly until you enter the setup mode. Alternatively, keep your finger on the key even before you switch on the computer and press it until the BIOS comes up.
The exact key or even a key combination depends on the make of the computer. Consult the computer’s manual for the right key if it’s not displayed on the boot screen.
Here are some common keys you can try on these brands.
| Brand | BIOS Key |
| HP | F9 or Esc |
| Dell | F12 |
| Acer | F12 |
| Lenovo | F12 |
| Asus | Esc |
| Samsung | F12 |
| Sony | Esc |
| Microsoft Surface Pro | Volume Down Button |
How To Boot Into UEFI BIOS on Windows 10
The Unified Extensible Firmware Interface (UEFI) is the successor to the older BIOS. The firmware is a part of all modern computers and provides faster boot times. It is functionally more sophisticated and visually richer than the legacy BIOS. It also supports both the keyboard and the mouse.
Faster boot speed is a unique feature of UEFI firmware settings, so you may find it easier to enter the BIOS from within Windows 10 without going through the startup routine.
-
Select Settings from the Start Menu (or press Windows + I).
-
Go to Update & Security. Select Recovery.
-
Go down to Advanced startup. Select Restart now and let the computer reboot.
-
The computer restarts to display boot options. Select Troubleshoot.
-
Select Advanced options.
NOTE TO PHOTO EDITOR: Please highlight «Advanced Options».
-
Select UEFI Firmware Settings.
-
Select Restart to open the UEFI BIOS.
Thanks for letting us know!
Get the Latest Tech News Delivered Every Day
Subscribe
В связи с тем, что Windows 10 использует быструю загрузку, напоминающую выход из спящего режима (или гибернации), то можно просто не увидеть и не успеть нажать требуемую для входа в Setup клавишу. Это происходит из-за того, что на достаточно современных компьютерах Windows 10 (а его только на таких и можно поселить) устанавливается в режиме UEFI.
Справка о UEFI:
Интерфейс Unified Extensible Firmware является спецификацией, которая определяет программный интерфейс между операционной системой и прошивкой платформы. UEFI заменяет системный BIOS (интерфейс встроенного программного обеспечения Basic Input/Output), которое изначально присутствует во всех PC-совместимых персональных компьютеров IBM. С помощью встроенного программного обеспечения в большинстве реализаций UEFI обеспечивает поддержку устаревших сервисов BIOS. UEFI может поддерживать удаленную диагностику и ремонт компьютеров даже при отсутствии установленной операционной системы. (Это я ещё не пробовал).
Можно добраться как до UEFI, так и до BIOS.
Для того, чтобы попасть в BIOS, надо успеть нажать DEL или F2. Если не они — смотрите документацию на материнскую плату. Если не успеваете, то надо отключить быструю загрузку. Это делается через «Панель управления -> Электропитание«. Там надо нажать на «Действия кнопок питания«. В открывшемся окне «Системные параметры» надо снять галочку с «Включить быстрый запуск«.
Но хорошей идеей является вход в UEFI.
Для того, чтобы туда попасть, надо зайти в «Пуск-Параметры -> Обновление и безопасность -> Восстановление«. Там надо нажать «Восстановление» и потом «Перезагрузить«.
В открывшемся при загрузке окне приблизительно такого вида

Давите «Диагностика» и попадаете в «Дополнительные параметры«, где нужно выбрать «Параметры встроенного ПО UEFI«. После перезагрузки попадёте в UEFI.
Примечание:
В случае наличия в компьютере дискретной видеокарты можно и не добраться к BIOS. Проблема решается переключением монитора на интегрированный видеовыход.
Quick Links
-
Accessing the BIOS/UEFI at Startup
-
Accessing the BIOS From Within Windows 10
-
Creating a Shortcut to Access the BIOS
-
What to Do If You Can’t Access the BIOS
Summary
- The BIOS (or UEFI) is a software that initializes and tests hardware on your computer, and can be accessed to customize hardware functions.
- Certain options in the BIOS can physically damage your computer, so caution is necessary when making changes.
- There are multiple ways to access the BIOS, including during startup by using specific keys, through Windows 10 settings, or by creating a shortcut on your desktop. You may also Shift+Click the «Restart» button.
The BIOS, or UEFI, is a powerful tool for configuring your PC’s hardware such as your RAM, CPU, motherboard, and more. It also has options that can increase the security of your PC. Here are a few different ways to access the BIOS.
What Is the BIOS?
The Basic Input-Output System (BIOS) is low-level software that is programmed onto your computer’s motherboard. When you turn on your computer, the BIOS initializes and tests all of the hardware in your PC to ensure it is functioning correctly. By accessing the BIOS, you can customize how your PC’s hardware functions.
Be careful though — some of the options available in the BIOS can physically damage your computer.
If you’re going to try overclocking components, be sure you understand what overclocking is, and take the necessary precautions to do it safely. You can also do things like enable XMP profiles to change your RAM speed, or boot your computer from a disk or USB drive.
The BIOS has been replaced by the Unified Extensible Firmware Interface (UEFI) on modern computers, but the term BIOS is commonly used to refer to UEFI. UEFI adds a number of new features that make it different from BIOS.
Accessing the BIOS/UEFI at Startup
When you start your PC, there will usually be a splash screen that displays the manufacturer’s name or logo. To access your BIOS, you can hit a key while the manufacturer’s splash screen is visible. The keys you can press to access the BIOS will typically be displayed near the bottom. Usually, the key will be either F2 or Delete, but not always. The manual for your computer or motherboard will also contain this information.
If you don’t see anything because the screen flashes by too quickly, or hitting the correct key doesn’t bring you into the BIOS, it is possible that Fast Boot is enabled in the BIOS, or you have Fast Startup mode enabled in Windows 10.
Fortunately, there are other ways to access the BIOS.
Accessing the BIOS From Within Windows 10
There are a handful of ways to access the BIOS from Windows 10.
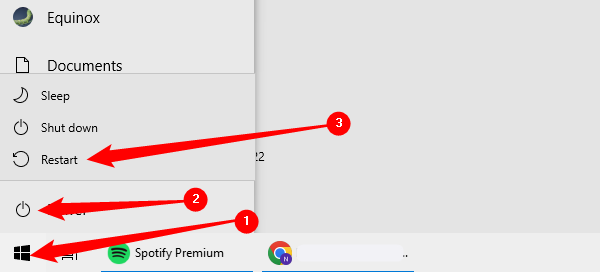
The simplest way to access the BIOS is with the Start button. Click the Start button, hit the power icon, and then hold Shift while you click «Restart.»
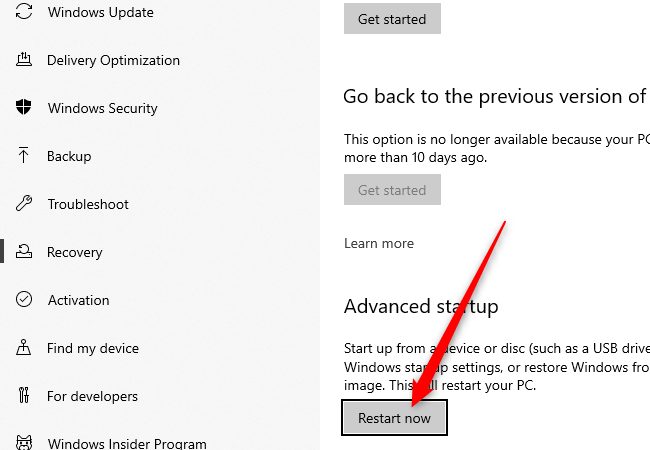
Alternatively, you can hit the Start button, in the search bar type «Change Advanced Startup Options» and then hit Enter. Go to the Advanced startup section of the window that pops up, and click the «Restart now» button.
If you used either of the two preceding methods, you’ll be sent to a blue screen with multiple options. Go to Troubleshooting > Advanced Options > UEFI Firmware Settings. You should then be at the BIOS.
If you don’t see «UEFI Firmware Settings» there are two likely explanations. The first is that the computer you’re using doesn’t have UEFI at all — this is especially likely if your PC is older, and actually has BIOS rather than UEFI. The second possibility is that your motherboard does have UEFI, but Windows 10 is booting from a drive that was partitioned using MBR and not GPT. If your boot drive was partitioned using MBR, it’ll force UEFI to use a BIOS Legacy mode that disables access from within Windows 10.
If you’d rather use Command Prompt to access the BIOS, click the Start button, type «cmd» in the search bar, and then select «Run as administrator.»
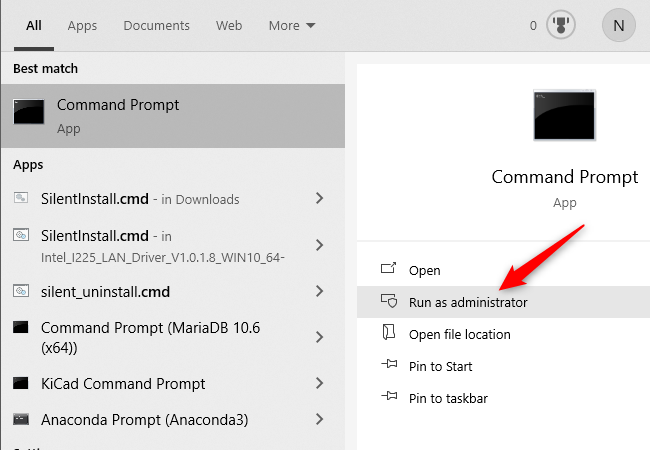
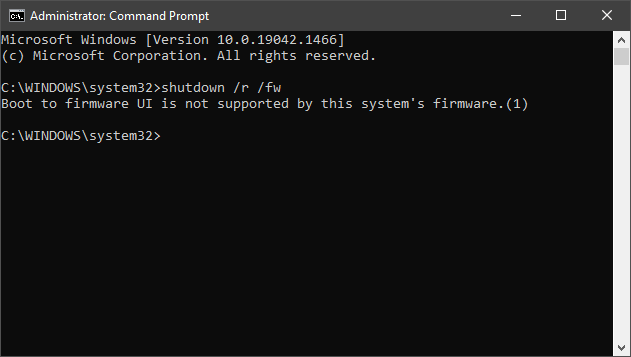
Then, type shutdown /r /fw into the Command Prompt window and press Enter.
If it worked, a window will pop up informing you that your PC will shut down in less than a minute.
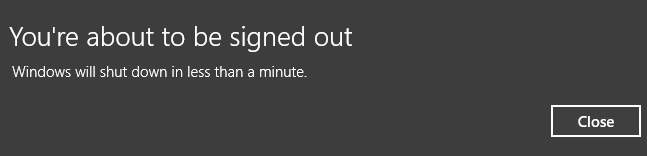
You can type shutdown /r /fw /t 0 into the Command Prompt to remove the waiting period and restart instantly.
If you see the message «Boot to firmware UI is not supported by this system’s firmware» when you try to run the shutdown command, it probably means that your motherboard doesn’t have UEFI. It could also mean that Windows 10 is installed on a disk that was partitioned with MBR.
If you can’t access the BIOS/UEFI from within Windows 10, and your PC has Fast Boot enabled in the BIOS/UEFI, you’ll have to do some troubleshooting.
Creating a Shortcut to Access the BIOS
The command to shut down and go into the BIOS can easily be made into a shortcut for faster and more convenient access. Right-click empty space on your desktop and select New > Shortcut.
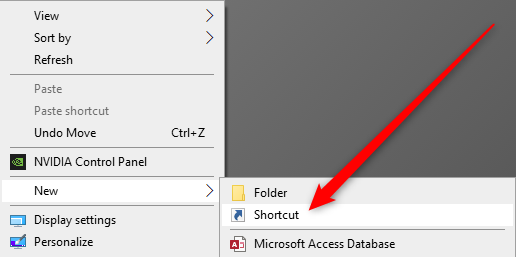
In the window that appears, type shutdown /r /fw where it says to type the location of the item, and then hit next. Name the shortcut something appropriate, then click «Finish.»
Once the icon is on your desktop, right-click it, and hit «Properties.» In the Properties window, click «Advanced.»
On this window, tick «Run as administrator», then hit «OK.»
Back on the Properties window, click «Apply» and then «OK» to finish creating the shortcut.
If you’d like, you can customize the icon of the shortcut by hitting the «Change Icon» button in the properties window. You can then select an icon from a number of default options, or you can make your own high-resolution icons out of any image.
What to Do If You Can’t Access the BIOS
If you can’t access your BIOS during startup, Fast Boot or Fast Startup could be the culprit. The terms Fast Boot and Fast Startup are often used interchangeably but are actually distinct.
Fast Boot usually refers to a setting in the BIOS or UEFI that changes the initial startup process of the computer. Fast Boot skips some of the hardware checks and initializations that normally occur when your PC is first turned on so that your operating system, like Windows 10, loads more quickly. There is an additional setting (sometimes called Ultrafast Boot) that is even faster because it doesn’t initialize things like USB controllers or disk drives. When that setting is enabled, USB devices like your mouse and keyboard won’t be usable until the operating system loads. It also prevents booting from DVDs or USB drives.
If that is the case for you, your best option is to try clearing your PC’s CMOS to reset your BIOS settings. Some newer or higher-end motherboards include buttons to clear the CMOS — check on the back of your PC, near the USB ports. If it is there, press and hold it for at least 10 seconds. By default, Fast Boot and Ultrafast Boot are disabled, so clearing your CMOS should enable you to hit the appropriate button to get into the BIOS during startup.
Fast Startup is a Windows feature that enables your computer to start more quickly after it was shut down. Windows 10’s Fast Startup mode can interfere with your ability to reach the BIOS if your computer had been shut off with Fast Startup mode enabled. Fast Startup mode doesn’t affect restarts though, so you should be able to reach your BIOS after a restart even with Fast Startup enabled.
If none of that works, you should check the documentation that came with your computer or motherboard. There may be more specific instructions for your machine that can help.